1
2.
NEW OPENING:
(Installations Other Then Vent Openings)
NOTE: NEVER create a LOW SPOT on the roof
where water will collect. Water standing around
the air conditioner may leak into the RV interior.
e.
The 14" x 14" roof opening is part of the return
air duct and must be finished in accordance
with NFPA standard 501C, Standard for Recreational Vehicles, Section 2-7.
DISCONNECT ALL POWER SUPPLIES AND THE POSITIVE (+) TERMINAL FOR THE SUPPLY BATTERY.
FAILURE TO FOLLOW THIS INSTRUCTION MAY CREATE A SHOCK HAZARD.
a.
A 14" x 14" opening must be cut through the
roof and ceiling of the RV. It is recommended
this opening be located between roof reinforcing members.
b.
Mark a 14" x 14" square on the roof and
carefully cut the opening.
c.
Using the roof opening as a guide, cut the
matching hole in the ceiling.
D. PLACING THE AIR CONDITIONER ON THE
ROOF
1.
2.
Remove the Air Conditioner from the carton and
discard the carton.
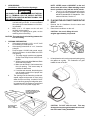
Place the air conditioner on the roof.
CAUTION: Use care in lifting- this unit
weights approximately 100 pounds.
CAUTION: There may be electrical wiring between the
roof and ceiling.
3.
OPENING PREPARATION:
a.
If the opening exceeds 14-1/2" x 14-1/2", it will
be necessary to install spacers.
b.
If the opening is less than 14" x 14", it must be
enlarged.
c.
Route a copper 12 AWG, with ground, supply
line from the fuse or circuit breaker box to the
roof opening.
1. The power supply must be on a separate
20 amp Time Delay Fuse or HACR Circuit
Breaker.
2. Wiring must comply with all National, State
and Local wiring codes.
3. Make sure at least 20" of wire extend into
the roof opening. This insures easy air
conditioner attachment.
4. If vent fan was removed, the existing wire
may be used provided it is of proper size
and correctly fused.
d.
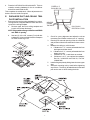
The opening must be framed to provide adequate support and prevent air from being
drawn from the roof cavity. Lumber 3/4" thick
or more and long enough to bridge the opening must be used. Remember to provide and
entrance hole for the power supply wire.
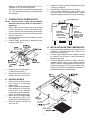
3/4" MIN.
3.
Lift and place the unit over the prepared opening using
the gasket as a guide. The condenser coil goes
toward the rear of the RV.
FRAME OPENING SO IT
WON'T COLLAPSE WHEN
BOLTING DOWN AIR
CONDITIONER
LEAVE ACCESS
FOR POWER
SUPPLY WIRING
CAUTION: DO NOT slide the unit. This may
damage the neoprene gasket attached to the bottom and create a leaky installation.
5