1
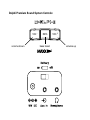
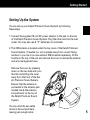
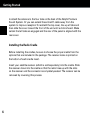
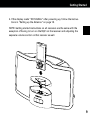
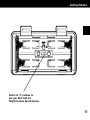
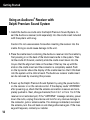
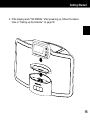
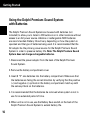
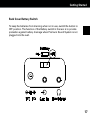
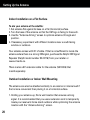
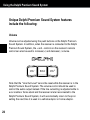
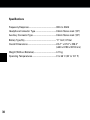
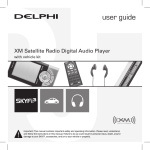
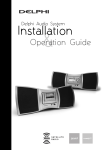
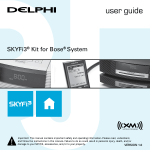
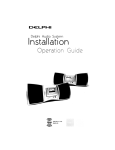
User Guide
Premium Sound System
(SKYFi3 receiver sold separately)
Important: This manual contains important safety and operating information. Please read, understand,
and follow the instructions in this manual. Failure to do so could result in personal injury, death, and/or
damage to your Delphi Premium Sound System, accessories, and/or to your vehicle or property.
This is the safety alert symbol. It is used to alert you to potential
personal injury hazards. Obey all safety messages that follow this
symbol to avoid possible injury or death.
Warning: To prevent fire or shock hazard, do not expose the
Delphi Premium Sound System to rain, moisture or water.
This device complies with part 15 of the FCC rules. Operation is subject to
the following two conditions:
1. This device may not cause harmful interference, and
2. This device must accept any interference received, including interference
that may cause undesired operation.
This Class B apparatus complies with Canadian ICES-003.
The Delphi XM® SKYFi2® and RoadyXT® Satellite Radio Receiver each
incorporate an FM transmitter and are thereby classified as intentional
transmitters. Changes or modifications not expressly approved by Delphi
could void your authority to operate this equipment.
Warning: The FCC and FAA have not certified the SKYFi3®, MyFi®, or
Roady XT® for use in any aircraft (neither portable nor permanent
installation). Use of these devices in an aircraft could interfere with
the aircraft navigation or communication devices and result in an
accident including fatal injuries and/or property damage.
ttention: Do not place your sound system directly on or near
A
credit cards or hard drives. This product contains powered
magnetic speaker drivers that may impact, alter, destroy,
and/or erase magnetic data storage.
Owner’s Record
The model number is located below and the serial number is located
on the label on the rear of the Delphi Premium Sound System.
Record the serial number in the space provided below. Refer to these
numbers whenever you call your dealer regarding this product.
Model No.: DELPHI SA10221
Serial No.: __________________________________________________
Delphi Premium Sound System Controls:
VOL-
volume down
BASS
bass boost
VOL+
volume up
Need help?
Call us at 1.877.GO.DELPHI
Monday through Friday from 8:00 a.m. - 8:00 p.m. Eastern Time
Saturday and Sunday from 10:00 a.m. - 4 :00 p.m Eastern Time
Note: Extended seasonal hours may be available.
Thank you for purchasing the Delphi Premium Sound System. We’ve
designed many thoughtful features into this system to ensure that your
level of listening enjoyment is the very best it can be.
In the event that you have questions or trouble getting started with your
new system, please do not return to the store. Call us first! We can help.
Technical Support is also available at www.shopdelphi.com/skyfi3support.
All features and functions are subject to change without notice.
Table of Contents
Contents
Welcome................................................................ 3
About Delphi......................................................... 3
Getting Started..................................................... 4
What’s in the Box.................................................. 4
Setting up the System.......................................... 5
Installing the Cradle.............................................. 6
Power up the System........................................... 7
Using SKYFi3®..................................................... 8
Using MyFi®...................................................... 10
Using Roady® XT............................................... 12
Using Audiovox® XpressTM. ............................ 14
Using Batteries.................................................... 16
Setting up the Antenna..................................... 18
Optimizing Antenna Position/Signal................. 18
Positioning the XM Antenna.............................. 19
Indoor Installation on a Flat Surface................. 20
Outdoor Installation or
Indoor Wall Mounting........................................ 20
Repeater Antenna............................................... 23
Using the Delphi Premium Sound System...... 24
Volume................................................................. 24
Bass Boost........................................................... 24
Headphones........................................................ 24
Aux In................................................................... 26
Other Things You Should Know....................... 27
Precautions.......................................................... 27
Troubleshhooting............................................... 28
Maintenance........................................................ 29
Specifications...................................................... 30
Warranty.............................................................. 31
Delphi Limited Consumer Warranty
United States of America................................... 31
Delphi Limited Consumer Warranty
Canada................................................................. 33
Welcome
Thank you for purchasing the new Delphi Premium Sound System.
You are just minutes away from being able to play crystal clear live XM®
satellite radio on a precisely engineered speaker system. Please read the
following pages to get started with your new Delphi Premium Sound System.
About Delphi
Delphi is a world leader in mobile electronics, vehicle components and
audio technology. Delphi created the first in-dash car radio in 1936 and
continues its strong tradition of innovation in the audio industry. Delphi
technology has helped make satellite radio a reality, and Delphi continues
to expand its in-vehicle and consumer electronics technologies. With its
exciting line of satellite radio products, Delphi offers a broad portfolio
of products to answer a wide variety of information and entertainment
needs—in the vehicle, home, office, or virtually anywhere.
About XM Satellite Radio
XM is Canada’s premium digital audio entertainment and information
company with the best satellite coverage in the country and offering a
unique lineup of premier Canadian and international content.
XM Canada offers listeners unique and exclusive programming including
the most NHL™ games, PGA TOUR™ and Major League Baseball™
coverage, the deepest play list, and news, talk, sports, entertainment and
children’s programming. After the 2006 / 2007 season, XM will become the
exclusive provider of NHL games on satellite radio.
To subscribe to XM Canada online or for more information about XM
Canada’s programming lineup, visit www.xmradio.ca or call 1-877-GETXMSR (1-877-438-9677).
Getting Started
What’s In the Box
Your Delphi Premium Sound System Kit contains the following components:
Items in the box
1. Premium Sound System
2. Radio cradle inserts for Roady® XT, MyFi®, SKYFi3® and Audiovox® receivers
3. Repeater Antenna Bracket and mounting screws
4. 18 volt power supply with separate cord (not pictured)
5. User Guide (not pictured)
6. Satellite home antenna (included
inside the Premium Sound System)
2
1
3
Getting Started
Setting Up the System
You can set up your Delphi Premium Sound System by following
these steps:
1. Connect the supplied 18-volt DC power adaptor to the jack on the rear
of the Delphi Premium Sound System. Plug the other end into the wall
outlet. You may also use 8 “C” batteries (not included).
2. The XM Antenna is located under the top cover of the Delphi Premium
Sound System. If needed (i.e. unit is placed away from a south facing
window or you live in an area without XM terrestrial repeaters), lift the
handle on the top of the unit and remove the cover to access the antenna
and wire management area.
Remove the cover by pressing
down on the two tabs with your
thumbs and sliding the cover
away from the front of the Delphi Premium Sound System.
Be sure that the antenna is
connected to the antenna jack
located inside the antenna
compartment on the top of
the Delphi Premium Sound
System.
You can wind the two cable
hooks in the compartment,
leaving just enough cable
Getting Started
to attach the antenna to the four tabs on the back of the Delphi Premium
Sound System. Or you can extend the entire 20’ cable away from the
system to improve reception.To reattach the top cover, line up all tabs and
then slide the cover toward the front of the unit until a click is heard. Make
certain that all tabs are engaged and the rear of the panel is aligned with the
rear cover.
Installing the Radio Cradle
Before installing the cradles, be sure to choose the proper cradle from the
options that are included in the package. The receiver name is printed on
the bottom of each cradle insert.
Insert your satellite receiver (which is sold separately) into the cradle. Slide
the receiver down into the cradle so that the radio lines up with the slots
on the receiver and the connector is completely seated. The receiver can be
removed by reversing this process.
Getting Started
Power Up the System
Use the power button on the receiver or on its remote control to turn on
the receiver. If the display reads “ANTENNA” after powering up, check that
the antenna connection is secure and completely pushed in. Next, change
channels (from 0 to 1 or from 1 to 0 if the receiver is not authorized yet).
NOTE: Some receivers will power up automatically when installed in the
Delphi Premium Sound System.
If the “ANTENNA” message remains, power down the radio, unplug
the antenna and look for any obvious damage in the connector, jack or
antenna cable. If no damage is detected, reconnect the antenna, turn the
unit back on, and change channels again. If the message still appears,
contact your retailer.
If the display reads “NO SIGNAL” after powering up, follow the instructions
in “Setting up the Antenna” on page 5.
Getting Started
Using SKYFi3® with Delphi Premium Sound System
1. Install the SKYFi3 cradle insert onto the Delphi Premium Sound System.
Insert the SKYFi3 receiver (sold separately) into the cradle insert included
with the Delphi Premium Sound System until snug.
Caution: Do not use excessive force when inserting the receiver into the
cradle. Doing so could cause damage to the unit.
2. Place the cradle insert containing the SKYFi3 into the cradle by first pressing in on the back of the black inset cradle in the Delphi Premium Sound
System. Then let the cradle tilt forward, carefully slide the cradle insert
down into the tray so that the alignment tabs on the sides of the tray line
up with the slots on the cradle insert and the connector is completely
seated. Push on the top center above the display of the cradle insert
so that it tilts back into the Delphi Premium Sound System until a click
is heard. The SKYFi3 Receiver adaptor can be removed by reversing
this process.
3. Power up the system by using the power button on the receiver or on the
remote control. If the display reads “ANTENNA” after powering up, check
that the antenna connection is secure and completely pushed in. Next,
change channels (from 0 to 1 or from 1 to 0 if the receiver is not activated
yet). If the “ANTENNA” message remains, power down the radio, unplug
the antenna, and look for any obvious damage in the connector, jack, or
antenna cable. If no damage is detected, reconnect the antenna, turn the
unit back on, and change channels again. If the message still
appears, contact your retailer.
Getting Started
4. If the display reads “NO SIGNAL” after powering up, follow the instructions in “Setting up the Antenna” on page 18.
NOTE: Getting started instructions on all receivers are the same with the
exception of having to turn on the MyFi on the receiver and adjusting the
separate volume control on that receiver as well.
Getting Started
Using MyFi® with Delphi Premium Sound System
Special note for MyFi receivers: If you have purchased the MyFi unit, you
must turn on the MyFi switch located in the battery compartment of the
Premium Sound System. Sliding this switch to “2” position will make
the Premium Sound System compatible with MyFi radios.
For all other radios this switch should be in “1” position and the Premium
Sound System should operate normally.
1) What happens if the Premium Sound System is not switched to correct
mode to position 2 (while a MyFi is plugged in)?
Volume and base boost buttons on the Premium Sound System will not
change the volume level.
2) W
hat happens if the MyFi switch is in the “2” position and we use
the MyFi?
Volume can be changed both on the MyFi unit and using the buttons on
the Delphi Premium Sound System.
10
Getting Started
Switch to “2” position to
use your MyFi with the
Delphi Premium Sound System.
11
Getting Started
Using Roady® XT with Delphi Premium Sound System
1. Install the Roady XT cradle onto the Delphi Premium Sound System.
Insert the Roady XT Receiver (sold separately) into the adaptor included
with the Delphi Premium Sound System until snug.
Caution: Do not use excessive force when inserting the receiver into the
cradle. Doing so could cause damage to the unit.
2. Insert the adaptor containing the Roady XT into the cradle by pressing
in on the back of the black inset cradle in the Delphi Premium Sound
System. Then let the cradle tilt forward and carefully slide the adaptor
down into the tray so that the alignment tabs on the sides of the tray line
up with the slots on the adaptor and the connector is completely seated.
Push on the top center above the display of the adaptor so that it tilts
back into the Delphi Premium Sound System until a click is heard. The
Roady XT receiver adaptor can be removed by reversing this process.
3. Power up the system by using the power button on the receiver or on the
remote control. If the display reads “ANTENNA” after powering up, check
that the antenna connection is secure and completely pushed in. Next,
change channels (from 0 to 1 or from 1 to 0 if the receiver is not activated
yet). If the “ANTENNA” message remains, power down the radio, unplug
the antenna and look for any obvious damage in the connector, jack or
antenna cable. If no damage is detected, reconnect the antenna, turn the
unit back on and change channels again. If the message still appears,
contact your retailer.
12
Getting Started
4. If the display reads “NO SIGNAL” after powering up, follow the
instructions in “Setting up the Antenna” on page 18.
13
Getting Started
Using an Audiovox® Receiver with
Delphi Premium Sound System
1. Install the Audiovox cradle onto the Delphi Premium Sound System. Insert the Audiovox receiver (sold separately) into the cradle insert included
with the system until snug.
Caution: Do not use excessive force when inserting the receiver into the
cradle. Doing so could cause damage to the unit.
2. Place the cradle insert containing the Audiovox receiver into the cradle by
first pressing in on the back of the black inset cradle in the system. Then
let the cradle tilt forward, carefully slide the cradle insert down into the
tray so that the alignment tabs on the sides of the tray line up with the
slots on the cradle insert and the connector is completely seated. Push
on the top center above the display of the cradle insert so that it tilts back
into the system until a click is heard. The Audiovox receiver cradle insert
can be removed by reversing this process.
14
3. Power up the Delphi Premium Sound System by using the power button
on the receiver or on the remote control. If the display reads “ANTENNA”
after powering up, check that the antenna connection is secure and completely pushed in. Next, change channels (from 0 to 1 or from 1 to 0 if the
receiver is not activated yet). If the “ANTENNA” message remains, power
down the radio, unplug the antenna and look for any obvious damage in
the connector, jack or antenna cable. If no damage is detected, reconnect
the antenna, turn the unit back on and change channels again. If the message still appears, contact your retailer.
Getting Started
4. If the display reads “NO SIGNAL” after powering up, follow the instructions in “Setting up the Antenna” on page 18.
15
Getting Started
Using the Delphi Premium Sound System
with Batteries
The Delphi Premium Sound System can be used with batteries (not
included) to allow you to listen to XM outdoors or in other locations without
access to an AC power source. Alkaline or rechargeable NiCD batteries
are recommended. Battery life will vary depending on how the system is
operated and the type of batteries being used. It is recommended that the
AC adaptor be the primary power source for the Delphi Premium Sound
System in order to preserve battery life. Note: The Delphi Premium Sound
System does not charge rechargeable batteries.
1. Disconnect the power adaptor from the back of the Delphi Premium
Sound System.
2. Remove the battery compartment cover.
3. Insert 8 “C” size batteries into the battery compartment. Make sure that
the batteries are facing the correct direction by verifying that the positive
(+) and negative (-) symbols in the battery compartment match up with
the same symbols on the batteries.
4. It is recommended that the batteries be removed when system is not in
use for an extended period of time.
5. When unit is not in use, use the Battery Save switch on the back of the
Delphi Premium Sound System to extend battery life.
16
Getting Started
Back Cover Battery Switch
To keep the batteries from draining when not in use, switch the button to
OFF position. The function of the Battery switch in the rear is to provide
protection against battery drainage when Premium Sound System is not
plugged into the wall.
17
Setting Up the Antenna
The antenna that comes with the Delphi Premium Sound System is a
high-gain antenna that can receive the XM signal from XM’s satellites
and/or XM’s land-based repeaters (depending on where you live). It is
recommended that the antenna be positioned near a south-facing window
or outdoors with a clear view of the southern sky in order to receive the
satellite signal. In some cases, it will be possible to receive the XM signal
through standard home walls or a roof.
To position your antenna, first set up the Delphi Premium Sound System
as described in this guide. Next, position the antenna until you receive the
strongest possible satellite signal. If the satellite signal is not available, you
can optimize it for a terrestrial signal (where available).
Optimizing Antenna Position/Signal
1. Press the “Power” button on the receiver to turn on the Delphi Premium
Sound System.
2. Press the “Menu” button.
3. Using the scroll wheel, turn the wheel until “Antenna Aiming”
is highlighted.
4. With “Antenna Aiming” still highlighted, press the “Enter” button found
in the center of the scroll wheel. The display will show the strength of the
satellite and/or terrestrial signals. The antenna signal strength is indicated
by the number of filled bars.
18
Setting Up the Antenna
Caution: Do not set anything on top of the Premium Sound System
as it may reduce antenna signal reception.
Positioning the Antenna
When outdoors with a view of the southern sky, or in an area of repeater
coverage, or when receiving a strong signal indoors, you can conveniently
leave the antenna under the top cover and secure the wires under the cover.
1. Remove the antenna cable storage cover as described in “Setting Up the
System,” wind the antenna around the two cable hooks, leaving several
inches of cable free, and replace the cover.
2. Fold the antenna down flat against its base.
3. Use the “Antenna Aiming” screen as described in “Optimizing Antenna
Position/Signal” to optimize the antenna tilt angle and position.
If you are unable to receive a signal, then position the antenna as described
in one of the next two sections.
19
Setting Up the Antenna
Indoor Installation on a Flat Surface
To aim your antenna at the satellite:
1. Set antenna flat against its base on a flat (horizontal) surface.
2. Turn the base of the antenna so that the XM logo is facing to the south.
3. Use the “Antenna Aiming” screen to optimize antenna tilt angle and
position.
4. If necessary, experiment with different locations near a south-facing
window or outdoors.
Your antenna comes with 20’ of cable. If that is not sufficient to locate the
antenna where there is a strong XM signal, purchase the Delphi XM Signal
Repeater (Delphi model number SA10116) from your retailer or
www.xmradio.ca.
There is also a 50’ extension cable for the antenna (SA10006) that
is sold separately.
Outdoor Installation or Indoor Wall Mounting
The antenna can also be attached vertically to an external or internal wall if
that is more convenient than placing it on a horizontal surface.
1. Holding your antenna up, find a wall location that ensures a strong
signal. It is recommended that you use an extension cord to temporarily
locate your receiver’s home stand outdoors while optimizing the antenna
location with the “Antenna Aiming” screen.
20
Setting Up the Antenna
2. Attach four screws to the wall using the screw-locator pattern shown
below. Photocopy the pattern to use as a template. Use screws with head
sizes small enough to fit in the center of each of the four holes but large
enough not to pop out of the elongated sections. Leave 1/8” of the screw
shanks behind the heads sticking out of the wall.
Photocopy this diagram of the screw-locator pattern on the bottom of your
XM Antenna to use as a template for wall attachment.
21
Setting Up the Antenna
3. Tilt the antenna fully back on the base. Place the antenna base on the four
screw heads with the antenna pivot at the top and pull down approximately 1/4” until the base is firmly secured. Note that the XM logo will be
upside down when the antenna is properly installed.
4. Tilt the antenna away from the wall/base until the signal is optimized.
Note: DO NOT CUT THE ANTENNA CABLE and attempt to splice it or attach
alternative connectors or cable. The cable and connectors used in your
Delphi Premium Sound System are specially chosen and attached at the
factory to ensure that they will work with XM’s unique frequency band. Use
an XM-approved extension kit (Delphi model number SA10006) with your
receiver.
22
Setting Up the Antenna
Repeater Antenna
The Delphi Premium Sound System comes with a repeater antenna bracket.
This bracket can be attached to base of the unit using the two screws
provided with the bracket. Once the bracket is attached to the audio system,
the repeater antenna can be snapped in place and the wire can be routed
through the opening provided in the rear under the top cover. Plug the
antenna into the connector and secure the access wire to the cover. The top
cover can now be snapped in place.
Once the Delphi Premium Sound System is set up and the satellite receiver
is installed, the complete setup can be controlled as described in the
receiver’s operating guide.
23
Using the Delphi Premium Sound System
Unique Delphi Premium Sound System features
include the following:
Volume
Volume can be adjusted using the push buttons on the Delphi Premium
Sound System. In addition, when the receiver is connected to the Delphi
Premium Sound System, the + and - controls on the receiver’s remote
control can also be used to increase (+) and decrease (-) volume.
VOL-
BASS
VOL+
Note that the “Line Out Level” cannot be reset while the receiver is in the
Delphi Premium Sound System. The volume control should be used to
control the audio output instead. If the line out setting is adjusted while in
a car cradle or home stand and the receiver is later reconnected to the
Delphi Premium Sound System, it will automatically return to the prior
setting the next time it is used in a vehicle adaptor or home adaptor.
24
Using the Delphi Premium Sound System
Bass Boost
Delphi Premium Sound System is equipped with Maxx Bass technology.
To turn on the additional bass press the BASS Boost (see illustration at left).
Additional Bass & Treble adjustment in the satellite radio: If your attached
satellite radio has built-in EQ settings, bass and treble can be adjusted by
pressing the “Menu” button, selecting “Bass + Treble,” and then setting
them in the same manner as other menu functions.
This feature only appears and only applies when the receiver is seated in
the Delphi Premium Sound System. If the receiver is removed and used in a
vehicle adaptor or home adaptor, the bass and treble settings out of the
receiver will be “flat” or “zero” since the audio signal will be processed by
the vehicle or home audio systems. When the receiver is returned to the
Delphi Premium Sound System, it will return to the previously used bass
and treble settings.
Headphones
The Delphi Premium Sound System has a headphone jack located in the
rear of the unit. Many popular styles and types of headphones or earbuds
can be used as long as their plugs and/or adaptors fit the industry standard
3.5 mm diameter stereo jack.
Warning: Hearing damage from loud noise is almost undetectable
until it is too late. Your hearing can adapt to higher volumes of
25
Using the Delphi Premium Sound System
sound. Sound that seems normal can be loud and harmful to your hearing.
Take precautions by adjusting the volume control on your audio system to a
safe sound level before your hearing adapts to it.
To help avoid hearing loss or damage, do the following:
1. Adjust the volume control to the lowest setting.
2. Increase volume slowly until you hear comfortably and clearly.
Aux Input
To plug in your MP3 player, CD player, or other audio device, the Delphi
Premium Sound System is equipped with an auxiliary 3.5 mm input jack
located in the rear of the unit. Connection cables are not included.
26
Other Things You Should Know
Precautions
1. On power sources:
•F
or AC operation, it is recommended that only the supplied AC power
adaptor is used.
•T
he satellite radio receiver should not be disconnected from the AC
power source as long as it is connected to the wall outlet, even if the
satellite radio receiver has been turned off or detached.
•U
nplug the AC power adaptor from the wall outlet when it is not used
for an extended period of time.
•F
or battery operation, use 8 “C” size batteries. Turn battery switch to
off position to save battery power and protect batteries from draining
during storage.
•T
he icon indicating operating voltage, power consumption, etc. is
located next to the power jack on the rear cover.
Caution: When the batteries are not being used, remove them
to avoid possible damage that can be caused by battery leakage
or corrosion.
2. On placement:
•D
o not place the Delphi Premium Sound System on an inclined or
unstable surface.
•D
o not place anything within 1/2” of the side of the Delphi Premium
Sound System. The audio/ventilation ports must be unobstructed for
the Delphi Premium Sound System to operate properly and prolong the
life of its components.
•S
ince a strong magnet is used for the speakers, keep personal credit
cards using magnetic coding or spring-wound watches away from the
unit to prevent possible damage from the magnetic fields.
27
Other Things You Should Know
3. Do not immerse in water.
•T
his product is not meant to be immersed in water or come in
continuous contact with water.
•B
efore opening or shutting the receiver cradle or battery compartment
panel, be sure to wipe off water, dust, or sand on the outside of the unit.
• If the Delphi Premium Sound System is splashed with salt water, wipe
clean with a damp cloth, and then dry with a soft dry cloth. Do not wash
under running water; do not use soap or detergent; do not dry with an
electric hair dryer.
•T
he supplied AC power adaptor is not water resistant. To prevent shock
hazard, avoid using the Delphi Premium Sound System near water
during AC operation.
•W
ater in the headphone jack, or Aux input jack, may cause rusting and
possible malfunction.
Troubleshooting
If the power is not on:
• Connect the AC power adaptor to a wall outlet securely and make sure the
wall outlet has 110V AC output.
• Make sure the batteries are inserted correctly.
• Replace all the batteries with new ones if they are weak.
• Make sure battery switch is turned to ‘ON” position if attempting to
operate on batteries.
28
Other Things You Should Know
If there is no audio:
• Unplug the satellite radio receiver from the Delphi Premium Sound
System and re-insert it.
• Make sure that Audio level is set correctly.
• Make sure that radio is not muted.
If noise is heard coming through the Delphi Premium Sound System:
• Someone is using a portable telephone or other equipment that emits
radio waves near the antenna (~2.3GHz). To solve this problem, move the
portable telephone, etc. away from the unit.
Maintenance
To clean the cabinet panel and controls, use a soft cloth slightly moistened
with a mild detergent solution. Do not use any type of abrasive pad,
scouring powder, or solvent, such as alcohol or benzene.
Note: Unplug the AC power adaptor before cleaning to avoid any electric
shock hazard.
29
Other Things You Should Know
Specifications
Frequency Response..................................................30Hz to 20kHz
Headphone Connector Type......................................3.5mm Stereo Jack (1/8”)
Auxiliary Connector Type...........................................3.5mm Stereo Jack (1/8”)
Battery Type/Qty.........................................................“C” Cell / 8 Total
Overall Dimensions....................................................L15.7” x H7.8” x W8.3”
.....................................................................................(L400 x H198 x W210 mm)
Weight (Without Batteries)........................................4.11 kg
Operating Temperatures............................................0˚ to 55˚ C (32˚ to 131˚ F)
30
Warranty
Delphi Limited Consumer Warranty (United States)
Delphi Product and Service Solutions (“Delphi”) warrants all XM Satellite
Radio Products sold by Delphi (each “Product”) to be free of defects in
material and workmanship, subject to the following conditions:
The duration of Delphi’s warranty with respect to each Product is limited to
one (1) year from the date of sale to the original consumer purchaser.
NO OTHER EXPRESS WARRANTIES ARE MADE WITH RESPECT TO
ANY PRODUCT. ALL IMPLIED WARRANTIES, INCLUDING WARRANTIES
OF MERCHANTABILITY AND FITNESS FOR A PARTICULAR PURPOSE
ARE LIMITED TO THE WARRANTY PERIOD SET FORTH HEREIN. THIS
WARRANTY IS NOT TRANSFERABLE AND APPLIES ONLY TO THE
ORIGINAL CONSUMER PURCHASER OF THE PRODUCT.
Delphi will, as its sole obligation under this warranty, replace or repair, at its
option, any Product that does not conform to this warranty. Products may
be repaired or replaced with new or with refurbished items. This limited
warranty does not cover defects in appearance, cosmetic or decorative
items, including any non-operative parts. Under no circumstances will
Delphi be liable for any incidental or consequential damages under this
warranty or any implied warranties. These remedies are the customer’s
exclusive remedies for breach of warranty. This limited warranty only
extends to customers who purchase the Products in the United States.
Delphi will not be responsible for damage resulting from any (i) deviation
of Delphi’s operating instructions as printed in Delphi’s catalog or on
any packaging, labels or other literature provided with a Product, (ii)
31
Warranty
installation of a Product in a manner which is inconsistent with Delphi’s
written instructions, (iii) alteration or modification of a Product, (iv)
misuse, (v) neglect, (vi) abuse, (vii) accident, (viii) normal wear and tear,
(ix) commercial use, (x) improper storage, (xi) environmental conditions,
including excessive temperature or humidity, (xii) service by anyone other
than a Delphi authorized repair facility, (xiii) other improper application,
installation or operation of this Product, or (xiv) defects or malfunctions
of which Delphi is not advised within ten (10) days of the expiration of the
limited warranty period.
How you (the Customer) can get service
To obtain warranty service during the first thirty (30) days after the date of
purchase, you must return the defective Product with the
original receipt to the original place of purchase. To obtain warranty service
during the first thirty (30) days for Products purchased from www.delphi.
com and for all products for the remainder of the limited warranty period,
you must contact Delphi by phone at 1.877.GO DELPHI (1.877.463.3574). If
further clarification or additional information is required from Delphi, you
may call Delphi at 1.877.GO DELPHI (1.877.463.3574).
If warranty service is needed at any time during the warranty period, the
purchaser will be required to furnish a sales receipt/proof of
purchase indicating the date of purchase, amount paid, and place of
purchase. Customers who fail to provide such proof of purchase will be
charged for the repair/replacement of any Product.
32
How state law relates to the warranty
Some states do not allow limitations on the duration of implied warranties,
or the exclusion or the limitation of incidental or consequential damages.
So the above limitations or exclusions may not apply to you. This warranty
Warranty
gives you specific legal rights. You may also have other rights that may vary
from state to state. NO PERSON IS AUTHORIZED BY DELPHI TO MODIFY
OR ADD TO THIS LIMITED WARRANTY.
Delphi Limited Consumer Warranty (Canada)
Delphi Product and Service Solutions (“Delphi”) warrants all XM Satellite
Radio Products sold by Delphi (each “Product”) to be free of defects in
material and workmanship, subject to the following conditions:
The duration of Delphi’s warranty with respect to each Product is limited to
one (1) year from the date of sale to the original consumer purchaser.
Delphi makes no express warranties with respect to any Product except
as set forth herein. All implied conditions and warranties, including the
implied conditions and warranties of merchantable quality and fitness for
a particular purpose are limited to the warranty period set forth above.
This warranty is not transferable and applies only to the original consumer
purchaser of the Product.
Delphi will, as its sole obligation under this warranty, replace or repair, at its
option, any Product that does not conform to this warranty. Products may
be repaired or replaced with new or with refurbished items. This limited
warranty does not cover defects in appearance, cosmetic or decorative
items, including any non-operative parts. Under no circumstances will
Delphi be liable for any loss of revenue, loss of profits or failure to realize
expected savings (collectively, “Economic Loss”) under this warranty or
any implied conditions or warranties. These remedies are the customer’s
exclusive remedies for breach of conditions or warranty. This limited
33
Warranty
warranty only extends to customers who purchase the Products in Canada.
Delphi will not be responsible for damage resulting from any (i) deviation
of Delphi’s operating instructions as printed in Delphi’s catalog or on
any packaging, labels or other literature provided with a Product, (ii)
installation of a Product in a manner which is inconsistent with Delphi’s
written instructions, (iii) alteration or modification of a Product, (iv)
misuse, (v) neglect, (vi) abuse, (vii) accident, (viii) normal wear and tear,
(ix) commercial use, (x) improper storage, (xi) environmental conditions,
including excessive temperature or humidity, (xii) service by anyone other
than a Delphi authorized repair facility, (xiii) other improper application,
installation or operation of this Product, or (xiv) defects or malfunctions
of which Delphi is not advised within ten (10) days of the expiration of the
limited warranty period.
How you (the Customer) can get service
To obtain warranty service during the first thirty (30) days after the date of
purchase, you must return the defective Product with the
original receipt to the original place of purchase. To obtain warranty service
during the first thirty (30) days for Products purchased from www.delphi.
com and for all Products for the remainder of the limited warranty period,
you must contact Delphi by phone at 1.877.GO DELPHI (1.877.463.3574). If
further clarification or additional information is required from Delphi, you
may call Delphi at 1.877.GO DELPHI (1.877.463.3574).
34
If warranty service is needed at any time during the warranty period, the
purchaser will be required to furnish a sales receipt/proof of
purchase indicating the date of purchase, amount paid, and place of
purchase. Customers who fail to provide such proof of purchase will be
charged for the repair/replacement of any Product.
Warranty
How provincial law relates to the warranty:
Some provinces do not allow limitations on the duration of implied
conditions or warranties, or the exclusion or the limitation of Economic
Loss. So the above limitations or exclusions may not apply to you. This
warranty gives you specific legal rights. You may also have other rights
that may vary from province to province. NO PERSON IS AUTHORIZED BY
DELPHI TO MODIFY OR ADD TO THIS LIMITED WARRANTY.
35
Delphi Corporation
1441 West Long Lake Road
Troy, Michigan 48098-5090 U.S.A.
Customer Service: 1.877.GO.DELPHI
www.delphi.com
SKYFi3, Roady XT, The XM name, TuneSelect, and related
logos are trademarks of XM Satellite Radio Inc.
Xpress by Audiovox is a trademark of the Audiovox
Electronics Corporation.
MaxxBass and Maxx logo are registered trademarks of
Waves Audio Ltd. in the United States and other countries.
MyFi is a trademark of Delphi Corporation.
©2007 Delphi Corporation. All rights reserved
DPSS-07-E-001
Version 1.0