1
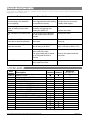
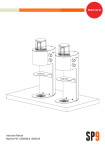
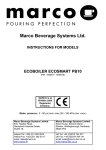
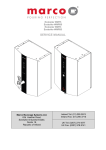
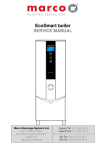
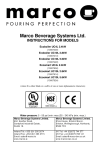
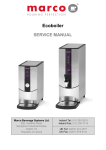
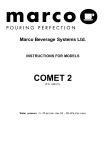
FILTRO Manual-Fill Jug & Flask Version - P/N: (Jug) 1000615 ; (Flask) 1000616 SERVICE MANUAL Marco Beverage Systems Ltd. 63d Heather Road, Sandyford Industrial Estate, Dublin 18, Republic of Ireland Service Manual 1000615 Filtro Jug MF 1000616 Filtro Flask MF 02-05-06 Ireland Tel: (01) 295 2674 Ireland Fax: (01) 295 3715 UK Tel: (0207) 274 4577 UK Fax: (0207) 978 8141 Page 1 of 9 INTRODUCTION The information provided in this manual is intended to assist in the installation and maintenance and service of the Manual-Fill versions of the Filtro Filter coffee Brewer. Please read the instructions carefully to prevent accidents and ensure an efficient installation. This manual is not a substitute for any safety instructions or technical data affixed to the machine or its packaging. All information in this manual is current at the time of publication and is subject to change without notice. Only technicians or authorised service providers should carry out maintenance of these machines. The company accepts no responsibility for any damage or injury caused by incorrect or unreasonable installation and operation. SAFETY INSTRUCTIONS Read and keep these instructions. To protect against electric shock do not immerse mains cord in water or other liquid. To prevent chafing of the cable, do not let the mains cord hang over the edge of a table or counter; or touch hot surfaces. Do not operate any product with a damaged cord, plugs, or after the machine malfunctions or has been damaged in any manner. If the supply cord is damaged, it must be replaced by the manufacturer or approved service agent in order to avoid a hazard. Switch off at the mains (unplug or disconnect from outlet). Allow to cool before removing components. The use of non-approved spares and/or accessories may cause damage and/or injuries. Do not use outdoors. Do not use the product for anything other than its intended use. Keep the outside of the coffee maker clean and dry at all times. Service Manual 1000615 Filtro Jug MF 1000616 Filtro Flask MF 02-05-06 Page 2 of 9 TECHNICAL DETAILS Model Supply voltage Frequency Power Dimensions Empty Weight Capacity (per hr) Brew time Brew capacity max Manual-Fill Jug 1000615 230V 50Hz 2300W 220x385x460 [WxDxH] mm 6.1kg 18L 5 min 1.8L Manual-Fill Flask 1000616 230V 50Hz 2100W 220x385x615 [WxDxH] mm 7.1kg 18L 6.5 min 2.2L INSTALLATION ELECTRICAL Electrical specification: 230Vac. 50Hz. This machine must be connected to a fused 13A single-phase power supply. This machine is provided with a 3-pin plug and must be connected to an earthed supply. LOCATION Position the brewer at buffet height on a firm level base that can bear the weight of the machine when it is filled. Position the brewer level and in such a way that it cannot cause any damage if it leaks. Position the brewer within 1.5 metres from a suitable power socket. OPERATION Allow time for all the coffee to drain from the filter bowl before removing. Protect the controls against grease and dirt. Never use warm or hot water to fill the machine. Risk of scalding. Beware of removing the filter basket/jug/flask when the brewer is in operation. ALL users of this machine should be trained and should be aware that the machine dispenses very hot beverages. Do not place an empty glass jug on a hotplate when it is switched on except immediately before brewing. PRIMING The coffee machine needs to be primed with water prior to being turned on and its first operation; an amount of water will always remain in the machine. Insert an empty filter basket into the machine and place an empty jug/flask on the lower hotplate (or base in the case of the flask version) Pour a jug (1.8l/2.2l) of water into the tank (cold water reservoir). Plug the machine into the power supply and switch on the power button. The switch indicator and ‘Brewing’ light will illuminate and the buzzer will sound for 1sec. The boiler will heat up and water will start to flow through the machine. At the end of the process the ‘Brew Ready’ light will illuminate and the buzzer will sound. Only half of the water will have transferred to the jug/flask and the remainder will stay in the machine. Service Manual 1000615 Filtro Jug MF 1000616 Filtro Flask MF 02-05-06 Page 3 of 9 The machine is now ready for use. If the machine is ever fully drained this process must be repeated. BREWING COFFEE Use fine grain coffee which has been ground for use with filter brewers. Keep the jugs/flasks and basket filter clean Put the correct amount of ground coffee into the filter paper. Your coffee supply company may have pack sizes to suit the brews of your new brewer; if not, as an approximate guide for your first brews: Water Volume Coffee Glass Jug 1.8L 65-90 grams Flask 2.2L 75-110 grams Level off the surface of coffee by gently shaking the filter bowl. Slide the coffee filter bowl into the guide rails and push fully home. Pour a jug/flask (1.8l/2.2l) of water into the tank (cold water reservoir). Plug the machine into the power supply and switch on the power button. The switch indicator and ‘Brewing’ light will illuminate and the buzzer will sound for 1sec. The boiler will heat up and water will start to flow through the machine. At the end of the process the ‘Brew Ready’ light will illuminate and the sounder will sound. (2 short pulses). The coffee is now ready to serve. The upper hot plate is independent of the brewing process and can be turned on or off when required SPOIL INDICATOR The ‘Brew Ready’ light will automatically turn off after 20 minutes from the completion of a brew and this can be used as a spoil indicator to signal if the prepared coffee has passed it’s usable duration. MAINTENANCE This machine has been designed to give many years of trouble free service. The only regular maintenance required is occasional de-scaling. In common with all coffee brewer manufacturers, service calls resulting from lime scale are not covered by warranty. Fitting a scale reducer is recommended, especially in hard water areas. This can reduce the buildup of scale but may not stop it altogether. The machine should be de-scaled regularly. (3-6 months) The frequency that de-scaling is required depends on the local water supply; hard water areas need more attention. The ‘Descale’ indicator is set to trigger every 300 cycles as a reminder for the user to descale the machine. The machine will continue to operate but the ‘Descale’ light will not reset until the ‘Descale Reset’ button is depressed and held during a power up sequence. DESCALING PROCEDURE Dissolve the recommended amount of scale remover (see instructions for scale remover) in one litre of warm water (approx 60 – 70 C). Slide an empty filter basket into the basket guide rails and place an empty jug/flask under it. Carefully pour the solution into the tank (cold water reservoir) and switch on the machine. The solution will now run through the heating system and discharge into the jug/flask. Leave the lid of the tank open. Switch off the machine after one minute. Service Manual 1000615 Filtro Jug MF 1000616 Filtro Flask MF 02-05-06 Page 4 of 9 Wait about 2 minutes. The solution will react with the scale in the heating system. After the 2 minutes switch the machine back on and allow the rest of the solution to run through the system. At the end of the process the ‘Brew Ready’ light will illuminate and the sounder will sound. (2 short pulses). Dispose of the de-scale solution and rinse out the jug/flask. After descaling the machine, flush the system twice by following the coffee brewing procedure without using filter paper or coffee. Remember to empty the jug/flask each time. Switch off the machine and thoroughly clean the basket filter and the jug/flask. The machine is now ready for use. The ‘Descale’ light will not reset until the ‘Descale Reset’ button is depressed and held during a power up sequence. CLEANING The exterior of this machine may be cleaned with a damp cloth and a light detergent. Do not use abrasive cloths or creams, as this will spoil the finish of the machine. Do not use a water jet or spray. The glass jugs and flasks can be washed normally and rinsed clean. The coffee deposits in the coffee jugs/flasks and the filter can be cleaned with a suitable Jug/Urn Cleanser. The Filtro is designed with a spray head which can be easily removed by hand for cleaning or de-scaling - the bayonet type of fixing can be simply twisted in and out of position. Ensure that the spray head is securely in place when replacing it. Service Manual 1000615 Filtro Jug MF 1000616 Filtro Flask MF 02-05-06 Page 5 of 9 TROUBLESHOOTING GUIDE If you have any difficulty with your machine do not hesitate to call us. Some common faults and solutions are highlighted in the table below. Fault Possible Cause Action The machine is not working and the lamp in the switches are not lighting. The fuse in the fuse box has been triggered the units loading the system too heavily Replace/Reset the fuse. Connect the unit to a more suitably rated supply. The "Brewing" LED is on but no water is flowing into the filter basket. The dry boil or thermal fuse on the boiler is triggering and holding the boiler off. Descale the boiler. or Replace the boiler. The "Descale" LED has turned on. The units has been operating for 300 cycles since the last descale Descale the boiler. The "Descale" LED stays on even after a descale operation. The "Descale" counter has not been reset Reset the "Descale" counter at power-up. There is water coming from under the machine The overflow is operating, the tank is being over-filled. Use machine to empty tank. [N.B. a full tank is about 2.3L] The coffee is too weak. Not enough ground coffee has been used in the filter. The spray head disk is scaled up or dirty and the flow in uneven. Increase the amount of coffee. Too much ground coffee has been used in the filter. Reduce the amount of coffee. The coffee is too strong. Remove the spray head disc and clean. SPARE PARTS LIST Part Description Number 2300072 1801196 1600341 1600342 1501058 1800643 1800644 1800641 1800642 1501076 1500925 1500927 1500926 8000200 8000270 1700173 1700170 Basket FILTRO Spray head Rose FILTRO P.C.B. FILTRO Control P.C.B. FILTRO Display Flash Boiler 230V 2100W Hose Silicone FILTRO Flask Hot side Hose Silicone FILTRO Flask Cold side Hose Silicone FILTRO Jug Hot side Hose Silicone FILTRO Jug Cold side Float switch FILTRO Hotplate FILTRO c/w PTC Hotplate FILTRO – plate w/o PTC Heater PTC FILTRO Filter Paper - FILTRO ScaleKleen 200g Airpot Lever 2.2L Jug Glass Coffee 1.8L Service Manual 1000615 Filtro Jug MF 1000616 Filtro Flask MF 02-05-06 1000615 1000616 Reference (see Figs 1& 2 ) 2 6 8 9 7 5 7 5 4 1,3 1,3 1,3 Page 6 of 9 “Descale Reset” Button Figure 1 Figure 2 Service Manual 1000615 Filtro Jug MF 1000616 Filtro Flask MF 02-05-06 Page 7 of 9 Figure 3: Wiring diagram for FILTRO Manual-Fill Jug [P/N 1000615] Service Manual 1000615 Filtro Jug MF 1000616 Filtro Flask MF 02-05-06 Page 8 of 9 Figure 4: Wiring diagram for FILTRO Manual-Fill Flask [P/N 1000616] Service Manual 1000615 Filtro Jug MF 1000616 Filtro Flask MF 02-05-06 Page 9 of 9