1
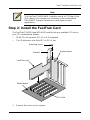
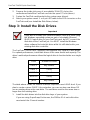
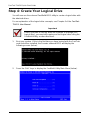
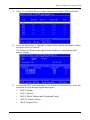
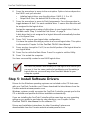
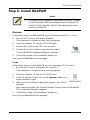
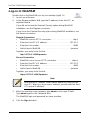
FASTTRAK
TX4310
QUICK START GUIDE
Version 1.0
© 2005 Promise Technology, Inc. All rights reserved.
FastTrak TX4310 Quick Start Guide
FastTrak Installation Task List
•
Step 1: Unpack Your FastTrak, below
•
Step 2: Install the FastTrak Card (page 3)
•
Step 3: Install the Disk Drives (page 4)
•
Step 4: Create Your Logical Drive (page 6)
•
Step 5: Install Software Drivers (page 8)
•
Step 6: Install WebPAM (page 9)
Step 1: Unpack Your FastTrak
When you receive the FastTrak TX4310 card, the package should contain the
items listed below:
•
FastTrak TX4310 RAID Controller Card
•
Quick Start Guide
•
Four 0.65m (25.6-inch) Serial ATA disk drive data cables
•
Two Y power splitter cables
•
CD with Drivers, Promise RAID Management (WebPAM) software and
FastTrak TX4310 User Manual
If any of the items are missing or appear to be damaged, please contact your
dealer or distributor immediately.
Warning
The electronic components on the FastTrak RAID Controller card
are sensitive to damage from Electro-Static Discharge (ESD).
Observe appropriate precautions at all times when handling the
FastTrak card or its subassemblies.
Warning
Before installing the adapter into an existing system, backup any
important or useful data. Failure to follow this accepted PC
practice could result in data loss.
2
Step 2: Install the FastTrak Card
Note
The FastTrak TX4310 RAID Controller card is a PCI Plug-n-Play
(PnP) device. No changes are necessary in the motherboard
CMOS/BIOS Setup for resources or drive types in most
applications.
Step 2: Install the FastTrak Card
The FastTrak TX4310 Serial ATA RAID card fits into any available PCI slot on
your PC's motherboard (below):
•
32-bit PCI slot (must be PCI 2.2 or 2.3 compliant)
•
The 32-bit portion of a 64-bit PCI or PCI-X slot
Attaching screw
System frame
Bracket
FastTrak card
Motherboard
PCI slots
1.
Remove the cover of your system.
3
FastTrak TX4310 Quick Start Guide
2.
Remove the inside slot cover of an available 32-bit PCI slot on the
motherboard.Install the FastTrak card into the open PCI slot (above).
3.
Fasten the FastTrak card bracket to the system case (above).
4.
Attach your system case's 2- or 4-pin LED cable to the LED connector on the
FastTrak card (see Install the Disk Drives, below).
Step 3: Install the Disk Drives
Important
If you wish to include your current bootable Serial ATA drive using
the Windows operating system as part of a bootable Mirrored
(RAID 1) logical drive on your FastTrak card, do NOT connect the
disk drive to the FastTrak yet. You MUST install the Windows
driver software first onto this drive while it is still attached to your
existing disk drive controller.
The FastTrak TX4310 RAID Controller card supports only Serial ATA disk drives.
For optimal performance, install disk drives of the same model and capacity. The
drives’ matched performance allows the logical drive to function better as a single
drive.
Level
Number of Drives
RAID 0
any number
RAID 1
2 only
RAID 5
3 or 4
RAID 10
4 only
JBOD
any number
The table above shows the number of drives required for each RAID level. If you
plan to create a mirror (RAID 1) for protection, you can use two new drives OR
use an existing drive and a new drive. The new drive must be the same size or
larger than the existing drive.
1.
Install the disk drives into the disk drive bays of your system.
If you are using SuperSwap Enclosures, the SMBus ID of each disk drive
must match the Channel number.
4
Step 3: Install the Disk Drives
Caution
Use of removable disk drive enclosures other than Promise
Technology’s SuperSwap is not supported and may result in
performance loss or other undesired results.
Port 1 /
Channel 1
Individual LED Aggregate LED
Connectors
Connectors
Port 2 /
Channel 2
Management
Connector
Port 3 /
Channel 3
Port 4 /
Channel 4
2.
Attach one Serial ATA data cable to each disk drive. Then attach the other
ends of the cables to the connectors on the FastTrak card (above).
3.
Attach the Y-cable power splitters to each of the disk drives.
5
FastTrak TX4310 Quick Start Guide
Step 4: Create Your Logical Drive
You will now use the onboard FastBuild BIOS utility to create a logical drive with
the attached drives.
For an explanation of the logical drive concepts, see Chapter 6 of the FastTrak
TX4310 User Manual.
Important
Even if you plan to use the WebPAM software to manage your
logical drive, you must still create your first logical drive using the
FastBuild Utility, as described here.
1.
Boot your system. If this is the first time you have booted with the FastTrak
card and drives installed, the Promise onboard BIOS will display the
following screen (below).
2.
Press the Ctrl-F keys to display the FastBuild Utility Main Menu (below).
6
Step 4: Create Your Logical Drive
3.
Press 2 on the Main Menu screen to display the Define LD Menu (below).
4.
Press the arrow keys to highlight an logical drive number you want to define
and press Enter to select it.
The Define LD Menu for the logical drive number you selected will next
appear (below).
5.
Choose the RAID Level you want. In the Define LD Menu section, press the
Spacebar to cycle through logical drive types:
•
RAID 0 (Stripe)
•
RAID 1 (Mirror)
•
RAID 5 (Block Striping with Distributed Parity)
•
RAID 10 (Stripe / Mirror)
•
JBOD (Single Drive)
7
FastTrak TX4310 Quick Start Guide
6.
7.
Press the arrow keys to move to the next option. Option choices depend on
the RAID Level you selected.
•
Initialize logical drive, zero the disk drives. RAID 0, 1, 5 or 10.
•
Stripe Block Size, the default 16KB is the only setting.
Press the arrow keys to move to Disk Assignments. Press the spacebar to
toggle between N and Y for each available drive. Y means this disk drive will
be assigned to the logical drive.
Assign the appropriate number of disk drives to your logical drive. Refer to
the table under “Step 3: Install the Disk Drives” on page 4.
A disk drive that is not assigned to a logical drive will automatically function
as a Hot Spare Drive.
8.
Press Ctrl-Y to save your logical drive configuration.
You have the option allocating a portion to a second logical drive. This option
is discussed in Chapter 3 of the FastTrak TX4310 User Manual.
9.
Press any key (except for Ctrl-Y) to use the full portion of the logical drive for
one logical drive.
10. Press Esc to exit to the Main Menu. Press Esc again to exit the Utility.
11. Press Y to restart the computer.
You have successfully created a new RAID logical drive.
Important
You must be partition and format your new logical drive before you
can use it. Use the same method of partitioning and formatting a
logical drive as you would any other fixed disk added to your
computer system.
Step 5: Install Software Drivers
Drivers for the Windows operating systems are included on the CD that came
with your FastTrak Controller card. Please download the latest drivers from the
Promise website at www.promise.com.
Windows systems usually recognize the FastTrak Controller, prompt you for the
CD or diskette and perform the driver installation automatically.
If you are installing the FastTrak Controller at the same time as your operating
system or you prefer to read step-by-step directions, see Chapter 4 of the
FastTrak TX4310 User Manual on the software CD.
Drivers and installation instructions for other Operating Systems are
downloadable from the Promise website at www.promise.com.
8
Step 6: Install WebPAM
Step 6: Install WebPAM
Notes
•
A complete set of installation instructions is found in Chapter
2 of the FastTrak TX4310 User Manual on the software CD.
•
Chapter 5 of the FastTrak TX4310 User Manual discusses
how to use WebPAM.
Windows
Follow these steps to install WebPAM on your Windows-based PC or Server.
1.
Boot up the PC/server and launch Windows.
If the computer is already running, exit all programs.
2.
Insert the software CD into your CD-ROM drive.
3.
Double-click on the Install CD's icon to open it.
4.
Double-click on the Installer icon to launch it (right).
The first WebPAM installation dialog box appears.
5.
Follow the prompts in the installation dialog box.
See Log-in to WebPAM on the next page.
Linux
Follow these steps to install WebPAM on your Linux-based PC or Server.
1.
Boot up the PC/server and launch the Linux GUI.
If the computer is already running, exit all programs.
2.
Insert the software CD into your CD-ROM drive.
3.
In the CD window, double-click on the webpam...bin icon to
begin installation (right).
4.
When the Run or Display? dialog box appears, click Run in
Terminal.
After several moments, the Terminal window closes and the first WebPAM
PRO installation dialog box appears.
5.
Follow the prompts in the installation dialog box.
See Log-in to WebPAM on the next page.
9
FastTrak TX4310 Quick Start Guide
Log-in to WebPAM
Double-click on the WebPAM icon on your desktop (right). Or,
1.
Launch your Browser.
2.
In the Browser address field, type the IP address of the Host PC, as
explained below.
If you did not choose the External Security option during WebPAM
installation, use the Regular connection.
If you chose the External Security option during WebPAM installation, use
the Secure connection.
Regular Connection
•
WebPAM uses an HTTP connection . . . . . . . . . . . . . . . . . . . . http://
•
Enter the Host PC’s IP address . . . . . . . . . . . . . . . . . . . . . 127.0.0.1
•
Enter the Port number . . . . . . . . . . . . . . . . . . . . . . . . . . . . . . . :8080
•
Add to launch WebPAM . . . . . . . . . . . . . . . . . . . . . . . . . . . . /promise
Together, your entry looks like this:
http://127.0.0.1:8080/promise
Secure Connection
•
WebPAM uses a secure HTTP connection . . . . . . . . . . . . . . .https://
•
Enter the Host PC’s IP address . . . . . . . . . . . . . . . . . . . . . 127.0.0.1
•
Enter the Port number . . . . . . . . . . . . . . . . . . . . . . . . . . . . . . . :8443
•
Add to launch WebPAM . . . . . . . . . . . . . . . . . . . . . . . . . . . . /promise
Together, your entry looks like this:
https://127.0.0.1:8443/promise
Note
Note that the IP address shown above applies to a log-in at the
Host PC. When you log in over a network, you will enter the Host
PC’s actual IP address.
3.
When the opening screen appears, type admin in the Login ID field.
Type admin again in the Password field.
The WebPAM login and password are case sensitive.
4.
Click the Sign in button.
10