1
B. Check all connections in the LP gas system (at the
back of the refrigerator) for gas leaks. The LP gas
supply must be turned on. Apply a non-corrosive
bubble solution to all LP gas connections.
The appearance of bubbles indicates a leak and
should be repaired immediately by a QUALIFIED
SERVICEMAN WHO IS FAMILIAR WITH GAS SYSTEM AND REFRIGERATORS.
! WARNING
DO NOT use a wire or pin when cleaning the burner
jet as damage can occur to the precision opening.
This can cause damage to the refrigerator or create
a fire hazard.
! WARNING
DO NOT use a flame to check for gas leaks.
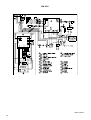
C. Check the AES control system by connecting/disconnecting 120 volt AC power, start/stop the engine, etc.
Compare the operation with the operation described
in section Operating Instructions.
D. The LP gas pressure should be checked and the main
regulator readjusted if pressure is incorrect. The correct operating pressure is 11 inches of water column.
The correct place to take the LP gas pressure is at
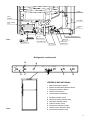
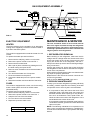
the test port just ahead of the burner jet. (See FIG. 12).
E. Inspect the flue baffle. It should be reasonably clean
and free of soot. Heavy soot formation indicates improper functioning of the burner. The flue and burner
both require cleaning in the following manner:
1. Unplug the refrigerator power cord from the 120 volt
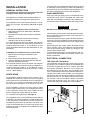
AC outlet. (See FIG. 3).
2. Disconnect or shut off the 12 volt DC power to the
refrigerator.
3. Turn manual shutoff valve to OFF. (See FIG. 1 & 12).
4. Remove cover from the burner housing. (See FIG. 1).
5. Remove the burner mounting screw and remove the
burner assembly. (See FIG. 12).
6. Remove the wire and flue baffle from the top of flue
tube. Clean the flue from the top using a flue brush.
Blowing compressed air into the flue will not properly
clean soot and scale out of the flue tube. Replace
the flue baffle.
7. Clean burner tube with a brush. Blow out burner with
compressed air.
8. Before removing burner jet, clean burner area of soot
and scale that fell out of flue tube. Remove the burner
jet. Soak the jet in wood alcohol and blow it out with
compressed air. Reinstall and tighten burner jet.
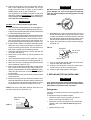
NOTE: The color of the flame shall be clear blue over
the slots of the burner. (See FIG. 13).
Clear blue color
of flame
9. Reinstall burner, being careful that the end of the
burner fits into the slot on the burner bracket. Check
to make sure slots are centered under the flue tube
and the thermocouple is positioned properly (tip of
thermocouple extends over two slots of burner).
10. Check the electrode for proper location and gap.
(See FIG. 14).
FIG. 14
Electrode
1/8” to 3/16”
(3-5 mm)
Burner tube
11. Turn on manual gas shutoff valve and check all fittings for leaks with soapy water.
12. Connect 120 volt power cord to the outlet and reconnect or turn on the 12 volt DC power.
13. Check LP gas safety shutoff. See page 6.
3. REPLACING THE HALOGEN LAMP
! CAUTION
Turn off the refrigerator before replacing the lamp.
Wear gloves as protection against hot lamp, broken
glass and as protection of the new lamp.
Refrigerator
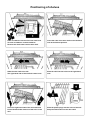
The lamp is located at the top of the refrigerator compartment.
To replace the lamp proceed as follows:
• remove the lamp cover by pressing in with the
thumb on the side of the lamp cover.
• with gloves, pull out the lamp from the socket and
FIG. 13
replace it with a new 12V, 10-watt halogen lamp
base G4.
• replace the lamp cover.
13