1
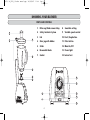
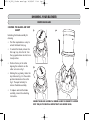
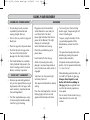
2007.9.18_DBL3_ blender manual.qxp
18/09/2007
11:44
Page 1
INSTRUCTION AND
G U A R A N T E E
O F
THE DUALIT BLENDER
2007.9.18_DBL3_ blender manual.qxp
18/09/2007
11:44
Page 2
2007.9.18_DBL3_ blender manual.qxp
18/09/2007
11:44
Page 3
CONTENTS
IMPORTANT SAFEGUARDS.....................
4
KNOWING YOUR BLENDER....................
5
USING YOUR BLENDER...........................
8
SERVICING & GUARANTEE.....................
10
3
2007.9.18_DBL3_ blender manual.qxp
18/09/2007
11:44
Page 4
IMPORTANT SAFEGUARDS
When using electrical appliances, basic
safety precautions should always be
followed including the following:
READ ALL
INSTRUCTIONS
•
•
•
To protect against risk of electrical
shock, do not put blender
powerbase in water or other
liquid
•
•
Do not let cord hang over edge of
table or counter
•
Keep hands and utensils out of
container while blending to
reduce the risk of severe injury to
persons or damage to the blender.
A scraper may be used but must
be used only when the blender is
not running
Make sure the electrical outlet is
rated at the same voltage as that
stated on the bottom of the power
base
Close supervision is necessary
when any appliance is used by or
near children
•
Unplug from outlet when not in
use, before putting on or taking
off parts, and before cleaning
•
Avoid contact with moving parts
•
Do not operate the blender with a
damaged cord or plug or after
appliance malfunctions, or is
•
dropped or damaged in any
manner. Return appliance to the
nearest Authorized Service Centre
for examination, repair or electrical
or mechanical adjustment
•
Do not use outdoors
•
Blades are sharp. Handle carefully
•
To reduce the risk of injury never
place the cutter assembly blades
on base without jug properly
attached
•
Always operate blender with Dualit
lid in place
•
This is an attended appliance
4
The use of attachments, not
recommended or sold by the
manufacturer may cause fire,
electric shock or injury
When processing warm liquids,
use heat proof gloves
•
Be certain the jar is firmly on the
base and the lid and blade
assembly is locked in place before
operating appliance
•
Never feed food by hand. Always
use food pusher
•
Do not attempt to defeat the
interlock mechanisms
•
Servicing should be performed by
a Dualit service representative
•
Never turn the blender “ON” for
longer than one minute - it may
overheat. All foods are fully
processed within one minute,
especially dry food and small
portions
•
Never blend more than 1.4 litres
2007.9.18_DBL3_ blender manual.qxp
18/09/2007
SAFEGUARDS
11:44
Page 5
KNOWING YOUR BLENDER
BEFORE PLUGGING IN
•
•
Never remove the jug from the
•
power base until motor and blades
are stationary. Damage to the
•
clutch can occur
Do not leave the blades in water
and never leave the blender
jug with any liquid inside it
•
Keep jug empty when not in use
•
Do not add boiling liquids or
foods to glass jug. Always
cool liquids or food items to
below 60°c before adding
•
•
•
•
•
Frozen foods with the exception of
small pieces of fruit or ice cubes
•
should not be placed in the jug
Do not insert frozen items into jug
taken directly from a hot
dishwasher
Do not immerse or wash jug in
boiling or very hot water
SAVE THESE
INSTRUCTIONS
•
Use this product with rated
voltage A.C. outlet only
Be sure to unplug the A.C. cord
when blender is not being used
Do not plug the appliance in
before checking that the voltage
indicated on the rating plate is the
same as the electrical supply
voltage
If the power cord is damaged it
must, for safety reasons, be
replaced by Dualit or an
authorised Dualit repairer
If blender fails to operate refit lid
ensuring correct positioning of the
plunger into the Safety Interlock
System and/or unplug for 15
minutes, plug in and try again
Ensure the blade assembly is cor
rectly fitted
If problems persist, either contact the
shop where you purchased from, or
contact Dualit customer services.
5
SAFETY INTERLOCK SYSTEM
This appliance is provided with a
safety system which disables the
mechanism if the jug lid or blade
assembly is not fitted even if the
switch button is ON.
Note: Do not use the jug to switch the
appliance on and off.
Only use with the glass jar and lid
firmly in place, ensure the lid and
plunger are correctly positioned into
the Safety Interlock System, page 7.
A small micro switch detects if the
blade assembly is locked into the
collar and is located in the correct
position. If the jug and blade unit are
not correctly assembled the motor
will not start.
ALWAYS PLACE ONE HAND ON
TOP OF THE LID WHEN THE
MOTOR IS RUNNING. ENSURE
SAFETY INTERLOCK IS FIRMLY
ENGAGED
2007.9.18_DBL3_ blender manual.qxp
18/09/2007
11:44
Page 6
KNOWING YOUR BLENDER
PARTS AND CONTROLS
1
2
3
4
1.
Filler cap/Blade removal key
8.
Smoothie setting
2.
Safety Interlock System
9.
Variable speed control
3.
Lid
10. Start/Stop button
4.
Glass jug with blades
11. Pulse button
5.
Collar
12. Main On/Off
6.
Removable blade
13. Power light
7.
Gasket
14. Sucker feet
5
6
7
8
9
10
START
STOP
PULSE
11
13
12
14
6
2007.9.18_DBL3_ blender manual.qxp
18/09/2007
11:44
Page 7
KNOWING YOUR BLENDER
REMOVABLE BLADE
CAUTION: THE BLADES ARE VERY
SHARP!
3
1
Unlocking the blade assembly for
cleaning:
•
The filler cap doubles as a key to
unlock the blade from jug.
•
To unlock the blade, remove the
filler cap / key from the lid. Turn
the jug upside down and rest on a
steady surface.
•
Position the key in the collar
aligning the indicators on the
collar as shown in Fig 1.
•
Holding the jug steady, rotate the
key clockwise Fig 2. to the unlock
position indicated on the collar
Fig 3. Then pull vertically to
remove the blade assembly.
•
To replace and lock the blade
assembly, reverse the unlocking
instructions.
2
ENSURE THE BLADE ASSEMBLY & RUBBER GASKET IS CORRECTLY LOCKED
INTO THE JAR TO CREATE A WATER TIGHT SEAL BEFORE USING.
7
2007.9.18_DBL3_ blender manual.qxp
18/09/2007
11:44
Page 8
USING YOUR BLENDER
BLENDING
ASSEMBLING YOUR BLENDER
•
Do not plug in until you have
assembled your blender and
unplug straight after use
•
Prior to first use, wash lid, jug and
blade unit
•
Place the jug onto the power base
•
Push the lid onto the jug and at
the rear of the lid locate the
plunger into the Safety Interlock
•
The Dualit blender has a double
Safety Interlock that prevents the
motor running unless the lid and
blade is correctly in position
FILLER CAP / BLADE KEY
•
•
•
•
To turn off, press the start/stop
button again, the power light will
return to flashing red
•
To pour, using the handle, lift the
jug vertically upwards off the
blender base, remove the lid to
pour
•
The speed can be adjusted when
blending by turning the speed
knob in either direction
•
Place fully assembled jug onto
power base
•
Insert foodstuffs into the jug
•
•
Attach lid, ensuring the safety
plunger is in place. Keep hand on
rear of lid to ensure safety switch is
engaged
•
Switch unit on, the power light
will slowly flash red
•
Remove cap and add ingredients
only at slow speeds. When using at •
high speed, with a full jug or with
warm contents, stop blender and
•
then add ingredients
The filler cap doubles up as a key
for removing the blade assembly
from the Jug for cleaning
Plug power cord into earthed
socket. Blender is now ready for
use. Please Note: The Red
power light indicates that there is
power to the Blender. This light
changes to a Green light
when the blades are running
Turn speed control knob to desired
setting
Press the start/stop button, the red
flashing light, will turn to solid
•
green and the blades will rotate
8
All speeds can be used with pulse
button. On the speed control knob
1 is slow 5 is fast
When blending warmed foods, do
not add ‘hot’ liquids to glass jug.
Always allow liquid to cool
below 60°c before adding to
the jug and place a gloved hand
over the lid and only operate on
slow speed
Do not insert frozen foods into jug
taken directly from a hot dish
washer
2007.9.18_DBL3_ blender manual.qxp
18/09/2007
11:44
Page 9
USING YOUR BLENDER
SMOOTHIE / ICE CRUSHING FEATURE
Create smoothies or crush ice in 45
seconds with the automated smoothie
and ice crushing feature.
•
To switch off manually, press the
Start/stop button, the power
light will return to flashing red
•
•
FOR ICE CRUSHING:
Add ice cubes into the jug. Do not
fill over half way and use single
cubes no larger than 3 - 4cm
Rotate the control knob
clockwise to ice symbol,
it will click into position. The
power light will fast flash red
•
FOR SMOOTHIES:
Add you ingredients into the jug
•
Press the start/stop button, the
power light will flash green while
in use
•
•
Follow the instructions above to
crush your ice in seconds
•
Only use rubber spatula to mix
foods when blender lid is
removed, the speed knob is at
speed 1 and the blades are
stationary
•
Always use the blender on a clean,
dry surface.
•
Cut most foods into cubes
approximately 3/4” (1.8cm) to
1” (2.5cm) to achieve a more
uniform result
•
Use a rubber or plastic spatula as
needed, only when the motor is
off. Never use metal utensils, as
damage may occur to the jug and
blades
•
Place lid on firmly. The blender will
only operate with the lid correctly
positioned on the jug and the
plunger inserted in the safety
switch
•
Always place one hand on top of
the lid when the motor is running
PULSE / TURBO FEATURE
•
The blade will then pulse at full
speed for 1 second, then
•
automatically reduce speed and
run at the lowest setting for
•
another 3 seconds. (This allows the
mixture to drop down onto the
blades to be processed.)
•
The blender will continue
alternating speeds for 12 cycles
Once complete the blender stops
and reverts back to the standby
BLENDING TIPS
Place ingredients into the jug
and firmly attach the lid
Switch blender on ,the red
standby light will flash
Press pulse button, green light
will glow and blades will rotate at
full speed until button is released
When blending at any speed the
pulse button can be pressed for
full speed and will hold full speed
until pulse button is released the
speed resumes as set on the knob
9
2007.9.18_DBL3_ blender manual.qxp
18/09/2007
11:44
Page 10
USING YOUR BLENDER
SERVICING
BLENDING TIPS
•
•
Cool hot foods to below 60°c
•
before blending and with all foods,
start at slow speed to combine
•
ingredients then increase speed, if
necessary. Use heat proof gloves, if
•
blending warm foods
For a thicker slushy consistency in
frozen drinks, simply add more ice, •
a cube at a time, until desired
•
consistency is reached
•
When crushing ice, do not fill the
jug over half way
•
Use ice cubes no larger than
3-4cm3 for even ice crushing
GUARANTEE
CLEANING
•
Switch off, unplug and
un-assemble before cleaning
Do not let the power base, flex or
plug get wet
If your blender fails within one year
from date of purchase we will repair or
replace it free of charge provided:
•
Wipe power base with damp cloth,
•
then dry.
You have not misused, neglected
or damaged it
It has not been modified
Hand wash the blade assembly.
•
The Jug, Lid and filler cap can be
washed in dishwasher, using a low
temperature cycle, then dry
The guarantee does not affect your
statutory rights.
Alternatively to clean the jug,
quarter fill with warm water, add a
few drops of washing liquid and
whizz for 30 seconds. Rinse
•
To remove blade for cleaning,
follow procedure on page 7
•
Do not touch the blades - brush
clean under a tap/faucet. Leave to
dry out of children’s reach
•
Warning: Do not immerse or
wash jug in boiling or very
hot water above 60°c
10
You supply your receipt showing
When you bought your blender
If over one year, contact Dualit for
recommended repair agents.
Further advice on using your Dualit
blender and other products in the
Dualit Range is available from:
Dualit Customer CareLine on
+44 (0) 1293 652 500
(09:00 to 17:00 Monday to Friday)
Alternatively email: [email protected]
Dualit does not assume any
responsibility for incidental or
consequential damages.
2007.9.18_DBL3_ blender manual.qxp
18/09/2007
11:44
Page 11
2007.9.18_DBL3_ blender manual.qxp
18/09/2007
11:44
Page 12
D U A L I T L I M I T E D C O U N T Y O A K W AY C R A W L E Y W E S T S U S S E X R H 1 1 7 S T
T E L E P H O N E : + 4 4 ( 0 ) 1293 652 500 FAC S I M I L E : + 4 4 ( 0 ) 1 2 9 3 6 5 2 5 5 5
E M A I L : i n f o @ d u a l i t . c o m W E B : w w w. d u a l i t . c o m
GB0907