1
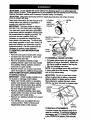
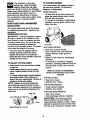
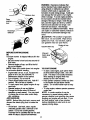
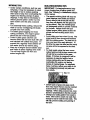
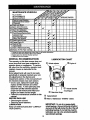
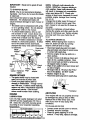
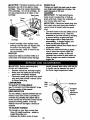
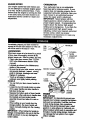
Owner's Manual
£RAFTSMAN"
6.0, HORSEPOWER
MULTI-CUT
ROTARY LAWN MOWER
Model No.
944.360440
•
•
•
•
•
Safety
Assembly
Operation
Maintenance
Repair Parts
CAUTION:
Read and follow .all
Safety Rules and Instructions
before operating this equipment
Sears Canada, Inc., Toronto, Ontario M5B 2B8
Warranty
Safety Rules
Assembly
Operation
Maintenance Schedule
Maintenance
4
5
9
9
Product
Specifications
Service and
Adjustments
Storage
Troubleshooting
Repair Parts
Parts Ordering
10
12
13
15
18
Back Cover
LIMITED TWO YEAR WARRANTY ON CRAFTSMAN power mower
For Two years from date of purchase Sears Canada, Inc. will repair or replace at Sears
option free of charge parts which are defective as a result of material or workmanship.
COMMERCIAL OR RENTAL USE:
Warranty on Power Mower (Gas) will be ninety (90) days from date of purchase if used
for commercial or rental purposes.
This Warranty does NOT cover:
• Pre-delivery set-up.
• Expendable items which become worn during normal use, such as rotary mower
blades, blade adapters, belts, air cleaners and spark plug.
• Repairs necessary because of operator abuse or negligence, including bent
crankshafts and the failure to maintain the equipment according to the instructions
contained in the owner's manual.
Warranty service is available by returning the Craftsman Power Mower to the nearest
Sears Service Centre/Department in Canada. This warranty applies only while this
product is in use in Canada.
This warranty is in addition to any statutory warranty and does not exclude or limit legal
rights you may have but shall run concurrently with applicable provincial legislation.
Furthermore; some provinces do NOT allow limitation on how long an implied warranty
will last so the above limitations may not applyto you.
SEARS CANADA, INC., TORONTO, ONTARIO M5B 2B8
Safety standards require operator
presence controls to minimize the
risk Of injury. Your unit is equipped
with such controls. Do not attempt to
defeat the function of the operator
presence controls under any
circumstances.
TRAINING:
• Read this operator's manual carefully.
Become familiar with the controls and
know how to operate your mower
properly. Leam how to quickly stop
mower.
• Do not allow children to use your mower.
Never allow adults to use mower without
proper instructions.
• Keep the area of operation clear of all
persons, especially small children and
pets.
• Use mower only as the manufacturer
intended and as described in this
manual.
• Do not operate mower if it has been
dropped or damaged in any manner.
Always have damage repaired before
using your mower.
• Do not use accessory attachments that
are not recommended by the manufacturer. Use of such attachments may be
hazardous.
• The blade turns when the engine is
running.
PREPARATION:
• Always thoroughly check the area to be
mowed and clear it of all stones, sticks,
wires, bones, and other foreign objects.
These objects will be thrown by the
blade and can cause severe injury.
• Always wear safety glasses or eye
shields when starting and while using
2
your mower.
• Dress properly. Do not operate mower
when barefoot or weadng open sandals.
Wear only solid shoes with good traction
• Do not run the engine indoors. Exhaust
fumes are dangerous.
• Never cut grass by pulling the mower
towards you. Mow across the face of
slopes, never up and down or you
might lose your footing. Do not mow
excessively steep slopes. Use caution
when operating the mower on uneven
terrain or when changing directions
maintain good footing.
• Never operate your mower without
proper guards, plates, grass catcher or
other safety devices in place.
MAINTENANCE
AND STORAGE:
• Check the blade and the engine
mounting belts often to be sure they are
tightened properly.
• Check all belts, nuts and screws at
frequent intervals for proper tightness to
be sure mower is in safe working
condition.
• Keep all safety devices in place and
working.
• To reduce fire hazard, keep the engine
free of grass, leaves or excessive
grease and oil.
• Check grass catcher often for deterioration and wear and replace wom bags.
Use only replacement bags that are
recommended by and comply with
specifications of the manufacturer of
your mower.
• Always keep a sharp blade on your
mower.
• Allow engine to cool before stodng in
any enclosure.
• Never store mower with fuel in the tank
inside a building where fumes may
reach an open flame or an ignition
soume such as a hot water heater,
space heater, clothes dryer, etc.
when mowing.
• Check fuel tank before starting engine.
Do not fill gas tank indoors, when the
engine is running or when the engine is
hot. Allow the engine to cool for several
minutes before filling the gas tank. Clean
off any spilled gasoline before starting
the engine.
• Always make wheel height adjustments
before starting your mower. Never
attempt to do this while the engine is
running.
• Mow only in daylight or good artificial
light.
OPERATION:
• Keep your eyes and mind on your
mower and the area being cut. Do not let
other interests distract you.
• Do not mow wet or slippery grass. Never
run while operating your mower. Always
be sure of your footing -- keep a firm
hold on the handles and walk.
• Do not put hands or feet near or under
rotating pads. Keep clear of the discharge opening at all times.
• Always stop the engine whenever you
leave or are not using your mower, or
before crossing ddveways, walks, roads,
and any gravel--covered areas.
• Never direct discharge of matedal
toward bystanders nor allow anyone
near the mower while you are operating
it.
• Before cleaning, inspecting, or repaidng
your mower, stop the engine and make
absolutely sure the blade and all moving
pads have stopped. Then disconnect the
spark plug wire and keep it away from
the spark plug to prevent accidental
starting.
• Do not continue to run your mower if you
hit a foreign object. Follow the procedure
outlined above, then repair any damage
before restarting and operating you
mower.
• Do not change the governor settings or
overspeed the engine. Engine damage
or personal injury may result.
• Do not operate your mower if it vibrates
abnormally. Excessive vibration is an
indication of damage; stop the engine,
safely check for the cause of vibration
and repair as required.
ALook for this symbol to point out
important safety precautions. It means
CAUT-IONll! BECOMEALERT!!!
YOUR
SAFETY IS INVOLVED.
FAICAU.TION: ' Always disconnect.spark.
ug wmreano place wire where ,t cannot
contact spark plug in order to prevent
accidental starting when setting up,
transporting, adjusting or making repairs.
3
_CAUTI. O.N: .Do.not o_rate this mower ,withoutthe d'Lschargeguard or an entire apl?mved
grass catcner .1 pace. tnose guaras are for your protection and are required by the American
National Standards Institute and Consumer Products Safety Commission.
ACAUTION:
Disconnect spark plug wire from spark plug and place wire where it cannot
come in contact with plug.
3-Position
Reed these instructionsand this manual in its
handle
pin
entiretybefore you attempt to assembleor
adjustment
/
operate your new lawn mower.
bracket
IMPORTANT: This lawn mower is shipped
WITHOUT OIL OR GASOLINE in the engine.
Your new lawn mower has been assembled
at the factory with the exception of those parts
left unassombied for shipping puqooses. All
pads such as nuts, washers, belts, etc.,
Operator presence
necessary to complete the assembly have
control bar
been placed in the pads bag. To ensure safe
and proper operation of your lawn mower, all
pads and hardware you _rnble
must be
Lift
tightened securely. Use the correct tools as
Mowing
necessary to ensure proper tightness.
Lower
position
TO REMOVE LAWN MOWER FROM
CARTON
• Remove loose parts included with mower.
• Cut down two end comers of carton and
lay end panel down flat.
• Remove all pacldng materials except
paddng between upper and lower handle
and padding holding operator presence
control bar to upper handle.
• Roll lawn mower out of carton and check
carton thoroughly for additional loose parts.
HOWTO SET UPYOUR LAWN MOWER
TO UNFOLD HANDLE
IMPORTANT: Unfold handles carefully so as
not to pinch or damage control cables.
• Raise lower handle section to operating
potion and squeeze the bottom ends of
lower handle towards each other until the
pin in handle can be inserted into one of
TO ASSEMBLE
GRASS CATCHER
• Put grass catcher frame into grass bag with
dgidpart of bag on tha bottom. Make,sum
the frame handle is outside of the bag top.
• Slip vinyl bindings over frame.
NOTE: Ifvinyl bindingsare too stiff,holdthem
in warm water for a few minutes, ff bag gets
wet, let it dry before using.
ACAUTION:
Do not run your lawn mower
without mulcher plug in place or approved
clipping deflector or grass catcher in place.
Never attempt to operate the lawn mower
with the rear door removed or propped open.
thethreeheightadjustment
holes.
frCaatrnC;e_--_L'_
_
• Remove protective padding, raise upper
handesectionintoplace on lowerhandle
and tighten both handle knobs.
• Remove any pacldng material from around
control bar.
• Your handles may be adjusted for your
mowing comfort. Refer to Service and
Adjustments section of this manual.
TO INSTALL A'rrACHM_rrs
Frame
opening
Your lawn mower was shipped reedy to be
used as a mulcher. To convert to bagging or
discha@ng, see =TO CONVERT MOWER"
in the OPERATION seclion of this manual.
4
KNOW YOUR LAWN MOWER
READ THIS OWNER'S MANUALAND SAFETY RULES BEFORE OPERATING YOUR LAWN
MOWER. Compare the illustrationswith your lawn mower to familiarize yourself with the
_
locationof various controlsand adjustments. Save this manual for future reference.
Throe=ymbob mw appearonyourIron mow="orin litB.ature
=UpldiedwithIhe _
_
_ _
CAUTION
OR WARNING
ENGINE
ON
ENGINE
FAST
SLOW
CHOKE
FUEL
OIL
DANGER,
OFF
KEEP HANDS
AND FEET AWAY
Engine zone control cable
Operator presence control bar
Starter handle
Handle knob
Engine oil
capw/
dipstick
Grass catcher
Gasoline cap
Housing
Mulcher
door
IMPORTANT:. This lawn mower is shipped
WITHOUT OIL OR GASOLINE in the engine.
Wheal adjuster
(on each wheel)
MEETS CPSC SAFETY REQUIREMENTS
Sears rotaw walk-behind powor lawn mowers conformto the safety standards of the American
National Standards Institute and the U.S. Consumer Product Safety Commission. The blade
turnswhentheengineisrunning.
Operator preNnce control ber -must be
heUdown
tothehand_
totortthee_j_e.
Primer - pumps addtional fuel from the
carburetor to the cylinder for use when
Relaaseto stoptheengine.
sta_g a colde_ne.
Starter handle - used for starting the er_.
5
TO CONVERT
mower
can result
in foreign
The operation
of any
lawn
objects thrown into the eyes,
which can result in severe eye damage.
Always wear safety glasses or eye shields
while operating your lawn mower or
performing any adjustments or repairs.
We recommend a wide vision safety mask
over spectacles or standard safety
glasses.
HOWTO USEYOUR LAWN MOWER
[_]
MOWER
Your lawn mower was shipped ready to
be used as a mulcher. To convert to
bagging or discharging:
REAR BAGGING
• Lift rear door of the lawn mower and
place the grass catcher frame hooks
onto the door pivot pins.
• To convert to mulching or discharging
operation, remove grass catcher and
close rear door.
ENGINE SPEED
The engine speed was set at the factory
for optimum performance.
Speed is not
adjustable,
ENGINE ZONE CONTROL
ACAUTION:
Federal regulations require
an engine control to be installed on this
lawn mower in order to minimize the risk
of blade contact injury. Do not under any
circumstances attempt to defeat the
function of the operator control. The blade
turns when the engine is running.
• Your lawn mower is equipped with an
operator presence control bar which
requires the operator to be positioned
behind the lawn mower handle to start and
operate the lawn mower.
TO ADJUST CUTnNG HEIGHT
• Raise wheels for low cut and lower wheels
for high cut
• Adjustcutting height to suit your requirements. Medium position is best for most
lawns.
• To change cutting height, squeeze adjuster
lever toward wheel. Move wheel up or
down to suit your requirements. Be sure all
wheels aro in the same sstlJng.
NOTE: Adjuster is prepedy positioned
when plate tab inserts into hole in lever.
Also, 9-position adjusters (if so equipped)
allow lever to be positioned between the
plate tabs.
Pivot pins
SIDE DISCHARGING
• Rear door must be closed.
• Open mulcher door and install discharge deflector under guard as
shown.
• Mower is now ready for discharging
operation.
• To convert to mulching or bagging
operation, discharge deflector must be
removed and mulcher door must be
closed.
" SIMPLE STEPS TO REMEMBER
WHEN CONVERTING YOUR LAWN
MOWER
FOR MULCHING • Rear door closed.
• Mulcher door closed.
FOR REAR BAGGING • Grass catcher installed.
• Mulcher door closed.
FOR SIDE DISCHARGING • Rear door closed.
• Side discharge deflector installed.
ACAUTION:
Do not run your lawn
mower without rear door closed or
approved grass catcher in place. Never
attempt to operate the !awn mower with
the rear door removed or propped open.
Plate Tab
Lower Wheels for High Cut
_ j_
Raise Wheels for Low Cut
6
WARNING: Experience ina_ates that
alcohol blended fuels (called gesohol or
usingethanolorme'a'_lol)can attract
_lchsr
door
Open
mulchq
door
Discharge
deflector
moisture which leads to separation and
formation of acids during storage. Ack_ gas
can damage the fuel system of an engine
while in storage. To avoid engine problems,
the fuel system should be emptJ_ before
storage of 30 days or longer. Drain the gas
tank, start the engine and let it run untilthe
fuel lines and carburetor are empty. Use
fresh fuel next season. See Storage
Instructionsfor additional information. Never
use engine or cadouretorcleaner products in
the fuel tank or permanent damage may
occur.
_CAUTION:
Fill to bottom of gas tank
filler neck. Do not overfill. Wipe off any
Spilled oil or fuel. Do not store, spill or
use gasoline near an open flame.
Gasoline filler cap
BEFORE STARTING ENGINE
OIL
Your lawn mower is shipped wiff_ut oil in the
engine.
• Be sure mower is level and area around oil
fill is dean.
• Remove engine oil cap and fill to the full
cap
(Discard
debris plug
inside)
H_ _ tba Q_stlok.
NOTE: Allow oil to settle down into engine
for accurate dipstick reading.
• Engine holds 20 ozs. of oil. For type and
grade of oil to use, see "ENGINE" in
Maintenance section of this manual.
• Pour oil slowly. Do not over fill.
• Check oil level before each use. Add oil if
needed. Fill to full line on dipstick.
• To read proper level, tighten engine oil cap
each time.
• Reinstall engine oil cap and tighten.
• Change the oil after even] 25 hours of
operation or each season. You may need
to change the oil more often under dusty,
dirty cona_dJons.
ADD GASOLINE
NOTE: Before filling fuel tank, remove and
discard the debris plug that is inside the
tank.
• Fillfueltank. Use fresh,clean,regular
unleadedgasolinewitha minimumof 87
octane. Do not mixoil withgasoline.
Purchasefuel in quantitiesthatcan be used
within30 days to assurefuelfrestmess.
TO START ENGINE
• To start a cold engine, push primer three
(3) times before tryingto strut. Use afirm
push. This step is not usually necessary
when starting an engine which has
already run for a few minutes.
• Hold operator presence control bar down
to the handle and pull starter handle
quickly. Do not allow starter rope to snap
back.
• To stop engine, release operator presence
control bar.
NOTE.: In cooler weather it may be
necessary to repeat pdming steps. In
warmer weather over priming may cause
flooding and engine will not start. If you
do flood engine, wait a few minutes
before attempting to start and do not
repeat priming steps.
MOWING TIPS
MULCHING
• Under certain conditions, such as very
tall grass, it may be necessary to raise
the height of cut to reduce pushing
effort and to keep from ovedoading the
engine and leaving clumps of grass
clippings. It may also be necessary to
reduce ground speed and/or run the
lawn mower over the area a second
time.
• For extremely heavy cutting, reduce the
width of cut by overlapping previously
cut path and mow slowly.
• For better grass bagging and most
cutting conditions, the engine speed
should be set in the fast position.
• Pores in cloth grass catchers can
become tilled with dirt and dust with use
and catchers will collect less grass. To
prevent this, regularly hose catcher off
with water and let dry before using.
• Keep top of engine around starter clear
and clean of grass clippings and chaff.
This will help engine air flow and
extend engine life.
IMPORTANT: For bsst performance, keep
mower housing free of built-up grass and
trash. See =Cleaning" in Maintenance section
of this manual.
MOWING TIPS
• The special mulching blade will recut the
grass clippings many times and reduce
them in size so that as they fail onto the
lawn they will disperse into the grass and
not be noticed. Abo, the muk:t._ grass
will biodegrade quicidyto provide nutrients
for the lawn. Always mulch with your
highest engine (blade) speed as this will
provide the best recuttingaction of the
blades.
• Avoid cuttingyour lawn when it is wet Wet
grass tends to form clumps and interferes
with the mulching action. The best time to
mow your lawn is the early aftemoon. At
this lime the grass hasd_
and the newly
cut area will not be exposed to the direct
sun.
• For best results, adjust the lawn mower
cutting height so that the lawn mower cuts
off only the top one-third of the grsss
blades. If thelawn is overgrown it Willbe
necessan] to ralae the height of cut to
reduce pushing effort and to keep from
overloading the engine and leaving
clumps of mulched grass. For extremely
heaW mulching, reduce your width of cut
by overlapping previouslycut"path and
mow slowly.
/3
• Certaintypes of grassand grassconditionsmay requirethatan area be mulched
a secondlima to completelyhidethe
clippings.When doinga sscend cut, mow
acrossorperpendicularto the firatcut path.
• Change yourcuttingpattemfromweekto
week. Mow northto southone wssk then
changeto eastto westthe nextweek. This
will help preventmattingand grairu'ng
of
the lawn.
8
AsYouCOMPLETE
REGULARSERVICE
Checkfor LooseFasteners
Clean/InspectGrasSCatcher
M
0_ _
/_._ERVICE
_
_
_
MowerS)
W
Check drive belt/pulleys
R
Check/Sharpen/Replace Blade
ill
9/
:_
(Power-PropelledMowers)
Lubrication Chart
Clean Battery/Recharge
_/
IElectric Start MowersI
NE Check
ChangeEr_jine
EngineOilOilLevel
I
I/'
_pg
I/'4
,,
I/1.2
Clean Air Filter
I_
2
InspectMuffler
N Cleanor ReplaceSpark Plug
ReplaceAir FilterPaper Cartridge
1234.
DATES
Clean Lawn
Mower
Clean
UnderDriveCover
(Power-Propelled
G
O_
I_2
Change more oltenwhen operatingundera heavy loador in highambient temperatureS.
Sewice morn oftenwhen operatingIn dirty_- dustycondlUons.
Replace bladesmorn oftenwhen mowklgIn sandy soil
Ch_uge48 hoursat end otseason.
GENERAL RECOMMENDATIONS
LUBRICATION CHART
The warranty on this lawn mower does not
cover items that have been subjected to
operator abuse or negligence. To receive
full value from the warranty, operator must
maintain mower as instructed in this
manual.
Someadjustments will need to be made
periodically to propedy maintain your unit.
All adjustments in the Service and
Adjustments section of this manual should
be checked at least once each season.
• Once a year, replace the spark plug,
replace air filter element and check
blade for wear. A new spark plug and
clean/new air filter element assures
proper air-fuel mixture and helps your
engine run better and last longer.
• Follow the maintenance schedule in this
manual.
BEFORE EACH USE
(_) Wheel adjuster
(_) Engineoil
Handle bracket
(_) Rear door hinge
mountingpin
(I) spray
U_ant
_) Refer to Maintenance 'ENGINE'
• Check engine oil level.
• Check for loose fasteners.
LUBRICATION
Keep unit well lubricated (See "LUBRICATION CHART").
IMPORTANT:
wbed bea_
secgon.
Do not oil or grease plastic
Viscous lubdcantswB attract
dustanddrtthatwmshortan
the_ d a_es_f
U=k:aa_g
bea_ngs.
Hyoufeaitheymust
be
lutmat_ useonlya dry,powdered
gral_
typetubrmnt
spa_.
9
PRODUCT
SPECIFICATIONS
MODEL NUMBER
SERIALNUMBER
944.360440
DATE OF PURCHASE
GASOLINE CAPACITY/TYPE:
1.6 QUARTS
UNLEADED REGULAR
OIL TYPE (API-SF/SG/SH):
SAE 30 (ABOVE 32°F)
SAE 5W-30 (BELOW 32°F)
2O OZS.
CHAMPION RJ19LM OR J19LM
INTAKE:
.004 - .008
EXHAUST: .004 - .008
OIL CAPACITY:
SPARK PLUG IGAP: .030")
VALVE CLEARANCE:
SOLID STATE IGNITION
AIR GAP:
.01251N.
35-40FT.
BLADE BOLT TORQUE:
LBS.
The model and serial numbers will be found on a decal attached to the rear of the
lawn mower housing.Record both serial number and date of purchase in space
provided above.
LAWN MOWER
Always observe safety rules when performing
any maintenance.
TIRES
• Keep tires free of gasoline, oil, or insect
control chemicals which can harm rubber.
• Avoid stumps, stones, deep ruts, sharp
objects and other hazards that may cause
_re damage.
BLADE CARE
For best results, mower blade must be
kept sharp. Replace bent or damaged
blades.
TO REMOVE BLADE
• Disconnect spark plug wire from spark
plug and place wire where it cannot
come in contact with spark plug.
•Tum
lawn mower on its side. Make
sure air filter and carburetor are up.
• Use a wood block between blade and
mower housing to prevent blade from
tuming when removing blade bolt.
• Protect your hands with gloves and/or
wrap blade with heavy cloth.
• Remove blade bolt by turning counterclockwise.
• Remove blade and attaching hardware
(bolt, lock washer and hardened
washer).
NOTE: Remove the blade adapter and
check the key inside hub of blade adapter.
The key must be in good condition to work
properly. Replace adapter if damaged.
TO REPLACE BLADE
• Position the blade adapter on the
engine crankshaft. Be sure key in
adapter and crankshaft keyway are
aligned.
• Position blade on the blade adapter
aligning the two (2) holes in the blade
with the raised lugs on the adapter.
• Be sure the trailing edge of blade
(opposite sharp edge) is up toward the
engine.
• Install the blade bolt with the lock
washer and hardened washer into
blade adapter and crankshaft.
• Use block of wood between blade and
lawn mower housing and tighten the
blade bolt, turning clockwise.
• The recommended tightening torque is
35-40 ft. Ibs.
10
IMPORTANT:
treated.
Blade bolt is grade 8 heat
TO SHARPEN
BLADE
NOTE: We do not recommend sharpening blade - but if you do, be sure the blade
is balanced.
Care should be taken to keep the blade
balanced. An unbalanced blade will
cause eventual damage to lawn mower or
engine.
• The blade can be sharpened with a file
or on a grinding wheel. Do not attempt
to sharpen while on the mower.
, To check blade balance, drive a nail
into a beam or wall. Leave about one
inch of the straight nail exposed. Place
center hole of blade over the head of
the nail. If blade is balanced, it should
remain in a horizontal position. If either
end of the blade moves downward,
sharpen the heavy end until the blade
is balanced.
Crank shaft
Blade
keyway
Key
Blade
Crank
shaft
bolt
Lock
washer
Hardened
washer
edge
Blade
adapter
GRASS CATCHER
• The grass catcher may be hosed with
water, but must be dry when used.
• Check your grass catcher often for
damage or deterioration. Through normal
use it willwear. If catcher needs replacing,
replace only with a manufacturer approved
replacement catcher. Give the lawn
mower model number when ordering.
ENGINE
LUBRICATION
Use only high quality detergent oil rated
with API service classification SF, SG or
SH. Select the oil's SAE viscosity grade
according to your expected operating
NOTE: Although multi-viscosity oils
(5W30, 10W30 etc.) improve starting in
cold weather, these multi-viscosity oils
will result in increased oil consumption
when used above 32°F. Check your
engine oil level more frequently to avoid
possible engine damage from running
low on oil.
Change the oil after every 25 hours of
operation or at least once a year if the
lawn mower is not used for 25 hours in
one year.
Check the crankcase oil level before
starting the engine and after each five (5)
hours of continuous use. Tighten oil plug
securely each time you check the oil
level.
TO CHANGE ENGINE OIL
NOTE: Before tipping lawn mower to
drain oil, drain fuel tank by running
engine until fuel tank is empty.
• Disconnect spark plug wire from spark
plug and place wire where it cannot come
in contact with spark plug.
• Remove engine oil cap; lay aside on a
clean surface.
• Tip lawn mower on its side es shown and
drain oil into a suitable container. Rock
lawn mower back and forth to remove any
oil trappedinside of e_ine.
• Wipe off any spilled oil on lawn mower and
on side of engine,
• Fdlengine with oiL Rll enly to the "FULL"
line on the dipstick. DO NOT overfill.
• Replace engine oil cap.
• Reconnoct spark plug wire to spark plug.
AIR RLTER
Your engine will not run propedy and may
be damaged by using a dirty air filter.
Replace the air filter every year, more
often if you mow in very dusty, dirty
conditions.
TO CLEAN AIR FILTER
• Loosen screw and tilt cover to remove.
• Carefully remove cartridge.
• Clean by gently tapping on a flat
surface. If very dirty, replace cartridge.
ACAUTION:
Petroleum solvents, such as
kerosene, are not to be used to clean
cartridge. They may cause deterioration
of the cartridge. Do not oil cartridge. Do
not use pressurized air to clean or dry
cartridge.
Back plate
Lip
Cover
tabs
Slots
Cartridge
Cover
• Install cartridge, then replace cover
making sure the tabs are aligned with
the slots in the back plate. Fasten
screw securely, collar to remove any
dirt accumulation.
MUFFLER
Inspect and replace corroded muffler as it
could create a fire hazard and/or damage:
ACAUTION:
Before performing any
service and adjustments:
•
Release control bar and stop engine.
•
Make sure the blade and all moving
parts have completely stopped.
•
Disconnect spark plug wire from spark
plug and place where it cannot come
in contact with plug.
LAWNMOWER
TO ADJUST CUTT1NG HEIGHT
See "TO ADJUST cUTrlNG HEIGHT" in the
Operation section of this manual.
REAR DEFLECTOR
SPARK PLUG
Chenge your spark plug each year to make
your engine start easier and run better. Set
_
plug gap at .O3Oind..
CLEANING
IMPORTANT:
For best performance,
keep mower housing free of built-up
grass and trash. Clean the underside of
your mower after each use.
_kCAUTION:
Disconnect spark plug wire
from spark plug and place wire where it
cannot come in contact with the spark
plug.
• Turn lawn mower on its side. Make sure air
filter and carburetor are up. Clean the
underside of your lawn mower by scraping
to remove build-up of grass and trash.
• Clean engine often to keep trash from
accumulating. A dogged engine runs
hotter and shortens engine life.
• Keep finished surfaces and wheels free of
all gasoline, oil,etc.
• We do not recommend using a garden
hose to cleen lawn mower unless the
electrical system, muffler, air filter and
carburetor are covered to keep water out.
Water in engine can result in shortened
enginelife.
handle towards each other until the pin
in handle can be inserted into one of
the three height adjustment holes.
High
Med.
Low
Handle pin
/3-Position
adjustment
bracket
The rear deflector,attachedbetweenthe rear
wheelsof your lawn mower,is providedto
minimizethe possibilitythatobjectswillbe
thrown outthe rear of the lawn mowerintothe
operator'smowingposition. If the rear
deflectorbecomesdamaged, it shouldbe
replaced.
TO ADJUST HANDLE
The handle on your lawn mower has
three (3) height positions -adjust to
height that suits yoU.
• Squeeze the bottom ends of lower
12
ENGINE SPEED
CARBURETOR
Your engine speed has been factory set.
Do not attempt to increase engine speed
or it may result in personal injury. If you
believe that the engine is runningtoo fast
or too stow, take your lawn mower to an
authorized service center for repair and
adjustment,
Your carburetor has a non-adjustable
fixed main jet for mixture control. If your
engine does not operate propedy due to
suspected carburetor problems, take your
lawn mower to an authorized service
center for repair and/or adjustment.
IMPORTANT:
Never tamper with the
engine governor, which is factory set for
proper engine speed. Overspeeding the
engine above the factory high speed
setting can be dangerous, if you think the
engine-governed high speed needs
adjusting, contact your nearest authorzed
service center, which has proper
equipment and experience to make any
necessary adjustments.
Immediately prepare your lawn mower for
storage at the end of the season or ifthe unit
will not be used for 30 days or more.
Handle pin
High
Med.
Low
LAWNMOWER
When lawn mower is to be stored for a period
of time, dean it thoroughlY,remove all dirt,
grease, leaves, etc, Store in a dean, dry area.
• Clean entire lawn mower (See "CLEANING" in the Maintenance section of _ds
manual).
• Lubricate as shown intheMaintenance
section of this manual.
• Be sure that all nuts, bolts, screws, and pins
/3-Position
handle
adjustment
bracket
Operator presence control bar
aresecurely
fastened.
Inspect
moving
pa_;fordamage,breakage
andweer.
Replace
W necessary.
Fold foward
for storage
• Touch up allrustedorchippedpaint
Lower
handle
surfaces;
sandlightlybeforepainting.
HANDLE
• You can fold your lawn mower hanclla for
storage.
• Loesen the two (2) handle knobs on sides
ofthe upperhandleand _low handleto
fold down to the rear.
• Squeeze the bottom ends of lower handla
toward each other untilpins in handle clear
Upper
backward
Mowing
position
ENGINE
thebracketsandpivotentirehandle
FUELSYSTEM
IMPORTANT: It is importantto prevent gum
assembly forward and allow it to rest on
depots
mower,
• When serdngup your handle from the
storage position, the lower handle will
require_
_
tom ng
inassert"fualsyst
parfs such as carburstor, f fuel fiiter,fuel hose
or tank during storage. Also, experience
indcatesthatalcoholblandedfuels( called
intothemowing gasoholor usinge_anolor mothanol)can
position.
IMPORTANT: When fdidmg the handle for
storage or transporlatJon,be sure to fold the
handla as shown or you any damage the
corttrolcables.
attract moisture which laads to esparalJon and
formation of acids during storage. Add_ gas
candamagethefuelsystem
of anengine
while in storage.
13
• Drainthe fuel tank.
OTHER
• Start the engine and let it run untilthe fuel
lines and carburetor are empty.
• Never use engine or carburetor deaner
products in the fuel tank or permanent
• Do not store gasoline from one season to
another.
• Replace your gasoline can if your can
starts to rust. Rust and/or dirt in your
gasoline will cause problems.
• If possible, store your unit indoors and
cover itto give protectionfrom dust and dirt.
• Cover your unitwith a suitable protective
cover that does not retain
moisture.Do
not use plastic. Plastic cannot breathe
which allows condensation to form and will
cause your unitto rust.
IMPORTANT: Never cover mower while
engine and exhaust areas are stillwarm.
ACAUTION:
Never store the lawn
mower with gasoline in the tank inside a
building where fumes may reach an open
flame or spark. Allow the engine to cool
before storing in any enclosure.
damagemayocour.
• Use freshfuelnextseason.
NOTE: Fuel stabilizer is an acceptable
alternative in minimizing the formation of fuel
gum deposits during storage. Add stabilizer
to gasoline in fuel tank or storage container.
Always follow the mix ratio found on stabilizer
container. Run engine at least 10 minutes
after adding stabilizer to allow the stabilizer to
reach the cad)umtor. Do not drain the gas
tank and carburetor if using fuel stabilizer.
ENGINEOIL
Drain oil (with engine warm) and replace with
clean engine oil. (See "ENGINE" in the
Maintenance section of this manual).
CYUNDER
• Remove spark plug.
• Pour one ounce (29 ml) of oil through
spark plug hole into cylinder.
• Pull starter handle slowly a few times to
distribute oil.
• Replace with new spark plug.
14
TROUBLESHOOTING CHART
PROBLEM
CAUSE
Does not start
CORRECTION
1.
2.
3.
Dirty air filter.
Out of fuel.
Staie fuel.
1.
2.
3.
4.
Water in fuel.
4.
5.
Spark plug wire is
disconnected.
5.
6.
7.
8.
Bad spark plug.
6.
Loose blade or broken blade 7.
adapter.
Control bar in released
8.
9.
Control bar defective.
1.
Reer of lawn mower housing 1.
or cutting blade dragging
in heavy grass.
Cutting too much grass.
2.
po oo.
Lossof power
2.
Poor cut-
uneven
9.
Cleen/replace air filter.
Fill fuel tank.
Drain tank and refillwith
fresh clean fuai.
Drain fuel tank and
carburetor and refilltank
with fresh gasoline.
Connect wire to plug.
Replace spark plug.
Tighten blade bolt or
replace blade adapter.
Depress control bar to
handle.
Replace control bar.
Set to _-Iigher Cut"
po_ion,
3.
4.
Dirty air filter.
Buildup of grass, leaves,
and trash under mower.
3.
4.
Set to "Higher Cur'
position.
Clean/replace air filter.
Clean underside of mower
5.
6.
Too much oil in engine.
Waiking speed too fast.
15.
housing.
_
oil level.
1.
6.
Cut at slower walking
speed.
Wom, bent or loose blade.
1.
2.
Wheel heights uneven.
2.
Replace blade. T_hten
blede bolt.
Set ail wheels at same
3.
Buildup of grass, leaves
and trash under mower.
3.
height
Clean underside of
15
mower housing.
TROUBLESHOOTING CHART
PROBLEM
CAUSE
Excessive
vibratlon
CORRECTION
1.
Wom, bent or loose blade.
1.
2.
Bent engine crankshaft.
2.
Replace blade. "lighten
blade bolt.
Contact an authorized
service
canter,
Starter rope hard
topull
,
Engine flywheel brake is on 1.
when control bar is released.
Depress control ber to
upper handle before
pulling starter rope.
Contact an authorized
service canter.
Bent engine crankshaft.
2.
3.
4.
Blade adapter brokan.
Blade dragging in grass.
3.
4.
Replace blade adapter.
Move lawn mower to cut
grass or to hard surface.
not filling (if so
equipped)
1.
2.
3.
Cutting height too low.
Lifi on blade wom off.
Catcher not venting air.
1.
2.
3.
Raise cutting height.
Replace blade.
Clean grass catcher,
Hard to push
1.
Grass is too high or wheel
height is too low.
Rear of lawn mower
1.
Raise cutting height.
*
Grass catcher
2.
3.
4.
housing or blade dragging
in grass.
Grass catcher too full.
Handle height position not
rightfor you.
16
2.
Raise rear of lawn mower
housingone (1) setting
higher.
3. Emptygrasscatcher.
4. Adjusthandle heightto
suit.
17
ROTARY LAWN MOWER MODEL NUMBER 944.360440
49
14
3
14
34
li
68
33
li
47
67
19
47
0el
27
2O
223O
36
4O
45
ROTARY LAWN MOWER MODEL NUMBER 944.360440
KEY
NO.
,.L
(D
1
2
3
4
5
6
7
8
9
10
11
12
13
14
15
16
17
18
19
20
21
22
23
24
25
26
27
28
29
30
31
PART
NO.
131696
166860X479
161105X479
132001
63601
131959
66426
74780512
154132
165754
162778
750097
86899X004
136376
51793
147286
165946)(479
17600406
167132)(004
167133X004
16,5858
168360X004
166875
751153
166236X479
166243x479
851856
152124
160835X007
19112222
165760
DESCRIPTION
ControlBar
UpperHandle
LowerHandle
RopeGulde
Locknut1/4-20
HandleBolt
Wire'lle
Hex BaR5/16-18 x 3/4
HingeBracket
MulcherDoor
EngineZoneControlCable
Hex Washer Head Screw#10-24 x 1/2
Up-Stop Bracket
HandleKnob
HairpinCotter
HingeRod
SupportBracket
Screw
Axle Arm Assembly- LF
Axle Arm Assembly- RF
Rear Skirt
SelectorSpring
Rear Door AssemblyKit (Incl.Spdngs)
Looknut5/16-18
Handle BracketAssembly(Left)
Handle BracketAssembly(Right)
Screw 1/4-20 x 3/8
HingeSpring
Wheel AdjustingBracket- Front
Spacer
Clipon DischargeGuard
KEY
NO.
PART
NO.
33
34
35
36
37
38
39
4O
41
42
43
44
45
46
47
48
49
50
51
52
53
54
55
56
57
58
67
68
87877
167130X004
166785
160828
151162
164362
83923
77400
88652
165766
165767
165912
150406
107339X
63124
167131X004
151161
57143
73990500
167712
851084
85O263
851074
165833
851514
161551
167710
165755
7 0
......
- - -
162300
172322
DESCRIPTION
SelectorKnob
Axle Arm Assembly- LR
Locknut5/16-18
ShoulderBall 5/16-18
WheelAssembly
ShoulderBolt
FlangedLocknut
Hubcap
HingeScrew
Spring(LH)
Spdng(RH)
Door Bolt
Hex Head Thread RollingScraw3/8-16 x 1
DangerDecal
Nut
Axle Arm Assembly- RR
Wheel
WaveWasher
Nut
HousingAssembly(Incl. Ref. #17, 18 & 46)
Hex Head Screw3/8-24 x 1-3/8 Grd.8
HelicalLockwasher
HardenedWasher
21" Blade
BladeAdapter
AdjustmentBolt
Grass Bag
CatchorFrame
Engine- (See Breakdown)
Bdggs& Stratton12H802-2675-B1
WarningDecal(Not Shown)
Owner'sManual
BRIGGS & STRA'I-rON
4-CYCLE ENGINE
MODEL NO. 12H802
TYPE NO. 2675-B1
968
6O6
971A
967
529
621
•
9-]4
l
%
I
I
124
634
130
127
617
2O
BRIGGS & STRATTON
4-CYCLE ENGINE
MODEL NO. 12H802
TYPE NO. 2675-B1
32
24
592_
461
20
572
22
3_7
383
3O6
lit REQUIRES SPECIAL TOOLS
TO INSTALL. SEE REPAIR
INSTRUCTION MANUAL.
21
BRIGGS & STRATTON
4-CYCLE ENGINE
_)
MODEL NO. 12H802
TYPE NO. 2675-B1
670A
8420
524 (_
358 GASKET
SET
I
104
110
634
977 CARBURETOR
110
134
617
GASKET
617
SET
I
1095 VALVE OVERHAUL
GASKET SET
127
121 CARBURETOR
°
634
KIT
BRIGGS & STRATTON
4-CYCLE ENGINE
MODELNO. 12H802
TYPENO. 267S.B1
930
334
55
23
BRIGGS & STRATTON
4-CYCLE ENGINE
KEY
NO.
1
2
3
4
5
7
8
9
9A
10
11
12
13
15
16
20
22
PART
NO.
493260
399269
299819
493279
214368
272916
495786
272481
272238
94650
231933
272198
94547
94720
498565
94388
399781
94220
94612
23
24
25
492177
222698
499429
26
499430
499431
499432
499425
27
28
29
32
33
34
35
40
45
499426
499427
499428
263190
499423
499424
94699
262651
262652
262224
93312
262204
MODEL NO. 12H802
TYPE NO. 2675-B1
KEY
NO.
DESCRIPTION
Cylinder Assembly
Bushing, Cylinder
*
Seal, Oil
Sump, Engine
Head, Cylinder
.... Gasket, Cylinder Head
Breather Assembly
.... Gasket, Valve Cover
* Gasket, Baffle Plate
Screw, Hex Head
Tube, Breather
°
Gasket, Crankcase
Screw, Cylinder Head
Plug, Oil Drain
Crankshaft
Timing Gear Key
*
Seal, Oil
Screw, Hex Head
Screw, Hex Head
_Used in Hole Nearest
reather)
Flywheel
Key, Flywheel
Piston Assembly, Standard
Size
Piston Assy. (.010" O.S.)
Piston Assy. (.020" O.S.)
Piston Assy. (.030" O.S.)
Ring Set, Piston, Standard
Size
Ring Set (.010" O.S.)
Ring Set (.020" O,S.)
Rin_ Set (.030" O.S.)
LOCK,Piston Pin
Pin, Piston, Standard Size
Rod, Connectin_g
Screw, Connecting Rod
Valve, Exhaust
Valve, Intake
Spdng, Valve
Retainer, Valve Spring
Tappet, Valve
PART
NO.
DESCRIPTION
46
47
51
54
55
56
58
498275
493737
272199 *
94526
4974420
498144
280399
Gear, Cam
Slinger, Oil
Gasket, Intake Elbow
Screw, Hex Head
Housing, Rewind Starter
Pulley, Rewind Starter
Rope, Rewind Starter
(Cut To 88-5/8")
Grip, Starter Rope
Screw, Phillips
LOCk,Muffler Screw
Screw, Round Head
_, Pin, Float Hinge
Gasket, Sealing (Sold in Kit
Only)
Jet, Main
Carburetor Kit
Screw, Carburetor Mounting
Carburetor
** Plug, Welch (Sold in Kit Only)
Valve, Throttle
Shaft, Throttle
Float, Carburetor
Valve, Inlet (Includes Seat)
--'. Gasket, Bowl (Sold in Kit
Only)
* Gasket, Air Cleaner
Hose, Fuel
Screw, Hex Head
Screw, Hex Head
Link, Govemor
Spdng, Governor
60
65
81
95
104
110
281434
94696
223664
94098
231371
---
117
121
124
125
127
130
131
133
134
137
494870
498260
94525
498170
- -224908
493267
398187
398188
---
163
187
188
188A
202
209
272653
492790
398540
94644
262579
263044
Included in Gasket Set (49"1316)
**
Included in Carburetor Kit (498260)
°**
Included in both Carburetor Kit (498260),
and Carburetor Gasket Set (498261)
....
Included in both Gasket Set (497316),
and Valve overhaul Gasket Set (498528).
NOTE: All component dimensions given In U.S.
inches 1 inch = 25.4 mm
24
MODEL NO. 12H802
TYPE NO. 2675-B1
IBRIGGS & STRATTON
4-CYCLE ENGINE
KEY
NO.
PART
NO.
DESCRIPTION
227 492349
230 67072
256 94512
284 94511
300 497838
304 493293
305 94744
306 224324
307 94515
332 94877
333 802574
334 94731
337 802592
366 497833
358 497316
363 19069
393 89838
387 496115
455 225121
456 281503
459 281505
461 94943
515 263073
523 495264
524 280393 *
525 495265
529 281299
562 94852
572 224326
592 231082
601 93053
606 224815
608 497680
includes:
94904
94908
613 94231
615 94474
616 263175
617 270344
620 499135
621 396847
625
497465
634
---
Lever, Governor
Washer, Thrust
Screw, Hex Head
Screw, Hex Head
Muffler, Exhaust
Housing, Blower
Screw, Seres
Shield, Cylinder
Screw, Hex Head
Nut, Flywheel
Armature, Magneto
Screw, Seres
Plug, Spark
Wire, Ground
Gasket Set
Puller, Flywheel
Wrenchl Spark Plug
Primer, Carburetor
Cup, Starter
Retainer, Starter
Pawl, Rachet
Screw, Shoulder
Spring, Retainer
Cap, Oil Filler
Seal, Filler Tube
Tube, Oil Fill
Grommet
Bolt, Governor Lever
Baffle, Cylinder
Nut, Hex
Clamp, Hose
Strap, Bracket
Starter, Rewind
Screw, Hex
NUt, Hex
Screw, Hex Head
Fastener
Crank, Governor
*** Seal, Intake Elbow
Bracket, Carburetor
Switch, Stop
Tube, Fuel Intake
*'* Washer, Shaft (Sold in Kit
Only)
KEY
NO.
PART
NO.
DESCRIPTION
635
670
670A
741
842
843
847
851
869
870
871
66538
Elbow, Spark Plug
280512
Spacer,Fuel Tank
493823 * Spacer, Bracket
262598 °
Gear, Timing
280966 * Seal, O-Ring
272616
Sleeve, Lever
495263
Tube Assembly, Oil
493880
Terminal, Ignition Cable
213512
Seat, Intake Valve
213513
Seat, Exhaust Valve
262001
Guide, Exhaust Valve
63709
Guide, Intake Valve
922 262640
Spdng, Brake
923 493442
Brake Assembly
930 497233
Guard, Finger
957 397974
Cap, Fuel Tank
966 496116
Base, Air Cleaner
967 491588
Filter, Air
968 281340
Cover, Air Cleaner
969 94872
Screw, Hex Head
971 94873
Screw, Hex Head
971A 94749
Screw, Hex Head
972 495224
Tank, Fuel
975 493640
Bowl, Float
977 498261
Gasket Set, Carburetor
1019 494256
Label Kit, Emission
1095 498258
Gasket Set, Valve Overhaul
2500 12J802-2915
Replacement Engine
_ m 498826
Replacement Shortblock
RPM Settings:
*
Low: 1900-2100;
High: 3000-3200
Included in Gasket Set (497316)
**
Included in Carburetor Kit (498260)
***
Included in both Carburetor Kit (498260),
and Carburetor Gasket Set (498261)
....
Included in both Gasket Set (497316),
and Valve overhaul Gasket Set (498528).
NOTE:
inches
25
All component dimensions given In U.S.
1 inch = 25.4 mm
NOTES
NOTES
27
NEED A PART?
SEARS HAS ACCESS
WHETHER
TO OVER 800,000 PARTS
IT'S A SPARK PLUG OR LAWNMOWER
SEARS PARTS AND SERVICE
BLADE.
CAN SUPPLY YOU WITH
TOP QUALITY REPAIR PARTS FOR ALL YOUR PRODUCTS.
JUST CALL ONE OF THE FOLLOWING NUMBERS TO PLACE YOUR
ORDER.
IF CALLING
REGINA-566-5124
LOCALLY:
MONTREAL-
333-5740
TORONTO- 744-4900
HALl FAX - 454-2444
KITCHENER-
OTTAWA- 738-4440
894-7590
VANCOUVER-
420-8211
ALL OTHER AREAS CALL 1-800-665-4455
172322
12.03.99
VB
Pdnted in U.S.A.