1
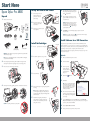
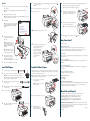
Start Here
Epson Stylus Pro 4880
1
Unpack
1
Make sure you have these items:
2
3
Printer
Power cord
hook
Quick
Reference
Guide
6 After installing all 8 cartridges, lower the ink levers.
Set Up and Turn On the Printer
®
Printer Guide
Connect the power cord to the
AC inlet on the back of the
printer. (Do not connect the
printer cable yet.)
The printer begins charging the ink delivery system
and the pause light flashes.
AC inlet
7 After approximately 2 minutes, ink lever messages
appear on the LCD. Follow the instruction to raise
or lower the ink levers.
Caution: Charging takes about 8 minutes. Never turn
off the printer, open the cover, remove the rear cover,
release the paper lever, or remove the ink cartridges or
maintenance tank while the pause light is flashing, or
you may damage the printer.
Plug the other end of the power
cord into a properly grounded
electrical outlet.
Insert the paper tray into the slots at the
front of the printer.
8 When READY appears on the LCD display, charging is complete. Close the ink
compartment covers.
Caution: Always turn off the printer using the
power button. Then wait until the LCD display
turns off. This ensures that the print head is safely capped.
Ink cartridges
Black ink
conversion
cartridges
CD-ROM
Limited Warranty
Install Software for a USB Connection
Install Ink Cartridges
1
Paper tray
Spindle adapters
(attached to spindles)
Press the
power button to turn on the printer.
Roll paper spindle
Power button
Your printer software works with Windows Vista,® Vista x64, Windows® XP, XP Professional x64
Edition, and Macintosh® OS X 10.4.9 or higher, or 10.5 or higher. If you are using the USB interface,
follow the steps below to install the printer software. If you are using the Ethernet interface, follow the
steps in Chapter 1 of the Printer Guide to configure the printer and install the software.
When you’re finished installing software, update the printer firmware if necessary. See chapter 1 of the
Printer Guide for instructions.
Warning: The printer weighs about 88.6 pounds (40.2 kg) without ink or paper and should be
lifted and moved by two people.
Note: Do not open ink cartridge packages until you are ready to install the ink. Cartridges are
vacuum packed to maintain reliability.
2 Press both ink compartment covers to open them.
2Remove all the packing materials and tape. Check carefully for all the tape inside and
Macintosh
1
Make sure your Macintosh and printer are turned on.
2
Connect the USB cable.
outside the printer. Save the box and packaging in case you need to ship the printer.
3Remove the two screws and the carriage retainer bracket.
3Insert the Epson Stylus
3
Pro 4880 printer CD.
If necessary, double-click
the Epson CD-ROM
desktop icon.
Raise both ink levers.
4
Double-click the
5
Click Install.
4Unlock the print head carriage by pulling the green tab to the left. Do not remove the tab.
4 Remove each ink cartridge from its package and gently shake
the cartridge.
ote: The first time you install ink cartridges, the printer uses
N
some ink to charge the printing system, so print yields may be
lower with the first cartridges. Subsequent ink cartridges will last
6
for their full rated life.
5 Install the ink cartridges in the printer. Hold each
cartridge with the arrow pointing toward the printer,
then insert it into its slot. Make sure you insert each
cartridge in the correct slot.
Caution: Do not push the green tab down or you may break it.
7
Epson icon.
Note: If you see a message that the installer has
detected an older version of EpsonNet Config on
your system, you must uninstall the older version
before you can install the new one. To uninstall,
drag the EpsonNet folder to the trash. Then
reinstall your printer software.
Follow the on-screen instructions to install all
the necessary software and manuals, and place a
link to the Epson Professional Imaging Website
on your desktop.
Open the Applications folder, then open the Utilities folder. Open the Printer Setup
Utility and click the Add icon at the top of the printer list window. (If you see a message that
you have no printers available, click Cancel.)
8Select the Stylus Pro 4880 and click Add.
9
Close the printer list and any open windows, then eject the CD.
7 Make sure the printer is powered on and ready. Press the
Windows
1Make sure your computer and printer are turned on but the printer is NOT CONNECTED
to your computer.
2
or
8
paper source button until the
roll paper icon appears.
Place the paper all the way back, against the right side of the tray.
Don’t load paper above the arrow mark inside the edge guide.
Raise the roll paper support on top of the paper tray cover.
Paper guide
5 Adjust the paper tray and edge guide according
9 Release the paper lever.
Note: If you see a Found New Hardware Wizard screen, click Cancel and disconnect the
USB cable.
4 Load the sheets in portrait orientation, with the whiter or glossier printable side face down.
to the paper size. For small sheets, raise the paper
guide and move it to the edge of the stack.
Insert the Epson Stylus Pro 4880 printer CD.
Note: With Windows Vista, if you see the AutoPlay window, click Run Epsetup.exe. When you see
the User Account Control screen, click Continue.
3Click Install.
6 Flip down the paper guide roller, then replace the
Note: If you see message asking if you want to install
or run various installation programs, select Continue,
Continue Anyway, or Install this driver software
anyway.
paper tray cover and adjust its length.
Note: Make sure the roll paper support is not raised.
10 Hold both sides of the paper and feed into the slot.
7
4When you see a window asking you
to connect the printer, connect the
USB cable.
Note: With Windows XP, if you see a
Found New Hardware Wizard screen
after you connect the printer, select No,
not this time and click Next. Then click
Next again.
Quick Reference Guide
until it is aligned with the OTHERS
mark on the paper tray cover.
Align the right edge with the
vertical mark on the right side
of the tray cover. Then return
the paper lever to the secured
position and close the roll
paper cover.
ote: If installation doesn’t continue
N
after a moment, make sure you securely
connected and turned on the printer.
Keep this book handy for instructions on loading paper, replacing ink cartridges and other
components, checking and aligning the print head, and what to do when you see a printer error
message. You can hang it on the side of your printer by using the included hook.
Printer Guide
Basic steps for using your printer. See Chapter 1 to install the printer software if you are connecting the
printer on a network.
OTHERS
Load Roll Paper
Load Cut Sheet Paper
1 Slide the black paper stop off the end of the spindle.
Tab
If the paper has a 2-inch core, remove the adapters by pressing the four tabs.
ote: Make sure your hands are clean, and avoid touching the printable
N
surface of the paper. Try to handle paper by the edges. Make sure you don’t rub
or scratch the coating or dent the edges of the paper.
Double-click the Epson Network Guide desktop icon for instructions on configuring the printer
for a network.
On-screen help with your software
Note: Some paper types cannot be used with the paper tray. You need to load them through the front or
rear manual feed slots. See the Printer Guide for details.
Epson Technical Support
it onto the spindle.
Remove the paper tray cover and flip up
the paper guide roller.
Note: If your paper size is A3 or larger,
pull out the paper tray.
S lide the black paper stop back onto the spindle. Insert it firmly into
the end of the roll.
Roll paper cover
Select Help or ? when you’re using your software.
Internet Support
epson.com/support
Epson PreferredSM Limited Warranty Plan
(888) 377-6611. Make sure you have your Epson Preferred Unit ID number. If you have any difficulty
with this service, call (562) 276-1305. You can purchase a one- or two-year extended service plan
through your Epson authorized reseller or from Epson.®
Need Ink and Paper?
Open the roll paper cover.
2
with the black end on the left.
On-screen Network Guide
When you are ready to print on cut sheet paper, make sure you release the paper lever and wind up the
roll paper. Then return the paper to the secured position and close the roll paper cover. Also, make sure
you lower the roll paper support on the paper tray.
1
3 Position the roll so the paper unwinds as shown, then slide
6 Place the paper and spindle in the printer as shown,
On-screen User’s Guide
Double-click the ESP4880 User’s Guide desktop icon for easy access to Epson Stylus Pro 4880
information.
6When you’re done, click Exit and remove the CD.
5
cut sheet icon.
Look here for answers:
11 Feed the paper all the way through the printer
to install all the necessary software
and manuals, and place a link to the
Epson Professional Imaging Website on your desktop.
4
paper source button until you see the
Any Questions?
5Follow the on-screen instructions
2
Press the
Slide the edge guide all the way to the left.
For the best prints, use genuine Epson ink and paper. You can purchase them from an
Epson Professional Imaging authorized reseller. To find the nearest reseller visit
www.proimaging.epson.com (U.S. sales), www.epson.ca (Canadian sales),
or call 800-GO-EPSON (800-463-7766). Or you can also purchase online at
www.proimaging.epson.com (U.S. sales) or www.epson.ca (Canadian sales).
Epson and Epson Stylus are registered trademarks and Epson Exceed Your Vision is a trademark of Seiko Epson Corporation.
Epson Preferred is a service mark of Epson America, Inc.
Paper source button
3 Thumb through a stack of
paper, then gently tap it on a
flat surface to even the edges.
General Notice: Other product names used herein are for identification purposes only and may be trademarks of their respective
owners. Epson disclaims any and all rights in those marks.
The contents of this sheet are subject to change without notice.
© 2007 Epson America, Inc. 9/07
Printed in USA
CPD-24504