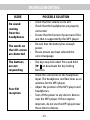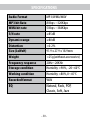
1
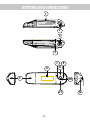
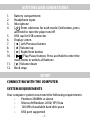
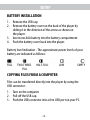
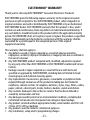
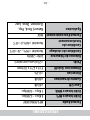
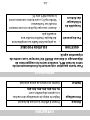
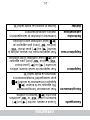
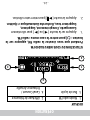
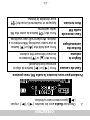
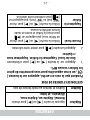
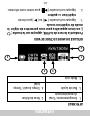
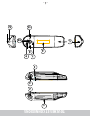
4GB MP3 PLAYER
INSTRUCTION MANUAL
EAMP100
Thank you for your purchase of this Electrohome product. Please read this instruction
manual carefully before using product to ensure proper use.
Keep this manual in a safe place for future reference.
www.electrohome.com
SAFETY AND WARNINGS
IMPORTANT INFORMATION
SAFETY
• Be sure not to short-circuit the terminals of the player
with other metallic objects.
• When using a neck strap, be careful to avoid hooking it
on objects that you pass by.
INSTALLATION
• Never use the player where it will be subjected to
extremes of light, temperature, moisture or vibration.
• Never leave the player exposed to high temperatures,
such as in a car parked in the sun or under direct sunlight.
HEADPHONE USE
ROAD SAFETY
Do not use the headphones while
driving, cycling or while operating
any motorized vehicle. It may create
a traffic hazard and is illegal in many
areas. It can also be potentially
dangerous to play at a high volume
while walking, especially at pedestrian
crossings. You should exercise
extreme caution or discontinue use in
potentially hazardous situations.
-2-
SAFETY AND WARNINGS
PREVENTING HEARING DAMAGE
Avoid using the headphones at a
high volume. Hearing experts advise
against continuous, loud and extended
play. If you experience a ringing
in your ears, reduce the volume or
discontinue use.
CLEANING
• Clean the player's case with a soft cloth, such as an
eyeglass cleaning cloth.
• if the player's case becomes very dirty, clean it with a soft
cloth slightly moistened with water or a mild detergent
solution.
• Do not use any type of abrasive pad, scouring powder
or solvent such as alcohol or benzene as it may mar the
finish of the case.
• Clean the headphone plug periodically.
• Be careful not to let water get into the player from the
opening near the connector.
-3-
TABLE OF CONTENTS
SAFETY AND WARNINGS................................................ 2
FEATUREs.................................................................... 5
What’s Included........................................................ 5
Buttons and Connections........................................ 6
SetUP.......................................................................... 7
CONNECTING WITH THE COMPUTER....................................7
BATTERY INSTALLATION......................................................8
COPYING FILES FROM A COMPUTER....................................8
Operation.................................................................10
TURNING THE MP3 PLAYER ON/OFF.................................. 10
ADJUSTING THE VOLUME .................................................. 10
UNLOCKING ALL BUTTONS................................................ 10
ENTERING THE MAIN MENU.............................................. 11
LISTENING TO MUSIC......................................................... 12
MANAGING AUDIO FILES................................................... 15
VOICE RECORDING AND PLAYING...................................... 16
MANAGING VOICE FILES.................................................... 21
FM RADIO.......................................................................... 22
FOLDER NAVIGATION......................................................... 26
CHANGING THE PLAYER SETTINGS.................................... 26
TROUBLESHOOTING.....................................................28
SPECIFICATIONS..........................................................30
FCC STATEMENT ..........................................................31
notes.........................................................................32
ELECTROHOME WARRANTY..........................................33
-4-
FEATURES
• Store up to 1,000 songs with 4GB of memory.
• Integrated high speed USB 2.0 connector for easy drag
and drop of files.
• Compact size and versatile functions supporting MP3,
WMA, WAV files, USB storage device, digital voice recorder,
lock function and equalizer settings.
• Enjoy 10 hours of continuous playback.
• Listen to your favorite FM radio stations while on-the-go.
WARNING: ALL PACKING MATERIAL SUCH AS TAPE, PLASTIC SHEETS, WIRE TIES
AND TAGS ARE NOT PART OF THIS ITEM AND SHOULD BE DISCARDED
FOR YOUR CHILD’S SAFETY.
NOTE: PLEASE KEEP THIS INSTRUCTION MANUAL, AS IT CONTAINS
IMPORTANT INFORMATION.
WHAT'S INCLUDED
•
•
•
•
•
4GB MP3 Player with Integrated USB connection
Earphones
AAA battery
Instruction Manual
Lifetime Live Customer Support
-5-
BUTTONS AND CONNECTIONS
1
2
4
3
7
6
8
5
9
10
11
-6-
12
BUTTONS AND CONNECTIONS
Battery compartment
Headphone input
Microphone
[ ] Enter submenu for each mode; Exit button; press
and hold to turn the player on/off
5. USB cap for USB connector
6. Display screen
7. [► ] Left/Previous button
8. [ ] Volume up
9. [ ►] Right/Next button
10. [ ►| | ]Play/Pause button; Press and hold to enter the
main menu or unlock all buttons
11. [ ] Volume down
12. Neck strap
►
1.
2.
3.
4.
►
SETUP
CONNECTING WITH THE COMPUTER
SYSTEM REQUIREMENTS
Your computer system must meet the following requirements:
• Pentium 200MHz or above
• Microsoft Windows 2000/ XP/Vista
• 120 MB of available hard disk space
• USB port supported
-7-
SETUP
BATTERY INSTALLATION
1. Remove the USB cap.
2. Remove the battery cover on the back of the player by
sliding it in the direction of the arrow as shown on the player.
3. Insert one AAA battery into the battery compartment.
4. Push the battery cover back into the player.
Battery level indication - The approximate power levels of your
battery are indicated as follows:
FULL
TWO-THIRDS
FULL
HALF-FULL
LOW
EMPTY
COPYING FILES FROM A COMPUTER
Files can be transferred directly into the player by using the
USB connector:
1. Turn on the computer.
2. Pull off the USB cap.
3. Push the USB connector into a free USB port on your PC.
-8-
SETUP
4.
5.
6.
The computer system will detect "New hardware" and
will begin to install the driver automatically. Wait for the
system to finish the installation. When it has finished,
a new "Removable Disk" will be created in "My Computer".
Drag and drop the files on your computer to the
"Removable Disk".
To disconnect the MP3 player from the computer, double
click the Safely Remove Hardware icon on the task
bar. Click the USB Mass Storage Device, and then click
OK. You can then unplug the MP3 player safely.
Note: Please do not disconnect the MP3 player from
the computer during file transferring. It may cause a
malfunction of the MP3 player and of the files.
-9-
OPERATION
TURNING THE MP3 PLAYER ON/OFF
Make sure the battery is charged and the headphones
are connected.
1. Press and hold the [ ] button to turn the MP3 player
ON.
2.
To turn OFF the MP3 player, press and hold the [ ]
button.
ADJUSTING THE VOLUME
►
2.
To increase the volume, press the [ ] button while
playing music.
To decrease the volume, press the [ ] button while
playing music.
►
1.
UNLOCKING ALL BUTTONS
All the buttons will on the MP3 player will automatically
lock when not in use (length of time can be pre-set in SETUP
menu). This prevents you from accidentally pressing a button
while using the MP3 player on the move.
•
Press and hold the [ ►|| ] button to unlock all of the
buttons.
- 10 -
OPERATION
ENTERING THE MAIN MENU
2.
3.
Press and hold the [►||] button to enter the main
menu while in STANDBY
► or PLAY mode.
Press the [ ] or [ ] button to select: Music, Record,
Voice, Radio, Folder and Setting.
Press the [►||] button to enter the desired setting.
►
1.
MAIN MENU ITEMS
DESCRIPTION
Music
Play music tracks
Record
Voice recording
Voice
Listen to voice recordings
Radio
Listen to FM radio; FM recording
Folder
View folders
Setting
Customize the MP3 settings
- 11 -
OPERATION
LISTENING TO MUSIC
PLAYING MUSIC
Make sure the battery is charged and the headphones
are connected.
1.
Access MAIN MENU.
2.
Select music with [►]/[►]. Press [ ►|| ].
- 12 -
OPERATION
►
- 13 -
►
While music is playing, you can:
• Pause/Resume Playing: Press [►||] button to pause
playing. To resume, press [►||] button again.
• Skipping Tracks: Press [►] or [►] button to skip to
previous/next track.
• Searching: Press and hold [►] button to fast rewind
within a track; Press and hold [►] button to fast
forward within a track.
• Adjust Volume: Press [ ] or [ ] button to increase/
decrease the volume.
• Power off: Press and hold [ ] button to power off
the player.
OPERATION
DISPLAY
1. Bit rate
2. File name
3. Battery status
4. Tracknumber/Total tracks
5. Music repeat mode
6. Time elapsed/Total time
4
5
1
6
3
2
- 14 -
OPERATION
SET MUSIC PLAYING MODE
While the music is playing, press the [ ] button, there
will pop up a window for you to set the music repeat
mode, equalizer and tempo rate.
1. Press the [►] or [►] button to select from Repeat,
Equalizer, Exit.
2. Press [►||] button to enter.
Repeat
Use [►] or [►] button to select from:
Normal, Repeat One, Repeat All,
Random, and Intro.
Equalizer
Use [►] or [►] button to select from:
Natural, Rock, Pop, Classic, Soft, Jazz.
Exit
Exit and return to music playing mode.
MANAGING AUDIO FILES
While the music is stopped, press the [ ] button,
there will pop up a window for you to manage the MP3
audio files.
1.
Press the [►] or [►] button to select from Local
folder, Delete file, Delete all and Exit.
2.
Press [►||] button to enter.
- 15 -
OPERATION
Local folder
Use [►] or [►] button to select an
audio file or a folder, and then press
[►||] button to select the file and enter
music playing mode.
Delete file
Use [►] or [►] button to select "YES"
or "NO", and then press [►||] button
to confirm.
Delete all
To delete all files stored in the local folder,
use [►] or [►] button to select "YES"
or "NO", and then press [►||] button
to confirm.
Exit
Exit and return to music playing mode.
VOICE RECORDING AND PLAYING
RECORDING A VOICE
1.
Access MAIN MENU by pressing and holding [►||].
- 16 -
OPERATION
2.
Select Record with [►] / [►] then [►||]. Press
[►||] to start recording.
While recording a voice you can:
Pause/Resume
recording
Save the
recording
Power off
Press [►||] button to pause
recording. To resume recording,
press [►||] button again.
Press and hold [►||] button to
save the recording.
Press and hold [ ] button to
save the recording and power off
the player.
- 17 -
OPERATION
DISPLAY
1. Recording Number/Total
recordings
2. File name
3. Battery status
4. Time elapsed/Total time
5. Recording mode
4
5
1
3
2
PLAYING A VOICE
1.
Access MAIN MENU by pressing and holding [►||].
- 18 -
OPERATION
2.
Select Voice with [►] / [►] then [►||]. Press [►||]
to start recording.
While playing a voice you can:
Pause/Resume
recording
Press [►||] button to pause playing.
To resume playing, press [►||] button
again.
Skipping Tracks Press [►] or [►] button to skip to
previous/next track.
Adjust Volume
Press the [ ] or [ ] button to
increase/decrease the volume.
Power off
Press and hold [ ] button to power
off the player.
►
Press and hold the [►] button to fast
rewind within a track; Press and hold
the [►] button to fast forward within
a track.
- 19 -
►
Searching
OPERATION
DISPLAY
1. Recording Number/Total
recordings
2. File name
3. Battery status
4. Time elapsed/Total time
5. Voice mode
4
5
1
3
2
SET VOICE PLAYING MODE
While the voice is playing, press the [ ] button, there
will pop up a window for you to set the voice repeat
mode.
1. Press the [►] or [►] button to select from Repeat
and Exit.
2. Press [►||] button to enter.
- 20 -
OPERATION
Repeat Use [►] or [►] button to select from:
Normal, Repeat One, Repeat All,
Random, and Intro.
Exit
Exit and return to voice playing mode.
MANAGING VOICE FILES
While the voice is stopped, press the [ ] button, there
will pop up a window for you to manage the MP3 voice
files.
1.
Press the [►] or [►] button to select from Local
folder, Delete file, Delete all and Exit.
2.
Press [►||] button to enter.
Local folder Use [►] or [►] button to select a
voice folder, and then press the [►||]
button to open the voice folder.
Delete file Use [►] or [►] button to select
"YES" or "NO", and then press [►||]
button to confirm.
- 21 -
OPERATION
Delete all
Exit
To delete all files stored in the voice
folder, use the [►] or [►] button to
select "YES" or "NO", and then press
the [►||] button to confirm.
Exit and return to voice mode.
FM RADIO
LISTENING TO FM RADIO
IMPORTANT
Always connect your headphones to the HEADPHONE
INPUT. The headphone cable serves as the antenna
for the internal radio.
1.
Access MAIN MENU by pressing and holding [►||].
- 22 -
OPERATION
2.
Select Radio with [►] / [►] then [►||].
While listening to FM radio you can:
Adjust Volume
Press the [ ] or [ ] button to
increase/decrease the volume.
Auto Searching
Press and hold the [ ] or [ ] button
to start auto searching. When there is a
station, the player will stop searching.
FM Radio
submenu
Press the [ ] button to enter the FM
radio submenu.
Power off
Press and hold [ ] button to power
off the player.
- 23 -
►
►
►
Press [►] or [►] button to skip to
previous/next channel.
►
Skip Channels
OPERATION
DISPLAY
1. FM radio mode
2. Frequency Indicator
3. Battery status
4. Current Channel/Current
Frequency
4
1
3
2
USING THE FM RADIO SUBMENU
While listening to the FM radio, press the [ ] button to
enter FM radio submenu.
1. Press the [►] or [►] button to select from Save,
Record, Delete, Delete all, Auto Search and Exit.
2. Press the [►||] button to enter.
- 24 -
OPERATION
Save
To save a station, use the [►] or [►]
button to select "YES" or "NO", and then
press the [►||] button to confirm.
Record
To start FM recording, press [►||] button.
Press and hold the [►||] button to save the
recording and return to the FM radio mode.
Delete
To delete the current channel, use the [►]
or [►] button to select "YES" or "NO", and
then press the [►||] button to confirm.
Delete all
To delete all channels, use the [►] or [►
] button to select "YES" or "NO", and then
press the [►||] button to confirm.
Auto
Search
Starts searching and saving the stations
automatically.
Exit
Exit and return to FM Radio mode.
- 25 -
OPERATION
FOLDER NAVIGATION
In the file view mode, you can browse all of the files
stored in the MP3 player.
1.
Press and hold the [►||] button to access the main
menu.
2.
Use the [►] or [►] button to select FOLDER and then
press the [►||] button to browse all files.
3.
Use the [►] or [►] button to select a file and then
press the [►||] button to open files.
CHANGING THE PLAYER SETTINGS
The system settings let you customize and configure
your MP3 player.
1.
In STANDBY or PLAY mode, press and hold the [►||]
button to access the main menu.
2.
Use the [►] or [►] button to select SETTING, then
press the [►||] button to enter the setting mode.
- 26 -
OPERATION
1.
Press the [►] or [►] button to select a setting item,
then press the [►||] button to change the setting.
2.
Use the [►] or [►] button to select a value.
3.
Press the [►||] button to confirm your selection or press
the [ ] button to exit.
Backlight
Set up the backlight time of the LCD.
The available options include: 0S, 5S, 10S,
15S, 20S, 25S, 30S.
Language
Set up the display language.
Power Off
OFF time
Powers off automatically after
a certain time in PLAY mode.
The available options include:
0s,10s,20s,30s,40s,50s,60s
SLEEP
time
Powers off automatically after
a certain time in STANDBY
mode. The available options
include: 0m,10m,20m,
30m,40m,50m,60m,70m,
80m,90m,100,
110m,120m
- 27 -
OPERATION
Version
Allows you to view software version.
Lock
Set key locked time.
The available options include:
0s,10s,20s,30s,40s,50s,60s
Exit
Exit and return to the main menu.
TROUBLESHOOTING
For any issues regarding the operation of your MP3 player,
please follow the troubleshooting suggestions below
BEFORE sending it to an Authorized Repair Center.
ISSUE
Cannot power
on
Unable to
download
files
POSSIBLE SOLUTION
•
The battery power may be low or
depleted. Please install a new battery.
•
Check to be sure that the driver is installed
correctly on the computer.
Check that there is a good connection
between the MP3 player and the PC.
•
- 28 -
TROUBLESHOOTING
ISSUE
No sound
coming
from the
headphones
POSSIBLE SOLUTION
•
•
•
Check that the volume is not at 0.
Check that the headphones are properly
connected.
Ensure that the format of your music file is
one that is supported by the MP3 player.
•
The words on
the LCD screen
•
are distorted
Be sure that the battery has enough
power.
Please ensure you have selected the
correct language.
The buttons
are not
responding
•
The keys may be locked. Press and hold
[►||] to deactivate the key locking
function.
•
Check the connection of the headphone
input. The headphone cord functions as an
antenna for the MP3 player.
Adjust the position of the MP3 player and
headphones.
Turn off the power to any electric devices
near the MP3 player. If the reception
improves, do not use the MP3 player near
those electric devices.
Poor FM
reception
•
•
- 29 -
SPECIFICATIONS
Audio Format
MP3/WMA/WAV
MP3 bit Rate
8 Kbps ~320Kbps
WMA bit rate
5 Kbps ~384Kbps
S/N rate
≥85dB
Dynamic range
≥80dB
Distortion
<0.2%
Size (LxWxH)
91.9 x 27.9 x 18.9mm
Weight
<25g (without accessories)
Frequency response
20Hz~20KHz
Storage condition
Humidity <90%, -20~60°C
Working condition
Humidity <80%,0~45°C
Recorded format
WAV
EQ
Natural, Rock, POP,
Classic, Soft, Jazz
- 30 -
FCC STATEMENT
This device complies with part 15 of the FCC rules.
Operation is subject to the following two conditions:
(1) this device may not cause harmful interference, and
(2) this device must accept any interference received,
including interference that may cause undesired
operation.
This class B digital apparatus complies with Canadian ICES-003
WARNING:
This equipment has been tested and is found to comply with the limits for a Class
B digital device, pursuant to Part 15 of the FCC Rules. These limits are designed
to provide reasonable protection against harmful interference in a residential
installation. This equipment generates, uses and can radiate radio frequency
energy and, if not installed and used in accordance with the instructions, may
cause harmful interference to radio communications. However, there is no
guarantee that interference will not occur in a particular installation. If this
equipment does cause harmful interference to radio or television reception, which
can be determined by turning the equipment off and on, the user is encouraged to
try to correct the interference by one or more of the following measures:
• Reorient or relocate the receiving antenna
• Increase the separation between the equipment and receiver
• Connect the equipment into an outlet on a circuit different from that to which
the receiver is connected
• Consult the dealer or an experienced radio/TV technician for help
WARNING:
Changes or modifications not expressly approved by the party responsible for
compliance with the FCC Rules could void the user’s authority to operate
this equipment.
- 31 -
NOTES
- 32 -
ELECTROHOME® WARRANTY
Thank you for choosing ELECTROHOME® Consumer Electronics Products!
ELECTROHOME gives the following express warranty to the original consumer
purchaser or gift recipient for this ELECTROHOME product, when shipped in its
original container and sold or distributed by ELECTROHOME or by an Authorized
ELECTROHOME Dealer: ELECTROHOME warrants that this product is free, under
normal use and maintenance, from any defects in material and workmanship. If
any such defects should be found in this product within the applicable warranty
period, ELECTROHOME shall, at its option, repair or replace the product as specified
herein. Replacement parts furnished in connection with this warranty shall be
warranted for a period equal to the unexpired portion of the original
equipment warranty.
This warranty shall not apply to:
A. Any defects caused or repairs required as a result of abusive operation,
negligence, accident, improper installation or inappropriate use as outlined in
the owner’s manual.
B. Any ELECTROHOME product tampered with, modified, adjusted or repaired
by any party other than ELECTROHOME or ELECTROHOME’s Authorized Service
Centres.
C. Damage caused or repairs required as a result of the use with items not
specified or approved by ELECTROHOME, including but not limited to head
cleaning tapes and chemical cleaning agents.
D. Any replacement of accessories, glassware, consumable or peripheral items
required through normal use of the product including but not limited to
earphones, remote controls, AC adapters, batteries, stylus, trays, filters, cables,
paper, cabinet, cabinet parts, knobs, buttons, baskets, stands and shelves.
E. Any cosmetic damage to the surface or exterior that has been defaced or
caused by normal wear and tear.
F. Any damage caused by external or environmental conditions, including but
not limited to transmission line/power line voltage or liquid spillage.
G. Any product received without appropriate model, serial number and CSA /cUL
/cULus /cETL /cETLus markings.
H. Any products used for rental or commercial purposes.
I. Any installation, setup and/or programming charges
- 33 -
ELECTROHOME® WARRANTY
Should this ELECTROHOME product fail to operate during the warranty period,
warranty service may be obtained upon delivery of the ELECTROHOME product
together with proof of purchase and a copy of this LIMITED WARRANTY statement
to an Authorized ELECTROHOME Service Centre. In-home warranty service may be
provided at ELECTROHOME’s discretion on any ELECTROHOME television with the
screen size of 40” or larger. This warranty constitutes the entire express warranty
granted by ELECTROHOME and no other dealer, service centre or their agent or
employee is authorized to extend, enlarge or transfer this warranty on behalf of
ELECTROHOME. To the extent the law permits, ELECTROHOME disclaims any and
all liability for direct or indirect damages or losses or for any incidental, special
or consequential damages or loss of profits resulting from a defect in material
or workmanship relating to the product, including damages for the loss of time
or use of this ELECTROHOME product or the loss of information. The purchaser
will be responsible for any removal, reinstallation, transportation and insurance
costs incurred. Correction of defects, in the manner and period of time described
herein, constitute complete fulfillment of all obligations and responsibilities of
ELECTROHOME Electronics to the purchaser with respect to the product and shall
constitute full satisfaction of all claims, whether based on contract, negligence,
strict liability or otherwise.
1 YEAR PARTS & LABOUR WARRANTY PERIODS
To obtain the name and address of the nearest Authorized
ELECTROHOME Service Centre or for more information on this
warranty
• Contact ELECTROHOME Support by Email: [email protected]
• Visit www.ELECTROHOME.com
• Mail your inquiry to:
ELECTROHOME Customer Service,
4080 Montrose Road, Niagara Falls, ON L2H 1J9
• Call toll free 1-800-663-5954
ELECTROHOME is a registered trade-mark of Circus World Displays Limited. 09.2011
- 34 -
GARANTIE ELECTROHOME®
H. Tout appareil utilisé à des fins commerciales ou de location.
I. Tous les frais d’installation, d’ajustement et/ou de programmation.
Si cet appareil de marque ELECTROHOME devient défectueux au cours de la période
de garantie, une réparation peut être obtenue, conformément aux termes de cette
garantie, en présentant cet appareil ELECTROHOME avec la preuve d’achat originale et
une copie de cette GARANTIE LIMITÉE à un centre de service autorisé par ELECTROHOME.
Le service à domicile est effectué, à la discrétion de ELECTROHOME, aux téléviseurs de
marque ELECTROHOME dotés d’un écran de 40 pouces et plus. Cette garantie constitue
la garantie expresse entière accordée par ELECTROHOME et aucun autre détaillant, centre
de service ni leur agent ou employé est autorisé à prolonger, étendre ou transférer cette
garantie au nom de ELECTROHOME. Dans la mesure où la loi le permet, ELECTROHOME
désavoue toute responsabilité pour des dommages ou pertes directs et indirects, tous
dommages accessoires, particuliers ou consécutifs ou perte de profits résultant d’un
défaut de matériel ou de fabrication de cet appareil, incluant les dommages attribuables
à la perte de temps ou perte de l’utilisation de cet appareil ELECTROHOME ou de la perte
de données. Il incombe à l’acheteur de défrayer les coûts encourus pour l’enlèvement,
la réinstallation, le transport et l’assurance de cet appareil. La correction de toute
défectuosité, de la manière et dans les délais indiqués dans la présente, constitue
l’exécution complète de toutes les obligations et les responsabilités contractés par
ELECTROHOMEenvers l’acheteur à l’égard du produit et constituera un acquittement
complet de toutes les réclamations contractuelles ou attribuables à la négligence, et la
responsabilité absolue ou autre.
GARANTIE D’UN ANS POUR LES PIÈCES ET LA MAIN D’OEUVRE
Pour obtenir le nom et l’adresse du centre de service ELeCrohome autorisé
le plus près de chez vous ou pour plus de renseignements sur cette
garantie :
• Contactez le service de soutient ELECTROHOME par courriel:
[email protected]
Visitez www.ELECTROHOME.com
Postez votre demande à: ELECTROHOME service à la clientèle,
4080 Montrose Road, Niagara Falls, ON L2H 1J9
Composez le numéro sans frais: 1-800-663-5954
•
•
•
•
ELECTROHOME est une marque déposée de Circus World Displays Limited. 09.2011
- 33 -
GARANTIE ELECTROHOME®
Merci d’avoir choisi un produit électronique grand public ELECTROHOME®!
ELECTROHOME accorde la garantie expresse suivante à l’acheteur original de cet appareil
ELECTROHOME ou à la personne qui l’a reçu en cadeau, pourvu qu’il ait été expédié et
vendu ou distribué par ELECTROHOME ou un détaillant ELECTROHOME autorisé dans son
emballage original. ELECTROHOME garantit que cet appareil est exempt de tout défaut
de matériau et de fabrication dans des conditions d’utilisation et d’entretien normales. Si
un défaut est décelé dans ce produit pendant la période de cette garantie, ELECTROHOME
s’engage à le réparer ou, le cas échéant et à son entière discrétion, le remplacer. Les pièces
de rechange qui sont fournis dans l’exécution de cette garantie sont aussi couvertes par
la garantie pendant une période égale à la portion non échue de la garantie originale
de l’appareil.
Cette garantie ne couvre pas :
A. Les défectuosités ni les réparations résultant d’un usage abusif, d’une négligence,
d’un accident ou d’une installation inadéquate ou un usage inapproprié selon les
directives fournies dans le guide d’utilisation accompagnant l’appareil.
B. Les appareils de marque ELECTROHOME trafiqués, modifiés, réglés, ajustés ou réparés
par une entité autre que ELECTROHOME ou un centre de réparation autorisé par
ELECTROHOME.
C. Les dommages causés ni les réparations requises à l’appareil résultant de son
usage avec des composantes ou accessoires non recommandés ni approuvés par
ELECTROHOME, incluant, sans en exclure d’autres, les cassettes et/ou produits
chimiques de nettoyage.
D. Le remplacement d’accessoires ou de pièces de verre, consommables ou des éléments
périphériques nécessaires à une utilisation normale du produit, y compris mais pas
limité aux écouteurs, télécommandes, adaptateurs CA, piles, pointes de lecture,
stylets, plateaux, filtres, câbles, papier, boîtier, composantes de boîtiers, boutons,
paniers, supports et tablettes.
E. Tout dommage apparent à la surface ou au boîtier extérieur de l’appareil et
attribuable à la détérioration ou à l’usure résultant d’un usage normal.
F. Tout dommage causé par des conditions externes ou environnementales, y
compris mais pas limité aux lignes de transmission ou de transport d’énergie ou le
renversement de liquide.
G. Tout appareil ne portant pas les identifications appropriées quant aux numéros de
modèle et de série ni les étiquettes et attestations de l’ACNOR, de l’ULC, de l’ULI, de
l’ETL au Canada et aux États-Unis.
- 32 -
DÉCLARATION DE LA FCC
Le présent appareil répond aux normes prescrites
au chapitre 15 des règles édictées par la FCC. Son
fonctionnement est assujetti aux deux
conditions suivantes:
(1) cet appareil ne doit en aucun cas être la source
d’interférence préjudiciable, et
(2) il doit pouvoir fonctionner normalement en dépit
de l’interférence auquel il pourrait être soumis.
Cet appareil numérique de classe B est conforme à la norme Canadienne ICES-003.
AVERTISSEMENT:
Cette unité a été testée et il a été déterminé qu’elle se conforme aux normes
stipulées par l’article 15 des règlements de la FCC pour un appareil numérique de
catégorie B. Ces normes sont établies afin d’offrir une protection raisonnable contre
toute possibilité de brouillage préjudiciable dans une installation résidentielle.
Cette unité produit, utilise et peut émettre une énergie radioélectrique, et si elle
n’est pas installée et utilisée conformément aux instructions, pourrait causer un
brouillage préjudiciable à la radiocommunication. Il est toutefois impossible de
garantir qu’il n’y aura pas de brouillage préjudiciable dans une installation donnée.
Si cette unité cause un brouillage préjudiciable à la réception radio ou télévisuelle,
ce qui peut être déterminé en activant ou désactivant l’appareil, l’utilisateur est
encouragé à tenter de corriger le brouillage en prenant l’une ou plusieurs des
mesures proposées suivantes :
• Réorienter ou déplacer l’antenne de réception
• Augmenter la distance entre l’appareil et le récepteur
• Branchez l’appareil dans une prise de courant CA différente de celle utilisée
par le récepteur
• Consulter le revendeur ou un technicien spécialisé dans le service des radios/
téléviseurs pour obtenir de l’aide.
AVERTISSEMENT:
Tout changement ou toute modification n’étant pas autorisée de façon explicite
par l’organisme responsable de la conformité aux règles de la FCC est en droit de
refuser l’autorisation à l’utilisateur d'utiliser ce produit.
- 31
37 -
SPÉCIFICATIONS
Humidité <80%,0~45°C
Conditions de
fonctionnement
Humidité <90%, -20~60°C
Conditions de stockage
20Hz~20KHz
Réponse de fréquence
<25g (sans accessoires)
Poids
91.9 x 27.9 x 18.9mm
Dimensions (LxLxH)
<0.2%
Distorsion
≥80dB
Gamme dynamique
≥85dB
Taux S/N
5 Kbps ~384Kbps
Débit binaire WMA
8 Kbps ~320Kbps
Débit binaire MP3
MP3/WMA/WAV
Format Audio
Format d'enregistrement WAV
Égalisation
Naturel, Rock, Pop,
Classique, Doux, Jazz
- 30
38 -
DÉPANNAGE
• Vérifiez que le volume n'est pas à 0.
• Vérifiez que les écouteurs sont
correctement connectés.
• Soyez sûr que le format de votre fichier de
musique est un format reconnu par
le MP3.
Aucun son
n'est transmis
par les
écouteurs
SOLUTION POSSIBLE
QUESTION
•
Les mots sur
l'écran ACL
•
sont déformés
Les boutons
ne réagissent
pas
•
•
•
Mauvaise
réception FM
•
Soyez sûr que la pile a assez de puissance.
Veuillez vous assurer que vous avez
sélectionné la bonne langue.
Les touches peuvent être verrouillées.
Appuyez et maintenez [►||] pour
désactiver la fonction de verrouillage.
Vérifiez la connexion de l'entrée pour
écouteurs. Le cordon des écouteurs sert
d'antenne pour le lecteur MP3.
Ajustez la position du lecteur MP3 et des
écouteurs.
Éteindre le pouvoir aux appareils
électriques près du lecteur MP3. Si la
réception s'améliore, n'utilisez pas le
lecteur MP3 à proximité de ces appareils
électrique.
- 29
39 -
OPÉRATION
Quittez et revenez au menu principal.
Quitter
Réglez le temps le verrouillage des touches.
Les options disponibles sont:
0s,10s,20s,30s,40s,50s,60s
Verrouillage
Permet d'afficher la version du logiciel.
Version
DÉPANNAGE
DÉPANNAGE
Pour toute question concernant le fonctionnement de
votre lecteur MP3, veuillez suivre les suggestions de
dépannage ci-dessous AVANT de l'envoyer à un centre de
réparation agréé.
QUESTION
SOLUTION POSSIBLE
• Assurez-vous que le pilote est correctement
installé sur l'ordinateur.
• Vérifiez qu'il y a une bonne connexion entre
le lecteur MP3 et le PC.
Incapable de
télécharger
des fichiers
• La pile peut être faible ou complètement
déchargée. Veuillez installer une
nouvelle pile.
Pas de pouvoir
- 28
40 -
OPÉRATION
Press the [►||] button to confirm your selection or press
the [ ] button to exit.
3.
Use the [ ] or [►] button to select a value.
2.
Press the [ ] or [►] button to select a setting item,
then press the [►||] button to change the setting.
1.
►
►
Rétroéclairage
Mettre en place le temps de rétroéclairage de
l'écran ACL. Les options disponibles sont: 0S,
5S, 10S, 15S, 20S, 25S, 30S.
Langage
Régler la langue de l'affichage.
Hors tension
S'éteint automatiquement
après un certain temps
en mode VEILLE. Les
options disponibles sont:
0m,10m,20m, 30m,40m,50
m,60m,70m,80m,90m,100,
110m,120m
Temps
SOMMEIL
S'éteint automatiquement
après un certain temps
en mode LECTURE. Les
options disponibles sont:
0s,10s,20s,30s,40s,50s,60s
Temps
ARRÊT
- 27
41 -
OPÉRATION
NAVIGATION DE DOSSIERS
Dans le mode de visualisation de fichiers, vous pouve
parcourir tous les fichiers stockés dans le lecteur MP3.
Utilisez les touches [ ] ou [►] pour choisir un fichier et
appuyez sur [►||] pour ouvrir les fichiers.
3.
Appuyez sur la touche [ ] ou [►] pour sélectionner Fichier
puis appuyez sur [►||] pour parcourir tous les fichiers.
2.
Appuyez et maintenez le bouton [►||] pour accéder au Men
Principal.
1.
►
►
CHANGER LES PARAMÈTRES DU LECTEUR MP3
Les paramètres système vous permettent de personnaliser e
configurer votre lecteur MP3.
Appuyez sur la touche [ ] ou [►] pour sélectionner
PARAMÈTRES, et appuyez sur [►||] pour entrer dans le
mode de PARAMÈTRES.
2.
En Mode veille ou Lecture, appuyez et maintenez la touche
[►||] pour accéder au Menu Principal.
1.
►
- 26
42 -
OPÉRATION
Quittez et revenez au mode radio FM.
Quitter
Commence à chercher et sauvegarder les
stations automatiquement.
Recherche
automatique
Pour supprimer tous les canaux, utilisez la
touche [ ] ou [►] pour choisir "YES"
(oui) ou "NO" (non), puis appuyez sur
[►||] pour confirmer votre sélection.
Supprimer tous
Pour supprimer le canal courant, utilisez
la touche [ ] ou [►] pour choisir
"YES" (oui) ou "NO" (non), puis appuyez
sur [►||] pour confirmer votre sélection.
Supprimer
Pour commencer l'enregistrement
FM, appuyez sur le bouton [►||].
Appuyez et maintenez la touche [►||]
pour sauvegarder l'enregistrement et
retourner au mode radio FM.
Enregistrement
To save a station, use the [ ] or [►]
button to select "YES" or "NO", and then
press the [►||] button to confirm.
Sauvegarde
►
►
►
- 25
43 -
OPÉRATION
DISPLAY
4. Canal Courant /
Fréquence Actuelle
3. État de la pile
2. Affichage de fréquence
1. Mode radio FM
4
1
3
2
UTILISATION DU SOUS-MENU RADIO FM
Pendant que vous écoutez la radio FM, appuyez sur le
bouton [ ] pour entrer le sous-menu radio FM.
1. Appuyez sur la touche [ ] ou [►] pour sélectionner
Sauvegarde, Enregistrement, Supprimer,
Supprimer tous, Recherche Automatique et Quitter.
►
2. Appuyez la touche [►||] pour entrer votre sélection.
- 24
44 -
2.
OPÉRATION
Choisissez Radio avec les touches [ ] / [►] et puis
[►||] pour entrer votre sélection.
►
Pendant que vous écoutez la radio FM, vous pouvez:
Saut de canaux Press [ ] or [►] button to skip to
previous/next channel.
►
Press the [ ] button to enter the FM
radio submenu.
Sous-menu de
radio FM
Press and hold the [ ] or [ ] button
to start auto searching. When there is a
station, the player will stop searching.
Recherche
automatique
Press the [ ] or [ ] button to
increase/decrease the volume.
Régler le
volume
►
Appuyez et maintenez la touche [ ]
pour éteindre le lecteur.
Hors tension
►
►
►
- 23
45 -
OPÉRATION
Quittez et revenez au mode lecture de
fichiers vocaux.
Quitter
Pour supprimer tous les fichiers stockés
dans le dossier vocal, utilisez la touche [
] ou [►] pour choisir "YES" (oui) ou
"NO" (non), puis appuyez sur [►||] pour
confirmer votre sélection.
Supprimer
tous
►
FM RADIO
ÉCOUTER LA RADIO FM
IMPORTANT
Connectez toujours vos écouteurs à la prise pour écouteurs puisque
le câble des écouteurs sert d'antenne pour la radio interne.
1.
Appuyez et maintenez le bouton [►||] pour accéder au
Menu Principal.
- 22
46 -
OPÉRATION
Quittez et revenez au mode lecture de voix.
Quitter
Appuyez la touche [ ] ou [►] pour choisir:
Normal, Répète un, Répète tous,
Aléatoire, et Intro.
Répéter
►
GESTION DES FICHIERS DE VOIX
Pendant que la voix est arrêté, appuyez sur le bouton [
] , un écran apparaîtra pour vous permettre de gérer
les fichiers vocaux MP3.
Appuyez la touche [►||] pour entrer votre sélection.
2.
Appuyez sur la touche [ ] ou [►] pour sélectionner
Dossier local, Supprimer le fichier, Supprimer tous
et Quitter.
1.
►
Utilisez la touche [ ] ou [►] pour choisir
"YES" (oui) ou "NO" (non), puis appuyez sur
[►||] pour confirmer votre sélection.
Supprimer le
fichier
Utilisez la touche [ ] ou [►] pour choisir
un fichier vocal, puis appuyez sur [►||]
pour choisir le fichier et entrer en mode
lecture de fichiers vocaux.
Dossier local
►
►
- 21
47 -
OPÉRATION
AFFICHAGE
4. Temps écoulé / Temps
total
3. État de la pile
2. Nom du fichier
1. Enregistrements / Total
d'enregistrements
5. Mode voix
4
5
1
3
2
RÉGLAGE DU MODE LECTURE DE VOIX
Pendant la lecture de la VOIX, appuyez sur la touche [
], un écran apparaîtra pour vous permettre de régler le
mode de répétition vocale.
1. Appuyez sur la touche [ ] ou [►] pour choisir
répétition ou quitter.
►
2. Appuyez sur la touche [►||] pour entrer votre sélection.
- 20
48 -
2.
OPÉRATION
Choisissez Voix avec les touches [ ] / [►] et puis
[►||] pour entrer votre sélection. Appuyez sur [►||] pour
commencer L'enregistrement.
►
Pendant la lecture d'une voix, vous pouvez:
Appuyez et maintenez la touche [
pour éteindre le lecteur.
Hors tension
Appuyez la touche [ ] ou [ ] pour
augmenter / diminuer le volume.
Régler le volume
Appuyez et maintenez la touche [
] pour effectuer un retour rapide de la
piste; Appuyez et maintenez la touche
[►] pour effectuer l'avance rapide
d'une piste.
Recherche
Appuyez la touche [ ] ou [►] pour
passer à la piste précédente / suivante.
Saut de pistes
Appuyez la touche [►||] pour
interrompre l'enregistrement. Pour
reprendre l'enregistrement, appuyez la
touche [►||] à nouveau.
Pause / Reprendre
l'enregistrement
►
►
►
►
]
- 19
49 -
OPÉRATION
AFFICHAGE
4. Temps écoulé / Temps total
3. État de la pile
2. Nom du fichier
1. Enregistrements / Total
d'enregistrements
5. Mode d'enregistrement
4
5
1
3
2
LIRE UN ENREGISTREMENT VOCAL
1.
Appuyez et maintenez le bouton [►||] pour accéder au
Menu Principal.
- 18
50 -
2.
OPÉRATION
Choisissez Enregistrement avec les touches
[ ] / [►] et puis [►||] pour entrer votre sélection.
Appuyez sur [►||] pour commencer l'enregistrement.
►
Pendant l'enregistrement d'une voix, vous pouvez:
Appuyez et maintenez la touche
[ ] pour stocker l'enregistrement
et éteindre le lecteur.
Hors tension
Appuyez et maintenez la touche
[►||] pour stocker l'enregistrement.
Stocker
l'enregistrement
Appuyez la touche [►||] pour
interrompre l'enregistrement. Pour
reprendre l'enregistrement, appuyez
la touche [►||] à nouveau.
Pause /
Reprendre
l'enregistrement
- 17
51 -
OPÉRATION
Quittez et revenez au mode lecture de
musique.
Quitter
Pour supprimer tous les fichiers stockés
dans le dossier local, utilisez la touche [
] ou [►] pour choisir "YES" (oui) ou
"NO" (non), puis appuyez sur [►||] pour
confirmer votre sélection.
Supprimer
tous
Utilisez la touche [ ] ou [►] pour choisir
"YES" (oui) ou "NO" (non), puis appuyez sur
[►||] pour confirmer votre sélection.
Supprimer le
fichier
Utilisez la touche [ ] ou [►] pour choisir
un fichier audio ou un dossier, puis appuyez
sur [►||] pour choisir le fichier et entrer en
mode lecture de musique.
Dossier local
►
►
►
ENREGISTREMENT DE LA VOIX ET LECTURE
ENREGISTREMENT D'UNE VOIX
1.
Appuyez et maintenez le bouton [►||] pour accéder au
Menu Principal.
- 16
52 -
OPÉRATION
RÉGLAGE DU MODE LECTURE DE MUSIQUE
Pendant la lecture de la musique, appuyez sur la touche [ ],
un écran apparaîtra pour vous permettre de régler le mode de
répétition de musique, l'égaliseur et le niveau du tempo.
Appuyez la touche [►||] pour entrer votre sélection.
2.
Appuyez la touche [ ] ou [►] pour sélectionner
Répéter, Égaliseur ou Quitter.
1.
►
Quittez et revenez au mode lecture de
musique.
Quitter
Utilisez la touche [ ] ou [►] pour choisir:
Naturel, Rock, Pop, Classique, Doux, Jazz.
Égaliseur
Utilisez la touche [ ] ou [►] pour choisir:
Normal, Répète une, Répète tous,
Aléatoire, et Intro.
Répéter
►
►
GESTION DES FICHIERS AUDIO
Pendant que la musique est arrêtée, appuyez sur la touche
[ ] button, un écran apparaîtra pour vous permettre de gérer
les fichiers audio MP3.
Appuyez la touche [►||] pour entrer votre sélection.
2.
Appuyez la touche [ ] ou [►] pour sélectionner
Répéter, Égaliseur ou Quitter.
1.
►
- 15
53 -
OPÉRATION
AFFICHAGE
6. Temps écoulé/Temps total
5. Mode répétition de
musique
4. Numéro de piste/Total de
pistes
3. État de la pile
2. Nom de fichier
1. Débit binaire
4
5
6
1
3
2
- 14
54 -
OPÉRATION
Pendant la lecture, vous pouvez:
Hors tension: Appuyez et maintenez la touche [ ]
pour éteindre le lecteur.
•
Régler le volume: Appuyez sur la touche [ ] ou [ ]
pour augmenter / diminuer le volume.
•
Recherche: Appuyez et maintenez la touche [ ] pour
effectuer un retour rapide ; Appuyez et maintenez la
touche [►] pour effectuer l'avance rapide d'une piste.
•
Saut de pistes: Appuyez sur la touche [ ] ou [►]
pour passer à la piste précédente / suivante.
•
Pause / Reprend la lecture: Appuyez sur la touche
[►||] pour interrompre la lecture. Pour reprendre,
appuyez sur la touche [►||] à nouveau.
•
►
►
►
►
- 13
55 -
OPÉRATION
ÉCOUTER DE LA MUSIQUE
LECTURE DE MUSIQUE
Assurez-vous que la pile est chargée et les écouteurs
sont branchés.
Choisissez la musique avec les touches [ ]/[►].
Appuyez sur [ ►|| ].
2.
Accédez le MENU PRINCIPAL.
1.
►
- 12
56 -
OPÉRATION
ACCÉDER LE MENU PRINCIPAL
1. Appuyez et maintenez la touche [►||] pour entrer dans
le menu principal en mode veille ou lecture.
2. Appuyez le bouton [ ] ou [ ] pour choisir: Music
(musique), Record(enregistrer), Voice(voix), Radio,
Folder(dossier), et Setting(réglage).
Appuyez le bouton [►||] pour sélectionner le réglage
désiré.
►
►
3.
ARTICLES DE MENU
PRINCIPAL
DESCRIPTION
Personnaliser les réglages MP3
Setting (réglage)
Afficher les dossiers
Folder (dossier)
Écoutez la radio FM;
enregistrements FM
Radio
Écouter vos enregistrement de voix
Voice (voix)
Enregistrement de la voix
Record (enregistrer)
Joue une piste musicale
Music (musique)
- 11
57 -
OPÉRATION
OPÉRATION DE BASE
DÉMARRER ET ARRÊTER LE LECTEUR MP3
Assurez-vous que la pile est chargée et les écouteurs
sont branché.
1. Appuyez et maintenez le bouton [ ] pour démarrer
le lecteur MP3.
2. Pour arrêter le lecteur MP3, appuyez et maintenez le
bouton[ ].
AJUSTEMENT DU VOLUME
1. Pour augmenter le volume, appuyez le boutton [ ]
pendant la lecture de la musique.
Pour réduire le volume, appuyez le bouton [ ] pendant
la lecture de la musique.
►
►
2.
DÉVEROUILLAGE DE TOUS LES BOUTONS
Tous les boutons du lecteur MP3 se verrouillent
automatiquement lorsqu'il n'est pas utilisé. La
longueur de temps peut être préréglée dans le menu
SETUP (configuration). Cela vous empêche d'appuyer
accidentellement sur un bouton tout en utilisant le lecteur
MP3 en mouvement.
• Appuyez et maintenez la touche [ ►|| ] pour
déverrouiller tous les boutons.
- 10
58 -
4.
5.
6.
CONFIGURATION
Le système informatique détectera le "Nouveau
matériel" et commencera à installer le pilote
automatiquement. Veuillez patienter jusqu'à ce que
l'installation soit terminée. Lorsque le système a
terminé, un nouveau "disque amovible" sera créé sous
"Mon ordinateur".
Faire glisser et déplacer les fichiers comprimés sur votre
ordinateur au "disque amovible".
Pour déconnecter le lecteur MP3 de l'ordinateur, doublecliquez sur l'icône Retirez le périphérique sur la barre
de tâches. Cliquez sur le périphérique de stockage
de masse USB, puis cliquez sur OK. Vous pouvez alors
débrancher le lecteur MP3.
Note: Ne déconnectez pas le lecteur MP3 de l'ordinateur
pendant le transfert de fichiers. Cela pourrait causer un fonctionnement défectueux du lecteur MP3 et
des fichiers.
9 ---59
CONFIGURATION
INSTALLATION DE PILE
1.
2.
3.
4.
Retirez le capuchon USB.
Retirez le couvercle du compartiment à pile à l'arrière du
lecteur en le glissant dans la direction de la flèche comme indiqué sur le lecteur.
Insérez une pile AAA dans le compartiment à pile.
Mettez le couvercle du compartiment à pile en place.
Indication du niveau de pouvoir de la pile - Les niveaux de
puissance approximative de votre batterie sont indiqués
ci-dessous:
PLEINE
PLEINE
DEUX-TIERS
À MOITIER
PLEINE
BASSE
DÉCHARGÉE
COPIER LES DOSSIERS D'UN ORDINATEUR
Les dossiers peuvent être transférés directement au lecteur en
utilisant le connecteur USB:
1. Allumez l'ordinateur.
2. Enlevez le capuchon USB.
3. Poussez le connecteur USB dans un port USB libre sur
votre PC.
8 ---60
TOUCHES ET CONNEXIONS
1. Compartiment à piles
2. Entrée pour écouteurs
3. Microphone
4. [ ] Entrez le sous-menu pour chaque mode; bouton
Quitter, appuyez et maintenez pour Démarrer/Arrêter le
lecteur
5. Capuchon USB pour connecteur USB
6. Affichage
7. [ ] Bouton Gauche / Précédent
8. [ ] Volume +
9. [ ►] Bouton Droite / Suivant
10. [ ►| | ]Bouton Lecture/Pause; Appuyez et maintenez pour
entrer dans le menu principal ou pour déverouiller tous les
boutons
11. [ ] Volume 12. Courroie de cou
►
►
►
CONFIGURATION
CONNEXION À VOTRE ORDINATEUR
EXIGENCES SYSTÈME
Votre système informatique doit répondre aux exigences suivantes:
• Pentium 200MHz ou plus
• Microsoft Windows 2000/ XP/Vista
• 120 Mo d'espace disque dur disponible
• Soutient un port USB
7 ---61
TOUCHES ET CONNEXIONS
1
2
4
3
7
8
6
9
5
10
12
11
6 ---62
DISPOSITIFS
• Stockez jusqu'à 1 000 chansons avec 4 Go de mémoire.
• Connecteur USB 2.0 intégré à haute vitesse pour glisser et
déposer des fichiers facilement.
• La taille compacte supporte les fichiers à format MP3,
WMA, WAV, périphériques de stockage USB et les fonctions
polyvalente comme un enregistreur vocal numérique, une
fonction de verrouillage et les réglages de l'égaliseur.
• Profitez de 10 heures de lecture continue.
• Vous permet d'écouter vos stations de radio préférées où que
vous soyez.
AVERTISSEMENT:
POUR LA SÉCURITÉ DE VOTRE ENFANT, JETEZ TOUS LES MATÉRIAUX D’EMBALLAGE
TELS QUE LES RUBANS ADHÉSIFS, LES FEUILLES DE PLASTIQUE, LES ATTACHES ET
LES ÉTIQUETTES. ILS NE FONT PAS PARTIE DE CET ARTICLE.
NOTE: IL EST CONSEILLÉ DE CONSERVER CE MANUEL D’UTILISATION CAR IL CONTIENT DES
INFORMATIONS IMPORTANTES.
CE QUI EST INCLUS
•
•
•
•
•
Lecteur MP3 4Go avec connexion USB intégrée
Écouteurs
Pile AAA
Manuel d'instruction
Soutien à la clientèle en direct pour la vie
5 ---63
TABLE DES MATIÈRES
SÉCURITÉ ET AVERTISSEMENTS.................................. 2
DISPOSITIFs............................................................. 5
CE QUI EST INCLUS.................................................... 5
TOUCHES ET ConneXions......................................... 6
CONFIGURATION....................................................... 7
CONNEXION À VOTRE ORDINATEUR................................ 7
INSTALLATION DE PILE.................................................... 8
COPIER DES FICHIERS DE VOTRE ORDINATEUR............... 8
OpÉration.............................................................10
DÉMARRER et arrÊter le lecteur mp3................... 10
Ajustement du VOLUME ........................................... 10
DÉVERROUILLAGE DE TOUS LES BOUTONS................... 10
ACCÉDER LE MENU PRINCIPAL...................................... 11
ÉCOUTER DE LA MUSIQUE............................................. 12
GESTION DES FICHIERS AUDIO...................................... 15
ENREGISTREMENT DE LA VOIX ET LECTURE.................. 16
GESTION DES FICHIERS DE VOIX.................................... 21
RADIO FM...................................................................... 22
NAVIGATION DE DOSSIER.............................................. 26
CHANGER LES PARAMÈTRES DU LECTEUR MP3............ 26
DÉPANNAGE............................................................28
SPÉCIFICATIONS......................................................30
DÉCLARATION DE LA FCC ..........................................31
GARANTIE ELECTROHOME........................................32
4 ---64
SÉCURITÉ ET AVERTISSENTS
PRÉVENTION DE DOMMAGES AUDITIFS
Évitez d'utiliser les écouteurs à un
volume élevé. Les experts en matière
d'audiométrie déconseillent l'utilisation
de volumes sonores élevées pour des
périodes prolongée .
Si vous éprouvez une sensation de bourdonnement dans les
oreilles, réduisez le volume ou cessez l'utilisation.
NETTOYAGE
• Nettoyez le boîtier du lecteur MP3 avec un chiffon doux,
comme un chiffon à lunettes.
• Si le boîtier du lecteur MP3 est vraiment sale, nettoyezle avec un chiffon doux, légèrement imbibé d'eau ou un
détergent doux.
• N'utilisez pas de tampons abrasifs, de poudre à récurer ou de
solvants tel que l'alcool ou le benzène qui risquent de ternir
le fini du boîtier.
• Nettoyez la prise du casque périodiquement.
• Soyez prudent de ne pas laisser pénétrer de l'eau dans le
lecteur MP3 par l'ouverture à proximité du connecteur.
3 ---65
SÉCURITÉ ET AVERTISSENTS
INFORMATIONS IMPORTANTES
SÉCURITÉ
•
Assurez-vous de ne pas court-circuiter les bornes du lecteur
avec d'autres objets métalliques.
Lorsque vous utilisez une courroie de cou soyez prudent
pour éviter de le pendre sur des objets que vous passez.
•
INSTALLATION
•
N'utilisez jamais le joueur où il sera soumis à conditions
extrêmes de luminosité, de température, d'humidité ou
de vibrations.
•
N'exposéz jamais le lecteur aux températures élevées, tels
que dans une voiture garée au soleil ou sous la lumière
solaire directe.
UTILISATION DU CASQUE D'ÉCOUTEUR
SÉCURITÉ ROUTIÈRE
N'utilisez pas les écouteurs lorsque
vous conduisez, en vélo ou lorsque vous
conduisez tout autre véhicule motorisé.
Ceci peut créer un danger pour la
circulation et est illégale à de nombreux
endroits. Il peut aussi être dangereux de
jouer de la musique à un volume élevé tout en marchant,
surtout aux passages pour piétons. Vous devez être
extrêmement prudent ou cessez d'utiliser le lecteur dans des
situations qui sont potentiellement dangereuses.
2 ---66
LECTEUR MP3 4Go
MANUEL D'INSTRUCTION
EAMP100
Merci d’avoir fait l’achat de cet appareil Electrohome. Veuillez lire ce manuel attentivement
avant de faire fonctionner l’appareil pour vous assurer de l’utiliser correctement. Conservez
ce manuel dans un endroit sûr afin de pouvoir vous y référer au besoin.
www.electrohome.com