1
MITEL
COMMUNICATIONS DIRECTOR
AND 5000 COMMUNICATIONS
PLATFORMS
IP-DECT SYSTEM (GLOBAL)
MITEL 5604 WIRELESS HANDSET USER GUIDE
NOTICE
The information contained in this document is believed to be accurate in all respects but is not warranted
by Mitel Networks™ Corporation (MITEL®). The information is subject to change without notice and should
not be construed in any way as a commitment by Mitel or any of its affiliates or subsidiaries. Mitel and its
affiliates and subsidiaries assume no responsibility for any errors or omissions in this document. Revisions
of this document or new editions of it may be issued to incorporate such changes.
No part of this document can be reproduced or transmitted in any form or by any means - electronic or
mechanical - for any purpose without written permission from Mitel Networks Corporation.
Trademarks
Mitel is registered trademark of Mitel Networks Corporation.
Other product names mentioned in this document may be trademarks of their respective companies and
are hereby acknowledged.
IP-DECT System (Global)
Mitel 5604 Wireless Handset User Guide
Release 6.0
March 2013
®,™ Trademark of Mitel Networks Corporation
© Copyright 2013, Mitel Networks Corporation
All rights reserved
ii
Table of Contents
About Your Phone . . . . . . . . . . . . . . . . . . . . . . . . . . . . . . . . . . . . . . . . . . . . . . . . . . . . . . . . . . . . . 1
Elements of the Handset . . . . . . . . . . . . . . . . . . . . . . . . . . . . . . . . . . . . . . . . . . . . . . . . . . . . . . . 2
Features and Functions . . . . . . . . . . . . . . . . . . . . . . . . . . . . . . . . . . . . . . . . . . . . . . . . . . . . . . . . 3
Chargers . . . . . . . . . . . . . . . . . . . . . . . . . . . . . . . . . . . . . . . . . . . . . . . . . . . . . . . . . . . . . . . . . 4
Contacting Emergency Services . . . . . . . . . . . . . . . . . . . . . . . . . . . . . . . . . . . . . . . . . . . . . . 4
Tips for your Comfort and Safety . . . . . . . . . . . . . . . . . . . . . . . . . . . . . . . . . . . . . . . . . . . . . . 5
Frequency Range . . . . . . . . . . . . . . . . . . . . . . . . . . . . . . . . . . . . . . . . . . . . . . . . . . . . . . . . . . 5
Exposure to Radio Frequency Signals . . . . . . . . . . . . . . . . . . . . . . . . . . . . . . . . . . . . . . . . . . 5
Environmental Requirements . . . . . . . . . . . . . . . . . . . . . . . . . . . . . . . . . . . . . . . . . . . . . . . . . 6
Chemical Resistance . . . . . . . . . . . . . . . . . . . . . . . . . . . . . . . . . . . . . . . . . . . . . . . . . . . . . . . 6
Icons and Text in the Display . . . . . . . . . . . . . . . . . . . . . . . . . . . . . . . . . . . . . . . . . . . . . . . . . . . . 7
Keys and Buttons . . . . . . . . . . . . . . . . . . . . . . . . . . . . . . . . . . . . . . . . . . . . . . . . . . . . . . . . . . . . 10
Off-hook Key . . . . . . . . . . . . . . . . . . . . . . . . . . . . . . . . . . . . . . . . . . . . . . . . . . . . . . . . . . . . . 10
On-hook and On/Off Keys . . . . . . . . . . . . . . . . . . . . . . . . . . . . . . . . . . . . . . . . . . . . . . . . . . 10
Navigation/Confirmation Key . . . . . . . . . . . . . . . . . . . . . . . . . . . . . . . . . . . . . . . . . . . . . . . . 10
Sound Off Key . . . . . . . . . . . . . . . . . . . . . . . . . . . . . . . . . . . . . . . . . . . . . . . . . . . . . . . . . . . 10
Mute and PTT Button . . . . . . . . . . . . . . . . . . . . . . . . . . . . . . . . . . . . . . . . . . . . . . . . . . . . . 10
Key Lock and Upper/Lower Case Key . . . . . . . . . . . . . . . . . . . . . . . . . . . . . . . . . . . . . . . . . 10
Soft Keys . . . . . . . . . . . . . . . . . . . . . . . . . . . . . . . . . . . . . . . . . . . . . . . . . . . . . . . . . . . . . . . 10
Hot Keys . . . . . . . . . . . . . . . . . . . . . . . . . . . . . . . . . . . . . . . . . . . . . . . . . . . . . . . . . . . . . . . . 11
Multifunction Button . . . . . . . . . . . . . . . . . . . . . . . . . . . . . . . . . . . . . . . . . . . . . . . . . . . . . . . 11
Volume Button . . . . . . . . . . . . . . . . . . . . . . . . . . . . . . . . . . . . . . . . . . . . . . . . . . . . . . . . . . . 11
Alphanumeric Keys . . . . . . . . . . . . . . . . . . . . . . . . . . . . . . . . . . . . . . . . . . . . . . . . . . . . . . . . . . 12
Headset . . . . . . . . . . . . . . . . . . . . . . . . . . . . . . . . . . . . . . . . . . . . . . . . . . . . . . . . . . . . . . . . . . . 13
Customizing Your Phone . . . . . . . . . . . . . . . . . . . . . . . . . . . . . . . . . . . . . . . . . . . . . . . . . . . . . . . 14
Switch the Handset On/Off . . . . . . . . . . . . . . . . . . . . . . . . . . . . . . . . . . . . . . . . . . . . . . . . . . . . 14
Log a Shared/Hot Desk Phone On/Off . . . . . . . . . . . . . . . . . . . . . . . . . . . . . . . . . . . . . . . . . . . 14
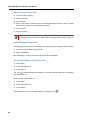
.Turn On/Off the Audible Signal . . . . . . . . . . . . . . . . . . . . . . . . . . . . . . . . . . . . . . . . . . . . . . . . . 15
Lock/Unlock the Keypad . . . . . . . . . . . . . . . . . . . . . . . . . . . . . . . . . . . . . . . . . . . . . . . . . . . . . . 15
Lock/Unlock the Handset . . . . . . . . . . . . . . . . . . . . . . . . . . . . . . . . . . . . . . . . . . . . . . . . . . . . . . 16
Using the Loudspeaking Function . . . . . . . . . . . . . . . . . . . . . . . . . . . . . . . . . . . . . . . . . . . . . . . 16
Making and Answering Calls . . . . . . . . . . . . . . . . . . . . . . . . . . . . . . . . . . . . . . . . . . . . . . . . . . . . 17
Call List . . . . . . . . . . . . . . . . . . . . . . . . . . . . . . . . . . . . . . . . . . . . . . . . . . . . . . . . . . . . . . . . . . . 17
Make a Call . . . . . . . . . . . . . . . . . . . . . . . . . . . . . . . . . . . . . . . . . . . . . . . . . . . . . . . . . . . . . . . . 17
Pre-Dial . . . . . . . . . . . . . . . . . . . . . . . . . . . . . . . . . . . . . . . . . . . . . . . . . . . . . . . . . . . . . . . . . 17
Dial Using a Pre-programmed Hot key, Soft key or Multifunction Button . . . . . . . . . . . . . . . 17
Dial a Number from the Call List . . . . . . . . . . . . . . . . . . . . . . . . . . . . . . . . . . . . . . . . . . . . . . 17
Dial the Sender of a Message . . . . . . . . . . . . . . . . . . . . . . . . . . . . . . . . . . . . . . . . . . . . . . . 18
iii
5604 Wireless Handset User Guide
Dial a Number from the Local Phonebook . . . . . . . . . . . . . . . . . . . . . . . . . . . . . . . . . . . . . . 18
Dial a Name from the Central Phonebook . . . . . . . . . . . . . . . . . . . . . . . . . . . . . . . . . . . . . . 18
Dial a Number from the Company Phonebook . . . . . . . . . . . . . . . . . . . . . . . . . . . . . . . . . . . 18
Answer a Call . . . . . . . . . . . . . . . . . . . . . . . . . . . . . . . . . . . . . . . . . . . . . . . . . . . . . . . . . . . . . . . 19
Answer a Call . . . . . . . . . . . . . . . . . . . . . . . . . . . . . . . . . . . . . . . . . . . . . . . . . . . . . . . . . . . . 19
End a Call . . . . . . . . . . . . . . . . . . . . . . . . . . . . . . . . . . . . . . . . . . . . . . . . . . . . . . . . . . . . . . . 19
During a Call . . . . . . . . . . . . . . . . . . . . . . . . . . . . . . . . . . . . . . . . . . . . . . . . . . . . . . . . . . . . . . . 19
Adjust the Volume during a Call . . . . . . . . . . . . . . . . . . . . . . . . . . . . . . . . . . . . . . . . . . . . . . 19
Open Contacts during a Call . . . . . . . . . . . . . . . . . . . . . . . . . . . . . . . . . . . . . . . . . . . . . . . . . 20
Open Messaging during a Call . . . . . . . . . . . . . . . . . . . . . . . . . . . . . . . . . . . . . . . . . . . . . . . 20
Turn the Microphone on/off during a Call . . . . . . . . . . . . . . . . . . . . . . . . . . . . . . . . . . . . . . . 20
Lock/Unlock the Keypad during a Call . . . . . . . . . . . . . . . . . . . . . . . . . . . . . . . . . . . . . . . . . 21
Start a New Call during a Conversation . . . . . . . . . . . . . . . . . . . . . . . . . . . . . . . . . . . . . . . . 21
Call Handling for MCD (3300 ICP) . . . . . . . . . . . . . . . . . . . . . . . . . . . . . . . . . . . . . . . . . . . . . . . . 22
Hold . . . . . . . . . . . . . . . . . . . . . . . . . . . . . . . . . . . . . . . . . . . . . . . . . . . . . . . . . . . . . . . . . . . . . . 23
Transfer . . . . . . . . . . . . . . . . . . . . . . . . . . . . . . . . . . . . . . . . . . . . . . . . . . . . . . . . . . . . . . . . . . . 23
Conference . . . . . . . . . . . . . . . . . . . . . . . . . . . . . . . . . . . . . . . . . . . . . . . . . . . . . . . . . . . . . . . . 24
Answer Call Waiting . . . . . . . . . . . . . . . . . . . . . . . . . . . . . . . . . . . . . . . . . . . . . . . . . . . . . . . . . . 24
Callback . . . . . . . . . . . . . . . . . . . . . . . . . . . . . . . . . . . . . . . . . . . . . . . . . . . . . . . . . . . . . . . . . . . 25
Call Park . . . . . . . . . . . . . . . . . . . . . . . . . . . . . . . . . . . . . . . . . . . . . . . . . . . . . . . . . . . . . . . . . . 25
Advanced Features for MCD (3300 ICP) . . . . . . . . . . . . . . . . . . . . . . . . . . . . . . . . . . . . . . . . . . . 26
Calls . . . . . . . . . . . . . . . . . . . . . . . . . . . . . . . . . . . . . . . . . . . . . . . . . . . . . . . . . . . . . . . . . . . . . 26
Call Forward . . . . . . . . . . . . . . . . . . . . . . . . . . . . . . . . . . . . . . . . . . . . . . . . . . . . . . . . . . . . . . . . 27
Call Pickup . . . . . . . . . . . . . . . . . . . . . . . . . . . . . . . . . . . . . . . . . . . . . . . . . . . . . . . . . . . . . . . . . 27
Do Not Disturb . . . . . . . . . . . . . . . . . . . . . . . . . . . . . . . . . . . . . . . . . . . . . . . . . . . . . . . . . . . . . . 27
Direct Page . . . . . . . . . . . . . . . . . . . . . . . . . . . . . . . . . . . . . . . . . . . . . . . . . . . . . . . . . . . . . . . . 28
Group Page . . . . . . . . . . . . . . . . . . . . . . . . . . . . . . . . . . . . . . . . . . . . . . . . . . . . . . . . . . . . . . . . 28
Loudspeaker Page . . . . . . . . . . . . . . . . . . . . . . . . . . . . . . . . . . . . . . . . . . . . . . . . . . . . . . . . . . . 28
Call Handling for the Mitel 5000 CP . . . . . . . . . . . . . . . . . . . . . . . . . . . . . . . . . . . . . . . . . . . . . . . 29
Hold . . . . . . . . . . . . . . . . . . . . . . . . . . . . . . . . . . . . . . . . . . . . . . . . . . . . . . . . . . . . . . . . . . . . . . 30
Transfer . . . . . . . . . . . . . . . . . . . . . . . . . . . . . . . . . . . . . . . . . . . . . . . . . . . . . . . . . . . . . . . . . . . 30
Conference . . . . . . . . . . . . . . . . . . . . . . . . . . . . . . . . . . . . . . . . . . . . . . . . . . . . . . . . . . . . . . . . 31
Answer Call Waiting . . . . . . . . . . . . . . . . . . . . . . . . . . . . . . . . . . . . . . . . . . . . . . . . . . . . . . . . . . 31
Advanced Features for the 5000 CP . . . . . . . . . . . . . . . . . . . . . . . . . . . . . . . . . . . . . . . . . . . . . . 32
Calls . . . . . . . . . . . . . . . . . . . . . . . . . . . . . . . . . . . . . . . . . . . . . . . . . . . . . . . . . . . . . . . . . . . . . 32
Call Operator . . . . . . . . . . . . . . . . . . . . . . . . . . . . . . . . . . . . . . . . . . . . . . . . . . . . . . . . . . . . . . . 33
iv
Table of Contents
Config Assistant . . . . . . . . . . . . . . . . . . . . . . . . . . . . . . . . . . . . . . . . . . . . . . . . . . . . . . . . . . . . . 33
Reverse Transfer . . . . . . . . . . . . . . . . . . . . . . . . . . . . . . . . . . . . . . . . . . . . . . . . . . . . . . . . . . . . 33
Messaging . . . . . . . . . . . . . . . . . . . . . . . . . . . . . . . . . . . . . . . . . . . . . . . . . . . . . . . . . . . . . . . . . . 34
Message List . . . . . . . . . . . . . . . . . . . . . . . . . . . . . . . . . . . . . . . . . . . . . . . . . . . . . . . . . . . . . . . 34
Receive a Message . . . . . . . . . . . . . . . . . . . . . . . . . . . . . . . . . . . . . . . . . . . . . . . . . . . . . . . . . . 34
Incoming Message for 5604 Services License . . . . . . . . . . . . . . . . . . . . . . . . . . . . . . . . . . . 34
Incoming Message for all 5604’s except for 5604 Services License . . . . . . . . . . . . . . . . . . 34
Read a Stored Message . . . . . . . . . . . . . . . . . . . . . . . . . . . . . . . . . . . . . . . . . . . . . . . . . . . . 34
Reply to a Message . . . . . . . . . . . . . . . . . . . . . . . . . . . . . . . . . . . . . . . . . . . . . . . . . . . . . . . 35
Delete a Message(s) . . . . . . . . . . . . . . . . . . . . . . . . . . . . . . . . . . . . . . . . . . . . . . . . . . . . . . 35
Forward a Message . . . . . . . . . . . . . . . . . . . . . . . . . . . . . . . . . . . . . . . . . . . . . . . . . . . . . . . 35
Call the Sender of the Message . . . . . . . . . . . . . . . . . . . . . . . . . . . . . . . . . . . . . . . . . . . . . . 35
Call a Number Included in a Message . . . . . . . . . . . . . . . . . . . . . . . . . . . . . . . . . . . . . . . . . 36
Save a Number . . . . . . . . . . . . . . . . . . . . . . . . . . . . . . . . . . . . . . . . . . . . . . . . . . . . . . . . . . . 36
Write and Send a Message . . . . . . . . . . . . . . . . . . . . . . . . . . . . . . . . . . . . . . . . . . . . . . . . . 36
Open a Sent Message . . . . . . . . . . . . . . . . . . . . . . . . . . . . . . . . . . . . . . . . . . . . . . . . . . . . . 37
Send a Message to Another Destination . . . . . . . . . . . . . . . . . . . . . . . . . . . . . . . . . . . . . . . 37
Receive a Message with Request for Answer . . . . . . . . . . . . . . . . . . . . . . . . . . . . . . . . . . . . . . 37
Accept/Reject a Message . . . . . . . . . . . . . . . . . . . . . . . . . . . . . . . . . . . . . . . . . . . . . . . . . . . 37
Message Queuing and Message Priority . . . . . . . . . . . . . . . . . . . . . . . . . . . . . . . . . . . . . . . . . . 38
Message Priority and Call Priority . . . . . . . . . . . . . . . . . . . . . . . . . . . . . . . . . . . . . . . . . . . . . . . 39
Message Indication Repetition . . . . . . . . . . . . . . . . . . . . . . . . . . . . . . . . . . . . . . . . . . . . . . . . . . 39
Interactive Messaging . . . . . . . . . . . . . . . . . . . . . . . . . . . . . . . . . . . . . . . . . . . . . . . . . . . . . . . . 39
Colored Messaging . . . . . . . . . . . . . . . . . . . . . . . . . . . . . . . . . . . . . . . . . . . . . . . . . . . . . . . . . . 41
Mobile Data . . . . . . . . . . . . . . . . . . . . . . . . . . . . . . . . . . . . . . . . . . . . . . . . . . . . . . . . . . . . . . . . 42
Send Mobile Data . . . . . . . . . . . . . . . . . . . . . . . . . . . . . . . . . . . . . . . . . . . . . . . . . . . . . . . . . 42
Send Mobile Data with a Prefix . . . . . . . . . . . . . . . . . . . . . . . . . . . . . . . . . . . . . . . . . . . . . . 42
Procedure Call . . . . . . . . . . . . . . . . . . . . . . . . . . . . . . . . . . . . . . . . . . . . . . . . . . . . . . . . . . . . . . 43
Voice Mail . . . . . . . . . . . . . . . . . . . . . . . . . . . . . . . . . . . . . . . . . . . . . . . . . . . . . . . . . . . . . . . . . 44
Receive a Voice Mail . . . . . . . . . . . . . . . . . . . . . . . . . . . . . . . . . . . . . . . . . . . . . . . . . . . . . . 44
Check the Voice Mail Inbox . . . . . . . . . . . . . . . . . . . . . . . . . . . . . . . . . . . . . . . . . . . . . . . . . 44
One Key Voice Mail Access . . . . . . . . . . . . . . . . . . . . . . . . . . . . . . . . . . . . . . . . . . . . . . . . . 44
Alarm Operation . . . . . . . . . . . . . . . . . . . . . . . . . . . . . . . . . . . . . . . . . . . . . . . . . . . . . . . . . . . . . . 45
Push-button Alarm . . . . . . . . . . . . . . . . . . . . . . . . . . . . . . . . . . . . . . . . . . . . . . . . . . . . . . . . . . . 45
Acoustic Location Signal . . . . . . . . . . . . . . . . . . . . . . . . . . . . . . . . . . . . . . . . . . . . . . . . . . . . . . 45
Test Alarm . . . . . . . . . . . . . . . . . . . . . . . . . . . . . . . . . . . . . . . . . . . . . . . . . . . . . . . . . . . . . . . . . 45
Alarm with Location Information . . . . . . . . . . . . . . . . . . . . . . . . . . . . . . . . . . . . . . . . . . . . . . . . 45
Alarm with Data . . . . . . . . . . . . . . . . . . . . . . . . . . . . . . . . . . . . . . . . . . . . . . . . . . . . . . . . . . 46
v
5604 Wireless Handset User Guide
Automatic Call after Alarm . . . . . . . . . . . . . . . . . . . . . . . . . . . . . . . . . . . . . . . . . . . . . . . . . . . . . 46
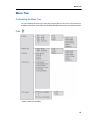
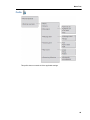
Menu Tree . . . . . . . . . . . . . . . . . . . . . . . . . . . . . . . . . . . . . . . . . . . . . . . . . . . . . . . . . . . . . . . . . . 47
Customizing the Menu Tree . . . . . . . . . . . . . . . . . . . . . . . . . . . . . . . . . . . . . . . . . . . . . . . . . . . . 47
Calls . . . . . . . . . . . . . . . . . . . . . . . . . . . . . . . . . . . . . . . . . . . . . . . . . . . . . . . . . . . . . . . . . . . . . 47
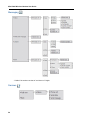
Contacts . . . . . . . . . . . . . . . . . . . . . . . . . . . . . . . . . . . . . . . . . . . . . . . . . . . . . . . . . . . . . . . . . . 48
Profile . . . . . . . . . . . . . . . . . . . . . . . . . . . . . . . . . . . . . . . . . . . . . . . . . . . . . . . . . . . . . . . . . . . . 49
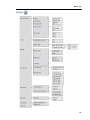
Messaging . . . . . . . . . . . . . . . . . . . . . . . . . . . . . . . . . . . . . . . . . . . . . . . . . . . . . . . . . . . . . . . . . 50
Services
. . . . . . . . . . . . . . . . . . . . . . . . . . . . . . . . . . . . . . . . . . . . . . . . . . . . . . . . . . . . . . . . . . 50
Short cuts . . . . . . . . . . . . . . . . . . . . . . . . . . . . . . . . . . . . . . . . . . . . . . . . . . . . . . . . . . . . . . . . . 51
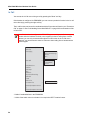
Connections . . . . . . . . . . . . . . . . . . . . . . . . . . . . . . . . . . . . . . . . . . . . . . . . . . . . . . . . . . . . . . . 52
Settings . . . . . . . . . . . . . . . . . . . . . . . . . . . . . . . . . . . . . . . . . . . . . . . . . . . . . . . . . . . . . . . . . . . 53
In Call . . . . . . . . . . . . . . . . . . . . . . . . . . . . . . . . . . . . . . . . . . . . . . . . . . . . . . . . . . . . . . . . . . . . . 54
Additional In Call Functions . . . . . . . . . . . . . . . . . . . . . . . . . . . . . . . . . . . . . . . . . . . . . . . . . . . . 55
Navigate the Menu . . . . . . . . . . . . . . . . . . . . . . . . . . . . . . . . . . . . . . . . . . . . . . . . . . . . . . . . . . . . 56
Connections Menu . . . . . . . . . . . . . . . . . . . . . . . . . . . . . . . . . . . . . . . . . . . . . . . . . . . . . . . . . . . 56
Headsets . . . . . . . . . . . . . . . . . . . . . . . . . . . . . . . . . . . . . . . . . . . . . . . . . . . . . . . . . . . . . . . . 56
System . . . . . . . . . . . . . . . . . . . . . . . . . . . . . . . . . . . . . . . . . . . . . . . . . . . . . . . . . . . . . . . . . 56
In Charger . . . . . . . . . . . . . . . . . . . . . . . . . . . . . . . . . . . . . . . . . . . . . . . . . . . . . . . . . . . . . . . 59
Calls Menu . . . . . . . . . . . . . . . . . . . . . . . . . . . . . . . . . . . . . . . . . . . . . . . . . . . . . . . . . . . . . . . . . 61
Call List . . . . . . . . . . . . . . . . . . . . . . . . . . . . . . . . . . . . . . . . . . . . . . . . . . . . . . . . . . . . . . . . . 61
Missed Calls . . . . . . . . . . . . . . . . . . . . . . . . . . . . . . . . . . . . . . . . . . . . . . . . . . . . . . . . . . . . . 62
Call Time . . . . . . . . . . . . . . . . . . . . . . . . . . . . . . . . . . . . . . . . . . . . . . . . . . . . . . . . . . . . . . . . 62
Push to Talk . . . . . . . . . . . . . . . . . . . . . . . . . . . . . . . . . . . . . . . . . . . . . . . . . . . . . . . . . . . . . 63
Short Cuts Menu . . . . . . . . . . . . . . . . . . . . . . . . . . . . . . . . . . . . . . . . . . . . . . . . . . . . . . . . . . . . 65
Define a Soft Key . . . . . . . . . . . . . . . . . . . . . . . . . . . . . . . . . . . . . . . . . . . . . . . . . . . . . . . . . 65
Define a Hot Key . . . . . . . . . . . . . . . . . . . . . . . . . . . . . . . . . . . . . . . . . . . . . . . . . . . . . . . . . . 66
Define a Navigation Key . . . . . . . . . . . . . . . . . . . . . . . . . . . . . . . . . . . . . . . . . . . . . . . . . . . . 66
Define the Multifunction or Alarm Button . . . . . . . . . . . . . . . . . . . . . . . . . . . . . . . . . . . . . . . 67
Services Menu . . . . . . . . . . . . . . . . . . . . . . . . . . . . . . . . . . . . . . . . . . . . . . . . . . . . . . . . . . . . . . 67
Add a Service . . . . . . . . . . . . . . . . . . . . . . . . . . . . . . . . . . . . . . . . . . . . . . . . . . . . . . . . . . . . 67
Edit a Service . . . . . . . . . . . . . . . . . . . . . . . . . . . . . . . . . . . . . . . . . . . . . . . . . . . . . . . . . . . . 68
Delete a Service . . . . . . . . . . . . . . . . . . . . . . . . . . . . . . . . . . . . . . . . . . . . . . . . . . . . . . . . . . 68
Messaging . . . . . . . . . . . . . . . . . . . . . . . . . . . . . . . . . . . . . . . . . . . . . . . . . . . . . . . . . . . . . . . . . 68
Inbox . . . . . . . . . . . . . . . . . . . . . . . . . . . . . . . . . . . . . . . . . . . . . . . . . . . . . . . . . . . . . . . . . . . 68
Write a New Message . . . . . . . . . . . . . . . . . . . . . . . . . . . . . . . . . . . . . . . . . . . . . . . . . . . . . .69
Unsent Messages . . . . . . . . . . . . . . . . . . . . . . . . . . . . . . . . . . . . . . . . . . . . . . . . . . . . . . . . . 70
Sent Messages . . . . . . . . . . . . . . . . . . . . . . . . . . . . . . . . . . . . . . . . . . . . . . . . . . . . . . . . . . . 70
Profiles Menu . . . . . . . . . . . . . . . . . . . . . . . . . . . . . . . . . . . . . . . . . . . . . . . . . . . . . . . . . . . . . . . 71
vi
Table of Contents
Contacts Menu . . . . . . . . . . . . . . . . . . . . . . . . . . . . . . . . . . . . . . . . . . . . . . . . . . . . . . . . . . . . . . 73
Call a Contact . . . . . . . . . . . . . . . . . . . . . . . . . . . . . . . . . . . . . . . . . . . . . . . . . . . . . . . . . . . . 73
Add a Contact . . . . . . . . . . . . . . . . . . . . . . . . . . . . . . . . . . . . . . . . . . . . . . . . . . . . . . . . . . . . 73
Edit a Contact . . . . . . . . . . . . . . . . . . . . . . . . . . . . . . . . . . . . . . . . . . . . . . . . . . . . . . . . . . . . 74
Delete a Contact . . . . . . . . . . . . . . . . . . . . . . . . . . . . . . . . . . . . . . . . . . . . . . . . . . . . . . . . . . 74
Central Phonebook . . . . . . . . . . . . . . . . . . . . . . . . . . . . . . . . . . . . . . . . . . . . . . . . . . . . . . . . 75
Settings Menu . . . . . . . . . . . . . . . . . . . . . . . . . . . . . . . . . . . . . . . . . . . . . . . . . . . . . . . . . . . . . . 76
Sound and Alert Settings . . . . . . . . . . . . . . . . . . . . . . . . . . . . . . . . . . . . . . . . . . . . . . . . . . . 76
Phone Lock Settings . . . . . . . . . . . . . . . . . . . . . . . . . . . . . . . . . . . . . . . . . . . . . . . . . . . . . . . 78
Display Settings . . . . . . . . . . . . . . . . . . . . . . . . . . . . . . . . . . . . . . . . . . . . . . . . . . . . . . . . . . 79
Time and Date Settings . . . . . . . . . . . . . . . . . . . . . . . . . . . . . . . . . . . . . . . . . . . . . . . . . . . . 80
Answering . . . . . . . . . . . . . . . . . . . . . . . . . . . . . . . . . . . . . . . . . . . . . . . . . . . . . . . . . . . . . . . 81
Change Text Size for Messages . . . . . . . . . . . . . . . . . . . . . . . . . . . . . . . . . . . . . . . . . . . . . 81
Change the Menu Language . . . . . . . . . . . . . . . . . . . . . . . . . . . . . . . . . . . . . . . . . . . . . . . . 82
Change the Owner ID . . . . . . . . . . . . . . . . . . . . . . . . . . . . . . . . . . . . . . . . . . . . . . . . . . . . . . 82
Advanced Functions . . . . . . . . . . . . . . . . . . . . . . . . . . . . . . . . . . . . . . . . . . . . . . . . . . . . . . . . . . . 83
Admin Menu . . . . . . . . . . . . . . . . . . . . . . . . . . . . . . . . . . . . . . . . . . . . . . . . . . . . . . . . . . . . . . . . 83
Clear Lists in Charger . . . . . . . . . . . . . . . . . . . . . . . . . . . . . . . . . . . . . . . . . . . . . . . . . . . . . . . . 83
System Handling. . . . . . . . . . . . . . . . . . . . . . . . . . . . . . . . . . . . . . . . . . . . . . . . . . . . . . . . . . . . . . 84
Software Upgrade and Additional Features . . . . . . . . . . . . . . . . . . . . . . . . . . . . . . . . . . . . . . . . 84
Troubleshooting . . . . . . . . . . . . . . . . . . . . . . . . . . . . . . . . . . . . . . . . . . . . . . . . . . . . . . . . . . . . . . 85
Operation Notice. . . . . . . . . . . . . . . . . . . . . . . . . . . . . . . . . . . . . . . . . . . . . . . . . . . . . . . . . . . . . . 88
Accessibility and Voice Quality . . . . . . . . . . . . . . . . . . . . . . . . . . . . . . . . . . . . . . . . . . . . . . . . . 88
Maintenance . . . . . . . . . . . . . . . . . . . . . . . . . . . . . . . . . . . . . . . . . . . . . . . . . . . . . . . . . . . . . . . . . 89
Maintenance of Batteries . . . . . . . . . . . . . . . . . . . . . . . . . . . . . . . . . . . . . . . . . . . . . . . . . . . . . . 89
Battery Warnings . . . . . . . . . . . . . . . . . . . . . . . . . . . . . . . . . . . . . . . . . . . . . . . . . . . . . . . . . 89
Charge the Battery . . . . . . . . . . . . . . . . . . . . . . . . . . . . . . . . . . . . . . . . . . . . . . . . . . . . . . . . 89
Charge Spare Batteries . . . . . . . . . . . . . . . . . . . . . . . . . . . . . . . . . . . . . . . . . . . . . . . . . . . . 89
Replace the Battery . . . . . . . . . . . . . . . . . . . . . . . . . . . . . . . . . . . . . . . . . . . . . . . . . . . . . . . 89
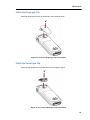
Easy Replacement of Handset . . . . . . . . . . . . . . . . . . . . . . . . . . . . . . . . . . . . . . . . . . . . . . . . . 90
Before Starting the Easy Replacement Procedure . . . . . . . . . . . . . . . . . . . . . . . . . . . . . . . . 90
Easy Replacement Procedure . . . . . . . . . . . . . . . . . . . . . . . . . . . . . . . . . . . . . . . . . . . . . . . 91
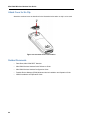
Attach the Hinge-type Clip . . . . . . . . . . . . . . . . . . . . . . . . . . . . . . . . . . . . . . . . . . . . . . . . . . . . . 93
Attach the Swivel-type Clip . . . . . . . . . . . . . . . . . . . . . . . . . . . . . . . . . . . . . . . . . . . . . . . . . . . . 93
Attach Cover for No Clip . . . . . . . . . . . . . . . . . . . . . . . . . . . . . . . . . . . . . . . . . . . . . . . . . . . . . . 94
Related Documents . . . . . . . . . . . . . . . . . . . . . . . . . . . . . . . . . . . . . . . . . . . . . . . . . . . . . . . . . . 94
Index . . . . . . . . . . . . . . . . . . . . . . . . . . . . . . . . . . . . . . . . . . . . . . . . . . . . . . . . . . . . . . . . . . . . . . . 95
vii
5604 Wireless Handset User Guide
viii
About Your Phone
About Your Phone
This guide contains feature descriptions for both the Mitel 5000 CP and the Mitel 3300 ICP.
•
“Call Handling for MCD (3300 ICP)” on page 22 and “Advanced Features for MCD (3300
ICP)” on page 26
•
“Call Handling for the Mitel 5000 CP” on page 29 and “Advanced Features for the 5000
CP” on page 32
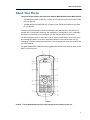
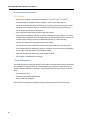
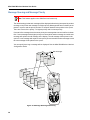
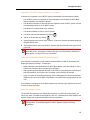
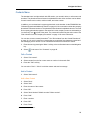
This document describes the features and settings of the 5604 handset. This feature-rich
handset has a color display, telephony, and messaging. It is designed for use in moderately
demanding environments, such as hospitals, but also suited to office environments.
The 5604 handset is suited to users who must be readily reached and/or need mobile voice
and messaging features. It is ideal for applications where the user needs either one way
messaging or needs to interact with other users. The color display enhances and simplifies the
use of the handset.
The 5604 Standard DECT Handset can be upgraded with the Services, Personal Alarm, and/or
DECT Location licences.
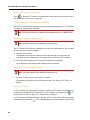
Figure 1:
Caution: The Handset/Headset must be fully charged before starting regular use.
1
Mitel 5604 Wireless Handset User Guide
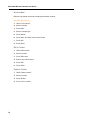
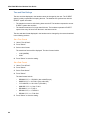
Elements of the Handset
1
Top/Alarm button
This button can be used as a short cut to functions; long or double press modes. In the 5604
Personal Alarm license, the button is used as a push button alarm only.
2
LED
Indicates incoming call, messaging, low battery, and charging.
3
Earpiece speaker
4
Headset connector
The headset connector is for connecting a headset. The connector is protected against dust by
using the headset connector cover.
5
Color display
The full graphic type display is 128 pixels wide and 160 pixels high. The display has multiple
colors and backlighting.
6
Soft keys
The 3 Soft keys can be pre-programmed or used with GUI
7
Four-way navigation key
Navigation key with Left, Right, Up, Down, and Confirmation (in the middle). It is also possible to
program these keys for short cuts, except the middle key.
8
On-hook and On/Off key
Combined button; to end a call, to return to standby mode, and to switch the handset on/off by
long press.
9
Tactile indicators
There are two tactile indicators to indicate the centre of the key pad
10
Sound off key
To turn on/off audible signals in idle mode, silencing the ring signal at incoming call, and to turn
on/off the microphone during a call.Note: Incoming high priority messages will still be indicated
with an audible signal when the handset is muted.
11
Space
To add space between text
12
13
Microphone
Key lock and Upper/Lower case
Combined key lock and Upper/Lower Case
14
Voice mail access*
A quick access to the handset’s Voice mail. * System dependent feature
15
Off-hook key
To answer a call, to pre-dial a number, and as a short cut to the Call list.
16
Mute and PTT button
To turn on/off audible signals in idle mode, silencing the ring signal at incoming call, and to turn
on/off the microphone during a call.
17
Volume button (down)
To decrease the speaker volume
18
Volume button (up)
To increase the speaker volume
2
About Your Phone
Features and Functions
IMPORTANT: The handset may retain small magnetic objects around the mouth cap or
ear cap region.
Case
The plastic cover parts are made of durable PC/ABS material.
Antenna
The antenna is integrated inside the handset.
Loudspeaker
The handset has a separate loudspeaker for the Loudspeaker function. It is on the back side
of the handset.
Microphone
The microphone is placed on the front bottom side of the handset.
Clip
There are two different belt clip options to the handset: a hinge-type clip (standard), and a
swivel-type clip. See “Attach the Hinge-type Clip” on page 93, or “Attach the Swivel-type Clip”
on page 93. Use the clip to attach the handset to a pocket or belt. You can use the handset
without a clip on. See “Attach Cover for No Clip” on page 94.
Battery
The battery is a rechargeable Li-pol battery, placed under a battery cover. See “Replace the
Battery” on page 89.
The battery is fully charged within four hours. See “Charge the Battery” on page 89.
The battery can be charged separately with a special battery charger. See “Charge Spare
Batteries” on page 89.
3
Mitel 5604 Wireless Handset User Guide
Chargers
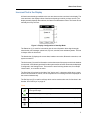
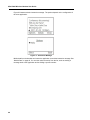
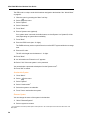
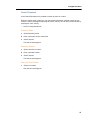
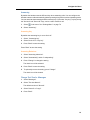
Desktop Charger
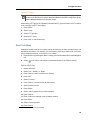
Figure 2: Desktop Chargers
There are two desktop chargers available: a basic one that will only charge the handset, and
one with advanced functionality to download new software and to synchronize parameters. The
handset is fully operational while placed in the charger.
The charger is delivered with a plug-in power supply and is connected into an ordinary wall
socket. For more information, see the 5603/5604/5607 Programmer Installation and
Maintenance Guide.
Note: Use the charger only within the temperature range of +5° C – +40° C.
Caution: Use only the provided power supply. See the 5603/5604/5607
Programmer Installation and Maintenance Guide.
Rack Charger
The Charging Rack charges six 5603/5604/5607/5624 handsets simultaneously and is used
for charging only.
For more information, see the 5603/5604/5607/5624 Rack Charger Installation and Operation
Guide.
Contacting Emergency Services
This handset, like any wireless phone, communicates using radio signals. As with any wireless
phone, you may not be able to establish a connection under all conditions; therefore, you should
not rely solely on a wireless telephone for essential, emergency communication. The key lock
feature disables the handset keypad and prevents the accidental dialing of numbers that may
result in nuisance calls. It also prevents accidental calls to emergency services numbers like
911, 999, or 112.
To disable the key lock feature, press the
4
key and then press Select.
About Your Phone
Currently, mobile IP phones do not support Enhanced 911 (E911) operation. If emergency
services are required, it is necessary to keep the system administrator and location database
up-to-date.
Tips for your Comfort and Safety
Don't Cradle the Handset!
Prolonged use of the handset can lead to neck, shoulder, or back discomfort, especially if you
cradle the handset between your ear and shoulder. If you use your phone a lot, you may find
it more comfortable to use a headset. See the section on headset usage elsewhere in this guide
for more information.
Protect your Hearing
Your phone has a control for adjusting the volume of the handset receiver or headset. Because
continuous exposure to loud sounds can contribute to hearing loss, keep the volume at a
moderate level.
Frequency Range
The handset is a radio transmitter and receiver. When it is on, it receives and sends out radio
frequency (RF) energy. The handset operates on different frequency ranges depending on
market and employs commonly used modulation techniques:
EU
1880-1900 MHz
USA
1920-1930 MHz
LA
1910-1930 MHz
BR
1910-1920 MHz
--
1900-1920 MHz
Exposure to Radio Frequency Signals
This equipment complies with FCC radiation exposure limits set forth for an uncontrolled
environment. This device complies with FCC SAR limit of 1.6 W/kg. The maximum SAR value
measured when used at the ear and when worn on the body using a belt clip is as follows:
SAR values
Head
0.072 W/Kg
Body worn
0.036 W/Kg
This device must not be co-located or operating in conjunction with any other antenna or
transmitter.
Use of non-Ascom approved accessories may violate the FCC RF exposure guidelines and
should be avoided.
5
Mitel 5604 Wireless Handset User Guide
Environmental Requirements
DECT Handset
•
Only use the handset in temperatures between 0o C to +40o C (32o F to 104o F).
•
Avoid exposing the handset for direct sunlight or close to other heat sources.
•
Avoid volume levels that may be harmful to your hearing. Exposure to excessive sound
pressure from a handset's earpiece or headset may cause permanently hearing loss.
•
Do not expose the handset to open flame.
•
Keep the handset away from excessive heat and moisture.
•
Avoid sudden temperature changes to prevent condensation in the handset. It is recommended to put the handset into an air tight plastic bag until the temperature is adjusted, for
example, when entering or leaving a cold/heated building on a warm/cold day.
•
Protect your handset from aggressive liquids and vapors.
•
The handset may retain small metal objects around the mouth cap or ear cap region.
•
If the handset has been exposed for water or condense, remove the battery immediately
and let it dry completely before re-inserting the battery.
•
Keep the handset away from strong electromagnetic fields.
•
Do not place a cold handset in a charger.
Chemical Resistance
The alpha and numeric characters printed on the exterior of the handset have been tested and
found resistant to chipping, fading or wearing off when the handset is treated with common
cleaners and disinfectants or perspiration. The following chemicals have shown no harmful
effect:
•
3% Hydrochloric Acid
•
M-alcohol (70% Methylated Ethanol)
•
60% Chlorhexidin 0.5mg/ml
Acetone can be damaging to the plastic casing of the handset and should not be used.
6
About Your Phone
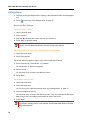
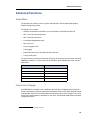
Icons and Text in the Display
All functions and settings available to the user are shown as icons and text in the display. The
icons and text in the display indicate functions and settings to which you have access. The
display normally displays date and time, the Owner ID and handset number. The Owner ID can
manually be set by the user.
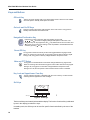
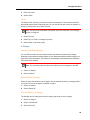
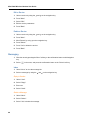
Figure 3: Display Configuration in Standby Mode
The Status bar (1) is used for icons which give the user information about signal strength,
missed calls, new messages, phone lock, key lock, sound off, time and battery status. This row
is always visible in all screens.
The Header bar (2) displays the current date, headset connection, Bluetooth connection, and
system connection.
The Active area (3) is used for information such as the name of the system to which the handset
is connected. A user identity provided from the system and/or an Owner ID can also be displayed
if configured in the Settings menu. This is also the area for dialog window text, for example
"missed calls", or to confirm an action.
The Scroll bar (4) is placed to the right of the "Active area". It becomes visible when a menu
screen has more than six menus, or if the complete text in a message cannot be displayed on
the screen simultaneously.
The Soft key bar (5) is used for soft keys which can be used as short cuts for functions in the
handset. See “Soft Keys” on page 10.
Icons
“Signal strength” icon is visible in the upper left corner. The staples shown in display depend
on the signal strength.
“Full battery” icon appears in upper right corner
"Low battery warning” icon is shown when the battery has 10% or less remaining capacity
left
"Empty battery warning" icon flashes when the battery has 5% or less remaining capacity
7
Mitel 5604 Wireless Handset User Guide
“Sound off” icon appears when the Sound off key or Mute button is pressed
The Silent ("Volume 0") icon is displayed when the volume has been set to Silent.
"Microphone off" icon indicates a silenced microphone. It appears after a long press on the
Sound off key, Mute button during a call.
During a PTT call, the microphone is silenced when the PTT button is released
“Loudspeaking” icon appears in the soft key bar during a call. Pressing this icon turns on
the loudspeaker.
“Loudspeaking off” icon appears after the soft key for Loudspeaking icon is pressed.
Pressing this icon turns off the loudspeaker.
“New message” icon or “Interactive message” icon indicates that a new text message (or
messages) has arrived. The icon remains in the status bar until all new messages in the
inbox are read.
"Request for answer" icon in front of a message indicates that this message must be
acknowledge or rejected
“Voice mail message” icon appears in the status bar when voice mails are received. The
icon remains until you listen to your the voice mail.
Voice mail message” icon appears in the message box when voice mails are received. The
icon remains until you listen to your the voice mail.
“Read message” icon or “Read Interactive message” icon in front of a message shows that
this message once has been read
"Unsent message" icon
"Sent message" icon
"New colored message" icon indicates that a new colored text message(s) has arrived. The
messages can be labeled with different colors.
"Read colored message" icon indicates that a colored text message(s) has been read. The
messages can be labeled with different colors.
"High priority" icon included with New message icon indicates message is of high priority
"Alarm priority" icon included with New message icon indicates alarm priority of a message
“Key lock” icon indicates a locked keypad
"Locked entry" icon indicates that the contact cannot be edited or deleted by the user
"Phone lock" icon indicates a locked handset
8
About Your Phone
“Headset” icon indicates that a corded headset is connected to the handset
“Outgoing call” icon is added to all outgoing calls in the call list
“Incoming call” icon is added to all answered calls in the call list
"Push to talk" icon is added to all incoming, outgoing, missed and answered PTT calls in the
call list/missed calls
Note: The icon is added when a PTT invitation is managed as a call (that is PTT Voice
Style) only
“Missed call” icon is added to all missed calls in the call list
“Missed call” icon indicates missed calls in the status bar
"PDM/WSM communication" icon is visible when handset is
communicating with PDM/WSM via advanced charger.
"Profile active" icon
"Personal Alarm" icon indicates that the handset is a 5604 Personal Alarm license
Menu icons
The ”Contacts” menu contains all names/numbers in the local phonebook. In addition, a
company phonebook* with up to 1000 entries can be downloaded to the handset via the
PDM. It is also possible to access a central phonebook* from the "Contact" menu.
The "Services" menu contains menu short cuts used to customize the phone menu of an
individual phone
The “Messaging” menu contains all message handling such as reading and writing
messages
The “Calls” menu contains call lists, call time, and call services*. Call services is configured
in the PDM.
The “Connections” menu contains headset selection, System selection, and In charger
selection
The ”Short cuts" menu contains short cuts for the soft keys, hot keys, navigation keys, and
the Multifunction button
The ”Short cuts" menu contains short cuts for the soft keys, hot keys, navigation keys, and
the Multifunction button
The “Profiles” menu allows you to add four different profiles. The "Normal" profile is active
by default.
* System dependent.
9
Mitel 5604 Wireless Handset User Guide
Keys and Buttons
Off-hook Key
This key is used to answer calls, to pre-dial numbers and as a short cut to the Call list.
One short press in standby mode opens the call list.
On-hook and On/Off Keys
This key is used to disconnect calls and return to the main screen. A long press in
standby mode switches the handset on/off.
Navigation/Confirmation Key
Use this key to step in the menu and when working in text mode.
, , , and are used for stepping left/right and up/down in the menu. The
navigation key can be programmed, the is by default a short cut to the Inbox, and
is a short cut to Call contact. During a call it is possible to increase/decrease the
volume by pressing
and .
Sound Off Key
A long press on the Sound off Key in idle mode toggles between ring signal on/off.
When you receive an incoming call, a long press on the key silences the ring signal.
During a call, a long press on the key changes between microphone on/off.
Mute and PTT Button
A long press on the Mute button in idle mode changes between ring signal on/off.
When an incoming call is received a long press on the button silences the ring signal.
During a call, a long press on the button changes between microphone on/off.
During a PTT call, the microphone is silenced when the PTT button is released.
Key Lock and Upper/Lower Case Key
This key locks the keypad in combination with the "Lock" soft key. It is also used for
switching between upper/lower case and digits.
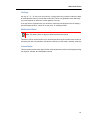
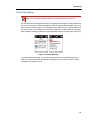
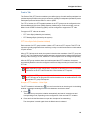
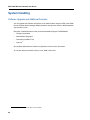
Soft Keys
List
003
Call
Soft keys
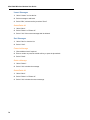
Figure 4: Soft Keys
The three soft keys are located just beneath the display. The function of each soft key is indicated
by text in the display just above the keys.
In standby mode, the Soft keys can be used for specific functions defined by the user of the
handset.
10
About Your Phone
Hot Keys
Any key "0", "2" - "9" can be set to a Hot Key. A long press on any of these numbers in stand
by mode provides a short cut to the Call contact list. The list is in alphabetic order. Which key
you press depends on where the contact appears in the list.
A hot key can be programmed to give access to frequently used functions such as dialing a
specific handset number, a short cut on the menu, or sending an SMS.
Multifunction Button
Note: This feature does not apply to 5604 Personal Alarm license.
This button can be used as a short cut to functions and has long and double press modes as
defined by the user of the handset. If the button is defined, it can be used in standby mode only.
Volume Button
The two buttons placed on the upper left side of the handset are used for increasing/decreasing
the earpiece, headset, and loudspeaker volume.
11
Mitel 5604 Wireless Handset User Guide
Alphanumeric Keys
Figure 5: Available Characters
Note: Depending on the selected menu language, other characters can be available.
This means that the character order can differ from the table above.
In Standby Mode, and Number Input Mode
•
A short press on a key enables you to enter the digits “0” - “9” and the characters * and #.
•
You enter a pause in the number input mode by a long press on the # key. A pause is
indicated by a "P" in the display.
•
A long press on the * key changes the tone sender. Tone sender On is indicated by a "T"
in the display.
In Text Input Mode
•
A short press on a key 0-9, displays the first available character on that specific key. The
marked character is selected after a timeout, or when another key is pressed.
•
You change to upper/lower case, by pressing the * key before entering the character. The
* key can also be used to display only the digits.
•
To add space in the text, make a short press on key 0.
•
The first character entered in a message, or when adding/editing a name in the Contacts
menu, will be an upper level character followed by lower level characters (unless the * key
is pressed before you enter the character). To switch between Abc, ABC, abc, and 123 you
press the * key.
•
A long press on the #-key displays special characters.
•
When entering text, press and hold the * key to display a list of languages. This makes it
possible to switch writing language while entering text.
Note: Switching languages works only if the DECT base station is configured to support
it.
12
About Your Phone
Headset
If you will use your handset frequently, we recommended you use a headset so you have both
hands free. The headset comes in three versions; microphone integrated in the cable,
microphone on a boom and hearing protection.
In order to achieve optimal audio quality with your headset we recommend you select the
corresponding headset profile.
Note: It is possible to configure the headset button with a specific function, such as hook
off, dial last called number, or dial a predefined number. See the Mitel 5604 Wireless
Handset Configuration Guide for more information.
The default setting is microphone on a boom, that is, the audio is optimized for using a headset
with microphone on a boom. The headset profile can be changed in the menu by do as follows:
1.
Enter the menu by pressing the “Menu” soft key, or the confirmation button on the Navigation
key.
2.
Select "Connections".
3.
Press "Select", or the confirmation button on the Navigation key.
4.
Select "Headset".
5.
Select the corresponding headset profile from list, that is, "Mic on boom", "Mic on cable",
or "Hearing protection".
6.
Press "Select", or the confirmation button on the Navigation key.
If the pre-configured headset profiles do not match the headset in use, or the audio performance
is bad, it is possible to configure an own headset profile. This is done in the PDM, see the Mitel
5604 Wireless Handset Configuration Guide. If an own profile is configured in the PDM, it will
be selectable in the handset menu.
13
Mitel 5604 Wireless Handset User Guide
Customizing Your Phone
Switch the Handset On/Off
Note: If a handset restriction is enabled, it might not be possible to switch off the handset.
See the Mitel 5604 Wireless Handset Configuration Guide.
When the handset is switched off:
1.
Press and hold the On-hook key
.
When pressing the On-hook key, the handset vibrates and the display lights up.
2.
A dialog window "Switch on?" appears.
3.
Press "Yes" to confirm.
When the handset is in idle mode:
Note: If the handset is a shared/hotdesk phone, it must first be logged out to be able to
switch off the handset. See “Log a Shared/Hot Desk Phone On/Off” on page 14".
1.
Press and hold the On-hook key
.
The "Switch off?" window appears.
2.
Press "Yes" to confirm.
Log a Shared/Hot Desk Phone On/Off
Note: This feature requires that the parameter "Phone mode" is configured. See the
Mitel 5604 Wireless Handset Configuration Guide.
The shared phone feature allows more than one user to use a handset. When a handset is
configured to be a shared phone, it can be used by any shared phone user in the system. The
message and call lists are deleted when a user logs off of a handset.
Log on a Handset
Before you log on to the handset ensure it has been switched on. See “Switch the Handset
On/Off” on page 14 for more information.
14
1.
If your handset display is lit, you will see "Please Login."
2.
Press any key. The "Login?" prompt appears.
3.
Press "Yes".
4.
Enter your extension number and user PIN.
5.
Press "Login"
Customizing Your Phone
You are logged in and will you will see your extension number in the idle display.
Note: If the IP-DECT system supports Hot Desking and the feature is enabled in the
handset via PDM/Device Manager, the handset’s call list will also be downloaded to the
handset. Calls made by the same person with other devices over the same IP-DECT
system will be listed.
Log off a Handset
1.
Press and hold
.
2.
When the "Logout?" window appears, press "Yes".
If the "Logout in Charger" option is selected, either on the handset or via PDM, the user is
logged out when the handset is placed in the charger.
A user is also logged out from the handset when logging on using a different device but the
same user account.
.Turn On/Off the Audible Signal
A long press on the
The
or
in idle mode toggles the ring signal on/off.
icon indicates a silenced handset.
Lock/Unlock the Keypad
Lock/Unlock the Keypad in Idle Mode
You can lock keys to prevent you from accidentally pressing them.
Lock the Keypad
1.
Press
.
2.
Press "Lock".
Unlock keypad
1.
Press
2.
Press "Yes".
Note: You can answer/close an incoming call and/or press the alarm button while the
keypad is locked. If configured in the PDM/WSM, you can call a pre-defined emergency
number while the keypad is locked. See the Mitel 5604 Wireless Handset Configuration
Guide.
Lock/Unlock the Keypad during a Call
To prevent accidentally pressing keys you can lock keys during a call. This is useful when
wearing a a headset and a handset attached to a pocket or belt.
15
Mitel 5604 Wireless Handset User Guide
Lock the Keypad
1.
Press
.
2.
Press "Lock".
Unlock the Keypad
1.
Press
2.
Press "Yes".
Note: You can press the volume buttons and the mute button during the call. If the 5604
Personal Alarm license is used it is also possible to press the alarm button.
Lock/Unlock the Handset
1.
Enter the “Settings” menu. See “Settings Menu” on page 76.
2.
Select “Locks”
3.
Select “Phone lock”.
4.
Select "Auto phone lock"
5.
Select "On", "On in charger", or "Off".
6.
Enter your PIN code.
7.
Press "OK".
Note: If the handset is configured in the PDM/WSM you can call a pre-defined
emergency number while the handset is locked. See the Mitel 5604 Wireless Handset
Configuration Guide.
Using the Loudspeaking Function
There are several options to activate the loudspeaking function:
•
Press a Navigation key, Hot key or Soft key defined as short cut to a Phone call
function. When pressing the key, a predefined number is called, see “Short Cuts Menu” on
page 65.
•
When receiving a call, press the soft key
•
During a call, press the soft key
This function can also be activated by selecting another answering method, that is,
"Automatically" and/or "Loudspeaking" See “Answer a Call” on page 19.
16
Making and Answering Calls
Making and Answering Calls
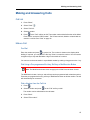
Call List
1.
Press "Menu",
2.
Select "Calls"
3.
Select "Call list".
4.
Select a number.
5.
Press
or the "Call" soft key to dial. The number can be edited before the call is dialled.
Press "More" and select "Edit number". The 25 last received, dialled or missed calls are
stored in a call list. See “Calls” on page 26.
.
Make a Call
Pre-Dial
Enter the number and press
to get the line. The number is shown on the display while
dialling. If required, you can press the Soft key "Clear" to erase the number. You can use the
navigation key to step and add/delete a digit in the middle of a number.
You can turn on the tone sender in a pre-dialled number by making a long press on the * key.
Dial Using a Pre-programmed Hot key, Soft key or Multifunction Button
Note: The Multifunction button does not apply to the 5604 Personal Alarm license.
The Multifunction button, hot keys, and soft keys can be programmed with a handset number.
Press the pre-programmed hot key, soft key or Multifunction button to dial the number. The call
will automatically be connected.
Dial a Number from the Call List
1.
Press
.
2.
Select a number and press
or the "Call" soft key to dial.
The number can be edited before the call starts.
3.
Press "More".
4.
Select "Edit number".
17
Mitel 5604 Wireless Handset User Guide
Dial the Sender of a Message
You can call the sender of a message stored in the message list, from the Messaging menu.
1.
Open the menu by pressing the confirmation button, or the soft key "Menu".
2.
Select "Messaging".
3.
Select "Inbox".
4.
Select a message from the list.
5.
Select "View".
6.
Select "More".
7.
Select "Call sender".
Dial a Number from the Local Phonebook
1.
Press "Menu".
2.
Select "Contacts".
3.
Select "Call contact".
4.
Select contact from list, or search name/number by entering characters in the "Search" field.
5.
Press the "Call" or the Off-hook soft key to make the call.
Dial a Name from the Central Phonebook
1.
Press "Menu".
2.
Select “Contacts”.
3.
Select "Central phonebook".
4.
Select "Search by name".
5.
Enter the first name and/or the last name. The whole name does not have to be entered.
6.
Press “Search”.
7.
Press the "Call" or the Off-hook soft key to make the call.
Dial a Number from the Company Phonebook
18
1.
Press "Menu".
2.
Select "Contacts".
3.
Select "Call contact".
4.
The local and company phonebook appears in the same list but the company names are
indicated by a “Locked entry” icon
in front of the name. Select a contact from the list or
search for the name/number by entering characters in the "Search" field.
5.
Press the "Call" or the Off-hook soft key to make the call.
Making and Answering Calls
Answer a Call
The flashing LED, accompanied by a ring signal and/or a vibrating handset, give you notice of
a call. Ring signal and vibrator can be disabled. The calling party’s handset number or name
is shown. The name will be shown if the calling party’s handset number is stored in the local
phonebook. Press the Off-hook key to answer the call. When a headset is connected to the
handset, the answering button on the headset can be used to answer the call.
Other answering methods can be specified in the Settings menu. See “Settings” on page 53.
The answering methods are Automatically and Loudspeaking.
When “Automatically” is enabled, all incoming calls are connected automatically.
Answer a Call
When the signal sounds press
to answer the call, or press the
soft key to answer the
call in loud-speaking mode. The name/number of the calling party appears if calling line
information is available.
End a Call
Press
to end the call. The duration of the call is shown in the display. The total time of the
call can also be retrieved from the Calls menu > Call time.
During a Call
Note: Some of these functions are system dependent. The parameters are set up in the
Portable Device Manager (PDM). See Mitel 5604 Wireless Handset Configuration
Guide, and Portable Device Manager (PDM) Installation and Operation Guide.
If the handset is configured via PDM/Device Manager, it is possible to call a predefined
emergency number while the handset/keypad is locked. When calling from a locked handset,
it is only possible to access the Microphone on/off function by pressing the soft key "More".
However, the entire In Call menu is accessible when calling from a handset with locked keypad.
Adjust the Volume during a Call
Press the "Volume up" button to increase the volume, and the "Volume down" button to decrease
the volume. The handset will now store and keep the new volume level. It is also possible to
use the navigation key, and to adjust the volume.
19
Mitel 5604 Wireless Handset User Guide
Open Contacts during a Call
1.
Press the "More" soft key.
2.
Select "Contacts".
3.
Press "Select".
4.
Select "Call contact" to search a local or company phonebook contact, or select "Central
phonebook" to search a central phonebook contact.
5.
Press "Select".
6.
Select a contact.
Note: You can call the selected contact by pressing "Call". When calling the contact,
the first call will be put on hold. See “Start a New Call during a Conversation” on page 21.
Open Messaging during a Call
The Messaging menu can be accessed during an ongoing call by pressing the soft key "More".
1.
Press the soft key "More" during the call.
2.
Select "Messaging".
See “Messaging” on page 34 for more information about messaging.
Turn the Microphone on/off during a Call
1.
Press "More".
2.
Select "Microphone off".
3.
Press "Select".
The icon
indicates a silenced microphone. This means that the other part in an ongoing
call cannot hear you.
To turn the microphone back on:
1.
Press "More".
2.
Select "Microphone on".
3.
Press "Select".
It also possible to turn the microphone off/on by a long press on
20
.
Making and Answering Calls
Lock/Unlock the Keypad during a Call
To prevent accidentally pressing keys, you can lock the keys during a call. This can be useful
when a headset is used and the handset is attached to a pocket or belt.
Lock the Keypad
1.
Press
.
2.
Press "Lock".
Unlock the Keypad
1.
Press
2.
Press "Yes".
You can press the volume buttons and the mute button during the call. If the 5604 Personal
Alarm license is used, it is also possible to press the alarm button.
Start a New Call during a Conversation
1.
Press "More".
2.
Select "New Call".
3.
Press "Select".
4.
Enter number, or press
5.
Press
to access the phonebook.
.
21
Mitel 5604 Wireless Handset User Guide
Call Handling for MCD (3300 ICP)
Tip: These feature descriptions apply to the use of the 5604 Wireless Handset on the
MCD. For information on the Call Handling features on the Mitel 5000, see “Call Handling
for the Mitel 5000 CP” on page 29.
During a call you may need to use features, such as Hold, Transfer, Conference, Call Swap,
Callback, and Call Park.
You access these features during a call by pressing the "More" soft key. It displays the "In Call"
menu depicted in the following image.
Figure 6: Accessing Features
Note: Some functions are system dependent and/or require configuration in the handset via
PDM/WSM3.
22
Call Handling for MCD (3300 ICP)
You can also use these features by pressing the "R" key on the handset during a call. The
following table lists the In-Call menu features and associated feature access code methods.
In-Call Menu under More
Associated Feature Access Code
Contacts
Microphone off
New Call
R
Hold/Retrieve
R
Release
R4
Call Swap
R2
Join
RR + *80
Call Back
5
Answer Call Waiting
R2
Call Park
RR + *7#
Hold
1.
Press the "More" soft key.
2.
Select "Hold/Retrieve" to put the call on hold.
Retrieve a Held Call
1.
Press "More".
2.
Select "Hold/Retrieve" to retrieve the call.
Transfer
1.
Press "More".
2.
Select "New Call".
3.
Dial the number to which you want to transfer the call and then press "Call".
4.
Do one of the following:
•
to make a blind transfer, select "Release" to hang up and connect the other two parties.
•
to make a supervised transfer, wait for an answer, announce the transfer, and then
select "Release" to hang up and connect the other two parties.
•
to terminate the transfer and return to the held call, press "More" and then select "Call
Swap".
23
Mitel 5604 Wireless Handset User Guide
Conference
To conference in another party while on a call:
1.
Press "More"
2.
Select "New Call" to put the current call on hold.
3.
Dial the number of the third party.
4.
Wait for an answer.
5.
Press "More".
6.
Select "Join".
Answer Call Waiting
Depending on system setup and configuration, Call Waiting may be handled in one of two
different ways:
Method 1
If a second caller calls during a phone call, the handset will beep and display the text "Internal
call" for internal callers and "External call" for external callers. The handset will also show the
name or phone number of the second caller. To answer the second caller:
1.
Press the soft key "Accept".
The text "Switch" briefly appears on screen, and the handset transfers to the second call.
The first call is put on hold.
2.
When finished speaking with the first caller, select the "More" soft key.
3.
Select "End Call".
The second call is closed and the first call is retrieved.
Note: It is possible to reject a second call by pressing the "Decline" soft key. The second
caller will hear a busy tone, and the call will be logged as a missed call in the handset.
Method 2
While on a call, if you hear a call waiting beep:
1.
Press "More"
2.
Press "Answer Call Waiting" to answer the incoming call.
3.
Press "Select". The new call is now connected, and the first call is on hold.
When the line is free, the call on hold will automatically be dialed again. This is a
system-dependent feature.
24
Call Handling for MCD (3300 ICP)
Callback
Callback lets you request that the system notify you when a busy extension becomes available.
To request a callback when a number/extension is busy:
1.
Press "More".
2.
Select "Call Back".
3.
Press "Select"
4.
Press "On-hook" and wait for the handset alert.
5.
Press "Off-hook" to answer the call.
Your extension will ring when the called extension becomes free and automatically dial the
extension back.
Call Park
The Call Park feature allows you to place a call in a special hold state.You, or someone else,
can then retrieve the call from any extension in the system. After parking the call, the system
can automatically connect you to paging equipment so that you can announce the call to the
requested party.
To park a in-progress call:
1.
Press "More".
2.
Select "Call Park".
3.
Dial the directory number on which to park the call.
4.
Inform the called party of the waiting call.
To retrieve a parked call:
1.
Press "Call -> Call Services".
2.
Select "Call Park - Retrieve" and enter the directory number on which the call is parked.
25
Mitel 5604 Wireless Handset User Guide
Advanced Features for MCD (3300 ICP)
Tip: These feature descriptions apply to the use of the 5604 Wireless Handset on the
MCD. For information on the Advanced features on the Mitel 5000, see “Advanced
Features for the 5000 CP” on page 32.
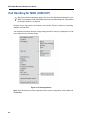
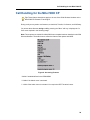
Calls
Figure 7: Calls Menu
* Visible if defined in the PDM
The following features are available from the Calls, Call Services menu:
•
26
Call Forward
Advanced Features for MCD (3300 ICP)
•
Call Forward Cancel
•
Do Not Disturb
•
Do Not Disturb Cancel
•
Call Pickup
•
Call Park Retrieve
•
Direct/Group Page
•
Loudspeaker Page
To access the Call Services menu:
•
Press "More".
Call Forward
To set Call Forwarding:
1.
Press "More".
2.
Select "Call Forward".
3.
Enter the extension number to which you will forward your calls.
4.
Press "Call".
5.
Listen for a confirmation tone and then hang up.
To cancel call forwarding:
1.
Press "More".
2.
Select "Call Forward Cancel".
3.
When you hear a re-order tone, press
to hang up.
Call Pickup
To answer a call that is ringing at another station in your Pickup Group:
1.
Press More".
2.
Select "Call Pickup".
3.
Answer the call.
Do Not Disturb
To activate Do Not Disturb:
1.
Press "More".
2.
Select "Do Not Disturb".
3.
When you hear a re-order tone, press
to hang up. Do Not Disturb is activated.
27
Mitel 5604 Wireless Handset User Guide
To deactivate Do Not Disturb:
1.
Press "More".
2.
Select "Do Not Dist. Cancel".
3.
When you hear a re-order tone, press
to hang up.
Do Not Disturb is deactivated.
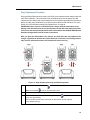
IMPORTANT: Do not select an option from the active call menu during any of the Paging
features.The options are not applicable and your call will be terminated if selected.
Direct Page
Direct Paging allows you to page a party through the party’s hands free speaker.
1.
Press "More".
2.
Select "Direct/Group Page".
3.
Dial the extension number.
4.
Announce the page.
Group Page
Group Paging allows you to page a group of telephones through their built-in speakers.
1.
Press "More".
2.
Select "Direct/Group Page".
3.
Do one of the following:
•
To page your prime page group, press #.
•
To page a specific page group, dial the page group directory number.
4. Speak to the dialed party after the tone.
Loudspeaker Page
1.
Press "More".
2.
Select "Loudspeaker Page".
3.
Dial the paging zone number, if required.
4.
Wait for the ring back and announce the page.
Note: Ask your Administrator for the paging zone number.
28
Call Handling for the Mitel 5000 CP
Call Handling for the Mitel 5000 CP
Tip: These feature descriptions apply to the use of the 5604 Wireless Handset on the
Mitel 5000 CP Release 6.0 and higher.
During a call you may need to use features, such as Hold, Transfer, Conference, and Call Swap.
You access these features during a call by pressing the "More" soft key. It displays the "In
Call" menu depicted in the following image.
Note: These options are visible if the Mitel 5000 menu template has been installed on the 5604
Wireless Handset. The default menus reflect the features that operate with MCD.
Figure 8: Accessing Features
* Visible if enabled/defined in the PDM/WSM3
** Visible if the Admin menu is activated.
*** Visible if the Admin menu is activated. You require the DECT location license.
29
Mitel 5604 Wireless Handset User Guide
You can also use these features by pressing the "R" key on the handset during a call. The
following table lists the In-Call menu features and associated feature access code methods.
In-Call Menu under More
Associated Feature Access Code
Contacts
Microphone off
Hold
R
New Call
R
Release
R4
Join
RR + (5)
Answer Call Waiting
R2
Call Swap
R2
Switch
R2
End Call
R1
Hold
1.
Press the "More" soft key.
2.
Select "Hold/Retrieve" to put the call on hold.
Retrieve a Held Call
1.
Press "More".
2.
Select "Hold/Retrieve" to retrieve the call.
Transfer
30
1.
Press "More".
2.
Select "New Call".
3.
Dial the number to which you want to transfer the call and then press "Call".
4.
Do one of the following:
•
to make a blind transfer, select "Release" to hang up and connect the other two parties.
•
to make a supervised transfer, wait for an answer, announce the transfer, and then
select "Release" to hang up and connect the other two parties.
•
to terminate the transfer and return to the held call, press "More" and then select "End
Call".
Call Handling for the Mitel 5000 CP
Conference
To conference in another party while on a call:
1.
Press "More"
2.
Select "New Call" to put the current call on hold.
3.
Dial the number of the third party.
4.
Press "Call".
5.
Wait for an answer.
6.
Press "More".
7.
Select "Join".
Answer Call Waiting
If a second caller calls during a phone call, the handset will beep and display the text "Internal
call" for internal callers and "External call" for external callers. The handset will also show the
name or phone number of the second caller. To answer the second caller:
1.
Press the soft key "Accept" or press R2.
The text "Switch" briefly appears on screen, and the handset transfers to the second call.
The first call is put on hold.
Note: It is possible to reject a second call by pressing the "Decline" soft key. The second
caller will hear a busy tone, and the call will be logged as a missed call in the handset.
31
Mitel 5604 Wireless Handset User Guide
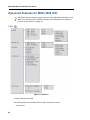
Advanced Features for the 5000 CP
Tip: These feature descriptions apply to the use of the 5604 Wireless Handset on the
Mitel 5000 CP Release 6.0 and higher.
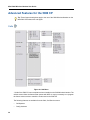
Calls
Figure 9: Calls Menu
* Visible if the 5000 CP menu template has been installed on the 5604 Wireless Handset. The
default menus reflect the features that operate with MCD. It may be necessary to re-program
the feature access codes to match the codes used on the 5000 CP.
The following features are available from the Calls, Call Services menu:
32
•
Call Operator
•
Config Assistant
Advanced Features for the 5000 CP
•
Reverse Transfer
To access the Call Services menu:
•
Press "More".
Call Operator
To call your switchboard operator:
•
Press "More".
•
Select "Call Operator"
Config Assistant
Configuration Assistant allows you to access a voice-guided configuration portal that provides
easy-to-use, remote access to the following phone configuration options:
•
Dynamic Extension Express
•
DND
•
Manual Call Forwarding
•
Meet-Me Conferencing
To use Config Assistant:
•
Press "More".
•
Select "Config Assistant"
Follow the voice prompts to make the changes to the required features.
Reverse Transfer
You can use Reverse Transfer (Call Pick Up) to answer calls that are ringing or holding at other
extensions. For example, if you receive a call while you are away from your desk, you can pick
up the call from another extension.
To use Reverse Transfer:
1.
Press "More".
2.
Select "Reverse Transfer"
3.
Dial the extension or hunt group number where the call is ringing or holding. The call is
transferred to the phone you are using and you are connected to the caller.
33
Mitel 5604 Wireless Handset User Guide
Messaging
Message List
The thirty last received messages are stored in a list. The message list is located in the
Messaging menu "Inbox". Time and date information is included in the message.
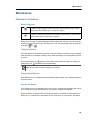
Receive a Message
Incoming Message for 5604 Services License
When a text message is received, the LED starts flashing and the message alert signal sounds.
The “New message“ icon, and the content of the received message are automatically displayed.
The icon will remain in the display until all new messages are opened. If the message is received
during a call a beep notifies the user.
It is possible to reply, forward the message, call the sender and call number included in a text.
It is also possible to read the message later by selecting "Close". A received message is stored
in the Inbox.
Incoming Message for all 5604’s except for 5604 Services License
When a text message is received, the LED starts flashing and the message alert signal sounds.
The “New message“ icon, and a text with information of received message are displayed. The
icon will remain in the display until all new messages are opened. If the message is received
during a call a beep notifies the user.
You can select "Yes" to read the message and reply to it, forward it, call the sender, or call the
number in text. Alternately, you can select "No" and read the message later. The message is
stored in the Inbox.
Note: New messages and information about incoming calls can be displayed upside
down. This can be useful if you wear the handset in a belt and want to read the
message/call information without rotating the handset. When pressing any key, the
messages will be displayed in the normal way. See the Mitel 5604 Configuration Manual
for more information.
Read a Stored Message
34
1.
Press "Menu".
2.
Select “Messaging”.
3.
Select “Inbox”.
4.
Select a stored message from the list.
5.
Press "View".
Messaging
Reply to a Message
1.
Press “Reply”.
2.
Enter message.
3.
Press "Send".
4.
if required, edit the number.
5.
Press "Send".
Delete a Message(s)
1.
Select "Inbox".
2.
Select a message to delete.
3.
Press "More".
4.
Select "Delete"
5.
Press "Yes" to confirm.
Forward a Message
1.
Select "Inbox"
2.
Select a message.
3.
Press "View".
4.
Press "More".
5.
Select "Forward"
6.
If required, write additional text.
7.
Enter the number to which you will forward the message or press the middle soft key to
open the phonebook and select a number.
8.
Press "Send" to forward the message.
Call the Sender of the Message
1.
Select "Inbox".
2.
Select a message.
3.
Press "More".
4.
Select "Call sender".
35
Mitel 5604 Wireless Handset User Guide
Call a Number Included in a Message
If the sender has written a number in the message you can call the number without dialling it.
1.
Select "View".
2.
Select "More".
3.
Select “Call no. in text”1.
4.
Select a number in the list.
5.
Press "Call".
Save a Number
1.
Select "Inbox".
2.
Select a message.
3.
Select "View".
4.
Press "More".
5.
Select "Save number".
6.
Select "Work number", "Mobile number", or "Other number".
7.
Add a name and press "OK".
8.
Press "Save".
The number will be added to the contact list.
Write and Send a Message
1.
In the “Messaging” menu, select “Write new message”.
2.
Write the message. Keys 0-9, * or # can be used. Key 0 and 1 contains special characters.
See “Alphanumeric Keys” on page 12 to see all characters.
The maximum message length is 140 characters.
Note: Some characters require 2 bytes in the final message; therefore, the user will
sometimes not be able to enter 140 characters.
The first character entered will be an upper level character followed by lower level characters
unless the * -key is pressed before entering the character.
When pressing a particular key, the first available character on the key appears. See
“Alphanumeric Keys” on page 12. To access another characters on the key, press the key until
the character appears in the display.
For example, to access the character E, press the 3 key twice. "E" appears in the display and
is selected after a timeout or when another key is pressed.
1. This option is visible only if the number consists of a minimum of 3 digits.
36
Messaging
Open a Sent Message
1.
In the “Messaging” menu, select “Sent”.
2.
Select a message.
3.
Select message.
4.
Press "View" to read the message.
Send a Message to Another Destination
1.
In the “Messaging” menu, select “Inbox” or "Sent".
2.
Select message.
3.
Press "More".
4.
Select "Forward".
5.
Press "Send".
6.
Enter the number.
7.
Press "Send".
Receive a Message with Request for Answer
In the status bar, a message with request for answer is indicated the same way as an ordinary
message, see “Receive a Message” on page 34.
In the message list, the message with request for answer is indicated by the
icon.
Accept/Reject a Message
Press the soft key “Accept” or “Reject”.
When an acknowledged message has been replied to, the icon
is shown in the message
list. The text “Accepted” or “Rejected”, and time and date is also added to the acknowledged
message.
Note: The option “Delete” is not available for a message with request for answer. An
unacknowledged message can be deleted only from the message list.
37
Mitel 5604 Wireless Handset User Guide
Message Queuing and Message Priority
Note: This feature applies to the 5604 Services license only.
The default settings is that each message will be displayed without being interrupted by another
message, except if the new message is of higher priority. Messages that are not shown yet are
placed in a queue and the priority and time of reception determine the position in the queue.
There are 9 levels of the priority. 1 is highest priority and 9 is lowest priority.
If several of the messages have the same priority the message that was received first is shown
first. If a new message with a higher priority is received while another message is read the new
message will replace the old message in the display. The old message will be placed in the
queue. If a new message with equal or lower priority is received while another message is read
the new message will be placed in the queue.
You can specify how long a message will be displayed. See the Mitel 5604 Wireless Handset
Configuration Guide.
New messages
Prio 7
14:04 Prio 4
14:03
Prio 1
14:02 Prio 9
14:01
Prio 9
14:01
Prio 8
13:59
Me
ss
Prio 7
14:04 Prio 4
14:03
Prio 2
13:59
Current Mess
ag
ue
Prio 2
13:59
Current Mess
Prio 1
14:02
010
eq
ue
Prio 4
13:58
Figure 10: Message Queuing and Priority
38
Messaging
Message Priority and Call Priority
Note: This feature requires settings in the PDM/Device Manager. See the Mitel 5604 Wireless
Handset Configuration Guide.
The default setting is that the call information dialog always shall be visible in front of a message
at incoming calls. It is possible to configure if a message with a certain priority shall be displayed
without being interrupted by a call. By setting a call priority, the handset compares the call
priority with the message priority in order to determine which information to be displayed, that
is, the call information dialogue or the message. If the message priority and the call priority are
equal, the message will be displayed.
Message Indication Repetition
By default, when a new message is received/displayed, the LED starts flashing green once
and the message alert signal sounds. It is possible to configure the handset to repeat the alert
signal for an unread message every 7th second as long it is displayed. See the Mitel 5604
Wireless Handset Configuration Guide for message settings.
Priority 1 messages with certain system-defined properties are handled as extra important and
therefore will the alert signal be repeated every 10th second in 5 minutes, or until any key is
pressed. Note that this is a system/application dependent feature and cannot be configured in
the handset.
Interactive Messaging
Note: This system dependent feature applies to the 5604 Services license only.
Interactive Messaging (IM) is a function that extends basic messaging. It makes it possible for
a user of a handset to access information from a client application in the system.
For example, customized applications can be accessed from the handset. A list of actions can
be included in the message sent from the application to the handset.
An IM is indicated and viewed the same way as an ordinary message, see "“Receive a Message”
on page 34. It is saved along with other messages in the message list.
When you read an IM it can display several options. Mark the appropriate IM and press “Select”.
If the selected option requests input, enter the information required and press “OK”. Pressing
the middle soft key changes the mode to digit or text input depending on the format of the
message. A read message is indicated the same way as an ordinary message.
Note: If a handset receives an IM update and the original message was deleted, the
handset sends a negative acknowledge (NAK) to the system.
39
Mitel 5604 Wireless Handset User Guide
Figure 9 illustrates a basic interactive message. The options depend on the configuration of
the client application.
Figure 11: Interactive Message
Mobile data from the handset can instruct the application to send the interactive message. See
“Mobile Data” on page 42. You can then select an action from the list, such as sending a
message back to the application and/or dialling a specific number.
40
Messaging
Colored Messaging
Note: This is a system dependent feature for the 5604 Services license only.
You can send colored messages to handsets. The application sending the message determines
the color of the message. Colored messaging is useful for categorizing messages. In figure 12,
there are two colored messages—a new message, and a read message—in the message inbox
(left in the figure). The messages are indicated by a gradient color bar behind the envelopes.
When reading a message, a gradient color bar is appears below the envelop (right in the figure).
Figure 12: Colored Message
To enable colored messaging, see the corresponding manual for the application used. In
addition, colored labels can be mapped to message beep codes. See the IP-DECT WSM
Installation and Operation Guide.
41
Mitel 5604 Wireless Handset User Guide
Mobile Data
Note: This is a system dependent feature for the 5604 Services license only.
Send Mobile Data
You can send user entered data from the handset by pressing a pre-programmed hot key or
soft key, or selecting a service. Mobile data can be used for actions such as opening a door,
or starting or stopping a machine. The data can either be predefined, or entered after the hot
key/soft key is pressed or service is selected.
The data can be predefined when programming the soft/hot key or service. See “Define a Soft
Key” on page 65, “Define a Hot Key” on page 66, or “Add a Service” on page 67.
Send Mobile Data with a Prefix
Mobile data with a prefix is sent from the handset by entering data and then pressing a
pre-programmed hot key or soft key or selecting a service. Mobile data with a prefix can be
used to send information to an application in the system.
You define the prefix when you program the hot/soft key or service. See “Define a Hot Key” on
page 66.
42
Messaging
Procedure Call
When configuring the functions Call services, In Call menu, Contacts, or a shortcut/service to
the Phone call function, the data added in these functions is static. When entering the data for
the function to be used, it is possible to add a variable/character U that allows the user to enter
additional numerical characters before calling the number/sending the data to a system.
See the following example for more information.
Example of configuration:
A user wants to create a service with the Phone call function. The PBX requires that a prefix
must be added to a phone number. In this case, the user can pre-program the prefix and then
enter the applicable phone number when using the Phone call function.
1.
Press "Menu", or the confirmation button.
2.
Select "Services".
3.
Select "Add new".
4.
In the Name field, enter "Call no.".
5.
Select the function "Phone call".
6.
In the Number field, enter the prefix to be used followed by the character "U". In this case,
the text string is as follows *21*U. The character U represents an Enter number dialog
where the user can enter the phone number.
7.
Press "Save".
When using the function, an Enter number dialog appears. If the user enters "123" (or selects
a contact with this number by pressing
) and presses "OK", the number *21*123 will be
dialed. Note that no call is established before the user presses "OK", that is, post-dial.
43
Mitel 5604 Wireless Handset User Guide
Voice Mail
Note: This feature is available only if configured in the system.
Receive a Voice Mail
When receiving a voice mail, the content of the voice mail notification appears automatically
on the screen, and is also indicated by the “Voice mail message” icon
in the status bar.
If the content of the notification appears, press “Call” to dial the voice mail. If “Close” is selected,
you can dial the voice mail by a long press on digit key “1” in standby mode or from the Inbox
menu.
Information is stored in the “Messaging” inbox until you listen to the voice mail messages.
Check the Voice Mail Inbox
The voice mail is indicated by a “Voice mail message” icon
message, and is also displayed first in the inbox list.
1.
In the “Messaging” menu, select “Inbox”.
2.
Select the voice mail message.
3.
Press “View”.
4.
Press “Call”.
in the front of the voice mail
Voice mail will be displayed with one entry in the message list regardless of the number of voice
mail received.
One Key Voice Mail Access
A long press on digit key “1” in standby mode will call your voice mail. If the extension number
is not available the “Voice mail number not defined" window appears.
Note: Some systems require the mailbox extension number to be downloaded to the
handset. See the Mitel 5604 Wireless Handset Configuration Guide.
44
Alarm Operation
Alarm Operation
Note: The following system dependent features apply to the 5604 Personal Alarm
license only. See the Mitel 5604 Wireless Handset Configuration Guide.
Push-button Alarm
You press the red alarm button twice within two seconds to activate the alarm. By default the
text “Personal Alarm” appears. The alarm is sent to the alarm centre that distributes it further.
After that the handset returns to stand-by mode. Note that you can always trigger the alarm
when you are speaking, editing your settings, or while the handset is locked.
Acoustic Location Signal
An alarm can be followed by an Acoustic Location Signal (ALS). The ALS is a signal from the
handset that sounds for a predefined period of time. You silence the signal by pressing the
Mute button on the handset.
Test Alarm
If you press and hold the red alarm button until the (default) “Test Alarm” text appears the
following occurs depending on the options specified:
•
A beep is heard.
•
The orange LED flashes twice.
•
The vibrator stirs.
•
The handset receives a notification that the alarm has been received by the system.
•
If configured, the Acoustic Location Signal (ALS) is activated after the alarm has been sent,
or a call is established to a pre-defined number.
If the parameter "Silent alarm" is set, ALS will not be triggered and you will not be notified
that the alarm was sent.
•
information about the handset’s location is sent along with the alarm.
Alarm with Location Information
Information about the handset’s location can be sent along with an alarm. The location can be
added as follows;
•
Manually added (see “Alarm with Data” on page 46), or
•
An approximately location given by the closest Base Station (see the Mitel 5604 Wireless
Handset Configuration Guide) or
45
Mitel 5604 Wireless Handset User Guide
•
A precise location given by the DECT location devices (see the Mitel 5604 Wireless Handset
Configuration Guide).
Alarm with Data
You must manually define and store the data. To use the function, one soft/hot key/Navigation
key in the handset must be defined as a shortcut to the menu “Edit alarm data". See “Short
Cuts Menu” on page 65. The stored data is added to all types of alarm at transmission.
Automatic Call after Alarm
You can configure a handset to call a pre-defined number after an alarm has been sent.
Depending on the settings, the call can be established in the following modes;
•
loud-speaking mode, or
•
Monitor mode, or
•
Normal mode.
See the Mitel 5604 Wireless Handset Configuration Guide for more information.
46
Menu Tree
Menu Tree
Customizing the Menu Tree
You can customize the menu tree, hiding any functions that you do not use. The functions to
be hidden are defined in the PDM. See the Mitel 5604 Wireless Handset Configuration Guide.
Calls
* Visible if defined in the PDM
47
Mitel 5604 Wireless Handset User Guide
Contacts
* System dependent
48
Menu Tree
Profile
This profile does not contain all of the applicable settings.
49
Mitel 5604 Wireless Handset User Guide
Messaging
* Visible if the number consists of a minimum of 3 digits
Services
50
Menu Tree
Short cuts
* Visible if defined in the PDM
51
Mitel 5604 Wireless Handset User Guide
Connections
You cannot unsubscribe a protected system using the System menu: use the Admin menu or
the DECT system.
52
Menu Tree
Settings
53
Mitel 5604 Wireless Handset User Guide
In Call
You access the In Call menu during a call by pressing the "More" soft key.
If the handset is configured via PDM/WSM, you can access a particular function in the In call
menu directly by pressing the right soft key.
The In call function can be used in combination with the Procedure call function, see “Procedure
Call” on page 43. See “Call Handling for the Mitel 5000 CP” on page 29 for an illustration of the
In Call menu.
Note: If the handset is configured via PDM/WSM, you can call a pre-defined emergency
number while the handset is locked or the keypad is locked. If calling from a locked
handset, you can only access the Microphone on/off function in the In Call menu.
However, you can access the entire In Call menu when calling from a handset with a
locked keypad.
Microphone on/off
Contacts
Messaging
New Call
Hold/Retreive
Release
Call Swap
Join
Call Back
Answer Call Waiting
Call Park
DTMF
DECT Info
Location Info
---> Inbox
Write new message
Unsent
Sent
---> Call
[Phonebook]
Cancel
---> DECT Location info
General purpose name 1
|
General purpose name 10
* Visible if enabled/defined in the PDM/WSM
** Visible if the Admin menu is activated. You require the DECT location license.
54
Menu Tree
Additional In Call Functions
In addition to the default In Call functions, you can define 10 system specific codes for general
purposes. See the 5603/5604/5607 Programmer and Installation and Maintenance Guide.
55
Mitel 5604 Wireless Handset User Guide
Navigate the Menu
Figure 13: Main Menu
(1) Messaging
(2) Short cuts
(3) Settings
(4) Contacts
(5) Profiles
(6) Services
(7) Connections
(8) Calls
Connections Menu
1.
Enter the menu by pressing the “Menu” soft key, or the confirmation button on the Navigation
key.
2.
Select
in the menu, and press the confirmation button or the "Select" soft key.
Headsets
In order to achieve optimal audio quality we recommend you specify a headset type: Mic on
boom, Mic on cable or Hearing protection. Additional headsets1 might be visible in the list.
To specify a headset type:
1.
Select "Headset".
2.
Select a headset type from list.
3.
Press "Select".
System
Change System
Select “Automatic” or a specific system. If the handset is set to “Automatic” it selects a system
according to the priority list. See “Priority” on page 59.
1. Only visible if the headset profile has been configured in the PDM/WSM.
56
Navigate the Menu
Subscribe to IP-DECT System (Release 4.x or higher)
A handset can subscribe to an IP-DECT system automatically if the following are fulfilled:
•
The IP-DECT system is configured for Easy Registration; see the Mitel IP-DECT Base
Station Installation and Operation Manual.
•
The handset’s extension number and IPEI are registered in the IP-DECT system, see the
corresponding manual for the IP-DECT system.
•
The handset is not subscribed to any systems.
•
The handset software is version 4.0.x or greater.
1.
If needed, switch off the handset by pressing
2.
Switch on the handset by pressing
3.
Select language to be used or press "Cancel". If Cancel is pressed, the default language
(English) will be used.
4.
The handset starts to search for IP-DECT systems and will subscribe to the system when
it is found.
.
.
Note: If no system is found within 2 minutes or "Cancel" is pressed, the handset’s
subscription menu is displayed. Continue with step 5 in the procedure “Subscribe to
Other System” on page 57 for more information.
Notes about Subscribing Handsets and Hot Desking
If the handset is subscribed, but not registered with the MCD or 5000 CP, the handset will
display the following message: "Please login".
•
When subscribing the handset to the IP-DECT Base Station, enter the leading 0’s of the
PARK code. Removing the 0’s will prevent subscription.
•
After registering the handset with the MCD or the 5000 CP using the System ID, Extension,
and auth password, the "Please Login" message is removed from the handset.
•
If you are unable to subscribe the handset, ask the administrator to remove the handset
IPED from the user in the IP-DECT Base Station, if the IPED was pre-programmed for the
user.
If the handset is configured as a Hot Desk handset, then "Please Login" appears for the user
to enter hot desk information.
Subscribe to Other System
The handset can subscribe up to eight different systems. To subscribe a new system, you
require the “Park:” (Portable Access Right Key) and “Ac:” (Authentication code) related to the
system. Contact your system administrator for more information.
Note: The PARK code may not be required if there is no alien DECT system within the
coverage area. The handset supports IP-DECT systems configured for Easy
Registration.
57
Mitel 5604 Wireless Handset User Guide
The IPDI code is a unique code which has been assigned to the handset. See “Admin Menu”
on page 83.
1.
Enter the menu by pressing the “Menu” soft key.
2.
Select
3.
Select "System".
4.
Select "Subscribe".
5.
Press "Next".
6.
Enter a System name (optional).
in the menu.
If no system name is entered, the default name, such as System A or System B, will be
used, depending on system name availability.
7.
Press "Next".
8.
Enter the PARK code (max. 31 digits).
The PARK code may not be required if there is no alien DECT system within the coverage
area.
9.
Enter an AC code.
The AC code length must be between 1 - 8 digits.
10. Press "Next".
11. An information text "Protection on?" appears.
12. Select "Yes" if the new system is to be protected.
You cannot delete a protected subscription from the System menu1.
13. Press "OK" to search.
Unsubscribe System
1.
Press “Menu”.
2.
Select
3.
Select "System".
4.
Select "Unsubscribe"1.
5.
Select the system to unsubscribe.
6.
Press "Yes to unsubscribe the system.
in the menu.
Rename System
You can change the name of the system in the handset.
1.
Select "Rename System".
2.
Select a system to rename.
1. It is not possible to unsubscribe a protected system via the System menu. The un-subscription must be made via the Admin menu or the
DECT system.
58
Navigate the Menu
3.
Enter new name.
4.
Select "Save".
Priority
The default order of priority is the order of entered subscriptions. This means that the first
subscribed system has the highest priority. You can edit this list and can set the systems in
priority by moving them up or down in the list.
Note: This is used in combination with system set to be "Automatic", see “Change
System” on page 56.
1.
Select "Priority".
2.
Select "Up" or "Down" to change the priority.
3.
Select "Back" to save the priority.
In Charger
Redirect Calls While Charging
You can redirect calls to another extension when the handset is placed in the charger.
Redirecting calls enables message absence. See “Messages Absence While Charging” on
page 60 for more information. The function is automatically cancelled when the handset is
removed from the charger.
Note: The extension where the calls will be redirected to is configured in the PBX.
1.
Select “In charger”.
2.
Select “Redirect”.
Switch off While Charging
When you place the handset in the charger it can be switched off while it is charging. When
you remove it from the charger it will switch on again.
1.
Select “In charger”.
2.
Select “Switch off”.
End Call When put In Charger
The handset can be configured to end an ongoing call when put in the charger.
1.
Select “In charger”.
2.
Select “Call behavior”.
3.
Select "End Call".
59
Mitel 5604 Wireless Handset User Guide
Mute Handset While Charging
When you place the handset in the charger it can be muted while it is charging. When it is
removed from the charger it will switch on the sound again.
1.
Select “In charger”.
2.
Select “Sound off”.
Loudspeaking (Handsfree) While Charging
1.
Select “In charger”.
2.
Select "Loudspeaking".
Log Off Handset While Charging
Note: This feature is license dependent and applicable in IP-DECT systems only.
Note: This feature requires that the parameter "Phone mode" is configured. See the
Mitel 5604 Wireless Handset Configuration Guide.
When you place the handset in the charger it can be logged off while it is charging. Call list and
message list will be deleted when the handset is logged out. When it is removed from the
charger you need to log on again.
1.
Select “In charger”.
2.
Select “Logout”.
Change Profile While Charging
When you place the handset in the charger it can change profile while it is charging. By default,
the "Normal" profile will be activated. It is possible to change to another profile if configured.
See “Profiles Menu” on page 71
1.
Select "In charger".
2.
Select "Change profile".
3.
if required, select "Edit" to change the profile to be activated when the handset is placed
in a charger.
Messages Absence While Charging
When you place the handset in the charger message absence can be enabled while it is
charging. See also “Redirect Calls While Charging” on page 59. The function is automatically
cancelled when the handset is removed from the charger.
When an application/system sends a message to a handset it will receive an indication that the
handset is absent. If a handset is absent the application/system determines if the message will
be sent to the handset or not, or redirected to another handset.
Note: If a message is sent from a handset it will not receive an indication that the recipient
is absent.
60
Navigate the Menu
1.
Select “In charger”.
2.
Select “Message Absence”.
Deactivate the Charging Mode
1.
Select “In charger”.
2.
Select “No action”.
3.
Press "Select" to save the setting.
Calls Menu
1.
Enter the menu by pressing the “Menu” soft key, or the confirmation button on the Navigation
key.
2.
Select
in the menu, and press the confirmation button or the "Select" soft key.
Call List
The 25 last received, dialled or missed calls are stored in a call list. If a number occurs more
than once, the last time stamp and the total number of occurrences are shown.
Note: If supported by the system, the number’s contact name can be displayed in the
call list.
This option can be disabled so handset does not store any calls in the call list1. This can for
example be used to allow privacy for users sharing the same handset.(This feature requires
configuration in the handset via PDM/Device Manager.)
1.
Select Call list, and step with the
and
to scroll in the list.
Dial a Number from the Call List
1.
Select a number to call.
2.
Press the "Call" soft key to dial.
View the Time of a Call
1.
Press the "More" soft key.
2.
Select "Time of call".
The time and date are displayed.
Edit a Number from the Call List
1.
Press the "More" soft key.
2.
Select "Edit number".
1. These feature requires configuration in the handset via PDM/Device Manager.
61
Mitel 5604 Wireless Handset User Guide
Save a Number
1.
Press the "More" soft key.
2.
Select "Save number".
Send a Message
1.
Press the "More" soft key.
2.
Select "Send message".
Delete an Entry from the Call List
1.
Press the "More" soft key.
2.
Select an entry to delete.
3.
Select "Delete".
4.
Select "Yes" to delete the entry from the list.
Delete all Entries from the Call List
1.
Press the "More" soft key.
2.
Select "Delete all".
3.
Select "Yes" to delete all the entries from the list.
Missed Calls
1.
Select Missed calls, and step with the
2.
Press the "Call" soft key.to call back.
and
to scroll in the list.
You can use the "More" soft key to view the time/date of the call, edit the received number, add
contacts and delete received numbers. See “Call List” on page 61 for information about the
functionality in "More" soft key.
Note: If supported by the system, the number’s contact name can be displayed in the
call list.It is possible to turn off the dialog window that appears for a missed call.
Additionally, it is also possible to turn off that the handset stores any calls in the call list.
The latter feature can for example be used to allow privacy for users sharing the same
handset.
Call Time
The total time of the previous call and last call appears.
1.
62
Select "Call time".
Navigate the Menu
Push to Talk
The Push-to-Talk (PTT) function enables a pre-defined group of mobile staff to participate in a
call whereby they all listen to the group's call activity, typically in loudspeaker (Handsfree) mode.
Participants press and hold a button in order to speak.
For PTT to function, the PTT-capable handsets in the PTT group must be configured on the
Wireless Messaging Services (WSM) Gateway. Additionally, a conference bridge, such as
Mitel's Audio & Web Conferencing (AWC) must be configured to support the PTT calls.
Two types of PTT calls can be made:
•
PTT Voice Style (initiated by the handset)
•
PTT Message Style (initiated by the system)
PTT Voice Style Calls (Handset initiated)
Each member of a PTT group is able to initiate a PTT call via a PTT request. This PTT Call
request is typically programmed onto a soft key, hot key or multi-function button on the handset
for quick access.
After a PTT Call request is made, the system invites the other members of the PTT group into
the PTT call. The invitation typically barges onto the invited members' handsets following brief
alerting of the incoming PTT call; manual PTT Call acceptance can be configured optionally.
After the PPT group members have received/accepted their PTT invitations, the system
automatically dials them onto the configured conference bridge and they become active in the
PTT call.
Note: Depending on the configuration, it may take 10 seconds or more for all members
to be active on the PTT call from the time a user initiates a PTT request.
Note: Multiple PTT groups are supported; if a handset is a member in multiple groups,
the PTT Groups can be programmed onto the handset menu to enable selection of the
appropriate PTT group Call request.
Accept a PTT Invitation - Voice Style
The PTT invitation is indicated by a
icon and is received as an incoming call. In the dialog
window, a message containing maximum 24 characters can also be shown.
1.
Press
.
The handset may accept the invitation automatically and start in inverted mute and
loud-speaking mode, depending on the configuration of the received PTT invitation.
2.
Press and hold the Mute button to open the microphone for transmitting.
The microphone is muted again when the Mute button is released.
63
Mitel 5604 Wireless Handset User Guide
Reject a PTT Invitation - Voice Style
Press
to reject the PTT invitation. The handset will return to the previously shown screen.
See also“Re-join a PTT Group” on page 64.
PTT Message Style (System/Application Initiated)
This mode is typically used in conjunction with an application that triggers the PTT call based
on a alarm or communication escalation.
Note: This method requires an additional Alarm Management Server (AMS) module.
Accept a PTT Invitation - Message Style
Note: This feature applies to the 5604 Services license only.
The PTT invitation is received as a message, can contain up to 1000 characters, and is viewed
the same way as an ordinary message.
1.
Press the "Call" soft key.
The handset may accept the invitation automatically and start in inverted mute and
loud-speaking mode, depending on the configuration of the received PTT invitation.
2.
Press and hold the Mute button to open the microphone for transmitting.
The microphone is muted again when the Mute button is released.
Reject a PTT Invitation - Message Style 2
Note: This feature applies to the 5604 Services license only.
•
Press the "Close" soft key to reject the PTT invitation.
The handset will return to the previously shown screen. See “Re-join a PTT Group” on
page 64.
Re-join a PTT Group
If a PTT invitation (PTT Voice Style) is rejected or missed, the PTT group can be dialed from
the Call list or from Missed calls, respectively. The PTT invitation is indicated by the
icon
in the list. See “Call List” on page 61, or “Missed Calls” on page 62.
If a PTT invitation (PTT Message Style) is rejected, the PTT group can be dialed by selecting
the message indicated by the
icon in the Messaging inbox and pressing the "Call" soft key.
64
Navigate the Menu
Call a PTT Group
Note: PTT group(s) must be defined in the PDM and Messaging Group(s) in WSM to
be able to use this function. See the Mitel 5604 Wireless Handset Configuration Guide,
and the WSM Installation and Operation Guide.
When calling a PTT group, the members in the defined PTT group will receive a PTT invitation
as an incoming call (PTT Voice Style).
1.
Press "Menu".
2.
Select "Calls".
3.
Select "PTT groups"1.
4.
Select a PTT group.
5.
Press "Call", or the Off-hook key.
Short Cuts Menu
Predefined functions can be set as short cuts for the soft keys, hot keys, navigation keys, and
the Multifunction button. For example, you can to define a soft key to make a call, as a short
cut for sending a message, or as a short cut to a menu.
1.
Enter the menu by pressing the “Menu” soft key, or the confirmation button on the Navigation
key.
2.
Select
in the menu, and press the confirmation button or the "Select" soft key.
Define a Soft Key
1.
Select "Soft keys".
2.
Select "Left", "Middle", or "Right".
3.
Press "Select" to enter a name for the Soft key.
4.
Press "OK".
5.
Select "Function".
6.
Press "Select" to select function for the soft key.
7.
Select function from list.
8.
Press "Back".
9.
Select "Value" (applies only to some functions).
10. Press "Select".
11. Enter a value (for example, enter a handset number).
12. Press "Back".
13. Select "Control question".
14. Press "Select".
1. Only available if a PTT group is defined in the PDM/WSM.
65
Mitel 5604 Wireless Handset User Guide
15. Press "Back".
16. Press "Save".
Define a Hot Key
1.
Select "Hot keys".
2.
Select "0", "2" to "9".
3.
Select "Function".
4.
Press "Select".
5.
Select a function from list.
6.
Press "Back".
7.
Select "Value" (applies only to some functions).
8.
Press "Select".
9.
Enter a value (for example, enter a handset number).
10. Press "Back".
11. Select "Control question".
12. Press "Select"
13. Press "Save".
Define a Navigation Key
1.
Select "Navigation keys".
2.
Select "Up", "Down", "Left", or "Right".
3.
Select "Function".
4.
Press "Select".
5.
Select a function from list.
6.
Press "Back".
7.
Select "Value" (applies only to some functions).
8.
Press "Select".
9.
Enter a value for example a handset number.
10. Press "Back".
11. Select "Control question".
12. Press "Select".
13. Press "Save".
66
Navigate the Menu
Define the Multifunction or Alarm1 Button
The Multi-function button can be defined with two different functions: a long press activates
one function, and a double press activates another function.
1.
Select "Multi-function button"/"Alarm button1".
2.
Select "Long press", or "Multi press".
3.
Select "Function".
4.
Press "Select".
5.
Select a function from list.
6.
Press "Back".
7.
Select "Value" (applies only to some functions).
8.
Press "Select".
9.
Enter a value (for example, enter a handset number).
10. Press "Back".
11. Select "Control question".
12. Press "Select".
13. Press "Save".
Services Menu
A list of predefined menu functions are available. Using the Services menu you can customize
the menu with functions you use often.
1.
Enter the menu by pressing the “Menu” soft key, or the confirmation button on the Navigation
key.
2.
Select
in the menu, and press the confirmation button or the "Select" soft key.
Add a Service
1.
Select "Add new".
2.
Enter a name of the service in the field>
3.
Press "OK"
4.
Select a function by using the
5.
Press "Select", or the confirmation button.
6.
If necessary, enter values in the fields (applies only to some functions)
7.
Press "Back".
and
on the navigation key.
1. Applies to the 5604 Personal Alarm license only.
67
Mitel 5604 Wireless Handset User Guide
Edit a Service
1.
Select a service by using the
2.
Press "More"
3.
Select "Edit".
4.
Edit the service parameters.
5.
Press "Back".
and
on the navigation key.
and
on the navigation key.
Delete a Service
1.
Select a service by using the
2.
Press "More".
3.
Mark "Delete" by using
4.
Press "Select".
5.
Press "Yes" to delete the service.
6.
Press "Back".
on the navigation key.
Messaging
1.
Enter the menu by pressing the “Menu” soft key, or the confirmation button on the Navigation
key.
2.
Select
in the menu, and press the confirmation button or the "Select" soft key.
Inbox
1.
Select "Inbox" to view the message list.
2.
Select a message by using the
and
Reply to Sender
1.
Select "View".
2.
Select "Reply".
3.
Enter text.
4.
Select "Send".
Delete a Message
68
1.
Select "More".
2.
Select "Delete".
3.
Select "Yes" to delete the message.
on the navigation key.
Navigate the Menu
Forward a Message
1.
Select "More".
2.
Select "Forward".
3.
Enter additional text if required.
4.
Select "Send"
5.
Enter number.
6.
Select "Send" to forward the message.
Call a Sender
1.
Select "View".
2.
Select "More".
3.
Select "Call Sender".
Call a Number in Text
1.
Select "View".
2.
Select "More".
3.
Select "Call (No. in text)"1.
4.
Select a number from the list.
5.
Select "Call"
Save a Number
1.
Select "View".
2.
Select "More".
3.
Select "Save number".
4.
Select "Work Number"/"Mobile number"/"Other number".
5.
Press "Add".
6.
Enter name for the contact.
7.
Press "OK".
8.
Press "Save". The number will be saved in the contact list.
Write a New Message
1.
Select "Write new message".
2.
Enter text, and press "Send". See also “Messaging” on page 34.
It is possible to save the message and send it later by pressing the soft key "Back" and
select "Yes". The message will be stored under Unsent messages.
3.
Enter number, or press middle soft key to get number from contact list.
4.
Press "Send".
1. Only visible if the number consists of minimum 3 digits.
69
Mitel 5604 Wireless Handset User Guide
Unsent Messages
1.
Select "Unsent" to view the list.
2.
Select message to edit/send.
3.
Select "Edit", edit text and/or just select "Send".
Delete/Delete All
1.
Select "More".
2.
Select "Delete" or "Delete all".
3.
Select "Yes" if the unsent message shall be deleted.
Sent Messages
1.
Select "Sent" to view the list.
2.
Select "View".
Forward a Message
1.
Enter additional text if required.
2.
Enter a number or press the middle soft key to open the phonebook.
3.
Select "Send".
Delete a Message
1.
Select "Delete".
2.
Select "Yes" to delete the message.
Delete/Delete All
70
1.
Select "More".
2.
Select "Delete" or "Delete all".
3.
Select "Yes" to delete the unsent message.
Navigate the Menu
Profiles Menu
You can set up your own profiles for incoming calls, message alerts, vibrating alerts and key
sounds. This can be useful when there are many users on the same handset and they want
different sound profiles. It can also be used for temporarily settings, for example to silence the
ring tone for incoming calls while in a meeting. You can readily switch between different profiles.
1.
Enter the menu by pressing the “Menu” soft key, or the confirmation button on the Navigation
key.
2.
Select
in the menu.
Add a New Profile
1.
Press "Add new".
2.
Enter name of the profile.
3.
Select "Save".
4.
Press "More"
5.
Select "Add settings".
6.
Select the settings to be added to the profile.
7.
Repeat steps 3 to 6 to add additional settings.
8.
Select a setting and press "Edit" to make the changes.
Create a Profile based on Another Profile
1.
Press "Add new".
2.
Enter a name for the profile.
3.
Press "Save".
4.
Press "More".
5.
Select the profile from which settings will be used for the new profile.
6.
Press "More".
7.
Select "Import from".
8.
Select an option to be added/imported/removed, if required.
9.
Select a setting.
10. Press "Edit" to make the changes.
Activate a Profile
1.
Select profile from list and change profile as wanted.
When a profile is activated, the icon
is displayed in idle mode.
71
Mitel 5604 Wireless Handset User Guide
Delete a Profile
1.
Select a profile from list.
2.
Press "More".
3.
Select "Delete" from the list.
4.
Press "Delete".
5.
Press "Yes" to confirm.
Edit a Profile
72
1.
Select a profile from list.
2.
Press "More".
3.
Select "Edit" from the menu.
4.
Select the information to be edited.
5.
Press "Edit".
6.
Perform any of the following options:
•
Edit a setting by marking it and then press "Edit".
•
Add additional settings by pressing "More" and selecting "Add setting" or "Import from".
•
Remove a setting by selecting it and selecting "More > Remove setting".
7.
Make changes.
8.
Press "Save" to confirm.
Navigate the Menu
Contacts Menu
The handset has a local phonebook with 250 entries: you can add, delete, or edit names and
numbers. The phonebook lists all names in alphabetical order. three numbers can be added
for each contact: work number, mobile number, and other number.
In addition, you can download a company phonebook to the handset via the PDM/WSM. See
“Software Upgrade and Additional Features” on page 84. You cannot edit or delete the company
phonebook names and numbers. The phonebook lists all names in alphabetical order. The local
and company phonebooks appear in the same list but the company names are indicated by a
“Locked entry” icon
in front of the name. The contact will include only the work number. See
“Dial a Number from the Company Phonebook” on page 18 for more information.
You can also access a central phonebook1. See “Dial a Name from the Central Phonebook”
on page 18. You send a request to a messaging server with the first characters entered and
the messaging server returns a list of names and numbers that matches the search.
1.
Enter the menu by pressing the “Menu” soft key, or the confirmation button on the Navigation
key.
2.
Select
in the menu. See “Contacts” on page 48.
Call a Contact
1.
Select "Call contact".
2.
Select contact from the list or enter name or number in the search field.
3.
Press the "Call" soft key.
You can select "View" > "More" to edit the contact and send a message.
Add a Contact
1.
Select "Add contact".
Add a New Contact
1.
Select "New".
2.
Select "Add".
3.
Enter the name of the contact.
4.
Press "OK".
5.
Select "Work Number"/"Mobile number"/"Other number".
6.
Press "Add".
7.
Enter a number.
8.
Press "OK".
9.
Press "Save".
1. This is a system dependent function.
73
Mitel 5604 Wireless Handset User Guide
10. Press "Back".
Different ring signals can be set to distinguish between contacts.
Add from the Call List
1.
Select "From call list".
2.
Select a number.
3.
Press "Add".
4.
Select a number type.
5.
Press "Select".
6.
Press "Add", and enter name for the contact.
7.
Press "OK".
8.
Press "Save".
Edit a Contact
1.
Select "Edit contact".
2.
Select a contact.
3.
Press "Edit" twice.
4.
Enter a new name/number.
5.
Press "OK".
6.
Press "Save".
Delete a Contact
74
1.
Select "Delete contact".
2.
Select a contact.
3.
Press "Delete".
4.
Press "Yes" to confirm.
Navigate the Menu
Central Phonebook
In the Central Phonebook it is possible to search by name or number.
When the search result is ready you can view contact information, add the number to new
contact, or send a message by selecting the "More" soft key. You can also call the number by
selecting the "Call" soft key.
•
Select "Central phonebook".
Search by Name
1.
Select Search by name.
2.
Enter a first name and/or a last name.
3.
Select "Search".
The search result appears.
Search by Number
1.
Select "Search by number".
2.
Enter a handset number.
3.
Select "Search".
The search result appears.
View Last Search Result
1.
Select "Last result".
Only the last result appears.
75
Mitel 5604 Wireless Handset User Guide
Settings Menu
1.
Enter the menu by pressing the “Menu” soft key, or the confirmation button on the Navigation
key.
2.
Select
in the menu. See “Settings Menu” on page 76.
Sound and Alert Settings
Adjust the Ringer Volume
1.
Select "Sound & Alerts.
2.
Select “Volume”.
3.
Step with
4.
Press "Back" to save the setting.
to increase the volume and with
to decrease it.
Note: If handset’s restrictions are enabled, it might not possible to set the ring volume
to "Silent". See the Mitel 5604 Wireless Handset Configuration Manual.
Set Ring Signals for Internal Calls, External Calls and Call Backs
1.
Select “Sound & Alerts”.
2.
Select “Ring signals”.
You can set different signals for internal calls, external calls and call backs.
3.
Select "Internal call", "External call", or "Callback".
The handset has 14 different ring signals.
4.
Select a sound.
You can press "Play" to listen to the different sounds.
5.
Press "Back".
Set Message Alerts for Mail
1.
Select "Sound & Alerts.
2.
Select “Message alert”.
You can select from 8 different message alerts. See “Settings Menu” on page 76.
3.
Select message alert from list.
You can press "Play" to listen to the different sounds. "Play" is not available for Enhanced
Beep. Instead, send a message to the handset to listen to the sound.
4.
Press "Back".
Note: By default, the message volume follows the ring volume setting, but it is possible
to set another message volume in the handset, see the Mitel 5604 Wireless Handset
Configuration Manual.
76
Navigate the Menu
Turn the Vibrator On/Off
If the vibrator is activated, it will vibrate at incoming call and message. In addition, it is possible
to activate the vibrator when receiving a message during a call. See the Mitel 5604 Wireless
Handset Configuration Manual.
1.
Select "Sound & Alerts.
2.
Select “Vibrator alert”.
3.
Select “On”, “On if silent” (that is, the vibrator is on when the handset is muted), or “Off”.
4.
Press "Back".
Set the Key Sound
When you set the sound key, every time a key is used the handset produces a faint sound.
1.
Select "Sound & Alerts".
2.
Select “Key sound”.
3.
Select “Silent, “Click”, or “Tone”.
4.
Select a key sound.
5.
Press "Back".
You can listen to the key sound by pressing the "Play" soft key.
77
Mitel 5604 Wireless Handset User Guide
Phone Lock Settings
Activate the Automatic Key Lock
1.
Select “Locks”.
2.
Select "Automatic key lock".
3.
Select "On" to activate the automatic key lock.
Note: You can answer/close an incoming call and/or press the alarm button while the
keypad is locked. If configured in the PDM/WSM, you can call an emergency number
while the keypad is locked. See the Mitel 5604 Wireless Handset Configuration Guide.
Activate the Phone Lock
You can protect a handset from unauthorized use. If the Activate phone lock function is activated
you must enter a PIN code at power on, or when the handset is placed in a charger. The phone
lock is activated when the handset is placed in the charger. The default phone lock code (0000)
can be changed to any 4 -8 digit code.
Note: If configured in the PDM/WSM, you can call an emergency number while the
handset is locked. See the Mitel 5604 Wireless Handset Configuration Guide.
1.
Select “Locks > "Phone Lock" > “Auto phone lock”.
2.
Select “On”, or "On in charger".
3.
Enter a PIN code.
4.
Press "OK".
If the PIN code is forgotten it can be removed by your distributor.
Deactivate the Phone Lock
1.
Select “Locks > "Phone Lock" > “Auto phone lock”.
2.
Select “Off”.
3.
Enter a PIN code.
4.
Press "OK".
Change the PIN Code
78
1.
Select “Locks > "Phone Lock" .
2.
Select "Change PIN code".
3.
Enter the old PIN code and press "OK".
4.
Enter a new PIN code twice.
5.
Press "Save".
Navigate the Menu
Display Settings
Screen Saver
1.
Select “Display”.
2.
Select “Screen saver”.
3.
Select “Information”, or “Black”.
Selecting "Information" displays time and status information. The display turns off when the
handset is not used.
4.
Press "Back".
When the handset is in a charging rack, the owner ID is displayed by the screen saver. This
simplifies identification when many handsets are charged together.
Brightness
1.
Select “Display”.
2.
Select “Brightness”.
3.
Select “Normal” or “Power save”.
4.
Press "Back".
Contrast
1.
Select “Display”.
2.
Select “Contrast”.
3.
Increase/decrease the contrast by pressing
4.
Press "Back".
and
on the Navigation key.
79
Mitel 5604 Wireless Handset User Guide
Time and Date Settings
The time and date displayed in the handset cannot be changed by the user. The IP-DECT
system is solely responsible for keeping the time. The handset also synchronizes with the
IP-DECT system time when:
•
The handset is turned on after having been turned off. The handset requests the current
IP-DECT system date and time.
•
The handset remains on for longer than 24 hours. The handset requests the IP-DECT
system time every 24 hours from the time it was last turned on.
The time and date formats displayed in the handset can be changed by the user as described
in the following sections.
Set a Time Format
1.
Select "Time & Date".
2.
Press "Select".
3.
Select a time format.
The actual time format will be displayed. The time formats include:
4.
•
12:00 (AM/PM)
•
24:00
Press "Select" to save the setting.
Set a Date Format
1.
Select “Time & Date”.
2.
Press "Select".
3.
Select “Date format”.
4.
Press "Select".
The date formats include:
5.
80
•
DD/MM/YYYY, i.e 17/09/2011 (also called Europe)
•
MM/DD/YYYY, i.e. 9/17/2011 (also called US)
•
YYYY-MM-DD, i.e. 2011-09-17 (ISO 8601)
•
MMM DD YYYY, i.e. Sep 17 2011
•
DD MMM YY, i.e. 17 Sep 11
•
DD.MM.YYYY, i.e. 17.09.2011
•
DD-MM-YYYY, i.e. 17-09-2011
Press "Select" to save the setting.
Navigate the Menu
Answering
By default the handset uses the Off-hook key when answering calls. You can configure the
handset to answer calls automatically (without pressing a key) and can set loud-speaking mode.
You can associate the answering behavior with any key. If you select "Any key", any key except
the "On-hook" and "Sound off" keys, can be used to answer a call.
1.
Select
in the menu. See “Settings Menu” on page 76.
2.
Select “Answering”.
Answering Key
By default the answering key is set to Hook-off.
1.
Select "Answering key"
2.
Select "Hook-off" or "Any key".
3.
Press "Back" to save the setting.
Press "Back" to save the setting.
Answering Behaviour
1.
Select "Answering behaviour".
2.
Select "Automatically" and/or "Loudspeaking".
3.
Press "Change" to change the setting.
The check box will be selected.
4.
Press "Back" to save the setting.
5.
To optionally remove the setting, press "Change".
The check box will be cleared.
Change Text Size for Messages
1.
Select "Messages".
2.
Select "Text size Normal".
The default text size is "Normal".
3.
Select "Normal" or "Large".
4.
Press "Back".
81
Mitel 5604 Wireless Handset User Guide
Change the Menu Language
1.
Select “Language”.
2.
Select the laungague to be used: Brazilian Português (Brazilian Portuguese), (Czech),
Dansk (Danish), Deutsch (German), English, Español (Spanish), Français (French),
(Greek), (Hungarian), Italiano (Italian), Nederlands (Dutch), Norska (Norwegian), (Polish),
(Russian), (Slovakian), Soumi (Finish), Svenska (Swedish), or (Turkish).
3.
Press "Back".
Note: The languages mentioned above are the default languages. . You can download
an additional language to the handset. See “Software Upgrade and Additional Features”
on page 84.
Change the Owner ID
The Owner ID is set to identify the handset.
82
1.
Select "Owner ID".
2.
Enter a name/identity.
3.
Press "Save".
Advanced Functions
Advanced Functions
Admin Menu
The handset has a hidden menu for system administrators. See the Mitel 5604 Wireless
Handset Configuration Guide.
The Admin menu contains:
•
Software and hardware information, licence information, IPEI/IPDI, and User ID
•
DECT link and system information
•
DECT location information1
•
Centralized Management status
•
Site survey tool
•
Licence upgrade menu
•
Fault logging
•
Enhanced system menu with ability to alter protection
•
Factory reset option
For quick access to the Device Information (DI) menu in idle mode, press the keys containing
*#DI# (that is *#34# ). For quick access to the IPEI/IPDI, press *#06# in idle mode. See the
table below.
Information
Code
Software version
*#34#
Hardware version
*#34#
License information
*#34#
IPEI/IPDI
*#34# or *#06#
User ID
*#34#
Clear Lists in Charger
Via PDM/WSM it is possible to set a parameter that will clear messaging lists and call lists
stored in the handset. When the parameter is activated and the function has been downloaded
to the handset, the lists will be deleted when the handset is placed in the charger. This can be
useful during administration of handsets for new users. See the Mitel 5604 Wireless Handset
Configuration Guide.
1. This feature applies to 5604 DECT Location license only.
83
Mitel 5604 Wireless Handset User Guide
System Handling
Software Upgrade and Additional Features
You can upgrade the software and features of the 5604 handset using the PDM or the WSM.
See the Portable Device Manager (PDM) Installation and Operation Guide or WSM Installation
and Operation Guide.
Examples of additional features that can be downloaded/configured via PDM/WSM:
•
Company phonebook
•
Downloadable languages
•
Customizing the Menu Tree
•
Licences1
See the Mitel 5604 Wireless Handset Configuration Guide for more information.
To view the handset’s software version, enter *#34# in idle mode.
1. The licence(s) can also be added via the Admin menu in the handset.
84
Troubleshooting
Troubleshooting
This section contains information on how to solve common operational problems and warnings
you may receive. If you cannot resolve the issue contact your system administrator. If others
are experiencing similar problems there may be a system error.
Operational Problems
Fault
Probable cause
Action or comment
No display
The battery level is low or the handset is
defective.
Charge the battery or contact system
administrator.
No ringing
The sound off icon is on, or the ringer
volume set to silent, or the handset is
defective.
Long press the Sound off key, increase
volume, or contact the system
administrator.
85
Mitel 5604 Wireless Handset User Guide
Error or Warning Messages
Display shows
Probable cause
Action or comment
No access
The network is in range but there are
no access rights.
Switch off the handset and then
switch it on again or contact your
system administrator.
No System. The handset
beeps once a minute
(during max 30 minutes)
with a low tone followed
by a high tone (if enabled,
the vibrator also follows
the beeps).
The handset is out of coverage or
handset is defective.
Stop the beep with the Sound off
key and go into range.
Note: When re-entering the
coverage area it can take a couple
of minutes before the handset
automatically has registered into
the system.
or
contact the system administrator.
SERVICE NEEDED
The handset is defective.
Select the reset option on the
middle soft key if available. If no
reset option is available or fault
does not resolve the issue the
handset needs repair.
Easy replacement procedure not
followed correctly or failure during
easy replacement procedure.
Send the handset for service.
Enter PIN code
The handset’s lock is activated.
Enter the required PIN code. If the
PIN code is lost enter a new one
via PDM or do a factory reset via
the PDM.
Battery low, charge now
The battery level is low.
Charge or replace the battery.
Phonebook is not
available at the moment
The phonebook does not respond, not
available at the moment.
Try again later. If the fault persists
do a factory reset via the Admin
menu or PDM.
Voice mail number not
defined
There is no Voice mail number
defined in the handset.
Define a Voice mail number via the
PDM.
Could not encrypt
connection
The parameter "Encryption Required"
is enabled in the handset in
combination with;
1. Disable the "Encryption
Required" parameter in
handset; and/or,
1. Un-encrypted base station(s);
and/or,
2. Enable the encryption in the
base station(s); and/or,
Parameters corrupt
SERVICE NEEDED
Invalid IPDI
Note: This display
message is only shown in
English.
2. Unsupported base station(s).
Note: If base station(s) is used,
the software version must be
3.1.x or later.
3. Use supported base station(s).
Ask your supplier.
86
Troubleshooting
LED Error Indications
See also “LED Indications during Easy Replacement” on page 92.
LED is flashing red, quick flash, (100 ms on, 800 ms off)
1.
If a third handset, that is another handset than the "old" (the replaced handset) and "new"
(the replacement headset) handset, is inserted into the charger during Easy Replacement,
this error indication appears. Change to the correct handset.
2.
The charger has found that Easy Replacement does not work. Change back to the "new"
handset.
LED is flashing red, long flash (800 ms on, 100 ms off)
Error during Easy Replacement. Both telephones need to be sent for service.
87
Mitel 5604 Wireless Handset User Guide
Operation Notice
Accessibility and Voice Quality
The base network is not always available. If you do not get in contact with your system, contact
your system administrator. For best voice quality, avoid positioning near computer, radio or
similar equipment.
Operating Area
You can only use the handset in the area that is covered by your system. Outside this area you
will loose contact with the system. The signal strength icon will be low and “Searching” will
appear.
Out of Range
When you leave the system's coverage area a short beep will sound and the text “Searching”
will appear in the display.
The out of range beep will be repeated every minute for 30 minutes. You can turn off the sound
by long pressing
, or
.
When re-entering the coverage area it can take a couple of minutes before the handset
automatically registered with the system.
88
Maintenance
Maintenance
Maintenance of Batteries
Battery Warnings
The "Low battery" icon appears when the battery has 10% or less remaining capacity.
In addition; a warning signal sounds every minute, the LED flashes orange, and the
dialog window shows "Battery low". "Charge now" appears.
The "Empty battery" icon flashes when the battery has 5% or less remaining capacity.
In addition; a warning signal sounds every second, the LED flashes red, and the dialog
window "Battery empty. Shutting down." appears.
During a call, only the corresponding battery warning signal will notify the user. The warning
signal cannot be silenced during a call. When not in call, the warning signal can be silenced
by pressing
or
.
Charge the Battery
Place the handset in the desktop charger or in the rack charger. The battery is being charged
when the LED on the handset is steady orange. When the battery is fully charged the LED will
be green.
An animated battery icon
appears in the display and indicates the battery is charging. A
filled battery icon
indicates a fully charged battery.
Note: Only use the prescribed chargers for charging.
Charge Spare Batteries
Spear batteries can be charged with a separate battery pack charger. It can charge six batteries
at the same time.
Replace the Battery
If the standby time for the handset becomes too low you must replace the battery with a new
one. Contact your system administrator or your supplier to obtain new batteries.
Attach the battery as described in the following illustration. You attach the battery inside the
battery lid. It is connected it to the handset in such a way that "no miss-contact" is possible.
89
Mitel 5604 Wireless Handset User Guide
Figure 14: Easy Replaceable Battery - Unlock the Lid and Remove the Battery
Easy Replacement of Handset
Easy replacement can be used if a handset needs to be replaced due to, for example, a broken
display. The easy replacement procedure is done via the handset display and the 5603/4/7
Programmer, or the rack charger.
The following settings are replaced during easy replacement:
•
DECT registration
•
User parameters (including User ID)
•
Contacts
•
The extension number is assigned to the new handset.
The following settings are not replaced during the easy replacement:
•
Call list
•
Messages
•
License(s)1
Before Starting the Easy Replacement Procedure
1.
Check that both the old handset (that is, the handset to be replaced) and the new handset
(that is, the replacement handset) are of the same device type (5604).
Note: It is possible to perform Easy Replacement between different licenses (that is;
5604 Standard, 5604 Services, 5604 Personal Alarm, and 5604 Dect Location). The
new handset’s license is not replaced by the old handset’s license during the procedure1.
2.
Make sure that the handset batteries are charged before starting the easy replacement
procedure.
3.
Switch off the new handset by long pressing
.
1. A license (that includes the handset variant and/or license dependent features) can be moved to another handset using PDM/WSM.
90
Maintenance
Easy Replacement Procedure
During the Easy Replacement procedure, the LEDs of the handset and the charger follow the
same LED indications. This means that if the old handset has a broken display, the LED
indications on the charger and on the handset can be used to follow the replacement procedure.
Before and after easy replacement, the LEDs may have different LED indications. For more
details, see “LED Indications during Easy Replacement” on page 92.
IMPORTANT: Never remove a handset from the charger until the instructions in the
display or the LED tells you to do so. (See the status on the LED if the display is broken).
If an error is indicated you may be able to remove the handset. See the Mitel 5604 Wireless
Handset Configuration Guide for further instructions.
After you place the old handset in the charger, you must place the new handset in the
charger, regardless of whether the replacement was successful or not. Failing to do so
may result in malfunction and the new handset will need servicing.
Figure 15: Easy Replacement using the 5604 Programmer
1
On the new handset, press and hold
Note: Do not release
until you are instructed to do so.
2
Put the new handset in the charger.
3
When the text "Start phone replacement?" appears, release
.
Press "Yes" (left soft key).
The text "Follow the instructions. Each step can take several minutes." appears.
Press "OK"(left soft key).
91
Mitel 5604 Wireless Handset User Guide
4, 5
When the text "Please insert old phone in charger" appears, replace the new handset with the
old handset.
The handset can either be switched on or off.
Note: If the rack charger is used, the same charging slot has to be used for both handsets.
The handset will be restarted and after a few seconds. The text "Saving settings. Do not remove
phone from charger" appears.
The charger LED changes to slow orange flashing.
IMPORTANT: Do not remove the handset while the text "Saving settings. Do not remove phone
from charger" appears. It may take several minutes.
6, 7
When the text "Please insert new phone in charger" appears, replace the old handset with the
new handset.
The text "Restoring settings" appears.
IMPORTANT: Do not remove the handset while the text "Restoring settings" appears
8
When the text "Phone successfully replaced. Please remove phone to restart." appears, remove
the handset from the charger. The handset is automatically restarted.
LED Indications during Easy Replacement
The following table shows the LED indications that are used for the 5604 and the charger during
the easy replacement procedure.
LED indication
Description
Orange, flashing (1 000 ms on, 1 000 ms off)
File transfer during Easy Replacement
Orange, flashing (100 ms on, 800 ms off)
“Change phone” indication during Easy Replacement
Red, flashing (100 ms on, 800 ms off)
Error indication during Easy Replacement. Put back old
handset in charger
Red, flashing (900 ms on, 100 ms off)
Error during Easy Replacement. Service needed for
both handsets
See also “Troubleshooting” on page 85.
92
Maintenance
Attach the Hinge-type Clip
Attach the hinge-type belt clip as described in the illustration below.
Figure 16: Screw the Hinge-type Clip into Position
Attach the Swivel-type Clip
Attach the swivel-type belt clip as described in the illustration below.
Figure 17: Screw the Swivel-type Clip into Position
93
Mitel 5604 Wireless Handset User Guide
Attach Cover for No Clip
Attach the enclosed cover as described in the illustration below when no clip is to be used.
Figure 18: Screw the Cover into Position
Related Documents
94
•
Data Sheet, Mitel 5604 DECT Handset
•
Mitel 5604 Wireless Handset Quick Reference Guide
•
Mitel 5604 Wireless Handset Configuration Guide
•
Portable Device Manager (PDM) Windows Version Installation and Operation Guide
•
WSM 3 Installation and Operation Guide
Index
Index
Loudspeaker 3
Loudspeaking 8, 19
NUMERICS
M
3rd party 9
Menu tabs 9
Message
new message 8, 34
old message 8
voice message 8
Microphone 3
Mute button 10
A
Antenna 3
B
Battery 3, 89
low battery 7, 89
N
C
C (Clear) button 10
Call info 9, 27, 33, 47
call priority 39
Call service 9
Calling
answered call 9
call a number from the call list 17
dial a number 17
missed call 9
outgoing call 9
quick call by a name in the phonebook 17, 18
Case 3
Centralized phonebook 73
Chemical resistance 6
Clip 3
Navigation Key 10
Number input mode 12
O
On/Off button 10
Ongoing call 9
Operating Area 88
Out of Coverage 88
P
PIN code 78
Push to Talk 63
R
Reply to a Text Message 35
Ring signal muted 8
D
S
DECT Location 46
Delete a Text Message 35
Earpiece 3
Easy replacement 90
Signal strength 7
Special characters 36
Standby mode
date 7
time 7
user identity 7
F
T
Forward a Text Message 35
Text input mode 12
I
W
Icons 7
Writing Text/Numbers
add space in text 12
pause 12
upper/lower case 12
E
L
LED indications 92
95
Mitel 5604 Wireless Handset User Guide
96