1
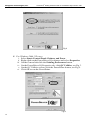
SubliJet IQ ™ Getting Started Guide For EPSON Stylus® Photo 1280 Revision 1.1 SubliJet IQ™ Getting Started Guide for the EPSON Stylus® Photo 1280 © Copyright 2003, Sawgrass Technologies, Inc., Revision 1.1 June 2004. All rights reserved. Printed in the United States of America. SubliJet® is a registered trademark of Sawgrass Technologies, Inc. SubliJet IQ™ is a Trademark of Sawgrass Technologies, Inc. Epson® and Stylus® are registered Trademarks of Seiko Epson Corporation. Other trademarks and registered trademarks are the property of their respective owners. No part of this manual may be reproduced or transmitted in any form by any means without the prior written consent of Sawgrass Technologies, Inc. Information in this manual is subject to change without notice and does not represent a commitment on the part of Sawgrass Technologies, Inc. IMPORTANT – READ CAREFULLY: This Process License Agreement (“PLA”) is a legal agreement between you and Sawgrass Technologies, Inc. (“Sawgrass”). By installing the SubliJet IQ™ ink in your printer, or otherwise using the Sawgrass SubliJet IQ™ ink, you agree to be bound by the terms of this PLA. If you do not agree to the terms of this PLA, Sawgrass is unwilling to license the process of using the SubliJet IQ™ ink to you. In such event, you may not use the SubliJet IQ™ink, and you should promptly contact your supplier for instructions on return of the unopened package. The process of using the SubliJet IQ™ ink is protected by U.S. and foreign patents. Sawgrass will provide a complete list of the relevant patents upon request. The use of the SubliJet IQ™ ink to practice the patented process is permitted by this license. GRANT OF LICENSE This PLA grants you the following rights: You may install and use the SubliJet IQ™ ink packaged herewith in your EPSON printer to practice the printing process described in U.S. Patent No. 5,488,907. The use of any ink, dye or pigment to practice the Sawgrass Process, other than a SubliJet IQ™ ink purchased from Sawgrass or its authorized distributor accompanied by a PLA, is not a licensed use of the Sawgrass Process. No rights to use the Sawgrass Process, except those specified herein, are granted, and no rights to use any other process, product, software or hardware developed or sold by Sawgrass are granted or implied hereby. LIMITATIONS ON REVERSE ENGINEERING You agree that you will not attempt to reverse engineer, reproduce or deformulate the SubliJet IQ™ ink. PATENTS AND COPYRIGHTS Sawgrass owns multiple U.S. and foreign patents, which apply to the Sawgrass Process and/or the SubliJet IQ™ ink or its use. All patents in and to the SubliJet® ink and the method of using the SubliJet IQ™ ink are owned by Sawgrass Technologies, Inc. You may not copy the printed materials accompanying the SubliJet IQ™ ink. All rights not specifically granted under this PLA are reserved by Sawgrass Technologies, Inc. Made In U.S.A. CAUTION: • For best printing results, use the ink within six months of purchase. • Keep out of reach of children. • Do not expose ink to temperatures above 100º F or below 40º F. • Keep ink out of direct sunshine. Sawgrass Technologies, Inc. agrees to replace any defective ink within a reasonable time, which shall be Sawgrass’ sole responsibility for errors or defects in these goods. THERE ARE NO OTHER WARRANTIES, EXPRESSED OR IMPLIED, INCLUDING, BUT NOT LIMITED TO, ANY IMPLIED WARRANTY OF MERCHANTABILITY OR ANY IMPLIED WARRANTY OF FITNESS FOR A PARTICULAR PURPOSE. SAWGRASS SHALL NOT BE LIABLE FOR LOSS OF PROFIT OR OTHER ECONOMIC LOSS, OR FOR INDIRECT, SPECIAL, CONSEQUENTIAL OR OTHER SIMILAR DAMAGES. SubliJet IQ is a trademark of Sawgrass Technologies, Inc. General Notice: Other product names used herein are for identification purposes only and may be trademarks of their respective owners. Sawgrass Technologies, Inc. disclaims any and all rights in those marks. Sawgrass Technologies, Inc. Limited Warranty – QuickConnectTM System What Is Covered: Defects in materials or workmanship. Length of Warranty Coverage: The warranty coverage for the QuickConnect is one year from date of purchase. QuickConnects not purchased from Authorized Sawgrass Resellers are not covered. How to get service: Please contact Sawgrass Technologies Technical Support at 843-884-1575 or an Authorized Sawgrass Reseller. A technical support representative will troubleshoot the issue and provide instructions on how to get a replacement if necessary. What we will do: Provide you with a new, or at our option, a refurbished QuickConnect unit. Alternatively, at our option, we may refund the purchase price. The exchange is under warranty for the remainder of the original products’ warranty period or 90 days, whichever is longer. The replacement will be shipped to you freight prepaid. What your warranty does not cover: Damage from misuse or neglect. Damage caused by use outside of Sawgrass’ Technologies recommendations. Limitations of Warranty THERE ARE NO OTHER WARRANTIES, EXPRESSED OR IMPLIED, INCLUDING, BUT NOT LIMITED TO, ANY IMPLIED WARRANTY OF MERCHANTABILITY OR ANY IMPLIED WARRANTY OF FITNESS FOR A PARTICULAR PURPOSE. SAWGRASS SHALL NOT BE LIABLE FOR LOSS OF PROFIT OR OTHER ECONOMIC LOSS, OR FOR INDIRECT, SPECIAL, CONSEQUENTIAL OR OTHER SIMILAR DAMAGES. Table of Contents Introduction ......................................................................... 2 About this Document.......................................................... 3 Setting up the QuickConnect System ............................... 4 Tips for Using the QuickConnect System ...................... 15 Using PowerDriver IQ ....................................................... 16 Selecting Paper ................................................................. 16 Heat Transfer Instructions ............................................... 17 Tips for Successful Sublimation ..................................... 18 Supplies & Equipment ...................................................... 20 Storage............................................................................... 20 Troubleshooting................................................................ 21 Technical Support............................................................. 23 Sawgrass Technologies, Inc. SubliJet IQ® Getting Started Guide for the EPSON Stylus Photo 1280 Introduction Congratulations on your purchase of SubliJet. With these specially formulated inks you can print full color sublimation transfers using your computer and the EPSON Stylus Photo 1280 printer. The SubliJet IQ inks and the QuickConnect™ ink delivery system for EPSON Stylus Photo 1280 are the latest advances from Sawgrass Technologies, Inc., a leader in the development of he digitally driven color transfer technologies and related products. SubliJet is ideal for markets that personalize, customize or create short-run output. Your printed images can be transferred on to any product designed to accept sublimation dyes, including ceramic, metal, Mylar, polyester fabric, UniSub®, and Hanes Soft L’Ink® Tshirts, resulting in an attractive, durable product. Your imagination is the limit for producing brilliant, near photo-quality images on caps, clipboards, clocks, mugs, mousepads, plaques, puzzles, synthetic T-shirts, and more. The team at Sawgrass strives to provide you with the tools to make the sublimation process easy to learn and simple to master. We hope you will find the tools we have developed make your years in the sublimation business fun and profitable. Please feel free to contact us with your feedback about our products. For additional information on SubliJet and our other products, visit our web site and www.sublimation.com. Thank you and enjoy your SubliJet printing system. 2 Sawgrass Technologies, Inc. SubliJet IQ® Getting Started Guide for the EPSON Stylus Photo 1280 About this Document This document contains descriptions and procedures for setting up the QuickConnect ink delivery system and using SubliJet IQ inks. Information for getting the best results from your transfers is also included. The information provided pertains only to the use of SubliJet in your EPSON Stylus Photo 1280 ink jet printer and therefore references are made back to the EPSON Stylus Photo 1280 Printer Basics Guide. To help point out important information, specific instructions and helpful tips look for the following symbols: Indicates Must-Do items; including warnings and important guidelines. Indicates useful tips. QuickConnect™ System Contents 1. Modified pre-filled cartridges, tubing and acrylic support arm with 3M Dual Lock Tape™ backing, and female adapters for QuickConnect system. 2. 2 rubber lid props with Velcro circles to attach to printer 3. 1 Tube clip 4. 1 positioning template 5. 1 alcohol cleaning pad 6. Ink Bag Carriage 7. PowerDriver IQ® installation CD 8. Installation Instructions 3 Sawgrass Technologies, Inc. SubliJet IQ® Getting Started Guide for the EPSON Stylus Photo 1280 Setting up the QuickConnect System Checklist of Items needed for successful sublimation: QuickConnect system EPSON Stylus Photo 1280 ink jet printer Recommended inkjet paper. See section entitled Selecting Paper Polymer Coated sublimation ready substrate Heat press SubliJet Ink bags Before you Begin It is crucial that the OEM ink supplied with your printer is installed before you attempt to install your SubliJet inks. This does two things for you. First, it primes the ink delivery system, ensuring that the SubliJet ink will load more easily. Second, it familiarizes you with the basic operation of your printer. Please see the EPSON Stylus Photo 1280 Printer Basics Guide. Installing the QuickConnect ink bags 1. Set the cartridges and attached support structure down on a level surface with the cartridges tilted forward onto their front edges. Carefully arrange the female connectors so they are easily identified and not tangled. See Fig. 1. Fig. 1 4 Sawgrass Technologies, Inc. SubliJet IQ® Getting Started Guide for the EPSON Stylus Photo 1280 2. The connectors are color-coded for easy identification. Find the black connector. Remove the plastic cap from the black ink bag and insert the male connector into the female connector on the tubing. See Fig 2. Once the black bag is attached, attach the rest of the ink bags to their corresponding colored tube. Fig. 2 Remember to match the right color ink to its corresponding cartridge chamber. Once the tube is filled, there is no way to undo it! 3. Once all of the bags are attached to the QuickConnect system place the bags into the ink rack. The rack has color coded dots for each bag. a. Hold the female connector of the black bag and 3-4 inches of tubing above the corresponding position in the ink rack. See Fig. 3. b. Slide the tubing into the slot and place the female connector firmly into the round opening. See Fig. 4. c. Place the bag in the holder. See Fig. 5. d. Repeat steps A-C for all colors of the ink. Fig. 3 Fig. 4 5 Sawgrass Technologies, Inc. SubliJet IQ® Getting Started Guide for the EPSON Stylus Photo 1280 Fig. 5 When finished loading the bags into the rack, ensure the ink rack and ink bags are placed on the same surface as the printer. See Fig. 6. The ink bags should never be elevated above the print head, or ink may drip from the print heads. Keeping the bags beside the printer and at the same level assures the ink delivery system will operate properly. Fig. 6 The ink bags should never be elevated above the printer or ink may drip from the print heads. 6 Sawgrass Technologies, Inc. SubliJet IQ® Getting Started Guide for the EPSON Stylus Photo 1280 Installing the QuickConnect Cartridges inside the printer 1. Open the printer cover and press the yellow button on the front panel of the printer to move the print head to the left. Unplug the printer from its electrical source. 2. Set the QuickConnect cartridges inside the cartridge bay. Ensure the black cartridges sitting on the hooks of the black cartridge holder lid. The color cartridge will not sit on the hooks of the color cartridge lid. See Fig 7. Fig. 7 3. The tubing from the color cartridge fits in the space between the black cartridge and the black cartridge lid. The black tube will extend out beneath the black cartridge lid towards the back of the printer. See Fig 5 and Fig 6. Fig. 8 Fig. 9 7 Sawgrass Technologies, Inc. SubliJet IQ® Getting Started Guide for the EPSON Stylus Photo 1280 4. Close the cartridge holder lids until they snap into place. Tubing from the color cartridge will protrude from beneath the black cartridge lid and should sweep towards the right side of the printer. See Fig 10. Fig. 10 5. Place the 1280 Positioning Template on the right side of the printer to determine where the 3M Dual Lock Tape should be attached. Once positioned, tape it in place. See Fig 11. Fig. 11 8 Sawgrass Technologies, Inc. SubliJet IQ® Getting Started Guide for the EPSON Stylus Photo 1280 6. Clean the area where the adhesive will contact the printer with the alcohol pad provided. Let dry. 7. Pull the bottom piece of 3M Dual Lock Tape off of the support bracket, peel the plastic backing and attach to the marked position. Firmly push down the entire piece. The support arm may need to be shifted left or right, up to a quarter of an inch, if the tubing contacts any part of the printer. If the tubing appears overly stressed when the print head is in the far left position, move the support arm slightly left by pulling the 3M Dual Lock Tape connection apart and reattaching. Make sure the 3M Dual Lock Tape on the support arm is fully locked onto the 3M Dual Lock Tape on the printer by applying pressure to it and slightly twisting the support arm back and forth. 8. Slide the print head left and right, as far as it will go to ensure that none of the tubing or any part of the QuickConnect system touches the interior of the printer. 9. When you are confident that the QuickConnect system will not interfere with normal print head movement, push the print head to the far right into the parked position. 10. Mark the position for the rubber bumpers used to prop open the lid. The bumpers should be far enough towards the back of the printer, to keep the lid from putting pressure on the Acrylic Support arm. See Fig 12 and Fig 13. Fig. 13 Fig. 12 9 Sawgrass Technologies, Inc. SubliJet IQ® Getting Started Guide for the EPSON Stylus Photo 1280 11. Clean the printer and the bottom of the rubber bumpers with the alcohol pad provided and attach the Velcro circles to the bumper and to the printer. Push them firmly into place. NOTE: Do not put the left bumper on the overhang of the printer interior. The weight of the lid can push down causing the overhang to contact the QuickConnect tubing. Installing the Clip 12. Once the QuickConnect is installed properly, remove the paper back from the adhesive strip and stick firmly against the side of the black cartridge holder lid. Press the tab to open the clip. See Fig 14. Fig. 14 13. Pull the tubing flush into the clip. Ensure the tubing is not pinched in any way as to constrict ink flow. See Fig 15. Fig. 15 10 Sawgrass Technologies, Inc. SubliJet IQ® Getting Started Guide for the EPSON Stylus Photo 1280 14. Close the clip securely. See Fig 16. Fig. 16 15. Turn on the printer and allow the cartridge holder to return to the home position. Priming the QuickConnect cartridges and tubing with ink 1. If you have not already done so, install the PowerDriver IQ software that came with your new system. For detailed installation instructions please refer to the PowerDriver IQ User Guide. 2. Access the PowerDriver IQ properties to run the PowerPrime A. For Windows 95, 98 and ME users: i. Select Start>Settings>Printers ii. Right-click on the PowerDriver IQ software and select Properties iii. Select the PowerDriver IQ tab; see Fig 1. iv. Click Setup Utilities v. On the Setup Utilities screen click the PowerPrime button; see Fig 2. vi. Click OK to run the Power Prime. Fig 1 11 Sawgrass Technologies, Inc. SubliJet IQ® Getting Started Guide for the EPSON Stylus Photo 1280 Fig 2 B. For Windows 2000, XP users: i. Select Start>Control Panel>Printers and Faxes. ii. Right-click on the PowerDriver IQ software and select Properties. iii. On the General tab click the Printing Preferences button. iv. On the PowerDriver IQ Properties tab, click QC Utilities; see Fig 3. v. On the QC Utilities screen, click the PowerPrime button; see Fig 4. vi. Click OK to run the PowerPrime. Fig 3 12 Sawgrass Technologies, Inc. SubliJet IQ® Getting Started Guide for the EPSON Stylus Photo 1280 Fig 4 The PowerPrime will partially fill the tubes with ink. The purpose of the prime is to move enough ink into the tubing to start printing. Do not be alarmed by air in the tubing. 3. Once the QuickConnect has been primed, ensure that all nozzles are firing properly by performing a Nozzle Check from the Setup Utilities Screen. If the nozzle check pattern is broken or gaps appear, a few cleaning cycles may be necessary to return the pattern to normal. 4. Your new 1280 QuickConnect system is ready to use! 13 Sawgrass Technologies, Inc. SubliJet IQ® Getting Started Guide for the EPSON Stylus Photo 1280 Replacing an Empty Ink bag 1. Move the slide clamp close to the female connector on the tubing of the ink bag to be changed. 2. Slide the clamp so that it pinches the tubing closed. 3. Disconnect the connectors by pressing the silver button on the female connector. Be aware the connectors may drip slightly when removed. Replace the empty ink bag with a fresh one. 4. Loosen the clamp so that it hangs loosely on the tubing. Transporting the printer with QuickConnect 1. To transport the printer with the QuickConnect, ensure the printer is off and in the parked position (printhead is all the way to the right and will not move). 2. Starting with the black tube, move the slide clamp close to the female connector and slide the clamp so that it pinches the tubing closed. Repeat this for all tubes. 3. Once the tubing is pinched off it is safe to transport the QuickConnect. Just remember to loosen the clamps when you’ve arrived at your destination to allow for the flow of ink again. 14 Sawgrass Technologies, Inc. SubliJet IQ® Getting Started Guide for the EPSON Stylus Photo 1280 Tips for Using the QuickConnect System Check the 3M Dual Lock Tape connections periodically Ensure the support arm is securely attached and not drooping, and that the lid props are firmly attached. If the support arm droops too low, the tubing could scrape the bottom of the printer. Check the clearance periodically Ensure there is clearance between the tubing going between the color cartridge and the black cartridge and the printer’s plastic overhang. Make sure the tubing isn’t scraping the overhang, or the tubing will become worn. If there is not a lot of clearance, pull the overhang upward and hold if for 30 seconds to ‘stretch’ it. Check the ink level in your ink bags periodically As the bags empty, they flatten in appearance. Before beginning a large print job, check the ink bags to ensure enough ink is available to finish the job. Ink indicator shows as low, even though ink bags are full The printer keeps track of how much ink has been used, and tries to write that level to the chip. Because the chips are write protected, it is not successful at changing the ink level value on the chips, however, the software based “Epson Status Monitor” reports the level in the printer’s memory to the computer. In order to clear the printer’s memory and reset it to the 100 percent full level on the chips, either unplug the printer for 1 second, or turn it off via the front power button and leave it off for 15 or more seconds. How to remove the QuickConnect system from the printer Clamp off the tubes before removing. The cartridges may drip slightly when removed from the printer because they are filled with more ink than the sponge can retain. Keep the cartridges above the level of the ink bags until you are able to plug the exit holes with 3M electrical tape. Please note the exit port area must be perfectly dry or the tape won’t stick. 15 Sawgrass Technologies, Inc. SubliJet IQ® Getting Started Guide for the EPSON Stylus Photo 1280 Using PowerDriver IQ SubliJet digital printing systems are comprised of a few key elements to ensure high quality output each time you print with SubliJet. PowerDriver IQ color management software is one of those tools. PowerDriver IQ color management software is a professional grade color management program that provides SubliJet users with the necessary tools to ensure colors print right the first time. PowerDriver IQ software is available for all major Windows based operating systems. PowerDriver IQ Color Sync profiles are also available for certain Macintosh based graphics programs. PowerDriver IQ software and profiles are intended to give you simple, easy to use color management tools to take the guesswork out of sublimation printing. With the click of your mouse you can automatically optimize colors for popular substrates like Unisub™, Soft L’ink®, ceramics, metal and many others. This is a valuable tool that saves you time, money and limits your need for costly sampling trying to get the job right. PowerDriver IQ also comes standard with the ColorSure palette matching system. ColorSure is the best way to match spot colors for corporate logos, specific customer requests and makes designing custom artwork easy. ColorSure is a simple system to use, for instructions on how to use the ColorSure system please refer to the PowerDriver IQ Users Guide or you can find an online tutorial at www.sublimation.com/colorsure. Selecting Paper For information on selecting the appropriate paper to use with your SubliJet inks, please check our website at www.sublimation.com or call your authorized SubliJet reseller. While the use of copy paper or other inkjet paper will not harm your printer, the transferred results may be light, splotchy or uneven and some papers may stick to the surface or leave a visible residue. 16 Sawgrass Technologies, Inc. SubliJet IQ® Getting Started Guide for the EPSON Stylus Photo 1280 Heat Transfer Instructions Because you can print on a variety of surfaces, you need to take all variables of the surface into account when selecting time, temperature and pressure. Some of the variables are: thickness of surface, how fast the surface absorbs heat, coatings used on the material to create a receptive surface for sublimation inks (ceramics, metals, etc.), accuracy of heat press (time, temperature, and pressure). The time, temperature and pressure listed below are only guidelines. Check with your supplier for specific heat transfer instructions. Due to the differences in heat presses and the various materials you will be printing on, it is not possible to give absolute figures. You should experiment to find your own preferred settings. SURFACE POLYESTER/ MOUSEPADS METAL (Universal Woods) METAL (Other) White, Silver, Gold TRANSFER TIME SUBLIJET TRANSFER TIME SUBLIJET IQ TEMP PRESSURE REMARKS 25 seconds 45 seconds 400oF 40 psi 40 seconds 60 seconds 400oF 40 psi Use absorbent, remove plastic 40 seconds 60 seconds 375oF - 400oF 40 psi Time varies with metal manufacturer (Contact your reseller for correct time and temperature) Place absorbent sheet on bottom plate of heat press. Then place transfer paper face up on top of the absorbent. Next place substrate face down on top of the transfer paper. UNISUB 75 seconds FR PLASTIC 33 seconds SOFT L’INK 25 seconds CERAMIC 150-210 seconds Remove paper from substrate immediately after transferring for best results. 75-85 seconds 75-80 seconds 35 seconds 400oF 40 psi Remove Plastic 400oF 40 psi Remove Plastic 400oF 40 psi 150-210 seconds 350400oF 40 psi Press for 5 secs to eliminate moisture, use Teflon sheet between sides of shirt to prevent “blow through” Time varies with press, use green tile mat for ceramic tile 17 Sawgrass Technologies, Inc. SubliJet IQ® Getting Started Guide for the EPSON Stylus Photo 1280 Tips for Successful Sublimation Tips for Polyester Fabric Maintain appropriate heat press times. Shortened pressing time will result in good surface color but the sublimation dyes will not completely penetrate the polyester fibers. This leaves the dyes more susceptible to wash out. Longer pressing times will cause the dye molecules to penetrate deeper into the fiber creating a washed out look. For guidelines on transfer times see the section entitled Heat Transfer Instructions. Maintain appropriate heat press temperatures The correct temperature setting is vital for achieving desired results. Higher temperatures can damage the polyester fibers to the point that they cannot properly “hold” the dyes. For guidelines on transfer temperatures see the section entitled Heat Transfer Instruction. Maintain appropriate pressure Too much pressure on the heat press may cause the dyes to penetrate too deeply into the fabric causing a washed out look. For guidelines on transfer pressure see the section entitled Heat Transfer Instructions. Tips for Metal To obtain the best results when printing onto metal, place the transfer between the metal and an absorbent cloth or fresh, non-textured paper towel. This will absorb any dyes that pass back through the paper and any moisture released during the transfer process. If you have problems with inconsistently filled areas, this may alleviate the problem. Tips for Ceramic Tiles and Mugs When transferring onto ceramic tiles and mugs, immediately peel the paper off of the ceramic after removing it from the heat press. Once the paper has been removed, cool the ceramic by submerging it in cool water, or run water over it from a faucet. If paper residue remains on the surface of the ceramic, clean with citrus cleaner. If you experience a significant paper-sticking problem, call your SubliJet reseller for assistance. 18 Sawgrass Technologies, Inc. SubliJet IQ® Getting Started Guide for the EPSON Stylus Photo 1280 Tips for Hanes Soft L’Ink® Shirts The presence of moisture in your fabric can lead to bleeding of the image. Remove moisture by pre-pressing your shirt for 10 seconds. Use Teflon sheets between the front and back of the shirt to prevent the inks from penetrating to the other side of the shirt. If dye residue from your heat press is being deposited on your shirts at any time, heat press a paper towel or similar absorbent material to remove residual dye. Using a lint brush before pressing can greatly reduce lint or debris on the shirt. Moisture and Humidity Problems The addition of moisture to the sublimation process can cause unwanted results. Under normal circumstances, the small amount of moisture that can accumulate in your paper is absorbed directly into the transfer substrate; however hard substrates like metal and ceramic are unable to absorb excess moisture. Some of problems that are attributed to moisture include: color shifting (colors lose accuracy) bleeding of the image uneven transfer of solid filled areas To avoid these problems Keep your paper in a dry place. If you suspect moisture, set the paper on your press for a few seconds. Do not press it. Just expose it to the warmth. The heat radiating from the press should help evaporate most of the moisture. To eliminate moisture in fabric, press the fabric for 10 seconds before doing the heat transfer. Use an absorbent cloth or fresh, non-textured paper towel behind the transfer sheet to absorb the moisture. 19 Sawgrass Technologies, Inc. SubliJet IQ® Getting Started Guide for the EPSON Stylus Photo 1280 Supplies & Equipment Contact your reseller to purchase sublimation supplies and equipment. For more information, see the Sublimation Supplies Directory on our World Wide Web site at www.sublimation.com. Operating Conditions Certain environmental conditions should be taken into account for the operation of SubliJet IQ inks, including temperature and relative humidity. • Supported Operating Conditions are 65° – 80° F with 40 – 60% relative humidity • Optimum Operating Conditions are 68° – 75° F with 40 – 60% relative humidity Storage Care should be taken to prevent storing SubliJet below freezing temperatures (32°F, 0°C). Do not expose SubliJet to extreme heat (temperatures in excess of 104°F, 40°C). If SubliJet has been in storage, you should allow it to reach room temperature before using it. Do not expose SubliJet cartridges directly to light, especially sunlight, for extended periods. For best results install your SubliJet cartridges by the date on the cartridge. 20 Sawgrass Technologies, Inc. SubliJet IQ® Getting Started Guide for the EPSON Stylus Photo 1280 Troubleshooting The troubleshooting tips found in this section relate mainly to problems that can be seen in transferred SubliJet images. If you are having problems related to the performance of your printer, please refer to the Problem Solving section found in the EPSON Stylus Photo 1280 Printer Basics Guide. The colors in my transferred image are incorrect The image may need color adjustment. Use PowerDriver IQ color matching software. For more information on how to use this software please see the PowerDriver IQ Users Guide. Ensure you use the right printer driver and driver settings. For more information, see your PowerDriver IQ Users Guide. Ensure you press the item with the proper time, temperature and pressure. For guidelines see the section entitled Heat Transfer Information. Verify all colors print correctly. Run the Nozzle Check utility and clean the print heads as required. See your EPSON Stylus Photo 1280 Printer Basics Guide for more detailed instructions. My printout is really light on paper This should be no cause for alarm. SubliJet naturally looks muted before heat transfer of the image. After heat transfer, SubliJet’s unique inks produce a brilliant and durable final product. My printout gets cut off on the bottom or side Verify the printer driver is setup for the correct paper size. Your printer driver setting needs to match the paper size that is loaded in your printer. Ensure the right paper guide is in the proper position. When setting up the printer, slide the right paper guide to the left until it clicks into position. My image looks good but it washes out Ensure you press the garment with the proper time, temperature and pressure. If so, try pressing longer to ensure that the dyes are penetrating the fibers sufficiently. For guidelines, see the section entitled Heat Transfer Information. Ensure you use a recommended paper. See the section entitled Selecting Paper. Ensure your substrate is designed to accept sublimation transfers. Garments made from natural fibers, such as cotton, are not compatible with the sublimation process. 21 Sawgrass Technologies, Inc. SubliJet IQ® Getting Started Guide for the EPSON Stylus Photo 1280 Colors are light and splotchy Ensure you print on the correct side of the paper. The print side is the bright white side of the paper. Ensure you use a recommended paper. For more information, see the section entitled Selecting Paper. Ensure you press the item with the proper time, temperature and pressure. For guidelines, see the section entitled Heat Transfer Information. Verify your printer driver settings are correct. See your PowerDriver IQ Users Guide for additional information. Ensure you do not have a moisture problem. For more information, see the section entitled Moisture and Humidity. Ensure your substrate is designed to accept a sublimation transfer. Garments made from natural fibers such as Cotton, are not compatible with the sublimation process. My image looks blurred Ensure you press the item with the proper time, temperature and pressure. For guidelines, see the section entitled Heat Transfer Information Ensure to use a recommended paper. For more information, see the section entitled Selecting Paper. Ensure you print on the correct side of the paper. The print side is the bright white side of the paper. Ensure you do not have a moisture problem. Try drying the paper on the press or putting a paper towel behind the transfer when you heat press it. Read the section entitled Moisture and Humidity. Verify that the printer’s print heads are properly aligned. For further instructions see the EPSON Stylus Photo 1280 Printer Basics Guide. My image has gaps or bands present Ensure that all of the printer’s nozzles are firing properly. Perform a Nozzle Check from the Utility tab of your printer driver. For further instructions see the EPSON Stylus Photo 1280 Printer Basics Guide. If one or more of the nozzles fail to print, perform a Print Head Cleaning. For further instructions see the EPSON Stylus Photo 1280 Printer Basics Guide. 22 Sawgrass Technologies, Inc. SubliJet IQ® Getting Started Guide for the EPSON Stylus Photo 1280 Technical Support If you are having difficulties achieving good results from your SubliJet inks, you have several support options: 1. Telephone: You may contact your authorized SubliJet reseller during their normal hours of operation for assistance. A full listing of authorized SubliJet Resellers is available on our Web site at www.sublimation.com. In addition, you may also contact Sawgrass Technical Support at (843) 884-1575 between the hours of 8:00 AM and 5:30 PM Eastern Standard Time. 2. Internet: Visit the Technical Support area of the Sawgrass Technologies, Inc. Web site at www.sublimation.com. The troubleshooting utility found here will provide you with solutions to some of the most common problems. You may submit a detailed description of your problem if you need further assistance. We will work with your reseller to provide you with a solution to your printing problems. 3. E-mail: You may e-mail Sawgrass Technical Support with a detailed description of your problem at [email protected]. We will work with your reseller to provide you with a solution to your printing problem. 4. Fax: You may fax a detailed description of your problem to Sawgrass Technical Support at (843) 849-3847. We will work with your reseller to provide you with a solution to your printing problems. 23 2233 Highway 17 North •Mount Pleasant, South Carolina 29466 Phone 843.884.1575 • Fax: 843.849.3847 www.sublimation.com