1
NaturaLink™
Getting Started Guide
For the MS-One
Revision 10/2006
MS-One
Fueled by NATURALINK TM
NATURALINKTM
Getting Started Guide
for the MS-One
© Copyright 2006, Sawgrass Technologies, Inc., Revision October 2006. All rights
reserved. Printed in the United States of America.
NaturaLinkTM and ColorSure™ are trademarks of Sawgrass Technologies, Inc.
PowerDriver MS-One® is a registered trademark of Sawgrass Technologies, Inc.
Other trademarks and registered trademarks are the property of their respective owners.
No part of this manual may be reproduced or transmitted in any form by any means
without the prior written consent of Sawgrass Technologies, Inc. Information in this
manual is subject to change without notice and does not represent a commitment on the
part of Sawgrass Technologies, Inc.
1
MS-One
Fueled by NATURALINK TM
IMPORTANT – READ CAREFULLY:
This Process License Agreement (“PLA”) is a legal agreement between you and Sawgrass Technologies, Inc. (“Sawgrass”).
By installing NaturaLinkTM in your printer, or otherwise using NaturaLinkTM, you agree to be bound by the terms of this PLA. If
you do not agree to the terms of this PLA, Sawgrass is unwilling to license the process of using NaturaLinkTM to you. In such
event, you may not use NaturaLinkTM, and you should promptly contact your supplier for instructions on return of the
unopened package.
The process of using NaturaLinkTM is protected by U.S. and foreign patents. Sawgrass will provide a complete list of the relevant
patents upon request. The use of NaturaLinkTM to practice the patented process is permitted by this license.
GRANT OF LICENSE This PLA grants you the following rights: You may install and use NaturaLinkTM packaged here with in your MSOne printer to practice the printing process described in U.S. Patent No. 6,341,856. The use of any ink, dye, or pigment to practice the
Sawgrass Process, other than NaturaLinkTM purchased from Sawgrass or its authorized distributor accompanied by a PLA, is not a
licensed use of the Sawgrass Process. No rights to use the Sawgrass Process, except those specified herein, are granted, and no
rights to use any other process, product, software, or hardware developed or sold by Sawgrass are granted or implied hereby.
LIMITATIONS ON REVERSE ENGINEERING You agree that you will not attempt to reverse engineer, reproduce, or deformulate
NaturaLinkTM.
PATENTS AND COPYRIGHTS Sawgrass owns multiple U.S. and foreign patents which apply to the Sawgrass Process and/or
NaturaLinkTM or its use. All patents in and to NaturaLinkTM and the method of using NaturaLinkTM are owned by Sawgrass Technologies,
Inc. You may not copy the printed materials accompanying NaturaLinkTM. All rights not specifically granted under this PLA are reserved
by Sawgrass Technologies, Inc.
Made In U.S.A.
CAUTION:
•
For best printing results, use the ink within six months of purchase. Please refer to the individual ink bag/cartridge for the
specific ink expiration date.
•
Keep out of reach of children.
•
Do not expose ink to temperatures above 75º F or below 50º F.
•
Keep ink out of direct sunshine.
Sawgrass Technologies, Inc. agrees to replace any defective ink within a reasonable time, which shall be Sawgrass’ sole responsibility
for errors or defects in these goods.
THERE ARE NO OTHER WARRANTIES, EXPRESSED OR IMPLIED, INCLUDING, BUT NOT LIMITED TO, ANY IMPLIED WARRANTY OF
MERCHANTABILITY OR ANY IMPLIED WARRANTY OF FITNESS FOR A PARTICULAR PURPOSE. SAWGRASS SHALL NOT BE LIABLE
FOR LOSS OF PROFIT OR OTHER ECONOMIC LOSS, OR FOR INDIRECT, SPECIAL, CONSEQUENTIAL OR OTHER SIMILAR DAMAGES.
2
MS-One
Fueled by NATURALINK TM
END-USER LICENSE AGREEMENT FOR SAWGRASS SOFTWAREPowerDriver MS-One®.
IMPORTANT-READ CAREFULLY: This Sawgrass Technologies Inc. End-User License Agreement ("EULA") is a legal agreement between you (either
an individual or a single entity) and Sawgrass Technologies, Inc for the Sawgrass software product identified above, which includes computer software
and may include associated media, printed materials, and "online" or electronic documentation ("SOFTWARE PRODUCT"). By installing, copying, or
otherwise using the SOFTWARE PRODUCT, you agree to be bound by the terms of this EULA. If you do not agree to the terms of this EULA, do not
install or use the SOFTWARE PRODUCT.
Software PRODUCT LICENSE
Copyright laws and international copyright treaties, as well as other intellectual property laws and treaties protect the SOFTWARE PRODUCT. The
SOFTWARE PRODUCT is licensed, not sold. The title to, and ownership of, this SOFTWARE PRODUCT remains with Sawgrass Technologies, Inc.
(Sawgrass).
GRANT OF LICENSE. This EULA grants you the following rights:
•
This license is provided to you for your use according to the terms hereof. You may install and use the SOFTWARE PRODUCT packaged
herewith to practice the printing process described in U.S. Patent No. 5,488,907 (the "Sawgrass Process"). The use of any ink, dye or pigment to
practice the Sawgrass Process, other than a SubliJet ink which is purchased from Sawgrass or its authorized distributor, is not a licensed use of
the SOFTWARE PRODUCT. You agree not to use the SOFTWARE PRODUCT for any other purpose or in any process except as expressly
permitted hereby.
•
Not for Resale. You may not sell, or otherwise transfer for value, the SOFTWARE PRODUCT.
•
No Reverse Engineering, Decompilation, Copying or Disassembly. You may not reverse engineer, decompile, copy or disassemble the
SOFTWARE PRODUCT.
•
No Rental. You may not rent, lease, or lend the SOFTWARE PRODUCT.
•
Support Services. Sawgrass Technologies, Inc. may provide you with support services related to the SOFTWARE PRODUCT ("Support
Services"). Use of Support Services is governed by the Sawgrass policies and programs described in the user manual, in "online"
documentation, and/or in other Sawgrass-provided materials. Any supplemental software code provided to you as part of the Support
Services shall be considered part of the SOFTWARE PRODUCT and subject to the terms and conditions of this EULA. With respect to
technical information you provide to Sawgrass as part of the Support Services, Sawgrass may use such information for its business
purposes, including for product support and development. Sawgrass will not utilize such technical information in a form that personally
identifies you.
•
No Assignment or Sublicense. You may not assign or sublicense the rights granted hereby.
•
Termination. Without prejudice to any other rights, Sawgrass may terminate this EULA if you fail to comply with the terms and conditions of
this EULA. In the event of termination, you must destroy all copies of the SOFTWARE PRODUCT and all of its component parts.
COPYRIGHT. All title and copyrights in and to the SOFTWARE PRODUCT (including but not limited to any images, photographs, animations, video,
audio, music, text, and "applets" incorporated into the SOFTWARE PRODUCT), the accompanying printed materials, and any copies of the
SOFTWARE PRODUCT are owned by Sawgrass Technologies Inc. or its suppliers. Copyright laws and international treaty provisions protect the
SOFTWARE PRODUCT. Therefore, you must treat the SOFTWARE PRODUCT like any other copyrighted material, except that you may install the
SOFTWARE PRODUCT on a computer for the uses permitted hereby. You may not copy the printed materials accompanying the SOFTWARE
PRODUCT. You may not loan, rent, lease, or otherwise transfer the other medium to another user, except as part of the permanent transfer (as
provided above) of the SOFTWARE PRODUCT.
U.S. GOVERNMENT RESTRICTED RIGHTS. The SOFTWARE PRODUCT and documentation are provided with RESTRICTED RIGHTS. Use,
duplication, or disclosure by the Government is subject to restrictions as set forth in subparagraph (c)(1)(ii) of the Rights in Technical Data and
Computer Software clause at DFARS 252.227-7013 or subparagraphs (c)(1) and (2) of the Commercial Computer Software-Restricted Rights at 48 CFR
52.227-19, as applicable.
3
MS-One
Fueled by NATURALINK TM
MISCELLANEOUS
a. If you acquired this product in the United States, this EULA is governed by the laws of the State of South Carolina. In the event of any dispute arising
under this license or from the use of the SOFTWARE PRODUCT, each party irrevocably agrees to the jurisdiction of the United States District Court for
the District of South Carolina, Charleston Division.
b. If you acquired this product in Canada, this EULA is governed by the laws of the Province of Ontario, Canada. In the event of any dispute arising
under this license or from the use of the SOFTWARE PRODUCT, each party irrevocably agrees to the jurisdiction of the courts of the Province of
Ontario and further agrees to commence any litigation which may arise hereunder in the courts located in the Judicial District of York, Province of
Ontario.
c. If this product was acquired outside the United States, then local law may apply.
LIMITED WARRANTY. Sawgrass warrants that (a) the SOFTWARE PRODUCT will perform substantially in accordance with the accompanying written
materials for a period of thirty (30) days from the date of receipt, and (b) any Support Services provided by Sawgrass shall be substantially as described
in applicable written materials provided to you by Sawgrass, and Sawgrass support engineers will make commercially reasonable efforts to solve any
problem issues. Some states and jurisdictions do not allow limitations on duration of an implied warranty, so the above limitation may not apply to you.
To the extent allowed by applicable law, implied warranties on the SOFTWARE PRODUCT, if any, are limited to thirty (30) days.
CUSTOMER REMEDIES. Sawgrass' and its suppliers' entire liability and your exclusive remedy shall be, at Sawgrass' option, either (a) return of the
price paid, if any, or (b) repair or replacement of the SOFTWARE PRODUCT that does not meet Sawgrass' Limited Warranty and which is returned to
Sawgrass with a copy of your receipt. This Limited Warranty is void if failure of the SOFTWARE PRODUCT has resulted from accident, abuse, or
misapplication. Any replacement SOFTWARE PRODUCT will be warranted for the remainder of the original warranty period or thirty (30) days,
whichever is longer. Outside the United States, neither these remedies nor any product support services offered by Sawgrass are available without
proof of purchase from an authorized international source.
NO OTHER WARRANTIES. To the maximum extent permitted by applicable law, Sawgrass and its suppliers disclaim all other warranties and
conditions, either express or implied, including, but not limited to, implied warranties of merchantability, fitness for a particular purpose, title, and noninfringement, with regard to the SOFTWARE PRODUCT, and the provision of or failure to provide Support Services. This limited warranty gives you
specific legal rights. You may have others, which vary from state/jurisdiction to state/jurisdiction.
LIMITATION OF LIABILITY. To the maximum extent permitted by applicable law, in no event shall Sawgrass or its suppliers be liable for any special,
incidental, indirect, or consequential damages whatsoever (including, without limitation, damages for loss of business profits, business interruption, loss
of business information, or any other pecuniary loss) arising out of the use of or inability to use the SOFTWARE PRODUCT or the provision of or failure
to provide Support Services, even if Sawgrass has been advised of the possibility of such damages. In any case, Sawgrass' entire liability under any
provision of this EULA shall be limited to U.S. $5.00. Because some states and jurisdictions do not allow the exclusion or limitation of liability, the above
limitation may not apply to you.
®
PowerDriver MS-One is a registered trademark of Sawgrass Technologies, Inc.
TM
NaturaLink and ColorSure™ are trademarks of Sawgrass Technologies, Inc.
General Notice: Other product names used herein are for identification purposes only and may be trademarks of their
respective owners. Sawgrass Technologies, Inc. disclaims any and all rights in those marks.
4
MS-One
Fueled by NATURALINK TM
Table of Contents
Introduction ..........................................................................................................................6
About this Document...........................................................................................................7
MS-One PRINTER.................................................................................................................8
Overview ...............................................................................................................................8
Other Requirements.............................................................................................................8
STORING, UNPACKING AND POSITIONING OF THE MACHINE .....................................9
ADJUSTMENTS BEFORE STARTING...............................................................................10
PRELIMINARY OPERATIONS............................................................................................11
INK LOADING .....................................................................................................................14
PRINTING PROCEDURES..................................................................................................16
PRINTING ............................................................................................................................20
Printing a Nozzle Check ....................................................................................................22
Applications........................................................................................................................24
Apparel Specifications ......................................................................................................24
Setup Instructions – Windows 2000 and XP....................................................................27
Appendix A: Network Printing in Windows 2000, XP .....................................................36
Appendix B: Defeating Application Color Management ................................................37
Tips for Successful Printing .............................................................................................48
Supplies & Equipment .......................................................................................................49
Operating Conditions ........................................................................................................49
Storage................................................................................................................................49
Troubleshooting.................................................................................................................50
MAINTENANCE...................................................................................................................52
Technical Support..............................................................................................................52
MS-One Warranty ...............................................................................................................53
5
MS-One
Fueled by NATURALINK TM
Introduction
Welcome to Sawgrass Technologies, Inc. and NaturaLink™. We are excited to offer our direct to cotton
solution for your business. We look forward to working with you and a continued partnership in digital
imaging.
The NaturaLink™ Getting Started Guide contains information for using NaturaLink™ inks and helpful
tips for getting the best printing results possible. The information provided pertains only to the use of
NaturaLink™ inks in your printer.
PowerDriver MS-One™ is included with NaturaLink™. Developed by Sawgrass Technologies,
PowerDriver MS-One™ is user-friendly software that enables you to maximize output quality and
quantity. Please refer to the detailed instructions provided in this manual or on your PowerDriver MSOne™ CD to customize each print.
Technical support is available from your Authorized NaturaLink™ reseller or directly from Sawgrass
Technologies, Inc. See the section entitled Technical Support for additional information. Please feel
free to contact us with your feedback about our products. For additional information on NaturaLink™ or
our other products, visit our web site at www.sawgrassink.com. Thank you and enjoy NaturaLink™.
6
MS-One
Fueled by NATURALINK TM
About this Document
This document contains descriptions and procedures for using NaturaLink™, along with
additional information on setting up your MS-One printer and for getting the best results from
use of this system. The documentation provided pertains only to the use of your MS-One
printer and NaturaLink™.
To help point out important information, specific instructions, and helpful tips look for the
following symbols:
SUGGESTION / REMARK: suggestion to optimize the operations of this
machine.
WARNING: important warning to avoid procedure mistakes.
DANGER: hazard which could seriously compromise the use of the
machine and/or the physical safety of the operator.
Indicates useful tips for printing.
7
MS-One
Fueled by NATURALINK TM
MS-One PRINTER
Overview
The instructions and information included in this manual will assist you in effectively operating
this machine.
The machine and inks must be stored and operated in temperature controlled room, free from
excessive temperature variations (under 50° F and over 86° F), and free from dust and
vibrations which may jeopardize the functionality of the machine.
It is critical before operating this machine and after changing garment materials to carefully
check the print head height. Any touching or scraping of any surface including the jig will
damage the print head and its repair or replacement will not be covered by warranty.
If the machine is not going to be used for an extended period of time, disconnect the power
and completely remove the inks from the machine. Also clean the ink feed lines by placing
the leavers in the lower position and powering the printer off. The ink lines will then empty
into the waste ink tank and will need to be purged per the Waste Ink Tank instructions.
Before each print ensure that the jig is positioned at the zero point corresponding with the
photocell.
USE ONLY SAWGRASS SUPPLIED INKS! THE USE OF OTHER INKS
WILL DAMAGE THE PRINTER AND WE WILL NOT BE LIABLE FOR ANY
DAMAGES INCURRED OR PRODUCTION LOST.
Other Requirements
Before starting the setup process you will need to obtain the following:
8
One – USB Printer Cable
MS-One
Fueled by NATURALINK TM
STORING, UNPACKING AND POSITIONING OF THE
MACHINE
1. Store the box, containing the machine, horizontally in a closed area protected
from atmospheric elements.
2. Open the box containing the machine and visually inspect the machine to
determine any damage during the transportation.
3. Remove the clamps/straps that lock the machine to the wooden pallet.
4. Remove the machine using the four black handles placed on the sides of the
printer.
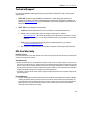
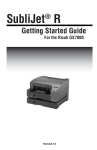
5. Place the machine on a sturdy table approximately 2.5-3 ft from the floor
supporting the front feet completely on the table. (PHOTO 1.A)
For proper printer operation, it is mandatory to place the machine on a flat and
level surface.
Due to the heavy weight of the machine, use extreme caution while moving the
machine. Always use all four handles and proper lifting techniques.
The inks are heat sensitive. If subject to extreme temperatures, they will loose
partial or complete functionality. See the section entitled Operating Conditions.
When not in use for extended periods, the inks must be removed and properly
stored. See the section entitled Storage.
9
MS-One
Fueled by NATURALINK TM
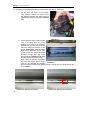
ADJUSTMENTS BEFORE STARTING
Belt Level
Verify the level of the printing surface (belt conveyor and jig support).
The belt conveyor supplied comes aligned and level. However, it is possible that during
transportation the level could vary. In this case, verify by means of a tape measure that the
belt height at the front feet and the height of the plain for the entire length of the belt are the
same (differences of few millimeters are acceptable).
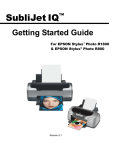
If the belt is not flat on right or left side:
1. Loosen the eight screws which support the belt (PHOTO 2.A)
PHOTO 2.A
2. Adjust the belt plane verifying by means of a fluid level (PHOTO 2.B)
PHOTO 2.B
3. Once the belt is level, tighten the screws. (PHOTO 2.A)
4. Verify result of the operation using a fluid level. Repeat from step 1 as needed.
10
MS-One
Fueled by NATURALINK TM
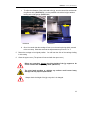
PRELIMINARY OPERATIONS
1.
Open the upper cover
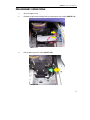
2.
Release the print head carriage lock by loosening the two screws (PHOTO 5.A)
PHOTO 5.A
3.
Pull the green tag until it clicks (PHOTO 5.B)
PHOTO 5.B
11
MS-One
Fueled by NATURALINK TM
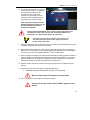
Starting the Machine
1. Power up the machine by plugging it into an outlet.
In case of frequent power surges or outages, use a UPS
(uninterruptible power supply).
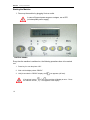
CONTROL BOARD
Every time the machine is switched on, the following operations have to be carried
out:
1. Press key 1 to turn the printer “ON”.
2. Wait until the display shows “READY”.
3. Verify that under the “READY” display, the
icon appears (roll feed).
If the printer is set to
or
the machine will display an error. Press
the 3 button until the proper icon appears in the display.
12
MS-One
Fueled by NATURALINK TM
Language Selection
If the preset language is not the desired language, modify it as follows:
1. Turn on the machine by pressing key 1 “POWER” and key 2 “PAUSE” simultaneously
to enter the configuration menu
2. Press key 5 until “LANGUAGE” is displayed.
Note: The arrow menu buttons only move up. If you pass your selection, you
will have to continue to arrow up until it your selection is displayed again.
3. Press key 6 “MENU” is displayed.
4. Press key 5 to select the desired language.
5. Press key 6 to confirm the selection.
6. Verify the modification by switching the machine off and on again.
13
MS-One
Fueled by NATURALINK TM
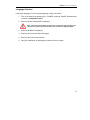
INK LOADING
1. Ensure the printer power is on. Press the ink compartment cover to release the latch and
open the cover.
2. Raise the ink lever to the unlocked position. The ink lever
is located to the right of each ink compartment.
3. Remove the ink cartridge from its packaging and insert it into the slot with the label facing
left. Do not force the cartridge into the slot. Start with the black cartridge on the left and
attach the cartridges in this order:
Black
Cyan
(In the Magenta Position) Magenta
(In the Yellow Position) Yellow
(In the Black Position)
(In the Cyan Position)
14
Yellow (In the Light Light Black Position)
Magenta (In the Light Magenta Position)
Cyan (In the Light Cyan Position)
Black (In the Light Black Position)
MS-One
Fueled by NATURALINK TM
If the cartridge does not insert smoothly into the slot, double check
to make sure you have the correct cartridge installed in the correct
slot. If the ink light remains on after installing the cartridge, remove
the cartridge and reinsert to ensure it was fully placed in the slot.
4. Lower the ink levers in to the locked position.
5. Close the ink compartment covers.
6. Once the cartridge is installed the printer will return to its READY state.
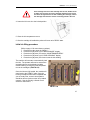
Initial ink filling procedure
(Refer to page 12 for menu button numbers)
1. Press the key 6 to enter the “MENU”.
2. Press the key 5 (arrow up) till “MAINTENANCE” display.
3. Press the key 6 (enter) to enter the “MAINTENANCE MENU”.
4. Press the key 5 (arrow up) till “PWR CLEANING” display.
5. Press the key 6 (enter) two times to start the inks loading.
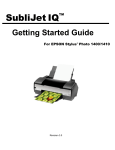
The machine will now start to automatically load
the inks. The operator will need to execute the
operations shown on the display including
include lowering or lifting the ink levers placed
next to the cartridges. (PHOTO 4.D)
Once the inks are fully loaded, the machine will
come back to the “READY” state. Once the
Printing Procedures have been completed and
you are ready Print, a nozzle check pattern
should be done to make sure the ink is loaded
correctly. See the Printing a Nozzle Check
section for instructions.
PHOTO 4.D
15
MS-One
Fueled by NATURALINK TM
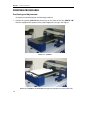
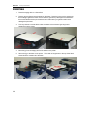
PRINTING PROCEDURES
Positioning and Adjustments
Check the print head height per the following procedures:
1. Position the jig base (PHOTO 5.A) and the jig on the center of the belt (PHOTO 5.B).
Both are equipped with registers for the perfect alignment of the jig in the support.
PHOTO 5.A – JIG BASE
PHOTO 5.B – BASE WITH JIG ATTACHED (See page 20 for instructions on how to load a shirt)
16
MS-One
Fueled by NATURALINK TM
2. Adjust the photocell plane at the rear of the belt drive to match the length of the garment.
To do this:
a. Loosen the fixing screws of the photocell support (A) and reflector (B)
(PHOTO 5.C)
PHOTO 5.C
b. Position the photocell and the reflector by sliding the guides towards the belt
and aligning them. The photocells should be as close as possible to the end
of the belt without touching it. The correct alignment of the reflector is
indicated by the lighting of the green LED on the photocell.
c.
Tighten the fixing screws.
3. With the machine on and in the “READY” state,
press the forward arrow key to cycle the belt and
garment support to the “zero” point or printing
origin. The belt and garment support will stop
automatically by tripping the photocell plane.
Do not press any key until
the word “READY” appears on the display.
Verify the tightness of the fixing screws of the photocell support and
reflector.
17
MS-One
Fueled by NATURALINK TM
4. Check the height of the print head to avoid contact with the jig. To do this:
a. Lift the clear top cover on the printer.
Then press the black lock screw to free
the printing carriage and gently move it
towards the center of the printer (PHOTO
5.D)
PHOTO 5.D
b. Check the level of the head to make
sure it is higher than the jig by
looking at the front of the machine
between the jig and the silver bar
that runs along the bottom of the
printer (Photo 5.E) while pressing
down on the black lock screw. The
bottom of the lock screw should be
showing through that gap when
pressed down (Photos 5.F & 5.G)
but should not be touching the jig.
Note: When a garment is present,
the black lock screw should be as
PHOTO 5.E
close to the garment as possible
without actually touching the garment when running the print head across the
entire platform.
PHOTO 5.F – Black lock screw up
18
PHOTO 5.G – Black lock screw down
MS-One
c.
Fueled by NATURALINK TM
To adjust the distance of the print head to the jig, turn the central foot underneath
the garment belt. (PHOTO 5.H). It is also possible to check the height variation
looking at the side gauge. (PHOTO 5.J)
PHOTO 5.H
PHOTO 5.J
d. Once it is certain that the carriage is free to run the entire printing width, proceed
to the next step. Otherwise execute the adjustments as per items 7 a - c.
5. Return the carriage to its original position. You will hear the click of the carriage locking
in its housing
6. Close the upper cover. (The printer will not work with the open cover.)
Before any operation, always check the height of the jig support to be
sure it is lower than the printing head. (PHOTO 5.I)
The print head touching or rubbing any surface could cause heavy
damage and may require replacement.
Always check the height of the jig every time it is changed.
19
MS-One
Fueled by NATURALINK TM
PRINTING
20
1.
Place the staging deck on a flat surface.
2.
Place a garment flat and evenly spread on the base. Place the hoop over the garment so
that it fits tight against the base. Ensure that the garment is pulled tight to avoid wrinkles
that could interfere with the print head and as a result stain your garment and/or even
damage the print head.
3.
Tuck any sleeves or excess fabric under the base so that it doesn’t get caught as it
passes through the printer.
4.
Move the jig from the staging deck to the base on the printer.
5.
Secure the jig to the base on the printer. The collar of the garment or the top of the fabric
should be at the outside end of the base.
MS-One
6.
Fueled by NATURALINK TM
On the back of the printer, you will find
two black arrow buttons. To advance
the belt forward, press down the
forward arrow key. After a few
seconds, the jig will begin to move
forward until it is completely back to
the printing origin (photocell limit).
Note: If properly configured in the
Printing Procedures section, the jig
will automatically stop when it
reaches the photocell.
Pushing the belt feed buttons on the printer or moving the jig before the
belt stops can cause a 1001 service code. This means that there is a
belt timing error. Restarting the printer will correct this.
To position the jig to print on a specific area of the shirt, you
must advance the jig forward and then bring it back into the
position needed for printing.
7.
Adjust the belt height (see the previous section on Positioning and Adjustments) of the jig
to add the thickness of the garment to be printed.
8.
After all adjustments have been made, send the print job to the printer via PowerDriver
MS-OneTM. For instructions on how to setup PowerDriver MS-OneTM and the settings to
use for printing, see the PowerDriver MS-OneTM User’s Guide section
9. Once the printing is finished, the printer will automatically bring the jig support forward so
that the operator can check the printed results and remove the garment. To remove the
garment, advance the jig support by pressing arrow down the back arrow key until it is
reversed far enough to remove the garment without obstruction.
10. Carefully remove the garment without touching the image since it will still be wet from
printing.
11. Heat press the garment according to the following directions:
Standard Heat press: 400 degrees at 40 psi, for 25 seconds.
Must use blotter paper to eliminate ink on heat platen.
12. Put a new garment on the holder and repeat from step 1.
Do not press any key until the word “READY” appears on the
display.
21
MS-One
Fueled by NATURALINK TM
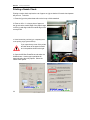
Printing a Nozzle Check
Printing a nozzle check requires the use of paper on a jig so that the full nozzle check pattern
will print out. To do this:
1. Place the jig on the printer base with out the hoop or fabric attached.
2. Place an 8.5 x 11 or larger piece of paper on
the jig so that the outside edge of the paper hangs
over the jig and aligns with the outside edge of the
conveyor belt.
3. Press forward key until the jig is completely back
to the printing origin (photocell limit).
If you open the top cover of the printer
and look down to the paper it should
be in the position shown to the right.
4. Open the MS-One PowerDriver and select the
Utilities button. Another pop-up window will
appear showing the utility options. Select the
nozzle check option.
22
MS-One
Fueled by NATURALINK TM
5. Once the printing is finished, the printer will automatically bring the jig support forward so that
the operator can check the printed results. If the nozzle check pattern has no gaps or lines,
then click Finish.
6. If the pattern has gaps or white lines click Clean to clean the print head.
After cleaning, run the nozzle check again. If no gaps or lines appear, you are ready
to print. If gaps or white lines continue to appear run the clean utility again. Note:
Do not run the clean utility more than 3 or 4 times. If your nozzle pattern does
not clean up after that time, contact Technical Support for more assistance.
7. Advance the jig forward and remove the paper. Proceed with printing using the Printing
Instructions on the previous page.
23
MS-One
Fueled by NATURALINK TM
Applications
T-shirt - long sleeve and short sleeve. Sweat shirts and Terry towels.
Adjustable platen accommodates range of product widths
Apparel Specifications
Printer currently works with whites and pastel shirts which represent 70% of the T-shirt
market.
24
Works with 100% cotton and cotton blends.
MS-One
Fueled by NATURALINK TM
PowerDriver MS-One
User Guide
For distribution with the MS-One printer only
NOT FOR RESALE
Rev 8.0.0
25
MS-One
Fueled by NATURALINK TM
Introduction
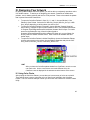
Obtaining the benefits of PowerDriver color management is now incredibly easy - simply print
from your application with PowerDriver MS-One rather than the Epson printer driver.
PowerDriver MS-One prints your image just like the Epson printer driver except for the colors.
Watch how it magically makes NaturaLink colors picture perfect!
PowerDriver MS-One delivers both convenience and the highest quality NaturaLink color
management technology. The innovation demonstrated by PowerDriver MS-One is the result
of our dedication to you, our customers. At Sawgrass Technologies, we are focused on
delivering the highest quality digital printing technology available. We fully expect that you
will be “wowed” by the results you obtain with NaturaLink and PowerDriver MS-One.
PowerDriver MS-One runs under Windows 2000 and Windows XP.
System Requirements
Minimum Hardware:
Pentium 4 – 2.5GHz Processor
512 MB System Memory
80 GB Hard Drive
USB 2.0
Recommended Hardware:
Pentium 4 – 3.0GHz Processor
1 GB System Memory
80 GB Hard Drive
USB 2.0
26
MS-One
Fueled by NATURALINK TM
Setup Instructions – Windows 2000 and XP
Product Overview
PowerDriver MS-One is color management software that has been written as a Windows
printer driver. It is designed to work with the MS-One t-shirt printer and Sawgrass NaturaLink
inks. The installation program will install Sawgrass color management software, the
Sawgrass PowerDriver MS-One printer driver software, and ColorSure tools and utilities.
Quick Start
1.
Unpack and setup printer as described in the MS-One manual.
2.
Insert the PowerDriver MS-One CD into the CDROM drive on the computer and
install PowerDriver MS-One as outlined below.
Step By Step Installation
To get started printing as soon as possible, these are the steps Sawgrass recommends you
perform while setting up your printer driver software.
1.
Setup the printer according to the MS-One instructions.
2.
Install Sawgrass NaturaLink inks.
3.
Insert the PowerDriver MS-One CD into your CDROM drive. The installation program
should run automatically. (If the program does not automatically run, click Start, Run.
Browse to your CDROM drive, and click on Setup.)
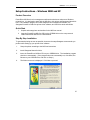
4.
The Welcome screen is displayed. Click Next to proceed.
27
MS-One
28
Fueled by NATURALINK TM
5.
The License Agreement is displayed next. Select the appropriate choice for
acceptance of the Licensing Agreement to continue.
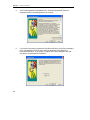
6.
If you have not previously registered PowerDriver MS-One, you will be prompted to
do so. Registering is the only way to take full advantage of the features in
PowerDriver MS-One. If you choose to register later, select Register Later and
click Next to proceed with the installation.
MS-One
7.
Fueled by NATURALINK TM
If you choose to register now, the registration screen will be displayed. To obtain
your registration code you may do so in one of the following ways: Register on-line
and receive your registration code via e-mail. Call Sawgrass Technologies, Inc.
directly (843) 884-1575 and obtain your code over the phone. Send a fax and
receive your registration code by fax.
To register, you will use your Product ID (displayed on the registration screen) to obtain a
Registration code. You will need separate registration code for every machine on which
PowerDriver MS-One is installed. Enter your registration code and click the Apply Code
button.
29
MS-One
30
Fueled by NATURALINK TM
8.
Sawgrass Technologies, Inc. provides ColorSure color palettes for use with Corel
and Adobe. (Check the ColorSure section of the manual for information on how to
use ColorSure to get perfect spot colors). If Setup detects either of these
applications on your system, the palette files will be placed in the appropriate folder
indicated in the Destination Folder box. Click Next to proceed with the installation.
9.
The PowerDriver MS-One installation program will attempt to use plug-n-play to
determine the port that the printer is connected to, click Next to continue. Note:
Cancel any ‘Found New Hardware’ wizards that may start during this process, do
NOT cancel any file copy process however.
MS-One
Fueled by NATURALINK TM
10.
If you see the screen below, click Continue Anyway to proceed with the installation.
11.
Once the installation has completed, the Installation Complete screen will be
displayed. Click OK to end the installation.
31
MS-One
Fueled by NATURALINK TM
Using PowerDriver MS-One in Windows 2000 / XP
PowerDriver MS-One is simple to use. Whenever you have NaturaLink inks in your printer,
you should print using PowerDriver MS-One. Do not print to your Epson printer with the
Epson printer driver; printing with the Epson driver will not give you the benefit of color
management.
Quick Start Example (Corel Draw)
1) Open/Create an image in Corel Draw.
2) Select print from the File menu.
3) Select the PowerDriver MS-One printer.
4) Use the properties button to access and set the Color, Output, Resolution, and
Advanced options.
5) Click Print.
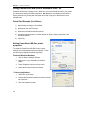
Setting PowerDriver MS-One printer
properties
To configure PowerDriver MS-One for the correct
settings, you must display its printer properties. There
are two ways to display the printer properties:
From the Windows Desktop:
1. Click on Start> Settings> Printers.
2. Right-click on your PowerDriver MS-One
printer.
3. Select Properties from the pop-up menu.
4. Select the Printing Preferences button.
From an Application:
1. Select File, Print Setup.
2. Choose the PowerDriver MS-One printer from the
list of printers.
3. Click the Properties button.
32
MS-One
Fueled by NATURALINK TM
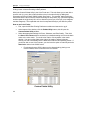
PowerDriver MS-One Properties Overview
The following figure shows the printer properties for a registered version of PowerDriver MSOne. The Advanced Color Options tab and the Print Palette functions will not be available if
the product has not been registered.
There are two main property groups;
1.
2.
General Options and Utilities – Utilities for printer maintenance, online help, product
registration, and setting input profiles
Color Options – Color management control options and ColorSure tools.
PowerDriver MS-One Color Options
Group 1 – General Options and Utilities
Register – If the PowerDriver MS-One product has not been registered, click this button for
instructions on how to register the product and unlock all the features.
33
MS-One
Fueled by NATURALINK TM
Utilities – Click this button to display a utilities screen. From the utilities screen you can print
a nozzle check, run a print head cleaning cycle, spool a print file to the printer, print a page of
primary ink colors, and view current ink levels.
Input Profile – This option allows you to specify an input profile that the driver will use when
color correcting your image. If you are printing scanned artwork and your scanner
manufacturer provided ICC profiles for your scanner model, select the profile here. In order
to select a profile IT MUST BE INSTALLED ON YOUR MACHINE. To install a profile on your
machine, right click on the profile file name and select “Install”.
Help – This will display a help dialog box for an easy overview of the PowerDriver MS-One
driver functions and settings. It also contains a link to the Sawgrass Technologies website.
Group 2 - Color Options
Overview
This tab gives you access to all of the color management controls available in PowerDriver
MS-One. Color correction allows you to create t-shirts from all kinds of images, from
photorealistic images to spot color logos. For maximum flexibility, PowerDriver MS-One lets
you color correct bitmap and vector elements differently, even if they are in the same
graphics file. For example, if you scan a photograph and import it into CorelDraw,
PowerDriver MS-One will use the color management settings that have been selected for
Bitmap. If you then add text on top of the bitmap image, PowerDriver MS-One will use the
color management settings that have been selected for Vector. The photograph and the text
will be color corrected differently! Why? You can now print images with realistic
photographic backgrounds that have vivid spot color text.
Vector and Bitmap Explanation
Bitmaps are a grid of pixels. Bitmaps come from digital cameras, scanners, and photo cds.
Bitmaps can also be created in applications like Corel PhotoPaint or Adobe PhotoShop.
Bitmaps have file extensions like GIF, JPG, BMP, and TIF. Vector components consist of
shapes, curves, lines, and text. They are created in programs such as CorelDraw and Adobe
Illustrator. Higher end programs like CorelDraw can combine Vector and Bitmaps into a
single image. As a rule of thumb, if the object in your image is made of curves, text, shapes,
or fills, it will be color corrected using the PowerDriver MS-One Vector settings. All other
image types will be color corrected based on the PowerDriver MS-One Bitmap setting.
Color Correction Settings
Bitmap/Vector Saturation Level - This option controls the intensity of the output from the
MS-ONE. For most images a Saturation level of one should produce vibrant images.
In some cases, such as black text on a light colored shirt you may want to increase
the Saturation Level to 2 or 3 to increase the intensity.
Detail Level - Set the detail level to “Normal” when printing spot colors or logos. Use the
“Fine” setting when printing photographs
ColorSure Enhancement - The ColorSure enhancement is used to replace specific colors in
your image with a spot color chosen from the ColorSure palette. This resulting spot
color enhancement is not affected by color setting. A ColorSure spot color will
ALWAYS print the same. See Appendix C for an overview of ColorSure.
34
MS-One
Fueled by NATURALINK TM
Speed
High Speed – The Speed option turns bi directional printing on or off. When printing fine
details such as small fonts or thin lines it may be necessary to “uncheck” the speed
option to produce images with the best clarity.
Print Palette Button – Prints the ColorSure palette for the selected substrate. ColorSure is
a method for reproducing exact spot colors. The two main components are; 1) the
printed palette and 2) the CorelDraw, Corel PhotoPaint, and Adobe swatches. For a
complete description on how to use ColorSure to get perfect spot colors, see appendix
C.
35
MS-One
Fueled by NATURALINK TM
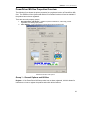
Appendix A: Network Printing in Windows 2000, XP
Network printing with PowerDriver MS-One in Windows 2000 and Windows XP is simple.
Before a network printer can be used it must be installed on the network and shared.
Host Machine (Server)
The server machine must have installed the printer and have the printer shared. To install
the networked printer, run Start | Setting | Printer | Add Printer. The Wizard will guide you
through setting up the printer. When prompted, choose “Network Printer” and browse to the
server machine to locate PowerDriver MS-One.
36
MS-One
Fueled by NATURALINK TM
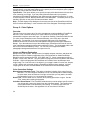
Appendix B: Defeating Application Color Management
PowerDriver MS-One provides a complete color management solution for your NaturaLink
printing. It is extremely important that you turn off any color matching features
associated with your design software. An explanation of how to disable print-time color
management in several popular design packages follows:
CorelDraw™ version 9
Create a new graphic.
From the main menu choose Tools, Color Management. The Color Management dialog
box is displayed.
In the Color Management window (see figure below), UNCHECK the Calibrate colors for
display box.
37
MS-One
Fueled by NATURALINK TM
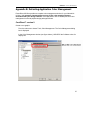
CorelDraw™ version 10, 11 and 12
Create a new graphic.
From the main menu choose Tools, Color Management. In the Color Management window
(see figure below), set the Style option to Color Management Off.
CorelDraw ™ (version 5, 6, or 7)
If you are using version 5, 6, or 7 of CorelDRAW, ensure that you have the Printer Color
Profile check box unchecked. This setting is found in the lower left of the Print dialog window.
See figure below.
Make sure this box
is not checked.
CorelDRAW 5, 6, and 7 print dialog
38
MS-One
Fueled by NATURALINK TM
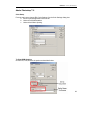
Adobe Photoshop™ 6
Color Setup
From the main menu choose Edit, Color Settings. On the Color Settings dialog box:
a. Set all Color Management Policies to Off
b. Uncheck Profile Mismatches
c. Uncheck Ask When Opening.
To Print RGB Graphics
Choose File, Print, and set the options as described below:
39
MS-One
Fueled by NATURALINK TM
To Print CMYK Graphics
Choose File, Print, and set the options as described below:
Adobe Photoshop™ 7, CS, and CS2
Color Setup
From the main menu choose Edit, Color Settings. On the Color Settings dialog box, turn all
Color Management Policies off. Turn off Profile Mismatches.
40
MS-One
Fueled by NATURALINK TM
To Print:
Always select File, Print with Preview. On the print dialog page, set the options as
described below:
a. Check Show More Options
b. Choose Color Management
c.
Choose Document as Source Space
d. Choose Same as Source for Print Space
From the Color Management drop option list, make sure that Source is set to “Document” and
Print Space is set to “Same As Source”.
41
MS-One
Fueled by NATURALINK TM
Appendix C: Using ColorSure™ and Custom Palette
I. Introduction
ColorSure is a method for reproducing exact spot colors. There are four main components of
the ColorSure System: 1.) the printed palette; 2.) Color Finder; 3.) Custom Palette; and 4.)
the CorelDRAW and Adobe application palettes / swatches.
1. ColorSure Palette: This is your main color palette that includes a wide variety of 152
commonly used colors.
2. Color Finder: If a color you need is not on the ColorSure palette, the Color Finder
tool allows you to locate the exact custom color you are looking for.
3. Custom Palette: With the Custom Palette feature, you can add new custom colors
to the existing ColorSure Palette mentioned in step 1.
4. Application Palettes: You can add your Color Finder colors to an existing
application palette, or you can add multiple custom colors to new, custom palette files
(*.cpl, *.acl, etc.).
II. Printing the ColorSure Palette
The first thing you will want to do is to print your ColorSure palette to the shirt you will be
using. Most likely you will have customers who desire precise colors. Having your ColorSure
palette available allows the customer to choose the color from the palette that is the closest
match to what they want, and this gives you a starting point for finding the exact custom color
that will match your customer’s needs.
To print the ColorSure palette, follow the steps below:
• Click ‘Start’ and navigate to the ‘Printers and Faxes’ folder. Right-click on your
PowerDriver MS-One printer and select ‘Printing Preferences’ from the menu. You
may also open PowerDriver from within an Adobe or Corel program by going to File,
Print, and choosing the PowerDriver printer from the pull-down menu. Click
Properties to open PowerDriver.
• Select the color settings and the speed (single pass, double pass) that you wish to
print the palette, and click the box ‘Print Palette’.
• You now have a visual representation of how the ColorSure palette colors will appear
on that particular substrate.
42
MS-One
Fueled by NATURALINK TM
III. Designing Your Artwork
By picking colors from the ColorSure palette, you will be able to consistently reproduce colors
in a reliable manner. To assist you in designing your artwork, PowerDriver installs three
palettes: two for Adobe products and one for Corel products. These colors match the palette
that is printed from within PowerDriver.
•
•
•
To open the ColorSure Palette in Corel 10, 11, and 12, choose Window | Color
Palettes | Open Palette. Select the file “MS-One_Rut.cpl, MS-One_Uni.cpl, or MSOne_Wil.cpl depending on which palette you wish to load.”
To open the ColorSure Palette in Illustrator, choose Window | Swatch Libraries |
Other Library. Navigate to where it was installed to when you installed PowerDriver:
C:\Program Files\Sawgrass\PowerDriver\Adobe Illustrator and hit Open. For easier
access to the Palette file copy it from this [above] path to
Illustrator10\Presets\Swatches and the palettes will show up in your pull-down list
directly under the Swatch Libraries menu. Other versions of Illustrator will have
similar steps.
To open the ColorSure Palette in Adobe PhotoShop, choose the Swatches Palette,
click the option arrow on the palette, choose Replace Swatches and pick the “MSOne_Rut.aco, MS-One_Uni.aco, or MS-One_Wil.aco” file.
HINT
After you have the ColorSure palette loaded into CorelDraw, move the cursor
over each color. As the cursor hovers over each different color, the
ColorSure name is displayed in the status area at the bottom of the screen.
IV. Using Color Finder
After printing the ColorSure Palette, you see that you have an array of colors to work with.
There will be times, however, when the color you need is not included in the ColorSure
Palette. This is a common example of when you will launch the PowerDriver Custom Palette
Utility.
43
MS-One
Fueled by NATURALINK TM
The Custom Palette Utility is a small program that coincides with PowerDriver to assist you in
finding custom colors and making custom palettes.
Within the Custom Palette Utility is the Color Finder tool. This tool allows you to start with a
specific color (e.g. navy blue) and find similar colors in the same family by adding and
subtracting up to three colors (CMYK) called ‘Step Colors.’ For example, starting with navy
blue with a CMYK value of 60,60,0,40 and choosing two step colors (e.g. cyan and magenta)
would expand the original navy blue in four directions (more cyan, less cyan, more magenta,
and less magenta). This expanded color chart is outputted directly to your MS-One printer.
How to use Color Finder:
• First, open the MS-One Printing Preferences window as instructed on pg. 8.
•
At the bottom of the window, click the Palette Utility button; this will open the
Custom Palette Utility window.
•
Select the appropriate settings for Printer, Substrate, and Print Quality. Then click
the Start Color Chooser button and select your desired starting color from the basic
colors or the color matrix. To use the color matrix, click anywhere in the matrix
window. You can use the slider at the right of the matrix to adjust luminosity.
Clicking ‘OK’ will automatically fill the CMYK boxes with the corresponding values. If
you do not wish to use Color Chooser, you also have the option to manually enter the
Start Color values in the CMYK boxes.
▬
For advanced users, CMYK values can be determined by printing out a
Custom Palette, which is outlined in the next section.
Custom Palette Utility
44
MS-One
•
Fueled by NATURALINK TM
You may alter the chosen start color’s CMYK value by selecting two or three Step
Colors. Using multiple step colors will present you with a greater range and variety
of colors to choose from.
▬
For instance, if you choose to modify your Start Color with two steps, then
Step Color 1 will change its values on the X (horizontal) axis and Step Color
2 will change its values on the Y (vertical) axis.
Color Finder Palette with two Step Colors
▬
If you modify your Start Color with three steps, Step Color 1 will remain the
same. However Step Color 2 and Step Color 3 will form an imaginary ‘X’ and
their values will change on opposing diagonal Y axes.
Color Finder Palette with three Step Colors
45
MS-One
•
Fueled by NATURALINK TM
Next, determine what Step Size you want to apply to the Color Finder palette. This is
simply a question of how much you want your Start Color to fluctuate. If your Start
Color is close the color you are looking for, use a low Step Size (i.e. 5-10). However,
if your start color is not close to what you are looking for, use a higher Step Size.
You can enter any Step Size value between 1 and 40.
▬
As an example, let’s say your Start Color is C:20, M:100, Y:150, K:0 and you
select Cyan and Magenta to be your Step Colors. You also enter a Step
Size of 10. When the ‘Print Similar Colors Chart’ button is clicked, your Start
Color will be in the middle of the Similar Colors Chart and from there each
color will vary the Cyan and Magenta values by 10.
•
When you are finished selecting the Start Color, Step Colors, and the Step Size, click
on the Print Similar Colors Chart button. This will print your custom Similar Colors
Chart directly to the MS-One.
•
After printing the Color Chart, try to match your desired color to one that is on the
palette. If you find a suitable match, you are finished using the Color Finder tool.
Move on to Section V. The Custom Palette.
•
If you couldn’t find an accurate match on the first printed Similar Colors Chart, don’t
worry. Follow the easy steps below, and you will find a more suitable custom color.
1. First, try to locate a new Start Color from the chart that is closer than the
original color.
2. Next, after finding a more suitable Start Color, write down that color’s CMYK
value. Here is how to obtain this value. There are numbers under each color
that are dependant upon which Step Colors you chose. For example, it
might say C:70 M:120. Take note of these values. Then, at the bottom left
of the Color Finder palette you will see a full set of CMYK values. The new
Start Color’s CMYK value would be C:70, M:120 and whatever the YK values
are from the full set.
3. Lastly, plug the CMYK values for the new Start Color into the boxes in Color
Finder, choose your Step Size, and click on Print Similar Colors once again.
Continue with steps 1-3 until you find your desired color.
46
MS-One
Fueled by NATURALINK TM
V. The Custom Palette
Let us assume that you have found the exact color you need using the Color Finder tool.
What you will want to do next is apply these custom color values to either an existing palette,
or to create a new custom palette altogether. This allows you access to this color again
should the same job arise.
How to use Custom Palette:
•
First, you need to assign the CMYK values of the matched color from the Similar
Colors Chart to the Output Color CMYK fields in the Custom Palette section.
•
Give your new custom color a descriptive Name in its designated field (e.g. IBM
Blue).
•
Next, assign an RGB Input Color value. There are two methods to establish this
value.
1. If you have the original file, sample the color that was matched in your
graphic design application with the eye dropper tool. This will give you the
RGB value of that color. Input this value into the RGB Input Color fields of
the Custom Palette section.
2. If you do not have the original file, or the artwork has not yet been designed,
simply click on the ‘Input Color Chooser’ button, and then click on “Define
Custom Colors”. From the color matrix, find a color that closely resembles
the color that you are adding to the custom palette. At the bottom-right of the
color matrix window are the RGB values. Simply click ‘OK’ and the RGB
Input Color values will be automatically entered. Please take note of these
RGB values for later use in your design applications.
•
Click the Add Color button. A window will pop up asking you whether you want to
add the color to the palette for all substrates, or just the current substrate. Click
‘YES’ here unless you have the same custom color saved on palettes for other
substrates. Another window will then ask you if you want to save the custom color for
all resolutions or just the current one. Click ‘YES’ here unless you have the same
custom color saved on palettes for other resolutions.
•
Lastly, click the Save Palette button. When finished, simply Exit out of the window.
* The ‘Import Palette’ and ‘Export Palette’ buttons are convenient to have in the event you need to
transfer palettes to and from different computers.
VI. Adding Swatches to your Application Palette:
It is possible to add your custom color(s) swatch to an application palette as well. You will
need to take note of the Input Color RGB value that you assigned in the previous step in
order to create the new swatch. Refer to your specific design application software’s manual
for instructions on this.
47
MS-One
Fueled by NATURALINK TM
Tips for Successful Printing
PRINTER
Make sure the jig is placed properly on the conveyor belt. Placing it too far to one side will
cause your printed image to be off center on your garment.
Make sure the photocell and reflector are setup properly to stop jig at the proper position for
printing. See the section entitled Printing Procedures.
Make sure the print head is adjusted properly or striking will occur on the garment if it’s too
high and the image will look faded if it’s too low.
PRINTING
Make sure that the garment is placed flat on the jig and all of the wrinkles are smoothed out.
Not smoothing wrinkles will cause white areas in the image.
The jig must be sent forward before the print button is selected. If not, the printer will print on
the belt. To clean ink from belt, use Simple Green cleaning solution.
DO NOT touch the final printed image as it is not dry until heat pressed.
TRANSFERRING
Make sure that blotter paper is used over the image when transferring to eliminate ink on the
heat platen.
Gently place the blotter paper over the image – DO NOT pat or rub sheet across the image as
it will smear.
48
MS-One
Fueled by NATURALINK TM
Supplies & Equipment
The MS-One, fueled by NaturaLink™, is sold through a network of Authorized NaturaLink™
Channel Partners. A full listing of authorized resellers is available on our Web site at
www.sawgrassink.com.
Operating Conditions
Certain environmental conditions should be taken into account for the operation of
NaturaLinkTM, including temperature and relative humidity.
Operating conditions are 65 ~ 80 °F with 35~60% relative humidity.
Optimum operating conditions are 70 ~ 75 °F with 40~50% relative humidity.
Storage
NaturaLink product should be stored in an environmental controlled room with a
temperature range of 50 oF ~ 75 oF.
Do not expose NaturaLinkTM cartridges directly to light, especially sunlight, for extended
periods.
For best results, install your NaturaLinkTM cartridges by the date on the cartridge. Please
refer to the individual ink bag/cartridge for the specific ink expiration date.
49
MS-One
Fueled by NATURALINK TM
Troubleshooting
The troubleshooting tips found in this section relate mainly to problems that can be seen in
transferred NaturaLinkTM images.
The colors in my transferred image are incorrect
The image may need color adjustment. Use PowerDriver MS-One color matching
software. For more information on how to use this software, please see the section
entitled PowerDriver MS-One User’s Guide.
Ensure you used the right printer driver and driver settings. Please see the section
entitled PowerDriver MS-One User’s Guide.
Ensure you pressed the item with the proper time, temperature, and pressure. For
guidelines see the section entitled Printing Instructions.
Verify all colors print correctly. Run the Nozzle Check utility and clean the print heads
as required.
Before or after pressing, there are streaks of ink showing in non-printed areas.
Verify that the print head isn’t touching the garment during printing. See the section
entitled Printing Procedures, Positioning and Adjustments.
Ensure that the wet image didn’t rub against the garment when removing from the
printer or during pressing.
Ensure you are using blotter paper when pressing the garment. When placing blotter
paper on image for pressing, ensure that it’s not smearing the image.
My image looks good but it washes out
Ensure you pressed the garment with the proper time, temperature, and pressure. If
so, try pressing longer to ensure that the dyes are penetrating the fibers sufficiently.
For guidelines, see the section entitled Printing Instructions.
Colors are light and splotchy or the image looks blurred
Ensure you pressed the item with the proper time, temperature, and pressure. For
guidelines, see the section entitled Printing Instructions.
Verify your printer driver settings are correct. Please see the section entitled
PowerDriver MS-One User’s Guide for additional information.
Verify that the printer’s print heads are properly aligned.
My image has gaps or bands present
50
Ensure that all of the printer’s nozzles are firing properly. Perform a Nozzle Check
MS-One
Fueled by NATURALINK TM
from the Utility tab of your printer driver.
If one or more of the nozzles fail to print, perform a Print Head Cleaning.
Make sure that the garment is placed flat on the holder and that all wrinkles are
smoothed out prior to printing.
51
MS-One
Fueled by NATURALINK TM
MAINTENANCE
Head Cleaning
It is possible, due to residues or impurities that the printing head work incorrectly (bending, color
lack, tonality variations, etc…). In this case, it is possible to enter the PRINTING DRIVER MENU
at the voice “UTILITY” and launch the program “HEAD CLEANING” which is executed by the
printer. It could be necessary to launch the “HEAD CLEANING” again, but if after various
cleanings (4-5 times) the problem still exists, please contact Technical Support.
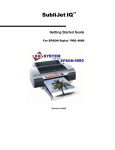
Waste Ink Tank
In the lower right side of the printer there is the waste
ink recovery tank (PHOTO 7.B).
The machine automatically advices when the box is
full. After having cleaned out the box, use the chip
resetter to reset the device.
Note:
Over time, the pad in that box will become saturated
and need to be replaced. You can purchase a new
ink tank at www.epson.com .
The digital printing inks should not be dispersed in
the environment, but collected and disposed by the
proper collectors.
PHOTO 7.B
Power Cleaning
If the normal cleaning process is not sufficient to bring back a full nozzle check, a Power Clean
maybe necessary. Only run a power clean when instructed by Technical Support. It takes a
sufficient amount of ink and should only be run when all other troubleshooting methods are
unsuccessful.
To run a Power Clean:
1. Press the Menu button
2. Press the down button until you see MAINTENANCE then press the Menu
button again.
3. Press the down button until you see PWR CLEANING then press the Menu
button again.
4. Follow the instructions on the LCD screen to raise or lower the ink levers.
5. Once the cleaning is completed the pause light will stop flashing.
6. Print a nozzle check to see if the cleaning was successful.
52
MS-One
Fueled by NATURALINK TM
Technical Support
If you are having difficulties achieving good results from your MS-One or NaturaLink™ inks, you have several
support options:
1.
LEVEL ONE: Contact your authorized MS-One or NaturaLink™ reseller during their normal hours of
operation for assistance. A full listing of authorized MS-One and NaturaLink™ Resellers is available on our
Web site at www.sawgrassink.com. If you purchased direct, please contact Sawgrass Technical Support as
listed below.
2.
LEVEL TWO: Contact Sawgrass Technical Support
a. Telephone: (843) 884-1575 between the hours of 8:00 AM and 5:30 PM Eastern Standard Time.
b. Internet: Visit the Technical Support area of the Sawgrass Technologies, Inc. website at
www.sawgrassink.com. The troubleshooting utility found here will provide you with solutions to some of
the most common problems. You may submit a detailed description of your problem if you need further
assistance.
c. E-mail: You may e-mail Sawgrass Technical Support with a detailed description of your problem at
[email protected].
d. Fax: You may fax a detailed description of your problem to Sawgrass Technical Support at (843) 849-3847.
MS-One Warranty
Break/Fix Program:
If it’s determined that the Level Three technical issue cannot be resolved then Sawgrass will send a replacement MSOne unit at no charge to the customer.
Standard Warranty:
MS Italy warranties MS-One’s Printer Systems (all systems except for the ink delivery system) for a period of oneyear from invoice date to end-user. Sawgrass will act as the MS-One Authorized Service & Repair Center for North
America. If any of the above printer systems fail to perform to specification and Sawgrass is unable to troubleshoot,
then the end-user will be given a return merchandise authorization, shipped a unit as a replacement unit via business
freight and the defective unit returned to Sawgrass in the same shipping crate.
If the failure is related to the ink delivery system, Sawgrass will repair the printer at its own expense during the oneyear warranty period.
Expanded Warranty:
Sawgrass Technologies as the North American Service for the MS One fueled by NaturaLink on behalf of MS Italy
is offering an expanded warranty to meet the need of those units who want a technician on site immediately. The
program which will cost $1800 annually will commit to having a technician on site anywhere in the Continental US
within 3 business days as part of the break fix program. This is for those customers who want the additional
security that someone will be there if needed.
53