1
User's Manual
Copyright © DENSO WAVE INCORPORATED, 2001
All rights reserved. No part of this publication may be reproduced in any form or by
any means without permission in writing from the publisher.
Specifications are subject to change without prior notice.
All products and company names mentioned in this manual are trademarks or registered trademarks of their respective holders.
Preface
Please READ through these operating instructions carefully. It will enable you to
operate your CU-7011 correctly.
After you have finished reading the instructions, keep this manual handy for speedy
reference.
i
How this book is organized
This manual is made up of 10 chapters and appendix.
Chapter 1
Ethernet System Configuration
Chapter 2
Functions of the CU-7011
Chapter 3
Components and Functions
Chapter 4
CU Status Indication by LED Indicators
Chapter 5
Applying Power to the CU-7011
Chapter 6
Connecting to Ethernet
Chapter 7
Charging the Rechargeable Battery Cartridge
Chapter 8
Displaying the CU System Information on the BHT
Chapter 9
Updating the CU System Program via the BHT
Chapter 10
MAC Address
Appendix
Specifications
ii
■ Related Publications
BHT-7000 User's Manual
BHT-7000 User's Manual "LAN Support Version"
BHT-100 Series User's Manuals
BHT-100 Series User's Manual "LAN Support Version"
BHT-BASIC Programmer's Manual
BHT-BASIC Programmer's Manual (BHT-100 series)
iii
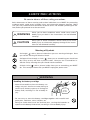
SAFETY PRECAUTIONS
Be sure to observe all these safety precautions.
Strict observance of these warning and caution indications are a MUST for preventing
accidents which could result in bodily injury and substantial property damage. Make
sure you fully understand all definitions of these terms and related symbols given below, before you proceed on to the text itself.
WARNING
Alerts you to those conditions which could cause serious
bodily injury or death if the instructions are not followed
correctly.
CAUTION
Alerts you to those conditions which could cause minor
bodily injury or substantial property damage if the instructions are not followed correctly.
Meaning of Symbols
A triangle (
) with a picture inside alerts you to a warning of danger. Here
you see the warning for electrical shock.
A diagonal line through a circle ( ) alerts you to something you should not
do; it may or may not have a picture inside. Here you see a screwdriver inside the circle, meaning that you should not disassemble.
A black circle ( ) with a picture inside alerts you to something you MUST
do. This example shows that you MUST unplug the power cord.
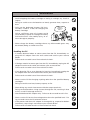
WARNING
Handling the battery cartridge
• Never disassemble or heat the battery cartridge, nor put it into fire or water; doing so
could cause battery-rupture or leakage of
battery fluid, resulting in a fire or bodily injury.
Never
put me
into fire!
• Do not carry or store the battery cartridge together with metallic ballpoint pens, necklaces, coins, hairpins, etc.
Doing so could short-circuit the terminal pins, causing the batteries to
rupture or the battery fluid to leak, resulting in a fire or bodily injury.
iv
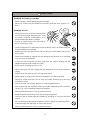
WARNING
• Avoid dropping the battery cartridge or letting it undergo any shock or
impact.
Doing so could cause the batteries to break, generate heat, rupture or
burn.
Charge only
with the
dedicated
device.
• Only use the dedicated charger (CU-7011,
CU-7001, C-700 or C-750) for charging the
battery cartridge.
Using a different type of charger could
cause battery-rupture or leakage of battery
fluid and result in a fire, bodily injury, or serious damage to property.
Undedicated
• Never charge the battery cartridge where any inflammable gases may
be emitted; doing so could cause fire.
Handling the CU
• If smoke, abnormal odors or noises come from the CU, immediately unplug the AC adapter from the wall socket and contact your nearest
dealer.
Failure to do so could cause fire or electrical shock.
• If foreign material or water gets into the CU, immediately unplug the AC
adapter from the wall socket and contact your nearest dealer.
Failure to do so could cause fire or electrical shock.
• If you drop the CU so as to damage its housing, immediately unplug the
AC adapter from the wall socket and contact your nearest dealer.
Failure to do so could cause fire or electrical shock.
• Never use the CU for charging anything other than the specified battery
cartridges.
Doing so could cause heat, battery-rupture, or fire.
• Never bring any metals into contact with the output terminals.
Doing so could produce a large current through the CU, resulting in heat
or fire, as well as damage to the CU.
• Use the dedicated AC adapter only. Failure to do so could result in fire.
• Never use the CU on the line voltage other than the specified level. Doing so could cause the CU to break or burn.
• If the power cord of the AC adapter is damaged (e.g., exposed or broken
lead wires), stop using it and contact your nearest dealer.
Failure to do so could result in a fire or electrical shock.
v
CAUTION
Handling the battery cartridge
• Never charge a wet or damp battery cartridge.
Doing so could cause the batteries to break, generate heat, rupture, or
burn.
Handling the CU
I'm burning
up!
• Never put the CU in places where there
are excessively high temperatures, such
as inside closed-up automobiles, or in
places exposed to direct sunlight.
Doing so could affect the housing or
parts, resulting in a fire.
• Avoid using the CU in extremely humid or dusty areas, or where there are
drastic temperature changes.
Moisture or dust will get into the CU, resulting in malfunction, fire or electrical shock.
• Never disassemble or modify the CU; doing so could result in an accident
such as fire or malfunction.
• If you are not using the CU for a long time, be sure to unplug the AC
adapter from the wall socket for safety.
Failure to do so could result in a fire.
• When caring for the CU, unplug the AC adapter from the wall socket for
safety.
Failure to do so could result in an electrical shock.
• Never cover or wrap up the CU or AC adapter in a cloth or blanket.
Doing so could cause the unit to heat up inside, deforming its housing,
resulting in a fire.
Always use the CU and AC adapter in a well-ventilated area.
• Do not place the CU anyplace where it may be subjected to oily smoke or
steam, e.g., near a cooking range or humidifier.
Doing so could result in a fire or electrical shock.
• Keep the power cord away from any heating equipment.
Failure to do so could melt the sheathing, resulting in a fire or electrical
shock.
• Do not insert or drop foreign materials such as metals or anything inflammable through the openings or vents into the CU.
Doing so could result in a fire or electrical shock.
vi
■ Proper Care of the CU
Before starting cleaning, unplug the AC adapter from the wall socket for safety.
Clean the housing and the charge terminals of the CU and the battery cartridge terminals with a dry, soft cloth.
• Never use benzene, alcohol, or other organic solvents. The housing may be marred or the paint may
come off.
• If the CU becomes smudged, moisten a soft cloth
with neutral detergent and wring it out thoroughly.
Wipe the CU with the cloth and then go over it again
with a dry cloth.
Take care of me
with a dry soft
cloth.
NO WAY!!
Thinner Benzine
■ Limited Warranty on Software Products
In no event will DENSO WAVE be liable for direct, indirect, special, incidental, or consequential damages (including imaginary profits or damages resulting from interruption
of operation or loss of business information) resulting from any defect in the software
or its documentation or resulting from inability to apply the software or its documentation.
■ DENSO WAVE INCORPORATED does not assume any product liability arising out
of, or in connection with, the application or use of any product, circuit, or application
described herein.
■ Intellectual Property Precaution
DENSO WAVE INCORPORATED ("DENSO WAVE") takes reasonable precautions to
ensure its products do not infringe upon any patent of other intellectual property
rights of other(s), but DENSO WAVE cannot be responsible for any patent or other
intellectual property right infringement(s) or violation(s) which arise from (i) the
use of DENSO WAVE's product(s) in connection or in combination with other
component(s), product(s), data processing system(s) or equipment or software not
supplied from DENSO WAVE; (ii) the use of DENSO WAVE's products in a manner
for which the same were not intended nor designed; or (iii) any modification of
DENSO WAVE's products by other(s) than DENSO WAVE.
vii
Content Overviews
Preface ................................................................................................................................. i
How this book is organized .............................................................................................. ii
SAFETY PRECAUTIONS ..................................................................................................... iv
Chapter 1
Ethernet System Configuration .................................................................... 1
Chapter 2
Functions of the CU-7011 .............................................................................. 1
Chapter 3
Components and Functions .......................................................................... 2
Chapter 4
CU Status Indication by LED Indicators ....................................................... 3
Chapter 5
Applying Power to the CU-7011 ................................................................... 4
Chapter 6
Connecting to Ethernet .................................................................................. 5
6.1
Setting the Transmission Speed of the CU-7011 ............................... 5
6.2
Interface Cable Connection .................................................................. 6
6.3
Communication with the Host Computer ........................................... 7
Chapter 7
Charging the Rechargeable Battery Cartridge ............................................. 8
Chapter 8
Displaying the CU System Information on the BHT ................................... 10
Chapter 9
Updating the CU System Program via the BHT .......................................... 10
Chapter 10 MAC Address ................................................................................................. 11
Appendix
Specifications ................................................................................................. 12
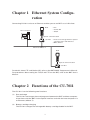
Chapter 1 Ethernet System Configuration
Connecting CU-7011 units to an Ethernet enables you to use BHTs as a LAN client.
BHT
Host computer
• FTP
• Socket API
• TCP/IP
Optical communication
CU-7011
• Protocol exchange between optical
communication and Ethernet
• MAC address
Ethernet 10Base-T
BHT
Optical communication
CU-7011
For details about FTP and Socket API, refer to the BHT-BASIC Programmer's Manual.
For procedures about setting the TCP/IP and FTP on the BHT, refer to the BHT User's
Manual.
Chapter 2 Functions of the CU-7011
The CU-7011 has the following two functions:
(1)
Data exchange
The CU-7011 exchanges data and programs between the BHT and host computer.
It interfaces with the BHT via the optical interface and with the host computer via
an Ethernet (10Base-T).
(2)
Battery cartridge charging
The CU-7011 charges the rechargeable battery cartridge loaded in the BHT.
1
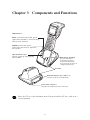
Chapter 3 Components and Functions
LED indicators
DATA (Communications LED, green)
Lights when the BHT is communicating
with the host computer.
POWER (Power LED, green)
Lights when the power is applied to
the CU-7011.
Optical interface port
Used to exchange data optically
with the BHT.
BHT charge terminals
Do not stain these
terminals; failure to
protect the terminals
may result in decreased
charging efficiency.)
CU-7011
Ethernet interface port (10Base-T)
Used to connect to an Ethernet.
Power inlet connector
Plug the AC adapter into this connector.
Place the CU on a flat, horizontal plane. Do not install the CU on a wall or in a
vertical position.
2
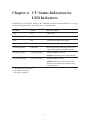
Chapter 4 CU Status Indication by
LED Indicators
According to the ON/OFF states of the POWER and DATA LED indicators, you may
check the machine status of the CU-7011 as listed below.
POWER
DATA
Machine status
OFF
OFF
Power off
ON
OFF
Power on
ON
ON
Communicating with the host
Flashing slowly*1
ON
Updating the CU system program
Flashing slowly
Flashing*2
Waiting for retry after occurrence of a
CU system program updating error
Flashing slowly
Flashing slowly
System program failure
Solution: Contact your nearest dealer.
Flashing quickly*3
Flashing quickly
System program error
Solution: Restart the CU-7011. If this
error occurs frequently, contact your
nearest dealer.
*1 At one-second intervals
*2 At 100-ms intervals
*3 At 50-ms intervals
3
Chapter 5 Applying Power to the
CU-7011
Apply power to the CU-7011 via the dedicated AC adapter.
Connect the outlet plug of the AC adapter to the power inlet connector of the CU-7011,
then plug the other end of the AC adapter into a wall socket.
AC adapter
Power inlet connector
WARNING
• If smoke, abnormal odors or noises come from the CU,
immediately unplug the AC adapter from the wall socket
and contact your nearest dealer.
Failure to do so could cause fire or electrical shock.
• If foreign material or water gets into the CU, immediately
unplug the AC adapter from the wall socket and contact
your nearest dealer.
Failure to do so could cause fire or electrical shock.
• If you drop the CU so as to damage its housing, immediately unplug the AC adapter from the wall socket and contact your nearest dealer.
Failure to do so could cause fire or electrical shock.
• Use the dedicated AC adapter only. Failure to do so could
result in a fire.
• Never use the CU on the line voltage other than the specified level. Doing so could cause the CU to break or burn.
• If the power cord of the AC adapter is damaged (e.g.,
exposed or broken lead wires), stop using it and contact
your nearest dealer.
Failure to do so could result in a fire or electrical shock.
CAUTION
• If you are not using the CU for a long time, be sure to
unplug the AC adapter from the wall socket for safety.
Failure to do so could result in a fire.
• When caring for the CU, unplug the AC adapter from the
wall socket for safety.
Failure to do so could result in an electrical shock.
• Never cover or wrap up the CU or AC adapter in a cloth or
blanket.
Doing so could cause the unit to heat up inside, deforming
its housing, resulting in a fire.
Always use the CU and AC adapter in a well-ventilated
area.
• Keep the power cord away from any heating equipment.
Failure to do so could melt the sheathing, resulting in a fire
or electrical shock.
4
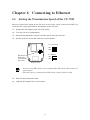
Chapter 6 Connecting to Ethernet
6.1
Setting the Transmission Speed of the CU-7011
Set the transmission speed of the CU-7011 to the same value as that of the BHT, by
using the DIP switch provided on the bottom of the CU-7011.
(1)
Unplug the AC adapter from the wall socket.
(2)
Turn the CU-7011 upside down.
(3)
Remove the protection sheet of the DIP switch from the CU-7011.
(4)
Set the selectors of the DIP switch as shown below.
For 115.2k bps
ON
ON
ON
OFF
1 2 3
1 2 3
For 4M bps
DIP switch
(Protection
sheet already
removed)
ON
OFF
ON
1 2 3
Bottom View
• Do not set the DIP switch to any configurations other than either of the two
shown above.
• When the power is turned on, the DIP switch settings will be read in.
(5)
Reinstall the protection sheet.
(6)
Plug the AC adapter into a wall socket.
5
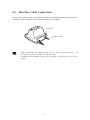
6.2
Interface Cable Connection
Connect the modular plug* of the Ethernet cable to the Ethernet port of the CU-7011.
(*10Base-T 8-pin modular, RJ45, ITA/ETA category 3 or higher)
Lock lever
Ethernet cable
• When connecting the modular plug, insert it until it snaps into place. To
disconnect it, press the lock lever and pull it out.
• Do not force the modular plug in or out. Doing so will result in a CU-7011
failure.
6
6.3
Communication with the Host Computer
This section describes how to start communication with the host computer according
to the FTP in System Mode.
(1)
Turn on the host computer.
(2)
On the host computer, start the FTP server program.
(3)
Turn on the BHT and run System Mode. Set the TCP/IP parameters (incl. IP
address and subnet mask)) and FTP parameters (incl. server IP and user ID).
(4)
Put the BHT on the CU-7011.
BHT
CU-7011
Take care not to put the hand strap or get any foreign material between the CU
and BHT. The BHT may fail to communicate with the host.
(5)
To upload a file from the BHT according to FTP, choose "FTP" on the SYSTEM
MENU in System Mode and then choose "UPLOAD."
To download a file from the host computer, choose "FTP" and "DOWNLOAD."
For details about the operating procedure, refer to the BHT User's Manual "LAN
Support Version."
The DATA LED will come on upon start of communication. After completion of
communication, the LED will go off.
7
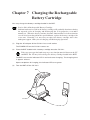
Chapter 7 Charging the Rechargeable
Battery Cartridge
You may charge the battery cartridge loaded in the BHT.
Service Life of Rechargeable Battery Cartridge:
Lithium-ion batteries used in the battery cartridge will gradually deteriorate during
the repeated cycles of charging and discharging due to its properties, even under
normal use. When the battery run time becomes shortened due to its deterioration
even if it has been charged for the specified hours, replace the battery cartridge with
a new one. Generally, it is necessary to replace the battery cartridge after it has
undergone approx. 300 cycles of charging and discharging operation.
(1)
Plug the AC adapter of the CU-7011 into a wall socket.
The POWER LED on the CU-7011 comes on.
(2)
Place the BHT loaded with a battery cartridge onto the CU-7011.
Take care not to put the hand strap or get any foreign material between the CU
and BHT. The CU may fail to charge the battery cartridge loaded in the BHT.
The BHT turns on the indicator LED in red and starts charging. The charging time
is approx. 6 hours.
Upon completion of charging, the indicator LED turns green.
(3)
Take the BHT off the CU-7011.
BHT
CU-7011
8
■ Charging Operation and BHT's Indicator LED
Operator's Action
CU-7011 Status
On standby
Indicator LED on
the BHT
OFF
⇓
Place the BHT
on the CU-7011.
Normal charging
⇓
⇓
After approx. 6 hours
Charging completed
⇓
⇓
Remove the BHT.
On standby
ON
(in red)
ON
(in green)
OFF
The charging time is approx. 6 hours if the "Charge the battery!" message is
displayed on the BHT. The battery cartridge not discharged so much will be fully
recharged in shorter time.
9
Chapter 8 Displaying the CU System
Information on the BHT
You may display the CU-7011 system information on the BHT's LCD.
Set the BHT on the CU-7011 and operate the BHT to display the SYSTEM INFORMATION screen on the LCD. From that screen, you may call up the system program
version and MAC address.
For details about the displaying procedure of the CU system information, refer to the
BHT User's Manual, "LAN Support Version."
Chapter 9 Updating the CU System
Program via the BHT
You may update the CU-7011 system program by using the BHT.
(1)
Downloading the CU-7011 system program file
Download the CU-7011 system program file to the BHT from the host computer.
(2)
Updating the current CU-7011 system program
Set the BHT on the CU-7011 whose system program should be updated. Operate
the BHT to display the CU-F/W MODIFY screen where you may update the system
program.
During updating, the POWER LED on the CU-7011 will flash. (Refer to Chapter 4,
"CU Status Indication by LED Indicators."
For details about the updating procedure, refer to the BHT User's Manual "LAN
Support Version."
10
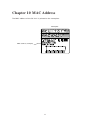
Chapter 10 MAC Address
The MAC address of the CU-7011 is printed on the nameplate.
Nameplate
MAC address (example)
11
Appendix Specifications
[ 1 ] Product Specifications
Power Source
-Europe
-U.S.
-Australia
230 VAC, 16 VA
120 VAC, 13 VA
10 to 18 VDC, 450 mA (on 12 VDC)
Power Consumption
8 VA
Dimensions
(W) x (L) x (H)
112 x 142 x 84 mm
(4.41 x 5.59 x 3.31 inches)
Weight
Approx. 220 g (Approx. 7.76 oz.)
Operating Ambient Temperature
0˚C to 40˚C (32˚F to 104˚F)
Operating Humidity
20% to 80% (with no dew condensation)
[ 2 ] Charging Requirements
Charge current:
Approx. 400 mA
Charge time:
Approx. 6 hours
[ 3 ] Interface
Ethernet interface
IEEE802.3, 10Base-T
8
12
1
Pin No.
Signal
1
2
3
4
5
6
7
8
TD+
TDRD+
N.C.
N.C.
RDN.C.
N.C.
Functions
Send data
Send data
Receive data
No connection
Receive data
No connection
Communication Unit
CU-7011
User's Manual
First Edition, October 2001
DENSO WAVE INCORPORATED
The purpose of this manual is to provide accurate information in the handling and
operating of the CU-7011. Please feel free to send your comments regarding any
errors or omissions you may have found, or any suggestions you may have for
generally improving the manual.
In no event will DENSO WAVE be liable for any direct or indirect damages resulting
from the application of the information in this manual.