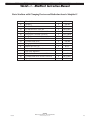
1
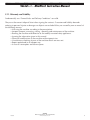
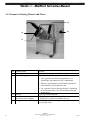
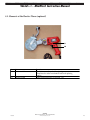
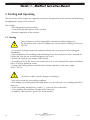
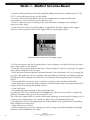
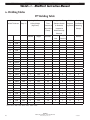
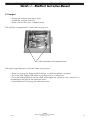
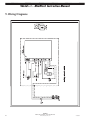
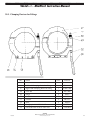
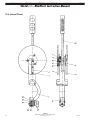
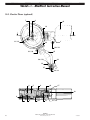
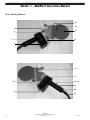
www.SimtechUSA.com WeldTech MiniPlast OPERATION MANUAL Corrosion Resistant Fluid and Air Handling Systems. WeldTech - MiniPlast Instruction Manual Table of Contents 1. DESCRIPTION OF THE PRODUCT...................................................................................................... 3 1.1 Usage and Purpose-oriented Use............................................................................................. 3 1.2 Overview............................................................................................................................... 3 1.3 Safety Measures...................................................................................................................... 4 1.4 Conformity............................................................................................................................. 4 1.5 Designation of the Product...................................................................................................... 4 1.5.1 Technical data . ........................................................................................................ 4 1.6 Equipment and Accessories:.................................................................................................... 5 2. SAFETY RULES..................................................................................................................................... 6 2.1 Explanation of the Symbols and Indications............................................................................. 6 2.2 Obligations of the Owner....................................................................................................... 6 2.3 Obligations of the Worker . .................................................................................................... 6 2.4 Measures of Organization ...................................................................................................... 7 2.5 Instructions for the Staff.......................................................................................................... 7 2.6 Structural Modifications on the Machine................................................................................. 7 2.7 Cleaning the Machine............................................................................................................. 7 2.8 Danger while Handling the Machine....................................................................................... 7 2.9 Dangers caused by Electric Energy.......................................................................................... 8 2.10 Specific Dangers................................................................................................................... 8 2.10.1 Danger of being burnt by Heating Element, Reception Box and Welding Area .......... 8 2.10.2 Danger of Stumbling over Electric Wires.................................................................. 8 2.10.3 Danger of Cutting / Squeezing / Catching Clothes . .................................................. 8 2.11 Warranty and Liability........................................................................................................... 9 3. FUNCTIONAL DESCRIPTION . ..........................................................................................................10 4. OPERATING AND INDICATING ELEMENTS.......................................................................................11 4.1 Elements on the Basic Machine / Table Support......................................................................11 4.2 Elements at Heating Element and Planer.................................................................................12 4.3 Elements at the Electric Planer (optional)................................................................................13 5. STARTING AND OPERATING.............................................................................................................14 5.1 Starting . ...............................................................................................................................14 5.1.1 Exchanging the Reduction Inserts..............................................................................15 5.2 Welding Process....................................................................................................................15 1.060606 SIMTECH Phone: 877-777-2467 • Fax: 215-547-3410 www.SimtechUSA.com WeldTech - MiniPlast Instruction Manual 6. WELDING TABLES............................................................................................................................. 18 7. MAINTENANCE AND REPAIR ............................................................................................................20 7.1 General .................................................................................................................................20 7.2 Clamping Elements ...............................................................................................................20 7.3 Planer....................................................................................................................................20 7.4 Storage .................................................................................................................................20 8. TRANSPORT ........................................................................................................................................................ 21 9. WIRING DIAGRAMS ....................................................................................................................... 22 10. SPARE PARTS LIST............................................................................................................................ 23 10.1 Basic Machine with Clamping Devices and Reduction Inserts...............................................23 10.2 Basic Machine ....................................................................................................................26 10.3 Clamping Devices for Fittings...............................................................................................27 10.4 Manual Planer 4504220 ......................................................................................................28 10.5 Electric Planer (optional) .....................................................................................................30 10.6 Heating Element..................................................................................................................32 10.7 Protection Box.................................................................................................................... 34 SIMTECH Phone: 877-777-2467 • Fax: 215-547-3410 www.SimtechUSA.com 1.060606 WeldTech - MiniPlast Instruction Manual 1. Description of the Product This chapter gives important basic information about the product and its prescribed use. All technical details of the machine are put together as a general arrangement. 1.1. Usage and Purpose-oriented Use The SIMTECH MINIPLAST 2 has been designed for heating element butt welding of pipes and fittings out of PE, PP and PVDF with a diameter range of Ø = 20 - 110 mm. The machine is kept small so that it can easily be used in the pipe system. For moulded narrow bends and fittings, special small basic clamping devices are available. All use going beyond is not purpose-oriented. The manufacturer is not responsible for damages caused by misuse. The risk is held only by the user. Also part of the purpose-oriented use is • Respecting all the indications of the working instructions and • Performing the inspection and maintenance works. 1.2. Overview 4 1 2 5 3 .O WITHOUTILLUSTR 1.060606 $ENOMINATION -ANUALPLANER %LECTRICPLANEROPTIONAL "ASICMACHINE 4ABLESUPPORT (EATINGELEMENT 2ECEPTIONBOX SIMTECH Phone: 877-777-2467 • Fax: 215-547-3410 www.SimtechUSA.com WeldTech - MiniPlast Instruction Manual 1.3. Safety Measures In case of wrong use, wrong operation or wrong maintenance, the machine itself or products standing nearby can be damaged or destroyed. Persons being in the endangered area may be injured. Therefore these working instructions have to be thoroughly read and the corresponding safety regulations must be necessarily adhered to. 1.4. Conformity The machine corresponds in its construction to the valid recommendations of the European Community as well as to the according European standard specifications. The development, manufacturing and mounting of the machine were made very carefully. 1.5. Designation of the Product The product is designated by a sign at the basic frame. It contains the type of the machine, the serial number and the year of construction. 1.5.1 Technical data 1.5.1.1 SIMTECH MINIPLAST 2 General Data -ATERIAL 0IPEDIAMETERRANGE 3HEETSTEELCARRYINGCASELXWXH 7EIGHTWITHOUTPACKING &USE 7IRECROSSSECTION %MISSIONS !MBIENTCONDITIONSINTHEWELDINGAREA 000%($06$&0% /UTSIDE MM XXMM KG ! MMÁ 4HESOUNDINTENSITYLEVELISBELOW D"! 7HENUSINGTHENAMEDPIPEMATERIALS ANDWHENWELDINGBELOW#NO TOXICANTDAMPARISES +EEPTHEWORKSHOPCLEANNODUSTAT THEWELDINGAREA DONOTWELDBELOW#IFNECESSARY PREHEAT AVOIDHUMIDITYIFNECESSARYUSEA WELDINGTENT AVOIDSTRONGSUNRAYSINFLUENCE PROTECTFROMWINDSHUTTHEPIPEENDS SIMTECH Phone: 877-777-2467 • Fax: 215-547-3410 www.SimtechUSA.com 1.060606 WeldTech - MiniPlast Instruction Manual 1.5.1.2 Heating Element 0OWER 6OLTAGE #URRENT &REQUENCY /UTSIDE 3URFACE !TTACHEDELEMENTS 7ATT 6 Õ ! Õ (Z MM NONSTICKCOATED ELECTRONICTEMPERATURECONTROL CONTROLLAMP CONNECTINGCABLEWITHPLUG APPRKG 7EIGHT 1.5.1.3 Manual Planer 7EIGHT APPRKG 1.5.1.4Basic Machine and Table Support -ATERIALFRAMEANDCLAMPINGDEVICES -AXFORCE 1.5.1.5 !LUMINIUM . Electric Planer (optional) ONREQUEST 0OWER 6OLTAGE #URRENT &REQUENCY 7EIGHT 6 Õ ONREQUEST (Z ONREQUEST 3EESPAREPARTSLISTFORORDERNUMBERSANDSINGLEPARTSWHENORDERINGPLEASESTATETHEMACHINE NUMBER 1.6. Equipment and Accessories: Following tools and accessories are part of the delivery: X X 1.060606 (EXAGONALSOCKETSCREWKEYSIZEFORSCREWINGINOUTTHE REDUCTIONINSERTS (EXAGONALSOCKETSCREWKEYSIZEFORTIGHTENINGTHEOPTIONAL CLAMPINGSHELLSFORFITTINGS 3CREWSFORREDUCTIONINSERTSFLATHEADSCREWSFORREDUCTION INSERTSFLATHEADSCREWSFORMOUNTINGTHEOPTIONALCLAMPING SHELLSFORFITTINGS SIMTECH Phone: 877-777-2467 • Fax: 215-547-3410 www.SimtechUSA.com WeldTech - MiniPlast Instruction Manual 2. Safety Rules The base for the safe handling and the fault-free operation of this machine is the knowledge of the basic safety indications and rules. • These working instructions contain the most important indications to run the machine safely. • The safety indications are to be followed by all persons working on the machine. 2.1. Explanation of the Symbols and Indications In the working instructions, the following denominations and signs are used for dangers: This symbol signifies a possible danger for the life and the health of persons. • The non-respect of these indications may have heavy consequences for the health. I I This symbol means a possible dangerous situation. • The non-respect of these indications may cause light injuries or damages on goods. This symbol gives important indications for the proper use of the machine. • The non-respect of these indications may conduct to malfunctions and damages on the machine or on goods in the surrounding. Under this symbol you get user tips and particularly useful information. • It is a help for using all the functions on your machine in an optimal way and helps you to make the job easier. The regulations for the prevention of accidents are valid (UVV). 2.2. Obligations of the Owner I The owner is obliged only to let persons work at the machine who • Know about basic safety and accident prevention rules and are instructed in the handling of the machine, as well as who • Have read and understood the safety chapter of this manual and certify this by their signature. The safety-conscious working of the staff has to be checked in regular intervals. 2.3. Obligations of the Worker All persons who are to work at the machine are obliged before working: • to follow the basic safety and accident protection rules. • to have read and understood the safety chapter and the warnings in this manual and to confirm by their signature that they have well understood them. SIMTECH Phone: 877-777-2467 • Fax: 215-547-3410 www.SimtechUSA.com 1.060606 WeldTech - MiniPlast Instruction Manual 2.4. Measures of Organisation • All equipment required for personal safety is to be provided by the owner. • All available safety equipment is to be inspected regularly. • The working instructions have to be permanently kept at the place of use of the machine. They are to be at the operator‘s disposal at any time and without much effort. • In addition to the manual, the common valid and the local accident protection rules and regulations for the environmental protection must be available and followed. • Every time the machine changes hands or is being rent to third persons, the working instructions are to be sent along with and their importance is to be emphasized. 2.5. Instructions for the Staff • Only skilled and trained persons are allowed to work at the machine. • It must be clearly defined who is responsible for transport, mounting and dismounting, starting the operation, setting and tooling, operation, maintenance and inspection, repair and dismounting. • A person who is being trained may only work at the machine under supervision of an experienced person. 2.6. Structural Modifications on the Machine • No modifications, extensions or reconstructions may be made on the machine without permission of the manufacturer. • Machine parts which are not in a perfect condition are to be replaced immediately. • Only use original SIMTECH spare and wear parts. 2.7. Cleaning the Machine The used materials and tissues are to be handled and disposed of properly, especially: • When cleaning with solvents • When lubricating with oil and grease. 2.8. Danger while Handling the Machine The machine SIMTECH MINIPLAST 2 is constructed according to the latest technical standards and the acknowledged technical safety rules. However, dangers for the operator or other persons standing nearby may occur. Also material damages are possible. The machine may only be used • According to the purpose-oriented usage • In safety technical impeccable status Disturbances which may affect the safety of the machine must be cleared immediately. 1.060606 SIMTECH Phone: 877-777-2467 • Fax: 215-547-3410 www.SimtechUSA.com WeldTech - MiniPlast Instruction Manual 2.9. Dangers caused by Electric Energy Only skilled persons are allowed to work at electrical appliances. • The electrical equipment of the machine has to be checked regularly. Loose connections and damaged cables have to be replaced immediately. • The heating element has to be protected from rain and dropping water, if need be use a welding tent. • According to VDE 0100, the use on construction sites is only allowed with a power distributor with a FI-safety switch. 2.10. Specific Dangers 2.10.1 Danger of being burnt by Heating Element, Reception Box and Welding Area You can burn yourself, inflammable materials can be ignited! The heating element is heated up to more than 200° C ! • Do not leave the heating element unsupervised. • Take enough safety distance to inflammable materials. • Do wear safety gloves. • Always put the heating element back into the reception box before and after each use. • Transport the heating element at the handle only, do not touch the surfaces of the heating element. 2.10.2 Danger of Stumbling over Electric Wires • Make sure that no person has to step over the wires. 2.10.3 Danger of Cutting / Squeezing / Catching Clothes • Always put the planer back into the reception box before and after each use. • Transport the planer at the handle only and do not touch surfaces. • Do not put hands between clamped pipe ends. • Make sure that your clothes are not caught by the planer. SIMTECH Phone: 877-777-2467 • Fax: 215-547-3410 www.SimtechUSA.com 1.060606 WeldTech - MiniPlast Instruction Manual 2.11. Warranty and Liability Fundamentally our “General Sales and Delivery Conditions” are valid. They are at the owner’s disposal latest when signing the contract. Guarantee and liability demands referring to personal injuries or damages on objects are excluded if they are caused by one or several of the following reasons: • Not using the machine according to the prescriptions. • Inexpert transport, mounting, starting , operating and maintenance of the machine. • Running the machine with defective or not orderly mounted safety appliances. • Ignoring the information given in this manual. • Structural modifications on the machine without permission. • Unsatisfactory checking of parts of the machine which are worn out. • Repairs performed in an inexpert way. • In case of catastrophes and force majeure. 1.060606 SIMTECH Phone: 877-777-2467 • Fax: 215-547-3410 www.SimtechUSA.com WeldTech - MiniPlast Instruction Manual 3. Functional Description Basically the international and national guidelines are to be followed. The plastic pipes are clamped by means of the clamping devices. Then the front sides of the pipes are cut plane and parallel by means of the planer and the misalignment of the pipes is checked. The heating element is inserted and the pipes are pressed against the heating element under defined adjusting pressure. This process is called “adjusting”. After the prescribed bead height being reached, pressure is reduced, the heating time begins. The function of this time is to heat up the pipe ends. After expiration of the heating time, the slides are opened, the heating element is removed quickly and the pipes are driven together again. The time gap from the removal of the heating element to joining the pipes is called change over time. The pipes are joined under prescribed welding pressure and then cool down under pressure (cooling time). The welded joint can be un-clamped, the welding process is finished. Heating element heats the pipes up to welding temperature Finished welding with internal and external bead 10 SIMTECH Phone: 877-777-2467 • Fax: 215-547-3410 www.SimtechUSA.com 1.060606 WeldTech - MiniPlast Instruction Manual 4. Operating and Indicating Elements 4.1. Elements on the Basic Machine / Table Support 6 7 8 9 10 11 13 14 15 12 .O $ENOMINATION 4IGHTENINGNUT 5PPERGUIDEBAR 3CALE (ANDWHEEL 3TARGRIPFORBASICMACHINE 3PINDLE ,OWERGUIDEBAR 3CREWSFORVERTICALOFFSET (EXAGONSCREWX 3CREWSFORHORIZONTALOFFSET 1.060606 &UNCTION 4IGHTENINGOFTHEPIPES 'UIDANCEFORTHESLIDE $ISPLAYOFTHEAPPLIEDWELDINGFORCE MAXKPDISPLAYED /PENINGCLOSINGTHESLIDES APPLICATIONOFTHEADJUSTINGFORCE !TTACHINGTHEBASICMACHINEATTHETABLE SUPPORT !DVANCEOFTHESLIDE 'UIDANCEFORTHESLIDE &IXINGTHEPLANER 2ESTFORTHEHEATINGELEMENT "YLOOSENINGTHESCREWSTHECLAMPINGDEVICE CANBEMOVEDUPWARDSORDOWNARDS 3ETTINGTHEANGLE "YLOOSENINGTHESCREWSTHECLAMPINGDEVICE CANBEMOVEDTOTHELEFTORTOTHERIGHTSIDE SIMTECH Phone: 877-777-2467 • Fax: 215-547-3410 www.SimtechUSA.com 11 WeldTech - MiniPlast Instruction Manual 4.2. Elements at Heating Element and Planer 18 19 16 17 .O $ENOMINATION +NOBWITHSLOT #ONTROLLAMPGREEN &UNCTION 3ETTINGTHETEMPERATUREFORTHEHEATINGELEMENT 4HEREARETHREEDIFFERENTSTATES s /UTSIGNALIZESTHATTHEHEATINGELEMENTISNOT HEATEDUPATTHEMOMENTORTHATITCOOLSDOWN s "LINKINGTHETEMPERATUREOFTHEHEATINGELEMENTIS MAINTAINEDBYAPULSEPOSITIONRATIO s /NSIGNALIZESTHATTHEHEATINGELEMENTISHEATEDUP 12 2ATCHET /NOFFnSWITCH FORELECTRICPLANEROPTION 3TARGRIPSCREW ATTHEMOMENTANDHASNOTYETREACHEDTHEDESIRED TEMPERATURE 4URNINGAROUNDTHEPLANER 4HEPLANERCANBESWITCHEDONOFF 4HEPLANERHASTOBESWITCHEDOFFAFTERUSE !TTACHINGTHEPLANERATTHEGUIDANCEBARBY TURNINGTHESCREW SIMTECH Phone: 877-777-2467 • Fax: 215-547-3410 www.SimtechUSA.com 1.060606 WeldTech - MiniPlast Instruction Manual 4.3. Elements at the Electric Planer (optional) 21 20 .O .AME "UTTONONOFF ,OCKINGKNOB 1.060606 &UNCTION 4HEBUTTONMUSTBEPUSHEDFORPLANING 4HEPLANERHASTOBESWITCHEDOFFAFTEREACHPLANING PROCESS +EEPSTHEONOFFBUTTONINPOSITION/. SIMTECH Phone: 877-777-2467 • Fax: 215-547-3410 www.SimtechUSA.com 13 WeldTech - MiniPlast Instruction Manual 5. Starting and Operating The instructions of this chapter are supposed to initiate in the operation of the machine and lead during the appropriate starting of the machine. This includes • The safe operation of the machine • Using all the possible options of the machine • Economic operation of the machine 5.1. Starting The machine may only be operated by initiated and authorized persons. For the qualification, a plastic welding exam can be taken according to DVS and DVGW. • In situations of danger for persons and the machine, the mains plug has to be unplugged immediately. • After completion of the welding work and during breaks the machine has to be switched off. Further take care that no unauthorized person has access. • Protect the machine from wetness and humidity. • According to VDE 0100, the use on construction sites is only allowed with a power distributor with a FI-security protective switch. • Connect the heating element and the electric planer (optional) to the mains supply (230 V / 50 Hz). I Lay electric cables carefully (danger of stumbling) ! • Take into account the surrounding conditions: • The welding may not be performed under direct sun rays influence, use a welding umbrella if necessary. • If the surrounding temperature is under 5° C, measures have to be taken: • Use a welding tent or preheat the pipe ends if necessary. • In addition, take measures against rain, wind and dust. I 14 SIMTECH Phone: 877-777-2467 • Fax: 215-547-3410 www.SimtechUSA.com 1.060606 WeldTech - MiniPlast Instruction Manual 5.1.1 Exchanging the Reduction Inserts • Unscrew the mounted reduction inserts by means of the provided Allan key. • Screw the reduction inserts with the corresponding diameter into the clamping devices. • When welding bends, the angle can be set on the basic clamping devices (on each side between -15° to +15°). • If necessary (e.g. for T-pieces) a special basic clamping device can be provided by means of which very short sections can be clamped. Large clamping device Small clamping device 5.2. Welding Process The respectively valid welding prescriptions (ISO / CEN / DVS ...) are to be basically followed. • Do wear safety gloves as protection against burning. • A stop-watch must be available for recording the actual times for heating up and cooling. • A welding table must be available from which the parameters for the pipe dimensions to be welded prescribed by the welding prescriptions may be taken. • The heating element surfaces must be clean and especially non greasy. Therefore they need to be cleaned shortly before each welding or in case of dirtiness by means of a fibre-free paper and a cleaning agent (e.g. PE cleaner or pipe cleaning tissues which are available at the SIMTECH company). The anti-adhesive coating of the heating element must remain undamaged in the working area. 1.060606 SIMTECH Phone: 877-777-2467 • Fax: 215-547-3410 www.SimtechUSA.com 15 WeldTech - MiniPlast Instruction Manual • Switch on heating element and set the required welding temperature (standard value PE-HD: 210° C) on the adjustment screw on the handle. • As soon as the control light blinks, the nominal temperature has been reached and is maintained at a constant level by a pulse-position ratio. • Screw in reduction inserts according to the outer diameter of the pipes to be welded, if necessary set the angle. • Attach the basic frame at the table support, if required fix the table support at the support surface or insert machine without table support directly into the pipe system. Machine working directly in the pipe system • Put the work pieces into the clamping device, fasten clamping nuts tightly and align the work pieces with respect to one another. • Insert the manual planer between the ends of the work pieces, lock it by turning the star grip on the guide bar and plane with low force. • Insert the electric planer (optional) between the ends of the work pieces, lock it by turning the star grip at the guide rod. Switch on planer at the on/off button and keep it switched on with the locking knob. Plane the pipes with low force. For releasing the locking knob, push shortly the button. • Planing should be carried out until a revolving cutting has been formed on both sides. • Open slide again, remove the planer and put it into the reception box. Remove the produced cuttings without contacting the worked surfaces. • Close slide again. • Check pipe mismatch and gap on the joining pipe ends. According to DVS 2207, the mismatch on the pipe outer side must not exceed 0.1 x pipe wall thickness, the admissible gap must not exceed 0.5 mm. The mismatch compensation is carried out by further tightening or releasing the clamping nuts. In case mismatch compensation was carried out, planing must be repeated afterwards. • The adjustment force for the pipe dimension to be welded can be gathered from the welding table. Add the movement force. • Open slide again somewhat. • Gather heating time, maximum change over time, cooling time and bead height for the pipe dimension to be welded from the table. 16 SIMTECH Phone: 877-777-2467 • Fax: 215-547-3410 www.SimtechUSA.com 1.060606 WeldTech - MiniPlast Instruction Manual • Move the heating element which has been cleaned and brought to desired temperature between the pipes with the handle facing downwards (hang into guide bar). • Close the slide smoothly with the determined adjustment force. The applied force can be read at the force scale on the hand wheel. When the prescribed revolving bead height is reached, reduce the force (Heating force = approx. 10 % of the adjustment force). • The heating time starts now. Press the stop-watch and compare the actual time with the nominal time taken from the table. • After expiration of the heating time, open the slide, remove the heating element as quickly as possible, put it into the heat protection box and close the slide smoothly. The maximum time frame for this process is predetermined by the value for the change over time taken from the table. • Press the stop-watch when the welding pressure is built up. If necessary, readjust the force during cooling (the force for cooling is the same as the adjustment pressure). • After expiration of the cooling time, release the force, remove the welded parts and open the slide. 1.060606 SIMTECH Phone: 877-777-2467 • Fax: 215-547-3410 www.SimtechUSA.com 17 WeldTech - MiniPlast Instruction Manual 6. Welding Tables PP Welding Table Diameter Weld Beginning Melt Pressure Heating Change Over Time Weld Cooling & Wall Thickness Temp °C & Bead Height Time (Remove Heater Pressure Time Before (Kg./Force) (Pressure at & Gradually (Kg./Force) Removing Near 0 Lbs. Increase to Force) Weld Pressure) Clamps Seconds Pressure Height Seconds Change Bring To Over Pressure Minutes ½” PN3.2 - - - - - - - - ½” PN6 - - - - - - - - ½” PN10 210 1 1/32” 30 3 4 1 3 ¾” PN3.2 - - - - - - - - ¾” PN6 - - - - - - - - ¾” PN10 210 1 1/32” 35 3 4 1 3 1” PN3.2 - - - - - - - - 1” PN6 - - - - - - - - 1” PN10 210 2 1/32” 40 4 4 2 4 1 ¼” PN3.2 - - - - - - - - 1 ¼” PN6 - - - - - - - - 1 ¼” PN10 210 3 1/32” 45 4 4 3 5 1 ½” PN3.2 - - - - - - - - 1 ½” PN6 - - - - - - - - 1 ½” PN10 215 4 1/32” 50 5 6 4 6 2” PN3.2 - 2 1/32” 30 3 4 2 3 2” PN6 210 4 1/32” 45 4 4 4 4 2” PN10 205 6 1/32” 60 5 6 6 7 2 ½” PN3.2 - 3 1/32” 35 4 4 3 4 2 ½” PN6 210 6 1/32” 55 5 6 6 5 2 ½” PN10 205 9 1/16” 75 5 7 9 8 3” PN3.2 - 5 1/32” 35 4 4 5 5 3” PN6 205 8 1/32” 60 5 6 8 8 3” PN10 200 13 1/16” 90 6 8 13 10 4” PN3.2 210 7 1/32” 40 4 5 7 5 4” PN6 205 12 1/32” 70 5 7 12 9 4” PN10 200 19 1/16” 100 6 10 19 12 SR45 = PN3.2; SR90 = PN6; SR150 = PN10; SR232 = PN16 18 SIMTECH Phone: 877-777-2467 • Fax: 215-547-3410 www.SimtechUSA.com 1.060606 WeldTech - MiniPlast Instruction Manual PVDF Welding Table Diameter Weld Beginning Melt Pressure Heating Change Over Time Weld Cooling & Wall Thickness Temp °C & Bead Height Time (Remove Heater Pressure Time Before (Kg./Force) (Pressure at & Gradually (Kg./Force) Removing Near 0 Lbs. Increase to Force) Weld Pressure) Clamps Seconds Pressure Height Seconds Change Bring To Over Pressure Minutes ½” PN16 230 1.36 1/32” 25 4 5 1.36 3 ¾” PN16 230 2.82 1/32” 25 4 5 2.82 3 1” PN16 230 3.18 1/32” 30 4 5 3.18 3 1 ¼” PN16 230 3.64 1/32” 35 4 5 3.64 4 1 ½” PN16 230 5.45 1/32” 40 4 5 5.45 5 2” PN16 230 7.27 1/32” 45 4 5 7.27 5 2 ½” PN16 230 7.27 1/32” 50 4 5 7.27 5 3” PN16 230 10.00 1/16” 40 4 5 10.00 6 4” PN16 230 15.45 1/16” 50 4 5 15.45 7 SR45 = PN3.2; SR90 = PN6; SR150 = PN10; SR232 = PN16 1.060606 SIMTECH Phone: 877-777-2467 • Fax: 215-547-3410 www.SimtechUSA.com 19 WeldTech - MiniPlast Instruction Manual 7. Maintenance and Repair 7.1. General I Replace damaged parts immediately, be particularly care full with electrical parts. Dirt and wetness are very good current conductors. Prescribed maintenance and inspection works should be performed in time. The DVS gives the advice of inspection works after 1 year. For machines with a specially high usage percentage the testing cycle should be shortened . The works should be performed at the SIMTECH company or by an authorized partner. I 7.2. Clamping Elements • For a long service life clean and grease regularly the threaded spindles and the joint parts which are used for clamping the pipes. 7.3. Planer • Do not lay the planer on its blades ! • Check the blades of the planer for sharpness, turn them if necessary (grinded on both sides, max. thickness of the shavings: 0,2 mm !). 7.4. Storage • Cover the guide bars and the spindle with a thin oil film. • Store dry. 20 SIMTECH Phone: 877-777-2467 • Fax: 215-547-3410 www.SimtechUSA.com 1.060606 WeldTech - MiniPlast Instruction Manual 8. Transport • Protect the machine from heavy chocs. • Handle the machine carefully. • Make sure that the case is closed correctly. The machine is transported in a sheet steel carrying case. Gibs for the box of the reduction inserts Placing the single elements in the steel sheet carrying case: • There is a rectangular shape inside of the box, in which the planer is inserted. • Put in the table support and the basic machine next to it (see picture). • Put in the heating element with the cable and temperature control in such a way that it is situated below the gibs for the reduction inserts. • Insert both boxes containing the reduction inserts. 1.060606 SIMTECH Phone: 877-777-2467 • Fax: 215-547-3410 www.SimtechUSA.com 21 WeldTech - MiniPlast Instruction Manual 9. Wiring Diagrams 22 SIMTECH Phone: 877-777-2467 • Fax: 215-547-3410 www.SimtechUSA.com 1.060606 WeldTech - MiniPlast Instruction Manual 10. Spare Parts List 10.1. Basic Machine with Clamping Devices and Reduction Inserts 1.060606 SIMTECH Phone: 877-777-2467 • Fax: 215-547-3410 www.SimtechUSA.com 23 WeldTech - MiniPlast Instruction Manual Basic Machine with Clamping Devices and Reduction Inserts Miniplast 2 Pos. 1 2 3 4 5 6 7 8 9 10 11 12 13 14 15 16 17 18 19 20 21 22 23 24 25 26 27 28 29 30 24 Name Spring block Guidance Counter bracket Upper guide bar Lower guide bar Ball bushing Ball bushing Spindle Trapezoidal nut Adjusting nut Bearing plate Spring washer Sleeve Ring with pressure display Scale Hand wheel Hexagon nut M 10 DIN 934 Tooth lock washer J 10,5 DIN 6797 Thrust ball bearing Pressure spring Flat-head screw M 8x25 DIN 7991 Flat-head screw M 8x35 DIN 7991 Flat-head screw M 5x25 DIN 7991 Flat-head screw M 5x10 DIN 7991 Headless pin M 5x6 DIN 916 Pipe clamp, upper part Pipe clamp, lower part Gib for screwing Disk with scale Clamping nut SIMTECH Phone: 877-777-2467 • Fax: 215-547-3410 www.SimtechUSA.com Piece Order no. 1 1 1 1 1 2 1 1 1 1 1 1 1 1 3 1 1 1 1 1 3 1 3 1 2 2 2 2 2 2 450113 450102 450103 450112 450111 LKH 2540 LKH 1630 450104 450105 450106 450107 450108 450109 450110 450114 BH100 0934J 67979J L51103 450115 799.28E+ 799.38E+ 799.28E+ 799.13E+ 91.68E+ 450701 450702 450703 450707 450705 1.060606 WeldTech - MiniPlast Instruction Manual Basic Machine with Clamping Devices and Reduction Inserts Miniplast 2 1.060606 31 32 33 34 35 36 37 38 39 40 41 42 Threaded insert M 8 Coupling Threaded insert M 4 Eye bolt BM 8x45 DIN 444 Straight pin 6 M 6x28 DIN 6325 Straight pin 8 M 6x26 DIN 6325 Straight pin 4 M 6x20 DIN 6325 Flat-head screw M 6x25 DIN 7991 Cylinder-head screw Star grip M 6 DIN 6336 Washer 6,3 DIN 125 Reducer inserts OD 20-90 43 44 45 Half shells (optional) Cylinder-head screw M 4x20 DIN 912 Cylinder-head screw M 4x25 DIN 912 Type plate SIMTECH Phone: 877-777-2467 • Fax: 215-547-3410 www.SimtechUSA.com 2 4 8 2 4 2 4 2 2 4 4 1 set GEW-M8 450704 GEW-M4 0444H045 6325F028 6325H026 6325D020 7991F025 450706 BG032 0125F 2008 8 8 1 0912D020 0912D025 SCHTMINI 25 WeldTech - MiniPlast Instruction Manual 10.2. Basic Machine 3 2 6 4 5 1 Pos. 26 Name Piece Order no. 1 Basic frame 1 450101 2 Hexagon nut M 8 DIN 934 2 0934H 3 Fixing bolt 2 450116 4 Star grip DIN 6336-KU-M8-K 1 on request 5 Headless pin M 8x40S DIN 6332 1 on request 6 Threaded insert M 8x12 1 GEW-M8 SIMTECH Phone: 877-777-2467 • Fax: 215-547-3410 www.SimtechUSA.com 1.060606 WeldTech - MiniPlast Instruction Manual 10.3. Clamping Devices for Fittings Pos. 1.060606 Name Piece Order no. 46 Left-hand clamping device for fittings 1 45081 10L 47 Right-hand clamping device for fitting 1 45081 10R 48 Draw bar 2 S0115067 49 Hinge 2 S0112 50 Knurled screw 2 S0113 51 Handle 2 S0114-1 52 Rivet 2 S0110 53 Straight pin 4 M 6 DIN 6325 4 6325D012 54 Flat-head screw M 6x12 DIN 7991 4 7991F012 SIMTECH Phone: 877-777-2467 • Fax: 215-547-3410 www.SimtechUSA.com 27 WeldTech - MiniPlast Instruction Manual 10.4 Manual Planer 28 SIMTECH Phone: 877-777-2467 • Fax: 215-547-3410 www.SimtechUSA.com 1.060606 WeldTech - MiniPlast Instruction Manual 10.4 Manual Planer Pos. 1.060606 Name Piece Order no. 1 Holder for planer 1 450401 2 Planer disk, right-hand 1 450402 3 Planer disk, left-hand 1 450403 4 Blade 2 MES072 5 Flat-head screw M 3x6 DIN 965 6 0965C006 6 Square bar 1 450404 7 Bearing ring 2 450405 8 Driving plate, right-hand 1 450406 9 Driving plate, left-hand 1 450407 10 Flat-head screw M 5x10 DIN 7991 6 7991J010 11 Flat-head screw M 3x6 DIN 965 2 0965C006 12 Mechanical drive 1 450410 13 Ball bearing 1 L0623 14 Grooved taper pin 3x16 DIN 1471 2 1471C016 15 Star grip screw 1 BG3230 16 Hexagon nut M 6 DIN 934 1 0934F 17 Closing disc 1 450408 18 Ball Ø 4 1 L0004 19 Pressure spring 1 450409 SIMTECH Phone: 877-777-2467 • Fax: 215-547-3410 www.SimtechUSA.com 29 WeldTech - MiniPlast Instruction Manual 10.5. Electric Planer (optional) 7 6 19 16 11 / 12 1 22 20 / 21 25 23 / 24 26 28 / 29 32 27 30 / 31 2 5 9 14 17 18 4 3 30 8 10 13 15 / 16 SIMTECH Phone: 877-777-2467 • Fax: 215-547-3410 www.SimtechUSA.com 1.060606 WeldTech - MiniPlast Instruction Manual 10.5. Electric Planer (optional) Pos. 1.060606 Name Piece Order no. 1 Planer housing 1 450431 2 Ball bearing 6010 RS 1 on request 3 Bevel gear m=1,5 / z=75 1 450438 4 O-ring 3x10⁸ 1 on request 5 Bolt for planer disk 1 450436 6 Flat head screw M 6x20 DIN 7991 2 7991F020 7 Flat head screw M 6x25 DIN 7991 2 7991F025 8 Adapter ring 1 450437 9 Planer disk, right-hand 1 450432 10 Planer disk, left-hand 1 450433 11 Blade 2 MES072 12 Flat head screw M 3x6 DIN 965 6 0965C006 13 Pinion with shaft m=1,5 / z=15 1 450439 14 Ball bearing 16101 2 on request 15 Washer M 10 DIN 125 1 0125J 16 Nut M 10x1, hardened and tempered 1 450442 17 Nut M 36x1,5 1 450441 18 Coupling piece 1 on request 19 Driving motor 230 V 1 on request 20 Washer M 6 DIN 433 1 0433F 21 Cylinder head screw M 6x30 DIN 912 1 0912F030 22 Adapter plate 1 on request 23 Counter-plate 1 on request 24 Hexagon head screw M 5x20 DIN 933 2 933.24E+ 25 Holder for planer 1 4504011 26 Star grip screw 1 BG3230 27 Hexagon nut M 6 DIN 934 1 0934F 28 Ball bearing 623 2Z 2 L0623 29 Grooved taper pin 3x16 DIN 1471 2 1471C016 30 Ball Ø 4 1 L0004 31 Compression spring 1 450409 32 Closing disc 1 450408 SIMTECH Phone: 877-777-2467 • Fax: 215-547-3410 www.SimtechUSA.com 31 WeldTech - MiniPlast Instruction Manual 10.6. Heating Element 10 11 1 12 2 3-5 13 6 14 15 7/8 16 - 18 19 20 9 21 32 SIMTECH Phone: 877-777-2467 • Fax: 215-547-3410 www.SimtechUSA.com 1.060606 WeldTech - MiniPlast Instruction Manual 10.6. Heating Element 1.060606 Pos. Name Piece Order no. 1 Teflon-conical nipple 1 H09091 2 Switch on/off with control lamp (red) 1 H0903 3 Control cnob with slot 1 H09075 4 Scale 180°-280° (d33) 1 H09074 5 Window cap for handle shell (white) 1 H09072 6 Control lamp (green) 1 H2105 7 Cylinder-head screw M 6x50 DIN 912 2 0912F075 8 Spring washer 6 DIN 7980 2 7980F 9 Electronic control without probe GZ4 1 H0918220 10 Isolator piece 11 Temperature probe PT1000 1 H09082 12 Heating element , complete 1 HMINIE Heating plate new, electric 1 HPMINIE Heating plate for change, electric 1 HPTMINIE 13 Triac with heat sink 1 H09081 14 Heating element holder 15 Cylinder-head screw M 4x70 DIN 912 3 0912D070 16 Handle shell 1 H0907 17 Strain relief 1 H09076 18 Sheet metal screw C 2,9x13 DIN 7981 2 7981C013 19 Sheet metal screw C 4,8x16 DIN 7981 3 798.19E+ 20 Cable bushing 1 EKT08 21 Connection cable with plug 1 EK3220 SIMTECH Phone: 877-777-2467 • Fax: 215-547-3410 www.SimtechUSA.com 1450506 1450508 33 WeldTech - MiniPlast Instruction Manual 10.7. Protection Box Pos. 34 Name Piece Order no. 1 oot 2 450517 2 Screw cap 4 200117 3 Insert for planer 1 450511 4 Insert for heating element 1 450512 5 Protective sheet 1 450513 6 Bar for distance 1 4 450514 7 Bar for distance 2 4 450515 8 Sleeve nut M 6 8 HÜ006 9 Threaded bolt 4 450518 10 Hoop 1 450516 11 Washer 10,5 DIN 125 4 0125J 12 Rivet Ø 2,4x8 DIN 7337 10 7337B008 SIMTECH Phone: 877-777-2467 • Fax: 215-547-3410 www.SimtechUSA.com 1.060606 WeldTech - MiniPlast Instruction Manual NOTES: 1.060606 SIMTECH Phone: 877-777-2467 • Fax: 215-547-3410 www.SimtechUSA.com 35 WeldTech - MiniPlast Instruction Manual NOTES: 36 SIMTECH Phone: 877-777-2467 • Fax: 215-547-3410 www.SimtechUSA.com 1.060606 WeldTech - MiniPlast Instruction Manual NOTES: 1.060606 SIMTECH Phone: 877-777-2467 • Fax: 215-547-3410 www.SimtechUSA.com 37 WeldTech - MiniPlast Instruction Manual Simtech Industrial Products, Inc. 47-A Runway Road, Levittown, PA 19057 Phone: 215-547-0444 Fax: 215-547-9129 E-mail: [email protected] Web site: www.SimtechUSA.com WARRANTY Simtech Industrial Products, Inc. products are warranted to be free from defects in materials and workmanship for one (1) year from date of shipment. No claim shall be permitted under this warranty unless Buyer gives Simtech Industrial Products, Inc. written notice of all respects in which Buyer claims the product to be defective. Notice must be received within ten (10) days from the date which the Buyer discovers, or should have discovered the defect. Buyer shall give Simtech Industrial Products, Inc. a reasonable opportunity to inspect the product after notice has been given. This warranty shall not apply to any products or components, which have been subjected to abnormal use, negligence or accident. Seller’s sole obligation under this warranty shall be limited solely on the repair or replacement, as elected by Simtech Industrial Products, Inc., of defective or nonconforming material. To the maximum extent permitted by law, Buyer irrevocably waives all claims for money damages relating to the condition, use and performance of the goods purchased. In no event shall Simtech Industrial Products, Inc. liability exceed the purchase price of the product sold by Simtech Industrial Products, Inc. In no event, whether because of a breach of warranty or representation or any other cause, whether based upon contract, tort, warranty or otherwise, arising out of the performance or nonperformance by seller of its obligations under this agreement or with respect to the products sold pursuant here to; shall seller be liable for lost earnings, income or profits or indirect, incidental, liquidated or consequential damages. The implied warranties of merchantability and fitness for a particular purpose except as set forth in this warranty, express or implied, are hereby disclaimed and excluded. Nothing shall be construed as an additional warranty unless specifically designated as such in writing and signed by Simtech Industrial Products, Inc. Simtech Industrial Products, Inc. reserves the right, in its discretion, at any time and from time to time, to make changes to any specification, data or information contained herein. 38 SIMTECH Phone: 877-777-2467 • Fax: 215-547-3410 www.SimtechUSA.com 1.060606