1
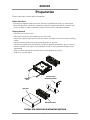
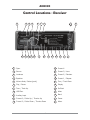
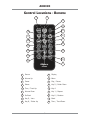
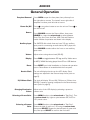
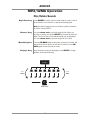
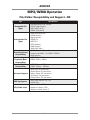
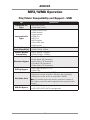
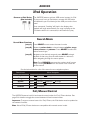
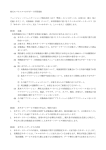
CD Receiver
INSTALLATION/OWNER'S
MANUAL
AXD330
Front and Rear Inputs
AXD330
Preparation
Please read entire manual before installation.
Before You Start
Ę'LVFRQQHFWQHJDWLYHEDWWHU\WHUPLQDO&RQVXOWDTXDOLILHGWHFKQLFLDQIRULQVWUXFWLRQV
Ę$YRLGLQVWDOOLQJWKHXQLWZKHUHLWZRXOGEHVXEMHFWWRKLJKWHPSHUDWXUHVVXFKDVIURP
GLUHFWVXQOLJKWRUZKHUHLWZRXOGEHVXEMHFWWRGXVWGLUWRUH[FHVVLYHYLEUDWLRQ
Getting Started
Ę5HPRYHWULPULQJIURPXQLW
Ę5HPRYHWUDQVLWVFUHZVORFDWHGRQWRSRIWKHXQLW
Ę,QVHUWWKHVXSSOLHGNH\VLQWRWKHVORWVDVVKRZQDQGVOLGHWKHXQLWRXWRIWKHPRXQWLQJ
sleeve.
Ę,QVWDOOPRXQWLQJVOHHYHLQWRRSHQLQJEHQGLQJWDEVWRVHFXUH
Ę&RQQHFWZLULQJKDUQHVVDQGDQWHQQD&RQVXOWDTXDOLILHGWHFKQLFLDQLI\RXDUHXQVXUH
Ę&HUWDLQYHKLFOHVPD\UHTXLUHDQLQVWDOODWLRQNLWDQGRUZLULQJKDUQHVVDGDSWHUVROG
VHSDUDWHO\
Ę7HVWIRUFRUUHFWRSHUDWLRQDQGVOLGHLQWRPRXQWLQJVOHHYHWRVHFXUH
Ę6QDSWULPULQJLQWRSODFH
REMOVAL
KEYS
OPTIONAL REAR
MOUNTING SUPPORT
HEAD UNIT
MOUNTING SLEEVE
TYPICAL DIN FRONT-LOAD MOUNTING METHOD
2
AXD330
Wiring Diagram
RCA Preamp Connections
Steering Wheel Interface Input
PAC SWI-PS connection (sold separately)
Rear Auxiliary Input
Rear/Subwoofer Output
Front Output
FRONT
R/SUB
AUX
L-CH
R-CH
Antenna
Connector
BLUE
Remote Turn-On
Connect to amplifier or power
antenna. Insulate wire if not used.
BLACK
Ground
Connect to the vehicle
chassis ground.
RED
Accessory
Connect to an existing ignition
circuit or switched 12 volt source.
FUSE
YELLOW
Memory
Connect to the battery
circuit or constant 12 volt source.
Right Front
Right Rear
Gray/Black (-)
Gray (+)
Violet/Black (-)
Violet (+)
Left Front
Left Rear
White/Black (-)
White (+)
Green/Black (-)
Green (+)
3
:KHQUHSODFLQJWKHIXVH
PDNHVXUHQHZIXVHLVWKH
FRUUHFWW\SHDQGDPSHUDJH
8VLQJDQLQFRUUHFWIXVHFRXOG
GDPDJHWKHUDGLR
7KH$;'XVHVRQH
DPS$70IXVHORFDWHG
in-line.
AXD330
Control Locations - Receiver
1
2
22
3
21 4
19 18
5
6
17
7
16
8
15
14
13
12
11
1
2SHQ
12
Preset 4
2
6RXUFH
13
3UHVHW,QWUR
3
Loudness
14
3UHVHW5DQGRP
4
(TDXOL]HU
15
3UHVHW5HSHDW
5
9ROXPH.QRE6HOHFWSXVK
16
7XQH7UDFN'RZQ
6
3OD\3DXVH
17
'LVSOD\
7
7XQH7UDFN8S
18
*R%DFN
8
86%3RUW
19
0XWH
9
$X[LOLDU\,QSXW
Band
3UHVHW)ROGHU8S7KXPEV8S
21
3RZHU
11
3UHVHW)ROGHU'RZQ7KXPEV'RZQ
22
0HQX
4
9
AXD330
Control Locations - Remote
1
2
3
4
5
18
6
17
7
16
6
8
15
9
14
13
12
11
1
6RXUFH
'LVSOD\
2
9ROXPH8S
11
0HQX
3
3RZHU
12
3OD\3DXVH
4
6HOHFW
13
.H\)ROGHU'RZQ
5
7XQH7UDFN8S
14
.H\
6
9ROXPH'RZQ
15
.H\5HSHDW
7
*R%DFN
16
.H\5DQGRP
8
.H\,QWUR
17
Band
9
.H\)ROGHU8S
18
7XQH7UDFN'RZQ
5
AXD330
General Operation
Faceplate Removal
Power On/Off
Source
Auxiliary Input
Press OPEN WRRSHQWKHIDFHSODWHWKHQSXOODZD\IURP
WKHULJKWVLGHWRUHPRYH7RUHLQVWDOOLQVHUWULJKWVLGHRI
IDFHSODWHILUVWWKHQSXVKOHIWVLGHWRVHFXUH
Press RUDQ\RWKHUEXWWRQWRWXUQWKHXQLWRQ3UHVV
WXUQWKHXQLWRII
to
Press SOURCEWRHQWHUWKH6RXUFH0HQXWKHQSUHVV
SOURCERUURWDWHWKHvolume knobWRVHOHFWEHWZHHQ
7XQHU'LVF$X[)URQW$X[5HDU86%L3RGDQG3DQGRUD
PRGHV0RGHVRIRSHUDWLRQDUHVKRZQLQWKHGLVSOD\
7KH$;'RIIHUVERWKIURQWDQGUHDUPPDX[LOLDU\
LQSXWSRUWVIRUFRQQHFWLQJDQDXGLRGHYLFH03SOD\HUHWF
Press SOURCEWRVHOHFWHLWKHUWKHIURQWRUUHDUDX[LOLDU\
LQSXWPRGH
Volume
$GMXVWYROXPHXVLQJYROXPHNQRE
Display
Press DISPWRWRJJOHEHWZHHQ,'WDJDQGILOHIROGHUQDPH
IRU03:0$ILOHVEHLQJSOD\HGIURP&'VRU86%GHYLFHV
Reset
Set the Clock
12/24-hour Clock
Changing Illumination
Colors
Selecting a Preset Color
Selecting a Custom
Color
Press RESETXSRQLQLWLDOLQVWDOODWLRQRULIDEQRUPDORSHUDWLRQ
RFFXUV5HVHWEXWWRQLVORFDWHGEHKLQGWKHIURQWSDQHO
7KHXQLWZLOOGLVSOD\WKHWLPHRQWKH/&'GLVSOD\&ORFN
VHWWLQJVDUHDGMXVWHGLQWKH*HQHUDOVHWXSPHQXUHIHUWR
SDJH
7KHFORFNZLOOGLVSOD\KRXU$030WLPHRUKRXUWLPH
)UHTXHQF\VSDFLQJLVDGMXVWHGLQWKH*HQHUDOVHWXS
PHQXUHIHUWRSDJH
$GMXVWFRORURIWKH/&'GLVSOD\E\VHOHFWLQJDSUHVHWRU
custom color.
Press MENUDQGWXUQWKHvolume knobWRē6HW&RORUĔ7XUQ
WKHvolume knobOHIWULJKWWRF\FOHEHWZHHQ2))$872RU
SUHVHWFRORUV
Press MENUDQGWXUQWKHvolume knobWRē6HW&RORUĔ
&KRRVHWKHOHYHORIUHGIURPXVLQJWKHvolume knob
WKHQSUHVVSELECT5HSHDWIRUGHVLUHGOHYHOVRIJUHHQDQG
EOXHWKHQSUHVVSELECTWRFRQILUPWKHILQDOFRORU
6
AXD330
General Operation
Setup Menu
Press MENUWRDFFHVVWKHVHWXSPHQXWKHQWXUQWKH
volume knobWRF\FOHWKURXJKPHQXFDWHJRULHV$XGLR&RORU
'LVSOD\7XQHUDQG*HQHUDO
:KHQGHVLUHGFDWHJRU\DSSHDUVLQWKHGLVSOD\SUHVV
SELECTWKHQURWDWHWKHvolume knobOHIWULJKWWRF\FOH
WKURXJKWKHRSWLRQVLQHDFKFDWHJRU\
:KHQGHVLUHGRSWLRQDSSHDUVLQWKHGLVSOD\SUHVVSELECT
WKHQURWDWHWKHvolume knobOHIWULJKWWRDGMXVWRUDFWLYDWH
desired function.
Note:6RPHIXQFWLRQVDUHWRJJOHGE\SUHVVLQJSELECT and
PD\QRWUHTXLUHWXUQLQJWKHvolume knob.
Press ESCWRUHWXUQWRWKHSUHYLRXVPHQXRUH[LWWKHPHQX
ZKLOHWKHPDLQPHQXLVGLVSOD\HG
Audio Setup Menu
Menu Function
Options
5RWDWHWKHvolume knobWRF\FOHWKURXJKWKHIROORZLQJHTXDOL]DWLRQFXUYHV)ODW
3RS-D]]&ODVVLF%HDW5RFNDQG8VHU$Q\PDQXDODGMXVWPHQWWRWKH%DVVRU
7UHEOHVHWWLQJVDUHDXWRPDWLFDOO\VDYHGDV8VHU
5RWDWHWKHvolume knobWRDGMXVWWKHEDVVOHYHOVHWWLQJ
Bass Level
PLQLPXPPD[LPXP
knobWRVHOHFWRQHRIWKHIROORZLQJEDVVIUHTXHQF\VHWWLQJV
Bass Frequency 5RWDWHWKHvolume
+]+]+]RU+]
5RWDWHWKHvolume knobWRDGMXVWWKHPLGGOHOHYHOVHWWLQJ
Middle Level
PLQLPXPPD[LPXP
Middle
5RWDWHWKHvolume knobWRVHOHFWRQHRIWKHIROORZLQJPLGGOHIUHTXHQF\VHWWLQJV
Frequency
+]N+]N+]RUN+]
5RWDWHWKHvolume knobWRDGMXVWWKHWUHEOHOHYHOVHWWLQJ
Treble Level
PLQLPXPPD[LPXP
Treble
5RWDWHWKHvolume knobWRVHOHFWRQHRIWKHIROORZLQJWUHEOHIUHTXHQF\VHWWLQJV
Frequency
.+].+].+]RU.+]
5RWDWHWKHvolume knobWRDGMXVWWKHEDODQFHVHWWLQJ
Balance
/WR5UHSUHVHQWVHTXDOEDODQFH
5RWDWHWKHvolume knobWRDGMXVWWKHIDGHUVHWWLQJ
Fader
)WR5UHSUHVHQWVHTXDOEDODQFH
Equalization
Curves
Subwoofer
5RWDWHWKHvolume knobWRWXUQVXEZRRIHURXWSXW21RU2))
Subwoofer Level 5RWDWHWKHvolume knobWRDGMXVWVXEZRRIHUOHYHOEHWZHHQDQG
Subwoofer
Frequency
5RWDWHWKHvolume knobWRVHOHFWRQHRIWKHIROORZLQJVXEZRRIHUFHQWHU
IUHTXHQF\VHWWLQJV2II+]+]DQG+]2IIUHSUHVHQWVDIXOOUDQJH
VXEZRRIHURXWSXW
7
AXD330
General Operation
General Setup Menu
Menu Function
Options
$XWR2II
3URJUDPVWKHXQLWWR86$WXQHUVSDFLQJ
N+]IRU)0DQGN+]IRU$0
3URJUDPVWKHXQLWWR6RXWK$PHULFDQWXQHUVSDFLQJ
N+]IRU)0DQGN+]IRU$0
3URJUDPVWKHXQLWWR(XURSHDQWXQHUVSDFLQJ
N+]IRU)0DQGN+]IRU$0
Press SELECTWRVHHNDQGVDYHVWURQJVWDWLRQVLQWKH
current band.
$FWLYDWHVGLVWDQFHWXQLQJ
$FWLYDWHVORFDOWXQLQJIRUVWURQJVWDWLRQUHFHSWLRQRQO\
:LWKWKHXQLWRQSUHVVDQGKROGDISPXQWLOWKHFORFNEHJLQV
WRDGMXVWWKH
WRIODVKWKHQUHOHDVH3UHVVTUNE
KRXUVDQGTUNE
WRDGMXVWWKHPLQXWHV3UHVVDISP
PRPHQWDULO\WRVDYHWKHVHOHFWHGWLPH
3URJUDPVWKHXQLWWRGLVSOD\KRXU$030WLPHH[DPSOH
30
3URJUDPVWKHXQLWWRGLVSOD\KRXUWLPHH[DPSOH
3URJUDPVWKHXQLWWRQRWVFUROODQ\LQIRUPDWLRQRQWKHGLVSOD\
3URJUDPVWKHXQLWWRRQO\VFUROOLQIRUPDWLRQRQFH
3URJUDPVXQLWWRVFUROOLQIRUPDWLRQRQFHHYHU\VHFRQGV
GHIDXOW
3URJUDPVXQLWWRVFUROOLQIRUPDWLRQFRQWLQXRXVO\
3URJUDPVWKHKHDGXQLWWRDGYDQFHGFRQWURORIWKHL3RG
L3KRQHGHYLFH
3URJUDPVWKHKHDGXQLWWRPDQXDOFRQWURORIWKHL3RGL3KRQH
GHYLFHDQGDOORZVPXVLFWREHFRQWUROOHGIURPWKHL3RG
L3KRQHGHYLFH
'LVDEOHVWKHFRQILUPDWLRQEHHS
(QDEOHVWKHFRQILUPDWLRQEHHS
3URJUDPVXQLWWRDOZD\VWXUQRQDWDVSHFLILFYROXPH
GHIDXOWLV2II$YROXPHOHYHORIFDQEHVHOHFWHG
3URJUDPVWKHXQLWWRUHPDLQWKHVHOHFWHGFRORU
$XWR2Q
3URJUDPVWKHXQLWWRFRQVWDQWO\FKDQJHFRORUV
86$
Tuner
Frequency
Spacing
6$PHULFD
(XURSH
Auto Station
Store
$8726725(
Local/Distance
Tuning
Off
On
Set the Clock
&ORFN
Clock Mode
Scrolling
Option
+RXU
+RXU
Off
Once
6HF
On
)XOO
iPod Control
0DQXDO
Beep
Confirmation
Programmable
Turn On Volume
Auto Color
Change
Action
Off
On
Variable
Value
ll
8
nn
AXD330
General Operation
Gain Setup Menu
Menu Function
Tuner Gain
Disc Gain
Aux Front Gain
Aux Rear Gain
USB Gain
iPod Gain
Pandora Gain
Options
5RWDWHWKHvolume knobWRDGMXVWWKHWXQHUJDLQ
PLQLPXPPD[LPXP
5RWDWHWKHvolume knobWRDGMXVWWKHJDLQIRUGLVFSOD\EDFN
PLQLPXPPD[LPXP
5RWDWHWKHvolume knobWRDGMXVWWKHJDLQIRUWKHIURQWDX[LOLDU\LQSXW
PLQLPXPPD[LPXP
5RWDWHWKHvolume knobWRDGMXVWWKHJDLQIRUWKHUHDUDX[LOLDU\LQSXW
PLQLPXPPD[LPXP
5RWDWHWKHvolume knobWRDGMXVWWKHJDLQIRU86%SOD\EDFN
PLQLPXPPD[LPXP
5RWDWHWKHvolume knobWRDGMXVWWKHJDLQIRUL3RGSOD\EDFN
PLQLPXPPD[LPXP
5RWDWHWKHvolume knobWRDGMXVWWKHJDLQIRU3DQGRUDSOD\EDFN
PLQLPXPPD[LPXP
Color Menu
Menu Function
Auto Change
Set Color
Set Custom
Color
Set Day/Night
Color
Options
6HWVWKHXQLWWRURWDWHEHWZHHQDOOLOOXPLQDWLRQFRORUVDXWRPDWLFDOO\6HWWLQJD
SUHVHWRUXVHUFRORUZLOOFDQFHOWKHDXWRPDWLFFRORUFKDQJH
$GMXVWWKHFRORURIWKHEXWWRQDQG/&'LOOXPLQDWLRQEHWZHHQSUHVHWFRORUV
ĘOffVHWVWKHFRORUWRZKLWHGHIDXOW
ĘDay/NightVHWVWKHFRORUWRFKDQJHWRGLIIHUHQWFRORUVGXULQJWKHGD\RU
QLJKW7KHGD\DQGQLJKWFRORUVPXVWEHVHWLQWKH'D\1LJKWFRORUPHQX
EHORZ
ĘUserVHWVWKHFRORUWRWKHFXVWRPFRORU7KHFXVWRPFRORUPXVWEHVHWLQWKH
PHQXEHORZ
Ę1-31FKRRVHIURPDQ\RIWKHSUHVHWFRORUV
,QGLYLGXDOO\VHOHFWWKHOHYHORI5HG*UHHQDQG%OXHIURP$Q\FRPELQDWLRQ
RIWKHVHFRORUVFDQEHVHOHFWHG
Important Note6HWWLQJHDFK5HG*UHHQDQG%OXHOHYHOVWRZLOOWXUQRIIVHW
WXUQRIIWKHLOOXPLQDWLRQIRUWKH/&'DQGEXWWRQV
6HWVLQLGYLGXDOFRORUVIRUWKHGD\RUQLJKW7KHFORFNPXVWEHVHWIRUSURSHU
IXQFWLRQ
ĘDay ColorVHWVWKHGD\WLPHFRORUWRDSUHVHWRUFXVWRPFRORU
ĘNight ColorVHWVWKHQLJKWWLPHFRORUWRDSUHVHWRUFXVWRPFRORU
ĘTimeDGMXVWVWKHQLJKWWLPHVSDQ7XUQWKHYROXPHNQREWRDGMXVWGHIDXOWLV
SPWRDP
9
AXD330
AM/FM Tuner Operation
Manual Tuning
Seek Tuning
nn
ll
nn
ll
or TUNE
PRPHQWDULO\WRFKDQJH
Press TUNE
UDGLRIUHTXHQF\XSRUGRZQRQHVWHSDWDWLPH3UHVVDQG
KROGWRDGYDQFHTXLFNO\
Press TUNE
or TUNE
IRUPRUHWKDQWZR
VHFRQGVWKHQUHOHDVHWRDXWRPDWLFDOO\VHHNDQGWXQHWRWKH
QH[WVWURQJVWDWLRQ
Band
Press BANDWRVHOHFWEHWZHHQ)0)0)0$0DQG
$0EDQGV
Storing Station Presets
6HOHFWWKHGHVLUHGEDQGDQGVWDWLRQ3UHVVDQGKROGWKH
GHVLUHGSUHVHWEXWWRQIRUPRUHWKDQWZRVHFRQGV
:KHQVWRUHGWKHSUHVHWQXPEHUZLOODSSHDULQWKHGLVSOD\
Recalling Station
Presets
6WRUHGVWDWLRQVFDQEHUHFDOOHGLQVWDQWO\E\SUHVVLQJWKH
FRUUHVSRQGLQJSUHVHWEXWWRQ
AXD330
CD Operation
Insert CD
Press OPENWRIROGGRZQWKHIURQWSDQHODQGH[SRVHWKH&'
VORW:LWKWKHODEHOIDFLQJXSLQVHUWDVWDQGDUGVL]H&'LQWR
WKH&'VORW7KH&'ZLOODXWRPDWLFDOO\EHJLQSOD\EDFN
Eject CD
:LWKWKHIURQWSDQHORSHQSUHVVEJECTWRHMHFWWKH&'7KH
XQLWZLOOFKDQJHWRSUHYLRXVPRGHRIRSHUDWLRQ,IWKHGLVFLV
QRWUHPRYHGZLWKLQVHFRQGVWKHXQLWZLOOUHORDGWKHGLVF
7KHXQLWGRHVQRWKDYHWREHWXUQHGRQWRHMHFW&'
Track Select
Fast Forward/Reverse
Pause
Repeat
Random
Intro
CD-R/CD-RW
Compatibility
ll
Press TRACK
WRVNLSWRWKHEHJLQQLQJRIWKHQH[W
WUDFN3UHVVTRACK
WRUHWXUQWRWKHEHJLQQLQJRIWKH
FXUUHQWWUDFN3UHVVLQJTRACK
DJDLQVNLSVWRWKH
EHJLQQLQJRIWKHSUHYLRXVWUDFN
nn
ll
nn
nn
3UHVVDQGKROGTRACK
or TRACK
RQWKH
UHPRWHFRQWUROWRIDVWIRUZDUGRUUHYHUVHDWUDFN
Press
Press
ll// IIWRWHPSRUDULO\VWRS&'SOD\EDFN
IIDJDLQWRUHVXPHSOD\EDFN
Press RPTWRFRQWLQXRXVO\UHSHDWWKHVHOHFWHGWUDFN
Press RDMWRSOD\DOOWKHWUDFNVLQUDQGRPRUGHU
Press INTWRSOD\WKHILUVWVHFRQGVRIHDFKWUDFN
6RPH&'5VDQG&'5:VPD\EHLQFRPSDWLEOHZLWKWKLV
XQLWGHSHQGLQJRQPHGLDW\SHDQGUHFRUGLQJPHWKRG,Q
DGGLWLRQWKHIROORZLQJ&'VPD\EHLQFRPSDWLEOHZLWKWKLV
XQLW
&'VH[SRVHGWRH[WUHPHWHPSHUDWXUHVRUGLUHFWVXQOLJKWIRU
H[WHQGHGSHULRGVRIWLPH&'VUHFRUGHGLQZKLFKDUHFRUGLQJ
VHVVLRQIDLOHGRUDUHUHFRUGLQJZDVDWWHPSWHGDQGRU
HQFU\SWHGRUFRS\SURWHFWHG&'VZKLFKGRQRWFRQIRUPWR
WKHDXGLR&''$UHGERRNUHFRUGLQJVWDQGDUG
11
AXD330
MP3/WMA Operation
Playing MP3/WMA
Files
Displaying Information
7RSOD\03:0$ILOHVLQVHUWDGDWD&'RU86%GHYLFH
FRQWDLQLQJ03:0$ILOHVē/RDGLQJZLOOIODVKLQWKH
GLVSOD\'HSHQGLQJRQWKHQXPEHURIILOHVDQGIROGHUVWKLV
PD\WDNHVHYHUDOVHFRQGV
Press DISPWRF\FOHEHWZHHQWUDFNLQIRUPDWLRQDQGILOH
folder information.
6RQJWLWOHDUWLVWQDPHDQGDOEXPQDPHZLOORQO\EH
GLVSOD\HGLILQFOXGHGZLWKWKH03:0$ILOH
:KHQUHIHUULQJWR03:0$SOD\EDFNWKHIROORZLQJ
WHUPVDUHV\QRQ\PRXV
Ę)LOHQDPHDQGWUDFNQDPH
Ę)ROGHUQDPHDQGGLUHFWRU\QDPH
Repeat
Press RPTWRHQWHUWKH)XQFWLRQ0HQXWKHQURWDWHWKHvolume knobXQWLO5HSHDWLVKLJKOLJKWHG3UHVVSELECTWKHQ
URWDWHWKHvolume knobWRVHOHFWRQHRIWKHIROORZLQJUHSHDW
RSWLRQV
Ę$OO3OD\VDOOVRQJVRQGLVFRUGHYLFH
Ę7UDFN&RQWLQXRXVO\UHSHDWVVHOHFWHGVRQJ
Ę)ROGHU&RQWLQXRXVO\UHSHDWVDOOVRQJVLQVHOHFWHGIROGHU
Random
Press RDMWRHQWHUWKH)XQFWLRQ0HQXWKHQURWDWHWKH
volume knobXQWLO5DQGRPLVKLJKOLJKWHG3UHVVSELECT
WKHQURWDWHWKHvolume knobWRVHOHFWRQHRIWKHIROORZLQJ
RSWLRQVIRUUDQGRPSOD\EDFN
Ę2II&DQFHOVWKH5DQGRPIXQFWLRQ
Ę$OO3OD\VDOOVRQJVLQUDQGRPRUGHU
Ę)ROGHU3OD\VDOOVRQJVLQIROGHULQUDQGRPRUGHU
Intro
Press INTWRHQWHUWKH)XQFWLRQ0HQXWKHQURWDWHWKH
volume knobXQWLO,QWURLVKLJKOLJKWHG3UHVVSELECT
WKHQURWDWHWKHvolume knobWRVHOHFWRQHRIWKHIROORZLQJ
RSWLRQVIRULQWURSOD\EDFN
Ę2II&DQFHOVWKH,QWURIXQFWLRQ
Ę$OO3OD\VILUVWVHFRQGVRIHDFKVRQJ
Ę)ROGHU3OD\VILUVWVHFRQGVRIHDFKVRQJLQIROGHU
Note)ROGHUUHSHDWUDQGRPDQGLQWURRSWLRQVRQO\IXQFWLRQ
RQ03:0$GLVFVRUGHYLFHVUHFRUGHGZLWKPRUHWKDQ
one folder.
12
AXD330
MP3/WMA Operation
File/Folder Search
Begin Searching
Press SELECT WRHQWHUWKHILOHIROGHUVHDUFKPRGH$OLVWRI
DOOWKHIROGHUVIURPWKHGLVFRUGHYLFHZLOOEHGLVSOD\HG
Note: $Q\ILOHVORFDWHGLQWKHURRWGLUHFWRU\ZLOOEHORFDWHGLQ
WKHIROGHUQDPHG5227
Choose a Song
Menu Navigation
Playing a Song
7XUQWKHvolume knobWRF\FOHWKURXJKDOOWKHIROGHUVRQ
WKHGLVFRUGHYLFHDQGSUHVVSELECTWRFKRRVHWKHGHVLUHG
IROGHU7KHOLVWRIILOHVLQWKHVHOHFWHGIROGHUZLOOEHGLVSOD\HG
7XUQWKHvolume knobWRF\FOHWKURXJKWKHOLVWRIILOHV
3UHVVLQJGO BACKZKHQYLHZLQJWKHFRQWHQWVRIDIROGHUZLOO
UHWXUQWRWKHOLVWRIIROGHUVRQWKHGLVFRUGHYLFH3UHVVGO
BACKDJDLQWRH[LWWKHVHDUFKPHQX
2QFHWKHGHVLUHGVRQJLVGLVSOD\HGSUHVVSELECTWREHJLQ
SOD\EDFNRIWKHGHVLUHGVRQJ
Press SELECT
to begin
Press
SELECT
Folder 1 Folder 2 Folder 3 Folder 4 Folder 5 Folder 6 Folder 7
Files
Files
Files
Files
Files
6(/(&7
Turn the
volume knob
13
Files
Files
Press
BACK
AXD330
MP3/WMA Operation
File/Folder Compatibility and Support - CD
Type
Compatible File
Types
Incompatible File
Types
Recording Format
Compatibility
Sampling
Frequency Rate
Compatibility
Transfer Bit Rate
Compatibility
Specification
Ę&'520,62&'5&'5:
Ę&''$GLJLWDODXGLR
Ę03GDWDPS
Ę:0$GDWDZPD
Ę'50SURWHFWHGILOHV
Ę:0$ORVVOHVV
Ę$SSOHORVVOHVV
Ę:0$3UR
Ę033UR
Ę03SOD\OLVWV
Ę:$9ORVVOHVV
Ę0$$$&GDWD
Ę,62OHYHOOHYHO
Ę<HOORZERRN02'(02'()250
Ę0XOWLVHVVLRQ
Ę03N+]N+]
Ę:0$N+]N+]
Ę03NESVNESV
Ę:0$NESVNESV
Ę6RQJ7LWOHFKDUDFWHUV
Ę$UWLVW1DPHFKDUDFWHUV
Character Support Ę$OEXP1DPHFKDUDFWHUV
Ę)LOH1DPHFKDUDFWHUV
Ę)ROGHU1DPHFKDUDFWHUV
Ę037DJV9HUVLRQ
ID3 Tag Support
Ę:0$7DJV
Ę0D[LPXPILOHV
File/Folder Limit Ę0D[LPXPIROGHUV
Ę0D[LPXPIROGHUOHYHOV
14
AXD330
MP3/WMA Operation
File/Folder Compatibility and Support - USB
Type
Specification
Ę03GDWDPS
Ę:0$GDWDZPD
Ę'50SURWHFWHGILOHV
Ę:0$ORVVOHVV
Ę$SSOHORVVOHVV
Ę:0$3UR
Incompatible File
Ę033UR
Types
Ę03SOD\OLVWV
Ę0$$$&GDWD
Ę:$9ORVVOHVV
Sampling Frequency Ę03N+]N+]
Rate Compatibility Ę:0$N+]N+]
Ę03NESVNESV
Transfer Bit Rate
Compatibility
Ę:0$NESVNESV
Ę6RQJ7LWOHFKDUDFWHUV
Ę$UWLVW1DPHFKDUDFWHUV
Character Support Ę$OEXP1DPHFKDUDFWHUV
Ę)LOH1DPHFKDUDFWHUV
Ę)ROGHU1DPHFKDUDFWHUV
Ę037DJV9HUVLRQ
ID3 Tag Support
Ę:0$7DJV
Ę0D[LPXPQXPEHURIILOHV
Ę0D[LPXPQXPEHURIIROGHUVSOXVWKHURRWIROGHU
Ę0D[LPXPQXPEHURIILOHVLQHDFKIROGHU
File/Folder Limit
Note)RUGHYLFHVZLWKPRUHWKDQWKHPD[LPXPQXPEHURI
ILOHVIROGHUVVRPHILOHVZLOOEHLQJQRUHGDQGPD\QRWIXQFWLRQ
SURSHUO\
Ę)$7)$7ILOHV\VWHPVXSSRUWHG
USB File System
Ę+)617)6(;7(;7QRWVXSSRUWHG
Compatible File
Types
15
AXD330
iPod Operation
Connect an iPod Device
(Not Included)
7KH$;'IHDWXUHVDGLUHFW86%FRQWUROV\VWHPIRUL3RG
7RSOD\PXVLFIURPDQL3RGGHYLFHFRQQHFWWKH86%FDEOH
LQFOXGHGZLWK\RXUL3RGGHYLFHWRWKH86%SRUWRQWKHIURQW
SDQHO.
2QFHFRQQHFWHG/RDGLQJZLOOIODVKLQWKHGLVSOD\WKHQ
SOD\EDFNZLOOEHJLQDXWRPDWLFDOO\,IDVRQJLVSOD\LQJRQWKH
L3RGGHYLFHEHIRUHLWLVFRQQHFWHGLWZLOOFRQWLQXHWRSOD\
Search Mode
Search Menu Functions
(step 1) Press SELECTRQFHWRHQWHUWKHVHDUFKPRGH
(step 2) 5RWDWHWKHvolume knobWRFKRRVHEHWZHHQplaylistsongs
artistsalbums and podcasts. Press SELECTWRVHOHFWWKH
GHVLUHGVHDUFKW\SH
(step 3) 1DYLJDWHWRWKHGHVLUHGVRQJDQGSUHVVSELECTWREHJLQ
SOD\EDFNRIWKDWVRQJ8VHWKHWDEOHEHORZIRUUHIHUHQFH
ZKHQQDYLJDWLQJWKURXJKWKHPHQXRSWLRQV
Note: Press GO BACKWRDFFHVVWKHSUHYLRXVOHYHOXSRQH
OHYHO3UHVVLQJGO BACK IURPWKHVHDUFKPDLQPHQXZLOO
H[LWWKHVHDUFK
6HHWKHEHORZWDEOHIRUDOLVWRIWKHVHDUFKPHQXQDYLJDWLRQRSWLRQV
0HQX1DYLJDWLRQ
6HDUFK,WHP
Playlist
0HQX
3OD\OLVWV
6RQJV
Songs
Artists
Albums
Podcase
0HQX
0HQX
0HQX
0HQX
6RQJV
$UWLVWV
$OEXPV
Podcasts
$OEXPV
6RQJV
6RQJV
Full/Manual Control
7KH$;'IHDWXUHVERWKIXOODQGPDQXDOFRQWUROPRGHVIRUL3RGL3KRQHGHYLFHV6HH
SDJHIRUGHWDLOVWRWRJJOHWKHFRQWUROEHWZHHQIXOODQGPDQXDOPRGHV
Important7RVXSSRUWPDQXDOFRQWUROIRUL3RGL3KRQHWKHL3RGGHYLFHPXVWEHXSGDWHGWR
WKHQHZHVWILUPZDUH
Note1RWDOOL3RGL3KRQHGHYLFHVDUHFRPSDWLEOHZLWKPDQXDOFRQWUROPRGH
16
AXD330
iPod Operation
Song Select
Fast Forward and
Reverse
Pause
Repeat
Random
Intro
Character Support
Press
nn
nn
ll
WRVNLSWRWKHEHJLQQLQJRIQH[WVRQJ3UHVV
WRUHWXUQWRWKHEHJLQQLQJRIFXUUHQWVRQJ3UHVVLQJ
DJDLQVNLSVWRWKHEHJLQQLQJRISUHYLRXVVRQJ
3UHVVDQGKROG
VRQJ
Press
Press
ll or nn WRIDVWIRUZDUGRUUHYHUVHD
ll// IIWRWHPSRUDULO\VWRSSOD\EDFN
IIDJDLQWRUHVXPHSOD\EDFN
Press RPTWRHQWHUWKH5HSHDWPHQXWKHQWXUQWKHvolume knobWRVHOHFWRQHRIWKHIROORZLQJRSWLRQV
Ę2II5HSHDWVDOOWUDFNV
Ę&XUUHQW6RQJ5HSHDWVVHOHFWHGWUDFN
Press RDMWRHQWHUWKH5DQGRPPHQXWKHQWXUQWKHvolume knobWRVHOHFWRQHRIWKHIROORZLQJRSWLRQV
Ę2II&DQFHOVWKH5'0IXQFWLRQ
Ę$OO6RQJV3OD\VDOOWUDFNVLQUDQGRPRUGHU
Ę&XUUHQW$OEXP3OD\VDOOWUDFNVLQWKHVHOHFWHGDOEXPLQ
random order.
Press INTWRHQWHUWKH,QWURPHQXWKHQWXUQWKHvolume
knobWRVHOHFWRQHRIWKHIROORZLQJRSWLRQV
Ę2II&DQFHOVWKH,17IXQFWLRQ
Ę2Q3OD\VILUVWVHFRQGVRIHDFKWUDFN
2QO\DOSKDQXPHULFFKDUDFWHUVFDQEHGLVSOD\HG$6&,,
W\SH126833257ZLOOEHGLVSOD\HGLIWKHILOHFRQWDLQV
FKDUDFWHUVWKDWFDQQRWEHGLVSOD\HG12),/(ZLOOEH
GLVSOD\HGLIWKHUHDUHQRVRQJVLQWKHVHOHFWHGSOD\OLVW
0D[LPXPFKDUDFWHUGLVSOD\LQIRUPDWLRQ
Ę6RQJWLWOHĎFKDUDFWHUPD[LPXP
Ę$UWLVWQDPHĎFKDUDFWHUPD[LPXP
Ę$OEXPQDPHĎFKDUDFWHUPD[LPXP
6RQJ7LWOH$UWLVW1DPHDQG$OEXPQDPHZLOORQO\EH
GLVSOD\HGLILQFOXGHGZLWKWKHILOH
17
AXD330
Pandora Operation
Requirements
USB Connection
Changing Stations
Control for Pandora requires:
ĘAn iPhone device with a reliable data connection, or an
iPod touch that is connected to wireless internet.
ĘThe Pandora App installed on the iPhone/iPod device.
ĘAn active account with Pandora. Sign up at www.pandora.
com.
ĘThe USB sync cable that came with your iPod/iPhone
device.
Connect an iPod touch or iPhone device (required, sold separately) to the USB port, using the USB sync cable included
with your iPhone device.
1. Press SELECT to display the Stations Menu.
the volume knob to choose to sort channels by
date or alphabetically.
3. Press SELECT to confirm, then turn the volume knob
to cycle through the list of stations.
4. Press SELECT when the desired station is highlighted,
and playback will begin.
Note: Stations must be created on your account prior to
connecting your iPod/iPhone device to the head unit.
Shuffle
Skipping Tracks
Play/Pause
Press SELECT to display the Stations Menu. Choose
“Shuffle” from the stations menu to shuffle songs from all of
your stations.
ll to skip the current song.
Press l/ II to temporarily stop playback.
Press l/ II again to resume playback.
Press
Thumbs Up
Press to tell Pandora you like the current track. Pandora
will play more tracks with similar qualities.
Thumbs Down
Press to tell Pandora you do not like the current track.
Pandora will not play the current track again, and will avoid
playing tracks with similar qualities.
Device Compatibility
Troubleshooting
Refer to www.pandora.com/everywhere/mobile for devices
compatible with the Pandora mobile application.
Note: Pandora is an internet service, carrier and data
charges may apply.
18
AXD330
Notes
19
AXD330
Limited One-Year Warranty
7KLVZDUUDQW\JLYHV\RXVSHFLILFOHJDOULJKWV
<RXPD\DOVRKDYHRWKHUULJKWVZKLFKYDU\
from state to state.
'XDO(OHFWURQLFV&RUSZDUUDQWVWKLV
SURGXFWWRWKHRULJLQDOSXUFKDVHUWREHIUHH
IURPGHIHFWVLQPDWHULDODQGZRUNPDQVKLS
IRUDSHULRGRIRQH\HDUIURPWKHGDWHRI
WKHRULJLQDOSXUFKDVH
What to do?
%HIRUH\RXFDOOIRUVHUYLFHFKHFNWKH
WURXEOHVKRRWLQJJXLGHLQ\RXURZQHUđV
PDQXDO$VOLJKWDGMXVWPHQWRIDQ\
FXVWRPFRQWUROVPD\VDYH\RXDVHUYLFH
call.
,I\RXUHTXLUHVHUYLFHGXULQJWKH
ZDUUDQW\SHULRG\RXPXVWFDUHIXOO\
SDFNWKHSURGXFWSUHIHUDEO\LQWKH
'XDO(OHFWURQLFV&RUSDJUHHVDWRXU
RULJLQDOSDFNDJHDQGVKLSLWE\SUHSDLG
RSWLRQGXULQJWKHZDUUDQW\SHULRGWRUHSDLU
WUDQVSRUWDWLRQZLWKDFRS\RIWKHRULJLQDO
DQ\GHIHFWLQPDWHULDORUZRUNPDQVKLS
UHFHLSWIURPWKHUHWDLOHUWRDQ
RUWRIXUQLVKDQHTXDOQHZUHQHZHG
DXWKRUL]HGVHUYLFHFHQWHU
RUFRPSDUDEOHSURGXFWZKLFKHYHULV
GHHPHGQHFHVVDU\LQH[FKDQJHZLWKRXW
3OHDVHGHVFULEH\RXUSUREOHPLQ
FKDUJHVVXEMHFWWRYHULILFDWLRQRIWKH
ZULWLQJDQGLQFOXGH\RXUQDPHDUHWXUQ
GHIHFWRUPDOIXQFWLRQDQGSURRIRIWKHGDWH
836VKLSSLQJDGGUHVV32%R[QRW
RISXUFKDVH6XEVHTXHQWUHSODFHPHQW
DFFHSWDEOHDQGDGD\WLPHSKRQH
SURGXFWVDUHZDUUDQWHGIRUWKHEDODQFHRI
QXPEHUZLWK\RXUVKLSPHQW
WKHRULJLQDOZDUUDQW\SHULRG
)RUPRUHLQIRUPDWLRQDQGIRUWKH
Who is covered?7KLVZDUUDQW\LV
ORFDWLRQRIWKHQHDUHVWDXWKRUL]HG
H[WHQGHGWRWKHRULJLQDOUHWDLOSXUFKDVHU
VHUYLFHFHQWHUSOHDVHFRQWDFWXVE\RQH
IRUSURGXFWVSXUFKDVHGIURPDQDXWKRUL]HG
RIWKHIROORZLQJPHWKRGV
'XDOGHDOHUDQGXVHGLQWKH86$
Ę&DOOXVWROOIUHHDW
What is covered?7KLVZDUUDQW\FRYHUV
Ę(PDLOXVDWFV#GXDODYFRP
DOOGHIHFWVLQPDWHULDODQGZRUNPDQVKLSLQ
WKLVSURGXFW7KHIROORZLQJDUHQRWFRYHUHG ([FOXVLRQRI&HUWDLQ'DPDJHV7KLV
VRIWZDUHLQVWDOODWLRQUHPRYDOFRVWV
ZDUUDQW\LVH[FOXVLYHDQGLQOLHXRIDQ\
GDPDJHUHVXOWLQJIURPDFFLGHQWPLVXVH
DQGDOORWKHUZDUUDQWLHVH[SUHVVHGRU
DEXVHQHJOHFWSURGXFWPRGLILFDWLRQ
LPSOLHGLQFOXGLQJZLWKRXWOLPLWDWLRQWKH
LPSURSHULQVWDOODWLRQLQFRUUHFWOLQHYROWDJH LPSOLHGZDUUDQWLHVRIPHUFKDQWDELOLW\DQG
XQDXWKRUL]HGUHSDLURUIDLOXUHWRIROORZ
ILWQHVVIRUDSDUWLFXODUSXUSRVHDQGDQ\
LQVWUXFWLRQVVXSSOLHGZLWKWKHSURGXFWRU
REOLJDWLRQOLDELOLW\ULJKWFODLPRUUHPHG\
GDPDJHRFFXUULQJGXULQJUHWXUQVKLSPHQW
LQFRQWUDFWRUWRUWZKHWKHURUQRWDULVLQJ
RIWKHSURGXFW6SHFLILFOLFHQVHFRQGLWLRQV
IURPWKHFRPSDQ\đVQHJOLJHQFHDFWXDORU
DQGFRS\ULJKWQRWLFHVIRUWKHVRIWZDUHFDQ LPSXWHG1RSHUVRQRUUHSUHVHQWDWLYHLV
EHIRXQGYLDZZZGXDODYFRP
DXWKRUL]HGWRDVVXPHIRUWKHFRPSDQ\
DQ\RWKHUOLDELOLW\LQFRQQHFWLRQZLWKWKH
VDOHRIWKLVSURGXFW,QQRHYHQWVKDOOWKH
FRPSDQ\EHOLDEOHIRULQGLUHFWLQFLGHQWDORU
FRQVHTXHQWLDOGDPDJHV
AXD330
Troubleshooting
Problem
Unit will not turn on
(no power)
Unit has power
(but no sound)
Unit blows fuses
Excessive skipping
NO FILE appears
on display
Unit will not accept
a disc
<HOORZZLUHQRWFRQQHFWHGRULQFRUUHFW
YROWDJH5HGZLUHQRWFRQQHFWHGRU
LQFRUUHFWYROWDJH
%ODFNZLUHQRWFRQQHFWHG
)XVHEORZQ
6SHDNHUZLUHVQRWFRQQHFWHG
2QHRUPRUHVSHDNHUZLUHVWRXFKLQJ
HDFKRWKHURUWRXFKLQJFKDVVLVJURXQG
&KHFNFRQQHFWLRQVIRUSURSHU
YROWDJH9'&
&KHFNFRQQHFWLRQWRJURXQG
5HSODFHIXVH
&KHFNFRQQHFWLRQVDWVSHDNHUV
,QVXODWHDOOEDUHVSHDNHUZLUHV
IURPHDFKRWKHUDQGFKDVVLV
JURXQG
<HOORZRUUHGZLUHWRXFKLQJFKDVVLV
JURXQG
6SHDNHUZLUHVWRXFKLQJFKDVVLVJURXQG
,QFRUUHFWIXVHUDWLQJ
8QLWLVQRWPRXQWHGFRUUHFWO\RU
EDFNVWUDSLVQRWVHFXUH
3K\VLFDOGHIHFWLQPHGLD&'&'5RU
&'5:
&KHFNIRUSLQFKHGZLUH
8VHIXVHZLWKFRUUHFWUDWLQJ
&KHFNPRXQWLQJVOHHYHDQG
EDFNVWUDSVXSSRUW
Disc read error
3UHVVHMHFWRURESET
)RFXVHUURURUGLVFLVXSVLGHGRZQ
3UHVVHMHFWRURESET
:0$ILOHLVSURWHFWHGE\'50'LJLWDO
5LJKWV0DQDJHPHQW
:ULWHGLVFXVLQJ:0$ILOHV
WKDWDUHQRWSURWHFWHG
1RSOD\DEOH03:0$ILOHVIRXQGRQ
WKHGHYLFH
&KHFNWKHGHYLFHIRUYDOLG
03:0$ILOHV
Communication error
5HPRYHDQGUHFRQQHFWWKH
device
&'PHFKDQLVPSRVLWLRQRXWRI
DOLJQPHQW
Press EJECT to reset CD
PHFKDQLVPSRVLWLRQ
&'WUDQVLWVFUHZVVWLOOLQSODFH
NO SUPPORT
appears on display
$FWLRQ
Cause
$QLQYDOLG,'WDJYHUVLRQLVSUHVHQW
21
&KHFNIRUSLQFKHGZLUH
&KHFNPHGLDIRUVFUDWFKHV
5HPRYHWUDQVLWVFUHZV
ORFDWHGRQWRSRIWKHXQLW
9HUVLRQWR,'WDJVDUH
VXSSRUWHG
AXD330
Specifications
CD Player
)UHTXHQF\UHVSRQVH 20Hz-20kHz
&KDQQHOVHSDUDWLRQ#N+] >65dB
'$FRQYHUWHU 1 Bit
FM Tuner
7XQLQJUDQJH 87.5MHz-107.9MHz
8VDEOHVHQVLWLYLW\ 8.5dBf
G%TXLHWLQJVHQVLWLYLW\ 10dBf
6WHUHRVHSDUDWLRQ#N+] >30dB
)UHTXHQF\UHVSRQVH 30Hz-13kHz
AM Tuner
7XQLQJUDQJH530kHz-1710kHz
8VDEOHVHQVLWLYLW\ 22uV
)UHTXHQF\UHVSRQVH 30Hz-2.2kHz
General
6SHDNHURXWSXWLPSHGDQFH 4-8 ohms
/LQHRXWSXWYROWDJH4 Volts RMS
'LPHQVLRQV 7" x 7" x 2" (178 x 178 x 50 mm)
'HVLJQDQGVSHFLILFDWLRQVVXEMHFWWRFKDQJHZLWKRXWQRWLFH
&($3RZHU6WDQGDUG6SHFLILFDWLRQV
UHIHUHQFH9'&9+]N+]
3RZHU2XWSXW:DWWV506[FKDQQHOVDWRKPVDQG<7+'1
6LJQDOWR1RLVH5DWLRG%$UHIHUHQFHZDWWLQWRRKPV
22
AXD330
FCC Compliance
7KLVGHYLFHFRPSOLHVZLWK3DUWRIWKH)&&5XOHV2SHUDWLRQLVVXEMHFWWRWKHIROORZLQJ
WZRFRQGLWLRQV
WKLVGHYLFHPD\QRWFDXVHKDUPIXOLQWHUIHUHQFHDQG
WKLVGHYLFHPXVWDFFHSWDQ\LQWHUIHUHQFHUHFHLYHGLQFOXGLQJLQWHUIHUHQFHWKDWPD\
FDXVHXQGHVLUHGRSHUDWLRQ
Warning&KDQJHVRUPRGLILFDWLRQVWRWKLVXQLWQRWH[SUHVVO\DSSURYHGE\WKHSDUW\
UHVSRQVLEOHIRUFRPSOLDQFHFRXOGYRLGWKHXVHUđVDXWKRULW\WRRSHUDWHWKHHTXLSPHQW
Note:7KLVHTXLSPHQWKDVEHHQWHVWHGDQGIRXQGWRFRPSO\ZLWKWKHOLPLWVIRUD&ODVV%
GLJLWDOGHYLFHSXUVXDQWWR3DUWRIWKH)&&5XOHV7KHVHOLPLWVDUHGHVLJQHGWRSURYLGH
UHDVRQDEOHSURWHFWLRQDJDLQVWKDUPIXOLQWHUIHUHQFHLQDUHVLGHQWLDOLQVWDOODWLRQ7KLV
HTXLSPHQWJHQHUDWHVXVHVDQGFDQUDGLDWHUDGLRIUHTXHQF\HQHUJ\DQGLIQRWLQVWDOOHG
DQGXVHGLQDFFRUGDQFHZLWKWKHLQVWUXFWLRQVPD\FDXVHKDUPIXOLQWHUIHUHQFHWRUDGLR
FRPPXQLFDWLRQV+RZHYHUWKHUHLVQRJXDUDQWHHWKDWLQWHUIHUHQFHZLOOQRWRFFXULQD
SDUWLFXODULQVWDOODWLRQ,IWKLVHTXLSPHQWGRHVFDXVHKDUPIXOLQWHUIHUHQFHWRUDGLRRU
WHOHYLVLRQUHFHSWLRQZKLFKFDQEHGHWHUPLQHGE\WXUQLQJWKHHTXLSPHQWRIIDQGRQWKH
XVHULVHQFRXUDJHGWRWU\WRFRUUHFWWKHLQWHUIHUHQFHE\RQHRUPRUHRIWKHIROORZLQJ
PHDVXUHV
Ę
5HRULHQWRUUHORFDWHWKHUHFHLYLQJDQWHQQD
Ę
,QFUHDVHWKHVHSDUDWLRQEHWZHHQWKHHTXLSPHQWDQGUHFHLYHU
Ę
&RQQHFWWKHHTXLSPHQWLQWRDQRXWOHWRQDFLUFXLWGLIIHUHQWIURPWKDWWRZKLFKWKH
receiver is connected.
Ę
&RQVXOWWKHGHDOHURUDQH[SHULHQFHGUDGLR79WHFKQLFLDQIRUKHOS
23
'XDO(OHFWURQLFV&RUS
7ROO)UHH
0RQGD\)ULGD\$030(67
ZZZD[[HUDDXGLRFRP
j'XDO(OHFWURQLFV&RUS$OOULJKWVUHVHUYHG
L3KRQHL3RGL3RGFODVVLFL3RGQDQRDQGL3RGWRXFKDUHWUDGHPDUNVRI$SSOH,QFUHJLVWHUHGLQWKH86DQGRWKHUFRXQWULHV
ē0DGHIRUL3RGĔDQGē0DGHIRUL3KRQHĔPHDQWKDWDQHOHFWURQLFDFFHVVRU\KDVEHHQGHVLJQHGWRFRQQHFWVSHFLILFDOO\WRL3RGRUL3KRQH
UHVSHFWLYHO\DQGKDVEHHQFHUWLILHGE\WKHGHYHORSHUWRPHHW$SSOHSHUIRUPDQFHVWDQGDUGV$SSOHLVQRWUHVSRQVLEOHIRUWKHRSHUDWLRQ
RIWKLVGHYLFHRULWVFRPSOLDQFHZLWKVDIHW\DQGUHJXODWRU\VWDQGDUGV3OHDVHQRWHWKDWWKHXVHRIWKLVDFFHVVRU\ZLWKL3RGRUL3KRQH
PD\DIIHFWZLUHOHVVSHUIRUPDQFH
3DQGRUDWKH3DQGRUDORJRDQGWKH3DQGRUDWUDGHGUHVVDUHWUDGHPDUNVRI3DQGRUD0HGLD,QFXVHGZLWKSHUPLVVLRQ
2WKHUWUDGHPDUNVDQGWUDGHQDPHVDUHWKRVHRIWKHLUUHVSHFWLYHRZQHUV
16$9
Installation
Installation
Before You Start
• Consult a qualified technician for instructions. Axxera always recommends
professional installation.
• Disconnect negative battery terminal.
• Remove trim ring from unit (if installed).
• Remove 2 transit screws located on top of the unit (if applicable).
• Insert the removal keys, and remove the mounting sleeve from the head unit.
Car Audio
Quick Start Guide
This Quick Start Guide provides basic instructions
for using your Axxera Receiver.
Note: Most vehicles require an installation kit, wiring harness and/or antenna
adapter (all sold separately) to properly install the head unit in the vehicle.
Installation Process
1. Carefully remove the existing head unit.
2. Connect wiring harness. Consult a qualified technician if you are unsure.
3. Mount the head unit using the mounting sleeve or ISO brackets (depending on
your vehicle’s dashboard).
4. Connect wiring harness and antenna. Test the head unit for correct operation.
5. Slide into mounting sleeve to secure, or mount the ISO brackets to the vehicle.
6. Snap trim ring into place.
Dashboard or Installation Kit
Mounting the Head Unit:
Typical DIN mounting
Step 1:
Insert the mounting sleeve into the
installation kit or dashboard.
Mounting Sleeve
Dashboard or Installation Kit
Step 2:
Bend multiple mounting tabs around
the mounting sleeve until the
mounting sleeve is secure.
Mounting Sleeve
Mounting Tabs
Wiring Connections
Dashboard or Installation Kit
The chart below defines the connection for each wire in the wiring harness.
be
fore you
pr
int
thin
k
To download the complete Owner’s Manual please
visit www.axxeraaudio.com/support/manuals.php
and type in the product’s model number
or call customer service at 1-866-382-5476.
Color
Connection
Red
Yellow
Black
Blue
Grey
Grey/Black
White
White/Black
Purple
Purple/Black
Green
Green/Black
12V Ignition / Accessory
12V Battery / Memory
Ground
Power Antenna / Amp Turn-on
Right Front (+)
Right Front (-)
Left Front (+)
Left Front (-)
Right Rear (+)
Right Rear (-)
Left Rear (+)
Left Rear (-)
General Operation
Power On/Off
Press the button to turn the unit on. Press
again to turn unit off.
Faceplate
Removal
Press the release button and pull away from the
left side to remove. To re-install, insert right side of
faceplate first then push left side to secure.
Changing
Modes
Press SOURCE to cycle through available
operating modes.
Volume
Mute
Auxiliary Inputs
Reset
Setting the
Clock
Display
Menu
Insert a 3.5mm cable in the units front AUX port,
or RCA cables into the rear AUX-IN connectors.
Press the RESET button to reset the unit back to
the factory settings if abnormal operation occurs.
The reset button is located behind the front panel.
With the unit on, press MENU until the General
menu appears. Highlight the clock and press
SELECT. Use the volume knob and SELECT
buttons to adjust the time.
Press DISP to toggle display between various
displayed information.
Press MENU to access the audio and setup menu
options.
Fuse:
When replacing the fuse, make
sure new fuse is the correct type
and amperage. Using an incorrect
fuse could damage the radio.
Manual Tuning
Band
*Storing
Presets
*Recalling
Presets
nn
ll
nn
ll
Mounting Sleeve
Head Unit
Mounting the Head Unit:
ISO mounting
Using the existing brackets or the
brackets supplied with the installation
kit, mount the brackets to the sides of
the head unit with the screws supplied
with the head unit.
AM/FM Tuner Operation
Seek Tuning
Adjust volume using volume knob.
Press
to silence the audio. Press
again to
resume listening at the previously selected volume.
Tip:
When a suitable ground wire is
not present in the vehicle wiring
harness, connect the black ground
wire to the vehicle chassis.
Step 3:
Connect all wiring harnesses and
slide the head unit into the mounting
sleeve until it clicks into place.
Existing
Brackets
Decorative
Bezel
New
Radio
CD Operation*
Press TUNE
or TUNE
for more than
one second to seek to the next strong station.
or TUNE
momentarily to
Press TUNE
move radio frequency up or down one step at a
time. Press and hold to advance quickly.
Press BAND to select between FM1, FM2, FM3,
AM1 and AM2 bands. Up to six presets can be
programmed for each band, enabling up to 18
FM stations and 12 AM stations to be stored in
memory.
Select the desired band and station. Press the
(F)unction button, turn the volume knob until the
desired preset number is highlighted, then press
SELECT to store the preset.
Press the P+ or P- buttons to cycle through the
1-6 presets in the current band.
*Storing
Presets
(AXD330 only)
Select the desired band and station. Press and
hold the desired 1-6 preset button for more than
two seconds. When stored, the preset number will
appear in the display.
*Recalling
Presets
(AXD330 only)
Stored stations can be recalled instantly by
pressing the corresponding 1-6 preset button.
Insert CD
Eject CD
Track Select
Press the OPEN button to open the front panel.
With the label facing up, insert a standard size CD
into the CD slot. The CD will automatically begin
playback.
Press EJECT to eject the CD. The unit will change
to previous mode of operation.
ll
nn
Fast Forward/
Reverse
Pause
Intro
nn
to skip to the beginning of the
Press TUNE
next track. Press TUNE
to return to the
beginning of the current track. Pressing TUNE
again skips to the beginning of the previous
track.
ll
nn to fast
temporarily stop CD playback.
ll// IIII toagain
to resume playback.
Press and hold TUNE
or TUNE
forward or reverse a track.
Press
Press
Press (F)unction or INT* to play the first 10
seconds of each track.
Repeat
Press (F)unction or RPT* to continuously repeat
the selected track.
Random
Press (F)unction or RDM* to play all the tracks
in random order.
CD-R/CD-RW
Compatibility
Some CD-Rs and CD-RWs may be incompatible
with this unit, depending on media type and
recording method. Refer to the online owner’s
manual for details.
* Not an available feature on all head units.
* Not an available feature on all head units.
* Not an available feature on all head units.
To download the complete Owner’s Manual for your radio,
please visit www.axxeraaudio.com/support/manuals.php.
To download the complete Owner’s Manual for your radio,
please visit www.axxeraaudio.com/support/manuals.php.
To download the complete Owner’s Manual for your radio,
please visit www.axxeraaudio.com/support/manuals.php.
MP3 / WMA Operation
Playing MP3/
WMA Files
Track Select
Fast Forward and
Reverse
Pause
Folder Access
To play MP3/WMA files, insert a data CD* or USB device
containing MP3/WMA files.
ll
nn nn
to skip to the beginning of the next song.
Press TUNE
Press TUNE
to return to the beginning of the current
again skips to the beginning of
song. Pressing TUNE
the previous song.
Press and hold TUNE
or reverse a track.
Press
Press
ll or TUNE nn to fast forward
ll
/ II to temporarily stop playback.
/ II again to resume playback.
Press P+ or * to select the next folder. Press P- or *
to select the previous folder. Folder access is only available
on discs or devices with more than one folder.
Operation of iPod/iPhone
To play music from an iPod/iPhone device, connect the
USB cable (included with your iPod/iPhone device) to the
unit’s USB port. Playback will begin automatically.
Device
Compatibility
Refer to the online Owner’s Manual for a complete list of
compatible iPod/iPhone devices.
Song Select
Fast Forward
and Reverse
Pause
Repeat
Repeat
Press (F)unction or RPT* to enter the Repeat menu, then
turn the volume knob to select one of the following options:
• Current Song - Continuously repeats selected track.
• Current Folder - Continuously repeats all files in folder.
Random
Press (F)unction or RDM* to enter the Random menu,
then turn the volume knob to select one of the following
options:
• Off - Cancels RDM function.
• All Songs - Plays all tracks in random order.
• Current Folder - Plays all tracks in folder in random order.
Intro
Press (F)unction or INT* to enter the Intro menu, then
turn the volume knob to select one of the following options:
• Off - Cancels the INT function.
• All Songs - Plays first 10 seconds of each track.
• Current Folder - Plays first 10 seconds of each track in
the selected folder.
Operation of iPod/iPhone
Connect an iPod/
iPhone Device
(sold separately)
Random
Intro
ll
Music Search
Select a Category: Turn the volume knob to
select between artists, albums, songs, playlists,
podcasts and audiobooks. Press SELECT to select
the desired search category and/or subcategory.
nnnnto return
again
Press
to skip to the next song. Press
to the beginning of the current song. Pressing
skips to the beginning of the previous song.
Press and hold
a song.
Press
Press
ll nn
or
Step Backwards: Press BACK to return to the
previous menu or to exit the search menu when
the main menu is shown.
to fast forward or reverse
/ II to temporarily stop playback.
l
l/ II again to resume playback.
Press (F)unction or RPT* to enter the Repeat menu,
then turn the volume knob to select one of the following
options:
• Off - Repeats all tracks.
• Current Song - Repeats selected track.
Press (F)unction or RDM* to enter the Random menu,
then turn the volume knob to select one of the following
options:
• Off - Cancels the RDM function.
• All Songs - Plays all tracks in random order.
• Current Album - Plays all tracks in the selected album
in random order.
Press (F)unction or INT* to enter the Intro menu, then
turn the volume knob to select one of the following options:
• Off - Cancels the INT function.
• On - Plays first 10 seconds of each track.
Press SELECT, and the main search menu will
appear.
Playing a Song: Navigate to the desired song/
podcast/audiobook, and press SELECT to begin
playback.
Manual Control
for iPod
When “MANUAL” control is selected from the
Setup Menu, the iPod or iPhone device can be
controlled directly from the device’s interface. All
functions except for volume can be used from the
iPod or iPhone device.
Note: The firmware of the iPod/iPhone must be
updated to the latest version to be compatible with
manual control mode.
Note: Not all iPod/iPhone devices are compatible
with manual control mode.
* Not an available feature on all head units.
* Not an available feature on all head units.
* Not an available feature on all head units.
To download the complete Owner’s Manual for your radio,
please visit www.axxeraaudio.com/support/manuals.php.
To download the complete Owner’s Manual for your radio,
please visit www.axxeraaudio.com/support/manuals.php.
To download the complete Owner’s Manual for your radio,
please visit www.axxeraaudio.com/support/manuals.php.
Pandora® Operation
Requirements
USB Connection
Changing Stations
Control for Pandora requires:
• An iPhone device with a reliable data connection, or an iPod touch
that is connected to wireless internet.
• The Pandora App installed on the iPhone/iPod device.
• An active account with Pandora. Sign up at www.pandora.com.
• The USB sync cable that came with your iPod/iPhone device.
Connect an iPod touch or iPhone device (required, sold separtely) to
the USB port, using the USB sync cable included with your iPhone
device.
Press SELECT to display the stations menu. Turn the volume knob
to cycle through the list of stations, then press SELECT when the
desired station is highlighted.
Note: Stations must be created on your account prior to connecting
your iPod/iPhone device to the head unit.
Shuffle
Press SELECT to display the stations menu. Choose “Shuffle”
from the stations menu to shuffle songs from all of your stations.
ll to skip the current song.
/ II to temporarily stop playback.
l
l/ II again to resume playback.
Limited One-Year Warranty
This device complies with Part 15 of the FCC Rules. Operation is subject to the
following two conditions:
(1) this device may not cause harmful interference, and
(2) this device must accept any interference received, including interference that
may cause undesired operation.
Who is covered? This warranty is extended to the original retail purchaser for
products purchased and used in the U.S.A.
Note: This equipment has been tested and found to comply with the limits for
a Class B digital device, pursuant to Part 15 of the FCC Rules. These limits
are designed to provide reasonable protection against harmful interference
in a residential installation. This equipment generates, uses and can radiate
radio frequency energy and, if not installed and used in accordance with the
instructions, may cause harmful interference to radio communications. However,
there is no guarantee that interference will not occur in a particular installation. If
this equipment does cause harmful interference to radio or television reception,
which can be determined by turning the equipment off and on, the user is
encouraged to try to correct the interference by one or more of the following
measures:
• Reorient or relocate the receiving antenna.
• Increase the separation between the equipment and receiver.
• Connect the equipment into an outlet on a circuit different from that to
which the receiver is connected.
• Consult the dealer or an experienced radio/TV technician for help.
What is covered? This warranty covers all defects in material and workmanship
in this product. The following are not covered: installation/removal costs, damage
resulting from accident, misuse, abuse, neglect, product modification, improper
installation, incorrect line voltage, unauthorized repair or failure to follow instructions
supplied with the product, or damage occurring during return shipment of the
product.
Skipping Tracks
Press
Play/Pause
Press
Press
Thumbs Up
Press
to tell Pandora you like the current track. Pandora will play
more tracks with similar qualities.
1. Before you call for service, check the troubleshooting guide in your owner’s manual.
A slight adjustment of any custom controls may save you a service call.
Thumbs Down
to tell Pandora you do not like the current track. Pandora
Press
will not play the current track again, and will avoid playing tracks with
similar qualities.
2. If you require service during the warranty period, you must carefully pack the
product (preferably in the original package) and ship it by prepaid transportation
with a copy of the original receipt from the retailer to an authorized service center.
Refer to the Owner’s Manual for a complete list of devices
compatible with this head unit.
3. Please describe your problem in writing and include your name, a return UPS
shipping address (P.O. Box not acceptable), and a daytime phone number with
your shipment.
Device Compatibility
Refer to www.pandora.com/everywhere/mobile for devices
compatible with the Pandora mobile application.
Troubleshooting
Note: Pandora is an internet service, carrier and data charges may
apply.
* Not an available feature on all head units.
To download the complete Owner’s Manual for your radio,
please visit www.axxeraaudio.com/support/manuals.php.
FCC Compliance
This warranty gives you specific legal rights. You may also have other rights which
vary from state to state. Dual Electronics Corp. warrants this product to the original
purchaser to be free from defects in material and workmanship for a period of one
year from the date of the original purchase. Dual Electronics Corp. agrees, at our
option, during the warranty period, to repair any defect in material or workmanship
or to furnish an equal new, renewed or comparable product (whichever is deemed
necessary) in exchange without charges, subject to verification of the defect or
malfunction and proof of the date of purchase. Subsequent replacement products are
warranted for the balance of the original warranty period.
What to do?
Warning: Changes or modifications to this unit not expressly approved by the
party responsible for compliance could void the user’s authority to operate the
equipment.
4. For more information and for the location of the nearest authorized service center
please contact us toll-free at 1-866-382-5476 or by email at [email protected].
Exclusion of Certain Damages: This warranty is exclusive and in lieu of any
and all other warranties, expressed or implied, including without limitation the
implied warranties of merchantability and fitness for a particular purpose and any
obligation, liability, right, claim or remedy in contract or tort, whether or not arising
from the company’s negligence, actual or imputed. No person or representative is
authorized to assume for the company any other liability in connection with the sale
of this product. In no event shall the company be liable for indirect, incidental or
consequential damages.
Dual Electronics Corp.
Toll Free: 1-866-382-5476
www.axxeraaudio.com
©2013 Dual Electronics Corp. All rights reserved.
NSA0113-V01