1
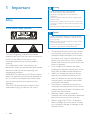
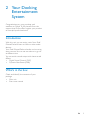
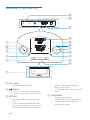
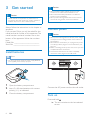
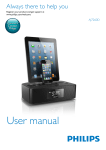
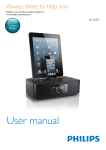
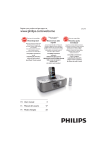
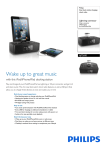
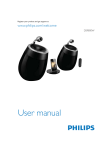
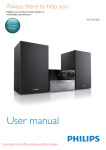
Always there to help you Register your product and get support at www.philips.com/welcome Question? Contact Philips User manual AJ7260D Contents 1 Important Safety Notice 2 2 3 2 Your Docking Entertainment System 5 Introduction What's in the box Overview of the main unit 3 Get started Install batteries Connect power Turn on Set time and date 4 Play Play from iPod/iPhone/iPad Play from an external device 5 Listen to radio Tune to a radio station Program radio stations 6 Other features Set the alarm timer Set the sleep timer Adjust display brightness 7 Adjust sound Adjust volume level Select a sound effect 5 5 6 8 8 8 8 9 10 10 11 12 12 12 13 13 14 14 15 15 15 8 Product information 6SHFLÀFDWLRQV 16 9 Troubleshooting 17 EN 1 1 Important Warning Never remove the casing of this apparatus. Never lubricate any part of this apparatus. Never place this apparatus on other electrical HTXLSPHQW Safety Know these safety symbols Keep this apparatus away from direct sunlight, naked ÁDPHVRUKHDW Ensure that you always have easy access to the power cord, plug or adaptor to disconnect the apparatus from the power. Use only power supplies listed in the user manual. Caution Danger of explosion if battery is incorrectly replaced. Remove battery if it is exhausted or will not be used for a long time. Batteries contain chemical substances, so they should be disposed of properly. Perchlorate Material-special handling may apply. See www.dtsc.ca.gov/hazardouswaste/perchlorate. This 'bolt of lightning' indicates uninsulated material within your unit may cause an electrical shock. For the safety of everyone in your household, please do not remove product covering. The 'exclamation point' calls attention to features for which you should read the enclosed literature closely to prevent operating and maintenance problems. :$51,1*7RUHGXFHWKHULVNRIÀUHRUHOHFWULF shock, this apparatus should not be exposed to UDLQRUPRLVWXUHDQGREMHFWVÀOOHGZLWKOLTXLGV such as vases, should not be placed on this apparatus. CAUTION: To prevent electric shock, match wide blade of plug to wide slot, fully insert. 2 EN The product/remote control may contain a coin/button type battery, which can be swallowed. Keep the battery out of reach of children at all times! If swallowed, the battery can cause serious injury or death. Severe internal burns can occur within two hours of ingestion. If you suspect that a battery has been swallowed or placed inside any part of the body, seek immediate medical attention. When you change the batteries, always keep all new and used batteries out of reach of children. Ensure that the battery compartment is completely secure after you replace the battery. If the battery compartment cannot be completely secured, discontinue use of the product. Keep out of reach of children and contact the manufacturer. Batteries (battery pack or batteries installed) shall not be exposed to excessive KHDWVXFKDVVXQVKLQHÀUHRUWKHOLNH Battery usage CAUTION – To prevent battery leakage which may result in bodily injury, property damage, or damage to the remote control: Install all batteries correctly, + and - as marked on the remote control. Do not mix batteries (old and new or carbon and alkaline, etc.). Remove batteries when the remote control is not used for a long time. Make sure that there is enough free space around the product for ventilation. The system shall not be exposed to dripping or splashing. Do not place any sources of danger on WKHV\VWHPHJOLTXLGÀOOHGREMHFWVOLJKWHG candles). Where the plug of the Direct Plug-in Adapter is used as the disconnect device, the disconnect device shall remain readily operable. Important notes for users in the U.K. This information applies only to products with a UK mains plug. 7KLVSURGXFWLVÀWWHGZLWKDQDSSURYHGPROGHG plug. If you replace the fuse, use one with: the ratings shown on the plug, a BS 1362 approval, and the ASTA approval mark. Contact your dealer if you are not sure about what type of fuse to use. Caution: To conform with the EMC directive (2004/108/EC), do not detach the plug from the power cord. Notice $Q\FKDQJHVRUPRGLÀFDWLRQVPDGHWRWKLV device that are not expressly approved by WOOX Innovations may void the user’s DXWKRULW\WRRSHUDWHWKHHTXLSPHQW This product complies with the radio LQWHUIHUHQFHUHTXLUHPHQWVRIWKH(XURSHDQ Community. Your product is designed and manufactured ZLWKKLJKTXDOLW\PDWHULDOVDQGFRPSRQHQWV which can be recycled and reused. When this crossed-out wheeled bin symbol is attached to a product it means that the product is covered by the European Directive 2002/96/ EC. Please inform yourself about the local separate collection system for electrical and electronic products. Please act according to your local rules and do not dispose of your old products with your normal household waste. Correct disposal of your old product helps to prevent potential QHJDWLYHFRQVHTXHQFHVIRUWKHHQYLURQPHQWDQG human health. Your product contains batteries covered by the European Directive 2006/66/EC, which cannot be disposed with normal household waste.Please inform yourself about the local rules on separate collection of batteries because correct disposal helps to prevent QHJDWLYHFRQVHTXHQFHVIRUWKHHQYLURQPHQWDO and human health. Environmental information All unnecessary packaging has been omitted. We have tried to make the packaging easy to separate into three materials: cardboard (box), polystyrene foam (buffer) and polyethylene (bags, protective foam sheet.) Your system consists of materials which can be recycled and reused if disassembled by a specialized company. Please observe the local regulations regarding the disposal of packaging materials, exhausted batteries and old HTXLSPHQW EN 3 “Made for iPod,” “Made for iPhone,” and “Made for iPad” mean that an electronic accessory KDVEHHQGHVLJQHGWRFRQQHFWVSHFLÀFDOO\WR iPod, iPhone, or iPad, respectively, and has EHHQFHUWLÀHGE\WKHGHYHORSHUWRPHHW Apple performance standards. Apple is not responsible for the operation of this device or its compliance with safety and regulatory standards. Please note that the use of this accessory with iPod, iPhone, or iPad may affect wireless performance. iPod and iPhone are trademarks of Apple Inc., registered in the U.S. and other countries. iPad is a trademark of Apple Inc. Class II equipment symbol: CLASS II apparatus with double insulation, and no protective earth provided. Note The type plate is located on the bottom of the unit. 4 EN 2 Your Docking Entertainment System Congratulations on your purchase, and ZHOFRPHWR3KLOLSV7RIXOO\EHQHÀWIURPWKH support that Philips offers, register your product at www.philips.com/welcome. Introduction With this unit, you can enjoy music from iPod/ iPhone/iPad and listen to radio or other audio devices. Your iPod/ iPhone/iPad and radios can be set as alarm sources. You can set two alarms to go off at different time. You can enrich sound output with these sound effects: Digital Sound Control (DSC) Dynamic Bass Boost (DBB) What's in the box Check and identify the contents of your package: Main unit Short user manual EN 5 Overview of the main unit q p AC ~ AU D I O I N FM ANTENNA o n m a VOL b c SET TIME TUNE PRE SET PROG SCAN PRE SET d l k j TUNE VOL i e AL 1 SNOOZE AL 2 BRIGHTNESS f f h g a VOL +/VOL Increase/decrease volume. b DOCK 1 In Dock 1 mode, start or pause play. In other modes, select Dock 1 source. c SET TIME In standby mode, set day, month and year. In other modes, enable/disable DBB (Dynamic Bass Boost) or select a DSC (Digital Sound Control) sound effect. 6 EN In dock mode, press and hold to search within a track. In FM mode, select FM stereo or FM mono. d PROG/SCAN Program radio stations. Automatically scan for radio stations. In dock mode, press and hold to search within a track. e /SOURCE Press and hold to turn on the unit or switch to standby mode. Stop alarm. Select a source: DOCK 1/DOCK 2, FM or AUDIO IN. f AL1/AL2 Set alarm. View alarm settings. Activate/deactivate alarm timer. g Display panel Show the current status. h SNOOZE/BRIGHTNESS Snooze alarm. Adjust the display brightness. i SLEEP Set the sleep timer. j PRESET +/PRESET Skip to next/previous track. Select a preset radio program. In dock mode, press and hold to search within a track. k OK/ DOCK 2 In Dock 2 mode, start or pause iPod/ iPhone/iPad play. In other modes, select Dock 2 mode. l TUNE+/TUNE Set time and date. When setting alarm, adjust alarm clock and volume, and select a sound source. Tune to an FM audio station. m Dock 1 for iPod/iPhone/iPad with Lightning connection n Dock 2 for iPod/iPhone/iPad with 30-pin connection o USB charging port p AUDIO IN Connect external audio device. q FM ANTENNA Connect an FM antenna to improve FM reception. EN 7 3 Get started Caution Risk of explosion! Keep batteries away from heat, VXQVKLQHRUÀUH1HYHUGLVFDUGEDWWHULHVLQÀUH Caution Use of controls or adjustments or performance of Risk of decreased battery life! Never mix different brands or types of batteries. Risk of product damage! When the remote control is not used for long periods, remove the batteries. procedures other than herein may result in hazardous radiation exposure or other unsafe operation. Always follow the instructions in this chapter in VHTXHQFH If you contact Philips, you will be asked for the model and serial number of this apparatus. The model number and serial number are on the bottom of the apparatus. Write the numbers here: Model No. __________________________ Serial No. ___________________________ Connect power Caution Risk of product damage! Ensure that the power voltage Install batteries corresponds to the voltage printed on the bottom of the apparatus. Risk of electric shock! When you unplug the AC power cord, always pull the plug from the socket. Never pull the cord. Before connecting the AC power cord, ensure you have completed all other connections. To disconnect the set from the mains completely, remove the mains plug from the wall socket. Note You can only use AC power as power supply. Batteries (not supplied) are for backup purpose. 1 2 3 FM ANTENNA AUDIO IN 5V 2. 1A AC ~ Open the battery compartment. Insert 2 x AA size batteries with correct polarity (+/-) as indicated. Connect the AC power cord to the wall outlet. Close the battery compartment. Turn on Press and hold . » The unit switches to the last selected source. 8 EN Switch to standby Press and hold again to switch the unit to standby mode. » The time and date (if set) appear on the display panel. Select source Press SOURCE repeatedly to select from DOCK 1/Dock 2, FM and AUDIO IN. Set time and date 1 2 3 4 In standby mode, press and hold SET TIME for 2 seconds. » [24H ] begins to blink, and you can hear a beep. Press TUNE+ or TUNE- to select the 12/24 hour format. Press OKWRFRQÀUP » 00:00 will display, and the hour digits begin to blink. Repeat steps 2-3 to set the hour, minute, day, month and year. Tip In 12 hour format, [MONTH--DAY] is displayed. in 24 hour format, [DAY--MONTH] is displayed. Note When iPod/iPhone/iPad is connected, the docking unit synchronizes time from the iPod/iPhone/iPad automatically. EN 9 4 Play Listen to the iPod/iPhone/iPad 1 2 Play from iPod/iPhone/iPad Press SOURCE repeatedly to select DOCK 1 or DOCK 2 mode. Place the iPhone/iPod/iPad into the Dock 1 or Dock 2. You can enjoy audio from iPod/iPhone/iPad through this unit. Compatible iPod/iPhone/iPad The integrated dual dock unit supports the following iPod, iPhone, and iPad models: Made for (Dock 1): iPod nano (7th generation) iPod touch (5th generation) iPad (4th generation) iPad mini iPhone 5 Also made for (Dock 2): iPod nano (2nd/3rd/4th/5th/6th generation) iPod classic iPod touch (1st/2nd/3rd/4th generation) iPad (3rd generation) iPad 2 iPad iPhone 4S iPhone 4 iPhone 3GS iPhone 3G iPhone To pause/resume play, press . To skip to a track, press / . To search during play, press and hold / or PRESET +/PRESET -, then release to resume normal play. Charge the iPod/iPhone/iPad When the unit is connected to power, the docked iPod/iPhone/iPad begins to charge. Tip For certain iPod models, it may take up to a minute before the charging indication appears. 10 EN Play from an external device You can also listen to an external audio device through this unit. 1 2 3 Press SOURCE repeatedly to select the AUDIO IN source. Connect a 3.5mm audio link cable (not supplied) to: the AUDIO IN jack (3.5mm) on the back of the unit. the headphone jack on an external device. » the screen displays scrolling text message [AUDIO IN]; and shows date and time. Start to play the device (see the device user manual). EN 11 5 Listen to radio Note The preset list can store up to 20 stations. If the preset list is fully occupied, the screen will show Note P 20. If saving a radio station to a position that has already been occupied, the original radio station will be replaced. Only FM radio reception is available on this unit. Tune to a radio station Tip Use an FM antenna for optimal reception. Fully extend and adjust the position of the antenna. Position the antenna as far as possible from TV, VCR or other radiation source. [STEREO] is default setting for tuner mode. In tuner mode, you can press and hold DBB/DSC/SET TIME to toggle between [STEREO] and [MONO], and the unit memorizes your setting even if you turn off the unit or turn to other sources. Program radio stations manually 1. Press SOURCE repeatedly to enter the FM mode. 2. Press TUNE+/TUNE- to tune to a radio station. 3. Press PROG/SCAN. » $SRVLWLRQQXPEHUÁDVKHV 4. Press OK to save current radio station to the selected position. Tip 1 2 3 Press SOURCE repeatedly to select FM mode. Press and hold TUNE+/TUNE- for more than 2 seconds. » The radio tunes to next station with strong reception automatically. Repeat step 2 to tune to more stations. To tune to a weak station, press TUNE+/TUNE- repeatedly until you ÀQGRSWLPDOUHFHSWLRQ Program radio stations Radio station preset allows you to save radio VWDWLRQVDQGTXLFNO\WXQHWRDIDYRULWHVWDWLRQ Press PRESET +/PRESET - to change the position to save a radio station. Program radio stations automatically 1 2 Press SOURCE repeatedly to enter the FM mode. Press and hold PROG/SCAN. » The screen displays [AUTO] (auto); » The unit starts to scan for all available radio stations automatically, and stores them to the preset list. 3 :DLWXQWLOWKHDXWRVFDQÀQLVKHV » 7KHÀUVWVWDWLRQLQWKHSUHVHWOLVW broadcasts automatically. Select a preset radio station 1 12 EN Press / to select a preset number. 6 Other features Set the alarm timer Activate and deactivate the alarm timer When an alarm setting is shown on the screen, press AL1/AL2 repeatedly to activate or deactivate the timer. » If the timer is activated, [ AL 1] or [ AL2] is displayed. You can set two alarms at different times. » If the timer is deactivated, [ [ AL2] disappears. AL1] or Note Ensure that you have set the clock correctly. 1 Press and hold AL1 or AL2. » The hour digits begin to blink, and you can hear one beep. Snooze When the alarm rings, press SNOOZE. » The alarm stops, and the alarm icon ÁDVKHV » The alarm will resume ringing 9 minutes later. » >$/6(7@DOOVHWÁDVKHVRQWKHVFUHHQ 2 3 Press TUNE+/TUNE- repeatedly to set the hour. Press OKWRFRQÀUP » The minute digits begin to blink. Note When using batteries to operate, alarms can only use buzzer as sound source. » >$/6(7@DOOVHWÁDVKHVRQWKHVFUHHQ 4 Repeat steps 2-3 to set the minute, select when to ring alarm, and choose alarm sound source and alarm volume. After alarm volume is set, the unit will exit alarm setting, and you can hear two beeps. Tip Stop alarm ring When the alarm rings, press the corresponding AL1 or AL2. » The alarm stops but the alarm settings remain. If you select DOCK 1/DOCK 2 as alarm sound source, when there is no device docked, the alarm will automatically switch to buzzer to ring the alarm. If both alarms are set to the same time, only Alarm 1 will ring. View the alarm settings Press AL1 or AL2 to view alarm settings. Tip You can also press to stop the alarm. The unit will switch to the last selected source. If you press and hold , the alarm will also be stopped, and the unit will switch to standby mode. If you do not stop the alarm, it will ring for 30 minutes. When an alarm rings, it shall begin from a relative low volume, and rise gradually to the highest alarm volume in 90 seconds. EN 13 Set the sleep timer This unit can switch to standby automatically after a set period of time. Press SLEEP repeatedly to select from 120, 90, 60, 45, 30 and 15 minutes. » When the sleep timer is activated, the display shows . To deactivate sleep timer 1 Press SLEEP repeatedly until [OFF] (off) is displayed. » The sleep timer is deactivated, disappears on the display. Adjust display brightness :KHQQRDODUPLVÀULQJSUHVVBRIGHTNESS repeatedly to select different levels of display brightness. Note When using batteries to operate, you can not select brightness levels. 14 EN 7 Adjust sound Adjust volume level During play, press VOL +/- to increase/decrease the volume level step by step. Tip Press and hold VOL +/- to increase/decrease the volume at faster speed. Select a sound effect During play, press SET TIME repeatedly to select from a preset sound effect and turn on/ off dynamic bass enhancement. Note The unit supports the following sound effects: [POP] (pop), [JAZZ] (Jazz), [ROCK] (rock), [CLAS] (classic) and [FLAT]ÁDW If DBB is activated, [DBB] is displayed. EN 15 8 Product information Note Product information is subject to change without prior notice. 6SHFLÀFDWLRQV $PSOLÀHU Total output power )UHTXHQF\5HVSRQVH Signal to Noise Ratio Aux Input (Audio in) 8W 80 Hz -16 kHz, ±3dB G%$ 0.6 V RMS 20kohm FM Tuning Range Tuning grid 0RQRG%TXLHWLQJ sensitivity 6WHUHRG%TXLHWLQJ sensitivity Search Sensitivity Total Harmonic Distortion Signal to Noise Ratio FM 87.5 - 108 MHz 50 KHz <22 dBf <51 dBf <41 dBf <2% >45 dB Speakers Speaker Impedance Speaker Driver Sensitivity 16 EN 4 ohm 57 mm >84dB/m/W General information AC power Operation Power Consumption Standby Power Consumption (clock display) Dimensions - Main Unit (W x H x D) Weight (Main unit, without packing) 230-240V~, 50Hz 44 W <1 W 260 x 138 x 185 mm 1.13 kg 9 Troubleshooting Caution Never remove the casing of this apparatus. To keep the warranty valid, never try to repair the system yourself. If you encounter problems when using this apparatus, check the following points before UHTXHVWLQJVHUYLFH,IWKHSUREOHPUHPDLQV unsolved, go to the philips web site (www. philips.com/support). When you contact philips, ensure that your apparatus is nearby and the model number and serial number are available. No power Ensure that the AC power plug of the unit is connected properly. Ensure that there is power at the AC outlet. Ensure that the batteries are inserted correctly. No sound Adjust the volume. Check if the unit is performing auto scan. Volume is muted during auto scan process. No response from the unit Remove the batteries from the main unit (if inserted), disconnect and reconnect the AC power plug, and turn on the unit again. Poor radio reception Increase the distance between the unit and your TV or VCR. Fully extend the FM antenna. Timer does not work Set the clock correctly. Switch on the timer. Clock/timer setting erased Power has been interrupted or the power plug has been disconnected. Reset the clock/timer. EN 17 Warranty Against Defects In this warranty: We means WOOX Innovations Singapore Pte Ltd ARBN 165 105 975, and our contact details are set out at the end of this warranty; You means the purchaser or the original end-user of the Goods; Supplier means the authorised distributor or retailer of the Goods that sold you the Goods in Australia or New Zealand; and Goods means the product or equipment which was accompanied by this warranty and purchased in Australia or New Zealand. If you require assistance with the operation of the product, its features or specifications please call the Philips Consumer Care Centre on 1300 850 633 in Australia or 0800 639 953 in New Zealand. Australia: If you are taken to have been supplied with our goods as a “Consumer” for the purposes of the Australian Consumer Law then : Our Goods come with guarantees that cannot be excluded under the Australian Consumer Law. You are entitled to a replacement or refund for a major failure and compensation for any other reasonably foreseeable loss or damage. You are also entitled to have the Goods repaired or replaced if the goods fail to be of acceptable quality and the failure does not amount to a major failure. This is not a complete statement of your legal rights as a consumer. New Zealand: Our Goods come with guarantees that cannot be excluded under the Consumer Guarantees Act 1993. This guarantee applies in addition to the conditions and guarantees implied by that legislation. Additional Warranty: In addition to the rights and remedies that you may have under the Australian Consumer Law, Consumer Guarantees Act of New Zealand or any other applicable law, we provide the following warranty against defects: (Additional Warranty). 1. If, during the first 12 months from their date of purchase from the Supplier (Warranty Period), the Goods prove defective by reason of improper workmanship or materials and none of your statutory rights or remedies apply, we will repair or replace the Goods without charge. 2. We do not have to repair or replace the Goods under this Additional Warranty if the Goods have been used for a commercial purpose; misused, improperly or inappropriately installed, operated or repaired; abused; damaged; or not maintained in accordance with the manufacturer’s instructions. 3. Even when we do not have to repair or replace the Goods, we may decide to do so anyway. In some cases, we may decide to substitute the Goods with a similar alternative product of our choosing. All such decisions are at our absolute discretion. 4. All goods that are repaired, replaced or substituted under this Additional Warranty continue to receive the benefit of this Additional Warranty for the time remaining on the original Warranty Period. 5. This Additional Warranty is limited to repair, replacement or substitution only. As far as the law permits, we will not be liable for any loss or damage caused to property or persons arising from any cause whatsoever. 6. In order to claim under this Additional Warranty you must telephone us on 1300 850 633 in Australia or 0800 639 953 in New Zealand within the Warranty Period. You will be asked for details of the Goods, a description of the defect and you personal details. Upon accepting your claim, we shall assist you with either returning the Goods to the Supplier for replacement or a Philips Authorised Service Centre in Australia or New Zealand for your Goods to be repaired. We may require that you return the Goods for repair, replacement or substitution. ∗ All returned Goods must be accompanied by satisfactory proof of purchase which clearly indicates the name and address of the Supplier, the date and place of purchase and identifies product. It is best to provide a legible and unmodified receipt or sales invoice. ∗ You must bear any expense for return of the Goods or otherwise associated with making your claim under this Additional Warranty. 7. This warranty is only valid and enforceable in Australia and New Zealand. Contact us for further details. In Australia contact Consumer Care: 1300 850 633 E-mail: [email protected] Website: www.philips.com/support 65 Epping Rd, North Ryde, NSW 2113 In New Zealand contact Consumer Care: 0800 639 953 Email: [email protected] Website: www.philips.com/support © 2013 WOOX Innovations Limited. All rights reserved. This product was brought to the market by WOOX Innovations Limited or one of its affiliates, further referred to in this document as WOOX Innovations, and is the manufacturer of the product. WOOX Innovations is the warrantor in relation to the product with which this booklet was packaged. Philips and the Philips Shield Emblem are registered trademarks of Koninklijke Philips N.V.” 18 6SHFLÀFDWLRQVDUHVXEMHFWWRFKDQJHZLWKRXWQRWLFH 2014 © WOOX Innovations Limited. All rights reserved. This product was brought to the market by WOOX Innovations Limited RURQHRILWVDIÀOLDWHVIXUWKHUUHIHUUHGWRLQWKLVGRFXPHQWDV:22; Innovations, and is the manufacturer of the product. WOOX Innovations is the warrantor in relation to the product with which this booklet was packaged. Philips and the Philips Shield Emblem are registered trademarks of Koninklijke Philips N.V. AJ7260D_79_UM_V2.1