1
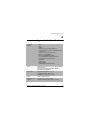
287449-001Cvr.qxd
4/18/2002
5:44 PM
Page 1
Compaq iPAQ
Connection Point CP-2E
User Guide
287449-001
© 2002 Compaq Information Technologies Group, L.P.
Compaq, the Compaq logo, iPAQ, and Connection Point are trademarks of Compaq
Information Technologies Group, L.P. in the U.S. and/or other countries. All other
product names mentioned herein may be trademarks of their respective companies.
Compaq shall not be liable for technical or editorial errors or omissions contained
herein. The information is provided “as is” without warranty of any kind and is
subject to change without notice. The warranties for Compaq products are set forth in
the express limited warranty statements accompanying such products. Nothing herein
should be construed as constituting an additional warranty.
iPAQ Connection Point CP-2E User Guide
First Edition (April 2002)
Document Part Number: 287449-001
Contents
1
Introduction
Features and Benefits . . . . . . . . . . . . . . . . . . . . . . . . . . . . . . . . . . . . . . . . 1–1
Share a Single High-Speed Internet Connection . . . . . . . . . . . . . . . 1–1
Ethernet Networking . . . . . . . . . . . . . . . . . . . . . . . . . . . . . . . . . . . . 1–2
Security and Advanced Management . . . . . . . . . . . . . . . . . . . . . . . 1–2
What's in the Box?. . . . . . . . . . . . . . . . . . . . . . . . . . . . . . . . . . . . . . . . . . . 1–2
What Else Do I Need? . . . . . . . . . . . . . . . . . . . . . . . . . . . . . . . . . . . 1–4
What's in Front? . . . . . . . . . . . . . . . . . . . . . . . . . . . . . . . . . . . . . . . . 1–5
What's in Back? . . . . . . . . . . . . . . . . . . . . . . . . . . . . . . . . . . . . . . . . 1–6
2
Installation and Configuration
Installation . . . . . . . . . . . . . . . . . . . . . . . . . . . . . . . . . . . . . . . . . . . . . . . . . 2–1
Connecting to the Internet . . . . . . . . . . . . . . . . . . . . . . . . . . . . . . . . 2–2
Connecting to Your PC . . . . . . . . . . . . . . . . . . . . . . . . . . . . . . . . . . 2–2
Powering Up . . . . . . . . . . . . . . . . . . . . . . . . . . . . . . . . . . . . . . . . . . 2–3
Client PC Configuration. . . . . . . . . . . . . . . . . . . . . . . . . . . . . . . . . . 2–3
Configuring Windows 98 and ME Clients. . . . . . . . . . . . . . . . . . . . 2–4
Setting Up Connection Point CP-2E . . . . . . . . . . . . . . . . . . . . . . . . 2–7
Using the Installation Wizard . . . . . . . . . . . . . . . . . . . . . . . . . . . 2–7
Choosing the Internet Connection Method . . . . . . . . . . . . . . . . . 2–7
Dynamic Internet IP . . . . . . . . . . . . . . . . . . . . . . . . . . . . . . . . . . 2–8
Configuring Dynamic Internet IP . . . . . . . . . . . . . . . . . . . . 2–9
Static Internet IP . . . . . . . . . . . . . . . . . . . . . . . . . . . . . . . . . 2–9
PPPoE . . . . . . . . . . . . . . . . . . . . . . . . . . . . . . . . . . . . . . . . . . . . 2–10
Configuring PPPoE . . . . . . . . . . . . . . . . . . . . . . . . . . . . . . 2–11
Timezone Setup . . . . . . . . . . . . . . . . . . . . . . . . . . . . . . . . . . . . . . . 2–12
Administrator Password Settings . . . . . . . . . . . . . . . . . . . . . . . . . . 2–13
Confirming Successful Setup. . . . . . . . . . . . . . . . . . . . . . . . . . . . . 2–14
Installing the Firmware Update Utility . . . . . . . . . . . . . . . . . . . . . 2–15
Registering the Connection Point CP-2E. . . . . . . . . . . . . . . . . . . . 2–16
3
Adding PCs To Your Network
Ethernet PCs. . . . . . . . . . . . . . . . . . . . . . . . . . . . . . . . . . . . . . . . . . . 3–1
Adding Ethernet PCs . . . . . . . . . . . . . . . . . . . . . . . . . . . . . . . . . 3–1
Windows XP Configuration. . . . . . . . . . . . . . . . . . . . . . . . . . . . . . . 3–2
Configuring the Client . . . . . . . . . . . . . . . . . . . . . . . . . . . . . . . . 3–2
Windows 2000 Configuration . . . . . . . . . . . . . . . . . . . . . . . . . . . . . 3–5
Configuring the Client . . . . . . . . . . . . . . . . . . . . . . . . . . . . . . . . 3–5
iPAQ Connection Point CP-2E User Guide
i
Windows NT4.0 Configuration . . . . . . . . . . . . . . . . . . . . . . . . . . . . 3–8
Configuring the Client . . . . . . . . . . . . . . . . . . . . . . . . . . . . . . . . 3–8
4
Connection Point CP-2E Home Page
Home Page Information Bar . . . . . . . . . . . . . . . . . . . . . . . . . . . . . . 4–1
Management Icons . . . . . . . . . . . . . . . . . . . . . . . . . . . . . . . . . . . . . . 4–2
Quick Setup Icon . . . . . . . . . . . . . . . . . . . . . . . . . . . . . . . . . . . . 4–2
System Info Icon . . . . . . . . . . . . . . . . . . . . . . . . . . . . . . . . . . . . . 4–2
General Information. . . . . . . . . . . . . . . . . . . . . . . . . . . . . . . 4–2
LAN Status . . . . . . . . . . . . . . . . . . . . . . . . . . . . . . . . . . . . . 4–3
Internet Status . . . . . . . . . . . . . . . . . . . . . . . . . . . . . . . . . . . 4–4
Network Information . . . . . . . . . . . . . . . . . . . . . . . . . . . . . . 4–5
Event Log. . . . . . . . . . . . . . . . . . . . . . . . . . . . . . . . . . . . . . . 4–6
Renew Internet IP Icon . . . . . . . . . . . . . . . . . . . . . . . . . . . . 4–7
Help/Troubleshooting Icon . . . . . . . . . . . . . . . . . . . . . . . . . 4–7
Firmware Update Icon . . . . . . . . . . . . . . . . . . . . . . . . . . . . . 4–7
5
Advanced Setup Icons
Accessing Advanced Configuration Options . . . . . . . . . . . . . . . . . . . . . . 5–1
System Settings . . . . . . . . . . . . . . . . . . . . . . . . . . . . . . . . . . . . . . . . 5–1
Password . . . . . . . . . . . . . . . . . . . . . . . . . . . . . . . . . . . . . . . . . . . 5–1
Resetting to Factory Default . . . . . . . . . . . . . . . . . . . . . . . . . . . . 5–2
Timezone Setup . . . . . . . . . . . . . . . . . . . . . . . . . . . . . . . . . . . . . 5–4
Internet . . . . . . . . . . . . . . . . . . . . . . . . . . . . . . . . . . . . . . . . . . . . . . . 5–4
LAN . . . . . . . . . . . . . . . . . . . . . . . . . . . . . . . . . . . . . . . . . . . . . . . . . 5–4
Changing the Subnet . . . . . . . . . . . . . . . . . . . . . . . . . . . . . . . . . . 5–5
MAC Spoofing . . . . . . . . . . . . . . . . . . . . . . . . . . . . . . . . . . . . . . 5–6
DMZ . . . . . . . . . . . . . . . . . . . . . . . . . . . . . . . . . . . . . . . . . . . . . . 5–7
Designating a DMZ Host. . . . . . . . . . . . . . . . . . . . . . . . . . . 5–7
Virtual Server . . . . . . . . . . . . . . . . . . . . . . . . . . . . . . . . . . . . . . . . . . 5–8
Adding a Virtual Server . . . . . . . . . . . . . . . . . . . . . . . . . . . . . . . 5–9
Packet Filtering . . . . . . . . . . . . . . . . . . . . . . . . . . . . . . . . . . . . . 5–10
Enabling Packet Filtering . . . . . . . . . . . . . . . . . . . . . . . . . 5–11
Adding an IP Rule . . . . . . . . . . . . . . . . . . . . . . . . . . . . . . . . . . 5–12
Adding Port Rules. . . . . . . . . . . . . . . . . . . . . . . . . . . . . . . . . . . 5–13
DHCP . . . . . . . . . . . . . . . . . . . . . . . . . . . . . . . . . . . . . . . . . . . . . . . 5–14
Changing DHCP Server Settings . . . . . . . . . . . . . . . . . . . . . . . 5–15
Reserved IP Table . . . . . . . . . . . . . . . . . . . . . . . . . . . . . . . . . . . 5–15
Adding a Reserved IP Address . . . . . . . . . . . . . . . . . . . . . 5–16
Excluded IP Addresses . . . . . . . . . . . . . . . . . . . . . . . . . . . 5–17
ii
iPAQ Connection Point CP-2E User Guide
Adding an Excluded IP Address . . . . . . . . . . . . . . . . . . . . 5–18
BOOTPIP Table. . . . . . . . . . . . . . . . . . . . . . . . . . . . . . . . . 5–19
Adding a BOOTP IP Address . . . . . . . . . . . . . . . . . . . . . . 5–19
Static Routing Table. . . . . . . . . . . . . . . . . . . . . . . . . . . . . . . . . . . . 5–21
Adding a Static Route . . . . . . . . . . . . . . . . . . . . . . . . . . . . . . . . 5–21
SMTP . . . . . . . . . . . . . . . . . . . . . . . . . . . . . . . . . . . . . . . . . . . . . . . 5–23
6
System Recovery
Using the Firmware Update Utility . . . . . . . . . . . . . . . . . . . . . . . . . . . . . . 6–1
Restore Factory Defaults . . . . . . . . . . . . . . . . . . . . . . . . . . . . . . . . . 6–2
7
8
Troubleshooting
Regulatory Compliance
Federal Communications Commission Notice . . . . . . . . . . . . . . . . . . . . . 8–1
Modifications . . . . . . . . . . . . . . . . . . . . . . . . . . . . . . . . . . . . . . . . . . 8–1
Cables. . . . . . . . . . . . . . . . . . . . . . . . . . . . . . . . . . . . . . . . . . . . . . . . 8–1
Declaration of Conformity for products marked with the FCC logo United States only . . . . . . . . . . . . . . . . . . . . . . . . . . . . . . . . . . . . . . 8–2
A Appendix A: Specifications
B Appendix B: MAC Address Manual Identification
Identify Media Access Control (MAC). . . . . . . . . . . . . . . . . . . . . . . . . .
For Windows XP . . . . . . . . . . . . . . . . . . . . . . . . . . . . . . . . . . . . . . .
For Windows 98 and ME PCs: . . . . . . . . . . . . . . . . . . . . . . . . . . . .
For Windows 2000 PCs . . . . . . . . . . . . . . . . . . . . . . . . . . . . . . . . . .
Accessing Security Configuration Options. . . . . . . . . . . . . . . .
B–1
B–1
B–2
B–3
B–3
G Glossary
iPAQ Connection Point CP-2E User Guide
iii
Introduction
1
Introduction
Congratulations! As the owner of a new Compaq iPAQ Connection Point
CP-2E, you are taking advantage of the most advanced network
technology available to manage your home or small office network. The
iPAQ Connection Point will be the focal point of your network, providing
secure broadband Internet connectivity to all of your networked
computers and devices.
This guide is designed to help you:
> Understand the networking features of your iPAQ Connection Point
CP-2E
> Install the product correctly
> Find additional information, as needed
Features and Benefits
Share a Single High-Speed Internet Connection
> Network address translation (NAT) allows a single public IP
address to be shared across many devices
> DHCP server automatically provides up to 253 IP addresses on the
local area network
> Supports dynamic IP, static IP, and PPPoE connections via an
external DSL or cable modem, providing high-speed Internet
access (up to 50 times faster than a 56K modem)
> MAC Spoofing makes connection easy to those ISPs that register
MAC addresses
iPAQ Connection Point CP-2E User Guide
1–1
Introduction
Ethernet Networking
> Built-in 4-port Fast Ethernet switch connects up to four PCs with
Ethernet cables for high-speed data transmission (up to 100 Mbps),
enhancing gaming and audio/video streaming
> Auto-sensing 10/100 ports automatically configure to 10Mbps or
100Mbps Ethernet transmissions
> Auto-sensing MDI/MDI-X cabling automatically configures for
use with normal or crossover Ethernet cables
Security and Advanced Management
> NAT firewall hides local PCs from external hackers by translating
IP addresses from public to private local addresses
> Secure VPN pass-through allows users to tunnel into a corporate
network from behind the Connection Point CP-2E firewall
> Internet protocol and port filtering enable you to block or allow
data based on individual protocols or ports
> Web DMZ allows an IP address to be set up outside the firewall for
web page serving or other services
> Virtual server enables a virtual port for such services as FTP,
while the host device remains behind the firewall
> Internal web-based management pages allow you to manage and
configure the Connection Point CP-2E through a web browser for
easy access and navigation
> NTP allows CP-2E to track events based upon your time zone.
What's in the Box?
>
>
>
>
>
1–2
Connection Point CP-2E
An Ethernet cable
An AC-to-12VDC power adapter
A Quick Setup Guide
iPAQ Connection Point CP-2E Utilities CD containing the
following:
iPAQ Connection Point CP-2E User Guide
Introduction
◆
Firmware Update Utility to update your Connection Point
CP-2E with the latest firmware or repair the system in the
case of failure
◆ Product Registration option walks you through the
registration of your Connection Point CP-2E to help ensure
that you get support information for this product
◆ Connection Point CP-2E User Guide that provides detailed
information regarding the configuration and use of your
Connection Point CP-2E
◆ Safety and Comfort Guide that provides information about
personal safety and comfort
> A limited warranty booklet
iPAQ Connection Point CP-2E User Guide
1–3
Introduction
What Else Do I Need?
To use the Connection Point CP-2E, you need:
> Microsoft® Windows® 98/98SE, NT 4.0, 2000, ME, XP or higher
> A CD-ROM drive
> An external cable or DSL modem with an RJ45 Ethernet port
> Internet Explorer 4.0 or higher, Netscape Navigator 6 or higher, or
MSN Explorer
> One network adapter for each PC
— Ethernet: Any 10Mbps or 100Mbps compatible Ethernet adapter.
> Additional Ethernet equipment:
— The Connection Point CP-2E comes with a built-in four-port
Ethernet switch, so you can connect up to four PCs without
purchasing an additional hub or switch. More than four Ethernet
PCs will require an additional hub or switch.
— Ethernet cabling to connect each PC to the Connection Point
CP-2E. Use Category 3 cabling or better for 10 Mbps, Category 5
cabling or better for 100 Mbps.
1–4
iPAQ Connection Point CP-2E User Guide
Introduction
What's in Front?
Before you begin installation, familiarize yourself with your Connection
Point CP-2E.
Your Connection Point CP-2E has the following LED indicators:
Item
Description
Significance
1
2
Power LED
Steady indicates power on
Test LED
Steady indicates self test in progress
Off indicates normal operation
3
4
5
6
Internet link LED
Steady indicates valid Internet link
Internet act LED
Blinking indicates data transmission
LAN 100 LED
Steady indicates Fast Ethernet connection
LAN link/act LED
Steady indicates valid Ethernet link
Blinking indicates Ethernet activity
iPAQ Connection Point CP-2E User Guide
1–5
Introduction
What's in Back?
The Connection Point CP-2E has the following components on the back.
1–6
Item
Description
Function
1
Power input
(DC12v 1.2A)
Power adapter connector
2
3
RJ 45 (1-4)
Individual Ethernet LAN ports
RJ 45 (Internet)
Ethernet port for broadband Internet
connection
4
Reset button
Used to manually restart the Connection
Point CP-2E
iPAQ Connection Point CP-2E User Guide
Installation and Configuration
2
Installation and Configuration
Installing and configuring the Connection Point CP-2E involves the
following steps:
> Installing the Connection Point CP-2E hardware
> Configuring a PC client
> Running the Installation Wizard
◆ Configure the Connection Point CP-2E Internet connection
◆ Establish a unique user name and password
Note: If you forget your user name and password, you will be unable to
modify the Connection Point setup. It is advisable to record your
user name and password and store in a secure location.
> Installing the firmware update utility
> Registering the Connection Point CP-2E
In this chapter, you will find step-by-step instructions to help you
complete the installation and configuration quickly and easily.
Installation
First, you must establish the physical connections between your
Connection Point CP-2E and:
> The Internet
> Your PC
> A power source
iPAQ Connection Point CP-2E User Guide
2–1
Installation and Configuration
Connecting to the Internet
1. Power down your broadband (cable or DSL) modem.
2. Disconnect the existing Ethernet cable from PC. Leave the other end
of the cable connected to your modem. 1
3. Connect the existing cable to the port labeled Internet on the back of
the Connection Point CP-2E. 2
Connecting to Your PC
2–2
iPAQ Connection Point CP-2E User Guide
Installation and Configuration
1. Plug one end of the supplied Ethernet cable into the port labeled 1 on
the back of the Connection Point CP-2E. 1
2. Plug the other end of the Ethernet cable into the Ethernet port on the
PC. 2
Powering Up
1. Plug the power adapter into an AC power outlet. 1
2. Connect the output of the power adapter to the 12V DC power input
on the rear of the Connection Point CP-2E. 2
The Power LED on the front panel should light up immediately.
The Connection Point CP-2E runs a series of self-tests to verify that it is
operating properly. The Test LED on the front panel remains lit while the
self-tests are running. The Connection Point CP-2E is ready to use when
the Test LED turns off.
Client PC Configuration
The configuration procedure for Windows 98 and ME clients is described
below.
Note: The configuration procedure for Windows XP, 2000 and NT4.0 are
described in Chapter 3, Adding PCs to Your Network.
The Connection Point CP-2E automatically provides the following
TCP/IP configuration information to your PC:
iPAQ Connection Point CP-2E User Guide
2–3
Installation and Configuration
> IP address of the PC
> Subnet mask of the PC
> IP address of default gateway, which is the IP address of the DHCP
server itself
> Domain name system (DNS) server
Note: If your PC provides Internet access to other computers on your network,
you must uninstall your Internet sharing software now in order for your
Connection Point to be the Internet sharing device.
You may also wish to uninstall the Internet sharing software from other PCs
on the network for consistency and to avoid confusion.
Configuring Windows 98 and ME Clients
To configure other clients, refer to Chapter 3.
1. From the taskbar, select Start > Settings > Control Panel.
The Control Panel window is displayed.
2–4
iPAQ Connection Point CP-2E User Guide
Installation and Configuration
2. Double-click the Network icon. The Network window is displayed.
3. In the list of installed network components on the Configuration tab,
double-click TCP/IP. If more than one TCP/IP entry is listed, select
the entry for the network adapter you will use to connect to the
Connection Point CP-2E. The TCP/IP Properties window is
displayed.
iPAQ Connection Point CP-2E User Guide
2–5
Installation and Configuration
4. Click the IP Address tab.
5. Click the Obtain an IP address automatically radio button.
6. Click OK. The Network window is displayed again.
7. Click OK.
8. Restart the PC to complete the process.
Note: You must restart your PC before continuing, even if you are not prompted to
reboot.
2–6
iPAQ Connection Point CP-2E User Guide
Installation and Configuration
Setting Up Connection Point CP-2E
To set up your Connection Point CP-2E you will use a web browser such
as Microsoft Internet Explorer or Netscape Communicator.
Using the Installation Wizard
1. Open a web browser.
2. Type cp.home into the Address field and press Enter. You may also
type in the base address, which is 192.168.1.1. The Quick Setup
Wizard will begin.
Choosing the Internet Connection Method
Connection Point will automatically attempt to connect to the Internet. If
connection is established, proceed to the Timezone setup section. If
connection is not established, perform the following procedures:
1. On the Connection Method screen, if you are unsure of which method
to use, click I’m not sure. A Help screen appears giving you
additional information to assist in your selection.
iPAQ Connection Point CP-2E User Guide
2–7
Installation and Configuration
2. Click Yes on the Connection Method screen. Choose the appropriate
Internet Connection Method:
> Dynamic Internet IP: This is the default setting for the
Connection Point CP-2E. If your internet service provider (ISP)
automatically assigns you a public IP address (common among
cable providers) or if you are unsure of the other options, select this
option.
> Static Internet IP: If your ISP provided you with a static IP
address, select this option.
> PPPoE: The point-to-point over Ethernet (PPPoE) connection is
the most likely choice for DSL service. A PPPoE user name and
password must be provided to you by your ISP.
Dynamic Internet IP
This setting configures your Connection Point CP-2E to automatically
obtain an IP address from your ISP. This is the most common setting, and
should be used unless your ISP provided specific instructions for use of a
static IP address or point-to-point protocol over Ethernet (PPPoE).
2–8
iPAQ Connection Point CP-2E User Guide
Installation and Configuration
Configuring Dynamic Internet IP
1. Click the Dynamic Internet IP. The Dynamic Internet IP page is
displayed.
2. If your ISP requires a specific domain name or computer name to be
used when you establish a connection, type the required domain or
computer name into the Domain Name or Computer Name field, as
appropriate. Otherwise, leave these fields blank.
3. If your ISP requires you to specify the IP address of its
primary/secondary DNS server(s), click the Manual radio button,
then type the IP address(es) for the DNS servers into the fields below
the radio buttons. Otherwise, leave these fields blank.
4. Click Next. The Reboot dialog box is displayed. The Connection
Point CP-2E must be rebooted for applied changes to take effect.
Static Internet IP
This setting configures your Connection Point CP-2E to use a static
(fixed) IP address to access the Internet. The static IP address is provided
to you by your ISP.
iPAQ Connection Point CP-2E User Guide
2–9
Installation and Configuration
Configuring Static Internet IP
1. Click the Static IP. The Static Internet IP page is displayed.
2. Type the static IP address provided by your ISP into the Internet IP
Address field.
3. Type the subnet mask provided by your ISP into the Subnet Mask
field.
4. Type the IP address of the default gateway provided by your ISP into
the Default Gateway field.
5. Type the IP address of a primary DNS server provided by your ISP
into the DNS Server 1 field. If an address for a secondary DNS server
is provided, type that into the DNS Server 2 field.
6. Click Next. The Reboot dialog box is displayed. The Connection
Point CP-2E must be rebooted for applied changes to take effect.
PPPoE
This setting configures your Connection Point CP-2E to connect to a DSL
service using PPPoE. A PPPoE password is provided by your ISP.
2–10
iPAQ Connection Point CP-2E User Guide
Installation and Configuration
Configuring PPPoE
1. Click the PPPoE. The PPPoE page is displayed.
2. Type your ISP user name into the User Name field.
3. Type your ISP password into the Password field.
4. Type your ISP password into the Confirm Password field.
Note: The above three entries are required, and may be case-sensitive.
5. If a service name is required by your ISP, type the service name into
the Service Name field. Otherwise, leave the field blank.
6. If your ISP requires you to specify the IP address of a DNS server,
click the Manual radio button and type the IP address into the DNS
Server 1 field. If there is a second DNS server IP address, type it into
the DNS server 2 field.
7. Click Next. The Reboot dialog box is displayed. The Connection
Point CP-2E must be rebooted for applied changes to take effect.
iPAQ Connection Point CP-2E User Guide
2–11
Installation and Configuration
Timezone Setup
1. On the Timezone Setup screen, select the appropriate timezone from
the pulldown menu.
2. Click the checkbox to activate Daylight Savings time compensation
functionality. Enter appropriate Daylights Savings time start and end
dates for your locale using the pulldown menus.
3. Click Next.
2–12
iPAQ Connection Point CP-2E User Guide
Installation and Configuration
Administrator Password Settings
The default Administrator login name is “admin” and the default
administrator password is left blank. To ensure the security of your
network, a unique administrator login name and password should be
entered.
1. Type desired Administrator Login Name, Administrator Login
Password into the appropriate field. Confirm password in the
Confirm Password field.
Note: Do not use cut and paste operations in the Confirm Password field.
2. Click Next.
3. The Congratulations! You have completed the Quick Setup
Wizard screen appears. Your Connection Point will reboot
automatically.
iPAQ Connection Point CP-2E User Guide
2–13
Installation and Configuration
Confirming Successful Setup
After your Connection Point reboots, the Home Page appears.
1. On the web browser toolbar, click on the Refresh icon.
2. If Internet Connection Status reads Connected in green print, your
setup has been successful. If Internet Connection Status does not read
Connected in green letters, click the Refresh button on your web
browser. If still not connected, proceed to Step 3.
2–14
iPAQ Connection Point CP-2E User Guide
Installation and Configuration
3. If your connection status reads Disconnected in red print, click on the
Help icon to troubleshoot configuration problems. If the problem
continues, it is possible that your ISP is tracking a MAC address.
Please refer to Chapter 5 for a full discussion of MAC Spoofing.
Installing the Firmware Update Utility
The Connection Point CP-2E firmware update utility enables you to
repair the system in case of failure.
It is recommended that you install the utility during initial set-up.
iPAQ Connection Point CP-2E User Guide
2–15
Installation and Configuration
1. Insert the CD into the CD-ROM drive of a network PC. The menu is
displayed.
2. Click Install Firmware Update Utility.
3. Follow the instructions presented by the Update Utility Wizard.
Registering the Connection Point CP-2E
You can register your new iPAQ Connection Point CP-2E at
www.compaq.com/register.
2–16
iPAQ Connection Point CP-2E User Guide
Adding PCs To Your Network
3
Adding PCs To Your Network
Once you have set up the Connection Point CP-2E, you can add more PCs
to your Connection Point CP-2E network. PC client configuration for
Windows XP, 2000 and NT 4.0 are included in this chapter. Refer to your
operating system’s online help for instructions to set up file sharing.
Ethernet PCs
The Connection Point CP-2E has a built-in 4-port 10/100 Ethernet switch.
Any of the Ethernet LAN ports can be connected to a computer that has
an Ethernet adapter installed. Each of the four Ethernet LAN ports
supports auto-sensing of MDI or MDI-X (crossover) connections. You
can connect the Connection Point CP-2E directly to personal computers
or indirectly through an Ethernet hub or switch. The Connection Point
CP-2E automatically determines the type of cable connection and
configures itself accordingly.
Adding Ethernet PCs
1. Use an Ethernet cable to connect your PC to the next available
Ethernet port on the Connection Point CP-2E.
2. Find the TCP/IP settings for the Ethernet client-adapter on your PC
and verify that it is set to obtain an IP address automatically.
Instructions for Windows 98 and ME are found in Chapter 2.
Instructions for various Microsoft operating systems are found below.
3. Restart the PC to complete the process.
Note: You must restart your PC before continuing, even if you are not prompted to
reboot.
iPAQ Connection Point CP-2E User Guide
3–1
Adding PCs To Your Network
Windows XP Configuration
Windows XP automatically configures itself to connect to CP-2E. If you
are having problems connecting to the network, verify the client setup by
following the steps below.
Configuring the Client
1. From the taskbar, select Start > Control Panel. The Control Panel
window is displayed.
2. Double-click the Network Connections icon. The Network
Connections window is displayed.
3–2
iPAQ Connection Point CP-2E User Guide
Adding PCs To Your Network
3. Double-click the icon for the individual connection you wish to
configure. The Network Connection Status window is displayed.
4. Click Properties. The Local Area Connection Properties window is
displayed.
5. Select Internet Protocol (TCP/IP) from the list. Components
checked are used by this connection.
iPAQ Connection Point CP-2E User Guide
3–3
Adding PCs To Your Network
6. Click Properties. The Internet Protocol (TCP/IP) Properties window
is displayed.
7. Click the Obtain an IP address automatically radio button.
8. Click the Obtain DNS server address automatically radio button.
9. Click OK. The Network Connection Properties window is displayed.
10. Click OK.
11. Restart the PC to complete the process.
3–4
iPAQ Connection Point CP-2E User Guide
Adding PCs To Your Network
Windows 2000 Configuration
Configuring the Client
1. From the taskbar, select Start > Settings > Control Panel. The
Control Panel window is displayed.
2. Double-click the Network and Dial-Up Connections icon. The
Network and Dial-Up Connections window is displayed.
iPAQ Connection Point CP-2E User Guide
3–5
Adding PCs To Your Network
3. Double-click the Local Area Connection icon. The Local Area
Connection Status window is displayed.
4. Click Properties. The Local Area Connection Properties window is
displayed.
5. Select Internet Protocol (TCP/IP) from the list. Components
checked are used by this connection.
3–6
iPAQ Connection Point CP-2E User Guide
Adding PCs To Your Network
6. Click Properties. The Internet Protocol (TCP/IP) Properties window
is displayed.
7. Click the Obtain an IP address automatically radio button.
8. Click the Obtain DNS server address automatically radio button.
9. Click OK. The Local Area Connection Properties window is
displayed.
10. Click OK. The Local Area Connection Status window is displayed.
11. Click OK.
12. Restart the PC to complete the process.
iPAQ Connection Point CP-2E User Guide
3–7
Adding PCs To Your Network
Windows NT4.0 Configuration
Configuring the Client
1. From the taskbar, select Start > Settings > Control Panel. The
Control Panel window is displayed.
2. Double-click the Network icon. The Network window is displayed.
3–8
iPAQ Connection Point CP-2E User Guide
Adding PCs To Your Network
3. Select TPC/IP Protocol and click Properties.The TCP/IP Properties
window is displayed.
4. Click the Obtain an IP address from a DHCP server radio button.
5. Click OK. The Network window is displayed again.
6. Click OK.
7. Restart your PC to put the change into effect.
iPAQ Connection Point CP-2E User Guide
3–9
Connection Point CP-2E Home Page
4
Connection Point CP-2E Home Page
The Connection Point CP-2E home page is accessed using your computer
Internet browser (Windows IE, Netscape Navigator, etc.). The Home Page
is a centralized point to access all of your system information, manage
network configuration settings and provide help and useful information
whenever you need it. To access the Home Page:
1. Open a web browser.
2. Type cp.home into the Address field and press Enter. You may also
type in the base address, which is 192.168.1.1.
Home Page Information Bar
The Information Bar on the bottom of the Home Page contains Internet
connection settings and status, Local Network connection settings and
status, and Version information about your CP-2E.
iPAQ Connection Point CP-2E User Guide
4–1
Connection Point CP-2E Home Page
Management Icons
The Management Icons are shortcuts to all of your configuration and
connection settings. When using the icons, you are required to enter your
Admin Login and Admin Password to change any settings of your CP-2E.
Quick Setup Icon
The Quick Setup Icon accesses the initial setup screens to configure
Internet connection method, SSID, WEP encryption, timezone setup and
Administrator Login and Password settings. Refer to Chapter 2 for a
complete discussion of these screens.
System Info Icon
The internal web pages provide system information to help you
understand the operating status and network configuration of your
Connection Point CP-2E.
General Information
This page displays hardware and software version information, as well as
the status of the LAN and Internet connections.
4–2
iPAQ Connection Point CP-2E User Guide
Connection Point CP-2E Home Page
Hardware Version: Displays the hardware version of your Connection
Point CP-2E.
Software Version: Displays the version of the software installed on the
Connection Point CP-2E. This changes whenever you install a software
upgrade.
Current Time: Displays current time based upon timezone.
Time since last boot: Displays the time that has elapsed since the
Connection Point CP-2E was last started.
LAN Status
LAN MAC Address: Displays the Ethernet MAC address of the LAN
interface of the Connection Point CP-2E. A MAC address is expressed in
six 2-digit hexadecimal number pairs.
IP Address: Displays the IP address of the local LAN interface of the
Connection Point CP-2E. This IP address is also used as the LAN
gateway address and DNS server address.
Subnet Mask: Displays the local subnet mask of the LAN interface of the
Connection Point CP-2E. The default subnet mask is 255.255.255.0.
DHCP: Displays the status (enabled or disabled) of the internal DHCP
server.
DHCP Start Address: Displays the first IP address in the DHCP
allocation pool. The internal DHCP server allocates IP addresses to client
computers with the start address as the low end of the address range.
DHCP End Address: Displays the last IP address in the DHCP
allocation pool. The internal DHCP server allocates IP addresses to client
computers with the end address as the high end of the range.
iPAQ Connection Point CP-2E User Guide
4–3
Connection Point CP-2E Home Page
Internet Status
MAC Address: Displays the Ethernet MAC address of the Internet
interface of the Connection Point CP-2E. A MAC address is expressed
with six 2-digit hexadecimal number pairs. You may have to provide this
value to your ISP to establish a connection to the Internet (especially for
certain cable ISPs).
IP Address: Displays the IP Address of the CP-2E as seen by devices
outside your network (including your ISP and other devices on the
Internet). The IP address is provided by your ISP.
Subnet Mask: Displays the local subnet mask of the internet interface of
the Connection Point. The default subnet mask is 255.255.255.0.
Gateway: Displays the IP address of the current internet gateway. The
gateway address is provided by your ISP.
DNS Server 1: Displays the IP address of the primary domain name
server for internet access. The DNS address is provided by your ISP.
DNS Server 2: Displays the IP address of the secondary domain name
server for Internet access. The DNS address is provided by your ISP.
4–4
iPAQ Connection Point CP-2E User Guide
Connection Point CP-2E Home Page
Network Information
This page displays the IP address of the internal DHCP server. It also lists
the hostname, LAN IP address and MAC address for each PC on the
LAN.
> Click Refresh to update the list and display any changes that may
have occurred.
iPAQ Connection Point CP-2E User Guide
4–5
Connection Point CP-2E Home Page
Event Log
This screen displays a list of operating events and exceptions (in
chronological order) that have occurred during the operation of the
Connection Point CP-2E since last started. Each event is listed with a time
stamp to indicate when the event or exception occurred.
The event log records such occurrences as:
> System restart (power-on or reboot)
> Failure to get an IP address from the DHCP server of the ISP
> Failure to log in to a PPPoE connection (usually due to an incorrect
user name or password)
> Attempts to access your network from the Internet
> DHCP Request Information
4–6
iPAQ Connection Point CP-2E User Guide
Connection Point CP-2E Home Page
Renew Internet IP Icon
The Renew Internet IP Icon accesses the functionality for quickly
requesting a new IP address from your ISP. This is occasionally necessary
when access to your ISP has been interrupted and you can no longer
connect to the Internet.
Help/Troubleshooting Icon
The Help/Troubleshooting Icon accesses the online help pages of the
CP-2E.
Firmware Update Icon
The Firmware Update icon accesses the Update utility.
Locate and download the latest firmware update from the
www.compaq.com/athome/support website and save it in a temporary
folder.
1. Click the Firmware Update icon.
2. Click the Update button. If you are updating from a CD or
downloaded file, use the Browse button. Select the file from the
Choose file screen, then click OK.
Note: For a full discussion of using the Firmware Utility for System Recovery, refer
to Chapter 7.
iPAQ Connection Point CP-2E User Guide
4–7
Advanced Setup Icons
5
Advanced Setup Icons
The Advanced Setup icon allows you to perform configuration and
maintenance tasks.
Accessing Advanced Configuration
Options
1. Click the Advanced Setup icon
.
System Settings
Password
The default login name for the Connection Point CP-2E is admin, with the
password field left blank.
iPAQ Connection Point CP-2E User Guide
5–1
Advanced Setup Icons
Note: You should change the administrator's user name and password from the
default setting immediately for security reasons. Make note of the new user
name and password so that you can access the Management Icons of the
Connection Point CP-2E in the future.
1. To change the default user name, type a new user name into the
Administrator Login Name field.
2. To set a password, type the new password once into the
Administrator Login Password field, and again into the Confirm
Password field.
Note: Passwords are case-sensitive. Each time you log in, you must use upper
and lower-case letters exactly as you entered them when you created the
password.
3. Click Apply. The Connection Point CP-2E must be rebooted for
applied changes to take effect.
4. Click OK. You can reboot the Connection Point CP-2E at any time by
clicking the Reboot button at the left.
Resetting to Factory Default
This procedure restores all factory defaults to the Connection Point
CP-2E. Any configuration changes you have made will be lost.
1. On the Connection Point CP-2E Homepage, click Reset Factory
Defaults. A confirmation dialog box is displayed.
5–2
iPAQ Connection Point CP-2E User Guide
Advanced Setup Icons
2. Click OK. The default factory settings are restored. A Changes Saved
message is displayed.
3. Click OK.
4. Click the Reboot button at the left. A confirmation message is
displayed.
5. Click OK. The system restarts, then resumes operation with the new
configuration.
iPAQ Connection Point CP-2E User Guide
5–3
Advanced Setup Icons
Timezone Setup
For a full discussion of the Timezone setup, please refer to Chapter 2.
Internet
For a full discussion of the Internet Connection method setup, please refer
to Chapter 2.
LAN
The LAN page allows you to adjust the TCP/IP settings of the Connection
Point CP-2E.
The default network IP address of the Connection Point CP-2E is
192.168.1.1. This IP address is also the default gateway and DNS server
that local clients use to access the Internet, leaving 253 IP addresses to be
assigned to LAN computers by the DHCP server.
You can change the IP address of the LAN interface on the Connection
Point CP-2E. You can also change the subnet mask, but if you do, you
must ensure that the new subnet includes the addresses your DHCP server
uses.
Note: If you choose a LAN interface subnet that doesn't include the current range
of the DHCP server, the DHCP server is automatically disabled. The current
DHCP server range is listed at the bottom of the page (DHCP Start Address
and DHCP End Address).
MAC Address: Displays the Ethernet Media Access Control (MAC)
address of the LAN interface on the Connection Point CP-2E. It is
expressed in six 2-digit hexadecimal number pairs (set at the factory)
and cannot be changed.
LAN IP Address: Displays the current IP address assigned to the
LAN interface on the Connection Point CP-2E. The IP address is
written in dotted decimal notation (four octets separated by decimal
points). This IP address serves as the DNS server/relay and the
default gateway for computers on the local network.
5–4
iPAQ Connection Point CP-2E User Guide
Advanced Setup Icons
Subnet Mask: Displays the subnet mask that determines which parts
of the IP address are used in the packet routing process. The default
subnet mask of the LAN interface on the Connection Point CP-2E is
255.255.255.0. The first three octets of the subnet mask are
unchangeable. A zero entry for the fourth octet defines a full Class C
local network. You can scale the network down from a full Class C by
entering a number other than zero in the fourth octet in the mask.
Changing the Subnet
1. Click the LAN link at the left. The LAN page is displayed.
2. To change the IP address of the LAN interface, type new octets into
the LAN IP Address field.
3. To change the subnet mask, type new octets into the Subnet Mask
field.
4. Click Apply. The Connection Point CP-2E must be rebooted for
applied changes to take effect.
5. Click OK. You can reboot the Connection Point CP-2E at any time by
clicking the Reboot button at the left.
iPAQ Connection Point CP-2E User Guide
5–5
Advanced Setup Icons
MAC Spoofing
MAC Spoofing allows you to specify the MAC address that is presented
to your ISP from the Connection Point. Some ISPs track the MAC address
of devices that connect to them.
Note: MAC (media access control) Address is a unique hardware address that
identifies each node of a network.
The MAC address of the PC previously connected to your ISP may be
registered with that ISP. To avoid any connection problems, activate the
Connection Point MAC Spoofing functionality.
1. Ensure that the PC with the MAC Address to emulate is connected to
your CP-2E.
2. Open a web browser. Type cp.home into the Address field and press
Enter. You may also type in the base address, which is 192.168.1.1.
3. Click Advanced Setting icon.
4. Click MAC Spoofing on the left.
5. Click on Enable.
6. Click Network Computer List.
5–6
iPAQ Connection Point CP-2E User Guide
Advanced Setup Icons
7. Use the pulldown button in the Network Computer List field. Select
the computer with the MAC address to emulate.
Note: There are two methods of enabling MAC Spoofing, Manual or Network
Computer List. Please refer to Appendix B for a full discussion of the
Manual Identification method for a MAC address.
8. Click Apply.
9. Click OK. The Connection Point CP-2E must be rebooted for applied
changes to take effect.
10. Click OK. You can reboot the Connection Point CP-2E at any time by
clicking the Reboot button at the left.
11. Click Reboot. Connection Point will reboot to the Home Page.
DMZ
The De-Militarized Zone (DMZ) allows you to specify the IP address of
one PC on your local network to be exposed to the Internet. This is
commonly used for Internet gaming or video conferencing. It also opens
potential security holes on your local network.
Designating a DMZ Host
1. Click the DMZ link at the left. The DMZ Host page is displayed.
2. Select Enable in the DMZ Status field.
iPAQ Connection Point CP-2E User Guide
5–7
Advanced Setup Icons
3. Select Manual or Network Computer List in the DMZ Host
Selection Method field.
4. If you selected Manual in Step 3, enter the IP address of the DMZ PC
in the DMZ Host (Manual Entry) field.
5. If you selected Network Computer List in Step 3, click the radial
button next to the computer name of the DMZ PC in the Network
Computer List field.
6. Click Apply. The Connection Point CP-2E must be rebooted for
applied changes to take effect.
7. Click OK. You can reboot the Connection Point CP-2E at any time by
clicking the Reboot button at the left.
Virtual Server
Virtual servers allow you to redirect incoming data on a specific port to a
server on the local network. You can configure multiple servers on your
local network, such as HTTP and FTP servers, and make them accessible
to users on the Internet without fully removing them from behind the
Connection Point CP-2E firewall.
Server Status: Displays the status of the virtual server, either enabled
or disabled.
Global Port: Displays the TCP or UDP port number that is visible to
external users on the Internet. This is also known as the external port
number. The port is mapped to a computer on your LAN.
Local IP: Displays the IP address on the local network to which the
incoming data from the Internet should be redirected.
Local Port: Displays the IP port number to which incoming data is
redirected. This port is mapped to the global port.
Protocol: Displays the protocol used on the specified port.
Comment: Displays a user-defined description of the virtual server.
This field is optional.
5–8
iPAQ Connection Point CP-2E User Guide
Advanced Setup Icons
Adding a Virtual Server
1. Click the Virtual Server link at the left. The Virtual Server page is
displayed.
2. Use the pulldown to select Enable in the Virtual Server field.
iPAQ Connection Point CP-2E User Guide
5–9
Advanced Setup Icons
3. Click Add. The Add Virtual Server Table will appear.
4. Type or select the information you wish to add or change into the
relevant fields.
5. Click Apply. The Connection Point CP-2E must be rebooted for
applied changes to take effect.
6. Click OK. You can reboot the Connection Point CP-2E at any time by
clicking the Reboot button at the left.
Packet Filtering
Packet filtering allows you to block specific services, applications, and
Internet locations by IP addresses and port numbers. For example, you
can deny users access to SMTP/POP3 email services on the Internet,
while allowing them access to Web/HTTP services. You can add new
packet filtering rules based on the destination IP address. Packets en route
from the LAN or private network to the WAN or public network are
evaluated against these rules.
Packet Filtering: Enable or disable all packet filtering processes.
This affects IP and port filtering rules.
5–10
iPAQ Connection Point CP-2E User Guide
Advanced Setup Icons
IP Rules: The IP Rules Status page shows destination IP addresses
that are blocked. Packets that have destinations matching any of these
addresses are discarded.
Port Rules: The Port Rules page displays port and protocol
combinations that are blocked. Packets of the matching port number
and protocol type are discarded. You can add new port/protocol
filtering combinations. Several predefined port mappings are
included.
Enabling Packet Filtering
1. Click the Packet Filtering link at the left. The Packet Filtering page
is displayed.
2. Use the pulldown menu to select Enable in the Packet Filtering
field.
3. Click Apply. The Connection Point CP-2E must be rebooted for
applied changes to take effect.
4. Click OK. You can reboot the Connection Point CP-2E at any time by
clicking the Reboot button at the left.
iPAQ Connection Point CP-2E User Guide
5–11
Advanced Setup Icons
Adding an IP Rule
1. Click the IP Rules link. The IP Rules page is displayed.
2. Click Add. The Add IP Rules page is displayed.
5–12
iPAQ Connection Point CP-2E User Guide
Advanced Setup Icons
3. Type the IP address of the public network device to be filtered out into
the Destination IP field.
4. Click Apply. The Connection Point CP-2E must be rebooted for
applied changes to take effect.
5. Click OK. You can reboot the Connection Point CP-2E at any time by
clicking the Reboot button at the left.
Adding Port Rules
1. Click the Port Rules link. The Port Rules page is displayed.
2. Click Add. The Add Port Rules page is displayed.
3. Select the protocol (or application) from the Protocol pulldown
menu. If you select a pre-defined protocol from the list, the
corresponding port number and service type are automatically set.
The Port edit box is disabled unless you choose the User-Defined
option at the bottom of the protocol list. This allows you to enter a
port number that is not on the pre-defined protocol list.
iPAQ Connection Point CP-2E User Guide
5–13
Advanced Setup Icons
4. For user-defined protocols, select the Service Type (TCP or UDP) to
block. This will not block all TCP or UDP traffic, just that traffic of
the matching protocol type or port number.
5. Click Apply. The Connection Point CP-2E must be rebooted for
applied changes to take effect.
6. Click OK. You can reboot the Connection Point CP-2E at any time by
clicking the Reboot button at the left.
DHCP
The Connection Point CP-2E has an integrated DHCP server that allows
you to automatically configure TCP/IP settings on computers attached to
the local network. The DHCP server can provide the following settings to
PCs on the local network:
> IP address
> Subnet mask
> Default gateway (which is the LAN interface IP address of
the Connection Point CP-2E)
> DNS server
DHCP: Displays the status (enabled or disabled) of the integrated
DHCP server. If you disable the integrated DHCP server, you must
configure the TCP/IP networking settings on each of your PCs
manually.
DHCP Start Address: Displays the first IP address to be leased out
by the DHCP server. The default is 192.168.1.11.
DHCP End Address: Displays the last address to be leased out by
the DHCP server. The default is 192.168.1.254.
5–14
iPAQ Connection Point CP-2E User Guide
Advanced Setup Icons
Changing DHCP Server Settings
1. Click the DHCP link at the left. The DHCP page is displayed.
2. Type the information you wish to change into the relevant fields.
3. Select IP Lease Time from pulldown list.
4. Click Apply. The Connection Point CP-2E must be rebooted for
applied changes to take effect.
5. Click OK. You can reboot the Connection Point CP-2E at any time by
clicking the Reboot button at the left of the Advanced Setup tab.
Reserved IP Table
The Reserved IP Table allows you to assign a specific IP address to a PC
on your local network based on its MAC address. The DHCP server
assigns the same IP address to the PC every time a new address is
requested by the PC. The main page shows IPs that are mapped to specific
MAC addresses.
You can add reserved IP addresses; however, you must have the MAC
address of each client PC for which you wish reserve an IP address.
iPAQ Connection Point CP-2E User Guide
5–15
Advanced Setup Icons
Adding a Reserved IP Address
1. Click the Reserved IP Table link on the left. The Reserved IP Table
page is displayed.
2. Click Add. The Add Reserved IP page is displayed.
5–16
iPAQ Connection Point CP-2E User Guide
Advanced Setup Icons
3. Type the IP address that you wish to reserve into the IP Address
field. The IP address you specify must be within the pool of valid IPs
available to the integrated DHCP server.
4. Type the MAC address of the PC on the local network for which you
wish to reserve the specified IP address into the MAC Address field.
Refer to Appendix B for a complete discussion of identifying MAC
addresses.
5. If you wish, you can type a brief description into the Comment field.
6. Click Apply. The Connection Point CP-2E must be rebooted for
applied changes to take effect.
7. Click OK. You can reboot the Connection Point CP-2E at any time by
clicking the Reboot button at the left.
Excluded IP Addresses
You can exclude a specific IP address within the DHCP server leasing
pool from being leased out. This is useful for assigning static IP addresses
to devices on the local network. IP addresses listed in the Excluded IP
Table are not assigned to client devices by the DHCP server.
iPAQ Connection Point CP-2E User Guide
5–17
Advanced Setup Icons
Adding an Excluded IP Address
1. Click Excluded IP Table on the left. The Excluded IP Table page is
displayed.
2. Click Add. The Add Excluded IP Address page is displayed.
5–18
iPAQ Connection Point CP-2E User Guide
Advanced Setup Icons
3. Type the IP address that you wish to exclude into the IP Address
field.
4. If you wish, you can type a brief description into the Comment field.
5. Click Apply. The Connection Point CP-2E must be rebooted for
applied changes to take effect.
6. Click OK. You can reboot the Connection Point CP-2E at any time by
clicking the Reboot button at the left.
BOOTPIP Table
The BOOTP IP Table allows you to reserve IP addresses for devices that
use the BOOTP protocol for TCP/IP network configuration. These values
are based on MAC addresses.
You must have the MAC address of each client device for which you wish
reserve an IP address.
Adding a BOOTP IP Address
1. Click BOOTP IP Table. The BOOTP IP Table page is displayed.
iPAQ Connection Point CP-2E User Guide
5–19
Advanced Setup Icons
2. Click Add. The Add BOOTP IP page is displayed.
3. Type the IP address that you wish to assign to the specified MAC
address into the IP Address field. The IP Address you specify must
be within the pool of valid IPs available to the integrated DHCP
Server.
4. Type the MAC address of the PC to which you wish to assign the
specified IP address into the MAC Address field. Refer to Appendix
B for a complete discussion of identifying MAC addresses.
5. If you wish, you can type a brief description into the Comment field.
6. Click Apply. The Connection Point CP-2E must be rebooted for
applied changes to take effect.
7. Click OK. You can reboot the Connection Point CP-2E at any time by
clicking the Reboot button at the left.
5–20
iPAQ Connection Point CP-2E User Guide
Advanced Setup Icons
Static Routing Table
The Static Routing Table defines pre-determined routes that Internet data
packets use when they are addressed to specific destination computers.
These entries are based on the IP address of the destination computer. It
may be necessary to define static routes when your Connection Point
CP-2E is connected to more than one local network, or when a site on the
Internet cannot be reached because too many hops are needed to route the
IP packet dynamically.
Adding a Static Route
1. Click the Static Routing Table link at the left. The Static Routing
Table page is displayed.
2. Click Add. The Add Static Routing Table page is displayed.
iPAQ Connection Point CP-2E User Guide
5–21
Advanced Setup Icons
3. Type the destination IP address to which you wish to assign a
specified route into the Network Address field.
4. Type the subnet mask associated with the destination IP address into
the Subnet Mask field. This determines which part of the destination
IP address is the network portion, and which is the host portion.
5. Type the IP address of the gateway device that is used to contact the
destination IP address into the Gateway field. If the destination
address is on the LAN, this gateway IP address must be in the range
of the assigned DHCP addresses for the LAN.
6. Select the LAN Ethernet or WAN from the Interface pulldown menu.
If you are connecting to a local subnet, select LAN. If you are
connecting to another computer through the internet, select WAN.
7. Click Apply. The Connection Point CP-2E must be rebooted for
applied changes to take effect.
8. Click OK. You can reboot the Connection Point CP-2E at any time by
clicking the Reboot button at the left.
5–22
iPAQ Connection Point CP-2E User Guide
Advanced Setup Icons
SMTP
Connection Point can send an e-mail containing log events.
1. Click on SMTP at the left. The SMTP page is displayed.
2. Click Enable.
3. Under the Address Info section, enter your information in the
required fields.
Note: Mail Server name is provided by your ISP.
4. Under the Send Log or Alert section, enter the desired timeframe in
which you want to recieve the e-mail.
5. Click Apply. The Connection Point CP-2E must be rebooted for
applied changes to take effect.
6. Click OK. You can reboot the Connection Point CP-2E at any time by
clicking the Reboot button at the left.
iPAQ Connection Point CP-2E User Guide
5–23
Advanced Setup Icons
5–24
iPAQ Connection Point CP-2E User Guide
System Recovery
6
System Recovery
The Connection Point CP-2E Firmware Update Utility allows you to
perform emergency recovery in case of critical system failure.
Using the Firmware Update Utility
To perform emergency recovery using the Firmware Update Utility, locate
and download the latest firmware update from the
www.compaq.com/athome/support website and save it to a temporary
folder. If Internet access is unavailable to obtain the latest firmware,
the default factory firmware will automatically be used for emergency
recovery.
1. From the Windows taskbar, select Start>Programs>Connection
Point>CP-2E Firmware Update Utility.The Welcome window is
displayed.
2. Click Next. The Firmware Update Utility detects whether a normal
firmware update or emergency recovery is required.
Note: If prompted for a filename, locate and select the update file.
iPAQ Connection Point CP-2E User Guide
6–1
System Recovery
3. Follow the wizard directions.
Restore Factory Defaults
There are three ways to restore factory defaults:
> Use the firmware update procedure described above.
> Click the Reset Factory Defaults button on the System page of the
Advanced Setup tab. Refer to Chapter 6 for more information.
> Hold down the reset button on the back of the Connection Point
CP-2E for ten seconds. Refer to Chapter 1 for the location of the
reset button.
Each of these procedures restores all factory defaults to the Connection
Point CP-2E. Any configuration changes you have made will be lost.
6–2
iPAQ Connection Point CP-2E User Guide
Troubleshooting
7
Troubleshooting
Symptom
Cannot
access
internal web
pages.
Possible Cause Solution
Connection Point
CP-2E not
working properly.
The 'Test' light
stays on.
Reset factory defaults: Press the reset
button for 10 seconds. If this does not fix
the problem, use update/recovery utility
to reinstall firmware.
Network adapter
on PC not
properly
installed.
Verify that network adapter is properly
installed and has TCP/IP bound to it.
PC does not have
IP address.
For Windows 9x, select Start > Run and
type winipcfg. Select the adapter that is
connected to the Connection Point
CP-2E. Click Release, then Renew.
Verify that the PC gets an address in the
appropriate range (192.168.1.xxx) and a
subnet of 255.255.255.0 (assuming that
the default IP of the router was not
changed).
For Windows 2000, open a DOS prompt.
Type ipconfig /release and press Enter.
Type ipconfig /renew and press Enter.
Type ipconfig and press Enter to verify
address.
Proxy settings
enabled on
browser.
Disable browser proxy settings.
iPAQ Connection Point CP-2E User Guide
7–1
Troubleshooting
Symptom
Cannot
access
Connection
Point CP-2E
configuration
pages
through an
Ethernet
adapter.
7–2
Possible Cause Solution
Network cables
not properly
connected to the
PC or the
Connection Point
CP-2E.
Verify that network cables are properly
connected at both ends and that
Connection Point CP-2E is
plugged in. The Connection Point CP-2E
act LEDs should be flickering on
corresponding cable connections
when PCs are on and connected.
iPAQ Connection Point CP-2E User Guide
Troubleshooting
Symptom
Cannot
access
access
Internet
(external web
pages) on my
PC through
the
Connection
Point CP-2E
(but can
access the
configuration
pages).
Possible Cause Solution
Modem is not on.
Turn on DSL or cable modem.
No valid IP
address on
Connection Point
CP-2E.
Go to Connection Point CP-2E Home
Page. Click Renew Internet IP Address
icon. Then, Renew Internet IP.
ISP service is
down.
Verify that DSL or cable modem is on
and working properly by checking the
modem’s LEDs. Consult modem
documentation or ISP for information
regarding modem status.
Previous MAC
address was not
released by cable
or DSL modem.
Reset the cable or DSL modem: unplug
power to modem for anywhere from
several minutes to several hours.
Contact ISP for more information.
Connection Point
CP-2E Internet
settings not
properly
configured.
ISP may require additional configuration
information: PPPoE account user name
and password, DNS, device name, or
MAC address. Contact ISP for specific
requirements and add them to your
configuration.
ISP requires MAC
address of
device
connected to
Internet.
Refer to Chapter 5 section on MAC
Spoofing.
iPAQ Connection Point CP-2E User Guide
7–3
Troubleshooting
Symptom
Cannot see
other users
on network.
Cannot
access files
or printers of
other
computers
on the
network.
7–4
Possible Cause Solution
Operating
system database
that tracks
names of
machines has
not been
synchronized, or
an update to the
database is
pending.
Select Start > Run. Type
\\<computername> or \\<PC IP
address> (replacing “computername”
and “PC-IP-address” with actual
values). Click OK.
Firewall on PC
prevents access
to other systems
on network.
Disable firewall. Connection Point CP-2E
provides firewall protection for PCs
connected to it.
File and printer
sharing not
enabled.
Open Control Panel. Double-click
Network icon. Click Add Service.
Select File and printer sharing. Click
OK. Reboot as required.
No files or
printers are
shared.
Go to PC with resource you want to
share. Right-click resource. Select
Sharing. Select Share this folder or
printer and create share name. Apply
appropriate permissions to folder.
Users not
entered in
Windows 2000
user list.
Open Control Panel on WIndows 2000
PC. Double-click Users and Passwords
icon. Add each user name that should
have access to resources on Windows
2000 PC.
On PCs attempting to access Windows
2000 PC, log on using one of the user
names that was added for resource
access on the Windows 2000 PC.
When the operating system database
updates (usually less than an hour)
this may no longer be necessary.
iPAQ Connection Point CP-2E User Guide
Regulatory Compliance
8
Regulatory Compliance
Federal Communications Commission
Notice
This equipment has been tested and found to comply with the limits for a
Class B digital device, pursuant to Part 15 of the FCC Rules. These limits
are designed to provide reasonable protection against harmful
interference in a residential installation. This equipment generates, uses,
and can radiate radio frequency energy and, if not installed and used in
accordance with the instructions, may cause harmful interference to radio
communications. However, there is no guarantee that interference will not
occur in a particular installation. If this equipment does cause harmful
interference to radio or television reception, which can be determined by
turning the equipment off and on, the user is encouraged to try to correct
the interference by one or more of the following measures:
> Reorient or relocate the receiving antenna.
> Increase the separation between the equipment and receiver.
> Connect the equipment into an outlet on a circuit different from
that to which the receiver is connected.
> Consult the dealer or an experienced radio or television technician
for help.
Modifications
The FCC requires the user to be notified that any changes or
modifications made to this device that are not expressly approved by
Compaq Computer Corporation may void the user's authority to operate
the equipment.
Cables
Connections to this device must be made with shielded cables with
metallic RFI/EMI connector hoods in order to maintain compliance with
FCC Rules and Regulations.
iPAQ Connection Point CP-2E User Guide
8–1
Regulatory Compliance
Declaration of Conformity for products marked
with the FCC logo - United States only
This device complies with Part 15 of the FCC Rules. Operation is subject
to the following two conditions: (1) this device may not cause harmful
interference, and (2) this device must accept any interference received,
including interference that may cause undesired operation.
For questions regarding your product, contact:
Compaq Computer Corporation
P. O. Box 692000, Mail Stop 530113
Houston, Texas 77269-2000
Or, call 1-800- 652-6672 (1-800-OK COMPAQ)
For questions regarding this FCC declaration, contact:
Compaq Computer Corporation
P. O. Box 692000, Mail Stop 510101
Houston, Texas 77269-2000
Or, call (281) 514-3333
To identify this product, refer to the part, series, or model number found
on the product.
8–2
iPAQ Connection Point CP-2E User Guide
Appendix A: Specifications
A
Appendix A: Specifications
Standard
features
•
•
•
•
•
•
•
•
•
•
•
•
•
•
NAT
NTP
SMTP
DHCP server (up to 253 IP addresses)
Supports dynamic IP, static IP and PPPoE Internet
connections
Built-in 4-port Fast Ethernet switch
Auto Sensing 10/100 ports
Auto Sensing MDI/MDI-X cabling
Secure VPN pass-through (IPSec & PPTP)
Internet protocol and port filtering
Web DMZ
Virtual server
MAC Spoofing
HTML-based management pages
Ports
WAN Internet interface: Qty 1 -RJ 45 10Mbps (10/100
BaseT-Ethernet)
LAN interface: Qty 4 -RJ 45 10Mbps (10/100
BaseT-Ethernet), MDI/MDI-X
Environment
Operating temperature 0 ~ 55 ° C
Storage temperature -20 ~ 70 ° C
Humidity (non-condensing) 5 ~ 80%
Power
12VDC 1.2A wall adapter
Dimensions and
weights
Unit: 8.75 x 6 x 1.375 in. (1.1lbs.)
Package: 13.563 x 7.185 x 2.563 in. (2.9 lbs.)
iPAQ Connection Point CP-2E User Guide
A–1
Appendix B: MAC Address Manual Identification
B
Appendix B: MAC Address Manual
Identification
Identify Media Access Control (MAC)
A MAC address is a physical address that uniquely identifies each node of
your network.
For Windows XP
1. Click Start>Run.
2. In the Run dialog box, enter CMD. Click OK. The DOS Window is
displayed.
3. At the c: prompt, type ipconfig /all and press Enter.
4. Locate the network adapter connected to the Connection Point CP-2E
in the list displayed.
5. Note the MAC address listed next to Physical Address.
iPAQ Connection Point CP-2E User Guide
B–1
Appendix B: MAC Address Manual Identification
For Windows 98 and ME PCs:
1. Select Start > Run. The Run window is displayed.
2. Type winipcfg into the Open field.
3. Click OK. The IP Configuration window is displayed.
4. Select the adapter that is connected to the Connection Point CP-2E
from the pick list.
5. Make note of the address listed in the Adapter Address field.
B–2
iPAQ Connection Point CP-2E User Guide
Appendix B: MAC Address Manual Identification
For Windows 2000 PCs
1. Click Start>Run.
2. In the Run dialog box, enter CMD. Click OK. The DOS Window is
displayed.
3. At the c: prompt, type ipconfig /all and press Enter.
4. Locate the network adapter connected to the Connection Point CP-2E
in the list displayed.
5. Note the MAC address listed next to Physical Address.
Accessing Security Configuration Options
1. To access the internal web pages, type cp.home into the Address field
of the web browser and login to your Connection Point CP-2E.
2. Click the Advanced Setup tab.
iPAQ Connection Point CP-2E User Guide
B–3
Glossary
G
Glossary
This glossary provides a brief list of commonly used technical terms and their
definitions.
10BaseT/100BaseT. Standard local area networking protocols, which run at
speeds of 10Mbps and 100Mbps, respectively. Most older networks use 10BaseT,
while newer networks use 100BaseT.
Access point. The bridge between a wired network and wireless devices.
Access rate. The speed at which users connect to the network. This is generally
measured in bits per second, kilobits per second, or megabits per second.
Adapter card. A device that provides network communication capaibilites when
installed in a computer. Sometimes called a “network interface card.”
Bit. A single unit of data. See byte and gigabyte.
BOOTP (Bootstrap Protocol). An Internet protocol that allows a diskless
workstation to discover its own IP address.
Broadband. A high-speed connection to the Internet, typically defined as
starting at 384 Kbps. It allows large files and rich media content (content that
uses video, audio or complex graphics like those used in high-end computer
games) to quickly flow across the network to and from the user's computer.
Browser. A computer program that opens and displays Web pages, including
Microsoft® Internet Explorer and Netscape Communicator. You need a Web
browser to access the Web.
Byte. On almost all modern computers, a byte is equal to 8 bits. Large amounts
of memory are indicated in terms of kilobytes (1,024 bytes), megabytes
(1,048,576 bytes), and gigabytes (1,073,741,824 bytes). See bit and gigabyte.
Data stream. A sequence of digitally encoded signals used to represent
information in transmission.
DHCP (dynamic host configuration protocol). A protocol for assigning
dynamic IP addresses to devices on a network that allows a device to have a
different IP address every time it connects to the network.
Dial-up. An Internet connection made via a telephone line.
Download. To copy a file from a computer on the Internet to your personal
computer. All Web pages are downloaded from the Internet. When you enter a
URL into your Web browser, the files that accompany that URL are copied and
sent to your computer, where they are displayed using your Web browser.
Driver. Software that enables the operating system to recognize and operate
devices installed in or attached to the computer, such as a printer.
iPAQ Connection Point CP-2E User Guide
G–1
Glossary
DSL (digital subscriber line). A technology that takes advantage of standard
copper telephone lines to provide high-speed Internet access.
Ethernet. A local area network protocol used to connect devices within a single
building or campus at speeds up to 10 Mbps.
Fast Ethernet. A local area network protocol used to connect devices within a
single building or campus at speeds up to 100 Mbps.
Firewall. A set of related programs located at the gateway server of a network
that protects information contained within the network from users outside the
network (on the Internet). A company with an intranet that also allows workers to
access to the wider Internet installs a firewall to prevent outsiders from accessing
its data resources.
FTP (file transfer protocol). A protocol used to send files over the Internet.
Gateway. A combination of hardware and software that links two different types
of networks.
Gbps (gigabits per second). A measure of bandwidth capacity or transmission
speed. It represents a billion bits per second.
Gigabyte. A billion bytes of data.
HPNA. Home Phone Network Alliance.
Hub. A common connection point for devices on a network.
IEEE. The Institute of Electrical and Electronics Engineers. An organization of
engineers, scientists, and students best known for developing standards for the
computer and electronics industry.
ISDN (integrated services digital network). A set of standards for digital
transmission capable of carrying data, voice, and video over ordinary telephone
copper wire as well as over other media. ISDN protocols are used worldwide for
connections to public ISDN networks or to attach ISDN devices to ISDN-capable
PBX systems (ISPBXs).
Interface. A point of connection between two systems, networks, or devices.
Internet. The world's largest computer network, which originated from a
research effort initiated by the U.S. Government and was initially used to connect
defense contractors and U.S. universities. Today, its nature is more commercial,
and it is becoming the preferred method of linking business and individual
computers to one another.
Internet access. The physical connection between the subscriber and the nearest
Internet access node.
ISP (internet service provider). A single computer network, connected to the
Internet, that provides access for individual computers to the Internet. ISPs
provide local dial-up and broadband Internet access for personal computers.
Intranet. A local network with internal Web servers that are accessible to
computers in the office, but not accessible from outside the company. Many
intranets are protected from exterior access by security devices such as firewalls.
G–2
iPAQ Connection Point CP-2E User Guide
Glossary
IP Address. The 32-bit numeric address that identifies a computer or device on a
TCP/IP network. An IP address is written as four numbers separated by periods.
For example, 1.160.10.240 could be an IP address.
IPX (internetwork packet exchange). A networking protocol used for
connectionless communications.
Kbps (kilobits per second). A measure of bandwidth capacity or transmission
speed representing a thousand bits per second.
Kilobit. 1,024 bits for technical purposes, such as data storage. 1,000 for general
purposes. Data transfer rates are measured in kilobits per second, abbreviated as
Kbps, and count a kilo as 1,000 bits.
Kilobytes. In decimal systems, kilo stands for 1,000, but in binary systems, a kilo
is 1,024 (2 to the 10th power). Technically, therefore, a kilobyte is 1,024 bytes,
but it is often used loosely as a synonym for 1,000 bytes. In computer literature,
kilobyte is usually abbreviated as K or KB. To distinguish between a decimal K
(1,000) and a binary K (1,024), the IEEE has suggested following the convention
of using a small k for a decimal kilo and a capital K for a binary kilo, but this
convention is by no means strictly followed.
LAN (local area network). A data communications network covering a small
area, usually within the confines of a building or floors within a building.
Common LAN protocols are Ethernet and Token Ring.
LED (light-emitting diode). An electronic device that lights up when electricity
is passed through it.
Line sharing. Allows a consumer to use his or her existing phone line for both
normal phone service provided by the local phone company and high-speed
digital subscriber line (DSL) Internet access through another provider.
MAC (media access control) Address. A unique hardware address that identifies
each node of a network.
Mbps (megabits per second). A measure of bandwidth capacity or transmission
speed. It represents a million bits per second.
MBps (megabytes per second). A measure of bandwidth capacity or
transmission speed. It represents a million bytes per second.
Megabit. When used to describe data storage, 1,024 kilobits. When used to
describe data transfer rates, it refers to one million bits. Network speeds are often
measured in megabits per second.
Megabyte. When used to describe data storage, 1,048,576 bytes. Megabyte is
frequently abbreviated as M or MB. When used to describe data transfer rates, as
in MBps, it refers to one million bytes.
Microsoft Windows®. A computer operating system by Microsoft Corporation,
Modem (MOdulator/DEModulator). Equipment that converts digital signals to
analog signals and vice versa. Modems are used to send data signals (digital) over
the telephone network, which is usually analog.
iPAQ Connection Point CP-2E User Guide
G–3
Glossary
NDIS (network driver interface specification). A Windows device driver
interface that enables a single network interface card to support multiple network
protocols.
NetBEUI (NetBIOS enhanced user interface). An enhanced version of the
NetBIOS protocol used by network operating systems such as LAN Manager,
LAN Server, Windows for Workgroups, Windows 95, and Windows NT.
NIC (network interface controller). The circuit board or other form of
computer hardware that serves as the interface between a computer (or other
form of data terminal equipment) and the communications network. In DSL, a
common NIC is an Ethernet NIC, which serves as the interface to the DSL
modem from the computer.
Node. A processing location such as a computer or other device. Every node has
a unique network address.
OS (operating system). The interface that permits a person and a computer to
“talk” to one another. Microsoft Windows, the most popular operating system,
displays icons, menus, and dialog boxes to find out what you want. You use a
mouse and keyboard to reply. See Microsoft Windows.
Packet. A sub-unit of a data stream.
Packet switched network. A network that transmits data in units called packets
in a connectionless manner. Data streams are broken into packets at the front end
of a transmission, sent over the best available network connection, and then
reassembled in their original order at the destination endpoint.
PCMCIA (Personal Computer Memory Card International Association).
The organization responsible for developing the standard for small, credit
card-sized devices, called PC Cards.
PDF (portable document format). A file format that has captured all the
elements of a printed document as an electronic image, which you can view,
navigate, print, or forward to someone else. PDF files are created using Adobe
Acrobat, Acrobat Capture, or similar products. To open the files, you need the
free Acrobat Reader, which you can easily download. Once you have
downloaded the reader, it starts automatically whenever you want to open a PDF
file.
Router. A device used to connect other devices on a network. A router provides
intelligent paths for data to flow between devices and provides identification for
these devices through IP addresses.
Server. A fast, high-power computer that is used as the repository and distributor
of data, and to control various applications. Servers can be used for a variety of
applications including hosting websites, email databases, and other types of
database applications.
SPX (sequenced packet exchange). A transport layer protocol used in Novell
Netware networks to provide connection-oriented services between two nodes on
the network. Used primarily by client/server applications.
G–4
iPAQ Connection Point CP-2E User Guide
Glossary
STP (Shielded Twisted Pair). A type of cable that consists of two shielded wires
twisted around each other. It is used extensively for local area networks and
telephone connections.
Switch. A switch is essentially an intelligent hub. When a packet arrives at the
switch, it looks at the packet, determines which computer the packet is directed
to, and forwards the packet to that computer. By contrast, a hub regenerates the
packet and broadcasts it to every computer connected through it.
TCP/IP (transmission control protocol/Internet protocol). A networking
protocol that provides communication across interconnected networks, between
computers with diverse hardware architectures and various operating systems.
TCP and IP are only two protocols in the family of Internet protocols. However,
TCP/IP is used to denote the family of common Internet protocols.
Telnet. Terminal emulation program for TCP/IP networks that runs on your
computer and connects your PC to a server on the network.
Traffic. A measure of the quantity of data transferred from one computer to
another computer per unit of time. Traffic is normally measured in megabytes.
Upload. To transmit files from your computer to another through a network.
UTP (Unshielded Twisted Pair). A type of cable that consists of two unshielded
wires twisted around each other. It is used extensively for local area networks and
telephone connections.
WLAN (wireless local area network). A type of local area network that uses
high-frequency radio waves instead of wires to communicate.
iPAQ Connection Point CP-2E User Guide
G–5