1
9045B/N (g-Cover) (’100. 7. 21)
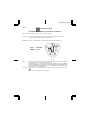
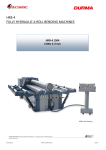
Finishing Sander
9045B
9045N
9045B
9045N
DOUBLE
INSULATION
9045B/N (g-Cover) (’100. 8. 2)
SPECIFICATIONS
Model
9045B
Pad size ........................................................................ 114 x 234 mm
Orbits per minute .......................................................... 10,000
Overall length ................................................................ 240 mm
Net weight ..................................................................... 2.6 kg
9045N
114 x 234 mm
10,000
268 mm
2.8 kg
• Due to our continuing program of research and development, the specifications herein are subject to change
without notice.
• Note: Specifications may differ from country to country.
Power supply
The tool should be connected only to a power supply of the same voltage as indicated on the nameplate, and
can only be operated on single-phase AC supply. They are double-insulated in accordance with European
Standard and can, therefore, also be used from sockets without earth wire.
Noise And Vibration Of Model 9045N
The typical A-weighted noise levels are
sound pressure level: 89 dB (A)
sound power level: 102 dB (A)
– Wear ear protection. –
The typical weighted root mean square acceleration
value is not more than 2.5 m/s2.
For European countries only
EC-DECLARATION OF CONFORMITY
The undersigned, Yasuhiko Kanzaki, authorized by
Makita Corporation, 3-11-8 Sumiyoshi-Cho, Anjo,
Aichi, 446 Japan declares that this product
(Serial No. : series production)
manufactured by Makita Corporation in Japan is in
compliance with the following standards or standardized documents,
HD400, EN50144, EN55014, EN61000*
in accordance with Council Directives, 73/23/EEC,
89/336/EEC and 98/37/EC.
*from 1st Jan. 2001
Yasuhiko Kanzaki CE 94
Director
MAKITA INTERNATIONAL EUROPE LTD.
Michigan Drive, Tongwell, Milton Keynes,
Bucks MK15 8JD, ENGLAND
2
9045B/N (illust) (’100. 7. 19)
1
2
3
4
5
6
7
3
9045B/9045N (Eng) (’100. 7. 18)
ENGLISH
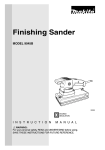
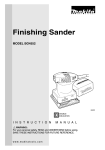
Explanation of general view
1
2
3
4
5 Base
6 Dust bag
7 Slide switch
Frame cover
Push button
Clamper
Abrasive paper
8 Limit mark
9 Brush holder cap
0 Screwdriver
SAFETY INSTRUCTIONS
13. Don’t overreach
Keep proper footing and balance at all times.
14. Maintain tools with care
Keep tools sharp and clean for better and safer
performance. Follow instructions for lubricating
and changing accessories. Inspect tool cords
periodically and, if damaged, have repaired by
authorized service facility. Inspect extension cords
periodically and replace if damaged. Keep
handles dry, clean and free from oil and grease.
15. Disconnect tools
When not in use, before servicing, and when
changing accessories such as blades, bits and
cutters.
16. Remove adjusting keys and wrenches
Form the habit of checking to see that keys and
adjusting wrenches are removed from tool before
turning it on.
17. Avoid unintentional starting
Don’t carry plugged-in tool with finger on switch.
Be sure switch is off when plugging in.
18. Outdoor use extension cords
When tool is used outdoors, use only extension
cords intended for use outdoors and so marked.
19. Stay alert
Watch what you are doing. Use common sense.
Do not operate tool when you are tired.
20. Check damaged parts
Before further use of the tool, a guard or other part
that is damaged should be carefully checked to
determine that it will operate properly and perform
its intended function. Check for alignment of moving parts, binding of moving parts, breakage of
parts, mounting, and any other conditions that
may affect its operation. A guard or other part that
is damaged should be properly repaired or
replaced by an authorized service center unless
otherwise indicated elsewhere in this instruction
manual. Have defective switches replaced by and
authorized service center. Do not use tool if switch
does not turn it on and off.
21. Warning
The use of any other accessory or attachment
other than recommended in this operating instruction or the catalog may present a risk of personal
injury.
22. Have your tool repaired by an expert
This electric appliance is in accordance with the
relevant safety rules. Repairing of electric appliances may be carried out only by experts otherwise it may cause considerable danger for the
user.
Warning! When using electric tools, basic safety
precautions should always be followed to reduce
the risk of fire, electric shock and personal injury,
including the following.
Read all these instructions before attempting to
operate this product and save these instructions.
For safe operation:
1. Keep work area clean
Cluttered areas and benches invite injuries.
2. Consider work area environment
Don’t expose power tools to rain. Don’t use power
tools in damp or wet locations. Keep work area
well lit. Don’t use power tools in presence of
flammable liquids or gases.
3. Guard against electric shock
Prevent body contact with grounded surfaces
(e.g. pipes, radiators, ranges, refrigerators).
4. Keep children away
Do not let visitors contact tool or extension cord.
All visitors should be kept away from work area.
5. Store idle tools
When not in use, tools should be stored in dry,
high, or locked-up place, out of the reach of
children.
6. Don’t force tool
It will do the job better and safer at the rate for
which it was intended.
7. Use right tool
Don’t force small tools or attachments to do the
job of a heavy duty tool. Don’t use tools for
purposes not intended; for example, don’t use
circular saw for cutting tree limbs or logs.
8. Dress properly
Do not wear loose clothing or jewelry. They can be
caught in moving parts. Rubber gloves and nonskid footwear are recommended when working
outdoors. Wear protective hair covering to contain
long hair.
9. Use safety glasses and hearing protection
Also use face or dust mask if cutting operation is
dusty.
10. Connect dust extraction equipment
If devices are provided for the connection of dust
extraction and collection facilities, ensure these
are connected and properly used.
11. Don’t abuse cord
Never carry tool by cord or yank it to disconnect it
from receptacle. Keep cord from heat, oil and
sharp edges.
12. Secure work
Use clamps or a vise to hold work. It’s safer than
using your hand and it frees both hands to operate
tool.
4
9045B/9045N (Eng) (’100. 7. 18)
ADDITIONAL SAFETY RULES
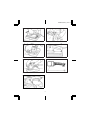
Switch action (Fig. 4)
To start the tool, move the slide switch forward. Move
it backward to stop.
1. Hold the tool firmly.
2. Do not leave the tool running. Operate the tool
only when hand-held.
3. This tool has not been waterproofed, so do not
use water on the workpiece surface.
Operation (Fig. 5)
Hold the tool firmly. Turn the tool on and wait until it
attains full speed. Then gently place the tool on the
workpiece surface. A finishing sander is generally
used to remove only a small amount of material at a
time. Since the quality of the surface is more important than the amount of stock removed, do not bear
down on the tool.
Keep the base flush with the workpiece at all times.
Excessive pressure may damage the paper and
shorten tool life.
SAVE THESE INSTRUCTIONS.
OPERATING INSTRUCTIONS
Installing or removing abrasive paper
(Fig. 1 & 2)
Important:
Always be sure that the tool is switched off and
unplugged before installing or removing the paper.
You can put a high polish on furniture or other fine
surfaces by using a cloth under the tool.
First, remove the frame cover from either the front or
back as shown in Fig. 1. (9045N only)
CAUTION:
• Do not block motor vent with your finger or hand.
• Never run the tool without paper. You may seriously
damage the pad.
Push the push button to release the clamper. Insert
the paper end into the clamper, aligning the paper
edges even and parallel with the sides of the base.
(Prebending the paper makes attachment easier.)
Repeat the same process for the other end of the
base, maintaining the proper paper tension.
(9045B & 9045N)
Then replace the frame cover. (9045N only)
MAINTENANCE
CAUTION:
Always be sure that the tool is switched off and
unplugged before carrying out any work on the tool.
CAUTION:
After inserting the paper, make sure the teeth of the
clamper hold it securely. Otherwise the paper will be
loose and subject to slippage, resulting in uneven
sanding operation.
Replacement of carbon brushes (Fig. 6 & 7)
Replace carbon brushes when they are worn down to
the limit mark. Both identical carbon brushes should
be replaced at the same time.
To maintain product safety and reliability, repairs,
maintenance or adjustment should be carried out by a
Makita Authorized Service Center.
Dust bag (Fig. 3)
9045N only
The use of the dust bag makes sanding operations
clean and dust collection easy.
To attach the dust bag, fit the bag’s entry port onto the
dust spout on the tool, then turn it clockwise or
counterclockwise so that the small hole in the port fits
over the pin protruding from the spout.
To remove the dust bag, turn it counterclockwise to
slip the hole off the pin, then pull off the dust bag. For
the best results, empty the dust bag when it becomes
about half full, tapping it lightly to remove as much
dust as possible.
5
9045B/9045N (Eng) (’100. 7. 21)
ACCESSORIES
CAUTION:
These accessories or attachments are recommended for use with your Makita tool specified in this manual. The
use of any other accessories or attachments might present a risk of injury to persons. The accessories or
attachments should be used only in the proper and intended manner.
• Abrasive paper
(with pre-punched holes)
Grit
Use
60
Coarse
80
100
Medium
120
150
180
6
Fine
9045B/9045N (Eng) (’100. 7. 21)
UK only
DOUBLE INSULATION
THE ADDITIONAL COMMENT OF ELECTRICAL CONNECTION
The tool is double insulated for safety, no earth connection is required.
CAUTION:
The tool must be connected to a plug having a rated current greater than that of tool.
The rated voltage and current appear on the name plate.
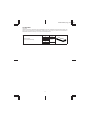
IMPORTANT: The wires in the mains lead are coloured in accordance with the following code.
NOTE:
As the colours of the mains lead of the tool may not correspond with the coloured markings
identifying the terminals in your plug, proceed as follows:
THE WIRE WHICH IS COLOURED BLUE MUST BE CONNECTED TO THE TERMINAL
WHICH IS MARKED WITH THE LETTER ‘‘N’’ OR COLOURED BLACK. THE WIRE WHICH IS
COLOURED BROWN MUST BE CONNECTED TO THE TERMINAL WHICH IS MARKED WITH
THE LETTER ‘‘L’’ OR COLOURED RED.
CAUTION:
Neither wire is to be connected to earth terminal which is marked with the letter ‘‘E’’ or symbol
‘‘ ’’.
FOR 110 VOLT TOOL, USE PLUGS TO BS4343.
7
9045B/9045N (Eng) ('100. 7. 18)
Made in Japan
883256D8