1
ENGLISH ESPANOL
Outdoor Gas Smoker
Use & Care Guide
Ahumador a Gas
para uso al Aire Libre
Manual de uso y cuidado
Kenmore Model Number :
Numero de Modelo Kenmore:
125.15884800
NOTICE TO INSTALLER:
LEAVE THESE INSTRUCTIONS WITH THE GRILL
OWNER FOR FUTURE REFERENCE.
NOTICE TO CONSUMER:
RETAIN THIS OWNER’S MANUAL FOR FUTURE
REFERENCE.
AVISO PARA EL INSTALADOR:
ENTREGUE ESTAS INSTRUCCIONES AL
PROPIETARIO DE LA PARRILLA PARA REFERENCIA
FUTURA.
AVISO PARA EL PROPIETARIO:
GUARDE ESTAS INSTRUCCIONES DE LA PARRILLA
PARA REFERENCIA FUTURA.
Customer Support Center
Centro para Servicio al Cliente
Call us first if you have any problem with this product. We
can help you with questions about assembly and grill
operation or if there are damaged or missing parts when you
unpack this unit. Please call before returning to the store.
Llámenos primero si usted tiene cualquier problema con
este producto. Podemos ayudarle con preguntas sobre
asamblaje y la operación de esta parrilla o con piezas
dañadas o que hacen falta cuando usted saque esta unidad
de su envase. Por favor llame antes de volver a la tienda
donde hizo la compra de este producto.
1-800-848-8915
8:30am-5:00pm CST, Mon thru Friday
140-5525-0
1007
Rev. 1
In the space below, record the model and serial
numbers and purchase date of your Outdoor
Electric Smoker. You will find the model and serial
numbers on the back of the unit.
En el espacio abajo, registre el modelo y los
números de serie y la fecha de compra de su
Ahumador Eléctrico para uso al aire libre. Usted
encontrará el modelo y los números de serie en la
parte posterior de la unidad.
Model No. / Num. de Modelo
______________________
Serial No. / Num. de Serie
______________________
Purchase Date / Dia de Compra ______________________
Keep this booklet and your Sears sales receipt in a safe
place for future reference.
Guarde esta manual y su recibo de venta de Sears en un
lugar seguro para referencia futura.
Sears, Roebuck and Co., Hoffman Estates, IL 60179 U.S.A.
www.sears.com
TABLE OF CONTENTS
Warranty Information . . . . . . . . . . . . . . . . . . . . . . . . . . . . . . . . . 2
Important Safety Warnings . . . . . . . . . . . . . . . . . . . . . . . . . . 2–4
Product Features . . . . . . . . . . . . . . . . . . . . . . . . . . . . . . . . . . . . 4
Carton Contents . . . . . . . . . . . . . . . . . . . . . . . . . . . . . . . . . . 4–6
Assembly Instructions . . . . . . . . . . . . . . . . . . . . . . . . . . . . . 7–12
Connecting the LP Tank . . . . . . . . . . . . . . . . . . . . . . . . . . . 13–14
Operating Instructions . . . . . . . . . . . . . . . . . . . . . . . . . . . . 14–15
Lighting Procedures . . . . . . . . . . . . . . . . . . . . . . . . . . . . . . 15–16
Cooking Instructions . . . . . . . . . . . . . . . . . . . . . . . . . . . . . . 16–17
Temperature Chart . . . . . . . . . . . . . . . . . . . . . . . . . . . . . . . . . . 17
After Use Safety and Maintenance . . . . . . . . . . . . . . . . . . 17–18
Storage . . . . . . . . . . . . . . . . . . . . . . . . . . . . . . . . . . . . . . . . . . 18
Troubleshooting . . . . . . . . . . . . . . . . . . . . . . . . . . . . . . . . . . . . 18
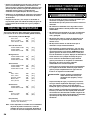
DANGER: Indicates an imminently hazardous situation which, if
not avoided, will result in death or serious injury.
WARNING: Be alert to the possibility of serious bodily injury if the
instructions are not followed. Be sure to read and
carefully follow all of the messages.
CAUTION: Indicates a potentially hazardous situation which, if
not avoided, may result in minor or moderate injury.
Kenmore One Year Full Warranty
If this product fails due to a defect in material or workmanship
within one year from the date of purchase, contact Sears at
1-800-4-MY-HOME® to arrange for free repair (or
replacement if repair proves impossible). This warranty gives
you specific legal rights, and you may also have other rights
which vary from state to state.
Sears, Roebuck and Co.,
Hoffman Estates, IL 60179
DANGER
If you
1.
2.
3.
4.
smell gas:
Shut off gas to the appliance.
Extinguish any open flames.
Open door.
If odor continues, keep away from
the appliance and immediately call
your fire department.
Failure to follow these instructions could
result in fire or explosion which could
cause property damage, personal injury
or death.
2
DANGER
1. Never operate this appliance
unattended.
2. Never operate this appliance within
10 ft (3.0 m) of any structure,
combustible material or other gas
cylinder.
3. Never operate this appliance within
25 ft (7.5 m) of any flammable
liquid.
4. Never allow oil or grease to get
hotter than 400°F or 200°C. If the
temperature exceeds 400°F (200°C)
or if oil begins to smoke,
immediately turn the burner or gas
supply OFF.
5. Heated liquids remain at scalding
temperatures long after the cooking
process. Never touch cooking
appliance until liquids have cooled
to 115°F (45 °C) or less.
6. If a fire should occur, keep away
from the appliance and immediately
call your fire department. Do not
attempt to extinguish an oil or
grease fire with water.
Failure to follow these instructions could
result in fire or explosion which could
cause property damage, personal injury
or death.
IMPORTANT SAFETY
WARNINGS
WE WANT YOU TO ASSEMBLE AND USE YOUR
SMOKER AS SAFELY AS POSSIBLE.
THE PURPOSE OF THIS SAFETY ALERT SYMBOL
IS TO ATTRACT YOUR ATTENTION TO
POSSIBLE HAZARDS AS YOU ASSEMBLE AND USE
YOUR SMOKER.
WHEN YOU SEE THE SAFETY ALERT SYMBOL
PAY CLOSE ATTENTION TO THE INFORMATION
WHICH FOLLOWS!
READ ALL SAFETY WARNINGS AND
INSTRUCTIONS CAREFULLY BEFORE ASSEMBLING
AND OPERATING YOUR SMOKER.
©Sears Brands L.L.C.
WARNING
• This instruction manual contains important information
necessary for the proper assembly and safe use of the
appliance.
• Read and follow all warnings and instructions before
assembling and using the appliance.
• Follow all warnings and instructions when using the
appliance.
• Keep this manual for future reference.
• DO NOT use this smoker in a manner other than its
intended purpose. It is NOT intended for commercial use.
It is NOT intended to be installed or used in or on a
recreational vehicle and/or boats. The smoker is not to be
used as a heater.
• Keep a fire extinguisher accessible at all times.
• The use of alcohol, prescription or non prescription
drugs may impair the user's ability to properly assemble
or safely operate the smoker.
• This smoker is for outdoor use only, in a well-ventilated
area. DO NOT operate the smoker indoors, in a garage, or
in any other enclosed area or under overhead
construction.
• Use caution when assembling and operating the smoker
to avoid cuts and scrapes from rough or sharp edges.
• Use caution when lifting and moving the smoker to avoid
strains or back injury. Two people are recommended to
lift or move the smoker. DO NOT move the smoker while
it is in use.
• DO NOT operate the smoker near or under flammable or
combustible materials such as decks, porches, or
carports. A minimum clearance of 36 inches (92cm) is
recommended. DO NOT operate the smoker under
overhead construction.
• Operate the smoker only on a stable, level, nonflammable surface such as asphalt, concrete or solid
ground. DO NOT operate the smoker on flammable
material such as carpet or a wood deck.
• DO NOT store the smoker near gasoline or other
combustible liquids or where combustible vapors may be
present.
• DO NOT store or operate this smoker in an area
accessible to children or pets. Store the smoker in a dry,
protected location.
• DO NOT leave the smoker unattended while in use.
Operate the smoker with close supervision.
• DO NOT allow anyone to conduct activities around the
smoker during or following use until it has cooled. It is
hot during operation and remains hot for a period of time
following use.
WARNING
• This smoker becomes extremely hot - allow the smoker
to cool completely before handling. If you must handle
the smoker while it is hot, ALWAYS wear protective oven
mitts or heat resistant gloves when handling the smoker
or its components.
• NEVER use gasoline or other highly volatile fluids as a
starter. They can explode.
• The water bowl and woodchip box should not be moved
while the smoker is operating or until the smoker has
cooled sufficiently. These contain hot ashes and liquids
that may cause serious injury. If you must move these
components, ALWAYS wear protective oven mitts or heat
resistant gloves.
• Dispose of cold ashes by wrapping them in heavy duty
aluminum foil and putting them in a non combustible
container. Be sure there are no other combustible
materials in or near the container.
• If you must dispose of the ashes in less time than it takes
for them to completely cool, remove the ashes from the
smoker, keeping them in heavy duty foil, and soak them
completely with water before disposing of them in a non
combustible container.
• DO NOT obstruct the flow of combustion air and / or
ventilation air for the smoker.
• Use caution when opening the door of the smoker while
in operation. Keep hands, face, and body safe from hot
steam or flare-ups. Protect your nose and mouth from
smoke inhalation.
• DO NOT wear loose clothing while operating the smoker.
Tie back long hair while operating the smoker. ALWAYS
wear fully-covering shoes while operating the smoker.
• Allow the smoker and its components to cool completely
before conducting any routine cleaning or maintenance.
• NEVER use glassware, plastic, or ceramic cookware on
or in your smoker.
• NEVER operate the smoker without water in the water
bowl. NEVER allow the water to completely evaporate.
Check the water level at least every 2 hours. A sizzling
sound may indicate a low water level. Follow instructions
in this manual for adding water while operating.
• When using flavoring wood, add a sufficient amount prior
to operation to avoid having to add wood while
operating. Adding wood while operating may splash hot
water and cause serious injury.
• Use of accessories not intended for this smoker is not
recommended and may lead to injury or property
damage.
• DO NOT leave hot ashes unattended until the smoker
cools completely.
• DO NOT move the smoker while it is in use. Allow the
smoker to cool completely before moving or storing.
3
WARNING
• An LP cylinder not connected for use should not be stored in the
vicinity of the smoker or any other appliance. DO NOT store
spare LP cylinders within 10 feet of the smoker. LP cylinders
must be stored outdoors, out of reach of children. DO NOT store
LP cylinders in a building, garage, or any other enclosed area.
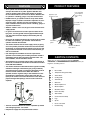
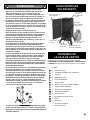
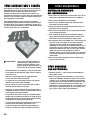
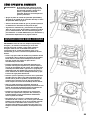
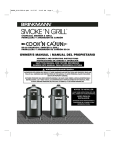
PRODUCT FEATURES
Four adjustable
chrome plated
steel cooking
grills
Appliance style
magnetic closure
• DO NOT store LP gas cylinders inside or on top of the smoker.
Improper storage of cylinders could lead to explosion, fire, and /
or personal injury. Cylinders are to be store outdoors, out of
reach of children and must not be stored in a building, garage, or
any other enclosed area.
Porcelain coated
water pan
• While the smoker is not in use, the gas must be turned off at the
supply cylinder.
• LP gasses are heavier than air, tend to pool and collect in lowlying areas, are easily ignited and are highly flammable. Proper
care and caution should be employed when dealing with any
such fuels.
• Do not use the smoker if the burner fails to light or fails to remain
lit. Under such conditions, gas should be shut off and fuel
cylinders should be disconnected.
Push-button
igniter
• The smoker should be shut off and all supply valves (on piping
or on fuel cylinders) should be closed in the event that the odor
of unburned gas is detected. Do not attempt to use the unit until
any gas leaks are fixed and / or the source of the unburned gas
odor is accounted for.
Powerful 14,500 BTU
brass burner
• Use under high wind conditions that result in poor burner
operation such as blowing out and flaring should be avoided. If
repositioning the unit does not improve operation under such
wind conditions, the unit should be shut off.
• All installations are to conform to local codes. In the absence of
local codes, installation should conform to the National Fuel Gas
Code, ANSI Z223.1/NFPA54.
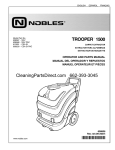
• The smoker should be installed with the hose regulator assembly
extended at full length of hose directly (24” [61cm] maximum)
away from the burner. When so configured, placement results in
maximum tank to smoker distance. When the smoker is
operated, the hose / regulator and gas tank should be on a line
perpendicular to wind direction. Placing tank closer than 24”
(61cm) to the smoker can overheat the tank and cause release of
propane through relief openings and can result in tank fire or
explosion.
WIND
24” min
(610mm)
• The hose to tank attachment can result in a potential trip hazard
and tank tipping hazard - use caution.
• Keep the fuel supply hose away from heated surfaces.
4
LP cylinder
not included
Wood chip pan
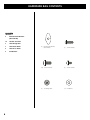
CARTON CONTENTS
Make sure you have all items listed under CARTON
CONTENTS and HARDWARE BAG CONTENTS before you
begin the assembly process.
Qty.
1
1
Door Handle
2
1
Temperature Gauge Assembly
3
1
Smoke Stack
4
4
Cooking Grills
5
1
Smoker Body
6
1
Water Pan
7
1
Wood Chip Box Lid
8
1
Wood Chip Box
9
1
Wood Box Stand
10
1
Burner Assembly
11
2
Side Handles
12
1
Control Panel Assembly
13
4
Legs
14
1
Zip Tie
1
Use & Care Guide
1
Hardware Bag
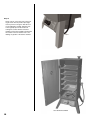
PARTS DIAGRAM FOR MODEL 125.15884800
1
3
2
4
5
6
7
8
11
10
9
13
12
14
Inspect contents of the box to ensure all parts are included and undamaged.
5
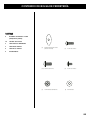
HARDWARE BAG CONTENTS
QUANTITY
6
2
Heat Resistant Washers
(Door Handle)
15
1/4-20 X 5/8” Bolts
3
10-24 Flange Nuts
7
10-24 X 5/8” Bolts
2
10-24 X 1/3” Bolts
2
#10 Washers
(2)
Heat Ressistant Washers
(Door Handle)
(7)
10-24 x 5/8” Bolts
(15) 1/4-20 x 5/8” Bolts
(2)
10-24 x 1/3” Bolts
(3)
(2)
#10 Washers
10-24 Flange Nuts
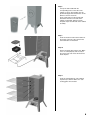
ASSEMBLY
Choose a good, cleared assembly area and
get a friend to help you put your smoker
together. Lay cardboard down to protect
smoker finish and assembly area.
CAUTION: Some parts may contain
sharp edges. Wear protective
gloves if necessary.
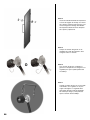
Leg with Hole
Note: With the help of a friend, turn the
smoker cabinet upside down.
Step 1
For each leg, line up the holes of cabinet
and insert the 1/4-20 X 5/8” bolts; nuts are
pre-welded to the cabinet. Securely tighten
the bolts. Make note of the arrow in the
illustration. This is where the leg with the
hole in it should be installed. DO NOT yet
insert the two bolts in the locations indicated
by the circles.
Bolt Holes
Support Tabs
Step 2
Place the Control Panel Assembly between
the front legs as shown. There is a slot on
each side of the control panel that fits
around the edge of the leg. The two
mounting tabs fit to the inside of the legs
and line up with the bolt holes. Be sure both
the support tabs on the back side of the
control panel are captured behind the legs
as shown to the right.
Step 3
Insert the two remaining 1/4-20 X 5/8” bolts
through the mounting tabs and tighten them
securely.
7
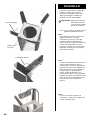
Step 4
Set the burner assembly onto the cabinet as
shown.
IMPORTANT: The burner tube must slide
properly onto the gas valve orifice as
shown.
Step 5
Secure the burner assembly with the three
1/4-20 X 5/8” bolts from the inside of the
cabinet. Securely tighten the bolts.
Step 6
Attach the loose igniter wire to the igniter on
the control panel as shown below.
Note: With the help of a friend, turn the
smoker body to its upright position.
Try to minimize stress on legs.
CAUTION: Make sure the valve gas
orifice slides and fits into the
burner tube.
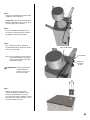
Step 7
Set the smoke stack on top of the cabinet
and line it up with the corresponding holes.
Insert three 10-24 X 5/8” bolts through
smoke stack base and into cabinet. Secure
with three 10-24 flange nuts.
8
Burner Tube
Igniter
Gas Valve
Orifice
Step 8
Line up the side handle with the
corresponding holes on the side of the
cabinet as shown. The handles must be
positioned upright with the bolt holes on the
bottom as shown. Insert two
10-24 X 5/8” bolts from the outside and
thread into the holes in the side of the
cabinet as illustrated. Tighten securely.
Complete steps for both sides of the cabinet
assembly.
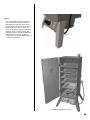
Step 9
Insert the wood box rack into the bottom of
the smoker. The feet of the rack sit in the
four indentations in the bottom.
Step 10
Set the wood chip box onto the rack. Make
sure it is seated properly and securely in
the center of the rack. Place the lid on the
wood chip box.
Step 11
Insert all cooking grills into rack supports
respectively as shown. Make sure each
cooking grill is firm and level.
9
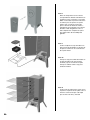
Step 12
Slide the water pan into the bottom rack
position as shown. Make sure water pan
is firm and level.
Wood Chip Rack
Step 13
Mount the door handle with two
10-24 X 1/3” bolts, two #10 washers and
two heat resistant washers. Insert each bolt
through the door from the inside. From the
outside place a heat resistant washer over
each bolt. Then thread the bolts into the
handle. Tighten each bolt securely.
#10 Washers
Heat Resistant
Washers
10
Step 14
Insert the temperature gauge with bezel
through the mounting hole in the front of the
door. Place back plate and a hex nut onto
the temperature gauge stem from the inside
of the door panel and tighten it firmly.
Step 15
Place one end of the S-Hook around the
regulator neck or hose as shown.
OR
Step 16
Using a set of pliers, crimp the S-hook
securely to the hose/regulator so that it can
not be removed from the assembly.
Step 17
When an LP tank is not attached to the
smoker, use the S-Hook to hang the
hose/regulator from the carry handle on the
side of the smoker. This will help prevent dirt
and other particles from plugging the end of
the assembly.
11
Step 18
Using a zip tie, secure the hose to the front
leg as shown. Do not pull the zip tie tight,
leave it just loose enough so that the hose
can be adjusted if needed. Tying the hose
to the leg helps prevent the hose from
coming into contact with the hot burner
chamber. Inspect the installation underneath
the smoker to ensure that the hose is not
rubbing any portion of the burner chamber.
Gas Smoker Assembled
12
CONNECTING THE LP TANK
WARNING
WARNING
•
Do not store tanks under or near the smoker.
•
Never fill tanks more than 80% full.
ALL INSTRUCTIONS AND SAFEGUARDS ON THIS PAGE
MUST BE FOLLOWED TO PREVENT FIRE, DAMAGE,
AND / OR INJURY.
1. The knob on the LP tank must be closed. See that the
knob is turned clockwise to a full stop.
2. Check that control knob on the smoker is turned off.
3. Remove the protective cap from the LP tank valve and
coupling nut, if present.
4. Hold the regulator in one hand and insert the nipple into
the valve outlet. Be sure the nipple is centered in the
valve outlet. The coupling nut connects to the large
outside threads on the valve outlet.
Note: Use care - do not cross thread the connection.
5. Hand tighten the coupling nut clockwise until it comes to
a full stop. Firmly tighten by hand only. Do not use tools.
If the two previous statements above are not followed
exactly, a fire causing death or serious injury may
occur.
•
This smoker is designed to operate on LP (Liquefied
Propane) gas only.
•
DO NOT leave the smoker unattended while in use.
Operate the smoker with close supervision.
The 20 lb LP cylinder used with this smoker must
conform to the following requirements.
Diameter- 12” (30.5cm)
Height 18” (45.7cm)
With a maximum capacity of 20 pounds. The gas
cylinder used must include a collar to protect the
cylinder valve. The cylinder supply system
must be arranged for vapor withdrawal.
The instructions stated on gas cylinder tanks have to
be followed when filling or transporting
tanks. Failure to do so could result in problems relating
to overfilling, excessive venting release
of gas and to regulator freezing.
Do not allow dirt or foreign material to get into or onto
tank connection when it is not attached to the fuel
supply system. Place the dust cap on cylinder valve
outlet whenever the cylinder is not in use. Only install
the type of dust cap on the cylinder valve outlet that is
provided with the cylinder valve. Other types of caps or
plugs may result in leakage of propane.
Cylinders must be filled before initial use. All handling,
transport, filling and storage of LP gas cylinders must
be in accordance with NFPA 58 Storage and Handling
of Liquid Petroleum Gases, or CSAB 149.1 Natural Gas
and Propane Installation Code. Cylinders must be
suitably tied down during transport. Do not place any
other items on top of cylinders at any time. Cylinders
are not to be exposed to excessive temperatures or
high heat.
CAUTION: In the connection process, the
hose/regulator side of the connection will
seal on the back check in the valve,
resulting in a slight resistance. The
connection requires about one-half to
three-quarters additional turn to complete
the connection.
Any fuel supply cylinder used must be constructed and
marked in accordance with specifications for propane
cylinders of the U.S. Department of Transportation
(DOT) CFR 49, or CAN/CSA B339. The appliances is to
be used only with the 20 pound, vertical standing vapor
withdrawal type tank.
If there is a question on the identity of your unit and of
the type of fuel to be used, please look on the data
plate. Units are factory equipped for use on only one
type of fuel. These units cannot be, and should not be
used on other type of fuels. Doing so can cause severe
damage to the unit and the installation area and the
added risk of serious injury. Any attempt to operate
these smokers on fuels for which they are not design
certified voids the manufacturer's warranty.
Gas Tank outlet must have Type 1 gas connection
termination in order to mate with gas hose provided
with smoker.
The pressure regulator and hose assembly supplied by
the manufacturer with the appliance must be used.
Replacement pressure regulators and hose assemblies
must be those specified by the appliance manufacturer.
13
CONNECTING THE LP TANK
The regulator/hose assembly should be handled carefully to
prevent contamination by foreign objects and dirt. Clean
and inspect the hose before each use of the appliance. If
there is evidence of abrasion, wear, cuts or leaks, the hose
must be replaced prior to the appliance being put into
operation. In order to insure proper operation, any
replacement of the fuel tank regulator assembly has to be
done with parts authorized by the smoker manufacturer.
This unit is not to be utilized with a non-self-contained LPgas supply system.
Valve/pressure regulators are factory set to the correct
operating pressures. No attempts should be made to adjust
these settings!
CHECKING FOR LEAKS
After all connections are completed, check all connections
and fittings for leaks with a soap solution.
• With all valves closed, apply the leak check solution
(50/50 mix of dishwashing detergent and water) to all gas
carrying connections, fittings and to tank seams.
• Open tank valve.
Presence of bubbles at areas of wet solution indicates a
gas leak. If leaks are detected or you smell or hear gas,
shut off the valve and repair the leak or replace the
defective part. Do not use the smoker until all leaks are
corrected.
When setting up the smoker and tank, it is
recommended to have the tank and smoker on a line
perpendicular to the wind direction.
The gas hose/regulator assembly should be totally
extended to the maximum distance so that the hose is
straight and the tank is as far from the smoker as it can
be.
LP tanks are intended for operation in the upright
position only.
Care should be taken to protect the fuel supply hose
from damage from either foot or vehicle traffic.
If the appliance is not in use, the gas must be turned off
at the supply cylinder and the cylinder should be
disconnected from the appliance.
Storage of the appliance indoors is only permissible if
the cylinder is disconnected and removed from the
appliance.
14
OPERATING INSTRUCTIONS
PRE-USE PROCEDURES
Before you cook food in your smoker, it is important to
“season” your smoker. Seasoning seals the paint and
interior of your smoker to enhance flavoring, durability, and
overall performance. This is also referred to as the “breakin” process.
If your smoker requires any touch-up paint on the inside of
the cabinet, the only time you should apply paint to the
inside is before the seasoning process. Paint should not be
applied to the interior of your smoker after your smoker
has been used. Paint toxins may contaminate your food.
However, if paint becomes necessary after use, see the
section in this manual concerning After Use Care and
Maintenance.
To season your smoker, simply use it as you normally
would; only do not cook any food. You will need to follow
all of the operating procedures in the next few sections of
this manual.
Using your desired flavoring woods and marinades, burn
your smoker at low temperature (around 125°F [50°C]) for
45-60 minutes. Let the smoker cool, and clean out the used
water and wood.
Once seasoning is complete, your smoker’s interior will
have a durable, seasoned coating.
ADDING WATER
To add water before cooking, simply remove the water bowl
and fill it with water up to 1” (2.5cm) below the rim. Then
replace the bowl to the bottom of the rack.
To add water while the smoker is hot, DO NOT pull the
water bowl out beyond the rack.
Cooking Tips:
Line the water bowl with aluminum foil before each use.
This will make it easy to clean and help your water bowl
last longer.
To make adding water easier and safer, use a clean
watering can with a long spout.
ADDING WOOD / CHARCOAL
To add wood chips before cooking, simply fill the wood chip
box with your choice of flavoring hardwood chips. The
amount and type of wood you use is entirely up to you. One
full box is typically enough for several hours of smoking.
Once the box is filled, place the lid on top of the box and
set the box in the smoker.
To add wood chips while cooking, we recommend using
tongs or long handled pliers to remove the box lid and to
place the pieces into the wood chip box without removing
the box. It is not recommended to remove the wood chip
box while the smoker is in operation.
LIGHTING PROCEDURES
IGNITER LIGHTING SYSTEM:
1. Check all connections for leaks using the “soapy water”
test as explained on page 13.
2. Open the smoker cabinet door.
3. Check for any blockage to the burner. Remove any
foreign objects or matter.
4. Be sure the burner control knob is in the “OFF” position.
5. Open the LP cylinder valve by turning counter-clockwise.
6. To light unit with the igniter, push in and turn the burner
control knob counter-clockwise to the high setting.
7. Immediately rotate the igniter repeatedly to click it
several times (you should see a small spark jumping
from the end of the electrode rod to the side of the
burner). If the burner doesn’t light within 3 to 5 seconds,
turn the burner control knob off and wait five minutes for
gas to clear before repeating the steps again. If burner
still fails to light try match lighting the smoker using the
instructions noted below.
8. Once the burner is lit, then close the door to allow heat
to accumulate.
MATCH LIGHTING:
1. Repeat steps 1 thru 5 of the Igniter Lighting System
above.
CAUTION: The wood chip box and lid get very hot.
Avoid handling them while in use. Always
wear protective oven mitts when handling
hot components.
Cooking Tip – Flavoring wood:
2. Remove the Wood Chip Box and its stand from inside
the smoker. Light a paper match and drop it into the
burn chamber, making sure it falls next to the brass
burner. Quickly turn the control knob to the light
position. If the burner does not light within 4 or 5
seconds, turn the control knob off, wait 5 minutes for
gas to clear, and repeat the process.
• Small wood chips work best inside the wood chip box.
• Use dry hardwoods such as hickory, pecan, apple,
cherry, or mesquite.
• Most fruit or nut tree woods produce excellent smoke
flavoring.
• Do not use resinous woods such as pine or plywood.
These usually produce unpleasant flavoring.
• Let your taste be your guide – experiment with different
types and quantities of wood chunks, chips, or sticks.
You can even mix woods.
• To produce more smoke and to prevent fast burning, presoak the wood chips in a separate bowl of water for at
least 20 minutes, or wrap the chips in perforated
aluminum foil.
• Most smoke flavoring occurs within the first hour of
cooking. Adding wood chips after the first hour is
typically not necessary unless extra smoke flavoring is
desired.
15
SHUTTING THE SMOKER OFF
CAUTION: The smoker can become very hot while in
use. Do not touch any portion of the smoker
except for the door handle and burner
control knob. It may be necessary to use
protective gloves.
• Turn the burner control knob off by pushing in and
rotating clockwise. The burner flame should then
go out.
• Turn off the LP cylinder valve by turning the knob
clockwise until it stops.
• Follow all warnings and safety precautions before
removing meat from smoker or preparing the unit for
storage. Please see page 16 for proper storage
procedures and the important warnings and safeguards
on pages 2 and 4.
COOKING INSTRUCTIONS
IMPORTANT: Before each use, clean and inspect the hose
and the connection to the LP cylinder. If there is evidence of
abrasion, wear, cuts or leaks, the hose must be replaced
before the smoker is used. Refer to the “leak test”
instructions in the LP Tank connection portion of this
manual.
• Fill the wood chip box with flavoring wood chips and
place the box inside the smoker as instructed in the
assembly section of this manual. Refer to the section that
explains flavoring wood for recommended use of
flavoring wood.
• Place the water bowl inside the smoker in the lowest rack
position as explained in the assembly section of this
manual. Carefully fill the water bowl with water or
marinade up to 1 inch below the rim. A full bowl will last
for approximately 2-3 hours. Do not overfill or allow water
to overflow from the water bowl.
• Insert or adjust the cooking grills in to the desired rack
positions. For better access to the food with tongs or
spatulas, make sure the grill wires run front to back as
explained in the assembly section of this manual.
• You are now ready to light the burner. Refer to the Lighting
Procedure on the previous pages of this manual. The heat
from the burner will allow the wood chips to burn, causing
the flavoring smoke to accumulate.
• Place the food on the cooking grills in a single layer with
space between each piece. This will allow smoke and hot
moisture to circulate evenly around all the food pieces.
• Smoking for 2 to 3 hours at the ideal constant cooking
temperature of 225° to 250° F (110° to 120° C) will get the
best results. This temperature is according to the
temperature gauge mounted on the front of the smoker.
For more tender and heavily smoked meat, a lower
temperature may be preferred. If time is critical, a higher
temperature range is recommended.
16
•
Check water level periodically and add water if low. For
best results and to retain heat, avoid opening the door
of the smoker while in use. When the door must be
opened, only open it briefly. The smoker will quickly
resume cooking temperature after the door is closed.
•
Always use a meat probe thermometer to ensure food
is fully cooked before removing it from the smoker.
•
After each use, and after the smoker is cooled,
carefully remove the grease pan from the bottom of the
smoker, empty the grease, and clean the grease pan.
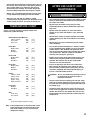
TEMPERATURE CHART
Here is a chart for measuring properly cooked meat
temperature: (USDA Standard)
Ground Meat & Meat Mixtures
Turkey, Chicken
165°F
Veal, Lamb
160°F
Beef, Pork
160°F
(74°C)
(71°C)
(71°C)
Fresh Beef
Medium Rare
Medium
Well Done
145°F
160°F
170°F
(63°C)
(71°C)
(77°C)
Fresh Lamb
Medium Rare
Medium
Well Done
145°F
160°F
170°F
(63°C)
(71°C)
(77°C)
Fresh Veal
Medium Rare
Medium
Well Done
145°F
160°F
170°F
(63°C)
(71°C)
(77°C)
Poultry
Chicken, whole
Turkey, whole
Breast, roast
Thighs, wings
Duck and Goose
180°F
180°F
170°F
180°F
180°F
(82°C)
(82°C)
(77°C)
(82°C)
(82°C)
Fresh Pork
Medium
Well Done
160°F
170°F
(71°C)
(77°C)
Ham
Fresh (raw)
Pre-Cooked
160°F
140°F
(71°C)
(60°C)
AFTER USE SAFETY AND
MAINTENANCE
WARNING
• Use caution when lifting and moving the smoker to avoid
strains or back injury. Two people are recommended to
lift or move the smoker.
• DO NOT store the smoker near gasoline or other
combustible liquids or where combustible vapors may
be present.
• DO NOT store this smoker in an area accessible to
children or pets. Store the smoker in a dry, protected
location.
• DO NOT allow anyone to conduct activities around the
smoker following use until it has cooled. It is hot during
operation.
• DO NOT leave hot ashes unattended until the smoker
cools completely.
• This smoker becomes extremely hot - allow the smoker
to cool completely before handling. If you must handle
smoker while it is hot, ALWAYS wear protective oven
mitts or heat resistant gloves when handling the smoker
or its components. Allow the smoker to cool before
removing and cleaning the grease pan.
• Dispose of cold ashes by wrapping them in heavy duty
aluminum foil and putting them in a noncombustible
container. Be sure there are no other combustible
materials in or near the container.
• If you must dispose of the ashes in less time than it
takes for them to completely cool, remove the ashes
from the smoker, keeping them in heavy duty foil, and
soak them completely with water before disposing of
them in a noncombustible container.
CAUTION: All care and maintenance procedures are to
be performed only while the smoker is
turned off and cooled.
• Clean the water bowl and cooking grills with hot, soapy
water. Rinse and dry thoroughly. You may prefer to coat
the water bowl and cooking grills lightly with cooking oil
or cooking spray.
• Frequently check and clean the burner for insects and
insect nests.A clogged tube can lead to fire outside the
smoker. Also make sure the smoker does not have any
foreign objects obstructing the flow of combustion and
ventilation air.
Fish
(Cook until opaque and flakes easily)
Note: These temperatures are measured with a meat
probe thermometer. The heat indicator on the
door of the smoker is not an accurate meat
temperature reading.
17
• If your heat indicator seems to be out of calibration:
Remove the heat indicator from the door of the smoker
by loosening and removing the mounting nut from the
inside. There is a second nut mounted on the back of the
heat indicator that can be turned to adjust the heat
indicator needle. Set the needle to the current outdoor
ambient temperature and re-mount the heat indicator to
the door of the smoker.
• To clean the inside and outside of the smoker cabinet,
simply use a damp cloth. Spray-washing with a water
hose is not recommended. All moisture should be wiped
away and not allowed to stand inside or on top of the
smoker. Carefully remove the grease pan, dispose the
grease, and wash thoroughly. Once cleaned, you may
prefer to lightly coat the interior of the smoker cabinet
with cooking oil or cooking spray.
STORAGE
BEFORE STORING YOUR GRILL:
• Clean all surfaces.
• When cool and not in use, store your smoker indoors in
a dry location to protect against rusting.
• If storing the grill outdoors, cover the grill with a grill
cover for protection from the weather.
TROUBLESHOOTING
PROBLEM
• If rust is present on the exterior surface of the smoker,
clean the area with steel wool or emery cloth and use
heavy duty, heat resistant paint.
Burner will
not light
• NEVER apply additional paint to the interior of the
smoker. If rust is present on the interior of the smoker,
clean it thoroughly with steel wool or emery cloth and
lightly coat the area with cooking oil or cooking spray to
help minimize recurring rust.
3. Burner may not be
properly seated.
4. Burner may be
obstructed.
5. The cylinder valve
may be closed.
6. Regulator is not
properly seated on
cylinder valve.
• When an LP tank is not connected, and to help prevent
dirt or other foreign particles from clogging the
hose/regulator, hang the end of the hose/regulator from
the side handle using the supplied S-hook.
• To protect your smoker from weather, always keep your
smoker covered while not in use.
• Inspect the flames at the burner by looking through the
front access hole.A good flame should be blue with a
yellow tip 1” to 2” in length. If flames are excessively
yellow and irregular, oil residue and food deposits may
be collecting on the burner. Try cleaning the burner
surface and the holes to improve the flames. Bad flames
may also be caused by poor gas valve orifice-to-burner
attachment. Always let the smoker cool before cleaning
or checking the assembly.
18
CAUSE
1. Check LP cylinder
fuel level.
2. Bad electrode
spark.
CORRECTION
1. Replace LP Cylinder.
2. Check to see if the grill
will match light.
Electrode or collector
may need adjustment.
3. Reseat burner.
4. Clear obstructions
from burner.
5. Open cylinder valve.
6. Reseat regulator on
cylinder valve.
Fire at
control
knob
1. Clear obstructions from
1. Burner holes may
burner.
be obstructed.
2. Burner is improperly 2. Reseat burner on
control valve.
seated on control
valve.
3. Leak check and tighten
3. Gas connections
all connections.
may be loose.
Yellow
Flames
at burner
1. Burner is
obstructed.
Flame
blows
out on
“LOW”
1. Clear obstructions from
1. Burner holes may
burner holes.
be obstructed.
2. Burner is improperly 2. Reseat burner on
seated on control
control valve.
valve.
3. Grill is not
3. Pre-heat grill
sufficiently.
sufficiently
pre-heated.
1. Clear obstructions from
burner.
Burner does 1. Flow control device
has been activated
not get hot
in regulator.
enough
1. Reset regulator by
turning off gas at LP
cylinder. Disconnect
regulator from tank.
Re-attach regulator to
tank.
Grill is
too hot
1. Clean smoker
components
thoroughly.
2. Replace with identical
parts.
3. Lower flame height
and temperature.
1. Excess grease
build-up causing
grease fires.
2. Damaged or faulty
regulator.
3. Cook on a lower
temperature
setting.
TABLA DE CONTENIDO
Información de Garantía . . . . . . . . . . . . . . . . . . . . . . . . . . . . . 19
PELIGRO
1.
Importantes Advertencias de Seguridad . . . . . . . . . . . . . . 19–21
Características del Producto . . . . . . . . . . . . . . . . . . . . . . . . . . 21
2.
Contenido del Cartón . . . . . . . . . . . . . . . . . . . . . . . . . . . . 21–23
Instrucciones de Asamblaje. . . . . . . . . . . . . . . . . . . . . . . . 24–29
Conexión de Cilindro de Propano Líquido (LP) . . . . . . . . 30–31
Instrucciones de Operación. . . . . . . . . . . . . . . . . . . . . . . . 31–32
Instrucciones de Encendido . . . . . . . . . . . . . . . . . . . . . . . . 32–33
3.
Instrucciones de Cocción . . . . . . . . . . . . . . . . . . . . . . . . . . 33–34
Tabla de Temperatura . . . . . . . . . . . . . . . . . . . . . . . . . . . . . . . 34
Seguridad y Mantenimiento Despues del Uso . . . . . . . . . 34–35
4.
Almacenamiento . . . . . . . . . . . . . . . . . . . . . . . . . . . . . . . . . . . 35
Identificación y Corrección de Problemas. . . . . . . . . . . . . . . . 35
PELIGRO:
Indica una situación peligrosa inminente la cual, si
no se evita, producirá lesiones graves o aún la
muerte.
5.
ADVERTENCIA: Manténgase alerta a la posibilidad de lesiones
corporales graves si no se siguen las instrucciones.
Asegúrese de leer y seguir cuidadosamente todos
los mensajes.
PRECAUCIÓN:
Indica una situación posiblemente peligrosa la cual,
si no se evita, puede producir lesiones menores o
moderadas.
Garantía de un Año Completo
Si este producto falla debido a un defecto en material o a la
ejecución en el plazo de un año a partir de la fecha de la
compra, comuníquese a Sears al 1-800-4-MY-HOME® para
hacer arreglos de reparación gratuita (o reemplazo si
reparación es imposible). Esta garantía le da derechos legales
específicos, y usted también puede tener otros derechos que
varíen por estado de estado.
Sears, Roebuck and Co.,
Hoffman Estates, IL 60179
PELIGRO
Si huele gas:
1. Apague el gas al artefacto.
2. Apague cualquier llama expuesta.
3. Abra la tapa.
4. Si el olor persiste, subsistencia
lejos de la aplicación y llame de
inmediato a su proveedor de gas o
a los bomberos.
Se puede producir un incendio y causar
lesiones o hasta la muerte si no siguen
estas instrucciones de forma exacta.
6.
Nunca opere este aparato dejándolo
desatendido.
Nunca opere este aparato sin un
espacio mínimo de 10 pies (3.0 m) entre
el aparato y otras estructuras,
materiales combustibles u otro cilindro
de gas.
Nunca opere este aparato sin un
espacio mínimo de 25 pies (7.5 m) entre
el aparato y otros líquidos inflamables.
Nunca permita que el aceite o la grasa
llegue a estar más caliente que 400°F o
200°C. Si la temperatura excede 400°F
(200°C) o si el aceite comienza a fumar,
apague inmediatamente la fuente de la
hornilla o de gas a (OFF) APAGADO.
Líquidos calentados permanecen
elevados a temperaturas que escaldan
por mucho tiempo después de cocinar.
Nunca toque el aparato hasta que los
líquidos se han refrescado a 115°F (°C
45) o menos.
Si ocurre un fuego, manténgase lejos
del aparato y llame inmediatamente a
los bomberos. No procure extinguir un
fuego de aceite o de grasa con agua.
Se puede producir un incendio y causar
lesiones o hasta la muerte si no siguen
estas instrucciones de forma exacta.
ADVERTENCIAS IMPORTANTES
DE SEGURIDAD
ES NUESTRO DESEO QUE ARME Y UTILICE SU PARRILLA
EN LA FORMA MÁS SEGURA POSIBLE. EL PROPÓSITO DE
ESTE SÍMBOLO DE ALERTA DE SEGURIDAD
ES QUE USTED PRESTE ATENCIÓN A LOS POSIBLES
PELIGROS CUANDO ARME Y UTILICE SU PARRILLA.
¡CUÁNDO VEA ESTE SÍMBOLO DE ALERTA DE SEGURIDAD
PRESTE ESPECIAL ATENCIÓN A LA INFORMACIÓN A
CONTINUACIÓN!
LEA DETENIDAMENTE TODAS LAS ADVERTENCIAS DE
SEGURIDAD E INSTRUCCIONES ANTES DE ARMAR Y USAR
LA PARRILLA.
19
ADVERTENCIA
• Este manual de uso y cuidado contiene información
importante necesaria para uso y cuidado apropiado de
este aparato.
• Lea y siga todas las advertencias e instrucciones antes
de usar este aparato.
• Guarde este manual para referencia futura.
• No utilice este ahumador en una manera diferente a su
propósito previsto. No esta diseñado para uso comercial.
No esta diseñado para ser instalado o para ser utilizado
en un vehículo recreacional y/o barcos. El ahumador no
debe ser utilizado como calentador.
• Tenga un extintor siempre cerca o a la mano.
• El uso de alcohol, prescripciones o drogas de
prescripción pueden deteriorar la capacidad mental del
usuario para usar correctamente y con seguridad el
ahumador.
• Este ahumador esta diseñado para el uso al aire libre
solamente, o en una área bien-ventilada. No use el
ahumador adentro de un garaje, o en cualquier otra área
con alguna construcción por encima del aparato.
• Use precaución al ensamblar u operar su ahumador para
evitar cortadas o raspones por orillas agudas de partes
de metal.
• Use precaución al levantar o mover el ahumador para
evitar tensiones o lesiones de su espalda. Se recomienda
dos personas para levantar o para mover el ahumador.
No mueva el ahumador mientras este en uso.
• NO opere el ahumador cerca o bajo materiales
inflamables o combustibles tal como cubiertas, pórticos,
o cubiertas para carros. Se recomienda una separación
mínima de 36 pulgadas (92cm). No use el ahumador con
alguna construcción por encima del aparato.
• Utilice el ahumador solo en superficies duras, niveladas,
incombustibles, y estables (cemento, suelo, etc.). Nunca
utilice el ahumador sobre madera u otras superficies que
pudieran quemarse.
• No almacene el ahumador cerca de la gasolina u otros
vapores o líquidos inflamables.
• No almacene el ahumador un área donde niños y
mascotas pueden entrar en contacto con la unidad.
Almacene el ahumador en un lugar seco y protegido.
• Nunca opere este aparato dejándolo desatendido. Cerca
supervisión es necesaria cuando se utilice este
ahumador.
• No permite a nadie conducir actividades alrededor del
ahumador durante o después de uso hasta que se haya
refrescado. El aparato se mantiene caliente durante y
después de su operación por un período de tiempo
extendido.
• No deje cenizas calientes desatendidas hasta que el
ahumador se refresca totalmente.
• No mueva el ahumador mientras este en uso. No mueva
o almacene el ahumador hasta que se haya refrescado.
20
ADVERTENCIA
• Este ahumador llega a temperaturas extremadamente
calientes - permita que el ahumador se refresque
totalmente antes de tocar. Si usted tiene que tocar el
ahumador mientras este caliente, SIEMPRE use mitones
protectores para horno o guantes para horno para poder
manejar el ahumador o sus componentes.
• NUNCA utilice gasolina u otros líquidos altamente
volátiles como arrancador. Pueden estallar.
• Mientras se este utilizando, el ahumador contiene liquido
caliente en la bandeja de agua. Use precaución extrema
en todo tiempo. No mueva el ahumador cuando la
bandeja de agua contenga líquidos calientes porque
podría causar serias lesiones corporales. SIEMPRE use
mitones protectores para horno o guantes para horno.
• Disponga las cenizas frías envolviéndolas en papel de
aluminio resistente y poniéndolas en un envase no
combustible. Asegúrese que no hay otros materiales
combustibles adentro ni cerca del envase.
• Si usted tiene que deshacerse de las cenizas en menos
tiempo que toma para que se refresquen completamente,
quite las cenizas del ahumador, manteniéndolas en papel
de aluminio resistente, y empápelas totalmente con agua
antes de disponer de ellas en un envase no combustible.
• No obstruya el flujo de aire de combustión y/o del aire de
la ventilación para el ahumador.
• Tenga cuidado al abrir la puerta del ahumador mientras
este en operación. Guarde las manos, la cara, y el cuerpo
del vapor caliente o de las llamaradas. Proteja su nariz y
boca contra la inhalación del humo.
• No use ropa floja mientras que use el ahumador. Ate pelo
largo detrás de su cabeza mientras que use el ahumador.
SIEMPRE use zapatos completamente cubiertos mientras
use el ahumador.
• Permita que el ahumador y sus componentes se
refresquen completamente antes de conducir cualquier
limpieza o mantenimiento rutinaria.
• NUNCA utilice vasijas cristalerías, de plástico, o de
cerámica en su ahumador.
• No permita que el líquido en la bandeja de agua se
evapore completamente. Revise la bandeja de agua cada
2 horas y agregue agua si el nivel esta bajo (un sonido
chirriante puede indicar la necesidad de agua). Siga las
instrucciones en la sección agregando agua mientras se
este cocinando de este manual.
• Al usar madera para agregar sabor, agregue una
suficiente cantidad antes de la operación para evitar de
que tener que agregar la madera durante la operación. La
adición de madera mientras que el aparato este operando
puede causar el salpicar de agua caliente y causar
lesiones serias.
• El uso de accesorios no previstos para este aparato no
se recomienda y puede causar lesiones o daños a
materiales o físicos.
ADVERTENCIA
• Un cilindro de gas LP no conectado para uso no se debe
almacenar en la vecindad del ahumador o otro aparato. No
almacene los cilindros de gas LP menos de 10 pies del
ahumador. Los cilindros de gas LP se deben almacenar al aire
libre, fuera del alcance de niños. No almacene los cilindros de
gas LP en un edificio, garaje, o ninguna otra área encerrada.
• No almacene cilindros de gas LP dentro o encima del ahumador.
El almacenaje incorrecto de cilindros de gas podía conducir a
una explosión, fuego, y/o a otros daños corporales. Los cilindros
de gas LP se deben almacenar al aire libre, fuera del alcance de
niños. No almacene los cilindros de gas LP en un edificio, garaje,
o ninguna otra área encerrada.
• Apague el cilindro de gas cuando no este en uso.
• Gases de propano son más pesados que el aire, tienden reunirse
en áreas bajas que fácilmente se encienden. Cuidado apropiado y
precaución deben ser empleados al usar estos combustibles.
• No utilice ahumador si hornilla no puede encenderse o no
permanece encendida. Bajo tales condiciones, apague el gas y
desconecte el cilindro de gas.
• El ahumador debe ser apagado y todas las válvulas apagadas
(en la tubería o en los cilindros del combustible) deben ser
cerrados en el caso que se detecte olor de gas no quemado. No
procure utilizar el aparato hasta que cualquier escape de gas ha
sido solucionado y/o la fuente del olor de gas no quemado se ha
encontrado y arreglado.
• No utilice el ahumador en condiciones de fuerte viento que dan
lugar a operación pobre y podrán extinguir la llama. Intente recolocar la unidad en otro lugar pero si la situación no mejora
bajo tales condiciones de viento, apague el ahumador.
• Este artefacto debe instalarse de acuerdo con todos los códigos
locales relevantes. Si no existen códigos locales, la instalacion
tiene que estar de acuerdo con Código de Gas Combustible de
EE.UU. ANSI Z223.1 NFPA 54.
• El ahumador debe instalarse con el ensamblaje del regulador de
la manguera extendido a toda la longitud de la manguera y
alejado directamente (24" [61 cm] como máximo) de la hornilla.
Esta colocación resulta en una distancia máxima entre el tanque
y el ahumador. Cuando el ahumador es utilizado, la manguera o
el regulador y el tanque de gas deben estar en una línea situada
perpendicularmente a la dirección del viento. Si uno coloca el
tanque a menos de 24" (61 cm) del ahumador éste puede
sobrecalentar el tanque y ocasionar la liberación de gas propano
a través de las aberturas de escape, lo que a su vez puede
causar que el tanque se incendie o explote.
VIENTO
24” min
(610mm)
• La unión de la manguera al tanque puede representar un peligro,
ya que uno puede tropezarse y tirar el tanque – tenga precaución.
• Mantenga la manguera suministradora de combustible alejada de
superficies calientes.
CARACTERÍSTICAS
DEL PRODUCTO
Cuatro parrillas
cromadas
ajustables para
cocinar
Cierre magnético estilo
electrodoméstico
Bandeja de
agua recubierta
de porcelana
Encendedor
de botón
Bandeja
para astillas
de madera
Cilindro de gas LP
(no incluido)
Hornilla potente hecho
de latón de 14,500 BTU
CONTENIDO DE
LA CAJA DE CARTÓN
Asegúrese de tener todas las piezas enumeradas bajo
"CONTENIDO DE LA CAJA DE CARTÓN" y CONTENIDO DE
LA BOLSA de ferretería antes de comenzar con el ensamblaje.
Cantidad
1
1
Manija de la Puerta
2
1
Ensamblaje del Indicador de la Temperatura
3
1
Chimenea
4
4
Rejillas para Cocinar
5
1
Cuerpo del Ahumador
6
1
Bandeja de Agua
7
1
Tapa de la Caja para las Astillas de Madera
8
1
Caja para Astillas de Madera
9
1
Soporte para Caja de Madera
10
1
Ensamblaje de la Hornilla
11
2
Manijas laterales
12
1
Ensamblaje del Panel de Control
13
4
Piernas
14
1
Abrazadera
1
Guía de Uso y Cuidado
1
Bolsa de Ferretería
21
DIAGRAMA DE PIEZAS PARA MODELO 125.15884800
1
3
2
4
5
6
7
8
11
10
9
13
12
14
Inspeccione el contenido de la caja para cerciorarse de que tenga todas las piezas intactas.
22
CONTENIDO DE BOLSA DE FERRETERÍA
CANTIDAD
2
Arandelas resistentes al calor
(manija de la puerta)
15
1/4-20 X 5/8” Pernos
3
10-24 Tuercas de Reborde
7
10-24 X 5/8” Pernos
2
10-24 X 1/3” Pernos
2
#10 Arandelas
(2)
Arandelas Resistentes a Calor
(Asidero de Puerta)
(7)
10-24 x 5/8” Pernos
(15) 1/4-20 x 5/8” Pernos
(2)
10-24 x 1/3” Pernos
(3)
(2)
#10 Arandelas
10-24 Arandelas de Reborde
23
ENSAMBLAJE
Seleccione una zona buena y despejada y
pídale a un amigo a que le ayude a
ensamblar su ahumador. Ponga cartón
debajo para proteger el acabado del
ahumador y la zona del ensamblaje.
Pierna con Agujero
PRECAUCIÓN: Algunas piezas pueden
tener bordes filosos. En
caso necesario, póngase
guantes de protección.
Nota: Con la ayuda de un amigo, voltee el
gabinete del ahumador al revés.
Paso 1
Para cada pierna, alinee los orificios del
gabinete e introduzca los pernos
1/4-20 X 5/8"; las tuercas ya han sido
soldadas al gabinete. Apriete bien los
pernos. Fíjese en la flecha de la ilustración,
ya que es allí donde debe montarse la
pierna con el agujero en ella. Todavía NO
introduzca los dos pernos en los lugares
que indican los círculos.
Orificios para
los Pernos
Lengüetas de Soporte
Paso 2
Coloque el ensamblaje del panel de control
entre las piernas delanteras como se
muestra. Hay una ranura en cada lado del
panel de control que encaja alrededor del
borde de la pierna. Las dos lengüetas de
montaje encajan en el interior de las
piernas, quedando alineadas con los
orificios para los pernos. Fíjese que ambas
lengüetas de soporte en la parte trasera del
panel de control sean enganchadas atrás
de las piernas como se muestra a la
derecha.
Paso 3
Inserte los dos pernos sobrantes de
1/4-20 X 5/8" a través de las lengüetas de
montaje y apriételos bien.
24
Paso 4
Coloque el ensamblaje de la hornilla sobre
el gabinete como se muestra.
IMPORTANTE: El tubo del quemador debe
deslizarse debidamente por el orificio de la
válvula de gas como se muestra.
Paso 5
Fije el ensamblaje del quemador con los
tres pernos 1/4-20 X 5/8" desde el interior
del gabinete. Apriete bien los pernos.
Paso 6
Una el cable suelto del encendedor al
encendedor ubicado en el panel de control
como se muestra abajo.
Nota: Con la ayuda de un amigo, voltee el
cuerpo del ahumador a su posición
vertical. Intente reducir el esfuerzo a
las piernas al mínimo.
Tubo del Quemador
Encendedor
Orificio de
la Válvula
de Gas
PRECAUCIÓN: Fíjese que el orificio de
la válvula de gas se
deslice y encaje en el
tubo de la hornilla.
Paso 7
Coloque la chimenea sobre la parte
superior del gabinete y alinéela con los
orificios correspondientes. Inserte tres
pernos de 10-24 X 5/8" al gabinete, a través
de la base de la chimenea. Fíjelos con tres
tuercas de reborde de 10-24.
25
Paso 8
Alinee la manija lateral con los orificios
correspondientes ubicados lateralmente en
el gabinete como se muestra. Las manijas
deben ir colocadas en posición vertical con
los orificios para los pernos en la parte
inferior como se muestra. Inserte dos
pernos 10-24 X 5/8" desde el exterior e
introdúzcalos enroscándolos a los orificios
ubicados al lado del gabinete como se
ilustra. Apriete bien. Complete los pasos
para ambos lados del ensamblaje del
gabinete.
Paso 9
Inserte la rejilla de la caja de madera a la
parte inferior del ahumador. Las piernas de
la rejilla se asientan en las cuatro marcas
de la parte inferior.
Paso 10
Coloque la caja para astillas de madera en
la rejilla. Asegúrese de que esté bien
asentada y fija en el centro de la rejilla.
Coloque la cubierta sobre la caja para
astillas de madera.
Paso 11
Inserte todas las rejillas para cocinar en los
respectivos soportes de las rejillas como se
muestra. Cerciórese de que cada rejilla
para cocinar esté firme y nivelada.
26
Paso 12
Deslice la bandeja de agua a la parte
inferior de la rejilla como se muestra.
Asegúrese de que la bandeja de agua esté
firme y nivelada.
Caja para Astillas de Madera
Paso 13
Monte la manija de la puerta con dos
pernos 10-24 X 1/3", dos arandelas #10 y
dos arandelas resistentes al calor. Inserte
cada perno a través de la puerta desde el
interior. Desde el exterior, coloque una
arandela resistente al calor sobre cada
perno, luego enrosque los pernos a la
manija. Apriete bien cada perno.
#10 Arandelas
Arandelas
Resistentes
al Calor
27
Paso 14
Inserte el indicador biselado de temperatura
a través del agujero de montaje en el frente
de la puerta. Coloque la placa trasera y una
tuerca hexagonal al vástago del indicador
de temperatura desde el interior del panel
de la puerta y apriete bien.
Paso 15
Coloque un extremo del gancho en “S”
alrededor del cuello del regulador o de la
manguera como se muestra.
O
Paso 16
Con un juego de alicates, comprima el
gancho en “S” fijamente a la manguera o al
regulador para que no pueda quitarse del
ensamblaje.
Paso 17
Cuando un tanque de gas LP no esté unido
al ahumador, use el gancho en “S” para
colgar la manguera o el regulador de la
agarradera ubicada a lado del ahumador.
Así evitará que mugre y otras partículas
tapen el extremo del ensamblaje.
28
Step 18
Con una abrazadera, fije la manguera a la
pata frontal como se muestra. No jale la
abrazadera para apretarla, déjela sólo lo
suficientemente floja para que la manguera
puede ajustarse en caso necesario. Si
amarra la manguera a la pata evitará que la
manguera toque la cámara caliente del
quemador. Revise la instalación debajo del
ahumador para asegurarse de que la
manguera no esté rozando alguna parte de
la cámara del quemador.
Ensamblaje del ahumador a Gas
29
CONECTANDO
EL TANQUE DE GAS LP
ADVERTENCIA
•
No almacene tanques bajo o cerca del ahumador.
•
Nunca llene tanques más del 80%.
ADVERTENCIA
DEBEN SEGUIRSE TODAS LAS INSTRUCCIONES Y
PRECAUCIONES DE ESTA PÁGINA PARA EVITAR
DAÑOS, INCENDIOS O LESIONES.
1. Debe cerrarse la perilla del tanque de gas LP. Fíjese que
la perilla haya sido girada hasta el tope en el sentido de
las manecillas del reloj.
2. Revise que la perilla de control del ahumador haya sido
apagada.
3. Quite la tapa protectora de la válvula de gas LP y la
tuerca de unión, si está presente.
4. Detenga el regulador con una mano e inserte el tubo
corto enroscado a la salida de la válvula. Fíjese que la
tuerca de unión esté centrada en la salida de la válvula.
La tuerca de unión se conecta a las grandes roscas
exteriores de la válvula de salida.
Nota: Tenga cuidado - no enrosque mal la conexión.
5. Apriete la tuerca de unión con la mano en dirección de
las manecillas del reloj hasta el tope. Apriete bien con la
mano solamente. No use herramientas.
Si no sigue las dos recomendaciones anteriores al pie
de la letra puede ocurrir una lesión grave o un
fallecimiento causado por incendio.
•
Este ahumador fue hecho para ser operado con gas LP
(propano licuado) únicamente.
•
NO deje el ahumador sin atender mientras lo usa.
Opere el ahumador bajo estricta supervisión.
Para usarse con este ahumador, el cilindro de 20 libras
de gas LP debe cumplir con los siguientes
requerimientos:
Diámetro: 12" (30.5 cm)
Altura: 18" (45.7 cm)
Capacidad máxima de 20 libras. El cilindro de gas
utilizado debe incluir un collarín para proteger la válvula
del cilindro. El sistema suministrador del cilindro debe
estar diseñado para la recuperación de vapores.
Las instrucciones dadas en los tanques de gas en
forma de cilindro tienen que seguirse durante el
llenado o transporte. Hacer caso omiso de las
instrucciones podría ocasionar problemas
relacionados con sobrellenado, demasiada liberación
del gas por ventilas y congelación del regulador.
No permita que mugre o materiales extraños entren a
la conexión o la tapen cuando no está unida al sistema
suministrador de combustible. Coloque la tapa contra
el polvo en la salida de la válvula del cilindro siempre
que no utilice el cilindro. Sólo coloque el tipo de tapa
contra el polvo en la salida de la válvula del cilindro
que viene con la válvula del cilindro. Otros tipos de
tapas o tapones pueden causar la fuga del propano.
Los cilindros deben llenarse antes de usarlos por
primera vez. Todo manejo, transporte, llenado y
almacenamiento de cilindros de gas LP debe realizarse
de acuerdo a la norma NFPA 58 ("Almacenamiento y
manejo de gases de petróleo líquido") o CSAB 149.1
("Código de instalación de gas natural y propano").
Los cilindros deben amarrarse debidamente durante su
transporte. No coloque ningún otro artículo sobre la
parte superior de los cilindros en ningún momento.
Los cilindros no deben exponerse a altas temperaturas
ni a calor extremo.
PRECAUCIÓN: Al momento de conectar, el lado de la
manguera o del regulador de la
conexión sellará el lado trasero e la
válvula, ocasionando una ligera
resistencia. La conexión requiere
medio o tres cuartos de giro adicional
para completar la conexión.
Todo cilindro suministrador de combustible tiene que
haber sido construido y marcado según las
especificaciones para cilindros de gas propano del
Departamento de Transporte de los EE.UU. (DOT) CFR
49, o CAN/CSA B339. La unidad debe usarse sólo con el
tanque de 20 libras de recuperación de vapores en
posición vertical.
30
Si desconoce el tipo de su unidad y de combustible
que debe usar, fíjese en la placa identificadora. Las
unidades se equipan en fábrica para usarse con un
solo tipo de combustible, por lo que no pueden ni
deben usarse con ningún otro tipo de combustible.
Usar otro tipo de combustible puede dañar seriamente
la unidad y la zona de instalación y aumentar el riesgo
de una lesión grave. Todo intento de operar estos
ahumadores con combustibles para los cuales no se
les expidió el certificado del diseño anula la garantía
del fabricante.
La salida del tanque de gas debe tener una terminación
para conectar el gas del Tipo 1 para que entre a la
manguera del gas incluida con el ahumador.
Deben usarse tanto el regulador de presión como el
ensamblaje de la manguera que incluye el fabricante
con la unidad. Los repuestos del regulador de presión
y de los ensamblajes de la manguera deben ser los
especificados por el fabricante del aparato.
CONECTANDO
EL TANQUE DE GAS LP
El ensamblaje de la manguera o del regulador debe
manipularse cuidadosamente para evitar que se contamine
con mugre u objetos extraños. Limpie y revise la manguera
antes de usar cada vez la unidad. Si nota abrasión,
desgaste o fugas, debe reemplazar la manguera antes de
encender y operar la unidad. Para asegurar que opere
debidamente, toda reposición del ensamblaje del regulador
del tanque del combustible debe hacerse con piezas
autorizadas por el fabricante del ahumador.
Esta unidad no debe utilizarse con un sistema de
suministro de gas LP que no esté integrado.
Los reguladores de presión o de la válvula han sido
ajustados en la fábrica a las presiones correctas de
operación. ¡No intente cambiar estos ajustes!
CÓMO ENCONTRAR FUGAS
Una vez hechas las conexiones, revise todo aditamento y
conexión con agua enjabonada para descubrir fugas.
INSTRUCCIONES DE
OPERACIÓN
PROCEDIMIENTO ANTES DEL USO
Antes de cocinar alimentos en su ahumador, es importante
"Preparar" su ahumador. La preparación o aplicación de
una capa de aceite sella la pintura y el interior de su
ahumador para mejorar su sabor, durabilidad y rendimiento
general. A esto también se le conoce como el
procedimiento de "Habituación".
Si su ahumador requiere algún retoque de pintura en el
interior del gabinete, la única vez que debe aplicar pintura
en su interior es antes de la preparación. No debe aplicarse
pintura en el interior de su ahumador si éste ha sido
usado, ya que las toxinas de la pintura pueden contaminar
sus alimentos. Sin embargo, si es necesario pintarlo tras el
uso, consulte la sección de esta manual referente a
"Cuidado y Mantenimiento".
Para preparar su ahumador, simplemente úselo como
pensaba hacerlo pero no cocine ninguna comida. Sólo
necesitará seguir todas las instrucciones de operación
descritas en las siguientes secciones de este manual.
•
Con todas las válvulas cerradas, aplique el agua
enjabonada para descubrir fugas (mezcla 50/50 de
detergente lavaplatos líquido y agua) a toda conexión,
aditamento y junta del tanque por donde circula el gas.
Ponga en su ahumador la leña y los adobos ácidos
preferidos para darle sabor, caliéntelo a baja temperatura
(aprox. 125°F [50°C]) por 45 a 60 minutos. Déjelo enfriar y
saque el agua y la leña.
•
Abra la válvula del tanque.
La presencia de burbujas en áreas donde aplicó el agua
enjabonada indica una fuga de gas. Si detectó fugas o
huele u oye gas, cierre la válvula y repare la fuga o
reemplace la pieza defectuosa. No use el ahumador
hasta haber reparado todas las fugas.
Una vez terminada la preparación, el interior de su
ahumador tendrá un revestimiento durable y
condimentado.
Al instalar el ahumador y el tanque, recomendamos que
ambos estén en una línea perpendicular con respecto a
la dirección del viento.
El ensamblaje de la manguera de gas o del regulador
debe extenderse totalmente a la distancia máxima para
que la manguera esté derecha y el tanque tan lejos del
ahumador como sea posible.
Los tanques de gas LP están destinados a operarse en
posición vertical solamente.
Cuídese de proteger la manguera suministradora de
combustible para no dañarla con el pie o tráfico
vehicular.
Cuando no use la unidad, debe apagar el gas del cilindro
suministrador. Además, debe desconectar el cilindro de
la unidad.
CÓMO AGREGAR AGUA
Si desea agregar agua antes del cocimiento, simplemente
quite la bandeja de agua y llénela con agua hasta 1" (2.5
cm) por debajo del borde. Luego, ponga la bandeja en la
parte inferior de la rejilla.
Para agregar agua si el ahumador está caliente, NO jale la
bandeja de agua más allá de la rejilla.
Recomendaciones para el Cocimiento:
Cubra la bandeja de agua con papel aluminio antes de
cada uso. Así, podrá limpiar su bandeja de agua más
fácilmente y ésta durará más.
Para agregar el agua con más facilidad y sin peligro, use
una regadera con pitón largo.
La unidad podrá almacenarse en el interior sólo si el
cilindro ha sido desconectado y desprendido de la
unidad.
31
CÓMO AGREGAR LEÑA O CARBÓN
Para agregar las astillas de madera antes del cocimiento,
simplemente llene la caja para astillas de madera con sus
pedacitos de leña favoritos para darle sabor. Use la
cantidad y el tipo de leña que desee. Una caja llena es
generalmente suficiente para varias horas de ahumado. Una
vez que la caja esté llena, coloque la cubierta encima de la
caja y póngala en el ahumador.
Para agregar pedacitos de leña durante el cocimiento,
recomendamos utilizar pinzas o alicates largos para quitar
la cubierta de la caja y colocar los pedacitos de leña en la
caja para astillas de madera sin quitarla. No recomendamos
sacar la caja mientras usa el ahumador.
CÓMO ENCENDERLO
SISTEMA DE ENCENDIDO
DEL ENCENDEDOR:
1. Revise todas las conexiones para descubrir fugas con el
método del agua enjabonada descrito en la página 13.
2. Abra la puerta del gabinete del ahumador.
3. Revise si hay cualquier bloqueo del quemador. Quite
todo objeto o artículo extraño.
4. Fíjese que la perilla de control del quemador esté en la
posición de "OFF" (apagado).
5. Abra la válvula del cilindro de gas LP girándola en contra
de las manecillas del reloj.
6. Para encender la unidad con el encendedor, empuje y
gire la perilla de control del quemador en contra de las
manecillas del reloj a la posición de "HIGH" (alto).
7. De inmediato, gire el encendedor una y otra vez para que
haga clic varias veces (debe ver una chispa pequeña
saltar del final de la varilla del electrodo al lado del
quemador). Si el quemador no se enciende dentro de 3 a
5 segundos, apague la perilla de control del quemador y
espere cinco minutos para que ya no haya gas antes de
repetir estos pasos. Si el quemador no vuelve a
encender, intente usar un fósforo o cerillo para encender
el ahumador siguiendo las instrucciones que aparecen a
continuación.
8. Una vez encendido el quemador, cierre la puerta para
que se acumule el calor.
PRECAUCIÓN:
La caja para astillas de madera y su
cubierta pueden calentarse mucho.
Procure no tocarlas durante el uso.
Siempre póngase guantes gruesos de
cocina antes de tocar partes calientes.
Recomendaciones de cocimiento – Leña para dar sabor:
CÓMO ENCENDER
CON UN FÓSFORO:
• Los pedacitos de leña imparten mejor sabor si se dejan
dentro de la caja.
1. Repita los pasos 1 a 5 del "Sistema de Encendido del
Encendedor" arriba.
• Use leña seca de madera fina de nogal americano,
pacana, manzano, cerezo o mesquite.
2. Retire la caja para astillas de madera y su soporte del
interior del ahumador. Encienda un papel con el fósforo
y déjelo caer en la cámara del quemador, asegurándose
que caiga junto al quemador de latón. Rápidamente, gire
la perilla de control a la posición de encendido. Si el
quemador no se enciende dentro de 4 a 5 segundos, gire
para apagar la perilla de control, espere 5 minutos para
que se vaya el gas y repita el procedimiento.
• La mayoría de la leña de árboles frutales o de nueces
imparten un excelente sabor ahumado.
• No use madera con resina como la del pino o madera
laminada porque imparten mal sabor.
• Guíese por su gusto, experimente con distintos tipos y
cantidades de trocitos, astillas o palitos de leña. Incluso
puede mezclar varios tipos de leña.
• Para producir más humo y evitar un cocimiento rápido,
remoje antes los pedacitos de leña en un tazón de agua
separado por 20 minutos como mínimo o bien envuelva
los pedacitos en papel aluminio perforado.
• La mayoría del sabor que imparte el humo ocurre en la
primera hora de cocimiento. Típicamente, no es
necesario agregar más pedacitos de leña después a
menos que se desee un sabor ahumado más intenso.
32
CÓMO APAGAR EL AHUMADOR
PRECAUCIÓN: El ahumador puede calentarse mucho
durante el uso. No toque ninguna parte
del ahumador excepto la manija de la
puerta y la perilla de control del
quemador. Quizá sea necesario ponerse
guantes protectores.
• Apague la perilla de control del quemador oprimiéndola y
girándola en el sentido de las manecillas del reloj. La flama
del quemador debería apagarse.
• Cierre la válvula del cilindro de gas LP girando la perilla en
el sentido de las manecillas del reloj hasta el tope.
• Siga todas las advertencias y precauciones de seguridad
antes de sacar la carne del ahumador o preparar la unidad
para su almacenamiento. Por favor consulte la página 34
para almacenar su unidad debidamente y las advertencias y
precauciones importantes en las páginas 20 al 22.
INSTRUCCIONES PARA COCINAR
IMPORTANTE: Antes de cada uso, limpie e inspeccione la
manguera y la conexión al cilindro de gas LP. Si nota
abrasión, desgaste, cortadas o fugas, debe cambiar la
manguera antes de usar el ahumador. Consulte las
instrucciones de la "prueba para detectar fugas" en la
conexión del gas LP en la sección correspondiente de este
manual.
• Llene la caja para astillas de madera con pedacitos de leña
para impartir sabor y coloque la caja dentro del ahumador
como indica la sección de ensamblaje de este manual.
Consulte sección que explica los tipos de leña
recomendada para dar sabor.
• Coloque la bandeja de agua dentro del ahumador en la
posición más baja para la parrilla tal y como lo explica la
sección de ensamblaje de este manual. Con cuidado, llene
la bandeja con adobo ácido o agua hasta a 1 pulgada por
debajo del borde. Una bandeja llena durará cerca de 2 a 3
horas. Cuídese de no llenar la bandeja demasiado, ya que
el exceso de agua podría derramarse.
• Inserte o ajuste las parrillas para cocinar en las posiciones
deseadas para las rejillas. Para poder manipular mejor la
comida con las pinzas o espátulas, cerciórese de que los
alambres de las parrillas vayan de atrás hacia delante
como lo explica la sección de ensamblaje de este manual.
• Ahora ya puede encender el quemador. Consulte el
procedimiento de encendido explicado previamente en este
manual. El calor del quemador quemará los pedacitos de
leña y la acumulación del humo impartirá sabor.
• Coloque una sola capa de comida en las parrillas para
cocinar con espacio entre cada pieza. Así, el humo y la
humedad podrán circular uniformemente alrededor de
todas las piezas de comida.
• Deje ahumar de 2 a 3 horas a la temperatura ideal de
cocimiento de 225° a 250° F (110° a 120° C) para resultados
óptimos. Esta temperatura se lee en el indicador montado
en el frente de su ahumador. Para carne más suave y
ahumada, quizá prefiera una temperatura más baja. Si el
tiempo es esencial, recomendamos una temperatura más
alta.
33
• Revise con regularidad el nivel del agua y añada si hay
poca. Para resultados óptimos y conservar el calor,
procure no abrir la puerta del ahumador mientras lo usa.
Si tiene que abrir la puerta, hágalo sólo brevemente. El
ahumador volverá a llegar a la temperatura de
cocimiento con rapidez después de cerrar la puerta.
• Siempre use un termómetro de sonda para carne porque
así se asegurará que esté bien cocida antes de sacarla
del ahumador.
• Después de cada uso y una vez que su ahumador se
haya enfriado, quite con cuidado la bandeja de grasa de
la parte inferior del ahumador, tire la grasa y limpie la
bandeja.
TABLA DE TEMPERATURA
Aquí está la tabla para medir temperatura correctamente
para cocción de carne: (Estándar USDA) (USDA Standard)
Carne Picada y Poductos
Pavo, Pollo
Ternera, Cordero
Carne de Res, Cerdo
Molidos
165°F
160°F
160°F
(74°C)
(71°C)
(71°C)
145°F
160°F
170°F
(63°C)
(71°C)
(77°C)
Borrego Fresco
Término Medio-Crudo
Término Medio
Término Bien Cocido
145°F
160°F
170°F
(63°C)
(71°C)
(77°C)
Ternera Fresca
Término Medio-Crudo
Término Medio
Término Bien Cocido
145°F
160°F
170°F
(63°C)
(71°C)
(77°C)
Aves
Pollo, entero
Pavo, entero
Pechuga, asada
Muslos, Alas
Pato y Ganso
180°F
180°F
170°F
180°F
180°F
(82°C)
(82°C)
(77°C)
(82°C)
(82°C)
Cerdo Fresco
Término Medio
Término Bien Cocido
160°F
170°F
(71°C)
(77°C)
160°F
140°F
(71°C)
(60°C)
Pez (Pescado)
(Cocine hasta que este opaco y las
escamas caen fácilmente)
Nota: Estas temperaturas se miden con un termómetro
de punta de prueba insertada en la carne. El
indicador de calor en la puerta del ahumador no
es exacta en calcular la temperatura de la carne.
34
ADVERTENCIA
• Tenga precaución al levantar y mover el ahumador para
no lesionar su espalda y evitar torceduras.
Recomendamos que dos personas levanten o muevan el
ahumador.
• NO almacene el ahumador cerca de gasolina u otros
líquidos combustibles o donde puedan haber vapores
combustibles.
• NO almacene este ahumador en un lugar accesible para
niños o mascotas. Guarde su ahumador en un lugar
seco y protegido.
• NO permita que nadie se acerque al ahumador tras el
uso hasta que se haya enfriado. Se calienta mucho
durante el uso.
• NO deje ceniza caliente sin atender hasta que el
ahumador se haya enfriado totalmente.
Carne de Res Fresca
Término Medio-Crudo
Término Medio
Término Bien Cocido
Jamon
Fresco (crudo)
Pre-cocinado
SEGURIDAD Y MANTENIMIENTO
DESPUÉS DEL USO
• Este ahumador se calienta muchísimo – por eso, deje
que se enfríe totalmente antes de manipularlo. Si tiene
que hacerlo mientras está caliente, SIEMPRE póngase
guantes gruesos de cocina o resistentes al calor para
tocar el ahumador o sus partes. Deje que el ahumador se
enfríe antes de sacar y limpiar la bandeja de grasa.
• Tire la ceniza fría envolviéndola en papel aluminio
grueso y meta toda en un recipiente no combustible.
Cerciórese de que no haya otros materiales
combustibles en o cerca del recipiente.
• Si tiene que tirar la ceniza antes de que esté totalmente
fría, sáquela del ahumador, métala en papel aluminio
grueso y mójela completamente con agua antes de
tirarla en un recipiente no combustible.
PRECAUCIÓN: Todo el cuidado y mantenimiento
deben hacerse sólo hasta que el
ahumador esté apagado y se haya
enfriado.
• Limpie la bandeja de agua y las parrillas para cocinar
con agua caliente enjabonada. Enjuague y seque muy
bien. Quizá prefiera cubrir o rociar ligeramente la
bandeja de agua y las parrillas con aceite para cocinar.
• Revise y limpie su ahumador frecuentemente para quitar
insectos y sus nidos. Un tubo tapado puede ocasionar
un incendio fuera del ahumador. También asegúrese de
que no haya ningún objeto extraño dentro del ahumador
que obstruya el flujo del aire de combustión y
ventilación.
• Si su indicador de calor parece ya no estar bien
calibrado, retírelo de la puerta del ahumador aflojando y
quitando la tuerca de montaje desde el interior. Hay una
segunda tuerca montada en la parte trasera del indicador
de calor que puede girarse para ajustar la aguja del
indicador. Fije la aguja a la temperatura ambiente externa
actual y vuelva a montar el indicador de calor a la puerta
del ahumador.
• Limpie el interior y exterior de la puerta del gabinete del
ahumador sólo con un trapo o paño húmedo. No
recomendamos lavarla rociando agua con la manguera.
Toda la humedad debe quitarse frotando y no debe
permitirse que se quede dentro o encima del ahumador.
Saque la bandeja de grasa con cuidado, tire la grasa y
limpie la bandeja muy bien. Una vez limpia, quizá desee
cubrir o rociar el interior del gabinete del ahumador con
una capa ligera de aceite para cocinar.
• Si se ha oxidado una parte de la superficie exterior del
ahumador, límpiela con estopa de acero o tela de esmeril
y use pintura resistente (también al agua).
• NUNCA aplique una capa adicional de pintura al interior
del ahumador. Si hay oxidación en su interior, limpie el
área afectada con estopa de acero o tela de esmeril y
cubra o rocíe ligeramente el área con aceite para cocinar
para impedir que se vuelva a oxidar.
ALMACENAMIENTO
ANTES DE ALMACENAR SU
PARRILLA:
• Limpie todas las superficies. .
• Cuando se haya enfriado y ya no use su ahumador,
almacénelo adentro en un lugar seco para protegerlo
contra la oxidación.
• Si almacena la parrilla afuera, cúbrala con una cubierta
para protegerla de las inclemencias del tiempo.
IDENTIFICACIÓN Y CORRECCIÓN
DE PROBLEMAS
PROBLEMA
Hornilla
no quiere
encender
• Para proteger su ahumador de las inclemencias del
tiempo, siempre guárdelo cubierto mientras no lo usa.
LLAMA MALA
REMEDIO
1. Reemplace el cilindro
de gas LP.
2. Revise para ver si el
fósforo o cerillo enciende. El electrodo o
colector puede necesitar un ajuste.
3. Vuelva a asentar la
hornilla.
4. Quite las obstrucciones
de la hornilla.
3. La hornilla no quedó
bien asentado.
4. Puede haber una
obstrucción en la
hornilla.
5. La válvula del cilindro 5. Abra la válvula del cilinpuede estar cerrada.
dro.
6. El regulador no está
6. Vuelva a asentar el
asentado debidamregulador sobre la válente en la válvula del
vula del cilindro.
cilindro.
• Cuando un tanque de gas LP no se conecta – y para
ayudar a evitar que mugre o partículas extrañas tapen la
manguera o el regulador – cuelgue el extremo de la
manguera o del regulador de el asa lateral con el gancho
en “S” incluido.
• Revise las flamas de su quemador mirando a través del
agujero de acceso frontal. Una buena flama debe ser azul
con una punta amarilla de 1" a 2" de largo. Si las flamas
son demasiado amarillentas e irregulares, es posible que
residuos aceitosos y depósitos de comida se estén
acumulando en el quemador. Intente limpiar la superficie
del quemador y los agujeros para mejorar las flamas.
Una flama mala también puede ser causada por una mala
unión del orificio de la válvula del gas con el quemador.
Siempre deje que el ahumador se enfríe antes de
limpiarlo o de revisar el ensamblaje.
CAUSA
1. Revise el nivel de
gas LP en el cilindro.
2. Mala chispa del electrodo.
Fuego en
la perilla
de control
1. Los orificios de las
hornillas pueden
estar obstruidos.
2. La hornilla no quedó
bien asentado sobre
la válvula de control.
3. Las conexiones del
gas pueden estar
sueltas.
1. Quite las obstrucciones
de la hornilla.
Hornilla
tiene flamas
amarillas
1. Hay una obstrucción
en la hornilla.
1. Quite las obstrucciones de la hornilla.
La flama
se apaga
en "LOW"
1. Los orificios de la
hornilla pueden estar
obstruidos.
2. La hornilla no quedó
bien asentado sobre
la válvula de control.
3. La parrilla no ha sido
precalentada lo suficiente.
1. Quite las obstrucciones
de los orificios de la
hornilla.
2. Vuelva a asentar la
hornilla sobre la válvula
de control.
3. Precaliente la parrilla lo
suficiente.
LLAMA BUENA
AMARILLO
2. Vuelva a asentar la
hornilla sobre la válvula
de control.
3. Revise si hay fugas y
apriete todas las conexiones.
AZUL
1. El dispositivo de
Hornilla
control del flujo ha
no puede
sido activado en el
calentarse
regulador.
lo suficiente
1. Reajuste el regulador
apagando el gas en el
cilindro LP. Desconecte
el regulador del tanque.
Vuelva a unir el regulador al tanque.
Parrilla
está
demasiado
caliente
1. Limpie las piezas del
ahumador muy bien.
Hornilla
Agujeros en Hornilla
CHEQUEO DE LLAMAS
1. Demasiada grasa
acumulada causa
incendios.
2. Regulador dañado o
defectuoso.
3. Cocine a temperatura más baja.
2. Reemplácelas con
piezas idénticas.
3. Baje la altura de la
flama y la temperatura.
35
Get it fixed, at your home or ours!
Your Home
For repair – in your home – of all major brand appliances,
lawn and garden equipment, or heating and cooling systems,
no matter who made it, no matter who sold it!
For the replacement parts, accessories and
owner’s manuals that you need to do-it-yourself.
For Sears professional installation of home appliances
and items like garage door openers and water heaters.
1-800-4-MY-HOME®
(1-800-469-4663)
Call anytime, day or night (U.S.A. and Canada)
www.sears.com
www.sears.ca
For expert home solutions advice: www.managemyhome.com
Our Home
For repair of carry-in items like vacuums, lawn equipment,
and electronics, call or go on-line for the location of your nearest
Sears Parts & Repair Service Center
1-800-488-1222 (U.S.A.)
1-800-469-4663 (Canada)
Call anytime, day or night
www.sears.com
www.sears.ca
To purchase a protection agreement on a product serviced by Sears:
1-800-827-6655 (U.S.A.)
1-800-361-6665 (Canada)
Para pedir servicio de reparación
a domicilio, y para ordenar piezas:
Au Canada pour service en français:
1-888-SU-HOGAR®
1-800-LE-FOYER MC
(1-888-784-6427)
® Registered Trademark / TM Trademark / SM Service Mark of Sears Brands, LLC
® Marca Registrada / TM Marca de Fábrica / SM Marca de Servicio de Sears Brands, LLC
MC
Marque de commerce / MD Marque déposée de Sears Brands, LLC
(1-800-533-6937)
www.sears.ca
© Sears Brands, LLC