1
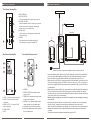
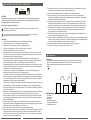
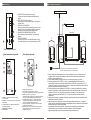
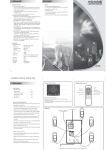
FC550
User Manual
Microlab Technology Company Ltd.
Made in China
All other brand and product names are trademarks of their respective holders. Actual contents may differ slightly from those shown in print. All
specifications and designs are subjected to changes without any prior notice.
MULTIMEDIA SPEAKER SYSTEM
Before using, please read the manual carefully
Important Safety Instructions
Caution:
To reduce the risk of electric shock, do not dismantle the product and do not expose the apparatus to rain or moisture. No
user-serviceable parts inside. Refer servicing to qualified personnel only.
Explanation of Graphical Symbols:
The lightning flash within an equilateral triangle is intended to alert you to the presence of uninsulated¡°
dangerous voltage¡±
within the product's enclosure that may be of sufficient magnitude to constitute an electric shock to a person or persons.
The exclamation point within an equilateral triangle is intended to alert you to the presence of important operating and
maintenance (servicing) instructions in the literature accompanying the product.
19. Servicing - Do not attempt to service this product yourself, as opening or removing covers may expose you to dangerous
voltage or other hazards. Refer all servicing to qualified service personnel.
20. Please remove the power plug form the main power source or wall power source when not in use. When plugged in to a
power source, the system is in standby mode, so the power is not entirely cut off.
21. Replacement parts - When replacement parts are required, ensure the service technician has used replacement parts
specified by the manufacturer or have the same characteristics as the original part. Unauthorized substitutions may
result in fire, electric shock or other hazards.
22. Mains fuses - For continued protection against fire hazard, use fuses only of the correct type and rating. The correct fuse
specification for each voltage range is marked on the product.
23. Do not turn up the volume while listening to a section with very low level inputs or no audio signals. If you do, the speaker
may be damaged when a peak level section is suddenly played.
24. The only means of completely disconnecting the product from the power supply is by removing the power cord from the
wall outlet or the product. The wall outlet or the power cord entry to the product must remain freely accessible at all times
while the product is in use.
25. Try to install the product near a wall socket or extension cord and shall be easily accessible.
26. The highest environmental temperature suitable for this product is 40oC.
WARNINGS:
1.
2.
3.
4.
5.
6.
Read Instructions - All the safety and operating instructions must be read before the product is operated.
Retain Instructions - The safety and operating instructions should be kept product for future reference.
Heed warnings - All warnings on the product and in the operating instructions should be adhered to.
Follow instructions - All operating and use instructions should be followed.
Installation - Install in accordance with the manufacturer's instructions.
Power sources - This product should be operated only from the type of power source indicated by the marking adjacent to
the power cord entry. If you are not sure of the type of power supply to your home, consult your product dealer or local
power company.
7. Grounding or polarisation - the product is not required to be grounded. Ensure the plug is fully inserted into the wall outlet
or extension cord receptacle to prevent blade or pin exposure. Some versions of the product are equipped with a power
cord fitted with a polarized alternating line plug (a plug having one blade wide than the other). This plug will fit onto the
power outlet only one way. This is a safety feature. If you are unable to insert the plug fully into the outlet, try reversing
the plug. If the plug should still fail to fit, contact your electrician to replace your obsolete outlet. Do not defeat the safety
purpose of the polarised plug. When using an extension power-supply cord or a power-supply cord other than that
supplied with the appliance ,it should be fitted with the appropriate molded-on plugs and carry safety approval appropriate
to the country of use.
8. Power cord protection - Power-supply cords should be routed so that they are not likely to be walked on, kinked or
pinched by items placed on or against them, paying particular attention to cords from plugs, receptacles and the point
where they exit from the appliance.
9. Overloading - Do not overload wall outlets, extension cords or multiple sockets, as this can result in a risk of fire or
electric shock.
10. Ventilation - The product must be properly ventilated. Do not place the product on a bed, sofa, or other similar surface.
Do not cover the product with any items such as tablecloths, newspapers, etc.
11. Heat - The product should be situated away from heat sources such as radiators, heat registers, stoves, or other
products) including amplifiers that produce heat. No naked flame sources, such as lighted candles, should be placed on
the apparatus.
12. Water and moisture - To reduce the risk of fire or electric shock, do not expose the product to train, dripping, splashing or
excessive moisture such as in a sauna or bathroom. Do not use this product near waterfor example, near a bathtub,
washbowl, kitchen sink, laundry tub, in a wet basement, or near a swimming pool and the like.
13. Object and Liquid Entry - Never push objects of any kind into this product through openings, as they may touch
dangerous voltage points or short-circuit parts that could result in a fire or electric shock. Never spill liquid of any kind on
the product. Do not place any object containing liquid on top of the product.
14. Cleaning - Unplug the product from the wall outlet before cleaning. The cabinet of the subwoofer may be cleaned by
dusting with a dry cloth. If you wish to use an aerosol cleaning spray, do not spray directly on the cabinet; spray onto the
cloth. Be careful not to damage the drive units.
15. Attachments - Do not use attachments not recommended by the product manufactures, as they may cause hazards.
16. Accessories - Do not place this product on an unstable cart, stand, tripod, bracket or table. The product may fall, causing
serious injury to a child or adult, and serious damage to the product. Use only with a cart, stand, tripod, bracket or table
recommended by the manufacturer or sold with the product. Any mounting of the product should follow the manufacturer's
instructions and should use a mounting accessory recommended by the manufacturer.
17. Moving the product - A product and cart combination should be moved with care. Quick stops, excessive force and
uneven surfaces may cause the product and cart combination to overturn.
18. Unused periods - The power cord of the appliance should be unplugged from the outlet during lightning storms or when
the apparatus is left unused for a long period of time.
1
Unpacking the system
Unpacking:
*Fold the carton flaps right back and invert the carton and contents.
*Lift the carton clear of the contents.
*Remove the inner packing from the product.
We suggest you retain the packing for future use.
Verpackung
Amplifier 1pc
Woofer 1pc
Satellites 2pcs
Remote control 1pc
Audio cable(3.5mm-2RCA) 1pc
User manual 1pc
2
Function Instruction
System Connection
*Front View of the Amplifier
To sound card
1.DIGITAL DISPLAY
2.INPUT SELECTOR
Push input select button to select input 1or input 2
3.VOLUME CONTROL
Adjust the speaker system's volume, turn the volume
control anti-clockwise to minimum, adjusting the
volume control to your desired level
4.PHONE JACK
You can connect your headphones to this jack with
3.5mm stereo plug
5.POWER
Press this key down to switch the system ON,
Press this key up to switch the system OFF
1
2
INPUT SEL
3
VOLUME
5
4
PHONE
POWER
To VCD DVD ,etc
Subwoofer
Amplifier
AUDIO INPUT
R
INPUT 2
L
AUDIO INPUT
1
2
INPUT 2
3
R
3D
INPUT
5
R
6
TREBLE
3
L
S.W.
AUDIO OUTPUT
BASS
BASS
-
+
TREBLE
_
4
AC IN
4
FUSE
T400mAL250V
STANDBY
INPUT 1
1
L
R
L
S.W.
AUDIO OUTPUT
*Front View of Remote control
AC IN
2
L
INPUT 1
R
*Back View of the Amplifier
MP3,etc
+
VOLUME
_
+
FUSE
T400mAL250V
5
1.INPUT 1: 3.5mm stereo audio input jack
2.INPUT 2: 2.0 channel (2 RCA) audio
input jacks
3.AUDIO OUTPUT: 2.1 channel (3 RCA)
audio output jacks
4.POWER CORD
5.FUSE
1. STANDBY
2. INPUT SELECTOR: press the key to select
input 1 or input 2
3. TREBLE+/-key: adjust the treble volume, press
the key to your desired level
4. VOLUME +/- key: adjust the speaker system's
volume, press the key to your desired level
5. 3D: press the key to select 3D sound effects
6. BASS +/-key: adjust the bass volume, press the
key to your desired level
3
*Please note the correct placement of speaker is shown in the above picture.
1.Connect the satellite speaker cables to the L & R audio output jacks on the back of the amplifier, then
put the left channel satellite speaker on the left and the right channel satellite speaker on the right.
2.Connect the cable of the woofer speaker to the back of the amplifier audio output S.W. jack.
3.While connecting to VCD/DVD, etc, please use double RCA ends audio cable. Connect one end of the
audio cable to the output jacks on the VCD/DVD, and the other end to the "L" & "R" of Input 2 jacks on
the back of the amplifier. Remarks: this system has no audio cable(2RCA-2RCA) inside, which is only
for demonstration.
4.While connecting to sound card(MP3,etc), please use the audio cable with double 3.5mm stereo plugs.
Connect one end of the audio cable to the audio output jack on the sound card(MP3, etc), and the
other end to the Input 1 jack on the back of amplifier. Remarks: this system has no audio cable(3.5mm3.5mm) inside, which is only for demonstration.
5.Remarks: the jacks and plugs are color-coded. Be sure to attach each color-coded plug to a matching
color coded jack.
6.Check the connection and make sure every cable is correctly connected, then connect power plug to
the right AC outlet. The shape of the plug and power outlet depends on the using country.
* When you connect the headphones to your speaker, you can only hear the sound in your headphones.
* Statement indicates that the socket-outlet shall be installed near the equipment and shall be easily
accessible.
o
* The highest environmental temperature suitable for this product is 40 C.
4
Trouble Shooting
Technical Information
If you experience problems with your speaker, the following troubleshooting may help.
Features
V12: designed by denmark famous speaker designer Peter Larsen, V12 fine cone 2.5 full range
speaker unit sets the industrial standard by its excellent flat response curve: 130HZ-8KHZ 1.5dB
and 100HZ-20KHZ 3dB.
2.1+1system: microlab-launched external power amplifier Hi-Fi 2.1 system is easy-use and
user-friendly. It can eliminate audio distortion caused by vibration, overheat and electromagnetic
interference. It is the best choice for those who persist in Hi-Fi sound quality.
5.25 subwoofer: 5.25 subwoofer unit made of dual Sr Magnet system blazes the trail in the use
of costly low-Q value, long-stroke program design, having the low-frequency quality of quick and
high resolution.
Full frequency: by virtue of its outstanding quality, V12 fine cone 2.5 full-range speaker can
provide ideal sound effect, build true 3D sound field and reproduce rich levels and details.
X-bass: microlab-developed robust bass replay technology, based on the design of woofer unit
and geometric structure of subwoofer cabinet refers to psychology theory to reproduce unimaginable
extraordinary high-quality low-frequency response.
Design for music: the ultimate aim of Microlab R&D system is to inherit and carry forward the
European musical culture style. To do this, all designs must be music-oriented and sourced from
music and art. Having Microlab, you can enjoy European musical taste.
Troubles
Solution
Check if the system is powered on
Power LED won't light up
Check the power plug is well connected
Check if the audio source is working well
No sound
Check if the audio and speaker cables are well connected
Check if the volume is at right level
One or more satellite no sound
Check if the satellite cable is well connected
No bass
Check if the Bass Volume is at right level
Sound is distorted
Check if the volume is at lower level
Remote control not working
Check if the battery is in the remote control
Specifications
*Amplifier specification:
AC IN
Power output
Frequency response
Sensitivity Input
Distortion
Separation
S/N
*Driver unit:
*Audio input:
*Audio output:
*Product size:
If the problem still exists, please contact the distributor or ask for professional service
220V-240V~ 50Hz 240mA
24W+15Wx2 RMS
35 Hz-20KHz
300mV
<0.3%(1W 1KHz)
>45 dB
>75 dB
(Woofer)5.25"
(Satellite)2.5"x2(magnetically shielded)
(Input 1) 3.5mm stereo jack
(Input 2) RCA jacks
RCA jacks
WxDxH
(Amplifier)77x210x200mm
(Woofer Speaker) 215x260x220mm
(Satellite Speaker) 85x100x165mm
5
6
www.microlab.cn
www.microlab.cn
FC550
Gebrauchsanleitung
Microlab Technology Company Ltd.
Made in China
MULTIMEDIA SPEAKER SYSTEM
No:80-FC550(08)-97-0001-02
All other brand and product names are trademarks of their respective holders. Actual contents may differ slightly from those shown in print. All
specifications and designs are subjected to changes without any prior notice.
Lesen Sie die Anleitung aufmerksam vor der Anwendung.
Die wichtige Information über die Sicherheit.
ACHTUNG
DIE HOCHVOLTSPANNUNG!
NICHT öFFNEN
ACHTUNG:
Um das Risiko eines Stromschlages zu vermeiden, nehmen Sie das Gerat nicht auseinander und
setzen Sie das Gerat weder Regen noch Feuchtigkeit aus. Keine brauchbaren Teile im Gerat. Zur
Wartung qualifiziertes Personal heranziehen.
Erklärung der graphischen Symbole:
Der Blitz in einem Dreieck macht Sie auf „gefährliche Spannung“ aufmerksam, die einen
Stromschlag hervorrufen kann.
Das Ausrufezeichen in einem Dreieck macht Sie auf wichtige Bedienungs- und Pflege/Wartungsanleitungen in der Gebrauchsanweisung aufmerksam
Warnungen:
1. Vor dem Anfang der Betriebsführung lesen Sie alle Anleitungen aufmerksam.
2. Sparen Sie die Anleitung auf - es kann Ihnen im Folgenden helfen.
3. Beachten Sie auf die Warnungen - sie haben die wichtige Bedeutung.
4. Folgen Sie den Anleitungen es hilft Sie das System effektiv zu verwenden.
5. Installation. Installieren Sie das Gerat nach der Führung.
6. Stromquelle. Dieses Produkt sollte nur an eine Stromquelle angeschlossen werden, die 220 Volt hat.
Wenn Sie sich nicht sicher sind, welche Stromversorgung Sie zuhause haben, konsultieren Sie einen
Produkthändler oder Ihren lokalen Stromversorger.
7. Erdung oder Polarisation. Das System braucht in der Erdableitung nicht. Einige Versionen des
Produktes sind mit einem Stromkabel mit einem gepolten Stecker ausgestattet (ein Stift ist breiter als
der andere). Dieser Stecker passt nur in eine Richtung in die Steckdose. Das ist eine
Sicherheitseinrichtung. Wenn es Ihnen nicht möglich ist den Stecker ganz in die Steckdose zu stecken,
versuchen Sie den Stecker umzudrehen. Sollte der Stecker immer noch nicht passen, kontaktieren Sie
Ihren Elektriker um Ihre Steckdose auszutauschen.
8.
Verhalten Sie sich vorsichtig zu den Ernährungskabeln - lassen Sie seine Beschädigung nicht. 9.
Überlastung. Bewahren Sie das System von der Überanspruchung.
10. Belüftung. Das Produkt muss angemessen belüftet werden. Platzieren sie es nicht auf einem Bett,
Sofa oder einer ähnlichen Oberflache. Bedecken Sie das Produkt nicht mit Tischdecken, Zeitungen, etc.
11. Hitze. Das Produkt sollte nicht in der Nahe von Hitzequellen, wie Radiatoren, Herden oder anderen
Gegenstanden, die Hitze verursachen aufgestellt werden.
12. Wasser und Feuchtigkeit. Um das Risiko eines elektrischen Schlages zu reduzieren, setzen Sie das
Produkt nicht Regen, tropfender oder spritzender Feuchtigkeit, wie in einer Sauna/Badezimmer aus.
Benutzen Sie das Produkt nicht in der Nahe von Wasser, z.B. in der Nahe der Badewanne, Spulbecken
oder eines Schwimmbades.
13. Gegenstands- und Flüssigkeitseintritt. Drucken sie nie irgendwelche Gegenstande durch die Öffnungen
in das Produkt, da diese gefährliche Spannungsteile berühren können oder einen Kurzschluss
hervorrufen können, was ein Feuer oder einen elektrischen Schlag zur Folge haben kann. Vermeiden
Sie die Einwirkung des Systems mit dem Wasser, verwenden Sie das System in den Räumen mit der
erhöhten Feuchtigkeit nicht.
14. Reinigung. Ziehen Sie den Stecker aus der Steckdose bevor Sie das Gerat reinigen. Das Gehäuse
sollte mit einem trockenen Tuch abgestaubt werden. Wenn Sie einen Reinigungsspray benutzen wollen,
sprühen Sie nicht direkt auf das Gehäuse, sondern auf ein Tuch.
15. Zubehör. Benutzen Sie kein Zubehör das nicht vom Hersteller empfohlen wird!
16. Zubehör. Stellen Sie das Gerat nicht auf einen instabilen Tisch, Ständer, Stativ oder Wagen. Das Gerat
konnte herunterfallen und dabei ein Kinder oder einen Erwachsenen ernsthaft verletzen und selbst
zerstört werden. Benutzen Sie es nur auf einem Ständer, Tisch, Stativ oder Wagen, die vom Hersteller
empfohlen oder mit dem Produkt verkauft wird.
1
17. Bewegung des Gerätes. Das Gerat muss vorsichtig bewegt werden. Schnelles anhalten, exzessive
Gewalt und unebene Oberflachen können das Gerat umkippen lassen.
18. Bei einem langen Stillstand des Systems, schalten Sie sie von einer Ernährung aus.
19. Wartung. Versuchen Sie nicht das Produkt selber zu warten, da Öffnen oder das Entfernen der
Abdeckungen Sie gefährlichen Spannungen oder anderen Gefahren aussetzen kann. Überlassen Sie
alle Wartungen qualifiziertem Servicepersonal.
20. Ersatzteile. Wenn Ersatzteile benötigt werden, stellen Sie sicher das der Servicetechniker, die vom
Hersteller empfohlenen Ersatzteile, oder solche, die den Originalteilen entsprechen, benutzt. Nicht
zugelassene Ersatzteile können Feuer, einen elektrischen Schlag oder sonstige Gefahren auslosen.
21. Netzsicherungen. Für fortlaufenden Schutz gegen Feuergefahr, benutzen Sie nur Sicherungen des
korrekten Typs und der entsprechenden Leistung. Die korrekte Sicherungsspezifikation für jeden
Spannungsbereich ist auf dem Produkt vermerkt.
22. Drehen Sie die Lautstarke nicht hoch, wahrend Sie sehr leise Passagen oder keine Musik hören, da
sonst die Lautsprecher beschädigt werden konnten.
23. Das einzige Mittel das Produkt komplett von der Stromversorgung zu trennen, ist das Netzkabel aus der
Steckdose oder aus dem Gerat zu entfernen. Entweder muss die Steckdose oder der Netzkabeleingang
am Gerat jederzeit frei zuganglich sein wahrend das Gerat benutzt wird.
24. Die Steckdose sollte in der Nahe des Gerätes installiert und leicht zuganglich sein.
25. Die maximale Temperatur der Nutzung soll über 40C nicht sein.
Auspacken
Auspacken:
Überprüfen Sie ob im Karton alle aufgezeigten Teile vorhanden sind. Heben Sie den
Karton für möglichen späteren Gebrauch auf. Stellen Sie sicher das sie das System
wieder in den Versandkarton packen wenn sie es außer Haus
bringen.
Verpackung
Verstärker 1
Subwoofer 1
Satelliten 2
Fernbedienungspult 1
Audiokabel 3.5mm2RCA 1
Gebrauchsanleitung 1
2
Die Frontansicht des Verstärkers
Illustration
Der Anschluß
Die Frontansicht des Verstärkers
Für die Soundkarte, CD/MP3 Players und andere.
1
1.
DIGITAL DISPLAY
2.
Eingang Regler
3.
SOUND Regler. Pressen Sie VOLUME für die
Regulierung der Lautstärke auf
Für VCD/DVD und andere
4.
Kopfhörer Buchse
5.
POWER. Pressen Sie on, off auf
2
INPUT SEL
Subwoofer
Verstärker
3
AUDIO INPUT
VOLUME
5
R
4
PHONE
L
INPUT 1
INPUT 2
L
R
POWER
R
Die Hinteransicht des Verstärkers
Die Frontansicht des Fernbedienungspults
AC IN
AUDIO INPUT
1
2
INPUT 2
3
L
R
FUSE
T400mAL250V
STANDBY
INPUT 1
1
2
L
S.W.
AUDIO OUTPUT
3D
INPUT
5
R
6
TREBLE
3
L
S.W.
AUDIO OUTPUT
BASS
BASS
-
+
*Please note the correct placement of speaker is shown in the above picture.
TREBLE
_
4
AC IN
4
+
VOLUME
_
FUSE
T400mAL250V
5
1.STAND BY Regime
2.Eingang Regler
3.Höhen Regler
4.Sound Regler
5.3D Sound Regler
6.Basse Regler
1. Eingang 1. 3.5 mm Stereo
Audioeingang Buchse
2. Eingang 2. 2.0 Kanal 2 RCA Audioeing
Ang Buchse
3. Audioausgang 2.1 Kanal 3 RCA
Audioausgang Buchse
4. POWER
5. Sicherung
3
+
1.Verbinden Sie die Sattelitenkabel mit dem L /R
Audioausgang Buchse auf der Rückseite des Verstärkers.
2.Verbinden Sie Subwooferkabel mit dem
Audioausgang Buchse auf der Rückseite des Verstärkers.
3.Wenn Sie VCD/DVD oder andere Einrichtungen
anschließen wollen - verbinden Sie mit dem RCA Audiokabel.
4.Wenn Sie Soundkarte CD/MP3 oder andere Einrichtungen anschließen wollen verbinden Sie mit dem doppelte 3.5 mm Stereo Buchse.
5.Überzeugen Sie sich, dass alle Kabeln richtig
angeschlossen sind, später schließen Sie die Anschlusskabel an.
Wenn Sie die Kopfhörer anschließen, hören Sie den Sound nur in den Kopfhörern
Das System soll sich in bequemer Stelle für den Kabelanschluss befinden
Die maximale Temperatur der Nutzung soll über 40C nicht sein.
4
FAQ:
Technical Information
Technische Besonderheiten
V12: Wurde von der bekannte Lautsprecher Designer Peter Larsen entwickelt. Tiefe
Bässe und ausgezeichnete mittlere und höhe Frequenzen lassen den klaren und
qualitativen Klang im breiten Frequenzbereich zu erreichen - 130HZ-8KHZ 1.5dB
und 100HZ-20KHZ 3dB
2.1 `+ 1 System: Microlab Außenverstärker Hi-Fi 2.1 System ist leicht im Gebrauch.
Entfernt die Verzerrungen, die durch die Sensibilität, die Vibration, der Wärme, den
elektromagnetischen Schwingungen herbeigerufen wurden. Es ist die beste Auswahl
für die Menschen, die Qualität des Hi-Fi Sound bevorzugen.
5.25 Subwoofer: 5.25 Subwoofer wurde von dem Doppelmagnetischen-System
gemacht, der die Niederfrequenzdeutlichkeit hat.
Frequenzbereich: V12 Diffusor 2.5 Breitband-Lautsprecher kann den idealen
lautlichen Effekt gewährleisten, einen realer 3D Sound übergeben und das breite
Spektrum des Sounds und der Details wiedergeben.
X-Basse: Microlab entwickelte hohe Technologie, die auf der geometrischen Struktur
des Subwoofers und des Lautsprecher gegründet wurde, gibt hochwertige,
eigenartige Niederfrequenzempfindlichkeit wieder.
Entwickelte für Musik: Diese Technologien lassen den qualitativen Klang im breiten
Frequenzbereich zu erreichen, was dieses System ideal für die Bewunderer der Musik
und der Filme macht. Das System entspricht den europäischen Standards. Sie
können mit dem Qualität Klangen genießen.
Verstärker
Leistung
Leistungausgang
220V-240V~ 50Hz 240mA
24W+15Wx2 RMS
Frequenzbereich
Empfindlichkeit
Harmonische Verzerrungen
35Hz-20KHz
300 mW
0.3 % 1 Watt 1 Hz
Verteilung
Störabstand
45 dB
75 dB
If you experience problems with your speaker, the following troubleshooting may help.
Frage
Auflösung
Prüfen Sie, dass das System angeschaltet ist.
Es gibt keine Indikation
Power LED
Prüfen Sie der Ernährungskabel auf
den Einschluss ins Netz
Prüfen Sie die Quelle des Sounds
Es gibt keinen Sound
Prüfen Sie die Vereinigung aller Leitungen
Prüfen Sie das Niveau des Sounds
Ein oder mehrere Satelliten
arbeiten nicht
Prüfen Sie, dass die Leitungen der Satelliten
angeschlossen sind, überzeugen Sie sich, dass
die Quelle des Sounds richtig abgestimmt ist.
Es gibt die großen Verzerrungen
bei der Vergrößerung der
Lautstärke
Schalten Sie die Wiedergabe des Lautes aus.
Machen Sie die Lautstärke niedriger.
Der Sound wird verzerrt
Prüfen Sie, dass die Hauptdatei oder die Disk nicht
beschädigt ist. Spielen Sie das andere Lied für
den Vergleich.
Wohin kann man die
Dynamiken stellen
Die Dynamiken sind magnetisch abgeschirmt.
Die können neben den LCD aufgestellt sein.
Das Fernbedienungspult
arbeitet nicht
Prüfen Sie die Niveau des Basses
Wenn Sie die anderen Fragen haben, bitte behandeln Sie ins Servicezentrum.
Dynamiken
Audioeingang
(Subwoofer)5.25"
(Satelliten)2.5"x2(magnetisch abgeschirmt)
1 (Eingang 1) 3.5mm Stereo Buchse
(Eingang 2) RCA Buchse
Audioausgang
RCA Buchse
Produktabmessungen
(Verstärker) 77x210x200mm
(Subwoofer) 215x260x220mm
5
6
FC550
Instrukcja obs³ugi
Microlab Technology Company Ltd.
Wyprodukowano w Chinach
Wszystkie inne nazwy produktów s¹ znakami handlowymi ich prawowitych w³aœcicieli. Rzeczywista zawartoœæ mo¿e nieznacznie
ró¿niæ siê od tych przedstawionych w druku. Wszystkie specyfikacje i projekty mog¹ byæ zmieniane bez uprzedniego powiadomienia.
G£OŒNIKI MULTIMEDIALNE
Przed u¿yciem nale¿y uwa¿nie przeczytaæ instrukcje obs³ugi.
Wa¿ne wskazówki bezpieczeñstwa
UWAGA
RYZYKO PORA¯ENIA PR¥DEM.
NIE OTWIERAÆ
Uwaga:
Aby zmniejszyæ ryzyko pora¿enia pr¹dem nie nale¿y rozk³adaæ urz¹dzenia na czêœci oraz nie nara¿aæ go na dzia³anie
deszczu lub wilgoci. Nie naprawiaæ samodzielnie czêœci wewn¹trz. Serwisowanie przekazywaæ wykwalifikowanemu
personelowi.
Wyjaœnienie Symboli Graficznych:
B³yskawica wewn¹trz trójk¹ta równobocznego ostrzega o obecnoœci nieizolowanych czêœci “pod napiêciem” w
obrêbie obudowy produktu, które mog¹ posiadaæ wystarczaj¹c¹ moc, aby wywo³aæ wstrz¹s elektryczny u ludzi.
Wykrzyknik wewn¹trz trójk¹ta równobocznego informuje o obecnoœci wa¿nych instrukcji obs³ugi i instrukcji
dotycz¹cych eksploatacji (obs³ugi) i konserwacji (serwisowania) w literaturze do³¹czonej do urz¹dzenia.
OSTRZE¯ENIA:
1. Czytaæ instrukcjeWszystkie instrukcje bezpieczeñstwa i obs³ugi powinny byæ przeczytane przed uruchomieniem
urz¹dzenia.
2. Zachowaæ instrukcjeInstrukcje bezpieczeñstwa i obs³ugi powinny byæ zachowane w celu póŸniejszego
wykorzystania.
3. Przestrzegaæ ostrze¿eñStosowaæ siê do wszystkich ostrze¿eñ umieszczonych na urz¹dzeniu i w instrukcjach
obs³ugi.
4. Przestrzegaæ instrukcjiWszystkie instrukcje obs³ugi i u¿ycia powinny byæ przestrzegane.
5. InstalacjaInstalowaæ zgodnie z instrukcj¹ producenta.
6. •ród³a zasilania Produkt ten mo¿e byæ pod³¹czony wy³¹cznie do okreœlonego rodzaju Ÿród³a zasilania
wskazanego na wejœciu kabla zasilania. W przypadku braku pewnoœci odnoœnie typu zasilania w domu, nale¿y
skonsultowaæ siê siê z dostawc¹ lub miejscow¹ elektrowni¹.
7. Uziemienie lub polaryzacjaUrz¹dzenie nie wymaga uziemienia. Nale¿y upewniæ siê, i¿ wtyczka jest prawid³owo
umieszczona w gnieŸdzie zasilania lub przed³u¿aczu w celu unikniêcia pora¿enia elektrycznego. Niektóre wersje
produktu zosta³y wyposa¿one w spolaryzowan¹ wtyczkê kabla zasilania pr¹du zmiennego (wtyczka z jednym
bolcem szerszym ni¿ inne). Ten rodzaj wtyczki mo¿na w³o¿yæ do gniazda zasilania tylko w jeden, okreœlony
sposób. Jest to zabezpieczenie, które nale¿y stosowaæ. Jeœli nie mo¿na wsun¹æ wtyczki do gniazdka, nale¿y j¹
obróciæ. W przypadku u¿ycia dodatkowego przed³u¿acza lub przewodu zasilania innego ni¿ oryginalny
dostarczony z urz¹dzeniem, powinien posiadaæ on odpowiednio zabezpieczon¹ wtyczkê, a tak¿e spe³niaæ
wszelkie normy bezpieczeñstwa i byæ dopuszczony do u¿ytku w danym kraju.
8. Zabezpieczenie kabla zasilania Kable zasilania powinny byæ u³o¿one tak, by nie by³o mo¿liwe nast¹pienie na nie,
lub przebicie ich przedmiotami na nich u³o¿onymi lub o nie opartymi, ze zwróceniem szczególnie uwagi na wtyczki,
gniazdka œcienne oraz miejsca, w których kable wychodz¹ z urz¹dzenia.
9. Przeci¹¿enieNie przeci¹¿aæ gniazd œciennych, przed³u¿aczy lub zintegrowanych przy³¹czy elektrycznych, gdy¿
mo¿e to powodowaæ ryzyko wyst¹pienia po¿aru lub pora¿enia elektrycznego.
10. WentylacjaProdukt musi byæ w³aœciwie wentylowany. Nie umieszczaæ produktu na ³ó¿ku, sofie lub innej podobnej
powierzchni. Nie przykrywaæ urz¹dzenia ¿adnymi rzeczami jak obrusy, gazety itd.
11.Gor¹coProdukt powinien byæ umieszczony z dala od Ÿróde³ ciep³a takich jak grzejniki, urz¹dzenia rejestruj¹ce
ciep³o, piece lub inne urz¹dzenia (w³¹czaj¹c wzmacniacze) wytwarzaj¹ce ciep³o. ¯adne nieos³oniête Ÿród³a
p³omieni, takie jak zapalone œwiece, nie powinny byæ umieszczane na urz¹dzeniu.
12. Woda i wilgoæ W celu zmniejszenia ryzyka po¿aru lub pora¿enia pr¹dem elektrycznym nie nara¿aæ na dzia³anie
deszczu, kapania i zachlapania lub nadmiernej wilgoci takiej jak w saunie lub ³azience. Nie korzystaæ z urz¹dzenia
w pobli¿u wody na przyk³ad w pobli¿u wanny, umywalki, zlewu kuchennego, wanny przeznaczonej do prania, w
wilgotnej piwnicy lub w pobli¿u basenu itp.
13. Przedostanie siê do œrodka przedmiotów i p³ynówNigdy nie wpychaæ przez otwory ¿adnego rodzaju przedmiotów
do œrodka urz¹dzenia, gdy¿ mog¹ dotykaæ miejsc o niebezpiecznym napiêciu lub powodowaæ zwarcie czêœci, co
mo¿e prowadziæ do po¿aru b¹dŸ pora¿enia elektrycznego. Nigdy nie nale¿y rozlewaæ ¿adnego rodzaju p³ynów do
lub na urz¹dzenie. Nie umieszczaæ ¿adnych obiektów zawieraj¹cych wodê na wierzchu produktu.
14. CzyszczenieOd³¹czyæ urz¹dzenie od gniazda œciennego przed rozpoczêciem czyszczenia. Kurz z obudowy
g³oœnika niskotonowego mo¿e byæ usuwany such¹ szmatk¹. U¿ywaj¹c œrodka czyszcz¹cego w rozpylaczu, nie
pryskaæ bezpoœrednio na obudowê, lecz na szmatkê. Uwa¿aæ, aby nie uszkodziæ elementów napêdu.
15. Urz¹dzenia dodatkoweNie u¿ywaæ urz¹dzeñ dodatkowych nie rekomendowanych przez producenta, gdy¿ mog¹
powodowaæ zagro¿enie.
16. AkcesoriaNie umieszczaæ urz¹dzenia na niestabilnym wózku, stojaku, statywie trójno¿nym, wsporniku lub stole.
Urz¹dzenie mo¿e spaœæ, powoduj¹c powa¿ne obra¿enia cia³a u dzieci i doros³ych oraz powa¿ne uszkodzenia
samego urz¹dzenia. U¿ywaæ tylko z wózkiem, stojakiem, statywem trójno¿nym, wspornikiem lub sto³em
zalecanym przez producenta lub sprzedawanych wraz z produktem. Ka¿dy monta¿ produktu powinien byæ zgodny
z instrukcjami producenta oraz przy u¿yciu dodatkowych akcesoriów przez niego zalecanych.
17. Przemieszczanie urz¹dzeniaUrz¹dzenie stoj¹ce na wózku powinno byæ przemieszczane ostro¿nie. Nag³e
zatrzymanie siê, nadmierna si³a i nierówna powierzchnia mog¹ spowodowaæ przewrócenie siê produktu wraz z
wózkiem.
1
18. Okresy nieu¿ywalnoœciPrzewód zasilania urz¹dzenia powinien byæ od³¹czony od gniazda podczas burzy z
piorunami lub kiedy urz¹dzenie nie jest u¿ywane przez d³u¿szy czas.
19. SerwisNie próbowaæ naprawiaæ urz¹dzenia samodzielnie, gdy¿ otwarcie lub usuniêcie pokrywy mo¿e naraziæ
na niebezpieczne napiêcie lub na inne zagro¿enia. Wszelkie prace serwisowe nale¿y powierzyæ
wykwalifikowanym pracownikom serwisu.
20. Podczas gdy urz¹dzenie nie jest u¿ywane nale¿y je od³¹czyæ od gniazdka elektrycznego. Kiedy jest ono
pod³¹czone do Ÿród³a zasilania, pracuje wówczas w trybie gotowoœci i nadal pobiera pr¹d.
21. Czêœci wymienneGdy niezbêdna jest wymiana czêœci, nale¿y upewniæ siê, ¿e technik serwisowy u¿y³ czêœci
wymiennych okreœlonych przez producenta lub maj¹cych te same charakterystyki co czêœæ oryginalna. U¿ycie
nieautoryzowanych czêœci mo¿e spowodowaæ po¿ar, pora¿enie pr¹dem lub inne zagro¿enia.
22. Bezpieczniki siecioweW celu ochrony przed po¿arem u¿ywaæ jedynie bezpieczników prawid³owego typu i z
w³aœciwymi wskaŸnikami. Prawid³owa specyfikacja zakresu napiêcia jest nadrukowana na urz¹dzeniu.
23. Nie nale¿y drastycznie zwiêkszaæ g³oœnoœci w przypadku niskiej g³oœnoœci lub podczas braku sygna³u audio.
G³oœnik mo¿e byæ zniszczony, gdy najwy¿szy poziom sekcji zostanie nagle w³¹czony.
24. Aby od³¹czyæ urz¹dzenie od zasilania nale¿y wyci¹gn¹æ wtyczkê przewodu zasilaj¹cego z gniazdka
elektrycznego. Zarówno gniazdo œcienne jak i wejœcie przewodu zasilania w urz¹dzeniu musi byæ zawsze
³atwo dostêpne gdy aparatura jest u¿ywana.
25. Gniazdo musi byæ zainstalowane blisko sprzêtu oraz byæ ³atwo dostêpne.
26. Najwy¿sza temperatura otoczenia odpowiednia dla tego produktu wynosi 40 oC.
Rozpakowywanie systemu:
Rozpakowywanie:
Otwórz opakowanie, przewróæ do góry dnem '
Podnieœ opakowanie do góry i delikatnie wyci¹gnij zawartoœæ opakowania
Usuñ wewnêtrzne opakowania z urz¹dzenia
Zalecamy zachowanie opakowania w celu wykorzystania go w przysz³oœci.
Podczas rozpakowywania powinieneœ znaleŸæ nastêpuj¹ce pozycje:
Wzmacniacz 1 szt.
G³oœnik niskotonowy 1 szt.
G³oœniki satelitarne 2szt
3.5mm-2RCA kabel audio 1 szt.
Pilot zdalnego sterowania 1 szt.
Instrukcja obs³ugi 1 szt.
2
Instrukcja
Pod³¹czenie systemu
Do karty dŸwiêkowej, CD, MP3,itp.
1. DIGITAL DISPLAY (Wyœwietlacz cyfrowy)
Po w³¹czeniu zasilania, wskaŸnik zasilania œwieci
jasniej
2. INPUT SELECT (Wybór wejœcia)
Nacisn¹æ przycisk, aby wybraæ wejœcie 1 lub wejœcie 2
wejœcia audio
3. REGULACJA G£OŒNOŒCI
Dostosuj system g³oœnoœci, zmniejsz g³oœnoœæ ruchem
przeciwnym do ruchu wskazówek zegara do minimum,
dostosuj regulacjê g³oœnoœci na ¿¹dany poziom
4. GNIAZDO S£UCHAWKOWE PHONE JACK
Mo¿na pod³¹czyæ s³uchawki stereo 3,5 mm do tego
gniazda
5. PRZYCISK POWER
Naciœnij ten przycisk w celu w³¹czenia systemu (ON),
Naciœnij ten przycisk w celu wy³¹czenia systemu (OFF)
1
2
INPUT SEL
3
VOLUME
5
4
PHONE
Do VCD, DVD, itp.
Subwoofer
Wzmacniacz
AUDIO INPUT
R
L
INPUT 1
INPUT 2
L
R
POWER
R
L
S.W.
AUDIO OUTPUT
Widok wzmacniacza z ty³u
Widok wzmacniacza z przodu
Pilot widok od przodu
AC IN
AUDIO INPUT
STANDBY
INPUT 1
1
2
1
INPUT 2
2
3
L
R
FUSE
T400mAL250V
3D
INPUT
5
R
6
TREBLE
3
L
S.W.
AUDIO OUTPUT
BASS
BASS
-
+
Proszê zwróciæ uwagê na prawid³owe rozmieszczenie
g³oœników, tak jak jest podane na powy¿szym rysunku
TREBLE
_
4
AC IN
4
+
VOLUME
_
+
FUSE
T400mAL250V
5
1. WEJŒCIE 1: 3,5mm Stereofoniczne gniazdo
wejœciowe audio
2. WEJŒCIE 2: 2.1 kana³owe (2 x RCA) audio gniazda
wejœciowego
3. WYJŒCIE AUDIO : 2.1 kana³owe (3 RCA) audio
gniazda wyjœciowego
4. PRZEWÓD ELEKTRYCZNY
5. BEZPIECZNIK
1. STAND BY (tryb gotowoœci)
2. INPUT SELECT (wybór wejœcia): nacisn¹æ
przycisk, aby wybraæ wejœcie 1 lub wejœcie 2 wejœcia audio
3. TREBLE (wysokie tony) przycisk +/-:
dostosowaæ dŸwiêk wysokich tonów, naciskaæ przycisk do
momentu uzyskania po¿¹danego poziomu dŸwiêku
4. VOLUME (dŸwiêk) przycisk +/-: dostosowaæ poziom
natê¿enia dŸwiêku g³oœników, naciskaæ przycisk do
momentu uzyskania po¿¹danego poziomu
5. 3D (trójwymiarowoœæ): nacisn¹æ przycisk, aby w³¹czyæ
przestrzenny efekt dŸwiêku
6. BASS (bas) przycisk +/-: dostosowaæ poziom dŸwiêku
basów, naciskaæ przycisk do momentu uzyskania
po¿¹danego poziomu
3
1. Pod³¹cz kable g³oœników satelitarnych do L i P gniazdek wyjœæ audio z ty³u wzmacniacza, a
nastêpnie umieœæ lewy g³oœnik satelitarny po lewej stronie wzmacniacza a prawy g³oœnik
satelitarny po jego prawej stronie.
2. Podl¹cz kabel do niskotonowego g³oœnika z ty³u wzmacniacza przez wyjœcie audio
3. Podczas po³¹czenia z VCD / DVD, itp., nale¿y u¿yæ podwójnego koñca kabla audio RCA.
Pod³¹cz jeden koniec kabla audio do gniazda wyjœcia do VCD / DVD, a drugi koniec do "L" i "P"
do wejœcia 2 gniazda z ty³u wzmacniacza . Uwaga: w zestawie nie ma kabla audio (2RCA-2RCA),
powy¿sze jest tylko dla informacji u¿ytkownika
4. Podczas pod³¹czenia karty dŸwiêkowej (CD, MP3, itp.), nale¿y u¿yæ kabla audio z podwójn¹
wtyczk¹ 3,5 mm stereo. Pod³¹cz jeden koniec kabla audio do wyjœcia gniazda audio na karcie
dŸwiêkowej (CD, MP3, etc), drugi koniec do gniazda wejœciowego 1 z ty³u wzmacniacza.
Uwaga: w zestawie nie ma kabla audio (3,5 -3,5 mm), powy¿sze jest tylko dla informacji
u¿ytkownika.
5. Uwagi: gniazda i wtyczki s¹ kolorowe. Pamiêtaj, aby pod³¹czaæ oznaczone kolorami wtyczki do
odpowiednio oznaczonych gniazd.
6. SprawdŸ po³¹czenia i upewnij siê, ¿e ka¿dy kabel jest prawid³owo pod³¹czony, a nastêpnie
pod³¹cz wtyczkê zasilania do prawid³owego gniazdka elektrycznego. Kszta³t wtyczki i gniazdka
elektrycznego zale¿y od kraju u¿ytkowania
* Po pod³¹czeniu s³uchawek do g³oœnika, mo¿na us³yszeæ dŸwiêk jedynie w s³uchawkach.
* Gniazda powinny byæ zainstalowane w pobli¿u urz¹dzenia i byæ ³atwo dostêpne.
* Najwy¿sza temperatura otoczenia odpowiednia dla tego produktu wynosi.
4
Rozwi¹zywanie problemów
Informacje techniczne
If you experience problems with your speaker, the following troubleshooting may help.
Funkcje
V12: zaprojektowany przez s³ynnego duñskiego projektanta g³oœników Petera Larsen.
Pe³nozakresowe sto¿kowe g³oœniki multimedialne V12 2.5 wyznaczaj¹ aktualne standardy poprzez
ich doskona³¹ p³ask¹ na wykresie: 130HZ-8kHz 1.5dB oraz 100Hz-20kHz 3dB.
2.1+1system: zewnêtrzny wzmacniacz Microlab o mocy Hi-Fi w systemie 2.1 jest ³atwy w u¿yciu i
przyjazny dla u¿ytkownika. Dziêki temu mo¿na wyeliminowaæ zak³ócenia dŸwiêku spowodowane
przez drgania, przegrzanie i zak³ócenia elektromagnetyczne. Jest to najlepszy wybór dla tych,
którzy lubuj¹ siê w jakoœci dŸwiêku Hi-Fi.
5.25 subwoofer: 5.25 " subwoofer to unikalny produkt wyprodukowany przy u¿yciu podwójnego
systemu magnesów Sr Magnet w celu przetarcia szlaku dla takich wartoœci jak natychmiastowa
reakcja g³oœników na wy³¹czenie dŸwiêku, wiêkszy ruch membrany, co daje lepsz¹ czêstotliwoœæ
dŸwiêku oraz szybsz¹ reakcjê g³oœników na dŸwiêk.
Czêstotliwoœæ: ze wzglêdu na ich doskona³¹ jakoœæ, pe³nozakresowe sto¿kowe g³oœniki
multimedialne V12 2.5 ", zapewniaj¹ idealny efekt dŸwiêkowy, buduj¹c zarazem prawdziwy œwiat 3D
w dziedzinie dŸwiêku i odtwarzaj¹c szerokie poziomy i szczegó³y.
X-Bass: Wysoce rozwiniêta solidna technologia Microlab pozwala odtworzyæ basy na specjalnie
zaprojektowanym do tego g³oœniku niskotonowym. Równie¿ obudowa subwoofera o geometrycznym
kszta³cie nawi¹zuje do teorii psychologii, która mówi o odtwarzaniu nadzwyczajnie wysokiej jakoœci
dŸwiêku co daje lepsz¹ jego czêstotliwoœæ
Zaprojektowane dla muzyki: podstawowym celem Microlab R & D system jest promowanie i
nadawanie tempa europejskiej kulturze muzycznej Aby to osi¹gn¹æ, wszystkie projekty powinny byæ
zorientowane na muzykê i pochodziæ ze sztuki muzycznej. Posiadaj¹c urz¹dzenie firmy Microlab
mo¿esz do woli delektowaæ siê europejskim, muzycznym smakiem.
Problem
Rozwi¹zanie
SprawdŸ czy urz¹dzenie jest w³¹czone
Kontrolka w³¹cznika
nie œwieci siê
SprawdŸ czy kabel zasilania jest dobrze pod³¹czony
SprawdŸ czy Ÿród³o audio dzia³a
Brak dŸwiêku
SprawdŸ czy kable g³oœników s¹ dobrze pod³¹czone
SprawdŸ czy pokrêt³o g³oœnoœci nie jest na minimum
Jeden lub wiêcej g³oœników
satelitarnych nie dzia³a
SprawdŸ czy kabel g³oœników satelitarnych
jest dobrze pod³¹czony
Brak basów
SprawdŸ czy pokrêt³o kontrolki basów
nie jest na minimum
DŸwiêk jest zniekszta³cony
SprawdŸ czy g³oœnoœæ jest na najni¿szym poziomie
Je¿eli którykolwiek z podanych powy¿ej problemów nadal istnieje skontaktuj siê ze
sprzedawc¹ lub z profesjonalnym serwisem.
Specyfikacja
Specyfikacja wzmacniacza:
AC IN
220V-240V~ 50Hz 240mA
Moc wyjœciowa
24W + 15 W x2 RMS
Pasmo czêstotliwoœci
35Hz-20KHz
Czu³oœæ wejœciowa
300mV
Zniekszta³cenie
< 0.3% (1W 1KHz)
Oddzielenie
> 45 dB
S/N
> 75 dB
Rozmiary g³oœników:
(G³oœnik niskotonowy)5.25
(G³oœniki satelitarne)2,5"x2(ekranowanie magnetyczne)
Wejœcie audio:
(Wejœcie 1) gniazdo stereo 3.5mm
(Wejœcie 2) gniazdo RCA
Wyjœcie audio:
RCA jack
Wymiary produktu
(g³. x wys. x szer.):
(Wzmacniacz) 77x210x200mm
(G³oœnik niskotonowy) 215x260x220mm
(G³oœniki satelitarne) 85x100x165mm
5
6