1
USER’S GUIDE
RF7000
VERSION 1.2
Wireless EZ Touch
Keyboard & Optical Mouse
Keyboard & Optical Mouse
IMPORTANT NOTICE!
The information in this document is subject to change without notice and does
not represent a commitment on the part of the vendor.
No warranty of representation, either expressed or implied, is made with respect
to the quality, accuracy or fitness for any particular purpose of this document.
The manufacturer reserves the right to make changes to the content of this
document and/or the products associated with it at any time without obligation
to notify any person or organization of such changes.
In no event will the manufacturer be liable for direct, indirect, special, incidental or
consequential damages arising out of the use or inability to use this product or
documentation, even if advised of the possibility of such damages.
Copyright©2003. All rights reserved
PC and ATX are registered trademarks of International Business Machines
Corporation.
Microsoft and Windows are registered trademarks of Microsoft Corporation in
the United States of America and/or other countries.
All other trademarks are trademarks of their respective holders.
TABLE
OF
CONTENTS
1. Introduction
1
What's in this package
1
2. System Requirements
1
3. Using the Keyboard and Mouse
2
3.1 Hardware Installation
2
3.2 Wireless ID Setting
4
3.3 Attaching the Wrist Rest
6
4. Software Installation
6
5. Uninstallation
7
6. Wireless EZ Touch Software
7
6.1 To Display the "KeyMaestro" Dialogue Box
7
6.2 To Display the "Configure Button" Dialogue Box
8
7.1 Using the Keyboard
9
7.1 Office Application Keys
9
7.2 Internet Keys
9
7.3 Application Keys
10
7.4 Multimedia Keys
10
7.5 Enhanced Function Keys
11
7.6 Programmable Scroll Wheel
12
7.7 Clipboard Keys
12
8. Using the Mouse
13
8.1 Using the Mouse Driver
13
8.2 Mouse Extra Functions
13
8.3 Quick Jump Function Introduction
14
9. Troubleshooting
15
1. Introduction
Congratulations on your purchase of the Memorex® Wireless EZ Touch Keyboard and
Mouse combo! This product includes a wireless, multimedia keyboard and an 800 dpi optical scroll mouse. Advanced radio frequency technology means reliable performance and
optimum accuracy. Because the products operate on two channels and have 256 IDs per
channel, there is virtually no interference.
Additionally, the RF7000 creates a fast, efficient work environment for all your favorite
functions and programs. One-touch editing features allow you to conveniently cut, copy
and paste with the tap of a single key. Additional time-savers include multimedia keys,
enhanced function keys for Microsoft Office, and Internet hot keys. The programmable
scroll wheel simplifies navigation by performing a host of timesaving functions including
volume control, forward and backward Internet navigation, and previous or next CD track
selection.
The mouse uses the latest optical technology, which means precise movement and no
mouse ball to clean. Because the optical sensor detects motion on hundreds of
surfaces, you can use the mouse on wood, plastic, or even your pants leg. The mouse
fits comfortably in either hand and operates with a resolution of 800 dpi for more
accurate cursor control. It has a scroll wheel, and three of its five buttons may be programmed using the included software.
In order to enjoy the full potential of the RF7000 EZ Touch Keyboard and Optical Mouse
combo, please read this manual carefully.
What’s in this package
•
•
•
•
•
•
Wireless EZ Touch Keyboard
Wireless Optical Mouse
RF Receiver
Removable Ergonomic Wrist Rest
4 AA Batterries
Software Driver Disc
2. System Requirements
• Microsoft Windows® 98 SE/Me/2000/XP
• Microsoft® Internet Explorer 5.0 or later version (for the Internet keys)
• CD-ROM or DVD drive (for CD or Video operation)
• Standard sound card (for CD or Video operation)
• USB port
• Microsoft® Office 97 or later version (for Office Application keys and Enhanced
Function keys)
• System support for ACPI or APM II (for power management buttons)
• ATX mother board and ATX power supply (for power management buttons)
1
3. Using the Keyboard and Mouse
This wireless keyboard and mouse combo consists of a receiver that plugs into the
computer, a wireless keyboard, and a wireless mouse.
3.1 Hardware Installation
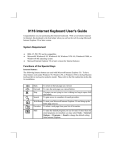
3.1.1 Getting the Receiver Ready
Connect the receiver and select a wireless channel:
1. Make sure your PC is switched off.
2. Turn the receiver over and find the channel slide switch. Select either channel
CH1 or CH2. Remember which channel you selected.
Bottom View of Receiver
Receiver Channel Slide Switch
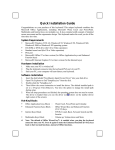
3. Connect the receiver to your PC by plugging the receiver's USB connector into your PC.
USB Connector
4. Set the receiver on a flat surface and follow these guidelines:
a. There should be a minimum of 8 inches clearance between the receiver and other
electronic devices.
b. There should be a minimum of 8 inches clearance between the receiver and the
monitor.
c. The distance between the receiver and the wireless mouse or keyboard should not
exceed 4.92 feet.
d. For better reception, the receiver works best on a nonmetallic surface.
3.1.2 Getting the Keyboard Ready
Install the two AA alkaline batteries (provided) into the keyboard and select a wireless channel:
1. Turn the keyboard over and find the battery compartment. Lift the cover.
2. Insert the included AA alkaline batteries into the compartment. Make sure the batteries
are placed in the correct direction by following the polarity signs in the battery
compartment.
Channel Slide Switch
Battery Compartment
Bottom View of Keyboard
2
3. Use the channel slide switch on the back of the keyboard to select the same channel as
the one you selected for the receiver.
Keyboard Channel Slide Switch
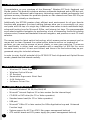
3.1.3 Getting the Mouse Ready
Install two AA batteries (provided) into the mouse and select the same wireless channel as
the receiver.
1. Turn the mouse over and find the battery compartment. Lift the cover.
Battery Compartment
Bottom View of Mouse
2. Use the channel slide switch, located inside the battery compartment of the mouse, to
select the same channel as the one selected on the receiver and on the keyboard.
Synch Button
Bottom View of Mouse
Channel Slide Switch
3. Insert the included AA batteries into the compartment. Follow the polarity signs in the
battery compartment and make sure the batteries are placed in the correct direction.
4. Replace the battery compartment lid.
Notes:
1. The keyboard and mouse each use two pieces of standard UM-3 "AA" 1.5V batteries.
2. Battery life for the keyboard is approximately 3-4 months, depending on the intensity of
usage.
3. Make sure the receiver is at least 8 inches away from the monitor and is placed in a
location relatively free of strong electromagnetic or transmission sources. This helps to
ensure optimal reception of the keyboard and mouse signal.
4. Your computer should be off during the entire hardware installation and channel
selection process.
5. The Keyboard and Mouse IDs must be resynchronized with the Receiver ID each time
that the batteries are replaced or removed from their battery compartment. If you are
only changing the batteries in one device, only the device with new batteries must be
resynchronized.
6. The optical mouse is deigned to save power by going into a Sleep mode after
10 minutes of inactivity. Simply move the mouse or click on the buttons to wake it up.
3
3.2 Wireless ID Setting
The mouse, keyboard and receiver each contain two channels, and each channel
contains 256 IDs that are randomly selected when you press the ID button. This IDrecognition function helps protect against interference from other wireless devices in
the same environment.
Important: Whenever you want to set the IDs of both the keyboard and mouse, you
must first set the receiver ID and keyboard ID, and then set the receiver ID and mouse
ID, as described in this procedure.
3.2.1 Synchronizing your Receiver, Keyboard and Mouse
1. Leaving your current keyboard and mouse connected, turn the computer on.
2. Let Windows detect your new USB Receiver (your Windows Operating System CD may
be needed). Once the USB Receiver is finished being detected, continue to step 3.
3. Press the ID button on the top of the receiver once. The LED light will start to blink.
ID Button
ID Button of Receiver
4. Turn the keyboard over and locate the ID button near the left footpad. Press the ID
button firmly with a blunt pointed object (like the tip of a ballpoint pen), then let go.
The receiver should blink rapidly then stop.
ID Button of Keyboard
ID Button
Important: If 30 seconds pass before you complete step 4, you must repeat steps 3 and 4
to set the keyboard ID. If the ID button is pressed more than one time during the keyboard
setup (step 4), you must start over with step 3 and set the receiver ID.
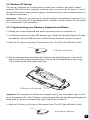
5. Press the ID button on the top of the receiver once. The LED light will start to blink.
ID Button
ID Button of Receiver
4
6. Turn the mouse over and locate the ID button on the left side of the mouse near
the battery compartment. Press the ID button firmly with a blunt pointed object
(like the tip of a ballpoint pen), then let go. The receiver should blink rapidly then
stop.
ID Button
Synch Button
ID Button of Mouse
Important: If 30 seconds pass before you complete step 6, you must repeat steps 5
and 6 to set the mouse ID. If the ID button is pressed more than once time during
the mouse setup (step 6), you must start over with step 5 and set the receiver ID. You
do not need to reset the keyboard ID.
7. To quickly verify that your new keyboard and mouse are properly synchronized,
depress a key or two on your keyboard. If the LED on the Receiver blinks
steadily, then it has made the connection. For the mouse, simply move it around
on a flat surface and click a button or two. If the LED on the receiver blinks
steadily, then the mouse has made the connection as well.
8. Now both the keyboard and mouse should be communicating properly. If they do
not seem to work please check for proper installation of the batteries and repeat
the steps again.
9. After you have verified that both your keyboard and mouse are functioning
properly, you should shut down your computer and remove your previous keyboard and mouse.
Notes:
1. You must follow the procedure above to set the ID of the receiver, keyboard
and mouse.
2. Once the receiver ID button is pressed you have 30 seconds to complete the
entire process, or you will need to begin again.
3. Once the keyboard or mouse ID buttons have been pressed, the green receiver
light will flash. Once the device ID is set, it will stop flashing and remain fully lit.
3.2.2 Replacing Batteries and Resetting ID Buttons
When the batteries are low, a battery low icon
will show on the right-bottom corner
of the taskbar instead of the keyboard driver software icon
. At that time you must
replace the batteries.
IDs need to be reset when batteries are changed.
When changing the batteries on one part of the product, you do not need to reset all the
IDs. Simply reset the ID for the receiver and the part that required new batteries. You must
press the receiver ID button first and then press the keyboard or mouse button. Refer to
the steps 3 and 4 or 5 and 6 above.
5
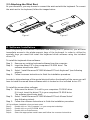
3.3 Attaching the Wrist Rest
At your discretion, you may choose to connect the wrist rest with the keyboard. To connect
the wrist rest to the keyboard, follow the images below:
Figure 1
Figure 2
4. Software Installation
After completing the hardware installation and turning the PC power on, you will have
immediate access to the alpha-numeric keys of the keyboard. In order to utilize the
specialty keys you must first install the keyboard driver software using the included
driver CD.
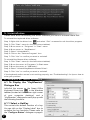
To install the keyboard driver software:
Step 1: Remove any existing keyboard software from the computer.
Step 2: Insert the driver CD in your computers CD-ROM drive. The
software should auto start*.
Step 3: Select "Install Memorex RF7000 Wireless EZ Touch Keyboard" (see following
picture).
Step 4: Follow onscreen instructions to finish the installation procedure.
In order to take advantage of the special shortcut button functionality of the mouse you will
have to install the mouse driver software which is located on the included driver CD.
To install the mouse driver software:
Step 1: Make sure the driver CD is still in your computers CD-ROM drive.
If it is not, insert the driver CD in your computers CD-ROM drive.
The software should auto start*.
Step 2: Select "Install Memorex RF7000 Wireless EZ Touch Mouse Series"
(see following picture).
Step 3: Follow the onscreen instructions to finish the installation procedure.
*If the software installation does not auto start:
Step 1:
Double click on "My Computer" on your computer's desktop.
Step 2:
Double click on your CD-ROM drive.
Step 3:
Double click on AutoRun.exe.
Step 4:
Select the appropriate model name and follow the onscreen instructions.
6
5. Uninstallation
Please note when reinstalling the driver software you have to uninstall them first.
To uninstall the keyboard driver software:
Step 1: Right-click the driver icon
Step
Step
Step
Step
Step
Step
2:
3:
4:
5:
6:
7:
and select "Exit" command to exit the driver program.
Click "Start" menu (on the left-bottom taskbar).
Move cursor to "Programs" in "Start" menu.
Move cursor to "KeyMaestro".
Select "Uninstallation".
Click on the "Remove Program" icon.
Click "Yes" to confirm you want to uninstall.
To uninstall the Mouse driver software:
Step 1: Click "Start" menu (on the left-bottom taskbar).
Step 2: Move the cursor to"Programs "in Start menu.
Step 3: Move the cursor to "MMaestro".
Step 4: Select "Uninstall KeyMaestro Mouse Driver".
Step 5: Click “Yes” to confirm you want to uninstall.
If the keyboard and/or mouse is not working properly, see "Troubleshooting" for tips on how to
solve your problem.
6. Wireless EZ Touch Software
6.1 To Display the "KeyMaestro"
Dialogue Box
Left-click the mouse on the Smart Office
Keyboard Driver icon
in the Windows
taskbar (located at the bottom right corner
of your computer desktop), and a
"KeyMaestro" dialogue box will pop up with
the following functions.
6.1.1 Select a HotKey
This controls the default function of a key.
You can click on the "Display Label" box to
re-define the key functions. Please refer to
the "Configure Button" dialogue on page 4.
7
6.1.2 Enable Display Label
This command displays or hides the OSD (On Screen Display). When the OSD is enabled,
each time you press any one of the multimedia buttons, its function name (button label) will
show on the right-bottom corner on the screen. This function is enabled by default.
6.1.3 Enable Taskbar Icon
This command displays or hides the taskbar software icon. When the function is
enabled, you can see a software icon
on the Windows taskbar, its function name
(button label) will show in the right-bottom corner of the screen. If you want to re-activate it, you can select Start => Programs => Configure to launch it. This function is
enabled by default.
6.1.4 Enable Auto Play
This command activates the auto play function. When the function is enabled, the Microsoft
Media Player will appear after you press the "Play" multimedia key. Winamp users may use
the multimedia keys to control the Winamp Player after the key is programmed and the
AutoPlay function is disabled.
6.2 To Display the "Configure Button" Dialogue Box
Each button has the ability to work in any of the
following manners. Simply select what type of
configuration you like by selecting the appropriate circle and follow the steps below.
6.2.1 Label
In the Label box, type the name of the application that the button will launch, or any name you
associate with the function of the button. This
label will appear on screen each time you press
the button.
6.2.2 Functions
You can see a list of the pre-defined functions or
change the function of any button.
6.2.3 Launch Application or Website
Type a frequently used application in the path or
click the Browse button to select any file on your computer. If you want to attach a web
page to the button, type in the website address in the dialogue box (remember to include
the http:// for website locations).
6.2.4 Combination Key
In many Windows applications, there are hot keys to execute frequently used commands.
Now you can program those complicated hot keys you always forget. Any combination is
available. For example, [Alt] + [F4] = close window, [Ctrl] + [A] = select all.
6.2.5 String
You may define a button with a string of text that you frequently use. The maximum
number of characters is 500. Simply enter the text string in the box.
If the keyboard is not working properly, see "Troubleshooting" (page 10) for tips on how
to resolve your problem.
8
7. Using the Keyboard
7.1 OFFICE APPLICATION KEYS
W
W
W
Word
Opens Microsoft Word
Excel
Opens Microsoft Excel
PowerPoint
Opens Microsoft PowerPoint
Calendar
Opens “Calendar” function of Microsoft
Outlook
7.2 INTERNET KEYS
W
Back
Returns to the last page you viewed.
Forward
Returns
to the page you viewed before
W
W
selecting
the back button.
Stop
If a page you are trying to view is taking too
long to open, click this button to stop.
Refresh
Refreshes the current Web page in order to
make sure you have the latest content.
www
W
Opens the default Internet browser.
W
W
W
Search
W
9
Opens the Internet search menu.
My
Favorite
Opens the Internet "My Favorites" folder.
E-mail
Opens the default program you use for
e-mail.
7.3 APPLICATION KEYS
W
W
Log Off
My
Computer
Opens “My Computer”.
Calculator
Starts Microsoft Calculator.
Log Off
Opens log off windows dialog box.
Sleep
Places the computer in Sleep Mode. This function is available only on certain computers.
Power
Turns the computer off
W
Note: For Power Management functions, please see your computer's manual for
assistance. Or see "Troubleshooting" on page 15 for more information.
7.4 MULTIMEDIA KEYS
Mute
Mutes the sound.
Volume Up
Adjusts volume up.
Volume
Down
Adjusts volume down.
Stop
Stops the playing of the CD player.
Previous
Skips backward to the previous file/track
when pressed once. Pressing the button
twice will cancel the function.
Next
Skip forward to the next file/track when
pressed once. Pressing the button twice will
cancel the function.
Play/
Pause
Press to begin playing. When the CD or
Video is playing, press this button to pause it.
Press the button again to resume playing
from the current position.
10
W
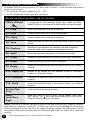
7.5 Enhanced Function Keys
Enhanced function keys consist of 12 keys and functions. There are two ways these
functions may work:
1. As a part of the main keyboard: F1 – F12.
2. As 12 embedded office keys and functions.
ENHANCED FUNCTION KEYS
ARE AS FOLLOWS :
Office Wizard
A toggle key for the Enhanced Office Keys. When the Office
Wizard LED is on, the Enhanced Office function keys are activated.
F1: Help
Opens the Help file for the active window.
F2: New
Creates a new, blank file in the active program.
F3: Open
Opens or finds a file in the active program.
F4: Save
Saves the active file with the current file name, location and file
format.
F5: Replace
Searches for and replaces the specified text and formatting.
Starts the spell check program in the active document.
F6: Spell
Starts the spell check program in the active document.
F7: Undo
Reverses the last command or deletes the last action completed.
F8: Redo
Reverses the action of the Undo command*.
F9: Reply
Replies to the selected e-mail in Microsoft Outlook or Outlook
Express.
F10: Reply All
Replies to all copied on the selected e-mail in Microsoft
Outlook or Outlook Express.
F11: Forward
Forwards the selected e-mail in Microsoft Outlook or Outlook
Express.
F12: Send
Sends the selected e-mail in Microsoft Outlook or Outlook
Express.
Prt Scr/Sys:
Print
Prints the file in the active window.
Num
Lock/Euro
Sign:
Make sure the LED light of both "Office Wizard" and "num
lock" are on. The Euro sign works when both of the Office
Wizard and Num Lock are activated.
Note: Microsoft Windows operating system and applications must support different
languages for different countries; it limits the functions of embedded office keys.
Some enhanced functions are only for target language usage. The descriptions of the
enhanced office keys' functions are for reference and may not reflect your keyboard
exactly.
11
* Some applications may not fully support this feature
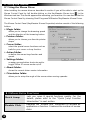
7.6 PROGRAMMABLE SCROLL WHEEL
Scroll Wheel
1. Works as a mouse with scrolling functions in 2
directions - up and down. You can use the up and
down functions of the Scroll Wheel to scroll the document vertically.
2. Works as a mouse button. When you push on the
scroll wheel, a series dialogue functions will pop-up
as shown below. Their functions are divided into 3
parts:
1. Works as "Internet keys" (Please see page 6
for descriptions of the Internet keys) or
"Multimedia keys" (Please see page 7 for
descriptions of the Multimedia keys). You can
program the push button as one of these
functions.
2. Works as Scroll Up/Down, Volume Up/Down,
www Back/Forward or Previous/Next Track. If
you customize the push button as one of these
functions, you only have to use the wheel to
control this function.
3. Works as "Configure" function (page 4).
Please refer to the description of the Smart
Office Keyboard Software on page 5 for more
information.
7.7 CLIPBOARD KEYS
Cut
Removes the selection from the active
document and places it on the Clipboard.
Copy
Copies the selection to the Clipboard.
Paste
Pastes the previously cut or copied items from
the Clipboard into the active area or document.
Mark
Press on the mark key once and use the up,
down, right and left direction keys to select
items. Press the mark key again or any other
keys except the up, down, right, left, home,
end, page up or page down key, to release
the mark function.
APP
Application
Switch
Opens a window allowing you to switch
between open application programs. The
function is the same as "Alt+Tab". Hold the
button and use the arrow keys to select
another open program.
Close
Close
Closes the active Windows Application.
12
8. Using the Mouse
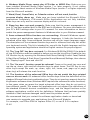
8.1 Using the Mouse Driver
After installing the mouse driver as described in section 4 you will be able to start up the
Mouse Control Panel by left double-clicking on the KeyMaestro Mouse icon
in the
Windows task bar. This should appear after restarting your machine. You can also invoke the
Mouse Control Panel by choosing Start?Programs?MMaestro?KeyMaestro Mouse Driver.
The Mouse Control Panel (KeyMaestro Mouse Properties) window consist of the following
folders:
• Magic folder:
allows you to change the browsing speed
and the direction of the browsing button.
• Pointers folder:
allows you to choose your favorite pointer
shape.
• Cursor folder:
select the special cursor functions such as
trails for your cursor or loop function.
• Action folder:
re-define the mouse keys function and
speed.
• Settings folder:
re-assign mouse button shortcuts and/or
toggle Office 97 mouse mode on/off.
• About folder:
shows the current driver version information.
• Orientation folder:
allows you to setup the angle of the mouse when moving upwards.
8.2 MOUSE EXTRA FUNCTIONS
Quick Jump
Double Click
13
Lets you open 8 special functions quickly. For the
details, please refer to the "Quick Jump Function
Introduction" in next section.
Replaces the "double click" movement to activate an
application or function. It reduces the number of mouse
clicks.
Window Zoom
To magnify or de-magnify the view of a document in an
application that supports it (this function works when
the application you used is with the ctrl + wheel scrolling function, ie, Word, Excel, PowerPoint and FrontPage
...).
Switch AP
Switch quickly from one opened application to another
application without an extra cursor move. Press the
"Switch AP" button you set and scroll the wheel button
to switch the applications.
Auto Panning
Move the cursor and then the document will scroll
slowly in the direction you just moved.
www Back
Returns to the last page you viewed.
www Forward
Returns to the page you viewed before selecting the
back button.
8.3 Quick Jump Function Introduction
After installing the mouse driver and invoking the
KeyMaestro mouse driver program you will have access to
nine special function icons by pressing the scroll wheel
once. These nine functions are:
Mouse
Control Panel
Activates the Mouse Control Panel Menu.
Control Panel
Activates the "Control Panel" window.
Horizontal
Scroll Bar
Sets the cursor to the horizontal scroll bar to
scroll the document horizontally. (the function
does not support Windows XP).
Vertical
Scroll Bar
Sets the cursor to the vertical scroll bar to scroll
the document vertically. (the function does not
support Windows XP).
Windows
Explorer
Activates the 'Windows Explorer' window.
Size Grip
Adjusts the frame size of the windows you
opened (the function does not support full screen.
The function is also not performed when the
frame of applications are not adjustable).
14
Minimize All
Windows
Allows you to minimize all the current opened
applications immediately (this function is only
performed when the applications are with the
minimize function).
Recall the
Last Active
Window
Recalls the last active window.
Exit
Exit the quick jump function panel.
Clicking once more on the scroll wheel will close these icons.
Note: For more detailed information please read the online help by right clicking on
the KeyMaestro Mouse icon
in the Windows task bar and select Help.
9. TROUBLESHOOTING
If you experience problems with your keyboard/mouse please read through the
following Troubleshooting topics:
1. Keyboard & Mouse do not work properly: Please attempt to first reset your
device IDs if your keyboard and mouse are not working properly.
2. Mouse does not work accurately: Use the mouse only on a clean, flat, non-slippery surface in order to ensure smooth and accurate cursor action. If you use a
mouse-pad, choose a light-colored one to use less battery power.
3. The Wireless EZ Touch Software does not work properly: If your special
function keys do not work properly after installing the KeyMaestro software, please
make sure that there are no other keyboard or mouse software programs installed.
If any is found, please remove all of the keyboard and mouse software (including
the KeyMaestro software), then restart your computer and reinstall only the
KeyMaestro software.
4. Add/Remove Software or Re-install: After installing the Keyboard software, the
Keyboard icon will display on the system tray. If you want to reinstall the software
for some reason, you must remove the Keyboard driver from your computer first.
For more detailed information, please refer to Section 5 of this manual for proper
uninstallation instructions.
5. Other software applications cannot be installed properly: If you are having
difficulty or failure to install other software applications on your computer, uninstall
the KeyMaestro keyboard and mouse software. Then install the application that
you were having trouble with and then re-install the KeyMaestro software.
15
10
6. Windows Media Player cannot play VCD titles or MPEG files: Make sure you
have installed Windows Media Player version 7 or later properly. If not, please
download the latest version of Windows Media Player (version 7 or higher required)
from the Microsoft website.
7. Word, Excel, PowerPoint, or Calendar actions will not work, but the
onscreen display shows up: Make sure you have installed the Microsoft Office
Applications completely. If Microsoft Office Applications are not fully installed,
these keys can only see the onscreen display and do not work.
8. Sleep key does not work properly: Make sure that the power management in
your PC has been enabled both in the BIOS and in Windows. For more information on
your PC's BIOS settings refer to your PC's manual. For more information on how to
enable the power management features in Windows refer to your Windows manual.
9. Some enhanced Office functions are not working: Microsoft Windows operating system and applications support different languages. It limits the functions of
enhanced office keys. Some enhanced functions are only for target language usage.
The descriptions of the enhanced function keys are for reference and may not reflect
your keyboard exactly. This kit is intended for use with the English language and the
operating system and applications should be English versions for proper support
10. The "Log Off" key does not work: For Windows 98 SE/Me/2000/XP the default
of Log Off function must be enabled in before you use the log off key. Enable the Log
Off function key by opening the Windows Start Menu/Setting/Control Panel/Taskbar
& Start Menu/Taskbar & Start Menu Properties Menu/Advanced/Settings, then choose
the "Display Logoff" item and click OK.
11. The "Un-mark" function cannot be released: Press on the mark key once and
use the up, down, right and left direction keys to select items. The ESC key (or any
other keys except the mark, up, down, right, left, home, end, page up or page
down key) will release the mark function.
12. The functions of the enhanced Office keys do not match the keys printed
name or do not work: All enhanced office function keys follow the definitions of the
standard Microsoft shortcut combination keys. They do not need any support from the
KeyMaestro software driver (Windows 98SE requires the software for some functions).
In few cases, when you press the target enhanced office keys, they do not work or
have different results. This means the applications do not support the definitions of
the standard Microsoft shortcut combination keys, and the target functions or the
software applications conflict with the definitions. Software that has been partially
installed or that has been damaged could have this problem as well.
We recommend that you contact the software application dealer or download
new versions to upgrade your applications from Microsoft Website.
For example, use Office 2000 to replace Office 97, or use IE 5.0 to replace
IE 4.0
11
16
Technical Support:
If the above instructions do not solve your problem, please contact Memorex
technical support at 877-Is it live (toll free), or visit us online at
www.memorex.com for our Frequently Asked Questions (FAQ).
Memorex Products One Year Limited Warranty:
Memorex Products, Inc. ("Memorex") warrants this product, excluding connected
equipment, against defects in materials and workmanship for one year from the
date of original purchase. PURCHASER'S REMEDY IS LIMITED TO REPAIR OR
REPLACEMENT OF ANY DEFECTIVE PRODUCT. THIS WARRANTY AND REMEDY
IS EXCLUSIVE AND WE SPECIFICALLY DISCLAIM ANY AND ALL OTHER EXPRESS
OR IMPLIED WARRANTIES. IN NO EVENT SHALL MEMOREX OR ANY SUPPLIER
OR SELLER BE RESPONSIBLE FOR ANY DIRECT, SPECIAL, INCIDENTAL, CONSEQUENTIAL OR ANY OTHER DAMAGES OF ANY KIND. For further information
regarding warranty service please go to www.memorex.com
Product Registration:
To register your product please visit service and support online at www.memorex.com
or write to us with your name, address, phone number, model name, model number, date of
purchase and place of purchase at: Memorex Products, Inc. 10100 Pioneer Blvd, Suite 110,
Santa Fe Springs, CA 90670.
17
FCC Guidelines:
This equipment has been tested and found to comply with the limits for a Class B digital
device, pursuant to Part 15 of the FCC Rules. These limits are designed to provide
reasonable protection against harmful interference in a residential installation. This equipment generates, uses and can radiate radio frequency energy and, if not installed and
used in accordance with the instructions may cause harmful interference to radio
communications. However, there is no guarantee that interference will not occur in a
particular installation. If this equipment does cause harmful interference to radio or
television reception, which can be determined by turning the equipment off and on, the
user is encouraged to try to correct the interference by one or more of the following
measures:
• Reorient or relocate the receiving antenna
• Increase the separation between the equipment and receiver
• Connect the equipment into an outlet on a circuit different from that to
which the receiver is connected.
• Consult the dealer or an experienced radio/TV technician for help.
The Class B digital apparatus meets all requirements of the Canadian
Interference-Causing Equipment Regulation.
Cet appareil numerique de la class B respecte toutes les exigences du Reglement
sur le materiel brouilleur du Canada.
Caution:
Any changes or modifications not expressly approved by the party responsible
for compliance could void the user's authority to operate this equipment.
Shielded interface cable, if any, must be used in order to comply with emission
limits.
18
©2003 Memorex Products, Inc. • Santa Fe Springs, CA 90670 • www.memorex.com
All other brand or product names are trademarks or registered trademarks of their respective owners.
5395 6196