1
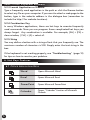
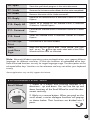
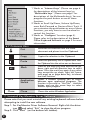
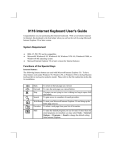
USER’S GUIDE
VERSION 1.0
Office Keyboard
MX3300 Multimedia
IMPORTANT NOTICE!
The information in this document is subject to change without notice and
does not represent a commitment on the part of the vendor.
No warranty of representation, either expressed or implied, is made with
respect to the quality, accuracy or fitness for any particular purpose of
this document. The manufacturer reserves the right to make changes to
the content of this document and/or the products associated with it at
any time without obligation to notify any person or organization of such
changes.
In no event will the manufacturer be liable for direct, indirect,
special, incidental or consequential damages arising out of the
use or inability to use this product or documentation, even if
advised of the possibility of such damages.
Copyright©2003. All rights reserved
IBM, PC/AT and PS/2 are registered trademarks of International Business
Machines Corporation.
Microsoft, Windows, and Windows NT are registered trademarks of
Microsoft Corporation in the United States of America and/or other
countries.
All other trademarks are trademarks of their respective holders.
TABLE
OF
CONTENTS
1.Introduction
What's in this package
1
1
2.System Requirements
2
3.Software Installation
2
4.Hardware Installation
3
5.Smart Office Keyboard Software
3
5.1 To Display the "KeyMaestro" Dialogue Box
3
5.2 To Display the "Configure Button" Dialogue Box
4
6.Hot Keys Features
5
6.1 Office Application Keys
5
6.2 Internet Keys
6
6.3 Application Keys
6
6.4 Multimedia Keys
7
6.5 Enhanced Function Keys
7
6.6 Programmable Scroll Wheel
8
6.7 Clipboard Keys
9
7.Uninstall Key Maestro Driver Software
9
8.Troubleshooting
10
1. Introduction
Congratulations on your purchase of the Memorex MX3300 Smart
Office Keyboard! This unique keyboard provides quick access to
applications, clipboard and multimedia functions with minimal
mouse movement and an ergonomic design.
The Memorex MX3300 Smart Office Keyboard is divided into 6
blocks plus the normal alpha-numeric keys. The 6 blocks are Office
Application Keys, Enhanced Function Keys, Internet Keys,
Application Keys, Multimedia Keys and Clipboard Keys. These keys
make your keyboard more powerful than ever. The applications and
functions you use everyday are included in these blocks; at the
touch of a button you can access them all immediately and save time
in your daily computer usage.
The Memorex MX3300 Smart Office Keyboard is creatively designed
to use the built-in Office and clipboard hot keys. The built-in programmable scroll wheel helps save hand-movement between the
keyboard and the mouse.
The Memorex MX3300 Smart Office Keyboard is compatible with
Windows® 95*/98/Me/NT 4.0**/2000/XP.
In order to enjoy the full potential of the Memorex MX3300 Smart
Office Keyboard, please read this manual carefully.
* OSR2 or higher version
** PS/2 connection only. Service pack 6 or higher
What’s in this package
• Smart Office Keyboard with USB connector
• Software CD
• USB to PS/2 Adapter
• Removable Ergonomic Wrist Rest
• Instruction Manual
1
2. System Requirements
Note: For Windows®95* and Windows® NT 4.0** operating system
users or users with a system with only a PS/2 port, please use USB
to PS/2 adapter (enclosed in the package) to connect the keyboard.
•
•
•
•
•
•
Microsoft Windows® 95/98/Me/NT 4.0/2000/XP
Microsoft® Internet Explorer 5.0 or later version (for the Internet keys)
CD-ROM or DVD drive (for CD or Video operation)
Standard sound card (for CD or Video operation)
USB port or PS/2 port
Microsoft® Office 97 or later version (for Office Application keys and
Enhanced Function keys)
• System support for ACPI or APM II (for power management buttons)
• ATX mother board and ATX power supply (for power management
buttons)
* OSR2 or higher version
** PS/2 connection only. Service pack 6 or higher
3. Software Installation
After completing the hardware installation and turning the PC power on
you will have immediate access to the alpha-numeric keys of the keyboard.
In order to utilize the specialty keys you must first install the keyboard
software using the CD included in the box.
TO INSTALL THE KEYBOARD SOFTWARE:
Step 1: Remove any existing keyboard software from the computer.
Refer to your keyboard manufacturer’s user guide.
Step 2: Insert the software CD in your computer's CD-ROM drive and
the software should auto start.
Step 3: If using the USB to PS/2 Adapter, select "Install Memorex MX3300
Office Keyboard Series (For PS/2)".
Step 4: If using the USB Keyboard plug, select "Install Memorex MX3300
Office Keyboard Series (For USB)".
Step 5: Follow onscreen instructions to finish the installation procedure.
Step 6: If the software installation does not auto start, then:
I. Double click on "My Computer" on your computer's desktop.
II. Double Click on your CD-ROM drive.
III. Double click on either "Memorex MX3300 Office Keyboard
Series (For USB)" or "MX3300 Office Keyboard Series (For
PS/2)" and follow the onscreen instructions.
2
4. Hardware Installation
Before you begin: If you are using the USB plug on your new keyboard,
please make sure the USB keyboard is turned on in your computer's
bios. For questions, please refer to your computer's manual. Windows®
95/NT 4.0 OS users must use the USB to PS/2 adapter provided to connect the keyboard to the computer. The USB connector will not function
properly with these operating systems.
Step 1: Verify that your previous keyboard's driver software has
been removed.
Step 2: Disconnect your old keyboard from the computer.
Step 3: Turn the PC power off.
Step 4: Plug the keyboard connector into the USB port of your PC.
Keyboard
USB to PS/2
Adapter
Step 5: To use the PS/2 port, attach the PS/2 adapter to the USB
connector of the keyboard. Then plug the PS/2 connector into your
computers PS/2 keyboard port.
Step 6: Turn the PC power on. The keyboard alpha-numeric keys should
now be detected.
5. Smart Office Keyboard Software
5.1 To Display the "KeyMaestro" Dialogue Box
Left-click the mouse on the Smart
Office Keyboard Driver icon
in
the Windows taskbar (located at the
bottom right corner of your computer desktop), and a "KeyMaestro"
dialogue box will pop up with the
following functions.
5.1.1 Select a HotKey
This controls the default function of
a key. You can click on the "Display
Label" box to re-define the key functions. Please refer to the "Configure
Button" dialogue on page 4.
3
5.1.2 Enable Display Label
This command displays or hides the OSD (On Screen Display). When the
OSD is enabled, each time you press any one of the multimedia buttons,
its function name (button label) will show on the right-bottom corner on the
screen. This function is enabled by default.
5.1.3 Enable Taskbar Icon
This command displays or hides the taskbar software icon. When the
function is enabled, you can see a software icon
on the Windows
taskbar, its function name (button label) will show in the right-bottom
corner of the screen. If you want to re-activate it, you can select Start
=> Programs => Configure to launch it. This function is enabled by
default.
5.1.4 Enable Auto Play
This command activates the auto play function. When the function is
enabled, the Microsoft Media Player will appear after you press the "Play"
multimedia key. Winamp users may use the multimedia keys to control the
Winamp Player after the key is programmed and the AutoPlay function is
disabled.
5.2 To Display the "Configure Button" Dialogue Box
Each button has the ability to work in
any of the following manners. Simply
select what type of configuration you
like by selecting the appropriate circle
and follow the steps below.
5.2.1 Label
In the Label box, type the name of the
application that the button will launch,
or any name you associate with the
function of the button. This label will
appear on screen each time you press
the button.
5.2.2 Functions
You can see a list of the pre-defined functions or change the function of any
button.
4
Smart Office Keyboard Software
5.2.3 Launch Application or Website
Type a frequently used application in the path or click the Browse button
to select any file on your computer. If you want to attach a web page to the
button, type in the website address in the dialogue box (remember to
include the http:// for website locations).
5.2.4 Combination Key
In many Windows applications, there are hot keys to execute frequently
used commands. Now you can program those complicated hot keys you
always forget. Any combination is available. For example, [Alt] + [F4] =
close window, [Ctrl] + [A] = select all.
5.2.5 String
You may define a button with a string of text that you frequently use. The
maximum number of characters is 500. Simply enter the text string in the
box.
If the keyboard is not working properly, see "Troubleshooting" (page 10)
for tips on how to resolve your problem.
6. Hot Keys Features
6.1 OFFICE APPLICATION KEYS
W
W
W
5
Word
Opens Microsoft Word
Excel
Opens Microsoft Excel
PowerPoint
Opens Microsoft PowerPoint
Calendar
Opens “Calendar” function of Microsoft
Outlook
6. Hot Keys Features
6.2 INTERNET KEYS
W
Back
Return to the last page you viewed.
Forward
View
W the page you viewed before selecting
theWback button.
W
Stop
If a page you are trying to view is taking too
long to open, click this button to stop.
Refresh
Refresh the current Web page in order to
make sure you have the latest content.
www
W
Opens the default Internet browser.
W
W
Search
W
Opens the Internet search menu.
My
Favorite
Opens the Internet "My Favorites" folder.
E-mail
Opens the default program you use for
e-mail.
6.3 APPLICATION KEYS
W
W
Log Off
My
Computer
Opens “My Computer”.
Calculator
Starts Microsoft Calculator.
Log Off
Opens log off windows dialog box.
Sleep
Places the computer in Sleep Mode. This function is available only on certain computers.
Power
Turns the computer off
W
Note: For Power Management functions, please see your computer's
manual for assistance. Or see "Troubleshooting" on page 10 for more
information.
6
W
6.4 MULTIMEDIA KEYS
Mute
Mute the sound.
Volume Up
Adjust the volume up.
Volume
Down
Adjust the volume down.
Stop
Stops the playing of the CD player.
Previous
Skip backward to the previous file/track when
pressed once. Pressing the button twice will
cancel the function.
Next
Skip forward to the next file/track when
pressed once. Pressing the button twice will
cancel the function.
Play/
Pause
Press to begin play. When the CD or Video is
playing, press this button to pause it, and
press the button again to resume play from
the current position.
6.5 Enhanced Function Keys
Enhanced function keys consist of 12 keys and functions. There are
two ways these functions may work:
1. As a part of the main keyboard: F1~F12.
2. As 12 embedded office keys and functions.
ENHANCED FUNCTION KEYS
7
ARE AS FOLLOWS :
Office Wizard
A toggle key for the Enhanced Office Keys. When the Office
Wizard LED is on, the Enhanced Office function keys are activated.
F1: Help
Opens the Help file for the active window.
F2: New
Creates a new, blank file in the active program.
F3: Open
Opens or finds a file in the active program.
F4: Save
Saves the active file with the current file name, location and file
format.
F5: Replace
Searches for and replaces the specified text and formatting.
Starts the spell check program in the active document.
F6: Spell
Starts the spell check program in the active document.
F7: Undo
Reverses the last command or deletes the last action completed.
F8: Redo
Reverses the action of the Undo command*.
F9: Reply
Replies to the selected e-mail in Microsoft Outlook or Outlook
Express.
F10: Reply All
Replies to all copied on the selected e-mail in Microsoft
Outlook or Outlook Express.
F11: Forward
Forwards the selected e-mail in Microsoft Outlook or Outlook
Express.
F12: Send
Sends the selected e-mail in Microsoft Outlook or Outlook
Express.
Prt Scr/Sys:
Print
Prints the file in the active window.
Num
Lock/Euro
Sign:
Make sure the LED light of both "Office Wizard" and "num
lock" are on. The Euro sign works when both of the Office
Wizard and Num Lock are activated.
Note: Microsoft Windows operating system and applications must support different
languages for different countries; it limits the functions of embedded office keys.
Some enhanced functions are only for target language usage. The descriptions of the
enhanced office keys' functions are for reference and may not reflect your keyboard
exactly.
*Some applications may not fully support this feature
6.6 PROGRAMMABLE SCROLL WHEEL
Scroll Wheel
1. Works as a mouse with scrolling functions in 2
directions - up and down. You can use the up and
down functions of the Scroll Wheel to scroll the document vertically.
2. Works as a mouse button. When you push on the
scroll wheel, a series dialogue functions will pop-up
as shown below. Their functions are divided into 3
parts:
Turn Page
8
PROGRAMMABLE SCROLL WHEEL
1. Works as "Internet keys" (Please see page 6
for descriptions of the Internet keys) or
"Multimedia keys" (Please see page 7 for
descriptions of the Multimedia keys). You can
program the push button as one of these
functions.
2. Works as Scroll Up/Down, Volume Up/Down,
www Back/Forward or Previous/Next Track. If
you customize the push button as one of these
functions, you only have to use the wheel to
control this function.
3. Works as "Configure" function (page 4).
Please refer to the description of the Smart
Office Keyboard Software on page 5 for more
information.
6.7 CLIPBOARD KEYS
Cut
Removes the selection from the active
document and places it on the Clipboard.
Copy
Copies the selection to the Clipboard.
Paste
Pastes the previously cut or copied items from
the Clipboard into the active area or document.
Mark
Press on the mark key once and use the up,
down, right and left direction keys to select
items. Press the mark key again or any other
keys except the up, down, right, left, home,
end, page up or page down key, to release
the mark function.
APP
Application
Switch
Opens a window allowing you to switch
between open application programs. The
function is the same as "Alt+Tab". Hold the
button and use the arrow keys to select
another open program.
Close
Close
Closes the active Windows Application.
7. Uninstall Key Maestro Driver Software
Please note that you must uninstall any existing keyboard software before
attempting to install the new software.
Step 1: For KeyMaestro Driver Software Removal: Right-click the driver
icon
and select "Exit" to close the driver program.
Step 2: Click "Start" (on the bottom left taskbar).
9
Step 3:
Step 4:
Step 5:
Step 6:
Step 7:
Select "Programs" from the "Start" menu.
Select "KeyMaestro" from the "Programs" menu.
Select "Uninstall".
Select the "Remove Program" icon.
Click "Yes" to confirm you want to uninstall.
If the keyboard is not working properly, see "Troubleshooting" for tips on
how to resolve your problem.
8. TROUBLESHOOTING
If you are experiencing problems with your keyboard, please try the
following:
1. Keyboard does not work properly:
If the keyboard does not work properly when plugged into your
computer with the power on, if it is USB, unplug the keyboard connector
and plug it in again. If you are using the PS/2 connector, shut down your
system first, then unplug and plug in the connector again, then reboot
your computer. This should resolve the problem. If you are still experienc
-ing problems check the connector on the keyboard and the port on the
computer for damage.
2. If the hot key functions do not work after installing the Smart
Office keyboard software:
Make sure you uninstall all previous keyboard software. After
removing all existing keyboard software, install the Memorex
Smart Office Keyboard Software.
3. Add/Remove or Reinstall the Smart Office Keyboard Software:
After installing the Smart Office Keyboard software, the Smart
Office Keyboard icon will display in the Windows system tray. If
you want to reinstall the software for any reason, you must first
remove the software from your system. For more detailed
information, please refer to Uninstall on page 2.
Note: If you want to upgrade your Smart Office Keyboard
software or it does not work properly, you can re-install it to solve
this problem.
4. Other software applications do not install properly:
If the Smart Office Keyboard Driver conflicts with installation of
another software installation:
Step 1: Uninstall the Memorex Smart Office Keyboard Software.
Step 2: Install the software application.
Step 3: Reinstall the Memorex Smart Office Keyboard Software.
5. Multimedia Player cannot play a VCD title or MPEG file:
Make sure you have properly installed Windows Media Player version 7 or
later. If not, please download the Windows Media Player version 7 or later
from www.Microsoft.com. For additional information please consult the
software manual or contact the software manufacturer.
Turn Page
10
6. Word, Excel, PowerPoint, or Calendar do not launch but text
appears onscreen:
Make sure you have installed the Office Applications completely. If
Office Applications are not fully installed, the keys will only display the
text they are programmed to display.
7. Sleep key does not work properly:
If you have problems using the sleep button, make sure that the
power management in your PC has been enabled both in the BIOS and
in Windows. For more information on your PC's BIOS settings, refer to
your PC's manual. For more information on how to enable the power
management features in Windows, refer to your Windows manual.
8. Some enhanced Office functions do not work:
Microsoft Windows operating system and applications must support
different languages for different countries. It limits the functions of
enhanced office keys. Some of the enhanced functions are only for
English language usage. The descriptions of the enhanced function keys
are for reference and may not reflect your keyboard exactly.
9. Log Off function does not work properly:
• Windows 95 and Windows NT 4.0 do not support the Log Off function.
• For Windows 98, Windows Me, Windows 2000 & Windows XP:
The default of Log Off function must be enabled in your Windows
operating system before you use the log off key. The way to enable
the Log Off function is to open the Windows Start Menu/ Setting/
Control Panel/Taskbar & Start Menu/Taskbar & Start Menu Properties
Menu/Advanced/Settings, then choose the "Display Logoff" item and
click OK to complete enable the Log Off function.
10.The "Un-mark" function does not release
Press the mark key once and use the up, down, right and left direction keys
to select items. Press the ESC key or any other keys except the mark, up,
down, right, left, home, end, page up or page down key to release the
mark function.
11. The functions of the enhanced Office function keys do not
match the key's printed name or do not work:
All enhanced office function keys follow the definitions of the standard
Microsoft shortcut combination keys. They do not need any support from
the software. In a few cases, when you press the enhanced office keys,
they will not work or will have a different result. This means the application
does not support the definitions of the standard Microsoft shortcut com
-bination keys and the target functions or the software application conflicts
with the definitions.Please contact the software application developer or
download the latest version of the application from their Web site.
11
Technical Support:
If the above instructions do not solve your problem, please contact
Memorex technical support at [email protected], or visit us
online at www.memorex.com for our Frequently Asked Questions
(FAQ).
Memorex Products One Year Limited Warranty:
Memorex Products, Inc. ("Memorex") warrants this product, excluding connected
equipment, against defects in materials and workmanship for one year from the
date of original purchase. PURCHASER'S REMEDY IS LIMITED TO REPAIR OR
REPLACEMENT OF ANY DEFECTIVE PRODUCT. THIS WARRANTY AND REMEDY
IS EXCLUSIVE AND WE SPECIFICALLY DISCLAIM ANY AND ALL OTHER EXPRESS
OR IMPLIED WARRANTIES. IN NO EVENT SHALL MEMOREX OR ANY SUPPLIER
OR SELLER BE RESPONSIBLE FOR ANY DIRECT, SPECIAL, INCIDENTAL, CONSEQUENTIAL OR ANY OTHER DAMAGES OF ANY KIND. For further information
regarding warranty service please go to www.memorex.com
Product Registration:
To register your product please visit service and support online at www.memorex.com
or write to us with your name, address, phone number, model name, model number, date of
purchase and place of purchase at: Memorex Products, Inc. 10100 Pioneer Blvd, Suite 110,
Santa Fe Springs, CA 90670.
FCC Guidelines:
This equipment has been tested and found to comply with the limits for a Class B digital device,
pursuant to Part 15 of the FCC Rules. These limits are designed to provide reasonable protection
against harmful interference in a residential installation. This equipment generates, uses and can
radiate radio frequency energy and, if not installed and used in accordance with the instructions
may cause harmful interference to radio communications. However, there is no guarantee that
interference will not occur in a particular installation. If this equipment does cause harmful interference to radio or television reception, which can be determined by turning the equipment off
and on, the user is encouraged to try to correct the interference by one or more of the following
measures:
• Reorient or relocate the receiving antenna
• Increase the separation between the equipment and receiver
• Connect the equipment into an outlet on a circuit different from that to which the
receiver is connected.
• Consult the dealer or an experienced radio/TV technician for help.
The Class B digital apparatus meets all requirements of the Canadian Interference-Causing
Equipment Regulation.
Cet appareil numerique de la class B respecte toutes les exigences du Reglement sur le materiel
brouilleur du Canada.
Caution:
Any changes or modifications not expressly approved by the party responsible for compliance
could void the user's authority to operate this equipment. Shielded interface cable, if any,
must be used in order to comply with emission limits.
12
13
©2003 Memorex Products, Inc. • Santa Fe Springs, CA 90670 • www.memorex.com
All other brand or product names are trademarks or registered trademarks of their respective owners.
5395 6071