1
www.SeaDooManuals.net
smo2000-004a.fm Page 0 Tuesday, March 28, 2000 8:05 AM
SAFETY WARNING
Disregarding any of the safety precautions and instructions contained in
this Operator’s Guide, the Safety Handbook and on Product Warning
Labels could cause injury, including the possibility of death. The operator
has the responsibility to inform passenger(s) of safety precautions.
This Operator’s Guide, the Safety Handbook and Videocassette should
remain with the craft at the time of resale.
Gelcote† is a trademark of Gelcote International
Knight’s Spray-Nine† is a trademark of Korkay System Ltd
The following trademarks are property of Bombardier Inc. and/or its
subsidiaries:
SEA-DOO®
BOMBARDIER-ROTAX®
Bombardier Lube®
BOMBARDIER-ROTAX Formula XP-S Synthetic Injection Oil
BOMBARDIER-ROTAX Formula XP-S DI Synthetic Injection Oil
BOMBARDIER-ROTAX Injection Oil
Sea-Doo Synthetic Grease
Sea-Doo LK TM
Printed in Canada (smo2000-004a.fm SH)
of Bombardier Inc. and/or its subsidiaries.
© 2000 Bombardier Inc. All rights reserved.
® *Trademarks
www.SeaDooManuals.net
smo2000-003a.book Page 1 Thursday, November 11, 1999 10:44 AM
Doin'it on your new Sea-Doo watercraft
Congratulations, you are now the proud owner of a Sea-Doo personal watercraft.
Whether you are an experienced boater or are new to the sport of boating, we
ask you to take the time to view the Videocassette provided with the watercraft,
to read this Operator’s Guide, the Safety Handbook and familiarize yourself with
the contents. These Guides contain pertinent information which, if followed, will
provide you with the necessary knowledge to help you fully enjoy the pleasures
of this watercraft.
We strongly recommend that all watercraft operators complete a safety boating
course. Check with your local Coast Guard or Power and Sail Squadron in your
area for course availability. More serious boaters may want to obtain Chapman
Piloting by Elbert S. Maloney, available at most book stores.
When introducing your family or friends to the sport, be sure they fully understand
the controls and operation of the watercraft and the importance of courteous,
responsible riding.
Each operator has a responsibility to ensure the passenger safety and the safety
of other water users. Please follow all safety instructions and drive with care.
We encourage you to have an Annual Safety Inspection of your watercraft. Please
contact your dealer for further details.
Finally, we urge you to visit your dealer regularly for regular and safety maintenance as well as any watercraft accessories you may require.
Have fun and... Bon Voyage.
Please keep this and on board at all times. These manuals should remain with the watercraft at time of resale.
www.SeaDooManuals.net
1
smo2000-003a.book Page 2 Thursday, November 11, 1999 10:44 AM
TABLE OF CONTENTS
FOREWORD ................................................................................
5
SAFETY WARNING .................................................................
6
General ....................................................................................................
6
Operation .................................................................................................
6
Maintenance ............................................................................................
9
LIST OF DISTRIBUTORS ............................................................. 10
BOMBARDIER LIMITED WARRANTY NORTH AMERICA:
2000 SEA-DOO® WATERCRAFT .................................................. 11
BOMBARDIER INTERNATIONAL LIMITED WARRANTY:
2000 SEA-DOO® WATERCRAFT .................................................. 13
REGISTRATION NUMBER LOCATION ......................................... 15
LOCATION OF THE IMPORTANT LABELS ................................... 16
IDENTIFICATION NUMBERS ....................................................... 18
Hull .......................................................................................................... 18
Engine...................................................................................................... 18
CONTROLS AND COMPONENT LOCATION ................................ 19
COMPONENTS FUNCTIONS ....................................................... 22
1) Safety Lanyard .................................................................................. 22
2) Handlebar .......................................................................................... 23
3) Throttle Lever.................................................................................... 23
4) Engine Start/Stop Button .................................................................. 23
5) Variable Trim System Button (VTS) (if so equipped) ......................... 24
6) Choke Lever ...................................................................................... 24
7) Shift Lever......................................................................................... 24
8) Speedometer .................................................................................... 24
9) Information Center Gauge/Buttons ................................................... 24
10) Glove Box.......................................................................................... 28
11) Fuel Tank Valve ................................................................................. 28
12) Fuel Tank Cap ................................................................................... 28
13) Oil Injection Reservoir Cap................................................................ 28
14) Front Storage Compartment Cover................................................... 29
15) Front Storage Compartment Cover Latch ......................................... 29
16) Tool Kit .............................................................................................. 29
17) Air Intake Opening ............................................................................ 29
18) Seat Strap ......................................................................................... 29
19) Seat Latch ......................................................................................... 30
20) Seat Extension Latch (if so equipped)............................................... 31
21) Rear Grab Handle .............................................................................. 31
22) Rear Storage Basket (if so equipped)................................................ 31
23) Bow and Stern Eyelets ..................................................................... 31
2
www.SeaDooManuals.net
smo2000-003a.book Page 3 Thursday, January 20, 2000 9:31 AM
24) Mooring Cleats..................................................................................
25) Cargo Cleats (if so equipped) ............................................................
26) Footboard..........................................................................................
27) Boarding Pads ...................................................................................
28) Boarding Platform .............................................................................
29) Cooling System Bleed Outlet............................................................
30) Flushing Connector ...........................................................................
31) Bilge Drain Plugs...............................................................................
32) Jet Pump Nozzle ...............................................................................
33) Reverse Gate ....................................................................................
34) Jet Pump Water Intake .....................................................................
FUEL AND LUBRICATION ...........................................................
Fueling Procedure ...................................................................................
Recommended Fuel ................................................................................
Recommended Oil ..................................................................................
Oil Injection System ................................................................................
BREAK-IN PERIOD ......................................................................
10-Hour Inspection ..................................................................................
DAILY PRE-OPERATION CHECKS ...............................................
Hull ..........................................................................................................
Jet Pump Water Intake ...........................................................................
Bilge ........................................................................................................
Battery .....................................................................................................
Fuel Tank and Oil Reservoir ......................................................................
Engine Compartment ..............................................................................
Steering System ......................................................................................
Throttle System .......................................................................................
Shifter System.........................................................................................
VTS (Variable Trim System) (if so equipped) ............................................
Safety Lanyard and Engine Start/Stop Button .........................................
Storage Compartment Covers.................................................................
OPERATING INSTRUCTIONS ......................................................
Principle of Operation ..............................................................................
Boarding the Watercraft ..........................................................................
Starting the Engine ..................................................................................
Rough Water or Poor Visibility Operation ................................................
Crossing Waves ......................................................................................
Stopping/Docking ....................................................................................
Beaching..................................................................................................
Shutting Off the Engine...........................................................................
www.SeaDooManuals.net
31
32
32
32
32
32
33
33
33
33
33
34
34
34
34
35
36
36
37
38
38
38
38
38
38
38
38
39
39
39
39
40
40
43
45
46
46
47
47
47
3
smo2000-003a.book Page 4 Thursday, November 11, 1999 10:44 AM
POST-OPERATION CARE ............................................................
General Care ............................................................................................
Additional Care for Foul Water or Salt Water ..........................................
Cooling System Flushing and Engine Internal Lubrication.......................
Anticorrosion Treatment..........................................................................
SPECIAL PROCEDURES..............................................................
Limp Home Mode ...................................................................................
Engine Overheating .................................................................................
Jet Pump Water Intake and Impeller Cleaning ........................................
Capsized Watercraft ................................................................................
Submerged Watercraft ............................................................................
Water-Flooded Engine .............................................................................
Fuel-Flooded Engine ................................................................................
Out of Fuel...............................................................................................
Towing the Watercraft in Water ..............................................................
Low-charge Battery Condition .................................................................
MAINTENANCE ..........................................................................
Lubrication ...............................................................................................
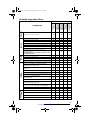
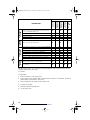
Periodic Inspection ..................................................................................
Periodic Inspection Chart.........................................................................
Throttle and Choke Cable Inspection.......................................................
Carburetor Adjustment ............................................................................
Fuel Injection System ..............................................................................
Fuel and Oil Filters...................................................................................
Steering Alignment..................................................................................
VTS Adjustment (if so equipped) .............................................................
Vacuum Bailer Pick-Ups...........................................................................
Fuses .......................................................................................................
General Inspection and Cleaning .............................................................
TRAILERING, STORAGE AND PRE-SEASON PREPARATION.......
Trailering ..................................................................................................
Storage ....................................................................................................
Pre-Season Preparation ...........................................................................
TROUBLESHOOTING ..................................................................
48
48
48
48
50
51
51
51
51
52
52
52
53
54
54
54
55
55
56
57
59
59
59
59
59
60
60
60
62
63
63
63
68
70
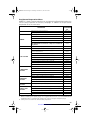
SPECIFICATIONS ........................................................................ 74
SI METRIC INFORMATION .......................................................... 78
ABBREVIATIONS USED IN THIS MANUAL ................................. 79
CHANGE OF ADDRESS............................................................... 81
4
www.SeaDooManuals.net
smo2000-003a.book Page 5 Thursday, November 11, 1999 10:44 AM
FOREWORD
The Operator’s Guide and Safety Handbook have been prepared to acquaint
the owner/operator or passenger with
this personal watercraft and its various
controls, maintenance and safe riding
instructions. Each is indispensable for
the proper use of the product, and
should be kept in a waterproof bag with
the watercraft at all times.
For any questions pertaining to the
warranty and its application, consult
the WARRANTY section in this Guide,
and/or an authorized SEA-DOO dealer.
This guide uses the following symbols
to emphasize particular information.
WARNING
Identifies an instruction which, if
not followed, may cause serious
personal injuries including the
possibility of death.
CAUTION: Denotes an instruction
which, if not followed, might damage
the watercraft and/or components.
NOTE: Indicates supplementary information needed to fully complete an instruction.
Although the mere reading of such information does not eliminate the hazard, the understanding and application
of the information will promote its correct use.
The information and components/
system descriptions contained in this
guide are correct at the time of publication. Bombardier Inc. however, maintains a policy of continuous improvement of its products without imposing
upon itself any obligation to install
them on products previously manufactured.
Because of our ongoing commitment
to product quality and innovation, Bombardier Inc. reserves the right at any
time to discontinue or change specifications, designs, features, models or
equipment without incurring obligation.
The illustrations in this document show
the typical construction of the different
assemblies and may not represent the
full detail or exact shape of the parts.
However, they represent parts that
have the same or similar function.
It is understood that this guide may be
translated into another language. In
the event of any discrepancy, the English version shall prevail.
Specifications are given in the SI metric system with the SAE U.S. equivalent in parenthesis. Where precise accuracy is not required, some conversions are rounded off for easier use.
A Shop Manual can be obtained for
complete service, maintenance and
more repair information.
www.SeaDooManuals.net
5
smo2000-003a.book Page 6 Thursday, November 11, 1999 10:44 AM
SAFETY WARNING
General
To fully appreciate the pleasures,
enjoyment and excitement of boating there are some basic rules that
should be observed and followed by
any rider. Some rules may be new
to you or covered in the Personal
Watercraft Safety Handbook or
Safety Video , others may be common sense or obvious… irrespective, we ask that you please take a
few minutes of your time to completely read these safety instructions completely before you operate your watercraft. Failure to
follow this safety information and
safe boating rules could result in
injury, including the possibility of
death to you, your passenger(s),
or other water users.
Information in this guide is limited.
It is strongly recommended that
you obtain further boating information from the local Coast Guard or
Power Squadron. We also recommend all operators to take a boating
safety course. Please check local
and federal boating laws applicable
to the waterways where you intend
to use the watercraft. Learn the local rules of the road. Always carry
the regulatory required safety items
on board.
The performance of this watercraft
may significantly exceed that of other crafts you have operated. Therefore, use of this watercraft by a novice or inexperienced operator, or an
underage or disabled person, is
NOT RECOMMENDED.
Observe and follow all on-product
warning labels.
6
Become completely familiar with the
controls and operation of the watercraft before embarking on your first
trip or taking on a passenger(s). If you
have not had the opportunity to do so
with your authorized Sea-Doo dealer,
practice driving solo in a suitable area
and feel the response of each control. Be fully familiar with all controls
before applying throttle above idle
speed. As its operator, you control
and are responsible for the watercraft’s safe operation.
Always carry the regulatory required
safety items on board. Check the local regulations or consult your dealer.
Make sure that all users of the watercraft read and are aware of all
warnings.
Operation
Always perform the daily pre-operation
checks as specified in this guide.
Operator and passenger(s) should at
all times wear a coast guard approved
personal flotation device (PFD) that is
suitable for personal watercraft.
Operator and passenger(s) should
wear protective clothing. Severe internal injuries can occur if water is
forced into body cavities as a result
of falling into water or being near jet
thrust nozzle. Wet suit bottom (or
clothing that provides equivalent
protection), footwear, gloves and
goggles/glasses are recommended.
www.SeaDooManuals.net
smo2000-003a.book Page 7 Thursday, November 11, 1999 10:44 AM
Always keep in mind that as the
throttle lever is released to idle position, less directional control is available. To turn the watercraft, both
steering and throttle are necessary. This watercraft has the capability of turning more sharply than
other crafts, however, unless in an
emergency, do not negotiate sharp,
high speed turns. You and your passenger(s) could be thrown from the
watercraft. It should also be remembered that sun, wind, alcohol or
drugs, may impair your judgment
and reaction time.
While your watercraft has the capacity of operating at high speeds,
it is strongly recommended that
high speed operation only be applied when ideal conditions exist
and are permitted. Higher speed operation requires a higher degree of
skill and increases the risk of severe
injuries.
The forces generated on the body
of riders while turning, negotiating
waves or wakes, operating in choppy waters, or falling off the watercraft, especially at higher speeds,
may cause injury including the possibility of broken legs and other
bones. Remain flexible and avoid
sharp turns. Never place your feet
and legs in the water to aid turning.
Ensure operator all-round visibility is unrestricted. Always keep a
constant lookout for other water
users or other potential hazards
especially when turning. Make
sure to keep a safe distance from
all other crafts, other waterusers
or other objects.
Like any other craft, this watercraft
has no brake. Stopping distance will
vary depending on initial speed, load,
wind, and water conditions. Practice
stopping and docking in a safe, traffic
free area to have an idea of how long
it will take to stop the watercraft under varying conditions. Do not release throttle when trying to steer
away from objects. You need throttle
to steer. Do not use the watercraft’s
reverse, if so equipped, to stop.
Ensure that all passengers know
how to swim and how to reboard
the watercraft from the water. The
operator and passenger(s) should
be properly seated before starting
or moving the watercraft, and at all
times when watercraft is in motion.
Do not start or operate the watercraft if a person(s) is seated on the
sun deck or swim platform, or are
nearby in the water. The watercraft’s jet thrust can cause injury. Always accelerate slowly. To prevent
accidental starting or unauthorized
use, always detach the safety lanyard from the watercraft especially
when swimmers are boarding or
nearby, or during removal of any
weeds or debris from the intake
grate. Keep away from intake grate
while engine is on. Items such as
long hair, loose clothing, or PFD
straps can become entangled in moving parts resulting in severe injury or
drowning.
Ride within your limits and avoid aggressive maneuvers to reduce the
risk of loss of control, ejection and
collision.
www.SeaDooManuals.net
7
smo2000-003a.book Page 8 Thursday, November 11, 1999 10:44 AM
Riding with a passenger(s) or pulling
other crafts, tubes, skies or wakeboards makes the watercraft handle
differently and requires greater skill.
Do not overload the watercraft or
take on more passengers than designated for the particular watercraft.
Overloading can affect maneuverability, stability and performance.
Avoid adding on accessories, or
equipment which may alter your
control of the watercraft. The watercraft maybe fitted with tow eyelets
which can be used to attach a ski
rope. However, do not use these
eyelets or the watercraft’s cleats to
tow a parasail. Severe watercraft
damage may occur.
Always respect the safety and comfort of your passenger(s) and persons being towed on skis, wakeboards or other water products.
Always have an observer while towing a skier, proceed with only as
much speed as required, and follow
the observers instructions. Unless
absolutely necessary, do not make
tight, sharp turns.
Know the waters in which the watercraft is to be operated. Current,
tides, rapids, hidden obstacles,
wakes and waves etc., can affect
safe operation. It is not advisable to
operate the watercraft in rough or
inclement weather.
Wake or wave jumping or riding the
surf line can cause severe personal
injury and damage the watercraft.
Never attempt to splash others with
your watercraft. You may misjudge
the ability of the watercraft or your
own riding skills and strike a craft or
person.
8
In shallow water, proceed with caution and at very low speeds.
Grounding or abrupt stops may result in injury. Debris may also be
picked up and be thrown rearward
by the jet pump onto people or property.
Respect no wake zones, the rights
of other water users and the environment. As the “skipper” and owner
of a watercraft you are responsible
for damage to other crafts caused by
the wake of your watercraft. Allow
no one to throw refuse overboard.
Remember that a watercraft is not
designed for night time operation.
Avoid adding on accessories or
equipment which may alter the
craft’s configuration or balance.
Remember, gasoline fumes are inflammable and explosive. Always
adhere to the fueling procedure
contained in this guide and those
given to you by the marina. Always
verify fuel level before use and during the ride. Apply the principle of
1/3 fuel to destination, 1/3 back and
1/3 reserve fuel supply. Do not carry
spare fuel or inflammable liquids in
any of the storage or engine compartments.
Combustion engine needs air to operate; consequently this watercraft
can not be totally watertight. Any
maneuvers such as figure eights
etc., that cause the upper deck to be
under water may cause severe engine problems due to water ingestion. Refer to “Special procedures”
and Limited Warranty contained in
this guide.
Due to the close proximity of other
racers, it is recommended that an
approved personal watercraft helmet be used during racing events.
Read and follow all instructions and
warnings provided with the helmet.
www.SeaDooManuals.net
smo2000-003a.book Page 9 Thursday, November 11, 1999 10:44 AM
Maintenance
Only perform servicing procedures
which are detailed in this guide. Further assistance or information can
be obtained from your authorized
Sea-Doo dealer. In many instances
proper tools and training is required
for certain servicing or repair procedures.
Maintain the watercraft and equipment in top condition at all times. Adhere to the prescribed maintenance
schedules. An annual inspection of
the watercraft is always a good recommendation that should be followed.
Always use spark plug cable grounding device when removing spark
plugs.
The bilge should be kept clean of oil,
water or other foreign materials.
Do not attempt to lift the watercraft
without special equipment and training.
The engine and the corresponding
components identified in this guide
should not be utilized on product(s)
other than for those they were designed. Maintenance procedures
and specified tightening torque
should be strictly adhered to. Never
attempt repairs unless the appropriate tools are available. These watercrafts are designed with parts dimensioned in both the metric and the
imperial systems. When replacing
fasteners, make sure to use only
those recommended by Bombardier.
If required, contact your authorized
Sea-Doo dealer for further servicing
information.
Never ride after consuming drugs or
alcohol. Operate your craft prudently and have fun. Don’t forget that all
persons must assist other boaters
in an emergency.
www.SeaDooManuals.net
9
smo2000-003B.fm Page 10 Wednesday, November 17, 1999 9:30 AM
LIST OF DISTRIBUTORS
NORTH AMERICA
U.S.A.
(Except Puerto Rico)
CANADA
Alberta
British Columbia
Manitoba
North West Territories
Nunavut
Ontario
Quebec
Saskatchewan
Yukon
New-Brunswick
Nova Scotia
Prince Edward Island
Newfoundland
BOMBARDIER MOTOR CORPORATION
OF AMERICA
5000 STEWART AVENUE
WAUSAU, WI
54401
Phone: (715) 842-8886
Fax: (715) 848-3455
http://www.bombardier.com
BOMBARDIER
RECREATIONAL PRODUCTS
75, J. A. BOMBARDIER ST.
SHERBROOKE, QC
J1L 1W3
Phone: (819) 566-3366
Fax: (819) 566-3062
http://www.bombardier.com
CHARLES R. BELL
P.O. BOX 1050
RIVERSIDE DRIVE
CORNER BROOK, NFLD
A2H 6J3
Phone: (709) 634-3533
FAX: (709) 634-2444
If your Sea-Doo watercraft requires warranty service, you should take it to any
authorized Sea-Doo dealer. Be sure to bring your warranty registration card or
other valid proof of the original date of purchase. If a question or problem arises
regarding warranty, first contact the service manager or owner of the Sea-Doo
dealership.
To find the nearest authorized Sea-Doo dealer, dial: 1-800-882-2900.
NOTE: If outside North America, consult the local authorized Sea-Doo distributor.
10
www.SeaDooManuals.net
smo2000-003a.book Page 11 Thursday, November 11, 1999 10:44 AM
BOMBARDIER LIMITED WARRANTY NORTH
AMERICA: 2000 SEA-DOO® WATERCRAFT
1. WARRANTY COVERAGE PERIOD
In Canada, BOMBARDIER INC. ("Bombardier"), and in the USA, Bombardier on behalf of
BOMBARDIER MOTOR CORPORATION OF AMERICA (BMCA), warrants FROM THE
DATE OF DELIVERY TO THE FIRST CONSUMER that each 2000 SEA-DOO watercraft
sold, as NEW and UNUSED and PREDELIVERED by an authorized North American
SEA-DOO watercraft dealer, will be free from any defects in material and/or workmanship
for a PERIOD of:
a) For private owners:
• TWELVE (12) CONSECUTIVE MONTHS.
SEA-DOO RX-DI AND SEA-DOO GTX-DI MODELS
• TWELVE (12) CONSECUTIVE MONTHS for the emission related components providing input to emission control. (e.g. sensors)
b) For commercial use:
• FOUR (4) CONSECUTIVE MONTHS.
SEA-DOO RX-DI AND SEA-DOO GTX-DI MODELS
• TWELVE (12) CONSECUTIVE MONTHS for the emission related components providing input to emission control. (e.g. sensors)
All genuine Bombardier accessories, installed by an authorized SEA-DOO dealer at the time
of delivery of the new and non-current new and unused SEA-DOO watercraft, carry the same
Warranty Coverage Period as for the SEA-DOO wartercraft.
2. WHAT BOMBARDIER WILL DO
BOMBARDIER will repair or replace, at its option, all genuine BOMBARDIER part found
defective in material and/ or workmanship, under normal use, maintenance and service,
with a genuine BOMBARDIER part without charge for parts and labor, at any authorized
SEA-DOO dealer during the Warranty Coverage Period.
3. CONDITION TO HAVE WARRANTY WORK VALIDATED
The customer must notify an authorized SEA-DOO watercraft dealer within two (2) days
of the appearance of the defect in material and/or workmanship and present to the servicing authorized SEA-DOO dealer the SEA-DOO Warranty Registration Card or a proof of
purchase of the NEW and UNUSED 2000 SEA-DOO watercraft and must sign the repair/work order prior to the start of the repair in order to validate a warranty repair. All parts
replaced under this limited warranty become the property of BOMBARDIER.
4.
•
•
•
•
•
•
•
•
•
•
EXCLUSIONS - ARE NOT WARRANTED
Normal wear and tear items;
Labor, parts and lubricant costs of all maintenance services.
Damages caused by failure to provide proper maintenance and/or storage, as described
in the "2000 SEA-DOO Watercraft Operator's Guide" ;
Damages resulting from improper repairs, modifications or use of non-approved parts
or, repairs not performed by a authorized SEA-DOO dealer;
Damages resulting from abuse, misuse, neglect, racing;
Damages resulting from accident, fire, theft, vandalism or any act of God;
Incidental or consequential damages, or damages of any kind such as but not limited
to towing charges, telephone calls or taxi;
Water damages caused by water ingestion;
Damages related to gel coat finish including but not limited to cosmetic gel coat finish,
blisters or fiberglass delamination caused by blisters, crazing, spyder or hairline cracks; and
Damages resulting from improper service or maintenance.
www.SeaDooManuals.net
11
smo2000-003a.book Page 12 Thursday, November 11, 1999 10:44 AM
5. LIMITATIONS OF LIABILITY
This warranty gives you specific rights, and you may also have other legal rights which may
vary from state to state, or province to province. WHERE APPLICABLE, THIS WARRANTY IS EXPRESSLY GIVEN AND ACCEPTED IN LIEU OF ANY AND ALL OTHER WARRANTIES, EXPRESSED OR IMPLIED, INCLUDING WITHOUT LIMITATION ANY WARRANTY OF MERCHANTABILITY OR FITNESS FOR ANY PARTICULAR PURPOSE.
Neither the distributor, any authorized SEA-DOO dealer nor any other person has been
authorized to make any affirmation, representation or warranty other than those contained
in this warranty, and if made, such affirmation, representation or warranty shall not be
enforceable against BOMBARDIER or any other person.
In no event shall BOMBARDIER be liable for special, consequential or incidental damages,
including but not limited to loss of use and transportation costs. Some states or provinces
do not allow the exclusion or limitation of incidental or consequential damages, or limitations
on how long an implied warranty lasts, so the above limitation or exclusion may not apply.
BOMBARDIER reserves the right to modify this warranty at any time, being understood
that such modification will not alter the warranty conditions applicable to the SEA-DOO
sold while this warranty is in effect.
6. TRANSFER
If the customer sells the SEA-DOO watercraft guaranteed under the present, he shall
assign and transfer this warranty, which shall be valid for the rest of the relevant PERIOD
as defined in section 1 hereinabove, to the new customer.
7. CONSUMER ASSISTANCE
a) In the event of a controversy or a dispute arising in connection with this BOMBARDIER
LIMITED WARRANTY, BOMBARDIER suggests that you try to resolve the issue at the
dealership level. We recommend discussing the issue with the authorized dealer's service manager or owner.
b) If further assistance is required, Bombardier`s service department should be contacted
in order to resolve the matter in Canada and the USA.
c) If the issue has still not been resolved, please submit in writing your complaint to:
In Canada and USA:
BOMBARDIER INC.
RECREATIONAL PRODUCTS
CUSTOMER ASSISTANCE CENTER
75, J.-A. BOMBARDIER STREET
SHERBROOKE, QC
J1L 1W3
Tel.: (450) 532-5000
SEPTEMBER 1999
® Trademark of Bombardier Inc. and/or its subsidiaries.
12
www.SeaDooManuals.net
smo2000-003a.book Page 13 Thursday, November 11, 1999 10:44 AM
BOMBARDIER INTERNATIONAL LIMITED
WARRANTY: 2000 SEA-DOO® WATERCRAFT
1. WARRANTY COVERAGE PERIOD
BOMBARDIER INC. ("Bombardier"), as manufacturer, warrants FROM THE DATE OF DELIVERY TO THE FIRST CONSUMER that each 2000 SEA-DOO Watercraft sold anywhere
in the world except the United States and Canada, as NEW and UNUSED and PREDELIVERED by an authorized SEA-DOO watercraft dealer, duly appointed by an authorized
SEA-DOO International Distributor, will be free from any defects in material and/or workmanship for a PERIOD of:
a) For private owners:
• TWELVE (12) CONSECUTIVE MONTHS.
SEA-DOO RX-DI AND SEA-DOO GTX-DI MODELS
• TWELVE (12) CONSECUTIVE MONTHS for the emission related components providing input to emission control. (e.g. sensors)
b) For commercial use:
• FOUR (4) CONSECUTIVE MONTHS.
SEA-DOO RX-DI AND SEA-DOO GTX-DI MODELS
• TWELVE (12) CONSECUTIVE MONTHS for the emission related components providing input to emission control. (e.g. sensors)
All genuine Bombardier accessories, installed by an authorized SEA-DOO watercraft dealer
at the time of delivery of the new and unused SEA-DOO watercraft, carry the same Warranty Coverage Period as for the SEA-DOO wartercraft.
2. WHAT BOMBARDIER WILL DO
BOMBARDIER through the local authorized SEA-DOO International Distributor will, during
the Warranty Coverage Period, repair or replace, at its option, all genuine BOMBARDIER
part found defective in material and/ or workmanship, under normal use, maintenance and
service, with a genuine BOMBARDIER part without charge for parts and labor, at any local
authorized SEA-DOO watercraft dealer.
3. CONDITION TO HAVE WARRANTY WORK VALIDATED
The customer must notify a local authorized SEA-DOO watercrafts dealer within two (2)
days of the appearance of the defect in material and/or workmanship and present to the
servicing authorized SEA-DOO watercraft dealer the SEA-DOO Warranty Registration Card
or a proof of purchase of the NEW and UNUSED 2000 SEA-DOO watercraft and must sign
the repair/work order prior to the start of the repair in order to validate a warranty repair.
All parts replaced under this limited warranty become the property of BOMBARDIER.
4.
•
•
•
•
•
•
•
•
•
•
EXCLUSIONS - ARE NOT WARRANTED
Normal wear and tear items;
Labor, parts and lubricant costs of all maintenance services;
Damages caused by failure to provide proper maintenance and/or storage, as described
in the "2000 SEA-DOO Watercraft Operator's Guide" ;
Damages resulting from improper repairs, modifications or use of non-approved parts
or, repairs not performed by a authorized SEA-DOO watercraft dealer;
Damages resulting from abuse, misuse, neglect, racing;
Damages resulting from accident, fire, theft, vandalism or any act of God;
Incidental or consequential damages, or damages of any kind such as but not limited
to towing charges, telephone calls or taxi;
Water damages caused by water ingestion;
Damages related to gel coat finish including but not limited to cosmetic gel coat finish,
blisters or fiberglass delamination caused by blisters, crazing, spyder or hairline cracks; and
Damages resulting from improper service or maintenance.
www.SeaDooManuals.net
13
smo2000-003a.book Page 14 Thursday, November 11, 1999 10:44 AM
5. LIMITATIONS OF LIABILITY
This warranty gives you specific rights, and you may also have other legal rights resulting
from the application of mandatory national laws which may vary from country to country.
WHERE APPLICABLE, THIS WARRANTY IS EXPRESSLY GIVEN AND ACCEPTED IN
LIEU OF ANY AND ALL OTHER WARRANTIES, EXPRESSED OR IMPLIED, INCLUDING
WITHOUT LIMITATION ANY WARRANTY OF MERCHANTABILITY OR FITNESS FOR
ANY PARTICULAR PURPOSE.
In no event shall BOMBARDIER be liable for special, consequential or incidental damages,
including but not limited to loss of use and transportation costs. Some countries do not
allow the exclusion or limitation of incidental or consequential damages, or limitations on
how long an implied warranty lasts, so the above limitation or exclusion may not apply.
Neither the SEA-DOO international distributor, the selling local authorized SEA-DOO watercrafts dealer nor any other person has been authorized to make any affirmation, representation
or warranty other than those contained in this warranty, and if made, such affirmation, representation or warranty shall not be enforceable against BOMBARDIER or any other person.
Every SEA-DOO watercraft is sold with the English version of this warranty. Some authorized SEA-DOO International Distributor may elect to translate this warranty into local language, it is then understood and agreed that in the event of any discrepancies or inconsistencies between the two versions, the English version shall prevail.
It is the customer's responsibility to ensure that the SEA-DOO watercraft complies with
all boating regulations and standards of any country, other than the original country of sale,
where the SEA-DOO watercraft is intended to be used.
BOMBARDIER reserves the right to modify this warranty at any time, being understood
that such modification will not alter the warranty conditions applicable to the SEA-DOO
watercraft sold while this warranty is in effect.
6. TRANSFER
If the customer sells the SEA-DOO watercraft guaranteed under the present, he shall
assign and transfer this warranty, which shall be valid for the rest of the relevant PERIOD
as defined in section 1 hereinabove, to the new customer.
7. CONSUMER ASSISTANCE
a) In the event of a controversy or a dispute arising in connection with this BOMBARDIER
INTERNATIONAL LIMITED WARRANTY, BOMBARDIER suggests that you try to resolve the issue at the dealership level. We recommend discussing the issue with the
authorized dealer's service manager or owner.
b) If further assistance is required, the authorized local SEA-DOO INTERNATIONAL DISTRIBUTOR's Service Department should be contacted in order to resolve the matter.
c) If the issue has still not been resolved, please submit in writing your complaint to:
BOMBARDIER INC.
RECREATIONAL PRODUCTS
CUSTOMER ASSISTANCE CENTER
75, J.-A. BOMBARDIER STREET
SHERBROOKE, QUEBEC
J1L 1W3
PHONE: (450) 532-5000
SEPTEMBER 1999
® Trademark of Bombardier Inc. and/or its subsidiaries
14
www.SeaDooManuals.net
smo2000-003a.book Page 15 Thursday, November 11, 1999 10:44 AM
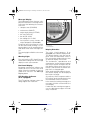
REGISTRATION NUMBER LOCATION
All personal watercraft are required by federal law to be registered and legally
numbered.
Due to space availability for proper display of registration number, refer to following illustration for location. The registration number should appear on each side
of the watercraft.
F07L1QL
1
1. Registration number location
NOTE: The registration number must be above the water line. Ensure also that
the numbers are of the correct size and color. Check with local regulations.
www.SeaDooManuals.net
15
smo2000-003b.fm Page 16 Thursday, January 20, 2000 8:52 AM
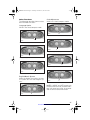
LOCATION OF THE IMPORTANT LABELS
Please read the following labels carefully before operating this watercraft.
1
4
5
7
2
F07L1SM
Label 1
Label 2
F01L9EY
CARBURETOR-EQUIPPED MODELS
F12L06Y
16
www.SeaDooManuals.net
3
6
smo2000-003b.fm Page 17 Thursday, January 20, 2000 8:52 AM
Label 2
Label 6
F12L08Y
DI MODELS
F06L0DZ
Label 3
Label 7
F02L2D0
Label 4
F00L0J1
Label 8
F01L6V0
Label 5
WARNING
DO NOT BOOST BATTERY
WHILE INSTALLED.
F00L2FY
DI MODELS ONLY
F00L050
www.SeaDooManuals.net
17
smo2000-003a.book Page 18 Thursday, November 11, 1999 10:44 AM
IDENTIFICATION NUMBERS
The main components of the watercraft (engine and hull) are identified by
different serial numbers. It may sometimes become necessary to locate
these numbers for warranty purposes
or to trace the watercraft in the event
of theft.
Hull
The Hull Identification Number (H.I.N.)
is located on footboard at the rear of
watercraft.
1
F08L0QY
GTX DI MODELS
1. Hull Identification Number
It is composed of 12 digits:
ZZN12345L495
Serial
number*
Manufacturer
Model year
Year of production
Month of production
F00A0CZ
*A letter may also be used as a digit.
Engine
The Engine Identification Number (E.I.N.)
is located on the upper crankcase on
MAGNETO side.
F00L2EY
1
RX/DI MODELS
1. Hull Identification Number
F06D15Y
1. Engine Identification Number
18
www.SeaDooManuals.net
1
smo2000-003a.book Page 19 Thursday, November 11, 1999 10:44 AM
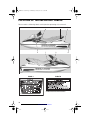
CONTROLS AND COMPONENT LOCATION
NOTE: Some components do not apply or are optional on some models.
RX/DI Models
10
2
7
26 18
19 21 27-28
3233
31
23
12 29
17
13 16 15 14
23
30
34
9
8
11
4
5
3
1
10
24
6
F12L04L
www.SeaDooManuals.net
19
smo2000-003a.book Page 20 Thursday, November 11, 1999 10:44 AM
GTX DI Models
14
15
2
7
26 18
19
25
20
27
28
32
33
23
22
25
12
17
16
10
31
21
23
29
30
34
9
8
13
4
3
24
1
6
F07L1WL
20
www.SeaDooManuals.net
smo2000-003a.book Page 21 Thursday, November 11, 1999 10:44 AM
1.
2.
3.
4.
5.
6.
7.
8.
9.
10.
11.
12.
13.
14.
15.
Safety Lanyard
Handlebar
Throttle Lever
Engine Start/Stop Button
Variable Trim System (VTS) Button
Choke Lever
Shift Lever
Speedometer
Information Center Gauge/Buttons
Glove Box
Fuel Tank Valve
Fuel Tank Cap
Oil Injection Reservoir Cap
Front Storage Compartment Cover
Front Storage Compartment Cover
Latch
16. Tool Kit
17. Air Intake Opening
18.
19.
20.
21.
22.
23.
24.
25.
26.
27.
28.
29.
30.
31.
32.
33.
34.
Seat Strap
Seat Latch
Seat Extension Latch
Rear Grab Handle
Rear Storage Basket
Bow and Stern Eyelets
Mooring Cleats
Cargo Cleats
Footboard
Boarding Pads
Boarding Platform
Cooling System Bleed Outlet
Flushing Connector
Bilge Drain Plugs
Jet Pump Nozzle
Reverse Gate
Jet Pump Water Intake
www.SeaDooManuals.net
21
smo2000-003b.fm Page 22 Thursday, January 27, 2000 11:36 AM
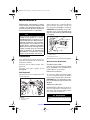
COMPONENTS FUNCTIONS
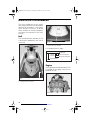
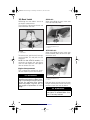
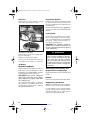
1) Safety Lanyard
The safety lanyard cap should be securely snapped onto its switch to be fully operational.
Pulling the safety lanyard cap from the
switch stops the engine operation. Attach the safety lanyard to the operator's Personal Flotation Device (PFD)
and snap the cap to the switch to be
able to start the engine.
Two short beeps indicates the system
is ready to allow engine starting. Otherwise, refer to the TROUBLESHOOTING section for the coded signals chart.
WARNING
Should the safety lanyard cap become loose or fail to remain on its
switch, replace it immediately in
order to avoid unauthorized use or
theft.
F00L07Y
1
2
1. Safety lanyard cap on the switch
2. Safety lanyard secured on operator’s PFD
WARNING
Should the engine be stopped,
watercraft directional control is
lost. Always disconnect safety lanyard when leaving watercraft.
22
WARNING
Do not lubricate the safety lanyard
post.
Digitally Encoded Security
System (DESS)
The safety lanyard cap specifically contains an electronic circuit that gives it
a unique electronic serial number.
This safety lanyard cannot be used on
another watercraft and conversely, the
one from another watercraft cannot be
used on your watercraft.
However, the DESS brings a great flexibility. You can buy an additional safety
lanyard and have it programmed for
your watercraft.
The DI models also offers a special
safety lanyard — the Sea-Doo LKTM
(Learning Key) — which can be programmed so that the vehicle can be
run only at a limited speed. Such feature is ideal for first time riders.
To have additional safety lanyard, refer
to an authorized Sea-Doo dealer.
If the engine is stopped with the start/
stop button while the safety lanyard remains on the switch, it can be restarted within approximately 10 minutes by
pressing the engine start/stop button.
After this delay, it is necessary to apply
a slight pressure or the removal and reinstallation of the safety lanyard on the
switch to allow engine starting.
WARNING
While engine can be stopped using the engine start/stop button,
good habits recommend that the
safety lanyard also be disconnected when stopping.
www.SeaDooManuals.net
smo2000-003a.book Page 23 Thursday, November 11, 1999 10:44 AM
2) Handlebar
The handlebar controls the direction of
the watercraft. Turning the handlebar
to the right steers the watercraft to the
right and inversely.
WARNING
Check handlebar and corresponding steering nozzle operation before starting.
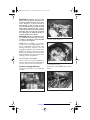
Adjustment (if so equipped)
The handlebar height can be adjusted
to suit rider preferences.
To perform this adjustment, turn the
knob underneath the handlebar.
Carburetor-Equipped Models
Do not depress lever unnecessarily
when engine is not running. A fuel accelerator pump delivers fuel to the engine each time throttle lever is applied.
CAUTION: Engine can be flooded if
throttle lever is unnecessarily applied several times. If engine is flooded, it will not start.
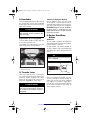
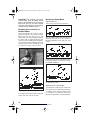
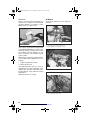
4) Engine Start/Stop
Button
All Models
To start engine, depress and hold the
start/stop button. Release immediately after engine is started.
To stop engine, fully release throttle lever then depress the start/stop button
and disconnect safety lanyard from the
switch.
WARNING
Directional control is lost when engine is stopped.
1
1
F07L0WY
TYPICAL
1. Adjustment knob
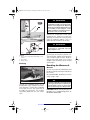
3) Throttle Lever
F01L63Y
When the throttle lever is squeezed,
the watercraft accelerates. When fully
released, engine automatically slows
down to idle speed and watercraft is
gradually stopped by water drag.
WARNING
Check throttle lever operation before starting the engine. Directional control is lost when engine is
stopped.
1. Engine start/stop button
With the Digitally Encoded Security
System, leaving the safety lanyard for
more than 10 minutes after stopping
the engine will require a slight pressure or the removal and reinstallation
of the safety lanyard on the switch to
allow engine starting.
www.SeaDooManuals.net
23
smo2000-003a.book Page 24 Thursday, November 11, 1999 10:44 AM
All Models
5) Variable Trim System
Button (VTS)
(if so equipped)
Located just below engine start/stop
button, this button is used to change
pump nozzle position and to adjust ride
to suit watercraft load and water conditions.
A VTS position indicator is included in
the information center gauge. See elsewhere in this section.
F01L62Y
1
GTX DI Models
From the forward position, pull the lever to neutral or reverse as desired.
Push back to go to previous positions.
Always set in forward when finished.
WARNING
Shift lever should only be used
when the engine is idling and watercraft is completely stopped. Only
use reverse at slow speed and for
the shortest time possible. Always
ensure the path behind is clear of
obstacles, swimmers and children
playing in shallow water. Never
rev the engine at high RPM in reverse. Do not use reverse to stop
the watercraft.
8) Speedometer
1. VTS button
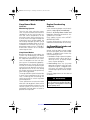
6) Choke Lever
Carburetor-Equipped Models
The choke is provided to supply a richer fuel/air mixture when starting a cold
engine.
Choke lever should be pulled and held to
operate. Lever will automatically return
to its normal position when released.
7) Shift Lever
A push-pull lever:
– forward
– neutral (if so equipped)
– reverse
RX Models
From the forward position, pull the lever to reverse. Push back to go to forward. Always set in forward when finished. To find the neutral, set in
reverse then push back until the watercraft stops moving backwards.
Analog speedometer indicates the
speed of watercraft in miles per hour
(MPH) and kilometers per hour (km/h).
The speed sensor mounted on the ride
plate sends the signal to the speedometer and information center.
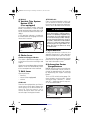
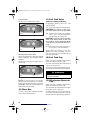
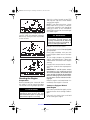
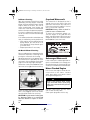
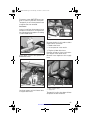
9) Information Center
Gauge/Buttons
NOTE: With the safety lanyard disconnected, information center can be activated for approximately 33 seconds
by depressing the engine start/stop
button.
This is a LCD multifunction gauge. Different displays and functions can be
activated using 2 buttons — MODE
and SET — following specific sequences as described below.
F00L2BY
1
1. To change display mode
2. To set or reset a function
24
www.SeaDooManuals.net
2
smo2000-003a.book Page 25 Thursday, November 11, 1999 10:44 AM
Resetting a Function
To reset a function (such as the chronometer, peak speed, distance, etc.,)
press and hold the SET button for 2
seconds while in the appropriate mode.
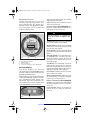
The information center includes the
following display areas.
2
1
When you are satisfied with your choice,
stop pressing the button.
Clock: Indicates the actual time in hours
and minutes (hh:mm).
Clock/Compass (if so equipped): Displays the cardinal points to indicate the
orientation of the watercraft.
WARNING
5
Use the compass as a guide only.
Not to be used for navigation purposes.
F00L2CY
1.
2.
3.
4.
5.
3
4
General display
Message/units display
Warning light
Fuel level display
VTS position indicator (if so equipped)
General Display
The default display is the clock (or
clock/compass if so equipped) unless
another mode has been selected. See
Display Priorities below.
Repeatedly pressing the MODE button
scrolls the following displays: Tachometer, speedometer, peak speed, average speed, trip meter, hourmeter, water temperature, exterior temperature
(if so equipped) and chronometer.
F00L2BZ
Tachometer: Indicates the revolutions
per minute (RPM) of the engine.
Speedometer: Indicates the speed of
watercraft in kilometers per hour (KPH)
or miles per hour (MPH).
Peak Speed: Indicates the top speed
the watercraft reached (PK KPH or PK
MPH).
Average Speed: The information center approximately calculates and displays the average speed (AV KPH or
AV MPH) of the watercraft since the
last engine start.
Trip Meter: The information center approximately calculates the distance
based on the operation time and the watercraft speed and displays the result in
kilometers (KM) or miles (MILES).
Hourmeter: Displays the time in hours
of the watercraft usage.
Water Temperature: Displays the water temperature (L TEMP) in degrees
Celsius (°C) or Farenheit (°F).
Exterior Temperature (if so equipped):
Displays the exterior air temperature
(E TEMP) in degrees Celsius (°C) or Fahrenheit (°F).
Chronometer: Allows to measure an
interval of time in hours and minutes
(hh:mm).
1
1. Press to change display mode
www.SeaDooManuals.net
25
smo2000-003a.book Page 26 Thursday, November 11, 1999 10:44 AM
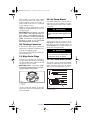
Message Display
The Information Center features a display area that blinks a message whenever one of the following circumstances occurs:
• compass error (COMPAS)
• maintenance (MAINT)
• engine overheating (H-TEMP)
• low fuel (FUEL-LO)
• low oil (OIL LOW)
• low voltage (12 V LOW)
• fuel injection system sensors and
major components (DI models)
Except for low fuel and low oil, which
can be corrected by refilling, it is recommended to see an authorized SeaDoo dealer when other messages occur.
The warning light will blink at the same
time.
Warning Light
The red warning LED (Light-Emitting
Diode) blinks along with the message
display to catch your attention.
Fuel Level Display
Bar gauge continuously indicates the
amount of fuel in the fuel tank while
riding. A low-fuel condition is also indicated when it occurs. See Message
Display above.
VTS Position Indicator
(if so equipped)
The VTS position indicator shows the
riding angle of the watercraft.
26
1
2 3
F00L2DY
1. Position indicator
2. Bow up
3. Bow down
Display Priorities
The clock, (clock/compass, if so
equipped) is the default display mode.
The default display is the one that appears when the information center is
first activated or displayed back after
an alternate display was chosen.
The tachometer, speedometer and
chronometer, are the only other modes
that may be chosen to replace the default display. When one of these is selected, it will become the default display until it is changed again.
When another display mode is chosen,
the default display will be displayed
back after 4 seconds.
As a self test, all LCD segments and the
LED will turn on for 3 seconds each time
the information center is activated.
In the event of a warning message, the
message will blink and override the
units display.
If more than one warning message occurs, the blinking messages will scroll
every 4 seconds.
www.SeaDooManuals.net
smo2000-003a.book Page 27 Thursday, November 11, 1999 10:44 AM
Other Functions
The following describes how to select
other available functions.
Clock Adjustment
While in the clock/compass mode:
Language Option
While in the clock/compass mode:
1
F00L2B1
1. Press TOGETHER and hold for 2 seconds
1
F00L2B0
1. Press and hold for 2 seconds
F00L2BZ
1
1. Repeatedly press to adjust HOURS
F00L2BZ
1
1. Repeatedly press
1
F00L2B0
1. Repeatedly press to adjust MINUTES
1
F00L2B0
1. Press to end
English/Metric System
Allows to display the units in the metric system or in the SAE English system.
F00L2B1
1
1. Press TOGETHER to end
NOTE: If MODE and SET buttons are
not pressed at the end, the default display will come back after 10 seconds
and the time entered will remain.
F00L2B1
1
1. Press TOGETHER and hold for 2 seconds
www.SeaDooManuals.net
27
smo2000-003a.book Page 28 Thursday, November 11, 1999 10:44 AM
Chronometer
While in the chronometer mode:
F00L2B0
1
1. Press to start or stop chronometer
F00L2B0
1
1. Press and hold for 2 seconds to reset
Maintenance Information
When the watercraft is due for a maintenance inspection, the message MAINT
will blink.
To clear the warning message while it
is blinking:
11) Fuel Tank Valve
Carburetor-Equipped Models
A 3-position rotating valve: OFF, ON
and RESERVE:
OFF: Stop fuel supply to carburetor(s).
CAUTION: Turn valve to OFF position when watercraft is not operated.
ON: Allows fuel to flow to carburetor(s). This is the normal position
for operation of watercraft.
CAUTION: Improper opening of fuel
valve may restrict flow of fuel and
may lead to engine damage. Make
sure valve is fully opened while running.
RES: Use when the watercraft has run
out of fuel in the ON position.
Always refill the fuel tank at the first
opportunity. After refueling, turn the
fuel tank valve to the ON position to
continue operation.
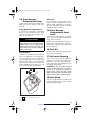
12) Fuel Tank Cap
Open the front storage compartment
cover to expose fuel tank cap.
The tank cap is located on the left hand
side of the watercraft.
Unscrew the cap counterclockwise. After fueling, reinstall cap and fully tighten.
WARNING
F00L2B0
Never use a lit match or open flame
to check fuel level.
1
1. Press and hold for 2 seconds to reset
NOTE: If ma in te n an ce me ss ag e
(MAINT) continues to blink, it indicates
a fault with the fuel injection system on
Di models. Refer to an authorized SeaDoo Dealer for servicing.
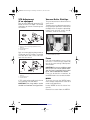
10) Glove Box
A small, convenient storage compartment for personal articles.
28
13) Oil Injection Reservoir
Cap
Open the front storage compartment
cover to expose reservoir cap.
The reservoir cap is located on the right
hand side of the watercraft.
To add injection oil in the reservoir, unscrew the cap counterclockwise. Do not
overfill. Reinstall cap and fully tighten it.
www.SeaDooManuals.net
smo2000-003a.book Page 29 Thursday, November 11, 1999 10:44 AM
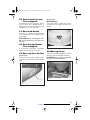
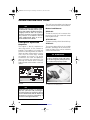
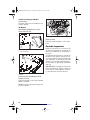
14) Front Storage
Compartment Cover
It gives access to the front storage compartment. Always relatch cover after
closing.
Front Storage Compartment
A convenient watertight, removable
basket to carry personal articles. Ideal
location for spare spark plugs, towrope, first aid kit, etc.
WARNING
Never leave any heavy or breakable objects in the storage basket.
Never store or carry anything below basket. Never operate the
craft with any storage compartment cover open.
GTX DI Models
The basket is provided with a holder to
store an approved fire extinguisher.
Fire extinguisher (sold separately)
should not be loose in the front storage compartment. A second holder
contains the Operator’s Guide, the
Safety Handbook and a tool kit. It can
be used to carry personal articles.
2
1
1
RX models
Lift the basket to get access to the
holder to store an approved fire extinguisher (sold separately). It also contains the Operator’s Guide, the Safety
Handbook and the tool kit.
15) Front Storage
Compartment Cover
Latch
Pull the latch lever upward in order to
open the front storage compartment
cover. Always relatch.
NOTE: Verify periodically the lock pin
tightness of storage cover. Tighten if
needed and make sure storage cover
latches properly.
16) Tool Kit
Contains tools needed to perform basic
watercraft maintenance.
17) Air Intake Opening
This is where air enters to supply the
engine and ventilate the engine compartment. If the air intake opening is
kept under water for a long period, water will get inside bilge.
CAUTION: If the air intake opening
is kept under water for a long period, such as turning constantly in
tight circles, water will get inside
bilge, which may cause severe damage to internal parts of the engine.
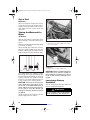
18) Seat Strap
The seat strap provides a handhold to
assist boarding and is used as a handhold for the passenger.
F04L0PY
TYPICAL
Step 1 : Turn cover counterclockwise
Step 2 : Lift
1. Holder
www.SeaDooManuals.net
29
smo2000-003a.book Page 30 Thursday, November 11, 1999 10:44 AM
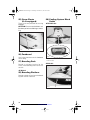
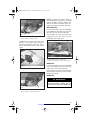
19) Seat Latch
Removing the seat allows access to
the engine compartment.
The seat latch is located at the rear end
and underneath the seat.
RX Models
When reinstalling the seat, insert seat
front tab into body hook.
1 2
F01L92Y
RX MODELS
1. Insert this tab in hook
2. Hook
1
F01L8XZ
TYPICAL
1. Seat latch
To remove seat, pull the latch lever upward and hold. Lift and pull the seat
rearward.
NOTE: On the GTX DI models, it is
necessary to remove the seat extension first and repeat the same procedure to remove the seat.
GTX DI Models
When reinstalling the seat, insert seat
hook into body front tab for each portion of the seat.
Engine Compartment
This is where the mechanical, electrical and fuel/oil systems are located.
WARNING
F06L12Y
Components inside engine compartment may be hot. When starting or operating the engine, do not
touch any electrical part. Never
leave any object, rag, tool, etc., in
the engine compartment or in the
bilge.
2
1
1. Insert this tab in hook
2. Hook
Pull latch lever to insert it over the rear
lock pin. Release latch lever then firmly
push on rear of the seat to relatch.
WARNING
Periodically verify the seat lock pin
and tighten if needed. Make sure
seat is securely latched.
30
www.SeaDooManuals.net
smo2000-003a.book Page 31 Thursday, November 11, 1999 10:44 AM
20) Seat Extension Latch
(if so equipped)
Removing the seat extension allows
access to the rear storage basket. It
also gives access to the seat latch on
models with a seat extension.
Stern Eyelet
GTX DI Models
This eyelet allows a rope with a hook,
a closed end or an open end to be attached.
21) Rear Grab Handle
Provides a handhold for boarding
when needed and a handhold for the
passenger.
CAUTION: Never use the grab handle to tow anything or to lift the watercraft.
22) Rear Storage Basket
(if so equipped)
1
F07L0YY
A convenient watertight, removable
basket to carry personal articles.
1. Stern eyelet
23) Bow and Stern Eyelets
These cleats can be temporarily used for
docking, while refueling for example.
CAUTION: Never use mooring cleats
to pull or lift the watercraft.
Bow Eyelet
Eyelets can be used for mooring, towing and as a tie-down point during trailering.
1
24) Mooring Cleats
F00L0DY
1
1. Mooring cleats
F00L0EY
1. Bow eyelet
www.SeaDooManuals.net
31
smo2000-003a.book Page 32 Thursday, November 11, 1999 10:44 AM
25) Cargo Cleats
(if so equipped)
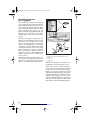
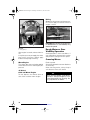
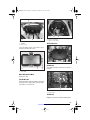
29) Cooling System Bleed
Outlet
These cleats are provided for securing
baggage.
CAUTION: Do not use the cleats as a
tie-down point for trailering or mooring.
GTX DI Models
F07L0XY
1
1. Cargo cleats (each side)
1
26) Footboard
User’s feet should rest on the footboard
when riding.
27) Boarding Pads
Provide a cushioned surface for the
knees when boarding from rear of watercraft.
F01L94Y
TYPICAL
1. Bleed outlet
RX Models
All Models
28) Boarding Platform
Provides a large surface for easier boarding from rear of watercraft.
F12L05Y
1. Bleed outlet
32
www.SeaDooManuals.net
1
smo2000-003a.book Page 33 Thursday, November 11, 1999 10:44 AM
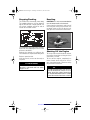
When engine is running, water should
flow from the outlet. This allows air in
engine cooling system to escape. It
also indicates that water is circulating
in the cooling system.
NOTE: It may be required to increase
slightly the engine RPM to see the water flowing out.
CAUTION: Should water not flow
from outlet a few seconds after engine starts, immediately stop engine and refer to POST-OPERATION
CARE and look for cooling system
flushing or refer to an authorized
Sea-Doo dealer for servicing.
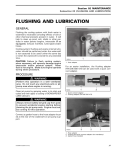
30) Flushing Connector
A convenient connector is provided to
allow easy installation of a garden hose
to flush the cooling system.
Refer to POST-OPERATION CARE section for proper use.
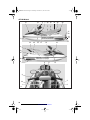
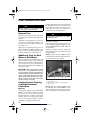
31) Bilge Drain Plugs
Should water be found in the bilge, it
can be easily drained by unscrewing
the drain plugs when engine is off and
watercraft is out of water.
CAUTION: Make sure drain plugs
are properly secured prior to launching the watercraft in water.
1
32) Jet Pump Nozzle
Jet pump nozzle turns side to side via
rider input at the handlebar. This provides directional control when engine
is running.
WARNING
Never use nozzle as a supporting
point to board the watercraft or to
lift it.
33) Reverse Gate
When selecting the neutral (if so
equipped) or reverse position with the
shift lever, the reverse gate moves up
(if equipped with a neutral) or down to
obtain the desired position.
WARNING
Never use gate as a supporting
point to board the watercraft. Do
not reverse while at speed.
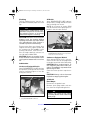
34) Jet Pump Water Intake
The water is drawn up by the impeller
through this opening. The water intake
grate minimizes the entry of foreign
objects into the propulsion system.
2
F02L2FY
1. Unscrew
2. Tighten
Tilt the watercraft slightly to the rear
so that the water can completely flow
out of the bilge.
F01J3ZY
1
TYPICAL
1. Water intake
www.SeaDooManuals.net
33
smo2000-003b.fm Page 34 Thursday, January 20, 2000 8:56 AM
FUEL AND LUBRICATION
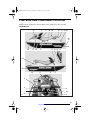
Fueling Procedure
Recommended Fuel
WARNING
Follow these safe boating fueling
instructions explicitly.
Do not allow anyone to remain on the
watercraft.
Tie watercraft securely to the fueling
pier.
Have a fire extinguisher close at hand.
Do not insert the spout too far in filler
neck.
Pour fuel slowly so that air can escape
from the tank and prevent fuel flowback. Be careful not to spill fuel.
Stop filling when the fuel reaches the
bottom of filler neck. Do not fill into the
filler tube to prevent fuel spill out. Do
not overfill. Fully tighten fuel tank cap.
WARNING
The tank design makes provision
for fuel expansion of about 5%. If
this area is filled, fuel will expand
and may come out through fuel
vent. Always stop the engine before refueling. Fuel is inflammable
and explosive under certain conditions. Always work in a well ventilated area. Do not smoke or allow
open flames or sparks in the vicinity. Never top off the fuel tank and
leave watercraft in the sun. As
temperature increases, fuel expands and might overflow. Always
wipe off any fuel spillage from the
watercraft.
34
Use unleaded regular gasoline with 87
octane (Ron + Mon)/2 specification.
NOTE: Do not mix oil with fuel except
at engine break-in. Refer to BREAK-IN
PERIOD. Always check injection oil
reservoir level when refueling.
CAUTION: Never experiment with
other fuels or fuel ratios. Never use
fuel containing more than 10% alcohol, (ethanol or methanol). The use
of non-recommended fuel can result
in watercraft performance deterioration and damage to critical parts in
the fuel system and engine components.
CAUTION: Never use injector cleaning products. They may contain additive that could damage injector
components.
Recommended Oil
Carburetor-Equipped Models
Use of BOMBARDIER-ROTAX Formula
XP-S synthetic injection oil (or equivalent high quality synthetic oil) available
from an authorized Sea-Doo dealer.
This fully synthetic oil provides outstanding lubrication and cleanliness,
less friction and wear for greater engine performance and durability.
CAUTION: The engine requires the
use of BOMBARDIER-ROTAX Formula XP-S synthetic injection oil (or
the equivalent high quality synthetic
oil).
www.SeaDooManuals.net
smo2000-003b.fm Page 35 Thursday, January 20, 2000 8:56 AM
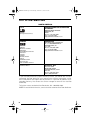
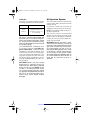
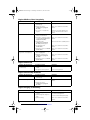
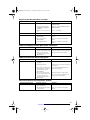
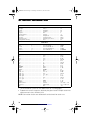
DI Models
Use only two-stroke engine injection
oil sold by authorized Sea-Doo dealers.
MODELS
OIL TYPE
RX DI
GTX DI
BOMBARDIER
FORMULA XP-S DI
synthetic injection oil
(or equivalent)
CAUTION: Bombardier formulation
XP-S DI is specially formulated and
tested for use in our 947 DI engines.
Use of any other brand of two-stroke
oil may void the limited warranty.
Use only Bombardier Formula XP-S
DI (or equivalent).
The BOMBARDIER FORMULA XP-S
DI synthetic injection oil provides superior lubrication, reduced engine
component wear and oil deposit, thus
maintaining maximum-level performance and antifriction properties. This
synthetic injection oil meets the latest
ASTM and JASO standards by ensuring high biodegradability and low exhaust smoke.
CAUTION: Never use four-stroke
petroleum or synthetic motor oil
and never mix these with outboard
motor oil. Do not use NMMA TC-W,
TC-W2 or TC-W3 outboard motor
oils or other ashless type two-stroke
oil. Avoid mixing different brands of
API TC oil as resulting chemical reactions may cause severe engine
damage.
Oil Injection System
This watercraft features an oil injection
system which does not require manual
fuel/oil mixing.
A sufficient amount of injection oil
should be maintained in the reservoir.
NOTE: It is recommended to carry a 1 L
of spare injection oil.
The use of a funnel is recommended
to pour the oil into the reservoir. Stop
filling as soon as oil appears at approximately 13 mm (1/2 in) from top of reservoir. Do not overfill.
CAUTION: Always maintain a sufficient amount of injection oil in the oil
reservoir. Check and refill every time
you refuel if necessary. Do not overfill. If the engine runs out of oil, severe engine damage will occur. If the
oil reservoir is found almost empty,
air can enter in the system and it
should be bled. Immediately refer to
an authorized Sea-Doo dealer to
have the oil injection system inspected.
www.SeaDooManuals.net
35
smo2000-003b.fm Page 36 Thursday, January 27, 2000 1:30 PM
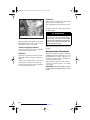
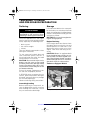
BREAK-IN PERIOD
With Sea-Doo watercraft powered by
Rotax® engines, a break-in period of 10
hours is required before continuous
operation at full throttle. To achieve a
good break-in, vary the engine speed
every few minutes with brief wide
open throttle accelerations of up to 15
seconds. Continued wide open throttle runs and prolonged cruising without speed variations should be avoided, this can cause engine damage
during the break-in period.
Carburetor-Equipped Models
To assure additional protection during
the initial engine break-in, it is recommended to add 1 L of the same oil as
in the injection oil reservoir in the fuel
tank for the first full fuel tank filling
only.
To add injection oil in the fuel tank, proceed as follows:
Fill fuel tank with approximately 15 liters (4 gal) of gasoline; then, add the
injection oil in the fuel.
Fill up fuel tank with gasoline. Do not
overfill.
36
NOTE: It is important to proceed in this
order to allow a proper mixing of the oil
in the gasoline. If oil is added first in an
empty fuel tank, fuel lines will be filled
up with injection oil leading in a no start
condition of the engine.
CAUTION: Remove and clean spark
plugs after engine break-in.
DI Models
Adding injection oil in the fuel tank for
the break-in has no noticeable effects
on a DI engine.
All Models
10-Hour Inspection
It is highly recommended that after the
first 10 hours of operation, the watercraft be checked by an authorized SeaDoo dealer. This inspection will also
provide the opportunity to discuss the
unanswered questions you may have
encountered during the first hours of
operation.
The 10-hour inspection is at the expense
of the watercraft owner.
www.SeaDooManuals.net
smo2000-003a.book Page 37 Thursday, November 11, 1999 10:44 AM
DAILY PRE-OPERATION CHECKS
Some of the following items may not have been previously covered in this guide,
however they will be described in the MAINTENANCE or SPECIAL PROCEDURES section. Please refer to these sections to have more detailed information
WARNING
Components inside engine compartment may be hot. Only start watercraft
once all items have been checked and operate properly.
WARNING
Safety lanyard should always be removed from its switch prior to verifying
any of the following.
ITEM
OPERATION
Hull
Inspect.
Jet pump water intake
Inspect/clean.
Bilge
Drain. Ensure plugs are secured.
Battery
Inspect tightness of cables and retaining strap.
Fuel tank and oil reservoir
Refill.
Engine compartment
Check fuel line connections for tightness.
Verify for any fuel leak/odor.
Steering system
Check operation.
Throttle system
Check operation.
Shifter system
Check operation.
VTS (if so equipped)
Check operation.
Safety lanyard and engine
start/stop button
Check operation.
Storage compartment covers
Ensure they are closed and latched.
www.SeaDooManuals.net
37
smo2000-003a.book Page 38 Thursday, November 11, 1999 10:44 AM
Hull
Fuel Tank and Oil Reservoir
Inspect hull for cracks or damage.
With the watercraft horizontal, fill the
fuel tank to specified level.
Check the oil level and refill reservoir
as necessary.
Check fuel tank and oil reservoir retaining straps/fasteners.
Jet Pump Water Intake
Remove weeds, shells, debris or anything else that could restrict the flow
of water and damage cooling system
or propulsion unit. Clean as necessary.
If any obstruction can not be removed,
refer to an authorized Sea-Doo dealer
for servicing.
Engine Compartment
WARNING
Should any leak or gasoline odor
be present, do not start the engine.
Refer to an authorized Sea-Doo
dealer before use.
Steering System
Assisted by another person, check
steering operation for free movement.
When the handlebar is horizontal, the
jet pump nozzle should be in the
straight ahead position. Ensure the jet
pump nozzle pivots easily when handlebar is turned.
1
F01J3ZY
TYPICAL
1. Inspect this area
Inspect leading edges of the impeller,
if they have nicks or bends performance will be greatly reduced.
Bilge
Should water be present in the bilge,
tilt the watercraft to the rear and unscrew drain plugs to completely empty
the bilge.
Secure bilge drain plugs.
Throttle System
Check throttle lever for free and smooth
operation. It should return to its initial
position immediately after it is released.
CAUTION: Engine can be flooded if
throttle lever is applied several
times when engine is not running. If
engine is flooded, it will not start.
Battery
WARNING
Verify tightness of battery cables to
their posts and condition of battery
retaining straps/fasteners.
38
www.SeaDooManuals.net
smo2000-003a.book Page 39 Thursday, November 11, 1999 10:44 AM
Shifter System
Check reverse gate operation for free
movement. With shift lever in forward
position, the gate should be in upward
position; locked on the GTX DI models and offering a resistance to go
downward on the RX models. With
the shift lever in neutral position, gate
should be in middle position. With shift
lever in reverse position, gate should
be in downward position.
WARNING
Verify the reverse gate operation
before starting the engine.
VTS (Variable Trim System)
(if so equipped)
Push on arrows on VTS button to check
nozzle movement.
NOTE: With the safety lanyard disconnected, electrical system can be activated for approximately 33 seconds by
depressing the engine start/stop button.
Safety Lanyard and Engine
Start/Stop Button
Position shift lever in neutral. Ensure
that both switches operate properly.
Start engine and stop it using each
switch individually.
WARNING
If engine does not shut-off when
pushing engine start/stop button
or by disconnecting the safety lanyard, stop the engine by applying
the choke and turning fuel tank
valve (if so equipped) to OFF position. Do not operate the watercraft
further, see an authorized Sea-Doo
dealer.
Storage Compartment
Covers
Ensure they are closed and latched.
www.SeaDooManuals.net
39
smo2000-003a.book Page 40 Thursday, November 11, 1999 10:44 AM
OPERATING INSTRUCTIONS
The shift lever should be in the forward
position in order for the craft to advance.
WARNING
Always perform the DAILY PREOPERATION CHECKS before operating the watercraft. Become thoroughly familiar with all controls
and the function of each. Should
any control or instruction not be
fully understood, refer to an authorized Sea-Doo dealer.
Principle of Operation
Propulsion
The engine is directly coupled to a
drive shaft which, in turn, rotates an
impeller. This impeller is accurately adjusted in a housing where the water is
drawn up from underneath the watercraft. Then the water flows through
the impeller to a venturi. The venturi
accelerates the water and produces
thrust to move the watercraft. Depressing the throttle lever increases
engine speed and therefore watercraft
speed.
Neutral and Reverse
RX Models
To find the neutral, set in reverse then
push back until the watercraft stops
moving backwards.
GTX DI Models
To obtain neutral, pull shift lever halfway.
All Models
The reverse gate will be in the middle
position, directing half of the thrust toward the front of the craft to minimize
watercraft movement.
WARNING
When the watercraft is in neutral
position, the drive shaft and impeller are turning. Stay away from water intake and jet pump outlet.
F01J3YY
F07L0RY
TYPICAL
1. Shift lever in neutral position
WARNING
Whenever the engine is to be started, the operator and passenger
should always be properly sitting
on the watercraft and be wearing
protective clothing including a
Coast Guard approved PFD.
40
1
www.SeaDooManuals.net
smo2000-003a.book Page 41 Thursday, November 11, 1999 10:44 AM
NOTE: To obtain maximum efficiency
and control from the reverse, increase
engine speed to slightly above idle.
Too much RPM will create water turbulence and reduce reverse efficiency.
F07J0NY
GTX DI Models
In reverse position, turn the handlebar
in the opposite direction that you want
to move the rear of the watercraft.
For example, to steer the rear of the
watercraft to the left side, turn the
handlebar to the right side.
1
TYPICAL
1. Reverse gate in middle position
1
To obtain reverse, pull shift lever completely. The reverse gate will be in
downward position, directing all the
thrust toward the front of the watercraft.
2
F07A0CY
1. Handlebar turned to the right side
2. Rear of watercraft moving to the left side
F07L0SY
RX Models
In reverse position, turn the handlebar
in the same direction that you want to
move the rear of the watercraft.
For example, to steer the rear of the watercraft to the left side, turn the handlebar to the left side.
1
1. Shift lever in reverse position
All Models
WARNING
Shift lever should only be used
when the engine is idling. Do not
use reverse to stop the watercraft.
F07J0OY
1
TYPICAL
1. Reverse gate in downward position
www.SeaDooManuals.net
41
smo2000-003a.book Page 42 Thursday, November 11, 1999 10:44 AM
Variable Trim System
(if so equipped)
The variable trim system (VTS) changes the angle of the jet pump nozzle to
provide the operator with a fast, effective system to compensate for load,
thrust, riding position and water conditions. Correctly adjusted, it can improve handling, reduce porpoising, and
position the watercraft at its best
riding angle to attain maximum performance.
When first using the watercraft, the
operator should become familiar with
the use of the variable trim system
(VTS) at varying speeds and water conditions. A mid-range trim is generally
used when cruising. Experience alone
will dictate the best trim for the conditions. During the watercraft break-in
period, when lower speeds are recommended, it is an excellent opportunity
to gain familiarity of trim adjustment
and its effects.
When the nozzle is positioned in an upward angle, the water thrust directs the
bow of the watercraft upward. This position is used to optimize high speed.
42
1
2
3
8°
F07L1XY
TYPICAL
1. Push on arrow pointing upward on VTS
button
2. Bow up
3. Nozzle up
NOTE: VTS position is indicated on a
bar gauge in the information center.
When the nozzle is directed downward, the bow is forced downward and
enhances the watercraft turning capabilities. As with any watercraft, speed
and operator body position and movement (body English), will determine the
degree and sharpness of the watercraft turn. Porpoising can be reduced or
eliminated if the nozzle is downward
and speed is adjusted proportionately.
www.SeaDooManuals.net
smo2000-003a.book Page 43 Thursday, November 11, 1999 10:44 AM
WARNING
Throttle should be applied and
handlebar turned to change the direction of the watercraft. Steering
efficiency will differ depending on
the number of passengers, load,
water conditions and environmental factors such as the wind.
1
Unlike a car, a watercraft needs some
throttle to turn. Practice in a safe area
applying the throttle and turning away
from an imaginary object. This is a
good collision avoidance technique.
2
3
WARNING
8°
F07L1YY
TYPICAL
1. Push on arrow pointing downward on VTS
button
2. Bow down
3. Nozzle down
Steering
Directional control is reduced when
the throttle is released and lost
when engine is off.
The watercraft behaves differently with
a passenger and requires greater skill.
The passenger should always grip the
seat strap or grab handle. Reduce
speed and avoid sharp turns. Avoid
choppy water conditions when carrying
a passenger.
Boarding the Watercraft
General
As with any watercraft, boarding should
be done carefully and engine should not
be running.
On some models, boarding is facilitated by using a step.
WARNING
F07A0AY
Turning the handlebar pivots the jet
pump nozzle which controls the watercraft direction. Turning the handlebar
to the right will turn the watercraft to
the right and inversely. The throttle
should be applied to turn the watercraft.
Inexperienced riders should practice
how to get aboard (all methods explained here) close to shore first
before venturing into deep water.
CAUTION: Never use jet pump components as a supporting point to
board the watercraft.
www.SeaDooManuals.net
43
smo2000-003a.book Page 44 Thursday, November 11, 1999 10:44 AM
CAUTION: The engine should be
started only after boarding, when
there is at least 90 cm (3 ft) of water
below the hull. Do not start engine
until the passenger(s) are properly
seated. Do not accelerate fast.
Boarding from a Dock or in
Shallow Water
When boarding from a dock, slowly
place one foot on the watercraft footboard nearest the dock and, at the
same time, transfer the body weight to
the other side in order to balance the
watercraft while holding the handlebar.
Then, bring the other foot over the seat
and put it on the other footboard. Push
the watercraft away from the dock.
Boarding in Deep Water
Operator Alone
Swim to the rear of the watercraft.
F01L5JY
Grip the grab handle and pull yourself
upward until your knee can reach the
boarding platform then grip the seat
strap.
F01L4JY
Bring your feet on the footboard while
maintaining balance using the handlebar (RX/DI models).
F07A0BY
F01L4KY
Sit astride the seat.
A
F01L4WY
A. 90 cm (3 ft)
In shallow water, board the watercraft
either from the side or the rear.
44
Operator with a Passenger
The operator climbs on the watercraft
the same way as explained previously.
In choppy water, the passenger, while
in the water, may hold the watercraft
to help the operator in climbing aboard.
www.SeaDooManuals.net
smo2000-003a.book Page 45 Thursday, November 11, 1999 10:44 AM
Attach the safety lanyard to your PFD
and snap the cap to its switch before
starting the engine.
NOTE: If you hear more than 2 short
beeps from DESS system, it indicates
a particular condition that should be
corrected. Refer to the TROUBLESHOOTING section for the meaning of
the coded signal.
F01L4MY
The passenger then climbs on the watercraft while the operator maintains
balance by sitting as close as possible
to the console.
F01L4NY
F01L4OY
Starting the Engine
Preparation
Before unloading the watercraft from
the trailer, it can be started for about
10 seconds to verify proper operation.
WARNING
Components inside engine compartment may be hot. Do not
touch electrical parts or jet pump
area when engine is running.
WARNING
Before starting, the operator and
passengers should always be
properly seated and be wearing
protective clothing including a
Coast Guard approved PFD.
Position shift lever to neutral.
Turn the fuel tank valve (if so equipped)
to ON position.
Firmly grip handlebar with your left
hand and place both feet on the footboard.
To start engine, depress and hold the
engine start/stop button. Follow procedure below for cold or warm engine
starting.
If engine fails to start after 10 seconds,
wait a few seconds then repeat procedure.
CAUTION: To avoid starter motor
overheating, the cranking period
should not exceed 5-10 seconds and
a rest period should be observed between cranking cycles to let the starter cool down and its mechanism disengage.
Release engine start/stop button immediately after engine is started.
Carburetor-Equipped Models
Cold Engine
The choke is provided to supply a richer
fuel/air mixture when starting a cold engine.
Fully pull the choke lever and hold
while starting the engine.
www.SeaDooManuals.net
45
smo2000-003a.book Page 46 Thursday, November 11, 1999 10:44 AM
Riding
Slowly accelerate to reach deeper water. Do not apply full throttle until the
engine is warm.
F07A0DY
F12L07Y
CAUTION: Avoid watercraft operation
in weeded areas. If unavoidable, vary
watercraft speed.
1
TYPICAL
1. Fully pulled
After engine is started, release choke lever.
It may be necessary to reapply the choke
lever and if necessary, slightly apply
throttle to keep engine running.
Warm Engine
The choke does not need to be applied
and throttle lever has to be slightly depressed.
All Models
Cold and Warm Engine
Do not depress the throttle lever to
start either a cold or warm engine.
46
Rough Water or Poor
Visibility Operation
Avoid operation in these conditions. If
you should do so, proceed with caution
and prudence using minimum speed.
Crossing Waves
Reduce speed.
Always be prepared to steer and balance
as necessary.
When crossing wakes, always keep a
safe distance from craft ahead.
WARNING
When crossing wakes, slow down.
Operator and passenger(s) can
brace themselves by posting. Do
not jump waves or wakes.
www.SeaDooManuals.net
smo2000-003a.book Page 47 Thursday, November 11, 1999 10:44 AM
Stopping/Docking
Beaching
The watercraft is slowed by water drag.
The stopping distance will vary depending on the craft size, weight, speed, water surface condition, presence and direction of wind and current.
CAUTION: It is not recommended to
run the watercraft to the beach.
Come slowly to the beach and shut off
the using the safety lanyard when water depth is 90 cm (3 ft) under the hull,
then pull the watercraft to the beach.
F01L50Y
The operator should become familiarized with the stopping distance under
different conditions.
Release the throttle at a sufficient distance before the expected landing area.
Reduce speed to idle.
Shift to neutral, reverse or forward, as
required.
F07A0EY
Shutting Off the Engine
WARNING
To keep watercraft directional control,
the engine should be running until the
watercraft is at idle.
To shut off the engine, completely release throttle lever and press the engine start/stop button. Remove safety
lanyard from watercraft.
Directional control is reduced when
throttle is released and lost when
engine is off.
WARNING
Should the engine be shut off, watercraft directional control is lost.
Never leave the safety lanyard on
an unattended watercraft in order
to avoid unauthorized use or theft.
www.SeaDooManuals.net
47
smo2000-003a.book Page 48 Thursday, November 11, 1999 10:44 AM
POST-OPERATION CARE
WARNING
Allow engine to cool before performing any maintenance.
Engine lubrication and flushing should
be performed when the watercraft is
not expected to be used further the
same day or when the watercraft is
stored for any extended time.
WARNING
General Care
Remove the watercraft from the water
every day to prevent marine organisms
growth.
Should any water be present in the hull,
unscrew the drain plugs and tilt the watercraft to the rear in order to allow water to flow out.
Wipe up any remaining fluid in the engine compartment (bilge, engine, battery, etc.) with clean dry rags (this is particularly important in salt water use).
Additional Care for Foul
Water or Salt Water
When the watercraft is operated in foul
water and particularly in salt water, additional care should be taken to protect
the watercraft and its components.
Rinse trailer and watercraft‘s bilge area
with fresh water.
CAUTION: Failure to perform proper
care such as: watercraft rinsing,
cooling system flushing and anticorrosion treatment, when watercraft is
used in salt water, will result in damage to the watercraft and its components. Never leave the watercraft
stored in direct sunlight.
Cooling System Flushing
and Engine Internal
Lubrication
General
Flushing the cooling system with fresh
water is essential to neutralize corroding effects of salt or other chemical
products present in water. It will help to
remove sand, salt, shells or other particles in water jackets (engine, exhaust
manifold, tuned pipe) and/or hoses.
48
Perform this operation in a well
ventilated area.
Proceed as follows:
Clean jet pump by spraying water in its
inlet and outlet and then apply a coating of BOMBARDIER LUBE lubricant
or equivalent.
Connect a garden hose to connector
located at the rear of watercraft on jet
pump support.
NOTE: A quick connect adapter can be
used (P/N 295 500 473). No hose pincher is required to flush engine.
F07E01Y
3
2
1
TYPICAL
1. Hose adapter
2. Quick connect adapter (not mandatory)
3. Garden hose
NOTE: The quick connect adapter may
be supplied with some models. It has
to be removed if you do not use a quick
connect adapter on your garden hose.
www.SeaDooManuals.net
smo2000-003a.book Page 49 Thursday, November 11, 1999 10:44 AM
Flushing
To flush cooling system, start the engine then immediately open the water
tap.
WARNING
Components inside engine compartment may be hot. Do not touch
any electrical parts or jet pump
area when engine is running.
CAUTION: Never flush a hot engine.
Always start the engine before
opening the water tap. Open water
tap immediately after engine is
started to prevent overheating.
Ensure water flows out of drain lines
(engine crankcase, engine cylinder and
air compressor (DI models) while
flushing. Otherwise, clean the lines.
Run the engine about 3 minutes at a
fast idle around 3500 RPM.
CAUTION: Never run engine longer
than 5 minutes. Drive line seal has no
cooling when watercraft is out of water.
Lubrication
Carburetor-Equipped Models
Spray BOMBARDIER LUBE lubricant
or equivalent, through hole of air intake
silencer keeping engine at fast idle
during one minute.
1
DI Models
Spray BOMBARDIER LUBE lubricant
or equivalent, through hole of air intake
silencer during one minute.
NOTE: An increase of engine RPM
may be noticed while spraying the lubricant in the air intake silencer.
F12F01Y
1
1. Partially pull tube out of air box to inject
BOMBARDIER LUBE lubricant or equivalent.
Push tube in when finished
Carburetor-Equipped Models
After approximately half a minute,
close fuel tank valve (if so equipped) to
run engine out of fuel while lubricating.
CAUTION: When engine begins to
run irregularly because of fuel starvation, immediately stop water flow
before engine dies.
Close the water tap then stop the engine.
CAUTION: Always close the water
tap before stopping the engine.
All Models
Final Steps
Disconnect the garden hose.
Remove spark plug cables and connect them on the grounding device.
WARNING
F02H0ZY
2
1. Air intake silencer
2. Spray BOMBARDIER LUBE here
A lway s use s pa rk plug cable
grounding device when removing
spark plugs.
www.SeaDooManuals.net
49
smo2000-003a.book Page 50 Thursday, November 11, 1999 10:44 AM
All Models
Apply anti-seize lubricant on spark plug
threads then reinstall them.
Reinstall plug on air intake silencer cover.
Properly reconnect spark plug cables
to spark plugs.
WARNING
F07H0AY
1
1. Grounding device
Remove both spark plugs and spray
BOMBARDIER LUBE lubricant or
equivalent into each cylinder.
Always reconnect spark plug cables at the sam e spark plugs
where they come from. The cable
coming out the edge of the electrical box must be connected to the
MAG side spark plug.
Carburetor-Equipped Models
Crank the engine a few turns to distribute the oil on cylinder wall.
Wipe up any residual water from the
engine.
DI Models
To prevent fuel to be injected in the engine and engine starting, proceed as
follows.
Depress the throttle lever at full throttle position and HOLD for cranking.
Crank the engine a few turns to distribute the oil on cylinder wall.
To prevent corrosion, spray a corrosion
inhibitor (salt water resistant) such as
BOMBARDIER LUBE lubricant or
equivalent over metallic components
in engine compartment.
Apply dielectric grease (salt water resistant) on battery posts and cable
connectors.
CAUTION: Never leave rags or tools
in the engine compartment or in the
bilge.
50
Anticorrosion Treatment
www.SeaDooManuals.net
smo2000-003a.book Page 51 Thursday, November 11, 1999 10:44 AM
SPECIAL PROCEDURES
Limp Home Mode
Engine Overheating
DI Models
Monitoring System
To assist you when using the watercraft, a system monitors the electronic
components of the fuel injection system and some components of the
electrical system. When a fault occurs,
it sends visual messages through the
information center and/or audible signals through a beeper to inform you of
a particular condition. Refer to the INFORMATION CENTER for the displayed messages and the TROUBLESHOOTING section for the beeper
coded signals chart.
All Models
If the monitoring beeper continuously
sounds, stop engine immediately.
Perform Jet Pump Water Intake and
Impeller Cleaning procedure described in this section.
Flush cooling system, refer to POSTOPERATION CARE.
If engine still overheats, refer to an authorized Sea-Doo dealer for servicing.
Limp Home Modes
Besides the signals as seen above, the
system may automatically set default
parameters to the MPEM to ensure
the adequate operation of the watercraft if a component of the fuel injection system is not operating properly.
Depending on the severity of the malfunction, the watercraft speed may be
reduced and not allowed to reach its
top speed as usual. In this case, letting
the engine returning at idle speed may
allow normal operation.
The engine RPM may be limited to idle
if some critical components fail. In this
case, removing and reinstalling the
safety lanyard on its switch may allow
normal operation.
These performance-reduced modes
allow the rider to go back home which
would not be possible without this advanced system. If this occurs, see an
authorized Sea-Doo dealer as soon as
possible for inspection.
Jet Pump Water Intake and
Impeller Cleaning
Weeds, shells or debris can get caught
on the intake grate, drive shaft and/or
impeller. A clogged water intake may
cause troubles such as:
1. Cavitation: Engine speed is high but
watercraft moves slowly due to reduced jet thrust, jet pump components may be damaged.
2. Overheating: Since the jet pump
operation controls the flow of water
to cool the engine, a clogged intake
will cause the engine to overheat
and damage engine internal components.
A weed clogged area can be cleaned
as follows:
WARNING
Always remove safety lanyard cap
from its switch to prevent accidental engine starting before cleaning
the jet pump area.
www.SeaDooManuals.net
51
smo2000-003a.book Page 52 Thursday, November 11, 1999 10:44 AM
In-Water Cleaning
Rock the watercraft several times while
repeatedly pressing engine start/stop
button for short period without starting
engine. Most of the time, this will remove the blockage. Start engine and
make sure water flows out from bleed
outlet and watercraft operates properly.
If system is still blocked, move the craft
out of the water and remove blockage
manually.
If the aforementioned method does not
work, the following can be performed:
– With engine running and before applying throttle, put shift lever in reverse position and vary throttle quickly several times.
– Repeat procedure if necessary.
On-Beach Water Cleaning
Place a cardboard or a carpet beside the
watercraft to prevent scratching when
turning the watercraft for cleaning.
Rotating watercraft in the proper direction eliminates the possibility of residual water in the tuned pipe entering the
engine and causing engine damage.
Rotate the watercraft clockwise (seen
from rear) to its right side for cleaning.
Capsized Watercraft
The watercraft is designed so that it
should not turn over easily. Also two
sponsons mounted on the side of the
hull assist watercraft stability. If it turns
over, it will remain capsized.
CAUTION: Always refer to decal located on stern of watercraft.
To return the watercraft upright, ensure the engine is off, grab the inlet
grate, step on bumper rail and use your
weight to rotate the watercraft counterclockwise (seen from rear).
F06L0DZ
Submerged Watercraft
If the watercraft is submerged and engine is water-flooded, it is strongly recommended that the watercraft be serviced by an authorized Sea-Doo dealer.
Water-Flooded Engine
In the event the engine cannot be serviced within a few hours, remove
spark plug cables and connect them
on the grounding device.
Max. 90°
WARNING
Never crank engine with spark
plugs removed unless spark plug
cables are connected to the grounding device.
F06L11Y
Clean the water intake area. If the system is still clogged, refer to an authorized Sea-Doo dealer for servicing.
CAUTION: Inspect water intake grate
for damage. Refer to an authorized
Sea-Doo dealer for repair as necessary.
52
Remove spark plugs and dry them
with a clean and dry cloth.
Cover spark plug holes with a rag.
www.SeaDooManuals.net
smo2000-003a.book Page 53 Thursday, November 11, 1999 10:44 AM
Carburetor-Equipped Models
Ensure choke lever is completely
pushed in.
DI Models
To prevent fuel to be injected in the engine and engine starting, proceed as
follows.
Depress the throttle lever at full throttle position and HOLD for cranking.
All Models
Crank engine several times to allow water to escape from spark plug openings.
DI Models
If water does not completely go out, it
may be necessary to remove the air intake silencer then to lean the vehicle so
that water can flow out from throttle
bodies.
All Models
Spray BOMBARDIER LUBE lubricant
or equivalent into spark plug holes.
Crank engine again.
Reinstall spark plugs. Install clean dry
spark plugs if possible. Reconnect cables.
WARNING
Always reconnect spark plug cables at the same spark plugs
where they come from. The cable
coming out the edge of the electrical box must be connected to the
MAG side spark plug.
Carburetor-Equipped Models
Install the safety lanyard cap on its
switch.
Ensure choke lever is completely pushed
in.
Depress the throttle lever at full throttle position and hold while starting the
engine. Try several times.
DI Models
To prevent fuel to be injected in the engine, proceed as follows.
Depress the throttle lever at full throttle position and HOLD for cranking.
Crank engine several times.
Carburetor-Equipped Models
As soon as the engine starts, release
throttle lever. Do not race engine.
All Models
If it does not work:
Remove spark plug cables and connect them on the grounding device.
WARNING
A lway s use s pa rk plug cable
grounding device when removing
spark plugs.
Remove spark plugs and dry them using
a rag.
Cover spark plug holes with a rag.
Crank engine several times.
Reinstall spark plugs. Install clean dry
spark plugs if possible. Reconnect cables.
Start engine normally.
Fuel-Flooded Engine
When the engine does not start after
several attempts, the engine may be
fuel-flooded. Proceed as follows.
WARNING
Always reconnect spark plug cables at the sam e spark plugs
where they come from. The cable
coming out the edge of the electrical box must be connected to the
MAG side spark plug.
Start engine as explained above. If engine continues to flood, see an authorized Sea-Doo dealer.
www.SeaDooManuals.net
53
smo2000-003a.book Page 54 Thursday, November 11, 1999 10:44 AM
Out of Fuel
DI Models
When running the engine out of fuel,
it may be necessary to remove and install the safety lanyard 2-3 times to initially feed the fuel system after fuel
tank refill.
Towing the Watercraft in
Water
All Models
Special precautions should be taken
when towing a Sea-Doo watercraft in
water.
Maximum recommended towing speed
is 24 km/h (15 MPH).
When towing your watercraft in water,
pinch the water supply hose from the
impeller housing to the engine with a
large hose pincher (P/N 529 032 500).
1
F12E01Y
CARBURETOR-EQUIPPED MODELS
1. Hose pincher on water supply hose on this
side of the T-fitting
F07E03Y
1
DI MODELS
1. Hose pincher on water supply hose
F01B23Y
This will prevent the cooling system
from filling which may lead to water being injected into and filling the exhaust
system. Without the engine running
there isn’t any exhaust pressure to carry the water out the exhaust outlet.
CAUTION: Failure to do this may result in damage to the engine. If you
must tow a stranded watercraft in
water and do not have a hose pincher, be sure to stay well below the
maximum towing speed of 24 km/h
(15 MPH).
Snugly install the hose pincher on the
water supply hose as shown.
54
CAUTION: When finished towing the
watercraft, hose pincher should be
removed before operating it. Failure
to do so will result in damage to the
engine.
Low-charge Battery
Condition
See an authorized Sea-Doo dealer to
have it charged or replaced.
WARNING
Do not charge or boost the battery
while installed on the watercraft.
www.SeaDooManuals.net
smo2000-003a.book Page 55 Thursday, November 11, 1999 10:44 AM
MAINTENANCE
Maintenance, replacement, or repair
of the emission control devices and
systems may be performed by any
marine SI (spark ignition) engine repair establishments or individual.
WARNING
Only perform procedures as detailed in this guide. It is recommended that the assistance of an
authorized Sea-Doo dealer be periodically obtained on other components/systems not covered in this
guide. Unless otherwise specified,
engine must not be running and the
safety lanyard must be removed
from its switch for all maintenance
procedures. Components inside
engine compartment may be hot.
Lubrication
Using a grease gun, carefully lubricate
PTO flywheel at grease fitting until
PTO flywheel boot begins to expand.
CAUTION: Immediately stop lubricating as soon as PTO flywheel boot
begins to expand to prevent damage
or slipping.
1
F01I0BZ
3
2
1. PTO flywheel
2. Grease fitting
3. PTO flywheel boot
Use SEA-DOO synthetic grease or
equivalent and lubricate PTO flywheel.
Proceed as follows:
Remove seat to expose engine compartment.
Remove vent tube support (if so
equipped).
Reinstall and secure PTO flywheel guard.
PTO Flywheel
Remove the fasteners and pull out PTO
flywheel guard.
Electrical Connections
As necessary, apply anticorrosion product such as dielectric grease on battery
posts and all exposed cable connectors.
CAUTION: Do not lubricate connectors of the Multi-Purpose Electronic
Module.
2
Anticorrosion Protection
Throttle/Choke Cables
Lubricate the throttle and choke cables
(if so equipped) with BOMBARDIER
LUBE lubricant or equivalent.
Additional Lubrication
BOMBARDIER LUBE lubricant or equivalent will help prevent corrosion of metallic parts and maintain proper operation of moving mechanisms.
F01I0AY
TYPICAL
1. Flywheel guard
2. Fasteners
WARNING
1
Do not lubricate the safety lanyard
post.
www.SeaDooManuals.net
55
smo2000-003a.book Page 56 Thursday, November 11, 1999 10:44 AM
Carburetor-Equipped Models
Choke Lever
Fully pull choke lever and lubricate the
metallic portion.
All Models
Seat Opening Mechanism, Tab,
Hook and Lock Pin
1
F01F07Y
TYPICAL
Reverse Gate
Lubricate pivoting points and mechanism.
2
Periodic Inspection
F01L7UY
Routine maintenance is necessary for
all mechanized products. A periodic inspection contributes to the product’s
life span.
The following maintenance chart gives
guidelines for regular watercraft servicing scheduled to be performed by
you and/or by an authorized Sea-Doo
dealer. The schedule should be adjusted according to operating conditions
and use.
IMPORTANT: Schedule for watercraft
rental operations or higher number of
hour use, will require greater frequency of inspection and maintenance.
1. Front tab
2. Rear mechanism
START
STOP
F01L51Y
TYPICAL
Carburetor/Throttle Body and Oil
Injection Pump
Lubricate springs, shafts and exposed
portion of cables.
NOTE: Grease carburetor linkage with
synthetic grease.
56
www.SeaDooManuals.net
smo2000-004b.fm Page 57 Monday, March 27, 2000 3:26 PM
Periodic Inspection Chart
LUBRICATION
SYSTEM
FUEL
SYSTEM
COOLING
SYSTEM
ENGINE
GENERAL
Lubrication/corrosion protection
EVERY 25
HOURS OR
3 MONTHS
EVERY 50
HOURS OR
6 MONTHS
EVERY 100
HOURS
OR 1 YEAR
TO BE
PERFORMED
BY
DESCRIPTION
FIRST 10
HOURS
FREQUENCY
➀
Support and rubber mount condition/tightness
✔
Exhaust system fasteners ➄
✔
RAVE valve cleaning ➄
Counterbalance shaft oil level
Spark plug inspection, cleaning and gap adjustment ➄ ➃ ✔
Spark plug replacement ➄
Ignition timing ➄ (for DI models)
➃✔
Air compressor, visual condition of hoses.
Check for leaks ➄
CAUTION: Main hose between compressor and
fuel rail may be hot.
Flushing
Hose condition and fasteners
✔
Inspect/clean engine drain tubes
Water flow regulator valve inspection
Carburetor adjustment including choke/throttle cable
adjustments (carburetor-equipped models)
Throttle/choke cables (carburetor-equipped
➀
models), inspection/lubrication
Fuel filter (carburetor-equipped models) and lines
✔
inspection
Fuel filter replacement
Direct injectors, check for leakage (DI models) ➄
✔
Fuel injection system sensors (except throttle body),
✔
visual inspection (DI models) ➄
Throttle body cleaning and their sensors
✔
(DI models) ➄ ➅
Fuel vent line pressure relief valve inspection
Fuel lines, connections (DI models), check-valve and
✔
fuel system pressurization ➄
Visual inspection: carburetors/throttle bodies, sensors,
✔
fuel lines, fuel rail and fittings (if so equipped) ➄
Air intake silencer fit/tightness
✔
Fuel tank straps visual inspection
✔
Oil injection pump adjustment ➄
✔
Oil filter and lines inspection
✔
✔
O
✔
✔
✔
✔
D
D
D
D
D
D
D
✔
✔
✔
✔
✔
D
✔➂
✔
O
D
O
D
✔
D
✔
✔➀
✔
O
✔
D
✔
D
D
✔
D
✔
✔
✔
D
✔
D
✔
D
✔
✔
✔
✔
✔
Oil reservoir straps
www.SeaDooManuals.net
D
D
✔
Oil filter replacement
D
O
D
O
57
smo2000-003a.book Page 58 Thursday, November 11, 1999 10:44 AM
ELECTRICAL
SYSTEM
STEERING
SYSTEM
Inspection and cable adjustment
Drive shaft boot and spline condition (if so equipped)
PTO flywheel lubrication
Shifter system/cable adjustment
VTS (Variable Trim System, if so equipped)
Jet pump reservoir oil level/oil condition
Replace
Jet pump cover pusher inspection
Impeller condition and impeller/wear ring clearance
Water intake grate condition
HULL AND
BODY
Electrical connections condition and fastening
(ignition system, electrical box(es), starting system,
fuel injectors (DI models), etc.)
MPEM mounting brackets/fasteners
Digitally Encoded Security System
Monitoring beeper
Battery condition and straps
PROPULSION
SYSTEM
EVERY 25
HOURS OR
3 MONTHS
EVERY 50
HOURS OR
6 MONTHS
EVERY 100
HOURS
OR 1 YEAR
TO BE
PERFORMED
BY
DESCRIPTION
FIRST 10
HOURS
FREQUENCY
Bailer pick-ups, check for obstructions
Hull condition
D
D
Replace
D
D
D
D
D
O
D
D
D
D
D
O
O
O
NOTE: Some items are included in the PRE-OPERATION CHECKS and not necessarily repeated in this chart.
D: Dealer
O: Operator
Every 10 hours in salt water use.
These items have to be initially checked after 25 hours. Thereafter, servicing
to be made as specified in this chart.
Daily flushing in salt water or foul water use.
Except DI models.
Emission-related component.
In salt water use.
58
www.SeaDooManuals.net
smo2000-003a.book Page 59 Thursday, November 11, 1999 10:44 AM
Throttle and Choke Cable
Inspection
Throttle Cable
Depress and release the throttle lever.
It should operate smoothly and return
to its initial position without any hesitation. Refer to an authorized Sea-Doo
dealer if necessary.
Carburetor-Equipped Models
Do not activate throttle lever unnecessarily, when engine is not running. Carburetors are equipped with fuel accelerator pumps. These pumps deliver
fuel to the engine each time throttle
lever is depressed.
All Models
WARNING
Do not alter or tamper with throttle cable adjustment or routing.
WARNING
Carburetor Adjustment
Carburetor adjustment is very important to allow good engine operation and
therefore watercraft performance. Carburetor adjustment requires technical
knowledge and experience to have the
correct mixture supplied to the engine.
CAUTION: Serious engine damage
can occur with improper carburetor
adjustment.
Fuel Injection System
DI Models
The fuel injection system inspection
should be performed by an authorized
Sea-Doo dealer.
CAUTION: Never use injector cleaning products. They may contain additives that could damage injector
components.
All Models
Fuel and Oil Filters
If throttle lever does not automatically return, do not operate watercraft and see your authorized SeaDoo dealer.
The fuel filter (carburetor-equipped
models) and the oil filter should be replaced by an authorized Sea-Doo dealer. Fuel system pressurization should
be conducted at the same time.
CAUTION: An obstructed oil filter
will cause oil starvation resulting in
serious engine damage.
Steering Alignment
1
F01K01Y
1. Should move freely
Carburetor-Equipped Models
Choke Cable
Ensure choke cable operates smoothly and without any hesitation from fully
opened to fully closed. When the
choke lever is fully pulled, choke
should be fully applied. Refer to an authorized Sea-Doo dealer if necessary.
When the handlebar is directed in
straight ahead position, the jet pump
nozzle should be in the same direction
allowing the watercraft to run in a
straight line.
Refer to an authorized Sea-Doo dealer
if an adjustment is necessary.
WARNING
Ensure the handlebar and jet
pump nozzle operate freely from
side to side and are not stressing
the steering cable or brackets.
www.SeaDooManuals.net
59
smo2000-003a.book Page 60 Thursday, November 11, 1999 10:44 AM
VTS Adjustment
(if so equipped)
Vacuum Bailer Pick-Ups
Push on arrow pointing upward on VTS
button until the VTS stops. The nozzle
should be up without interfering with
the venturi.
2
They are located each side of the drive
shaft tunnel.
Two pick-ups use a low pressure area in
the jet pump to siphon the water out of
the bilge when the engine is operating.
Inspect each pick-up screen for obstructions, clean as necessary.
3
1
F01J5CY
TYPICAL
1. Push on arrow pointing upward on VTS
button
2. No interference
3. Nozzle up
F01L7RY
Push on arrow pointing downward on
VTS button until VTS stops. The nozzle
must be down and it must not interfere with the venturi.
3
1
F01J5BY
2
1. Push on arrow pointing downward on VTS
button
2. No interference
3. Nozzle down
If VTS needs to be readjusted, refer to
an authorized Sea-Doo dealer.
CAUTION: Trim ring and/or nozzle
should not interfere at any position.
60
1
TYPICAL
1. Vacuum bailer pick-ups
Fuses
If an electrical problem occurs, check
the fuses. If a fuse is burnt, replace by
one of the same rating. Follow procedures below.
CAUTION: Do not use a higher rated
fuse as this can cause severe damage. If a fuse is regularly burnt, refer
to an authorized Sea-Doo dealer.
Fuses can be found at 2 locations; on
the MPEM and in the rear electrical box.
MPEM
To access fuses on the MPEM, open
front storage compartment cover and
remove storage basket.
Locate MPEM on the left side of watercraft.
Remove fuse cover from the MPEM.
www.SeaDooManuals.net
smo2000-003a.book Page 61 Thursday, November 11, 1999 10:44 AM
1
F12H01Y
F06H1SY
2
1
1. Rear electrical box
2. Remove vent tubes
2
TYPICAL
1. MPEM
2. Fuse cover
GTX DI Models
Use the tabs of the fuse cover to remove and reinstall fuses.
F07H07Z
F06H1TY
1
2
All Models
Unclip and remove cover of the electrical box.
1. Fuse cover
2. Fuse tabs
Rear Electrical Box
Remove seat.
RX/DI Models
Remove darts retaining tubes then pull
out both vent tubes each side of electrical box at rear of hull.
F12H02Y
1
TYPICAL
1. Fuse holder
All Models
Properly reinstall removed components.
www.SeaDooManuals.net
61
smo2000-003a.book Page 62 Thursday, November 11, 1999 10:44 AM
General Inspection and
Cleaning
Inspection
Check engine compartment for any
damage and fuel/oil injection systems
for leaks. Ensure all hose clamps are
properly secured and no hose is
cracked, kinked or presenting any other damage.
WARNING
If any gasoline leak and/or odor
are present, do not start the engine. Have the watercraft serviced
by an authorized Sea-Doo dealer.
Inspect muffler, battery, fuel tank and
oil reservoir fastening devices. Visually
check electrical connections for corrosion and tightness.
Inspect hull and jet pump water intake
grate for damage. Replace or have damaged parts repaired.
Cleaning
The bilge should be cleaned by an authorized Sea-Doo dealer to remove any
fuel/oil/electrolyte deposits and mildew.
Occasionally, wash the body with water and soap (only use mild detergent).
Remove any marine organisms from
engine and/or hull. Apply non-abrasive
wax such as silicone wax.
CAUTION: Never clean fiberglass
and plastic parts with strong detergent, degreasing agent, paint thinner, acetone, etc.
Stains may be removed from seat and
fiberglass with Knight’s Spray-Nine
from Korkay System Ltd or the equivalent.
Respect the environment by ensuring
fuel, oil or cleaning solutions do not
drain into the waterways.
62
www.SeaDooManuals.net
smo2000-003a.book Page 63 Thursday, November 11, 1999 10:44 AM
TRAILERING, STORAGE
AND PRE-SEASON PREPARATION
Trailering
Storage
WARNING
Always turn the fuel tank valve (if so
equipped) to OFF position when
trailering or docking the watercraft.
Check the applicable laws and regulations in your area concerning towing a
trailer, especially the following rules:
– brake system
– tow vehicle weight
– mirrors
Take the following precautions when
towing the watercraft:
Tie the watercraft to both bow and
stern (front/rear) eyelets so that it is
firmly retained on the trailer. Use additional tie-downs if necessary.
CAUTION: Do not route ropes or tiedowns over the seat as they could
produce permanent damage. Wrap
ropes or tie-downs with rags or similar protectors where they can touch
the watercraft body.
Ensure all storage compartment covers and seat are properly latched.
A SEA-DOO cover can protect the watercraft, particularly before driving on
dirt roads, to prevent dirt entry through
the air intake opening(s).
Observe trailering safety precautions.
Launching/Loading
Before launching the watercraft, ensure the bilge plugs are fully screwed.
After loading the watercraft, ensure
they are removed to drain bilge.
It is recommended that the watercraft
be serviced by an authorized Sea-Doo
dealer for storage but the following operations can be performed by you with
a minimum of tools.
CAUTION: Do not run the engine during the storage period.
Engine Draining
Check engine drain hose (lowest hose
of engine). Make sure there is no sand
or other particles in it and that it is not
obstructed so that water can exit the
engine. Clean hose and fitting as necessary.
CAUTION: Water in engine drain
hose should be free to flow out, otherwise water could be trapped in engine. Should water freeze in engine,
severe damage will occur. Check engine drain hose for obstructions.
Carburetor-Equipped Models
F07E0MY
1
1. Engine drain hose
www.SeaDooManuals.net
63
smo2000-003a.book Page 64 Thursday, November 11, 1999 10:44 AM
DI Models
Disconnect the quick connect fitting.
Press both tabs and pull fitting.
Propulsion System
Lubricant in jet pump reservoir should
be drained and reservoir cleaned. Refer to an authorized Sea-Doo dealer for
this operation.
Grease lubrication point(s) of propulsion
system as explained in MAINTENANCE
section.
Fuel System
SEA-DOO fuel stabilizer (or equivalent), can be added in fuel tank to prevent fuel deterioration and carburetor
gumming. Follow manufacturer’s instructions for proper use.
CAUTION: Fuel stabilizer should be
added prior to engine lubrication to
ensure carburetor protection against
varnish deposits.
F07E0HY
WARNING
DISCONNECT THIS HOSE
Lower hose as necessary so that draining can take place.
Reconnect fitting when done.
Also ensure air compressor drain line
is not obstructed. Clean as necessary.
All Models
Body Rinsing/Repair
Wash the body with soap and water solution (only use mild detergent). Rinse
thoroughly with fresh water. Remove
marine organisms from the hull.
CAUTION: Never clean fiberglass
and plastic parts with strong detergent, degreasing agent, paint thinner, acetone, etc.
For small gelcoat repairs, a Bombardier repair kit is available. Refer to an
authorized Sea-Doo dealer. Replace
damaged labels/decals.
64
Fuel is flammable and explosive
under certain conditions. Always
work in a well ventilated area. Always wipe off any fuel spillage
from the watercraft. Always turn
the fuel tank valve (if so equipped)
to OFF position when storing the
watercraft.
Cooling System Flushing and
Engine Internal Lubrication
Refer to procedure in POST-OPERATION
CARE.
Battery
Contact your authorized Sea-Doo dealer.
Antifreezing Protection
NOTE: This procedure requires approximately 2.5 L (2.6 US qt.) of antifreeze.
In cool regions where freezing point
may be encountered, cooling system
should be filled with an equal part of
water and antifreeze solution.
www.SeaDooManuals.net
smo2000-003a.book Page 65 Thursday, November 11, 1999 10:44 AM
CAUTION: Antifreeze mix must be
fed in cooling system. Otherwise remaining water will freeze. This operation requires a good technical
knowledge of the cooling system
path. If antifreezing is not performed
adequately engine/exhaust system
may freeze and cause severe engine
damage. We strongly recommend
this operation be performed by an
authorized Sea-Doo dealer.
CAUTION: Always use ethylene glycol antifreeze containing corrosion
inhibitors specifically recommended
for aluminum engines.
NOTE: When available, it is recommended to use biodegradable antifreeze compatible with internal combustion aluminum engines. This will
contribute to protect the environment
NOTE: The engine will not have to run
during this operation but should have
been ran before to exhaust water from
cooling system components.
Hose Pinchers Installation
Some hoses have to be plugged to
prevent draining, before filling cooling
system jackets with the antifreeze.
Carburetor-Equipped Models
Install hose pinchers at the following
location:
F12E02Y
1
1
F07E0JY
1. Engine cylinder drain hose
1
F12E04Y
1. Tuned pipe bleed hose
Disconnect water INLET hose where
shown.
F12E03Y
1
1. Disconnect hose this side of T-fitting
1. Water outlet hose
www.SeaDooManuals.net
65
smo2000-003B.fm Page 66 Wednesday, November 17, 1999 8:18 AM
Antifreeze
Insert a funnel into hose and pour antifreeze mix in engine until the colored
solution appears at cooling system
bleed outlet (LH side of hull).
DI Models
Install hose pinchers at the following
location:
F07E0QY
F07E0LY
At this point, remove the hose pincher
at tuned pipe bleed hose. If necessary,
continue to pour antifreeze mix until
the colored solution appears at the
other cooling system bleed outlet
(stern eyelet).
Remove the remaining hose pinchers
in this order to allow proper flow of antifreeze.
1. Engine cylinder drain hose.
2. Water outlet hose.
Pour approximately 200 mL (7 oz) of
antifreeze in the water regulator valve
supply hose to allow antifreeze flowing through the valve and into muffler
to protect it.
Reconnect hose to T-fitting.
1
2
1. Air compressor water outlet hose
2. Water supply hose (largest hose)
F07E0JY
1
1. Engine cylinder drain hose
1
F07E0RY
1. Disconnect this hose here
66
www.SeaDooManuals.net
smo2000-003B.fm Page 67 Wednesday, November 17, 1999 8:18 AM
Disconnect water OUTLET hose at engine as shown in previous illustration.
Temporarily install a short piece of hose
to replace the one removed.
Antifreeze
Insert a funnel into the temporary hose
and pour antifreeze mix in engine until
the colored solution appears at cooling
system bleed outlet.
1
F07E0NY
1. Engine drain hose
F07E0LY
At this point, install a hose pincher on
bleed outlet hose.
Remove pinchers in this order to allow
proper flow of antifreeze.
1. Bleed outlet hose.
2. Air compressor water outlet.
3. Engine cylinder drain hose.
Remove temporary hose and reconnect engine water outlet hose.
Remove water regulator valve supply
hose.
1
F07E0OY
F07E0PY
1. Bleed outlet hose
Continue to pour until antifreeze flows
in engine drain hose.
2
1
1. Water regulator valve
2. Supply hose
Temporarily install a short piece of hose
to replace the one removed.
www.SeaDooManuals.net
67
smo2000-003B.fm Page 68 Wednesday, November 17, 1999 8:18 AM
Pour approximately 200 mL (7 oz) of
antifreeze in hose. This will protect the
valve and the muffler.
Remove temporary hose and reconnect hose to valve.
All Models
Most of the antifreeze will drain out
when removing the hose pinchers. Use
a container to recover it. DISPOSE ANTIFREEZE AS PER YOUR LOCAL LAWS
AND REGULATIONS.
NOTE: Although antifreeze will mainly
drain out, the antifreeze has mixed with
the water that was possibly trapped in
the water jackets and thus preventing
freezing problems.
At pre-season preparation, drain the
remaining antifreeze from cooling system prior to using the watercraft.
The following steps should be performed to provide the watercraft enhanced protection.
Clean the bilge with hot water and detergent or with bilge cleaner. Rinse
thoroughly. Lift front end of watercraft
to completely drain bilge. If any repairs
are needed to body or to the hull contact your authorized Sea-Doo dealer.
For paint touch up to mechanical parts
use Bombardier spray paint.
Reinstall vent tube support (if applicable).
Anticorrosion Treatment
Wipe off any residual water in the engine compartment.
Spray BOMBARDIER LUBE lubricant
or equivalent over metallic components in engine compartment.
Final Steps
Apply a good quality marine wax to the
body.
The seat and the seat extension (if so
equipped) should be partially left
opened, and storage baskets (if so
equipped) should be removed during
storage. This will avoid engine compartment condensation and possible
corrosion.
If the watercraft is to be stored outside, cover it with an opaque tarpaulin
to prevent sun rays and grime from affecting the plastic components, watercraft finish as well as preventing dust
accumulation.
CAUTION: The watercraft should
never be left in water for storage.
Never leave the watercraft stored in
direct sunlight.
Pre-Season Preparation
Use the following chart.
Since technical skills and special tools
are required, some operations should
be performed by an authorized SeaDoo dealer.
WARNING
Observe all WARNINGS and CAUTIONS mentioned throughout this
guide which are pertinent to the
item being checked. When component conditions seem less than
satisfactory, replace with genuine
BOMBARDIER parts or approved
equivalents.
WARNING
Do not lubricate the safety lanyard
post.
Lubricate the throttle cable with BOMBARDIER LUBE lubricant or equivalent.
68
www.SeaDooManuals.net
smo2000-003a.book Page 69 Thursday, November 11, 1999 10:44 AM
Pre-Season Preparation Chart
NOTE: It is highly recommended that an authorized Sea-Doo dealer perform the
annual safety inspection and factory campaigns in addition to the pre-season
preparation all at the same time.
OPERATIONS
GENERAL
ENGINE
Lubrication/corrosion protection
Spark plug replacement Operator
Dealer
Exhaust system condition (fasteners, hoses etc)
Dealer
RAVE valve cleaning
Dealer
Counterbalance shaft oil level
Dealer
Ignition timing
Dealer
Air compressor, visual condition of hoses. Check for leaks CAUTION: Main hose between compressor and fuel rail
may be hot.
COOLING SYSTEM Inspection of cooling system hoses and components
Carburetor adjustment (carburetor-equipped models)
FUEL SYSTEM
TO BE
PERFORMED
BY
Dealer
Dealer
Dealer
Throttle and choke (carburetor-equipped models) cable
inspection/adjustment
Dealer
Fuel filter replacement (carburetor-equipped models)
Dealer
Fuel injection sensors verification (DI models)
Dealer
Fuel system; check valves, lines, fasteners, pressurization Direct injector, check for leakage (DI models) Filler neck, fuel tank and fuel cap condition Fuel tank straps
Dealer
Dealer
Dealer
Operator
Refill fuel tank
Oil injection pump adjustment
Oil filter replacement
LUBRICATION
SYSTEM
ELECTRICAL
SYSTEM
STEERING
SYSTEM
PROPULSION
SYSTEM
HULL AND BODY
Dealer
Dealer
Oil injection reservoir straps
Operator
Oil injection reservoir filling
Operator
Oil injection pump adjustment and bleeding
Dealer
Battery condition/charging and reinstallation
Dealer
Battery, starter connections and routing Dealer
Monitoring beeper
Dealer
Digitally encoded security system
Dealer
Steering system adjustment/inspection Dealer
Shifter system condition and cable adjustment (if so equipped)
Dealer
VTS (Variable Trim System, if so equipped)
Dealer
Propulsion system inspection
Dealer
Jet pump oil replacement
Dealer
Inspection of bailer pick-ups
Dealer
Before installing new spark plugs, it is suggested to burn the excess BOMBARDIER
LUBE lubricant or equivalent by starting the engine using the old spark plugs.
Safety item covered in the annual safety inspection.
www.SeaDooManuals.net
69
smo2000-003a.book Page 70 Thursday, November 11, 1999 10:44 AM
TROUBLESHOOTING
The following chart is provided to help in diagnosing the probable source of simple
troubles. You may be able to solve many of these problems rather quickly, but
others may require the skills of a mechanical technician. In such cases, consult
an authorized Sea-Doo dealer for servicing.
Monitoring Beeper Coded Signals
CODED SIGNALS
POSSIBLE CAUSE
• Confirms safety lanyard
signal operation.
REMEDY
• Safety lanyard on switch
for more than 10 minutes
without starting engine.
Apply a slight pressure or remove
and reinstall safety lanyard on
switch.
• Bad connection.
Reinstall safety lanyard cap correctly
over switch.
• Wrong safety lanyard.
Use a safety lanyard that has been
programmed for the watercraft.
• Defective safety lanyard.
Use another programmed safety
lanyard.
• Dried salt water in safety
lanyard cap.
Clean safety lanyard cap to remove
salt water.
• Improper operation of
MPEM or defective
wiring harness.
• Exhaust system
overheat.
Refer to an authorized Sea-Doo
dealer.
• Fuel tank level is low.
Refill as soon as possible.
• Very low battery voltage.
Refer to an authorized Sea-Doo
dealer.
• Coolant and exhaust gas
temperature sensors or
TPS (throttle position
sensor) or CPS
(crankshaft position
sensor) malfunction.
• MPEM malfunction.
Refer to an authorized Sea-Doo
dealer.
A 2 seconds beep every
15 minutes intervals
(DI models).
• Oil injection reservoir
level is low.
Refill.
8 short beeps (carburetorequipped models).
• Defective MPEM.
Refer to an authorized Sea-Doo
dealer.
Continuously beeps.
• Engine overheats.
See engine OVERHEATING.
2 short beeps
(while installing safety
lanyard on switch).
1 long beep
(while installing safety
lanyard on watercraft
switch or when pressing
engine start/stop button).
A 2 seconds beep every
2 seconds intervals
(DI models).
A 2 seconds beep every
minute intervals
(DI models).
70
Engine can be started.
See engine OVERHEATING.
Refer to an authorized Sea-Doo
dealer.
www.SeaDooManuals.net
smo2000-003a.book Page 71 Thursday, November 11, 1999 10:44 AM
Engine Will Not Start
OTHER OBSERVATION
POSSIBLE CAUSE
• Safety lanyard removed.
REMEDY
• Burnt fuse(s).
Check wiring then replace fuse(s).
• Discharged battery.
Refer to an authorized Sea-Doo
dealer.
• Battery connections,
corroded or loose.
Refer to an authorized Sea-Doo
dealer.
• Water-flooded engine.
Refer to Water-Flooded Engine in
SPECIAL PROCEDURES.
• MPEM malfunction.
Refer to an authorized Sea-Doo
dealer.
Engine turns slowly.
• Discharged or weak
battery.
Refer to an authorized Sea-Doo
dealer.
Engine turns normally.
• Closed fuel tank valve
(carburetor-equipped
models).
• Fuel tank empty or watercontaminated.
• Fuel filter clogged or
water-contaminated
(carburetor-equipped
models).
• Fouled/defective spark
plugs.
• Misuse of choke
(carburetor-equipped
models).
• Fuel-flooded engine.
Turn fuel tank valve to ON position.
• Fuel rail/air compressor
malfunction (DI models).
Refer to an authorized Sea-Doo
dealer.
• Burnt fuel pump fuse
(DI models).
• Electrical problem
(DI models).
Check wiring then replace fuse.
Engine does not turn over.
www.SeaDooManuals.net
Install cap over switch.
Refill. Siphon and fill with fresh fuel.
Clean, check fuel tank for water.
Replace.
Use only with cold engine. Replace
spark plugs.
Refer to Fuel-Flooded Engine in
SPECIAL PROCEDURES.
Refer to an authorized Sea-Doo
dealer.
71
smo2000-003a.book Page 72 Thursday, November 11, 1999 10:44 AM
Engine Misfires, Runs Irregularly
OTHER OBSERVATION
Weak spark.
Lean fuel mixture.
Rich fuel mixture
(high fuel consumption).
POSSIBLE CAUSE
• Fouled/defective/worn
spark plugs.
• Faulty rev limiter
(carburetor-equipped
models).
• Too much oil supplied to
engine.
• Fuel: Level too low, stale or
water-contaminated.
• Fuel filter, clogged or watercontaminated (carburetorequipped models).
• Fuel tank valve
(carburetor-equipped
models) partially open.
• Clogged injectors
(DI models).
• Defective sensor or MPEM
(DI models).
• Flame arrester dirty/clogged
(if so equipped).
• Partially closed choke
(carburetor-equipped
models).
• Defective sensor or MPEM
(DI models).
REMEDY
Replace.
Refer to an authorized Sea-Doo
dealer.
Improper oil pump adjustment,
refer to an authorized Sea-Doo
dealer.
Siphon and/or refill.
Refer to an authorized Sea-Doo
dealer.
Turn fuel tank valve to ON position.
Refer to an authorized Sea-Doo
dealer.
Refer to an authorized Sea-Doo
dealer.
Clean or replace.
Refer to an authorized Sea-Doo
dealer.
Refer to an authorized Sea-Doo
dealer.
Engine Overheats
OTHER OBSERVATION
Monitoring beeper sounds
continuously.
POSSIBLE CAUSE
• Clogged jet pump water
intake.
• Clogged coolant system.
REMEDY
Clean.
Flush cooling system.
Engine Continually Backfires
OTHER OBSERVATION
Weak spark.
Overheated engine.
POSSIBLE CAUSE
• Fouled/defective/worn
spark plugs.
• See engine OVERHEATS.
REMEDY
Replace.
Refer to an authorized Sea-Doo
dealer.
• Faulty rev limiter
(carburetor-equipped
models).
Engine Pinging or Knocking
OTHER OBSERVATION
72
POSSIBLE CAUSE
• Poor quality gasoline/low
octane.
• Spark plug heat range too
high.
• Ignition timing.
www.SeaDooManuals.net
REMEDY
Use well known quality and
recommended gasoline.
Use recommended spark plugs.
Refer to an authorized Sea-Doo
dealer.
smo2000-003a.book Page 73 Thursday, November 11, 1999 10:44 AM
Engine Lacks Acceleration or Power
OTHER OBSERVATION
Overheated engine.
POSSIBLE CAUSE
• Weak spark.
REMEDY
• Incorrect fuel mixture
(carburetor-equipped
models).
• Water in fuel or injection
oil.
• See engine OVERHEATS.
Refer to engine MISFIRES, RUNS
IRREGULARLY.
• Clogged injectors
(DI models).
Refer to an authorized Sea-Doo
dealer.
• Low fuel pressure
(DI models).
Refer to an authorized Sea-Doo
dealer.
• Stuck RAVE valves.
Refer to an authorized Sea-Doo
dealer.
Refer to engine MISFIRES, RUNS
IRREGULARLY.
Siphon and replace.
Watercraft Engine Cannot Run Above Idle Speed
OTHER OBSERVATION
POSSIBLE CAUSE
• The monitoring system
put the watercraft in limp
home mode due to a
component malfunction
(DI models).
REMEDY
Try removing and reinstalling the
safety lanyard on its switch. Refer to
an authorized Sea-Doo dealer.
Watercraft Can Not Reach Top Speed
OTHER OBSERVATION
Cavitation.
POSSIBLE CAUSE
• Jet pump water intake
clogged.
• Damaged impeller.
REMEDY
• The safety lanyard used
purposely does not allow
watercraft top speed
(DI models).
• The monitoring system
put the watercraft in limp
home mode due to a
component malfunction
(DI models).
Use a safety lanyard that allows to
reach the top speed.
Clean.
Replace. Refer to an authorized SeaDoo dealer.
Release throttle so that engine
returns to idle speed. Refer to an
authorized Sea-Doo dealer.
Abnormal Noise From Propulsion System
OTHER OBSERVATION
Cavitation.
POSSIBLE CAUSE
• Weeds or debris jammed
around impeller.
• Damaged impeller shaft
or drive shaft.
www.SeaDooManuals.net
REMEDY
Clean and check for damage.
Refer to an authorized Sea-Doo
dealer.
73
smo2000-003b.fm Page 74 Thursday, January 20, 2000 8:57 AM
SPECIFICATIONS
ENGINE
RX (5513/5514)
Engine type
Rotax 947, 2-stroke
Induction type
Reed valve
Water cooled/water
injected with regulator
Exhaust system
Exhaust valve
Rotax Adjustable Variable Exhaust (RAVE)
Type
Lubrication
RX DI (5646/5656)
Oil injection
Formula XP-S
synthetic injection oil
Oil type
Formula XP-S DI
synthetic injection oil
Number of cylinders
2
951.2 cm3 (58 in3)
Displacement
Rev limiter setting
7200 RPM ± 50
COOLING
Open circuit.
Direct flow from propulsion unit.
Type
ELECTRICAL
Magneto generator output
180 W @ 6000 RPM
270 W @ 6000 RPM
Digital CDI
Digital inductive type
Make and type
NGK, BR8ES
NGK, ZFR4F-11
Gap
0.5 - 0.6 mm
(.020 - .024 in)
1.1 mm
(.043 in)
Ignition system type
Spark plug
Starting system
Electric starter with reduction gear
Battery
12 V, 19 A•h
MPEM
5A
Electrical system
Fuse
1 x 15 A
2 x 25 A
2 x 15 A
VTS system
7.5 A
Fuel pump
N.A.
Information center
10 A
1A
CARBURETION
Fuel type
Unleaded regular gasoline with 87 octane (R+M)/2
Carburetor/ fuel injection
BN 46i (diaphragm).
Fuel accelerator pump.
Quantity: 2
N.A.: Not Applicable.
74
www.SeaDooManuals.net
Orbital direct fuel
injection,
twin throttle body
(46 mm (1.81 in))
smo2000-003a.book Page 75 Thursday, November 11, 1999 10:44 AM
PROPULSION
RX (5513/5514)
Propulsion system
RX DI (5646/5656)
Bombardier Formula pump
Jet pump type
Axial flow, single stage
Transmission
Direct drive
SEA-DOO synthetic polyolester oil
SAE 75W90 GL5
Jet pump oil type
Pivoting angle of direction (nozzle)
~ 20°
Minimum required water
level for jet pump
DIMENSIONS
Number of passengers
90 cm (3 ft)
2
Overall length
286 cm (113 in)
Overall width
120 cm (47 in)
Overall height
104 cm (41 in)
Weight
275 kg (605 lb)
Load limit (passengers + luggage)
181 kg (350 lb)
CAPACITIES
Fuel tank
56.5 L (15 U.S. gal)
Oil injection tank
Impeller shaft
reservoir
6 L (1.6 U.S. gal)
Capacity
115 mL (3.8 U.S. oz)
Oil level
Up to plug
Refer to load limit.
BOMBARDIER INC. reserves the right to make changes in design and specifications and/or to make additions to, or improvements in its products without imposing any obligation upon itself to install them on its products previously manufactured.
www.SeaDooManuals.net
75
smo2000-003b.fm Page 76 Thursday, January 20, 2000 8:57 AM
ENGINE
GTX DI (5649/5659)
Engine type
Rotax 947, 2-stroke
Induction type
Reed valve
Water cooled/water
injected with regulator
Exhaust system
Exhaust valve
Lubrication
Rotax Adjustable Variable Exhaust (RAVE)
Type
Oil injection
Oil type
Formula XP-S DI synthetic injection oil
Number of cylinders
2
Displacement
951.2 cm3 (58 in3)
Rev limiter setting
7200 (± 50) RPM
COOLING SYSTEM
Open circuit.
Direct flow from propulsion unit
Type
ELECTRICAL SYSTEM
Magneto generator output
270 W @ 6000 RPM
Ignition system type
Digital inductive type
Spark plug
Make and type
Gap
NGK, ZFR4F-11
1.1 mm (.043 in)
Starting system
Electric starter with reduction gear
Battery
12 V, 19 A•h
MPEM
Fuse
5A
Electrical
system
1 x 15 A
2 x 25 A
Fuel pump
10 A
Information
center
1A
FUEL SYSTEM
Unleaded regular gasoline with 87 octane
(R+M)/2
Fuel type
Orbital Direct Fuel Injection,
twin throttle body (46 mm (1.81 in))
Fuel injection
PROPULSION
Propulsion system
Bombardier Formula pump
Jet pump type
Axial flow, single stage
Transmission
Direct drive
SEA-DOO jet pump synthetic
polyolester oil SAE 75W90 GL5
Impeller shaft reservoir oil type
Pivoting angle of direction (nozzle)
Minimum required water
level for jet pump
76
~ 20°
90 cm (3 ft)
www.SeaDooManuals.net
smo2000-003a.book Page 77 Thursday, November 11, 1999 10:44 AM
DIMENSIONS
Number of passengers
GTX DI (5649/5659)
3
Overall length
315 cm (124 in)
Overall width
107 cm (42 in)
Overall height
94 cm (37 in)
Weight
309 kg (680 lb)
Load limit (passengers + luggage)
243 kg (535 lb)
CAPACITIES
Fuel tank
Impeller shaft
reservoir
56.5 L (15 U.S. gal)
Capacity
115 mL (3.8 U.S. oz)
Oil level
Up to plug
Oil injection reservoir
6 L (1.6 U.S. gal)
Refer to load limit.
BOMBARDIER INC. reserves the right to make changes in design and specifications and/or to make additions to, or improvements in its products without imposing any obligation upon itself to install them on its products previously manufactured.
www.SeaDooManuals.net
77
smo2000-003a.book Page 78 Thursday, November 11, 1999 10:44 AM
SI* METRIC INFORMATION
BASE UNITS
DESCRIPTION
length ..................................................
mass....................................................
force ....................................................
liquid ....................................................
temperature.........................................
pressure ..............................................
torque ..................................................
land velocity.........................................
navigation velocity ...............................
UNIT
meter..................................
kilogram ..............................
newton ...............................
liter .....................................
Celsius................................
kilopascal ............................
newton-meter.....................
kilometer per hour ..............
knot ....................................
SYMBOL
m
kg
N
L
°C
kPa
N•m
km/h
kn
PREFIXES
PREFIX
kilo .......................
centi ....................
milli ......................
micro ...................
SYMBOL
k.........................
c.........................
m .......................
µ.........................
MEANING
one thousand......................
one hundredth of ................
one thousandth of ..............
one millionth of...................
VALUE
1000
0.01
0.001
0.000001
CONVERSION FACTORS
TO CONVERT
in .........................................................
in .........................................................
in² ........................................................
in³ ........................................................
ft ..........................................................
oz.........................................................
lb .........................................................
lbf ........................................................
lbf•in ...................................................
lbf•ft ....................................................
lbf•ft ....................................................
PSI .......................................................
imp. oz.................................................
imp. oz.................................................
imp. gal................................................
imp. gal................................................
U.S. oz .................................................
U.S. gal ................................................
knot .....................................................
MPH ....................................................
Fahrenheit ...........................................
Celsius.................................................
hp ........................................................
TO mm .....................................
cm ......................................
cm² .....................................
cm³ .....................................
m ........................................
g .........................................
kg........................................
N .........................................
N•m ....................................
N•m ....................................
lbf•in ..................................
kPa......................................
U.S. oz ................................
mL ......................................
U.S. gal ...............................
L .........................................
mL ......................................
L .........................................
MPH ...................................
km/h ...................................
Celsius................................
Fahrenheit ..........................
kW ......................................
MULTIPLY BY
25.4
2.54
6.45
16.39
0.3
28.35
0.45
4.4
0.11
1.36
12
6.89
0.96
28.41
1.2
4.55
29.57
3.79
1.15
1.61
(°F - 32) ÷ 1.8
(°C x 1.8) + 32
.75
* The international system of units abbreviates SI in all languages.
To obtain the reverse sequence, divide by the given factor. Example: to convert
millimeters to inches, divide by 25.4.
NOTE: Conversion factors are rounded off to 2 decimals for easier use.
78
www.SeaDooManuals.net
smo2000-003a.book Page 79 Thursday, November 11, 1999 10:44 AM
ABBREVIATIONS USED IN THIS MANUAL
DESCRIPTION
AC
Alternate current
CDI
Capacitor discharge ignition
DC
Direct current
DESS
Digitally encoded security
system
DI
Direct injection
ECU
Electronic control unit
E.I.N.
Engine identification number
HP
Horse power
LCD
Liquid crystal display
LED
Light-emitting diode
MAG
Magneto
MPEM
Multi-purpose electronic
module
MPH
Mile per hour
N.A.
Not applicable
OPT
Optional
PFD
Personal flotation device
P/N
Part number
PTO
Power take off
RAVE
Rotax adjustable variable
exhaust
RFI
Rotax fuel injection
STD
Standard
VROI
Variable rate oil injection
VTS
Variable trim system
www.SeaDooManuals.net
79
smo2000-003a.book Page 80 Thursday, November 11, 1999 10:44 AM
MODEL No. _______________________________________________________
HULL
IDENTIFICATION NUMBER (H.I.N.) __________________________________
ENGINE
IDENTIFICATION NUMBER (E.I.N.) __________________________________
IDENTIFICATION NUMBER (E.I.N.)
Purchase Date
year
month
day
year
month
day
Warranty Expiry Date
To be completed by the authorized Sea-Doo dealer at the time of the sale
DEALER IMPRINT AREA
Please verify with your selling dealer to ensure your SEA-DOO watercraft
has been registered with Bombardier.
80
www.SeaDooManuals.net
smo2000-003a.book Page 81 Thursday, November 11, 1999 10:44 AM
CHANGE OF ADDRESS
If your address has changed, be sure to fill out and mail the card provided on this
page.
Such notification is likewise necessary for your own safety even after expiration
of the original warranty, since Bombardier will be in a position to contact you if
correction to your watercraft becomes necessary.
NOTE: This card is strictly for change of address only.
CHANGE OF ADDRESS
CHANGE OF ADDRESS
WATERCRAFT IDENTIFICATION NUMBERS
Model Number
Hull Identification Number (H.I.N.)
OLD ADDRESS: ______________________________________________
NAME
________________________________________________________________
NO.
STREET
APT
________________________________________________________________
CITY
STATE/PROVINCE
ZIP/POSTAL CODE
NEW ADDRESS: ______________________________________________
NAME
________________________________________________________________
NO.
STREET
APT
________________________________________________________________
CITY
STATE/PROVINCE
ZIP/POSTAL CODE
STOLEN UNITS
In the event that your watercraft is stolen, you should notify your area’s distributor
warranty department of such.
Please provide your name, address, phone number, Hull Identification Number and
date it was stolen.
Bombardier will provide a list of stolen units to all authorized Sea-Doo dealers on a
monthly basis to aid in recovery of such units to their owners.
www.SeaDooManuals.net
81
smo2000-003a.book Page 82 Thursday, November 11, 1999 10:44 AM
CHANGE OF ADDRESS
If your address has changed, be sure to fill out and mail the card provided on this
page.
Such notification is likewise necessary for your own safety even after expiration
of the original warranty, since Bombardier will be in a position to contact you if
correction to your watercraft becomes necessary.
NOTE: This card is strictly for change of address only.
CHANGE OF ADDRESS
AFFIX
PROPER
POSTAGE
BOMBARDIER
RECREATIONAL PRODUCTS
WARRANTY DEPARTMENT
75, J.A. BOMBARDIER ST.
SHERBROOKE (QUEBEC)
CANADA J1L 1W3
www.SeaDooManuals.net
smo2000-003a.book Page 83 Thursday, November 11, 1999 10:44 AM
CHANGE OF ADDRESS
If your address has changed, be sure to fill out and mail the card provided on this
page.
Such notification is likewise necessary for your own safety even after expiration
of the original warranty, since Bombardier will be in a position to contact you if
correction to your watercraft becomes necessary.
NOTE: This card is strictly for change of address only.
CHANGE OF ADDRESS
CHANGE OF ADDRESS
WATERCRAFT IDENTIFICATION NUMBERS
Model Number
Hull Identification Number (H.I.N.)
OLD ADDRESS: ______________________________________________
NAME
________________________________________________________________
NO.
STREET
APT
________________________________________________________________
CITY
STATE/PROVINCE
ZIP/POSTAL CODE
NEW ADDRESS: ______________________________________________
NAME
________________________________________________________________
NO.
STREET
APT
________________________________________________________________
CITY
STATE/PROVINCE
ZIP/POSTAL CODE
STOLEN UNITS
In the event that your watercraft is stolen, you should notify your area’s distributor
warranty department of such.
Please provide your name, address, phone number, Hull Identification Number and
date it was stolen.
Bombardier will provide a list of stolen units to all authorized Sea-Doo dealers on a
monthly basis to aid in recovery of such units to their owners.
www.SeaDooManuals.net
83
smo2000-003a.book Page 84 Thursday, November 11, 1999 10:44 AM
CHANGE OF ADDRESS
If your address has changed, be sure to fill out and mail the card provided on this
page.
Such notification is likewise necessary for your own safety even after expiration
of the original warranty, since Bombardier will be in a position to contact you if
correction to your watercraft becomes necessary.
NOTE: This card is strictly for change of address only.
CHANGE OF ADDRESS
AFFIX
PROPER
POSTAGE
BOMBARDIER
RECREATIONAL PRODUCTS
WARRANTY DEPARTMENT
75, J.A. BOMBARDIER ST.
SHERBROOKE (QUEBEC)
CANADA J1L 1W3
www.SeaDooManuals.net
smo2000-003a.book Page 85 Thursday, November 11, 1999 10:44 AM
CHANGE OF ADDRESS
If your address has changed, be sure to fill out and mail the card provided on this
page.
Such notification is likewise necessary for your own safety even after expiration
of the original warranty, since Bombardier will be in a position to contact you if
correction to your watercraft becomes necessary.
NOTE: This card is strictly for change of address only.
CHANGE OF ADDRESS
CHANGE OF ADDRESS
WATERCRAFT IDENTIFICATION NUMBERS
Model Number
Hull Identification Number (H.I.N.)
OLD ADDRESS: ______________________________________________
NAME
________________________________________________________________
NO.
STREET
APT
________________________________________________________________
CITY
STATE/PROVINCE
ZIP/POSTAL CODE
NEW ADDRESS: ______________________________________________
NAME
________________________________________________________________
NO.
STREET
APT
________________________________________________________________
CITY
STATE/PROVINCE
ZIP/POSTAL CODE
STOLEN UNITS
In the event that your watercraft is stolen, you should notify your area’s distributor
warranty department of such.
Please provide your name, address, phone number, Hull Identification Number and
date it was stolen.
Bombardier will provide a list of stolen units to all authorized Sea-Doo dealers on a
monthly basis to aid in recovery of such units to their owners.
www.SeaDooManuals.net
85
smo2000-003a.book Page 86 Thursday, November 11, 1999 10:44 AM
CHANGE OF ADDRESS
If your address has changed, be sure to fill out and mail the card provided on this
page.
Such notification is likewise necessary for your own safety even after expiration
of the original warranty, since Bombardier will be in a position to contact you if
correction to your watercraft becomes necessary.
NOTE: This card is strictly for change of address only.
CHANGE OF ADDRESS
AFFIX
PROPER
POSTAGE
BOMBARDIER
RECREATIONAL PRODUCTS
WARRANTY DEPARTMENT
75, J.A. BOMBARDIER ST.
SHERBROOKE (QUEBEC)
CANADA J1L 1W3
www.SeaDooManuals.net
smo2000-003a.book Page 87 Thursday, November 11, 1999 10:44 AM
CHANGE OF ADDRESS
If your address has changed, be sure to fill out and mail the card provided on this
page.
Such notification is likewise necessary for your own safety even after expiration
of the original warranty, since Bombardier will be in a position to contact you if
correction to your watercraft becomes necessary.
NOTE: This card is strictly for change of address only.
CHANGE OF ADDRESS
CHANGE OF ADDRESS
WATERCRAFT IDENTIFICATION NUMBERS
Model Number
Hull Identification Number (H.I.N.)
OLD ADDRESS: ______________________________________________
NAME
________________________________________________________________
NO.
STREET
APT
________________________________________________________________
CITY
STATE/PROVINCE
ZIP/POSTAL CODE
NEW ADDRESS: ______________________________________________
NAME
________________________________________________________________
NO.
STREET
APT
________________________________________________________________
CITY
STATE/PROVINCE
ZIP/POSTAL CODE
STOLEN UNITS
In the event that your watercraft is stolen, you should notify your area’s distributor
warranty department of such.
Please provide your name, address, phone number, Hull Identification Number and
date it was stolen.
Bombardier will provide a list of stolen units to all authorized Sea-Doo dealers on a
monthly basis to aid in recovery of such units to their owners.
www.SeaDooManuals.net
87
smo2000-003a.book Page 88 Thursday, November 11, 1999 10:44 AM
CHANGE OF ADDRESS
If your address has changed, be sure to fill out and mail the card provided on this
page.
Such notification is likewise necessary for your own safety even after expiration
of the original warranty, since Bombardier will be in a position to contact you if
correction to your watercraft becomes necessary.
NOTE: This card is strictly for change of address only.
CHANGE OF ADDRESS
AFFIX
PROPER
POSTAGE
BOMBARDIER
RECREATIONAL PRODUCTS
WARRANTY DEPARTMENT
75, J.A. BOMBARDIER ST.
SHERBROOKE (QUEBEC)
CANADA J1L 1W3
www.SeaDooManuals.net
www.SeaDooManuals.net