1
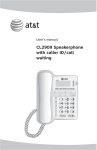
User’s manual
Part 2
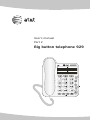
Big button telephone 929
Congratulations
on your purchase
of this AT&T product.
Before using this AT&T product, please
read the Important product information (Part 1).
Please thoroughly read this user’s
manual for all the feature operations
and troubleshooting information necessary
to install and operate your new
AT&T product. You can also visit our
website at www.telephones.att.com or call
1 (800) 222-3111.
In Canada, dial 1 (866) 288-4268.
Model #:
929
Serial #: Purchase date: Place of purchase: Both the model and serial number of your AT&T product can be
found on the bottom of the telephone base.
Save your sales receipt and original packaging in case it is necessary
to return your telephone for warranty service.
© 2007 Advanced American Telephones. All rights reserved.
AT&T and the AT&T logo are trademarks of AT&T Intellectual Property II, L.P. d/b/a
AT&T Intellectual Property licensed to Advanced American Telephones. Printed in China.
Table of contents
Before you begin
Telephone memory
Parts checklist........................... 2
Directory card......................... 11
Store a number in
memory.................................. 11
Store a pause in a
memory number................ 12
Dial a number in a
one-touch memory........... 12
Dial a number in a
two-touch memory........... 12
Erase a memory
number................................... 12
Installation
Table/desk installation......... 3
Wall installation....................... 5
Telephone operation
Make a call.................................. 8
Answer a call............................. 8
End a call..................................... 8
Ringing indicator...................... 8
Speakerphone............................ 8
Mute............................................... 8
Redial............................................. 9
Erase a redial............................. 9
Flash............................................... 9
Temporary tone dialing........ 9
Handset volume.................... 10
Ringer volume........................ 10
Speakerphone volume....... 10
Audio assistTM....................... 10
Appendix
General product care...........13
Troubleshooting..................... 14
Technical specifications..... 16
Index........................................... 17
Before you begin
Parts checklist
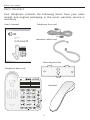
Your telephone contains the following items. Save your sales
receipt and original packaging in the event warranty service is
necessary.
User's manual
User’s manual
Part 2
Telephone line cord
Handset coiled cord
Mounting bracket
Telephone base unit
Handset
Installation
Installation
Table/desk installation
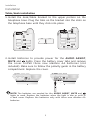
1. Install the desk/table bracket to the upper portion on the
telephone base. Plug the tabs on the bracket into the slots on
the telephone base until they click into place.
2. Install batteries to provide power for the AUDIO ASSIST,
MUTE and
lights. Press the battery cover tabs and remove
the cover. Install three new alkaline AA batteries (not
included). Make sure to follow the polarity guide in the battery
compartment. Replace the cover.
NOTE: The batteries are needed for the AUDIO ASSIST, MUTE and
lights to work. Replace the batteries when the light is dim or unlit in
a dark room. Replace the batteries only with three new alkaline AA
batteries.
Installation
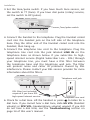
3. Set the tone/pulse switch. If you have touch tone service, set
the switch to TT (tone). If you have dial pulse (rotary) service,
set the switch to DP (pulse).
Tone/pulse switch
4. Connect the handset to the telephone. Plug the handset coiled
cord into the handset jack on the left side of the telephone
base. Plug the other end of the handset coiled cord into the
handset, then hang up.
5. Connect the telephone line cord to the telephone. Plug the
telephone line cord into the jack labeled LINE IN on the
telephone base as shown below. If you subscribe to highspeed internet service (Digital Subscriber Line - DSL) through
your telephone line, you must have a DSL filter between
the telephone base and the telephone wall jack. The filter
will prevent noise and caller ID problems caused by DSL
interference. Please contact your DSL service provider for more
information about DSL filters.
Telephone wall jack
DSL filter (not included)
required if you have DSL
high-speed internet service.
Telephone line cord
6. Check for a dial tone. Lift the handset or press
to listen for a
dial tone. If you cannot hear a dial tone, slide HS VOL (handset
volume) or SPK VOL (speakerphone volume) upward. If you still
do not hear a dial tone, see the Troubleshooting section on
page 14 of this user's manual.
Installation
Wall installation
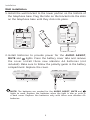
1. Install the wall bracket to the lower portion on the bottom of
the telephone base. Plug the tabs on the bracket into the slots
on the telephone base until they click into place.
2. Install batteries to provide power for the AUDIO ASSIST,
MUTE and
lights. Press the battery cover tabs and remove
the cover. Install three new alkaline AA batteries (not
included). Make sure to follow the polarity guide in the battery
compartment. Replace the cover.
NOTE: The batteries are needed for the AUDIO ASSIST, MUTE and
lights to work. Replace the batteries when the light is dim or unlit in
a dark room. Replace the batteries only with three new alkaline AA
batteries.
Installation
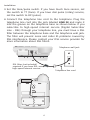
3. Set the tone/pulse switch. If you have touch tone service, set
the switch to TT (tone). If you have dial pulse (rotary) service,
set the switch to DP (pulse).
4. Connect the telephone line cord to the telephone. Plug the
telephone line cord into the jack labeled LINE IN and route it
into the groove on the telephone base as shown below. If you
subscribe to high-speed internet service (Digital Subscriber
Line - DSL) through your telephone line, you must have a DSL
filter between the telephone base and the telephone wall jack.
The filter will prevent noise and caller ID problems caused by
DSL interference. Please contact your DSL service provider for
more information about DSL filters.
Telephone wall jack
DSL filter (not included)
required if you have DSL
high-speed internet service.
Telephone line cord
Installation
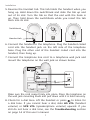
5. Reverse the handset tab. This tab holds the handset when you
hang up. Hold down the switchhook and slide the tab up and
out of its slot. Turn the tab so that the end with the hook is
up. Then hold down the switchhook while you insert the tab
back into its slot.
Switchhook
Handset tab
6. Connect the handset to the telephone. Plug the handset coiled
cord into the handset jack on the left side of the telephone
base. Plug the other end of the handset coiled cord into the
handset, then hang up.
7. Connect the telephone line cord to a telephone wall jack and
mount the telephone on the wall jack as shown below.
Make sure the cord snaps firmly into place. Place the telephone on
the wall jack mounting studs and pull down until it is held securely.
8. Check for a dial tone. Lift the handset or press
to listen for
a dial tone. If you cannot hear a dial, slide HS VOL (handset
volume) or SPK VOL (speakerphone volume) upward. If you
still do not hear a dial tone, see the Troubleshooting section
on page 14 of this user's manual.
Telephone operation
Telephone operation
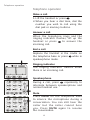
Make a call
1. Lift the handset or press .
2. When you hear a dial tone, dial the
number you wish to call using the
dial pad or memory buttons.
Answer a call
When the telephone rings and the
ringing indicator flashes, lift up the
handset or press
to answer the
incoming call.
End a call
Replace the handset in the cradle on
the telephone base or press
while in
speakerphone mode.
Ringing indicator
The ringing indicator flashes when
there is an incoming call.
Speakerphone
During a call, press
repeatedly to
alternate between speakerphone and
normal handset use.
Mute
Press MUTE on the telephone base
to silence the microphone during a
conversation. You can still hear the
caller but the caller cannot hear
you. Press MUTE again to resume
the conversation.
Telephone operation
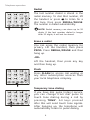
Redial
The last number dialed is stored in the
redial memory. To dial that number, lift
the handset or press
to listen for a
dial tone, then press REDIAL/PAUSE.
The number is dialed automatically.
NOTE: Redial memory can store up to 32
digits. If the last number dialed is longer
than 32 digits, it will not be stored.
Erase a redial
You can erase the redial memory for
privacy. Lift the handset, then press
PROG. Press REDIAL/PAUSE and then
hang up.
-ORLift the handset, then press any key
and then hang up.
Flash
Press flash to access call waiting or
any other subscription services from
your local telephone company.
Temporary tone dialing
If you have dial pulse (rotary) service,
you can change from dial pulse to
touch tone dialing during a call by
pressing TONE * . All keys pressed
after this will send touch tone signals.
After hanging up, the telephone will
automatically return to pulse dialing.
Telephone operation
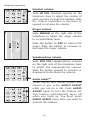
Handset volume
Slide HS VOL (handset volume) on the
telephone base to adjust the volume of
what you hear through the handset. Slide
the control downward to decrease or
upward to increase the volume.
Ringer volume
Slide RINGER on the right side of the
telephone to adjust the ringer volume
to a comfortable level.
Slide the button to OFF to silence the
ringer. Slide the button to increase or
decrease the ringer volume.
Speakerphone volume
Slide SPK VOL (speakerphone volume)
on the right side of the telephone base
to adjust the speakerphone volume.
Slide the button upward to increase or
downward to decrease the volume.
Audio assistTM
Some voices will sound louder and
clearer if you press AUDIO ASSIST
while you are on a call. Press AUDIO
ASSIST again to turn the feature off.
This feature automatically turns off
when you hang up. You must press
AUDIO ASSIST every time you want to
activate this feature.
10
Telephone operation
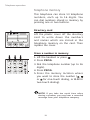
Telephone memory
This telephone can store 13 telephone
numbers, each up to 16 digits. You
can dial numbers stored in memory by
pressing one or two buttons.
Directory card
Lift the plastic cover off the directory
card to write down the numbers
and names which are stored in the
telephone memory on the card. Then
replace the cover.
Store a number in memory
1. Lift the handset or press .
2. Press PROG.
3. Dial the telephone number (up to 16
digits).
4. Press PROG.
5. Press the memory location where
you want to store the number ( ,
or for one-touch dialing, or 0-9 for
two-touch dialing).
NOTE: If you take too much time when
storing a number, you may hear a recorded
message from your telephone company.
11
Telephone operation
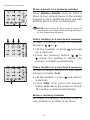
Store a pause in a memory number
Press REDIAL/PAUSE once to store a
three to four second pause in the dialing
sequence. Each additional press will add
another three to four second pause.
NOTE: Each three to four second pause is
counted as one digit when storing numbers
in the telephone memory.
Dial a number in a one-touch memory
To dial a number stored in memory
locations , or :
1. Lift the handset or press
and wait
for a dial tone.
2. Press the memory button ( ,
or
) where the number is stored. The
number is dialed automatically.
Dial a number in a two-touch memory
To dial a number stored in a two-touch
memory location (0-9):
1. Lift the handset or press
and wait for
a dial tone.
2. Press MEM, then press the memory
button (0-9) where the number is stored.
The number is dialed automatically.
Erase a memory number
To erase a memory location, store a
new telephone number in its place.
12
Appendix
General product care
To keep your telephone working and looking good, follow these
guidelines:
• Avoid putting it near heating appliances and devices that
generate electrical noise (for example, motors or fluorescent
lamps).
• DO NOT expose it to direct sunlight or moisture.
• Avoid dropping the telephone and/or other rough treatment.
• Clean with a soft cloth.
• Never use a strong cleaning agent or abrasive powder
because this will damage the finish.
• Retain the original packaging in case you need to ship it at a
later date.
13
Appendix
Troubleshooting
If you have difficulty with your telephone, please try the
suggestions below. For Customer Service, visit our website at
www.telephones.att.com, or call 1 (800) 222-3111. In Canada,
call 1 (866)288-4268.
No dial tone
• Make sure all plugs are connected
properly. Inspect the line cord connections
at the modular jack and at the telephone.
Also inspect the telephone handset cord
connections at both ends.
• Unplug the telephone and connect it to
another modular jack. If it still does not
work, and other telephones in your home
are working, the problem is with this
telephone.
The telephone
does not ring
• Make sure the RINGER switch is not set
to OFF.
• If there are several other telephones
connected on the same line, try
disconnecting some of them. Having too
many telephones connected can also
create problems such as low ringer volume
or impaired sound quality during calls.
14
Appendix
Troubleshooting
Backlight of
AUDIO ASSIST,
MUTE or
is dim or not
functioning
• Make sure you have installed three fully
charged AA batteries (not included)
following the polarity guide in the battery
compartment. See Installation on page 3 of
this user's manual.
• The backlight may not be noticeable unless
the room is dark.
Cannot store
telephone
numbers in
memory
• Make sure you are pressing the correct
sequence of buttons when storing numbers
(see pages 11 and 12).
Memory numbers
are lost
• Make sure the line cord is connected.
This telephone retains numbers stored in
memory for about thirty minutes if the
telephone line cord is disconnected.
15
Appendix
Technical specifications
REN
1.5B
Power
Three AA batteries are required for
backlighting of the AUDIO ASSIST, MUTE
and
lights. The telephone must also
be connected to a telephone line for all
features to work.
Line feed voltage 48V +/- 2V
Line loop current 18mA to 100mA
Ringer levels
Off = 0dB
HI = 85dB
Compliance
FCC and UL approved
Memory One-touch memory: 3 memory locations,
16 digits per location
Two-touch memory: 10 memory locations,
16
16 digits per location
Appendix
Index
A
Answer a call
Audio assist 10
O
One-touch memory
8
P
Pause
B
Batteries 3, 5
D
Directory card
E
End a call
8
Erase redial
9
S
Speakerphone
8
T
Temporary tone dialing
9
Tone/pulse switch
4, 6
Troubleshooting
14
Two-touch memory
12
F
Flash 9
10
V
Volume
M
Make a call
8
Memory
11
Mute
8
N
No dial tone
12
R
Redial
9
Ringing indicator
8
Ringer volume
10
11
H
Handset tab 7
Handset volume
12
14
17
10
www.telephones.att.com
© 2007 Advanced American Telephones. All rights reserved.
AT&T and the AT&T logo are trademarks of AT&T Intellectual Property II, L.P. d/b/a
AT&T Intellectual Property licensed to Advanced American Telephones.
Printed in China. Issue 2 AT&T 12/07.