1
Preparation
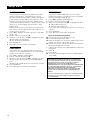
Analog Connections
Use audio/video cable supplied with this unit to connect
AUDIO OUT L (left) and R (right) jacks of this unit to
corresponding input jacks of your audio equipment such
as Stereo amplifier.
General Notes on connections
●
●
●
●
Never make or change connections with the power
switched on.
Depending on the equipment you wish to connect, there
are various ways you could connect this unit. Possible
connections are shown in the following drawings.
Please refer to the manuals of other equipment as
necessary to make the best connections.
Do not connect this unit via your VCR. The video quality
could be distorted by the copy protection system.
Do not connect this unit’s audio out jack to the phono in
jack of your audio system.
DIGITAL
OUT
AUDIO
OUT
VIDEO OUT
L
VIDEO
R
S VIDEO
COAXIAL
OPTICAL
E
L
R
(supplied)
R
Stereo
amplifier
L
1 CD/DVD
R
L
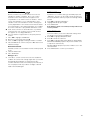
Digital Connections
This unit has COAXIAL and OPTICAL digital out jacks.
Connect one or both of them to your AV receiver
equipped with Dolby digital or MPEG decoder using
each specific cable (separate purchase).
DIGITAL
OUT
Left
speaker
Right
speaker
AUDIO
OUT
VIDEO OUT
L
VIDEO
R
S VIDEO
COAXIAL
OPTICAL
AV receiver
E
O
C
COAXIAL
IN
OPTICAL
IN
Subwoofer
Center speaker
Left main
speaker
Left rear
speaker
Right main
speaker
Right rear
speaker
You will need to set this unit’s digital output to All (see
‘DIGITAL OUTPUT’).
Note:
– If the audio format of the digital output does not match the
capabilities of your receiver, the receiver will produce a
strong, distorted sound or no sound at all. Make sure to
select the appropriate audio format at menu screen included
on the disc.
Pressing AUDIO once or more may change not only audio
languages but also audio formats, and the selected format
appears for several seconds on the status window.
5
English
Please refer to the RX-E600 manual for
instructions on connecting this unit to
the RX-E600 receiver.