1
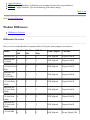
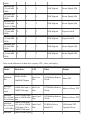
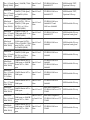
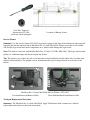
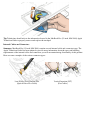
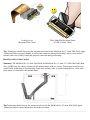
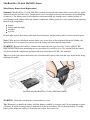
MacBook Pro
Getting Started
Welcome to the MacBook Pro course.
Reviewing this course will enable you to efficiently
troubleshoot and service MacBook Pro computers.
MacBook Pro computers present special challenges for
service technicians.
We will review how you can best address these challenges.
In addition, we will offer guidance on best troubleshooting
and repair practices.
Target Audience
This course is intended for technicians who support and service Apple products.
Prerequisite Courses
Basic Computer Theory and Terms
Underlying Technologies
References
Diagnostics
Troubleshooting Theory
ESD Precautions
Hardware Tools
Technician Safety
Hardware Service Issues
Liquid Crystal Displays
Wireless Networking
Time Required
45 minutes
Course Objectives
Applicable to all models covered in this course:
Given an isolated hardware device issue and a possible resolution, use Apple documentation, approved
tools, and service inventory to safely repair the hardware device in 45 minutes.
Using Apple technical documentation as a reference, remove and then replace a specified component
of a given supported product in the time allocated for that repair procedure.
Given a hardware service repair and the correct Apple technical documentation for a specified
supported product, identify the service and safety issues for that product in 2 minutes.
Given a hardware service repair and the correct Apple technical documentation for a specified
supported product, identify specialized tools/fixtures or procedures required to service that product in 2
minutes.
Use hardware service diagnostics to thoroughly verify that a given hardware service repair was
completed correctly in 5 minutes.
Reseat identified connectors to resolve a hardware issue on a given device before replacing any service
parts on that device in 10 minutes.
Return to top
Next: MacBook Pro Overview
MacBook Pro Overview
MacBook Models
Documentation
MacBook Pro Models
The MacBook Pro series was introduced in January of 2006. It brought Intel-based processors to Apple's
professional portable line.
The MacBook Pro series consists of the following models:
MacBook Pro
MacBook Pro (15-inch Core 2 Duo)
MacBook Pro (15-inch 2.4/2.2GHz)
MacBook Pro (17-inch)
MacBook Pro (17-inch Core 2 Duo)
MacBook Pro (17-inch 2.4GHz)
MacBook Pro (15-inch Late 2007)
MacBook Pro (17-inch Late 2007)
MacBook Pro (15-inch Early 2008)
MacBook Pro (17-inch Early 2008)
MacBook Pro (15-inch Glossy)
MacBook Pro (17-inch Late 2008)
MacBook Pro (15-inch Late 2008)
MacBook Pro (17-inch Early 2009)
MacBook Pro (13-inch Mid 2009)
MacBook Pro (15-inch Mid 2009)
MacBook Pro (15-inch Mid 2009, 2.53 GHz)
MacBook Pro (17-inch Mid 2009)
MacBook Pro (17-inch Mid 2010)
MacBook Pro (15-inch Mid 2010)
MacBook Pro (13-inch Mid 2010)
Documentation
Here are the MacBook Pro service manuals and technician guides.
Manual/Tech Guide
Models Covered
MacBook Pro
MacBook Pro
MacBook Pro (17-inch)
MacBook Pro (17-inch)
MacBook Pro (17-inch Core 2 Duo)
MacBook Pro (17-inch 2.4GHz)
MacBook Pro (17-inch Late 2007 CTO)
MacBook Pro (17-inch Early 2008)
MacBook Pro (17-inch Late 2008)
MacBook Pro (15-inch Core 2 Duo)
MacBook Pro (15-inch Core 2 Duo)
MacBook Pro (15-inch 2.4/2.2GHz)
MacBook Pro (15-inch 2.4/2.2GHz)
MacBook Pro (15-inch Early 2008)
MacBook Pro (15-inch Early 2008)
MacBook Pro (15-inch Late 2008)
MacBook Pro (15-inch Late 2008)
MacBook Pro (17-inch Early 2009)
MacBook Pro (17-inch Early 2009)
MacBook Pro (17-inch Mid 2009)
MacBook Pro (13-inch Mid 2009)
MacBook Pro (13-inch Mid 2009)
MacBook Pro (15-inch Mid 2009)
MacBook Pro (15-inch Mid 2009)
MacBook Pro (15-inch, 2.53 GHz,
Mid 2009)
MacBook Pro (15-inch, 2.53 GHz, Mid 2009)
MacBook Pro (17-inch Mid 2009)
MacBook Pro (17-inch Mid 2009)
MacBook Pro (17-inch Mid 2010)
MacBook Pro (17-inch Mid 2010)
MacBook Pro (15-inch Mid 2010)
MacBook Pro (15-inch Mid 2010)
MacBook Pro (13-inch Mid 2010)
MacBook Pro (13-inch Mid 2010)
Back to top
Next: Course Exercise
Course Exercise
Open this page separately and keep it open while you review the course.
As you go through the course answer the following questions.
1. What is the maximum amount of memory you can install in a MacBook Pro (Core 2 Duo)?
A. 1 GB
B. 1.5 GB
C. 2 GB
D. 2.5 GB
E. 3 GB
2. Where is the MacBook Pro (17-inch) serial number located?
A. The top of the battery bay
B. The bottom of the battery bay
C. On the bottom of the main battery
D. Underneath the illuminated keyboard
3. What type of battery is used in the MacBook Pro (17-inch)?
A. Lead acid
B. Lithium ion
C. Di-lithium ion
D. Lithium polymer
4. A customer complains that her MacBook Pro will not start up unless it is plugged in. What is the first
question you should ask her?
5. A customer complains that their MacBook Pro is running too hot. What should you first ask this
person?
6. Using the MacBook Pro service manual, locate the position of the power button pads on the logic
board.
7. A customer states that the display hinge on his MacBook Pro (17-inch) will not stay open when the
display is partially raised. How do you respond?
8. What are the recommended tools for cleaning a MagSafe connector?
9. What is the first step you should perform before doing any work inside the MacBook Pro (13-inch, Mid
2009)?
A. Remove the top case
B. Remove the main battery
C. Disconnect the main battery
D. Remove any installed memory
E. Remove the internal hard drive
10. In the MacBook (13-inch Mid 2009), which of the following can be used in the SD card slot with the
proper adapter? Select all that apply:
A. miniSD
B. microSD
C. XD Card
D. Memory Stick™®
E. CompactFlash™ Card
11. The service fixture is required when removing the _____ in the MacBook Pro (15-inch, Mid 2009).
Select all that apply:
A. Heat sink
B. Hard drive
C. Logic board
D. Left fan
E. Optical drive
Next: Significant Features
Significant Features
MagSafe Connectors
Target Disk Mode and MacBook Pros
Battery End of Life
Processor Soldered to Logic Board
Resources
MagSafe Connectors
The MacBook Pro 85-Watt power adapter with MagSafe connector uses a magnetic connection instead of a
physical plug. This means that tripping over a power cord won't send your MacBook Pro flying off the table
or desk; the cord simply breaks cleanly away, without damage to either the cord or the computer.
There are a number of service issues for such connectors. Your best resource for learning about these issues
is support article TS1713 "Apple Portables: Troubleshooting MagSafe adapters".
Review this article before continuing.
MacBook Pro in Target Disk Mode
If you attempt to mount an Intel-based MacBook Pro in Target Disk Mode on a Mac running Mac OS X
10.3.9 or earlier, you'll see an alert message that says "You have inserted a disk containing no volumes that
Mac OS X can read."
The computer you are mounting to must be running Mac OS X 10.4 or later for Target Disk Mode to work.
Battery End of Life
When a lithium polymer battery reaches its end of life, the battery simply ceases function. There is no
downward ramp in performance. This means that any battery issue should prompt questions as to how long
the battery has been used.
More information about this topic is found at Battery Replacement.
Processor Soldered to Logic Board
The processors in the MacBook Pro series are soldered to the logic board and are considered part of the main
logic board assembly for troubleshooting and servicing purposes.
Resources
Please access and review the following articles.
Apple Notebooks
HT1490 - "Apple Portables: Calibrating your computer's battery for best performance"
HT1446 - "Apple Portables: Tips for maximizing your battery charge"
Back to top
Next: Product Differences
Product Differences
Differences Overview
Differences Overview
Here you see how MacBook Pro computers differ in I/O ports, power adapter, and card slot.
Model
FireWire FireWire
400
800
USB 2.0
Ports
Power Adapter
Card Slot
MacBook Pro
1
0
2
85W Magsafe
ExpressCard/34
MacBook Pro
(17-Inch)
1
1
3
85W Magsafe
ExpressCard/34
MacBook Pro
(15-inch Core 2 1
Duo)
1
2
85W Magsafe
ExpressCard/34
MacBook Pro
(15-inch
2.4/2.2GHz)
1
1
2
85W Magsafe
ExpressCard/34
Macbook Pro
(15-inch Early
2008)
1
1
2
85W Magsafe
ExpressCard/34
Macbook Pro
(17-inch Early
2008)
1
1
3
85W Magsafe
ExpressCard/34
Macbook Pro
(15-inch Late
2008)
0
1
2
85W Magsafe
ExpressCard/34
Macbook Pro
(17-inch Late
2008)
1
1
3
85W Magsafe
ExpressCard/34
0
1
2
60W Magsafe
Secure Digital (SD)
Macbook Pro
(15-inch Mid
2009)
Macbook Pro
(13-inch Mid
2009)
0
1
2
60W Magsafe
Secure Digital (SD)
MacBook Pro
(15-inch Mid
2009)
0
1
2
85W Magsafe
Secure Digital (SD)
MacBook Pro
(15-inch Mid
0
2009 2.53 Ghz)
1
2
60W Magsafe
Secure Digital (SD)
MacBook Pro
(17-inch Mid
2009)
0
1
3
85W Magsafe
ExpressCard/34
MacBook Pro
(17-inch Mid
2010)
0
1
3
85W Magsafe
ExpressCard/34
MacBook Pro
(15-inch Mid
2010)
0
1
2
85W Magsafe
Secure Digital (SD)
MacBook Pro
(13-inch Mid
2010)
0
1
2
60W Magsafe
Secure Digital (SD)
Here are the differences in hard drive capacity, CPU, video, and display.
Model
Hard Drive
CPU
Video
Display
MacBook
Pro
80GB, 100GB,
ATI Mobility Radeon
X1600
Matte TFT
100GB@7200rpm
Intel Core
Duo
120GB 5400-rpm or
100GB 7200-rpm
Intel Core
Duo
ATI Mobility Radeon
X1600
Matte or Glossy TFT
MacBook
120 or 160GB 5400Intel Core 2
Pro (15-inch rpm or 200GB 4200Duo
Core 2 Duo) rpm
ATI Mobility Radeon
X1600
Matte or Glossy TFT
200GB (4200-rpm)
MacBook
120, 160, or 250GB
Pro (15-inch
(5400-rpm) 160 or
2.4/2.2GHz)
200GB (7200-rpm)
NVIDIA GeForce
8600M GT
LED backlit TFT,
Optional Glossy
MacBook
Pro (17Inch)
Macbook
200 or 250GB (5400-
Intel Core 2
Duo
Pro (15-inch rpm), 200GB (7200- Intel Core 2
Early 2008) rpm)
Duo
NVIDIA GeForce
8600M GT
LED backlit TFT,
Optional Glossy
250GB (5400-rpm),
Macbook
200GB (7200-rpm),
Pro (17-inch
or 300GB (4200Early 2008)
rpm)
Intel Core 2
Duo
NVIDIA GeForce
8600M GT
LED backlit TFT,
Optional Glossy
250 or 320GB (5400Macbook
rpm SATA), 250 or
Intel Core 2
Pro (15-inch 320GB (7200-rpm
Duo
Late 2008) SATA), or 128 or
256GB (SSD)
NVIDIA GeForce
9600M GT and
GeForce 9400M
LED backlit Glossy
Macbook
320GB (5400- or
Intel Core 2
Pro (17-inch 7200-rpm SATA) or
Duo
Late 2008) 128GB (SSD)
NVIDIA GeForce
8600M GT
LED backlit Glossy.
Optional anti-glare
250, 320, or 500GB
Macbook
(5400-rpm SATA),
Intel Core 2
Pro (15-inch 320 or 500GB (7200Duo
Mid 2009)
rpm SATA), or 128
or 256GB (SSD)
NVIDIA GeForce
9400M
LED backlit Glossy.
Optional anti-glare
160, 250, 320, or
Macbook
500GB (5400-rpm
Pro (13-inch
SATA) or 128 or
Mid 2009)
256GB (SSD)
Intel Core 2
Duo
NVIDIA GeForce
9400M
LED backlit Glossy
320GB Serial ATA;
MacBook
5400 rpm or 500GB
Pro (15-inch
Serial ATA; 5400
Mid 2009)
rpm
Intel Core 2
Duo
NVIDIA GeForce
9600M
NVIDIA GeForce
9400M
LED backlit Glossy
MacBook
Pro (15-inch 250GB Serial ATA;
Mid 2009
5400 rpm
2.53 Ghz)
Intel Core 2
Duo
NVIDIA GeForce
9400M
LED backlit Glossy
MacBook
500GB Serial ATA;
Pro (17-inch
5400 rpm
Mid 2009)
Intel Core 2
Duo
NVIDIA GeForce
9600M
LED backlit Glossy
MacBook
500GB Serial ATA;
Pro (17-inch
5400 rpm
Mid 2010)
Intel Core i5
Intel HD Graphics5;
NVIDIA GeForce GT
330M
LED backlit Glossy
320GB Serial ATA;
MacBook
5400 rpm or 500GB
Pro (15-inch
Serial ATA; 5400
Mid 2010)
rpm
Intel Core i5
or Intel Core
i7
Intel HD Graphics5;
NVIDIA GeForce GT
330M
LED backlit Glossy
250GB Serial ATA;
MacBook
5400 rpm or 320GB
Pro (13-inch
Serial ATA; 5400
Mid 2010)
rpm
Intel Core 2
Duo
NVIDIA GeForce
320M
LED backlit Glossy
Next: Troubleshooting Issues
Troubleshooting Issues
Troubleshooting Issues
Troubleshooting Issues
Processor is soldered to the logic board. It is not upgradeable.
Keeping the MagSafe connectors clean is very important. Also, be sure to inspect for bent pins.
If a MacBook Pro is started into Target Disk Mode, it will only show up on the Desktop of a Mac
computer running Mac OS X 10.4 or later.
If you are formatting a MacBook Pro drive via Target Disk Mode use an Intel-based Mac to do the
formatting.
Only 34mm wide ExpressCard modules are compatible with the MacBook Pro models that accept
ExpressCards.
Lithium Polymer Batteries - Will go completely dead when they reach end of life.
RAM needs to be fully seated for correct performance. No video is a symptom of incompletely seated
RAM. The service manual has details of how you can fully seat RAM.
For MacBook Pro (15-inch and 17-inch Early 2008) models - Unlike versions of ASD previously
available for earlier MacBook Pro models, these models use ASD version 3S121 or later, which
requires installation onto an external USB hard drive.
Back to top
Next: Tools
Tools
Issues with Tools
Required Tools
Issues with Tools
Using Correct Tools
MacBook Pro computers contain small parts that are held together with a wide variety of small screws and
bolts. One of the most common mistakes in working with MacBook Pro computers is to use the wrong size or
type of tool to repair the unit.
All too often, the wrong tool means that screws are worn or screw attachment points are stripped.
Apple service manuals contain procedures that describe the tools needed to replace parts and perform the
repair. These procedures work as long as you use the recommended tools as a part of the recommended
procedure.
NOTE: Special tools are required for removing the battery from the MacBook (13-inch Mid 2009) and the
MacBook (15-inch Mid 2009).
In addition, a logic board fixture is required for working with the logic board in the MacBook Pro (15-inch
Mid 2009).
Details on these tools are located in the Repair Issues section of this course.
Keeping Track of Parts
One of the recommended tools for any repair is a tray with numerous compartments. If you do not use some
means of keeping track of the screws and other small parts that you remove from a MacBook, you will have a
very difficult time reassembling the computer.
A partitioned tray along with the Screw Matrix in the Service Manual will save you a great deal of time and
ensure that a completed repair has not added problems to the computer.
Issues with Metal tools
Be very careful whenever using metal tools anywhere around a MacBook Pro. It's very easy to scratch outer
surfaces with metal tools.
Remember to only use plastic pry tools to carefully unlatch cable connectors and release catches on plastic
case parts. Apple recommends the Nylon Probe Tool. This is a black plastic pry tool that should not damage
plastics or scratch metals if used carefully.
More details on tools for computer repair are found in the Hardware Tools course.
Required Tools
You need the following tools to work on MacBook Pro computers.
Clean non-marring work surface
ESD wrist strap and mat
Multi-compartment screw tray (such as a plastic ice cube tray)
#0 Phillips screwdriver (magnetized)
#1 Phillips screwdriver (magnetized)
Torx T6 screwdriver (magnetized)
4 mm socket wrench
Black stick (nylon probe 922-5065) or other non-conductive nylon or plastic flat-blade tool
Razor knife
Needle-point metal probe
Needlenose pliers
Tweezers
Kapton tape (922-1731) (0.5-inch x 12-yard roll)
Thermal grease (922-7144)
Gasket kit (varies with model)
Alcohol pads
Fine-point felt-tip permanent marker
Putty knife tool (922-6761)
Apple Pro keyboard and mouse (for troubleshooting)
Next: Repair Issues
Take Apart Issues
Take Apart Issues
MacBook Pro (15-inch Mid 2009) Issues
MacBook Pro (13-inch Mid 2009) Issues
Take Apart Issues
The following tips are taken from the MacBook Pro service manuals and other sources. If you have any
questions regarding any of these tips, consult the manual before proceeding with a repair.
Serial number and Ethernet ID are located in the battery bay
Never double up layers of Kapton tape. Clear off old tape before applying new tape. Doubling up
layers can lead to clearance issues when you reassemble the system.
When removing memory from a MacBook Pro, you must remove memory from the top slot before
removing memory from the bottom slot.
When removing top case, be careful not to break the keyboard flex cable when lifting the top case.
When replacing top case, do NOT attempt to put screws into the DVI port screw holes. This is a
common mistake and can damage the case.
When replacing keyboards, please note that the keyboard flex cables are quite delicate.
Antenna cables for AirPort Extreme Card are color coded to avoid incorrectly connected antennas.
When replacing thermal sensors be sure to put the sensor back in the same exact place you took it from.
Marking the location before removal with a marker is helpful.
Removing tape from Hard Drive must be done carefully because a torn drive label voids the hard drive
warranty.
The rubber grommets and screws on a defective hard drive must be transferred to the replacement hard
drive.
Optical drives in the MacBook Pro models are quite delicate. Refer to the service manual for handling
instructions.
JST Connectors were introduced with the MacBook Pro (2.4/2.2 GHz) models. You should use a
narrow probe to open these connectors. Review the service manual procedures before attempting to
take apart these systems for the first time.
When replacing the Logic Board, tape the Thermal Sensor Cable to Display Assembly to avoid
trapping it.
Do not flex the logic board at any time. This can crack solder joints - particularly at the narrow neck of
the fan cutout.
Do not hold the Logic Board horizontally when replacing it. Holding it horizontally can crack the
solder joints.
You must clean off thermal grease from the heatsink when replacing the Logic Board.
Each application of thermal grease to a heatsink contact point uses one-third of a syringe-full. Mark off
thirds on thermal grease syringe before applying the grease.
When replacing the Logic Board, follow the sequencing of screw replacement described in the service
manual.
On the MacBook Pro (15-inch 2.4/2.2 GHz) models The Left I/O Board is new and has EMI mylar film
on the bottom. Do NOT remove the film.
When replacing the Display Assembly, verify AirPort Extreme, camera, trackpad, keyboard, and
keyboard backlight cables are connected. It is easy to forget one of these connectors when replacing the
MLB.
Be careful not to allow screws and small metal parts near the MagSafe Connector.
Keep cards with magnetic stripes clear of the MagSafe Connector. Otherwise there is risk of data
corruption on the card.
The MacBook Pro (Early 2008) keyboard is not interchangeable with any previous models, including
the original MacBook Pro, Core 2 Duo and 2.4/2.2GHz. If replacing the keyboard, verify that the
correct replacement keyboard and/or top case is ordered.
MacBook Pro (15-inch Mid 2009) Issues
Internal Battery
Summary: MacBook Pro (15-inch, Mid 2009) contains an internal-only battery that is serviceable by Appleauthorized service providers only. Tamper-proof screws are employed to prevent customers from attempting
to remove it. The battery must be disconnected when performing any internal service on this product, to
avoid damage to the battery and/or the internal components. Battery removal is only required when replacing
the following components:
battery
trackpad
left speaker
microphone
MagSafe board
center bracket
logic board
top case
In most other repairs, the battery cable must be disconnected, but the battery and its screws remain in place.
Note: Unlike previous MacBook Pro models, there is no access door on the bottom of this model. Rather, the
entire bottom case is removed to gain access to the battery and other internal components.
WARNING: Because the battery is internal and connected to the logic board by a cable, it MUST BE
DISCONNECTED before performing service procedures. If you fail to do so, live current from the battery
will short circuit the components and render the logic board and/or LVDS cable unusable.
Tip: Every time you remove the bottom case, disconnect the battery cable from the logic board before doing
anything else inside.
Disconnecting MacBook Pro (15-inch, Mid 2009) Battery
WARNING: Underside of battery has a nonconductive cover.
Tip: Whenever you handle the battery, hold the battery carefully by its edges only. Do not puncture or press
on battery. If mylar covering battery is punctured, do not re-use battery. Do not drop the battery. If setting
battery aside, make sure surface is clean and free of dust, dirt, screws, etc.
Battery Removal Tool
Tip: To remove the security screws holding the battery in place, you will need a special tool, the Torx Plus
Tamper 6 screwdriver, Apple part number 922-9101, available through GSX.
Torx Plus Tamper 6
Screwdriver 922-9101
and Screw Head (enlarged)
Location of Battery Screws
Service Fixture
Summary: Use the service fixture (922-9102) to provide support to the logic board whenever removing and
replacing the left fan and heat sink in MacBook Pro (15-inch, Mid 2009). Failure to use the service fixture
will flex the logic board and strain components on it, which could damage the logic board.
Note: The fixture is not used with the MacBook Pro (15-inch, 2.53 GHz, Mid 2009). The logic board on that
product is a different shape and doesn't require the fixture.
Tip: The fixture is two-sided; one side is for fan removal and installation and the other side is for heat sink
removal and installation. The graphics below demonstrate the logic board positioned on each side of the
fixture.
MacBook Pro (15-inch, Mid 2009) Service Fixture – 922-9102
Fan Installation and Removal Side
Heat Sink Installation and Removal Side
Trackpad Replacement Procedure
Summary: The MacBook Pro (15-inch, Mid 2009) Apple Technician Guide contains new, detailed
replacement instructions for the built-in trackpad.
Tip:Technicians should refer to the information located in the MacBook Pro (15-inch, Mid 2009) Apple
Technician Guide to properly remove and replace the trackpad.
Internal Cables and Connectors
Summary: MacBook Pro (15-inch, Mid 2009) contains several internal cable and connector types. The
Apple Technician Guide has been updated to provide more information about the types and handling
requirements of the internal cables and connectors you will encounter during disassembly of this product.
Here are some examples of the various connector types:
Low-Profile Solid Platform Flex
(Optical Drive Flex Cable)
Vertical Insertion (JST)
(Fan Cables)
Locking Lever
(Keyboard Flex Cable)
Thin, Multi-Pin Horizontal Insert
(LVDS, Camera Cable)
Tip: Technicians should always use the information located in the MacBook Pro (15-inch, Mid 2009) Apple
Technician Guide to properly handle all cables and connectors during disassembly, and to ensure that all
internal cables are securely seated and properly connected during reassembly.
Hard Drive Flex Cable Caution
Summary: The MacBook Pro (15-inch, Mid 2009) and MacBook Pro (15-inch, 2.53 GHz, Mid 2009) hard
drive and IR/sleep flex cable is fastened to the internal frame with two screws. Technicians should be very
careful when connecting or disconnecting a hard drive and this cable, to avoid tearing this flex cable at the
point where it is fastened to the internal frame.
Tip:Technicians should refer to the information located in the MacBook Pro (15-inch, Mid 2009) Apple
Technician Guide for more information about this procedure.
MacBook Pro (13-inch Mid 2009) Issues
Main Battery Removal and Replacement
Summary: MacBook Pro (13-inch, Mid 2009) contains an internal-only battery that is serviceable by Appleauthorized service providers only. Tamper-proof screws are employed to prevent customers from attempting
to remove it. The battery must be disconnected when performing any internal service on this product, to
avoid damage to the battery and/or the internal components. Battery removal is only required when replacing
the following components:
battery
battery indicator light
trackpad
top case
In most other repairs, the battery cable must be disconnected, but the battery and its screws remain in place.
Note: Unlike previous MacBook models, there is no access door on the bottom of this model. Rather, the
entire bottom case is removed to gain access to the battery and other internal components.
WARNING: Because the battery is internal and connected to the logic board by a cable, it MUST BE
DISCONNECTED before performing service procedures. If you fail to do so, live current from the battery
will short circuit the components and render the logic board and/or LVDS cable unusable.
Tip: Every time you remove the bottom case, disconnect the battery cable from the logic board before doing
anything else inside.
Disconnecting MacBook Pro (13-inch, Mid 2009) Battery
WARNING: Underside of battery has a nonconductive cover.
Tip: Whenever you handle the battery, hold the battery carefully by its edges only. Do not puncture or press
on battery. If mylar covering battery is punctured, do not re-use battery. Do not drop the battery. If setting
battery aside, make sure surface is clean and free of dust, dirt, screws, etc.
Battery Removal Tool
Tip: To remove the security screws holding the battery in place, you will need a special tool, a tri-lobe #0
screwdriver, Apple part number 922-8991, available through GSX.
Tri-lobe #0 Screwdriver
922-8991
and Screw Head (enlarged)
Location of Battery Screws
Trackpad Replacement Procedure
Summary: The MacBook Pro (13-inch, Mid 2009) Apple Technician Guide contains new, detailed
replacement instructions for the built-in trackpad.
Tip:Technicians should refer to the information located in the MacBook Pro (13-inch, Mid 2009) Apple
Technician Guide to properly remove and replace the trackpad.
Internal Cables and Connectors
Summary: MacBook Pro (13-inch, Mid 2009) contains several internal cable and connector types. The
Apple Technician Guide has been updated to provide more information about the types and handling
requirements of the internal cables and connectors you will encounter during disassembly of this product.
Here are some examples of the various connector types:
Low-Profile Solid Platform Flex
(Optical Drive Flex Cable)
Vertical Insertion (JST)
(Fan Cables)
Locking Lever
(Keyboard Flex Cable)
Thin, Multi-Pin Horizontal Insert
(LVDS, Camera Cable)
Tip: Technicians should always use the information located in the MacBook Pro (13-inch, Mid 2009) Apple
Technician Guide to properly handle all cables and connectors during disassembly, and to ensure that all
internal cables are securely seated and properly connected during reassembly.
Hard Drive Flex Cable Caution
Summary: The MacBook Pro (13-inch, Mid 2009) hard drive and IR/sleep flex cable is fastened to the
internal frame with two screws. Technicians should be very careful when connecting or disconnecting a hard
drive and this cable, to avoid tearing this flex cable at the point where it is fastened to the internal frame.
Tip:Technicians should refer to the information located in the MacBook Pro (13-inch, Mid 2009) Apple
Technician Guide for more information about this procedure.
Back to top