1
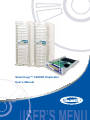
SmarrCopy™ CD/DVD Duplicator
User’s Manual
Copyright and Trademark Statement
The information contained in this work is the exclusive property of Utronics
International, Inc., and any respective copyright owners. This work is protected under
United States copyright law and other international copyright treaties and conventions.
No part of this work may be reproduced or transmitted for commercial purposes, in any
form or by any means, electronic or mechanical, including photocopying and recording,
or by any information storage or retrieval system, except as expressly permitted in
writing.
Disclaimer--This document has been produced for informational purposes only and
as a service to our customers. The systems intended use is for copying and editing of
personal audio and video data. Any attempted use of this equipment for the duplication
of copy-protected materials is a criminal act and the manufacturer is not responsible for
such illegal recordings.
Warranty and Limitation of Liability--THE INFORMATION AND/OR MATERIALS
CONTAINED HEREIN ARE PROVIDED “AS IS,” WITHOUT WARRANTY OF ANY
KIND, EITHER EXPRESS OR IMPLIED, INCLUDING, BUT NOT LIMITED TO, THE
IMPLIED WARRANTIES OF MERCHANTABILITY AND FITNESS FOR A PARTICULAR
PURPOSE.
The Company shall not be liable for direct, indirect, special, incidental, or consequential
damages related to your decision to use any of the information in this document, even if
we are advised of the possibility of such damage.
The information contained in this document is subject to change without notice.
SmarrCopy™, and the SmarrCopy™ logo are the legal property of Utronics
International, Inc.
i
INDEX
Chapter 1 INTRODUCTION...............................................................................5
1.1 Overview .............................................................................................5
1.2 Features of SmarrCopy CD/DVD/Duplicator.......................................5
Chapter 2 GETTING STARTED.........................................................................7
2.1 Before You Start...................................................................................7
2.2 Unpacking the Case............................................................................7
2.3 Installation Instructions........................................................................7
2.4 About the LCD Panel Display..............................................................9
2.5 Turing on the system...........................................................................9
Chapter 3 THE BASICS...................................................................................10
3.1 Function.............................................................................................10
3.2 Start the System................................................................................11
3.3 Disc Duplication.................................................................................12
3.3.1 Disc-to-Disc Copy.....................................................................12
3.3.2 HDD-to-Disc Copy....................................................................13
3.3.3 Set (HDD) Partition Name........................................................14
3.4 Edit and Duplicated Audio CDs..........................................................15
3.4.1 Compilation and Duplication Thru CD/DVD Drives..................15
3.4.2 Compilation and Duplication Thru Built-In HDD.......................16
3.4.3 Delete the Contents in HDD Partition.......................................17
3.5 Unable to Identify the Master CD Being w/o RING Protection...........18
3.6 RING Setup in Master CDs................................................................19
3.7 Updating the Controller Firmware......................................................20
Chapter 4 NOTE...............................................................................................21
Chapter 5 MENUS IN THE OPERATION MODE.............................................23
5.1 Test....................................................................................................23
5.2 Copy..................................................................................................23
5.3 Compare............................................................................................23
5.4 Copy & Compare...............................................................................23
5.5 Verify..................................................................................................23
5.6 Erase.................................................................................................23
5.7 Load...................................................................................................24
Chapter 6 MENUS IN THE SETUP MODE......................................................25
6.1 Partition Name...................................................................................25
6.2 Set as Default....................................................................................25
6.3 Update Firmware...............................................................................25
6.3.1 Updating the Controller Firmware............................................25
6.3.2 Updating Drive/Writers Firmware.............................................26
6.3.3 What You Have to Know About Firmware Update....................27
6.3.4 The Firmware Support List CD/DVD Drives.............................27
6.4 CD Reading Speed............................................................................34
6.5 CD Writing Speed..............................................................................34
6.6 DVD Reading Speed.........................................................................34
6.7 DVD Writing Speed............................................................................35
6.8 Burn Test Mode..................................................................................35
6.9 Advanced Setup.................................................................................35
Chapter 7 MENUS IN THE ADVANCED MODE..............................................36
7.1 Choose Source..................................................................................36
7.2 Disc Counter......................................................................................36
7.3 Skip Read Err....................................................................................37
7.4 CD Writing Way..................................................................................37
7.5 DVD Writing Way...............................................................................38
7.6 Check TRK LEN.................................................................................38
7.7 Show Disc Info...................................................................................38
7.8 Show System Info..............................................................................38
7.9 Show EXE. Time................................................................................38
7.10 Auto EXE. Time................................................................................39
7.11 Enable Send OPC............................................................................39
7.12 Support UPC/ISRC..........................................................................39
7.13 Region Free Set...............................................................................39
7.14 Partition Size....................................................................................40
7.15 CD GigaRec Rate............................................................................40
7.16 Disable L0 Change..........................................................................40
7.17 Boot Delay Time..............................................................................41
7.18 Fast Close Disc................................................................................41
7.19 Disable Power Rec..........................................................................41
7.20 Auto Close Tray...............................................................................41
Chapter 8 APPENDIX.......................................................................................42
8.1 Specification......................................................................................42
8.2 Main Board Diagram..........................................................................43
8.3 Installation Instruction........................................................................43
8.4 Error Code Definitions.......................................................................45
8.5 Troubleshooting.................................................................................46
1
INTRODUCTION
1.1 Overview
Thank you for purchasing the SmarrCopy™ CD/DVD duplicator system
and welcome to this User’s Guide. This system is a work of the art in
the age of DVD Duplication. Your SmarrCopy™ Controller is capable of
providing superior quality copies in 18X high-speed mode with 18X DVD
burners installed on independent IDE Channels (18X for M09). It can be
used for quick system backups and supports various blank disc formats.
Its robust operating functions can be easily performed thru a simple two
button user-friendly interface. The SmarrCopy™ supports most DVD
writers, like NEC, Pioneer, Sony, Lite-On …… etc..
1.2 Features of SmarrCopy™ CD/DVD Duplicator 163/165/167/1611
A. Supports 18X writing speeds when installed on independent IDE
channels.
B. Uses UDMA4 mode for data transfer.
C.All DVD burners are allowed to run at full speed both independently
and simultaneously.
D.Up to 128MB buffer RAM. A sufficient amount of RAM insures efficient
flow of data from the reader to the burner, increasing the chances of a
successful high-speed burn.
E. An optional built-in HDD will allow storage of image files.
F. Format & name HDD partitions.
G.Because HDDDs perform better than ROM drives, a data transfer from
the HDDD to the DVD burner is less prone to error and copy speeds
are greatly improved.
H.Music CDs can be edited on the HDDD using the controller menus.
I. Users can chose and set different Read/Write speeds to improve copy
quality.
J. Support various writing methods such as TAO, SAO/DAO, RAW
and Incremental to meet users’ needs and increase DVD burner
compatibility. Using the appropriate writing methods will result in
improved compatibility between DVD burner and media type.
K. This duplicator is a “Standalone” unit and does not require a PC
connection to control any of its CD/DVD functions. All functions are
controlled using the simple two- button controls on the front of the unit.
L. The “Automatic Check” function on the controller card provides
detailed information on the source disk.
Chapter 1
M.The controller card also provides information about blank disks.
N.Error codes are provided and will be displayed on the controller’s
display screen.
O.Backup and recover data written on minor defective tracks of original
discs.
P. The system provides a “VERIFY” function to check source discs for
bad sectors.
Q.The system’s firmware can be upgraded by inserting upgrade disc.
R.The system can count the number of copied and failed discs.
S. With a built-in HDD, the user can use “Load” function to load source
discs to a preset or assigned location.
T. Execution time will be displayed in the LCD panel display.
U.Supports Plextor px-712a writer GigaRec technique.
V. Supports unlocking DVD video region coding.
W.Supports UPC (Universal Products Code) and ISRC (International
Standard Recording Code) to simplify backing up a complete disc.
1.2 Features of SmarrCopy™ CD/DVD Duplicator M09
1. Assemble and operate 9 DVD drives at most in a complete system.
2. Drives run simultaneously in full speed. Each operates individually
without interfering with the others.
3. Up to 128MB buffer RAM. A sufficient amount of RAM insures efficient
flow of data from the reader to the burner, increasing the chances of a
successful high-speed burn.
4. An optional built-in HDD will allow storage of image files.
5. The <MUSIC DJ> function, Edit and Duplicate Audio CDs, enables
the compilation of music albums whenever the source is in the optical
drive or in HDD.
6. Users can manually set both the reading and writing speeds to achieve
better quality. The controller also provides read/write speed and laser
power adjustments On-The-Fly.
7. Controller supports and differentiates most types of discs.
8. Controller provides users with main functions such as TEST(Simulate
Duplication), COPY, VERIFY,COMPARE, and ERASE.
9. Easy upgrade of the controller’s firmware using factory supplied CD.
10. All sectors and tracks of the source disc are inspected prior to the
duplication by controller in order to avoid any failed copies.
2
GETTING STARTED
2.1 Before you start
This product is for you to backup and save data. Please refer to the
copyright statement contained on front of inside cover
2.2 Unpacking the case
Please check that the following accessories have been included with your
SmarrCopy™ CD/DVD Duplicator.
1) Controller Card: Controller card and user’s manual.
2) Standard System: DVD-ROM Drive, CD/DVD Writers, Case with
Power Supply, and Power Cord, IDE HDD(Optional).
Please Note: If what you have purchased including the options, please
check the model and the numbers carefully. Contact your local dealer if
you find any defects or shortage.
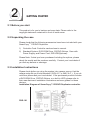
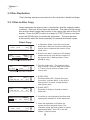
2.3 Installation Instructions
Please check before you plug the system into a power source, that the
voltage setup fits your local standard (120V A.C. or 240V A.C.). If you do
not know, please ask your local dealer. If the purchased product includes
a DVD-ROM Drive, CD/DVD Writers, or a built-in HDD, please refer to
their manufacturers’ installation illustrations and user guides for those
devices.
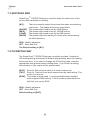
Installation Diagram of SmarrCopy™ CD/DVD Duplicator controller.
DVD-161
Chapter 2
DVD-167
DVD-1611
DVD-M09
Chapter
Getting Started
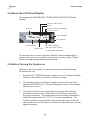
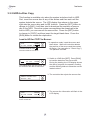
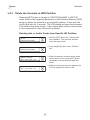
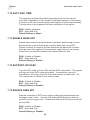
2.4 About the LCD Panel Display
The diagram for SMARRCOPY CD/DVD DUPLICATOR LCD Panel
Display
Number of Blank Discs
Manual
Number of Devices Detected
Function
Source Location
0 / M / 8S
TEST
0 PSD 0 FLD
000
Passed Discs
Select Button
Run Button
Hard Disk Partition
(will only show if there
Failed Discs
is a Hard Disk Installed)
The buttons can be used to perform different functions depending on
which mode you are in or which function menu you are using. Please
refer to corresponding chapters and sections.
2.5 Before Turning the System on
Before you turn the system on, please make sure that the following
conditions are met.
1. SmarrCopy™ CD/DVD duplicator system is put on a flat and steady
surface to illuminate errors due to vibration or slope.
2. The voltage setting to the power supply must be set to the local
standard (120/240V A.C.). Serious damage will occur if the voltage
setting is not correct.
3. The system drives work at high speed to access data and thus
produces excessive heat. Heat removal is therefore a key factor
for proper operation. The temperature in the working environment
should be kept at about 25° C/ 77° F or room temperature. The
system needs to be positioned so that the multiple fans in the unit
can ventilate the unit and remove the heat to insure that the unit will
operate properly.
3
THE BASICS
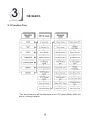
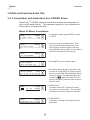
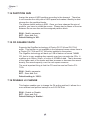
3.1 Function Tree
*The above features will be displayed in the LCD panel display while the
device is being installed.
10
Chapter
The Basics
3.2 Starting the System
Once the set up in 2.6 above has been performed, you may start the
system. Once started the controller card display will indicate the program
version used in your particular system. It then searches linked drives,
writers, or HDD. The searching process can be seen in the display
screen. The devices searched by SmarrCopy™ CD/DVD duplicator
controller follows in order #1, #2, #3, and so on. If there are any missing
devices indicated by the system, please check to see that the flat cables
and power lines are in connected securely, and see that the DVD-ROM
Drive, writers, and the HDD are all in good condition. If this problem
persists, please refer to the troubleshooting section of this guide or
contact your local dealer for services.
The Start Frames
The following frames show the start-up sequence of system checks.
SM A R R C O P Y
DU P L I C A T O R
Search Devices...
DVD 16 X D U P L I C A T O R
VER 1 . 8 3 E N G 0 5 1 0 F
#1: PIONEER DVD-RW
DVR-111
1.06
#2: ASUS
6A2
CHE C K M E M O R Y
DVD-E61
1.03
TEST
0 /M/ 8S
0 OPSD 0 FLD 000
MEM O R Y = 1 2 8 M B
11
Chapter 3
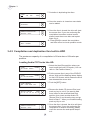
3.3 Disc Duplication
(The following operations are based on the controller’s default settings)
3.3.1 Disc-to-Disc Copy
Insert separately the source disc in drive/writer, and the target(s) media
in writers. Wait until all the discs are detected. The status of the source
disc and the blank media can be seen in the upper right side of the LCD
display. Press the [SET] button to change to {COPY} function and then
press the [RUN] button to initiate the duplication. The drive devices
automatically eject the discs separately for passed and failed copies.
Direct Copy:
0/M/8S
SET
0 FLD
000
RUN
COPY
#7 DVD 4465MB
7/M/8S7
-ROM
RUN
TEST
0 PSD
SET
The content of the source disc.
COPY
#7 001S
7/M/8S7
TYG01
C
SET
RUN
The session of the disc is closed
COPY
LONG OPC 0X
0%
COPY
LONG WRT 0X
0%
COPY
16X
100%
COPY
7 PSD
0 FLD
7/M/8S7
SET
0M
RUN
7/M/8S7
SET
0M
RUN
7/M/8S7
SET
4465M
RUN
0/M/8S7
SET
000
RUN
1. In Operation Mode, Insert the source and
blank discs. Wait until controller detects the
source device code and the amount of the
blank ones.
2. If the source disc is ready, the LCD display
shows the device code and the content of
the source disc in flashing letters. Press
[RUN] for copy.
3. The disc maker info.. This session of the
disc is closed. No more data can be filled
in. There is mono session of data in the
source disc.
4. [LONG OPC]
Controller does OPC, Optical Proximity
Correction, on blank discs. In the limit of
laser power in the disc, it finds the best
laser power value.
5. [LONG WRT]
Controller is writing in th lead-in area of
blank disc.
6. Controller is now duplicating the discs and
showing the related info. at the same time.
7. Once the duplication is finished, the
system will eject all good copies. The
controller shows the total number of copies
passed and failed. The LCD on the left
shows 7 passed copies.
12
Chapter
The Basics
3.3.2 HDD-to-Disc Copy
This function is available only when the system includes a built-in HDD.
First, insert the source disc in any of the writers and then wait until the
system detects the source. The LCD display then shows in the upper
right side the source disc and its IDE location. Press the [SET] button to
change to {LOAD}; it will then start to download the contents of source
disc to the HDD. Once the system accomplishes the download to the
built-in HDD, you can remove the source disc. Press the [SET] button
to change to {COPY} and then insert the target blank discs. Press the
[RUN] button to initiate the duplication.
Load to HD for COPY to Burner:
1/M/8S7
TEST
#7 DVD 4465MB -ROM 000
1.In operation mode, insert the source and
blank discs. Wait until controller detects
the position of the source and the number
of blanks. (You can refer to “ Direct Copy”)
The partition is at 000.
SET
RUN
Controller detects a HD
The source disc is now at S7
LOAD
5X
45%
1/1/8S7
2278MB
SET
RUN
The loading seed, rate of progress, and
the amount of the data of source disc.
REMOVE SOURCE DISC
ANY KEY→ EXIT
COPY
#H DVD 4465MB
0/M/8SH
-ROM
2. Switch to LOAD thru [SET]. Press [RUN]
to load the data from the source disc.
During the loading, the LCD display shows
the rate of progress, the speed in loading,
and the flashing letters to show the current
loaded volume.
3. The controller then ejects the source disc
SET
RUN
4. The source disc information will flash in the
LCD display.
SET
RUN
The present source device is at “#H”
which means HD.
13
Chapter 3
3.3.3 Set (HDD) Partitions Name
Each HDD partition is identified using 5 digits. The first 2 digits are
used for the ID setting to the HDD. The remaining 3 digits represent the
position on HDD partition. The capacity of HDD determines the number
of partitions. When loading CDs onto HDD, the HDD will be divided into
1GB/per partition. When loading DVDs onto a HDD, the HDD will be
divided into 9GB/per partition.
Example of 80GB HDD:
For CD loading, the HDDD is split up into 80 partitions using codes
00000-00079
For DVD loading, The HDDD is split up into 8 partitions using codes
00000-00007
Press and hold the [SET] button for 3 seconds. The function will then
change to the {SETUP} mode. Press the [SET] button to change to
{PARTITION NAME}. The [SET] button selects the position of partitions
and the [RUN] button will change partition codes. Once the setting is
finished, press and hold the [SET] button for 3 seconds to complete the
setting.
Set Partition Name:
TEST
0 PSD
0 FLD
0/M/8S
SET
000
RUN
SETUP
PARTITION
NA.
[00000]
RUN
NA.
[00000]
RUN
4. When the setup is finished, press [SET]
until it beeps. The partition setup is now
finished. Press [SET] once more to exit the
setup mode.
SET
NA.
TEST
0 PSD
3. You can start the partition setup when it’s
in “Partition NA.”
Shift the position of partition thru [SET]
Change the partition number thru [RUN]
SET
SETUP
PARTITION
2. If the controller had installed the Hard Disk,
you will see the function of “Partition NA.”
firstly after entered the setup mode.
SET
SETUP
PARTITION
1. In operation mode, press [SET] until it
beeps. It will then enter the setup mode.
0 FLD
[00001]
RUN
0/M/8S
SET
001
RUN
The partition name has been changed
to 001.
14
Chapter
The Basics
3.4 Edit and Duplicate Audio CDs
3.4.1 Compilation and duplication thru CD/DVD drives
SmarrCopy™ CD/DVD duplicator controller enables the compilation of
one or more audio disc(s). The maximum capacity to the compilation is
99 minutes or 99 tracks per disc.
Music DJ Music Compilation:
TEST
0 PSD
0/M/8S
SET
000
RUN
0 FLD
COPY
#4 01S15T
1/M/8S4
MUSIC
RUN
COPY TRACKS?
SET → YESȂRUN → NO
RUN
COPY
LOAD
LONG OPC
5X
COPY
LONG WRT
00/79
06 07
SET
3. Press [SET] to select music tracks.
SET
4. Controller shows all the tunes of the musical record. Press [SET] to switch the position of music tracks. Press [RUN] to select
the music tracks. The selected tracks are
marked as █ █. When the selection is finished, press [SET] until the beep and then
start the copy.
SET
RUN
1/M/8S4
1/1/8S7
0X 0%2278MB
0M
45%
RUN
1/M/8S4
0% 00/69
RUN
0X
2. Insert the source and blank discs. Wait
until controller detects the device code
of the source and the length of the disc.
Press [RUN] until the beep. You are able to
select music tracks from drive now.
SET
RUN
1/M/8S4
COPY
#4 CD CAP:0668MB
SELECT TRACKS
01 02 03 04 05
1. In operation mode, press [SET] to switch
to COPY.
5. [LONG OPC]
Controller does OPC, Optical Proximity
Correction, on blank discs. The controller
will optimize the laser power for that disc
SET
6. [LONG WRT]
Controller is writing in the lead-in area of
blank disc.
SET
15
Chapter 3
COPY
31X
53%
1/1/8S7
38/69
1/M/8S4
COPY
CLSE DISC..
7. Controller is duplicating the discs.
SET
RUN
8. Once the session is closed no more dada
can be added.
SET
RUN
REMOVE SOURCE DISC
ANY KEY → EXIT
WAIT SOURCE READY..
RUN → CANCEL
9. Once the disc is closed, the drive will eject
the source disc. If you are continuing the
compilation to another musical record,
please insert the source disc and repeat
steps 2 to 4.
SET
RUN
10. Press [RUN] to cancel the compilation
and then return to nirmal operation mode.
SET
RUN
3.4.2 Compilation and duplication thru built-in HDD
The maximum capacity of a compilation is 99 minutes or 99 tracks per
partition.
Loading Audio CD Tracks Into HD:
LOAD
#2 01S16T
1/M/8S2
MUSIC
RUN
1/M/8S2
LOAD
#2 CD CAP:0668MB
RUN
LOAD TRACKS?
SET → YESȂRUN → NO
RUN
SELECT TRACKS
01 02 03 04 05
1. Select the Hard Disc partition where you
want to edit the Audio CD tracks. (You can
refer to “Set Partition Name”)
SET
76/99
06 07
REMOVE SOURCE DISC
ANY KEY → EXIT
2. Put the source disc in any of the CD/DVD
drives. Wait until the flashing letters display
on the LCD Screen, which means the drive
has detected the source disc.
SET
3. Push the [SET] button.
SET
4. Remove the Audio CD (source Disc) and
push any key to exit. If you want to add
more tracks to the selected Hard Disk
partition, then insert another Audio CD
(Source Disc 2) and close the tray and go
back to Step 3. When you finished loading
push any key to exit.
SET
RUN
5. Once the disc is closed, the drive will eject
the source disc. If you are continuing the
compilation of another recording, please
insert the source disc and repeat steps 3
to 4.
SET
RUN
16
Chapter
The Bascis
3.4.3 Delete the Contents in HDD Partition
Press the [SET] button to change to “PARTITION NAME” in {SETUP}
mode. Refer to the foregoing descriptions in [Set Partition Names in HDD]
section to delete the contents in any particular partition. Press and hold
the [RUN] button for 3 seconds. The LCD display will show the command
if the deletion has been chosen. If the chosen audio track(s) is/are shown
in the command line, then it/they will be deleted.
Deleting info. or Audio Tracks from Specific HD Partition:
SETUP
PARTITION NA. [00000]
RUN
DEL PARTITION #000?
PARTITION NA. [00000]
RUN
DELETE TRACKS?
SET → YESȂRUN → NO
RUN
DEL PARTITION #000?
SET → YESȂRUN → NO
1. Hold the [SET] button for 3 second and
then release it. The controller will then
enter the setup mode.
SET
2. Push the [SET] button select “Partition
NA.”
SET
3. When the partition contains sound tracks
as the shown on left, press [SET] button
repeatedly as many times as there are
tracks
SET
4. When the last track has been deleted, the
LCD will display the frame on left.
SET
RUN
17
Chapter 3
3.5 Unable to identify the master CD being w/o RING protection
In Advanced mode press the [SET] button to change to {SKIP READ
ERR.}
Set it to [SHORT] in the {SKIP READ ERR} function. Then press the
[SET] button 1 more time to change to {CHECK TRK LEN} function. Set
it to [SHORT] as shown below in the captured screens. Once this setup
is complete, it will enable copying the master CDs that are unable to be
identified with or without RING. protection. The setting does not affect
normal copies.
Duplication of Source Disc with Bad Tracks which Can Not be
Judged by the Surface:
TEST
0 PSD
0/M/8S
SET
000
RUN
0 FLD
SETUP
ADCANCED SETUP
ADVANCED!SETUP
SKIP READ ERR [SHORT]
ADVANCED!SETUP
CHECK TRK LEN [SHORT]
1. In operation mode, press [SET] until the
beep. It then enters the setup mode.
2. Press [SET] than switch to Advanced
mode, and enter to Advanced mode menus
with [RUN] under setup mode.
SET
RUN
3. InAdvanced mode, press [SET] and
switch to “SKIP READ ERR.” then set it to
[SHORT] thru [RUN].
SET
RUN
4. Presses [SET] amd switch to “Check TRK
LEN” then switch the setting to [SHORT]
thru [RUN].
SET
RUN
18
Chapter
The Basics
3.6 RING Setup in Master CDs.
In Advanced mode press the [SET] button to change to {SKIP READ
ERR.}
Set it [LONG] in the {SKIP READ ERR} function. Press the [SET] button
one more time to change to {CHEK TRK LEN} function. Set it to [LONG]
as shown below in the captured screens. Thru this setup, you can do a
copy with RING master CDs. This setting does not affect normal copies.
Duplication of Source Disc with Bad Tracks:
TEST
0 PSD
0/M/8S
SET
000
RUN
0 FLD
SETUP
ADCANCED SETUP
RUN
ADVANCED!SETUP
SKIP READ ERR [LONG]
RUN
ADVANCED!SETUP
CHECK TRK LEN [LONG]
1. In operation mode, press [SET] until the
beep. It then enters the setup mode.
2. Press [SET] than switch to Advanced
mode, and enter to Advanced mode menus
with [RUN] under setup mode.
SET
3. InAdvanced mode, press [SET] and
switch to “SKIP READ ERR.” then set it to
[SHORT] thru [RUN].
SET
4. Presses [SET] amd switch to “Check TRK
LEN” then switch the setting to [SHORT]
thru [RUN].
SET
RUN
19
Chapter 3
3.7 Updating the Controller Firmware
Put the update CD into any of the Drive/Writers. In the operation mode,
hold the [SET] button until beep sound. It’s now entering the {SETUP}
mode. Change to the {UPDATE FIRMWARE} function and press the
[RUN] button to start the firmware update.
Duplication of Source Disc with Bad Tracks:
COPY
#4 01S16T
0/M/8S4
CDROM
COPY
#4 CD CAP:0002M
0/M/8S4
SET
RUN
SETUP
PARTITION NA. [00000]
RUN
SETUP
UPDATE FIRMWARE
RUN
UPGRADE NOW?
SET → YESȂRUN → NO
UPGRADE NOW
100%
UPGRADE SUCCEED!
RESTART NOW!
1. Insert the CD with the firmware upgrade
into one of the drives, and wait for the
controller to check it.
SET
RUN
2. Hold the [SET] button for 3 seconds and
then release it. The controller will then
enter the setup mode.
SET
3. Press the [SET] button and select the “UPDATE FIRMWARE”. Then press the [RUN]
button to start the firmware upgrade.
SET
4. Push the [SET] button to begin.
SET
RUN
5. Attention: do not turn off the power or push
any keys while upgrading the controller
firmware, it will crash the system and the
only way to fix it is send it back to your local distributor for repair.
SET
RUN
6. After the upgrade has been completed, the
system must be rebooted.
SET
RUN
20
4
NOTES
1. Check the voltage setting before you plug in the duplicator to see if
it fits the local standard. If the setting is incorrect, it may result in the
unstable display and damage to the system.
2. Please be aware that the power cord connection of the controller
card connects to the card in the opposite way of the DVD drives.
3. Please note that the controller is mainly for you to backup and keep
personal files. It is not intended to be used as an authentic disc
quality tester.
4. Please reload the source to HDD if the firmware in the controller has
just been updated.
5. If it fails to execute {TEST} when using DVD+R formatted blank
media and if you insist on running the function, the display will show
[PLEASE CHANGE TO COPY MODE].
6. If a DVD master is placed into the source drive and you insert a CD
blank into one of the writers, then the system will display [PLEASE
USE BLANK CD]
7. How controller finds the source?
1) When there is a combination of drives and/or built-in HDD in the
system, the controller seeks the source disc in those drives or
saved files in HDD.
2) If there is no source in either the drive or HDD, the controller
seeks the devices sequentially in turn. Please watch the right
upper side the S(*) sign when there are flashing letters in the
display screen. e.g. “S5” means that the source is in the 5th
writer.
3) If the source device is preset using [CHOOSE SOURCE], the
controller will run{ COPY} thru that preset source.
8. Please check the position of drive where the source is put before you
run each function. The position of the device should be same as that
shown in the display.
9. If both the source and the targets are DVD+RW, please be sure that
the position of the source device is correct.
10. Special attention should be made to direct DVD drive-to-drive copy.
1) DVD default settings :
1.1 We cannot guarantee the quality of read-out in direct copy
due to the performance variations with and among different
DVD drives. The DVD controller supports the highest
21
Chapter 4
possible read-out speed in direct copy using the drive
models listed below.
1.2 Lite-on JLMS XJ-HDD 166S / 167、Pioneer DVD121/122
support full speed in disc-to-disc copy. However, the
prerequisite is that the source disc must be DVD+R or Book
Type such as DVD-ROM.
1.3 Please contact us regarding the firmware for the abovementioned models.
1.4 Reset it only once in firmware update to the controller. It
remains the original setting when system reboot.
2) Manual setting to DVD write-in speed
2.1 Press and hold the SET button for 3 seconds. The system
will then enter the {SETUP} mode.
2.2 Change to setting to ‘DVD Writing Speed’.
2.3 Press [RUN] to change the default setting from MAX to 18X.
2.4 Once the setting is changed, the DVD controller will support
the highest read-out speed of the installed DVD drives in
direct the copy mode. However, it will have an effect on the
copy quality in direct copy because the DVD drives are not
able to read out the data in real time.
11. When upgrading the controller firmware please check for the
following conditions if the LCD screen displays “Wrong VENDOR”
message.
1) The system’s language or the corresponding controller model is
different than the version in the update CD.
For example : Either the controller is in Chinese language system but
the update CD firmware is in the English language, or the controller
model starts with CDR but the update CD is for the DVD model. 2) Possible error in burning or saving of downloaded firmware.
For example : You can use BURN IMAGE to burn .iso files but
must drag .bin files for burning. 1) The LOGO setting in the existing firmware of the controller does
not match what’s in the update CD. 2) Please make sure that the file is formed as .bin after being
burned onto the updated CD. 3) Once all of the above conditions have been met, please burn the
firmware again.
12. How to duplicate a CD+G source disc?
In [CD WRITING WAY] in the ‘Advanced Mode’, change to {RAW}
using the [RUN] button. Whether the direct copy thru drives or
the copy thru a HDD is chosen, the installed CD/DVD drives must
support the write-in or read-out mode to {RAW}.
13. How to determine if the DVD movie has CSS protection.
TEST
#1 DVD 7738MB
0 /M / 8S1
-ROM P
22
Namely, the source media protected
by CSS.
5
OPERATION MODE MENU
5.1 TEST
{TEST} simulates a duplication run either thru a disc-to-disc or HDD-todisc mode. {TEST} just does the burning test but does not actually write
to the blank disc. The source location is determined by the controller and
can be either the built-in HDD or one of the drives.
5.2 COPY
{COPY} does an actual burn either thru disc-to-disc or HDD-to-disc mode
and is decided by the user settings in the controller. {COPY} enables the
compilation of data or audio discs directly thru the source discs. Press
and hold the [RUN] button for 3 seconds to execute this function. Please
refer to chapter 3.3.
5.3 COMPARE
Compare pre-saved files either in the source drive or on the HDD to that
in the copied CD.
5.4 COPY & COMPARE
COMPARE follows COPY.
5.5 VERIFY
Verify the copied discs to see if there are any unreadable sectors.
5.6 ERASE
This mode erases the data on discs and is available under +R/RW writers
and -R/RW media. The default setting is {Quick Erase}. Pressing and
holding the [RUN] button for 3 seconds will do a {Full Erase}. The system
display will be the same but the process will take longer.
23
Chapter 5
5.7 LOAD
If the system has a built-in HDD, you can execute {LOAD}. You can load
data from the source disc to HDD partitions. The original data in the
partition will be over written. Users do not have to reset the partitions if
the load is for copy instantly since it just needs a partition for work only.
If you are loading various sources to the HDD, change to {PARTITION
NAME} to set the partition after each load is finished. This avoids
overwriting the original data in the partition.
{LOAD} enables the audio tracks in the source disc to be added to HDD
partition. Press and hold the [RUN] button for 3 seconds to execute this
mode. For details, please refer to chapter 3.3.
24
6
SETUP MODE MENU
The menus in the {SETUP} mode allows the user to setup an operation
in the SmarrCopy™ Duplicator. Pressing the [SET] button allows you to
make changes to all any available functions. Pressing the [RUN] button
allows you to change the setup. Most setup options are in parentheses.
The content in the parentheses indicates the present setup value. Hold
the [SET] button until a beep sounds. It will then exit the setup mode and
return to the operation mode.
6.1 Partition Name
Set up the ID and the partition number of HDD.
The partition number is formed using 5 digits. The first 2 digits are the
I.D. of the HDD section that you wish to change. It can be from 00 to 99.
The remaining 3 digits represent the position of the partition determined
by HDD capacity. The Default setting is 00000.
Press and hold the [RUN] button for 3 seconds to delete a particular
partition. Any audio tracks in that partition will be deleted. SmarrCopy™
Duplicator queries you to see if you really want to delete the partition.
Press the [RUN] button to cancel the command or press the [SET] button
to continue with the deletion of the partition.
6.2 Set as Default
The SmarrCopy™ Duplicator stores the argument settings in the
advanced mode. Use this function if you want to save these settings as a
default setting.
6.3 Update Firmware
6.3.1 Update the Controller Firmware
Change the {SETUP} mode and enter into the operation mode by holding
the [SET] button until beep sounds. Change the function to {UPDATE
FIRMWARE}. The SmarrCopy™ Duplicator system will start to detect the
devices to find the update CD. When the system finds the correct Update
CD, it will query the user to confirm the Update. To cancel the command,
just press the [RUN] button. When the SmarrCopy™ Duplicator system
is performing an update do not turn off the system power. Doing so will
cause the system to will fail and result in a shut down. The only way to
25
Chapter 6
remedy this is to send the system back to the manufacturer for repairs.
When the update action is finished, the screen will show a message and
all arguments will return to default settings. Please restart the system to
complete the task.
6.3.2 Updating Drive/Writers Firmware
In the operation mode, hold the SET button until beep sounds to enter
the {SETUP} mode. Change the function to {UPDATE FIRMWARE}. The
SmarrCopy™ Duplicator Controller searches for the update CD put in
the drive/writers. When SmarrCopy™ Duplicator Controller detects the
correct update CD, it will query you to confirm the update. To cancel the
command, just press the [RUN] button.
TEST
0 PSD
0/M/8S
SET
000
RUN
0 FLD
SETUP
UPDATE FIRMWARE
1. In operation mode, insert the update disc
to any of the drives. Wait until the controller
detects the update disc.
2. In operation mode, press [SET] until the
beep. Enter the setup mode and select
“UPDATE FIRMWARE.”
SET
RUN
UPGRADE XXX NOW?
SET → YESȂRUN → NO
RUN
UPGRADE XXX NOW
Please Wait ...120
RUN
3. DVD-18X controller asks if you are really
going to update firmware. Press [SET] for
YES or [RUN] for NO.
* XXX represents the brand of the device.
SET
4. Press [RUN] to update the firmware of
drive.
SET
NOTE: Updating the firmware will take
120 sec. Do not turn off the power or
press and buttons. Doing so will cause
a system crash.
**XXX represents the brand of the
device.
UPGRADE SUCCEED
RESTART NOW!
5. The display shows the succssful update.
Please restart the DVD-18X controller.
SET
RUN
NOTE: Before you restart the controller,
Please take out the update disc from
the drive in advance.
26
Chapter
Setup Mode Menu
6.3.3 What you need to Know About Firmware Updates
1) Before doing an update, please be sure that you have correct
firmware version.
2) Because of some unforeseen factors successful firmware updates
are not guaranteed.
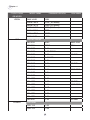
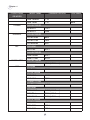
3) If the firmware update fails, please consult your supplier. 6.3.4 Firmware Support List for CD/DVD Drives.
CD/DVD DRIVE
OR WRITER
MODEL NAME
FIRMWARE VERSION
CD-ROM
LTN-529S
7S57
LTN-529SV
7$58
CD-RECORDER
LTR-52327S
QS0E, QS5A
LTR-52328S
4S07
LTR-52329S
2S09
SOHR-5239S
2S0B
SOHR-5239V
2$0B
COMBO CD-RW
LITEON
SOHC-5236K
RK0A (18X Read)
DVD-ROM
LTD-166S
DS1E (18X Read)
SOHD-167T
9S1B (18X Read)
SOHD-16P9S
FS09 (18X Read)
SOHD-16P9SV
F$01 (18X Read)
DVD-RECORDER
SHOW-811S
HS0R (12X Read)
SHOW-812S
US0S (12X Read)
SHOW-832S
VS0M (12X Read)
LDW-851S
GS0P (12X Read)
SOHW-1213S
TS0J (18X Read)
SOHW-1613S
AS06 (18X Read)
SOHW-1633S
BS0Y (18X Read)
27
OEM NAME
Chapter 6
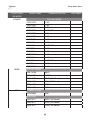
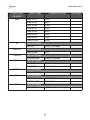
CD/DVD DRIVE
OR WRITER
LITEON
NEC
PIONEER
MODEL NAME
FIRMWARE VERSION
SHW-1635S
YS0V
SOHW-1653S
CS0T (18X Read)
SHOW-1673S
JS0D (18X Read)
SHOW-1693S
KS0B (18X Read)
SHW-160P6S
PS09
SHM-165P6S
MS0N
SHW-16H5S
LS0W
OEM NAME
DVD-RECORDER
ND-2510
20F9
MAD DOG
ND-2510
205C
DELL
ND-3500
2.1B
ND-3520
3.07-OFFICA
ND-3520
3.23
ND-3540
1.03-FAST
ND-3540
1.04
ND-3540
1.24
ND-3540
1.W9
ND-3540
1.F1
ND-3550
1.06
ND-3550
1.Y6
ND-4550
1.08
ND-4550
1.29
IO-DATA
ND-4550
1.F1
MAD DOG
ND-4550
1.X7
ND-4550
1.84
ND-4551
1.08
ND-4551
1.21
ND-4551
1.22
DVD-ROM
DVD-122
1.03
DVD-123
1.06
28
IO-DATA
IO-DATA
MAD DOG
IO-DATA
Chapter
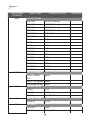
CD/DVD DRIVE
OR WRITER
Setup Mode Menu
MODEL NAME
FIRMWARE VERSION
PIONEER
BENQ
SONY
DVD-RECORDER
DVR-107D
1.22
DVR-108D
1.20
DVR-109D
1.58
DVR-109D
1.58-FAST
DVR-109D
8.58
DVR-110D
1.39
DVR-110D
8.37
DVR-A10
1.39
DVR-A10
1.39-FAST
DVR-110
1.39
DVR-110
8.39
DVR-111D
1.19
DVR-A11
1.19
DVR-A11
1.19-FAST
DVR-111
1.19
DVR-111D
1.19
DVD-RECORDER
DW-1610A
B8V9
DW-1610A
G8M9
DW-1620A
B7W9 (18X Read)
DW-1625A
BBIA (18X Read)
DW-1640A
BSPB
DW-1640A
GSHB
COMBO CD-RW
CRX320EE
RYK1
DVD-ROM
DDU1612
DYS3 (18X Read)
DDU1613
9YS2 (18X Read)
DDU1615
FYS2 (18X Read)
29
OEM NAME
Chapter 6
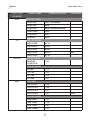
CD/DVD DRIVE
OR WRITER
SONY
MEMOREX
MODEL NAME
FIRMWARE VERSION
DVD-RECORDER
DRU-70A
VY08 (12X Read)
DRU-710A
BYX5 (18X Read)
DRU-720A
JY07 (18X Read)
DRU-720A
JY08 (18X Read)
DRU-800A
KY06 (18X Read)
DRU-810A
1.0E
D22A
BYS3
D23A
CYS1
D26A
JYS2
DW-Q28A
KYS4
DW-Q28A
KYR6
DW-Q30A
YY04
DW-Q31A
KYS6
DW-U18A
UYS4
DW-G120A
MYL2
DW-G120A
MYR3
DW-G120A
MYS3
DVD-RECORDER
DVD+- DLRWL1
F16
BWSE
DVD+- RW TRUE8XI UWS4
DVDUR RW 8412AJ HWS7
MSI
NU
DVD-RECORDER
DR16F
2.10
DR16F2
2.50
DR16B3
B1.1 (18X Read)
DVD-RECORDER
DDW163
TEAC
G7V9
DVD-ROM
DV-516G
F4S6
DV-516G
F4S6 (18X Read)
30
OEM NAME
Chapter
Setup Mode Menu
CD/DVD DRIVE
OR WRITER
TEAC
LG
PLEXTOR
MODEL NAME
FIRMWARE VERSION
OEM NAME
DVD-RECORDER
DV-W512G
T4S9 (18X Read)
DV-W516G
B4S6
DV-W516G
B4S6-LowSpeedSupport
DV-W516GB
J4S2
DV-W58G-A
U4S7
DV-W58G
H4S4
DVD-RECORDER
GRA-4120B
A116
GSA-4082B
A209
GSA-4160B
A306
GSA-4163B
AN16
GSA-4163B
A106
NEC
CD-RECORDER
FREMIUM
PX-W5232TA
1.06
DVD-RECORDER
ASUS
PX-78A
1.12
PX-712A
1.09
PX-716A
10.9
PX-740A
1.01
DVD-ROM
DVD-E616A
1.08
DVD-E616P2
1.08
DVD-E616P3
1.07
DVD-E616P3
1.07
DVD-RECORDER
DRW-0804P
1.21
DRW-1604P
1.18
DRW-1608P
1.57
DRW-1608P2
1.39
31
OEM
Chapter 6
CD/DVD DRIVE
OR WRITER
TOSHIBA
GIGABYTE
BTC
MODEL NAME
FIRMWARE VERSION
DRW-1608P2S
1.39
DRW-1608P
1.57
DVD-RECORDER
SD-R5275
1031
SD-R5372
TU56
DVD-RECORDER
GO-W1608A
B8S3
GO-W1616A
J8S2
GO-W0808A
USY1
DVD-ROM
BDV316G
0019
DVD-RECORDER
HIVISON.COM
DRW1004IM
0251
DRW1116IM
A190
DVD-RECORDER
DRW3S121
4KUS
TSW1 (18X Read)
CD-ROM
CCD-9S52
7SGB
CD-RECORDER
CDR-9S52
2SGB
CDR-9S52
2$G6
COMBO CD-RW
COB-6K5216
RKG5
DVD-ROM
DVD-16X65
DSG2 (18X Read)
DVD-7T16
9SG6 (18X Read)
DVD-9S16P
FSG2 (18X Read)
DVD-RCORDER
DRW-1S81
HSG8
DRW-2S81
USG4
DRW-2S83
VSG1
32
OEM NAME
BULK
Chapter
Setup Mode Menu
CD/DVD DRIVE
OR WRITER
4KUS
HP
MODEL NAME
DRW-3S121
TSG2
DRW-3S163
BSG5
DRW-3S165
CSG5
DRW-3S167
JSG8
DRW-3S169
KSG3
DRW-5S163
YSZ2
DRW-5S163
YSG6
DSM-6S165P
MSG7
DVD-RECORDER
HP530R
IMATION
OPTODISC
AOPEN
TOSB (18X Read)
DVD-RECORDER
ED16DVDR
B5S6
ED8 DVDRW
V5S3 (12X Read)
DVD-RECORDER
OptoriteDD0201
TDK
HSI3
DVD-RECORDER
DVDRW12448
PHILIPS
VPSG (12X Read)
DVD-RECORDER
IMWDVRW8I
IOMEGA
FIRMWARE VERSION
2.60
DVD-RECORDER
DVDRW 1612DLB
C7S3 (18X Read)
DVDRW 1280B
T7S4 (18X Read)
DVD-RECORDER
DUW-1608P
A080
33
OEM NAME
Chapter 6
6.4 CD READING SPEED
The setting to CD drive reading speed. CDR models support :
MX/01/02/04/06/08/10/12/16/20/24/32/40/46/48/52
[MX] : The maximum speed in CD reading. If the setting exceeds the
highest CD reading speed of the drive, the drive works at its highest
speed.
[MD] : It reads at the highest speed the blank disc supports.
RUN – Modify parameter
SET – Save and Quit
Default setting is [MX].
6.5 CD WRITING SPEED
The setting to CD writer writing speed. CDR models support :
MX/01/02/04/06/08/10/12/16/20/24/32/40/46/48/52
[MX] : The maximum speed in CD writing. If the setting exceeds the
highest CD writing speed of the writer, the writer works at its highest
speed.
[MD] : It writes at the highest speed the blank disc supports.
RUN – Modify parameter
SET – Save and Quit
Default setting is [MX].
6.6 DVD READING SPEED
The setting to DVD drive reading speed. DVD models support :
MX/1/2/2.4/4/6/8/12/16/18
[MX] : The maximum speed in DVD reading. If the setting exceeds the
highest DVD reading speed of the drive, the drive works at its highest
speed.
[MD] : It reads at the highest speed the blank disc supports.
RUN – Modify parameter
SET – Save and Quit
Default setting is [MX].
34
Chapter
Setup Mode Menu
6.7 DVD WRITING SPEED
The setting to DVD writer writing speed. DVD models support :
MX/MD/1/2/2.4/4/6/8/12/16/18
[MX] : The maximum speed in DVD writing. If the setting exceeds the
highest DVD writing speed of the writer, the writer works at its highest
speed.
[MD] : It writes at the highest speed the blank disc supports.
RUN – Modify parameter
SET – Save and Quit
Default setting is [MX].
6.8 BURN TEST MODE
The purpose of Burn-in feature is to test the compatibility between the
System and the burners.
This feature will apply the {TEST} and {COMPARE} function.
RUN – Modify parameter
SET – Save and Quit
Default setting is ‘Disable’.
6.9 ADVANCED SETUP
Enter Set-Up mode using the [RUN] button and chose ‘Advance
Functions’.
Some features in “Advance Functions” are as follows;
Pressing the [SET] button until its beep sound changes brings you to go
back to the last screen.
Pressing the [SET] button two times will bring you back to the Main
Screen.
35
7
AVANCED MODE MENU
7.1 CHOOSE SOURCE
Changing the device code of the source. Press [RUN] to change the
default code setting for source device. The digits displayed represent the
device code. “A” means the auto-operation determined by SmarrCopy™
CD/DVD Duplicator controller itself. If the SmarrCopy™ CD/DVD
Duplicator controller is in the auto-operation mode, it will seek and sort
the source devices below.
A. DVD-ROM drive contains a readable disc.
B. The system includes a built-in HDD where there are readable data in
the partitions.
C. Recorder/Writer contains a readable disc while the device code is the
smallest.
RUN – Modify parameter
SET – Save and Quit
The Default setting is [A] which means that the SmarrCopy™ CD/
DVD Duplicator controller is in its auto operation and will determine
items A, B, and C above.
7.2 DISC COUNTER
The number of the target discs in auto-operation mode.
Those digits stand for the number of discs.
[M]:Press the [RUN] button manually.
[A]: The SmarrCopy™ CD/DVD Duplicator controller in auto-operation
determines the number of target discs that are in the machine to be
copied. Normally, the number of target discs is equal to or less than the
number of writers in a system.
RUN – Modify parameter
SET – Save and Quit
Default setting is [M] which means manual operation.
36
Chapter
Advanced Mode Menu
7.3 SKIP READ ERR
SmarrCopy™ CD/DVD Duplicator controller skips the read errors of the
source disc and keeps on reading.
[NO] :
The drive instantly rejects the source disc when encountering
read errors. The display will show a copy failure.
[SHORT] :The system skips read errors by 2-KB sectors
[MED] : The system skips read errors by 100-KB sectors.
[LONG] : The system skips read errors by few-MB sectors.
[SKIPA] : The system skips the reading of a track when encountering
the first bad sector.
RUN – Modify parameter
SET – Save and Quit
The Default setting is [NO]
7.4 CD WRITING WAY
The SmarrCopy™ CD/DVD Duplicator controller provides 3 modes for
CD reading/writing and follows its default writing setting when the reading
the source drive. If you want to change the CD writing mode, reset the
appropriate writing mode before loading dicks. If you force the setting,
the accuracy of your copies will be questionable.
[DAO] : Short for Disc at Once which is in most common use.
[TAO] : Short for Track at Once which means track-by-track writing. This
mode is in rare use.
[RAW] : This mode is rarely used. It is only available when installed
writer supports RAW writing. If the 2 modes mentioned above
both fail, you can try RAW.
RUN – Modify parameter
SET – Save and Quit
Default setting is [DAO].
37
Chapter 7
7.5 DVD WRITING WAY
[DAO] : Short for Disc at Once which is in most common use. DAO is fit
for not only outdated but up-to-date DVD writers.
[INC] : INC improves the readability in other DVD players. INC suits old
writers or writers which support INC writing.
RUN – Modify parameter
SET – Save and Quit
Default setting is [DAO].
7.6 CHECK TRK LEN
There are various ways for the detection of bad sectors.
[NO] :
Read as GAP = 0.
[AUTO] : Read by standard GAP.
[SHORT] :Read by short GAP.
[LONG] : Read by long GAP.
RUN – Modify parameter
SET – Save and Quit
Default setting is [SHORT].
7.7 SHOW DISC INFO.
Show the disc info. what is put in the drive/writer.
For CDs : It shows ATAPI CODE
For DVDs : It shows MANUFACTURE CODE
7.8 SHOW SYSTEM INFO.
Shows hardware information about the controller, drive, writer, and HDD.
7.9 SHOW EXE. TIME
Shows the time used to execute a function to completion.
RUN – Enable or Disable
SET – Save and Quit
Default Setting is ‘Disable’.
38
Chapter
Advanced Mode Menu
7.10 AUTO EXE. TIME
The system must detect the blank discs before this function can be
executed. Regardless of the number of the blank discs put in the writers
is correct or not, the controller goes executing the functions automatically.
This execution is not repeated until the cancellation of this option.
RUN – Modify parameter
SET – Save and Quit
Default Setting is ‘60sec’.
7.11 ENABLE SEND OPC
Adjusts laser power to the blank discs to optimize disk-burning process.
Because there is no such thing as a perfect blank disk, using OPC,
Optical Proximity Correction, we can determine the best level of power
from the laser to be applied to the particular target disks you are using.
SmarrCopy can therefore produce the lowest read error rate.
RUN – Enable or Disable
SET – Save and Quit
Default Setting is ‘Enable’.
7.12 SUPPORT UPC/ISRC
Copy the UPC code of music CDs and the ISRC code tracks. The system
will copy all of the ISRC code information. It records the country of
manufacture, the owner, the date, the serial number of each track…etc.
The content can be different from track to track.
RUN – Enable or Disable
SET – Save and Quit
Default Setting is ‘Disable’.
7.13 REGION FREE SET
Rips the restriction of DVD movie region coding and automatically sets
the region code to free . As such, the duplicated DVD movies have no
protection to the region code. Please note that the DVD movies must first
be non-CSS.
RUN – Enable or Disable
SET – Save and Quit
Default Setting is ‘Disable’.
39
Chapter 7
7.14 PARTITION SIZE
Assign the space of HDD partition according to the demand. Therefore,
it can increase the utility rate of HDD space and makes it flexibly to data
storage thru the partition blocks.
The system default setting is 9GB. Once you have changed the size of
partition, you have to reload the source. Please also be aware of the size
between the source disc and the assigned partition block.
RUN – Modify parameter
SET – Save and Quit
Default Setting is ‘9G’.
7.15 CD GIGAREC RATE
Supports the GigaRec technology of Plextor PX-712A and PX-716A
writer. This function is not available in the Advanced menu unless there is
a Plextor PX-712A and PX-716A writer installed in the system.
The GigaRec technology will back up 1GB of data on a normal 740MB
CD, that is to say, enabling disc capacity over-burn on particular CDs. It
enables up to 99min. 59sec. of music or 875MB of data. That is because
of the higher rank of the tracks and then increase or decrease the record
density, the record capacity, over the unit square measure.
The most important thing is that the CD must be read on Plextor PX712A.������� RUN – Modify parameter
SET – Save and Quit
Default setting is ‘100%’.
7.16 DISABLE L0 CHANGE
This feature enables you to change the DL writing method; it allows for a
more efficient and quicker backup to an 8.5G DL Disk.
RUN – Enable or Disable
SET – Save and Quit
Default Setting is ‘Enable’.
40
Chapter
Advanced Mode Menu
7.17 BOOT DELAY TIME
Some 18X writers take more time to initiate and can cause delays in
the time it takes the system to boot, but other writers will not cause this
problem. If the writers are able to support quick initiation, the feature will
allow the user to change this parameter to shorten the boot time. The
default setting will give enough time to insure that all writers are able to
complete the boot process.
RUN – Modify parameter
SET – Save and Quit
Default Setting is’0’
7.18 FAST CLOSE DISC
This feature works only with DVD+R discs with data of less than 1G.
This feature does not work for all writers, unless the writer supports this
function.
RUN – Modify parameter
SET – Save and Quit
Default Setting is ‘Disable’
7.19 DISABLE POWER REC.
As usual, the user can decide at which speed he/she would like to burn,
however, high speed writing may lead to poor writing quality and a high
failure rate. At the same time, the user should consider the quality of the
discs being used. Enable Power Rec. allows the duplicator to recognize
the disk quality and the best or optimal writing speed for those particular
disks. However, this feature is only supported for some writers, and not
for all.
RUN – Modify parameter
SET – Save and Quit
Default Setting is ‘Enable’
7.20 AUTO CLOSE TRAY
When the user inserts a master disk in the ROM tray, and presses the
[RUN] button, the system will automatically load the information on master
disc onto the hard drive.
RUN – Modify parameter
SET – Save and Quit
Default Setting is ‘Enable’
41
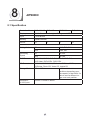
8
APPENDIX
8.1 Specification
Controller Model
DVD-163/165
DVD-167
Display
20 X 2 Character with Lighted Background LCD
Input
2 Push Button
Memory
128MB SDRAM
Device
3/5
Writing Method
CD
DAO, TAO, RAW
DVD
DAO, INC
Recording
Speed
CD
1X-52X
DVD
1X-18X
DVD Format
DVD-ROM, DVD-R, DVD-RW, DVD+R, DVD+RW,
DVD-Video, DVD+R DL, DVD-R DL
CD Format
CD-ROM, CD-ROM XA, CD-Audio, CD Extra, CD Text,
CD-Bridge, Photo-CD, Video CD, Hybrid CD
Storage Device
IDE Hard-Disk
Dimension
(L*W*H) mm
235mm X 155mm X 60mm
7
42
DVD-M09
9
DVD-1611
11
It will be divided into several
partitions depending upon
the capacity of hard disk. It’s
able to save a different image onto each partition.
Chapter
Appendix
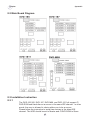
8.2 Main Board Diagram
8.3 Installation Instruction
8.3.1
The DVD-163/165, DVD-167, DVD-M09, and DVD-1611 all support C/
DVD-ROM and Hard-disc as a source in the same IDE channel. In other
words, the user is allowed to choice either one to be a source.
Please follow the instruction to install two devices in the latest IDE
channel. The HDD should be set to Master and C/DVD-ROM to Slave.
43
Chapter 8
8.3.2
Loading speed will be based on the reader’s performance. Using the
same source disk in a different C/DVD-ROM will likely produce different
reading speed results.
44
Chapter
Appendix
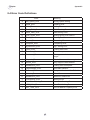
8.4 Error Code Definitions
Code
Meaning
‘S’
Set_Speed_Error
Wrong Speed Setting
‘r’
Read_Error
Reading Error
‘w’
Write_Error
Writing Error
‘R’
Read_DMA_Error
DMA Reading Error
‘W’
Write_DMA_Error
DMA Writing Error
‘U’
CUE_Sheet_Error
Writing Wrong CUE-SHEET
‘E’
Erase_Error
Erasing Error
‘F’
Format_Error
Formatting Error
‘C’
Compare_Error
Comparing Error
‘Z’
Synchronize_Error
Syn. Writing Error
‘O’
Close_Error
Closing Disk Error
‘T’
Terminate_Error
Data Interrupt
‘B’
Blankmed_Error
Disk type error between source and
target
‘A’
Atipcode_Error
Blank disk can not be recognized
‘M’
Mcode_Error
Only Support Ritek Medium
‘D’
Readdiscinf_Error
Closing Disk Incomplete
‘N’
Targnotempty_Error
Non Blank Medium
‘P’
Plusrtest_Error
Doing test function with +R Medium
‘K’
Unknow_Error
Other Error
‘D’
Readdiscinf_Error
Medium Format Error
‘J’
CDDVDDisc_Error
Medium Error
‘G’
Hard-Disk Reading Error
Hard-Disk Reading Error
‘H’
HDD_Write_Error
Hard-Disk Writting Error
‘I’
Rev_Track_Error
DVD-R Medium Capacity Error
45
Chapter 8
8.5 Troubleshooting
● SMARRCOPY™ CD/DVD DUPLICATOR Controller is unable to start or starts but
without display ??
Solutions:
1.) Check if the power setting in the rear of the system is set to the
local voltage standards.
2.) Open the case to see if the power cables are connected.
3.) Open the case to see if the cable to the LCD Display is
connected.
● The System is Unable to Duplicate CDs.
Solutions:
1.) First check to see if the system detects all the devices. If there
are any missing devices, please open the case to check if all
the flat cables and power cables are firmly connected. All the
devices should be set to MASTER.
2.) Check to see if there are any scrapes or other visual damage on
the source CD.
3.) Try some other blank CD media.
4.) Check if the master CD is not copy protected and ready for
duplications.
5.) Check if the source devices are in good condition.
● Deceleration or Unstable Burning.
Solutions:
1.) If you install the devices yourself, please be sure that the
installation instructions in user manual have been followed
correctly.
2.) Try to use other blank CD media brands. When the quality
of the target CD is questionable you may get poor results.
Moreover, it might be that the writers have not yet proofread
the blank CD media you are attempting to use. We especially
recommend that you open the [Disable Send OPC] function in
the setup mode.
3.) When a hard disk is installed and used as your source drive, the
writing/reading stability should be improved. This method will
tend to reduce any negative influences caused by a less than
perfect source disk
46
Chapter
Appendix
4.) Any single defective device will affect the writing performance
of the system as a whole. Try to locate the defect device if
possible.
5.) If any blank disk does not support high-speed reading or writing,
the system speed may become unstable. If this happens, try
to slow down the writing speed.For example reduce the speed
from 52X to 48X or to 40X.
● Music CDs have interference noise or VCD have blocks.
Solutions:
1.) Check the source quality to see if it has noise or block.
2.) Slow down the writing speed. For example slow down from 52X
to 48X or to 40X.
47
www.smarrcopy.com
Copyright © 2006 SmarrCopy™