1
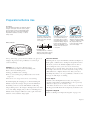
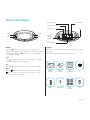
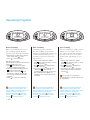
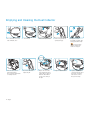
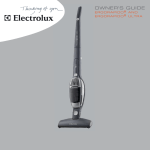
English
Table of Contents
Let me take the strain out of cleaning. Just leave me on the floor.
I will vacuum for you. Automatically.
My built-in, advanced sensors scan the room when I vacuum.
I charge myself and switch off when the job is done. Just leave
me to do the job.
Time to
enjoy life
Let me vacuum the kitchen when you are surfing the net in the
office. I will take care of spilled rice and sugar. I will take care of
the office when you are in the kitchen. Let me vacuum a room
each day when you go to work.
I am Trilobite – your personal vacuum cleaner. I do the
vacuuming so you can do other things, whenever you want, as
often as you want.
Important Safeguards
1–2
Time to enjoy life
3
Product Description
5
Getting started
Preparations Before Use
6
7–8
Buttons and Display
9
Vacuuming Programs
10
Timer
11
Changing the Message Display Language
11
Error Messages
11
Emptying and Cleaning
the Dust Collector
12
Cleaning the Roller
13
Questions and Answers
14
Accessories
15
After-Sales Service
16
Technical Specifications
16
English 3
“I am Trilobite – your personal vacuum
cleaner. I do the vacuuming so you can do
other things”
4 English
Product Description
Filter lid
lock button
Roller
Drive wheel
Rating plate
Terminals for
connection
to charger
Roller cover
lock button
Self-adhesive magnet strip for
permanent installation
Battery charger
Display
Handle
Connection
terminals
Movable, wide magnetic
strip for temporary use
Flexible bumper
Trilobite
Trilobite navigates using ultrasound and uses infrared light to
detect differences in surface level. During Wall Mapping, it receives
information about the size of the room.Wall Mapping is the basis
for the estimated duration for independent vacuuming in Normal
vacuuming mode.
NOTE:Trilobite is not fully charged upon delivery. Before
using it the first time, connect it to the battery charger (see page 7).
A full battery charge takes approximately two hours.
Battery charger
Put the battery charger on the floor, plug it into a nearby outlet
and place it with its rear side facing the wall. Allow a free space of
8 inches on the right side of the charger.When Trilobite has
completed Normal vacuuming, it returns to the charger.The
batteries are then charged, and it is ready for more work.
Magnetic strips
The magnetic strips serve as “virtual walls” and are important for
correct operation. Use them to block door and wall openings, as
well as differences in level of less than 4 inches (see page 8).
Be sure to block differences in level of less than 4 inches with the
magnetic strips. If you fail to do so, Trilobite could fall over the edge
and cause injuries or damage to property.
A self-adhesive magnetic strip that has been pulled back up has
less adhesive capability.We therefore strongly recommend that
you permanently mount all necessary strips. Never re-use the
adhesive of a magnetic strip in any application where safety is
important. Note that the magnetic strip is not a safety device
unless it is fastened to the floor; that applies to both the selfadhesive and the wider strip. If you nonetheless choose to let a
strip lie unfastened on the floor, make sure that the side with the
adhesive (covered by the protective paper backing) is face down!
For the wide magnetic strip, the flat side (marked with two
parallel grooves) should be facing downwards.
Use a pair of scissors or a knife to trim magnetic strips to the
correct length. See page 8 in the user instructions to see how a
magnetic strip should be fitted.
NOTE: Magnetic strips left partially coiled, may attract
Trilobite when it is seeking the battery charger – uncoil the
magnetic strip completely.
Emptying the dust collector
Empty the dust collector when the Dust Collector icon shows in
the display. Be sure to empty the dust collector, even if it is not
completely full.The light indicator may be displayed if a filter is
blocked.
English 5
Getting started
To make it easier to find
the charger, start Trilobite
towards a wall close to
the charger.
NOTE: Trilobite starts by first travelling along
the walls to establish the size of the room. If the
charger is placed at an isolated item in the
room (e.g. an island), Trilobite will not be able to
find its way back to the charger.
Charger
Place the charger close to a wall.
This way, Trilobite will find the
charger during Wall Mapping.
Start
Wall mapping
Cleaning
Start Trilobite directly from the
charger, or face it towards a wall
at a distance of 20 inches. Start
vacuuming (see page 10).
Trilobite starts by travelling
along the walls of the room
to establish the size of the
room.
During the Vacuum Cycle,
Trilobite moves through the
room on its own.
Vacuuming program
Trilobite has three vacuuming programs:
“Normal” Trilobite first plots the room by following the walls
(wall mapping) and then vacuums all open surfaces.
“Quick” The same as Normal but without Wall Mapping.
“Spot”
Trilobite vacuums an area of about 10 sq.ft. twice.
See page 10 for more information on how to proceed and when to use the
different programs.
Starting vacuuming
You will probably use the Normal program most of the time.
This program starts with Trilobite approaching a wall and then
mapping the walls by left turns.Trilobite makes one full circuit of
the room, continually turning left. Depending on the size and
layout of the room, wall mapping may take up to 15 minutes (25
minutes, if Trilobite has found the charger).Wall Mapping ends
when the circuit is complete, and vacuuming commences.
Main cleaning program
During the main cleaning sequence,Trilobite moves freely all
over the room.Trilobite “sees” its way around with the help of
harmless ultrasound.This is the same technique that bats use to
navigate in the dark, for instance, and for fetal diagnostics in
6 English
hospitals.When it discovers an object in its path,Trilobite stops a
couple of inches in front of it and then changes direction.
Trilobite can handle most obstacles. However, if it does get
stuck,Trilobite will continue with its cleaning program if you
release it within 20 minutes, put it back down on the floor within 30 seconds and press the “Yes” button.
Charging
If Trilobite is started from the charger unit or locates it during
Wall Mapping, it will return to the charger whenever the battery
falls below a specific charge level. If there is not enough battery
power to finish the cleaning cycle,Trilobite will go to the charger
and park for charging.While charging to resume cleaning,
Trilobite will give an audible signal at regular intervals. Charging
can be stopped by pulling Trilobite away from the charger and
pressing the On/Off button.Trilobite can then be put back in the
charger and will resume charging without the signal.To start
cleaning again, start Trilobite manually.
When the job is done,Trilobite returns to the charger. If
Trilobite cannot find the charger during Wall Mapping and the
battery voltage becomes too low, it will stop somewhere in the
room.
Preparations Before Use
Recharging
Push the Trilobite unit with its rear against the battery
charger’s contact plate. Press it in securely. Keep it
pressed in until you hear an acknowledging signal
(this may take a few seconds). This is particularly
important if the batteries are entirely – or almost
entirely – dead.
The battery charger should be
placed along a wall with a free
margin of 8 inches to the right
of the charger.
Battery indicator
A
B
C
If the battery charger is placed
on a soft surface like a loose
rug or fitted carpet, or if there
is protruding ledge which does
not allow the battery charger to
be placed snugly against the
wall, use the adjustable screws
located on the rear of the unit
to rectify this.
An audible signal sounds and
the battery symbol in the
display shows when charging
commences. Trilobite becomes
fully charged in about two
hours at which time “Ready”
shows in the display.
Charging status
Normal, Timer: Auto
Start vacuuming?
The battery indicator on Trilobite’s
display shows the battery capacity
during vacuuming and charging.
You may well develop a personal affection to Trilobite and appreciate its
intelligence.To get the best from your Trilobite, we recommend you
consider the following.
Charging (also see the picture “Charging status”)
Check the battery indicator before vacuuming starts.
Refer to the lower, middle picture.
A.Charge your Trilobite before vacuuming.
B.You can start vacuuming, but your Trilobite will need to find the
charger soon.
C.You do not need a charger in the room to start vacuuming.
Avoid interrupting the charging process. If unavoidable, pull
Trilobite away from its charger and press the On/Off button.
Vacuuming can also be started while Trilobite is still being
charged. If the power to the charger is interrupted for more than
30 seconds during charging and you have not manually placed
Trilobite in the charger, it will leave it, take a spin on the floor
and then connect with the charger again.
Move the furniture
Trilobite picks its way around furniture, whether standing free or
flush against a wall. However, cleaning is both quicker and more
effective if you move the furniture slightly before it is time to
start cleaning. Of course, you do not need to move heavy
furniture such as sofas, but chairs can be placed on top of tables,
floor lamps can be moved out of the way and loose rugs can be
shifted. But don’t complicate matters more than you need to!
Normally, all you have to do is to put Trilobite on the floor and
let it get on with the job of cleaning.
Loose objects
Trilobite cannot distinguish between dust, coins, rings and
expensive jewelry. Before starting Trilobite, be sure to put away
small, loose objects you do not want to lose.
Also make sure there are no cords or other objects on the floor
that may prevent Trilobite from moving freely around the room.
Important safeguard
Before vacuuming, read “Important safeguard” on pages 1–2!
English 7
Affixing the
magnetic strip
NOTE! Do
not place the
magnetic strip
at an angle of
less than 90°.
Clean the surface
with the enclosed
cleaning pad.
Allow to dry.
Always attach the magnetic strip on
top of the level difference (Figures 3
and 4) and never along its side
(as shown in Figure 5).
Warning! Credit cards etc.
held in the immediate vicinity
may become demagnetized.
Room with a low ledge
Room with wall openings
Pull off
the protective
backing.
Affix the
magnetic strip.
3.
1.
4.
2.
5.
Room with
thresholds
Room with
thresholds
Rooms with a staircase
Rooms with thresholds
Trilobite can detect staircases with a step height of 4 inches or
more.When Trilobite detects such a staircase, it stops automatically.
Do not place any objects on the top step.
Always fit the magnetic strip on the floor in front of the threshold
in the room you will be vacuuming. See Figures 1 and 2.
Rooms on different levels or with inclines.
Trilobite can not detect differences in surface level of less than 4
inches. If a room has such a difference in level – and especially if
it leads to a stairway – it should be blocked with a magnetic strip
to ensure the unit stops before reaching the obstacle.
If the carpet has a pile depth of less than 3/4 of an inch, the
magnetic strip can be placed under it with maintained
functionality.
If the strip is fitted on top of the carpet, be sure it is securely
attached.
Rooms with wall openings
Be careful!
Trilobite is able to vacuum rooms with wall openings or walls
placed at odd angles. However, this will take longer than usual.
It is a good idea to vacuum one room at a time and separate the
rooms by using a moveable magnetic strip as shown above.
To prevent Trilobite from pushing the moveable magnetic strip,
the support at each end should be minimum 2 inches.
Always move the magnetic strip to the room where Trilobite is
in operation.
Before starting Trilobite, be sure to put away small, loose objects
that might otherwise be vacuumed by Trilobite.
Also make sure there are no cords or other objects on the floor
that may prevent Trilobite from moving freely around the room.
8 English
Magnetic strips and carpets
Buttons and Display
Dust collector full
Remaining time
Charger Found indicator
Battery indicator
Stop
On/Off
Next
Yes
Clock
Current
vacuuming
program
Message display
On/Off
Symbols
Press the
button for about one second to start and stop
Trilobite. If the display screen is illuminated but there is no menu
visable, press and hold the
button for 20 seconds.This will
reset Trilobite’s software.
Information is shown in the display using status messages and also
by symbols.
(The battery capacity symbol is shown on page 7.)
Stop
The
button has two functions. Use it to cancel a command
or to stop Trilobite during vacuuming.
Yes
Press the
button to confirm a setting shown on the display.
Next
Use the
button to select items on the menu. Also use the
button as a “No” button when you do not want to select
a setting presented in the display.
Normal
vacuuming
Quick
vacuuming
Spot
vacuuming
Timer
Battery
Charger found
Dust
collector full
Clock
English 9
Vacuuming Programs
Normal. Timer: Auto
Quick. Timer: 10min
Spot
Select program?
Select program?
Select program?
Normal vacuuming
Quick vacuuming
Spot vacuuming
When you start Trilobite, it is ready to
start vacuuming using the Normal
program and automatic time calculation.
The Quick program is identical to
Normal vacuuming except that wall
mapping is not included.Vacuuming takes
less time with the duration preset to
10 minutes; however, the result may be
slightly inferior.
Use Spot vacuuming to quickly vacuum a
limited area – for example, after you
have spilled something. Put Trilobite in
the center of the area to be vacuumed.
It will vacuum approximately 10 sq. ft.
twice.
Changing the time setting
This may be necessary when vacuuming floor
surfaces of 400 sq.ft. or more.
1. Press
twice until “Select timer?”
is shown, confirm by pressing
.
2. Set the desired time setting by pressing
and then confirm with
.
(When “On” is chosen, use
to set
desired time, confirm by pressing
.
This is the vacuuming time after wall
mapping.)
3. Press
to commence vacuuming.
1. After you have switched on Trilobite,
press
until “Select program?” is shown.
Confirm by pressing
.
2. Hold
until “Quick” is displayed and
confirm by pressing
.
3. If you do not want to change the time
setting, press
twice and start
vacuuming by pressing
. If you would
like to change the time setting, see
Changing the time setting under Normal
vacuuming.
1. After you have switched on Trilobite,
press
until “Select program?” is shown.
Confirm by pressing
.
2. Hold
until “Spot” is displayed and
confirm by pressing
.
3. Put Trilobite in the center of the area to
be vacuumed and start vacuuming by
pressing
.
Never start vacuuming at distances
under 20 inches from a magnetic strip,
staircase, difference in surface level or other
obstacle. Vacuuming can always be
interrupted by pressing
. After this,
pressing
resumes vacuuming, while
pressing
will call up the menu.
Never start vacuuming at distances
under 20 inches from a magnetic strip,
staircase, difference in surface level or other
obstacle. Vacuuming can always be
interrupted by pressing
. After this,
pressing
resumes vacuuming, while
pressing
will call up the menu.
Never start vacuuming at distances
under 20 inches from a magnetic strip,
staircase, difference in surface level or other
obstacle. Vacuuming can always be
interrupted by pressing
. After this,
pressing
resumes vacuuming, while
pressing
will call up the menu.
1. When Trilobite is switched off or placed
in the charger, press
to start.
2. Press
to start vacuuming.
10 English
Do not under any circumstances
vacuum liquids or lit or glowing objects such
as cigarette butts.
Timer
Changing the
Message Display
Language
Error Messages
Error: 7
Normal. Timer: Auto
English
Select timer?
Select language?
Check
the bumper
See manual
Timer
Language
Error Messages
It is possible to set the time duration for
Normal or Quick vacuuming.
Trilobite is able to present the
information on the display in a number
of different languages.
The only faults that you can rectify
yourself are the ones listed below. In the
event of other error messages, recharge
and restart your Trilobite. If it still does
not start, contact our Customer Service
(see page 16).
1. Select the desired vacuuming program, or
press
twice till “Select timer?” is
shown. Confirm by pressing
.
2. Set the desired time setting by pressing
and then confirm by pressing
.
When “Auto” is chosen Trilobite will
calculate its own vacuuming time.
When “On” is chosen, use
to set
desired time, confirm by pressing
.
When “Off” is chosen Trilobite will clean
until charging is needed.
For normal vacuuming, this is the
vacuuming time after wall mapping.
3. Press
to commence vacuuming.
1. To change the display language, switch
on Trilobite and press
.
2. Press
until the displays asks if you
want to change the language. Press
.
3. Press
to select the desired language
and confirm by pressing
.
Trilobite will now show display messages
in the selected language.
Status Messages
When you select a function, a status
message is shown on the display for about
seven seconds. After this, the name of the
function is shown again. It is of course
possible to change or confirm a displayed
function even while the status message is
shown.
The errors you can correct yourself are
presented below:
5. Check roller.
Is something stuck?
Is it incorrectly attached?
6. Check casters.
Is something stuck?
7. Check bumper.
Verify its spring action. Is something
stuck preventing it from moving?
12. Trilobite is stuck.
Move it and switch it on again. Also see
Normal Vacuuming on page 4.
15. Check dust cassette.
In most cases, the filter unit has probably
not been set or it is incorrectly set.
16. Check charger.
Is the charger plugged into an outlet?
Are the terminals on the charger and
Trilobite properly connected to each
other?
21. Moisture on the circuit board.
Let the machine dry out for 12 hours.
Then try restarting it.
English 11
Emptying and Cleaning the Dust Collector
1. Press the button on the rear
2. ... lift off the lid.
3. Take out the dust collector.
side of Trilobite, and ...
4. Remove the grill with the
opening facing up.
5. Empty the collector
(preferably in a plastic bag
fit snugly around the unit).
Do not knock the
collector against hard
surfaces to empty it.
6. Rinse the dust collector
under running water.
Do not clean in a dishwasher
or washing machine.
12 English
7. Insert a new filter and
replace the grill.
8. Replace the motor filter
every tenth time the dust
collector filter is replaced.
Attach the filter with the
cut-off corners facing to
the right.
9. Replace the dust collector.
10. Replace and push down
on the lid. If the lid cannot
be properly closed, the
dust collector is most
likely set incorrectly.
Cleaning the Roller
1. Check the roller each time
the dust collector is emptied.
If cleaning is needed, begin
by lifting Trilobite by the
handle.
6. Clean the roller. Use a pair
of scissors to cut away
strings, threads etc.
2. Turn Trilobite upside down
and put it on a soft surface
with the display facing you.
7. Slide in the roller. Take care
to secure the belt and rotate
it so that the teeth engage
securely.
3. Push the locking knob to the
4. Raise the cover.
right.
8. Press the roller downwards
and inwards.
5. Lift the roller by the end
without a drive belt.
Remove it by holding it
at an angle and pulling
upwards/outwards.
9. Replace the lid. When the
three pegs in the picture are
placed correctly, the lid is in
the correct position.
10. Finally, push the lid down
into place.
Do not wash the
roller in water or other
liquids.
English 13
Questions and Answers
Should I pay attention to anything special when I vacuum a room for the
first time?
Why does Trilobite stop completely during vacuuming?
It is a good idea to be present when the room is vacuumed the first
time, for example to see if it takes unnecessary time for Trilobite to
navigate around furniture.
1. Check that it has been sufficiently charged (see page 7).
2. Did it find the charger during wall mapping?
3. The time duration for vacuuming may need to be increased (see
page 11).
Can I use Trilobite in a room with an activated alarm?
Why does Trilobite crackle while vacuuming?
Yes, if it has a “pets monitoring” function.
This sound is produced by the navigation system.
Can I hide the magnetic strips under, say, a carpet?
Why do I need to replace the filter so often?
They confirm that a command or measure has been correctly received
or to advise of a problem.
The filter is actually one of the most important components in the
machine. It collects all dust, even very small dust particles (this is why
you should also use original Electrolux filters). Just as a dust bag
becomes full, so does the filter. Trilobite needs no dust bag, but the
filter is always necessary.
Trilobite operates at different speeds. Is something wrong?
If Trilobite starts to smell bad, what could be causing it?
Yes, as long as it is not thicker than 3/4 of an inch.
What’s the purpose of the audible signals?
Not at all. The speed varies, depending on the layout and furniture in
the room.
The dust filter was probably not replaced.
Is it okay to leave Trilobite connected to the charger whenever it
isn’t in use?
The errors you yourself can correct are shown on page 11.
In all other cases, contact Customer Service (see page 16).
Yes, but make sure children cannot start it by mistake.
Is it necessary to switch off Trilobite before charging it?
No.
How can I know if I’ve positioned Trilobite correctly for manual battery
charging?
What should I do when an error message is displayed?
What’s the Cable Protection System?
This is simply a system that prevents Trilobite from getting stuck in
electric cords on the floor.
What’s the Trilobite Stairsafe system?
A battery symbol lights in the display and you hear an audible signal.
It is a safety system that uses infrared light to help Trilobite detect and
avoid staircases .
Why doesn’t it charge?
Do I also need to vacuum manually?
1. Check that Trilobite is correctly connected to the charger
(see the question above).
2. Check that the charger has been plugged into an outlet.
3. Check that the rear of the charger has enough support (see page 7).
In one room,Trilobite does not start and error code 12 is displayed.
Is it dangerous to touch the charging terminals?
No. They have no power in output mode and carry max. 28 V in input
mode.
Why does Trilobite sometime pause for approximately 10 seconds during
vacuuming?
Trilobite uses two battery packs. It will briefly pause when switching
from one battery pack to the other.
14 English
Sometimes this may be necessary in corners or along the walls in the
room.
On some extremely dark or shiny floors, Trilobite will not operate. This
could also be the explanation if Trilobite will not go out on a surface or
into a room.
Accessories
Battery charger
Filter
Magnetic strips
Movable, wide magnetic strip
Battery charger
Aluminum Magnetic Strip Cover
To make vacuuming easier, you can purchase additional chargers.
Why not one for each room? Or one for your weekend retreat?
Order number: ZAC 100.
Note that Trilobite might mistake loudspeakers placed on the
floor for the charger.
Hide your magnetic strip with this high quality aluminum cover.
For more information, contact our Customer Service
Representative or visit our website: www.electroluxusa.com.
Order number: CE110.
Magnetic strips
The selection of accessories is continuously updated. Please
contact your dealer, Electrolux Customer Service or visit our web
site for more information about new accessories.
You can also purchase additional magnetic strips as well as
moveable magnetic strips.They come in many different designs
and with different surface coatings. For more information, contact
your dealer, our Customer Service department or visit our web
site. Order number: ZE 110.
Miscellaneous
Filter
Filters come in 10+1 packages; 10 filters for the dust collector
and one motor protection filter (which should be replaced every
tenth time the dust collector is emptied).The filters are available
from your dealer.You can also use our filter subscription service
(contact Customer Service) – or order them from our web site.
Order number: EF 110.
English 15
After-Sales Service
Customer Service
Accessories, service, problems… No matter what type of question
you may have about your Trilobite, you are always welcome to
contact our Customer Service.Visit www.electroluxusa.com or
call 1-877-366-5514 for answers.
Reservations
Electrolux will not accept any responsibility for damage caused by
incorrect use or unauthorized modifications of the product.
Product designs and specifications are subject to change without
notice.The products are protected by patents or registered designs.
Additional Information
For the location of the nearest Electrolux Authorized Warranty
Station or for service information in the United States or Canada,
please telephone toll free: 1-877-366-5514.You may also visit us online
at www.electroluxusa.com (USA) or www.electroluxca.com (Canada).
Technical Specifications
Trilobite
Model name
Diameter
Height
Weight
Noise level
Power
Speed
Navigation
Stair detection
Quick stop
Dust collector
Vacuum duration
Batteries
Charging duration
Charger
Charger name
Height
Width
Length
Weight
Input voltage
Output voltage
Power
Cord length
EL520A
13.8" (350 mm)
5.1" (130 mm)
11.0 lb. (5 kg)
approx. 75 dBA
approx. 90 W
max 1.3 f.p.s. (0.4 m/sec).
180° ultrasound
infrared light
lift the machine
1.1 qt. (1.2 l)
approx. 45-60 min/charge
environmentally friendly Nickel-Metal hybrid
approx. 2-3 hours
ZAC100
5.1" (130 mm)
6.3" (160 mm)
14.9" (380 mm)
1.8 lb. (0.8 kg)
AC 120 V, 60 Hz
max DC 28 V
60 W
71" (180 cm)
The Electrolux Limited Warranty
Your Electrolux cleaner is warranted to be free from all defects in material and workmanship in normal household use for a period of
two years.The warranty is granted only to the original purchaser and members of his or her immediate household.The warranty is
subject to the following provisions.
This warranty does not cover parts of the cleaner that require replacement under normal use, such as filters, brush roll, and cleaning. Any
damages or malfunctions caused by negligence, abuse, or use not in accordance with the Owner’s Guide are not covered by this warranty.
Likewise, any defects or damages caused by unauthorized service or the use of other than Genuine Electrolux parts is not covered.
Electrolux will, at its option, repair or replace a defective cleaner or cleaner part that is covered by this warranty. As a matter of warranty
policy, Electrolux will not refund the consumer’s purchase price.
To register your warranty, please visit www.electroluxusa.com (USA), www.electroluxca.com (Canada) or fill out and return the attached
warranty registration card.
To obtain warranty service you must return the defective cleaner or cleaner parts along with proof of purchase to any Electrolux
Authorized Warranty Station.
Further Limitations and Exclusions are as follows
Any warranty that may be implied in connection with your purchase or use of the cleaner, including any warranty of Merchantability or
any warranty for Fitness For A Particular Purpose is limited to the duration of this warranty. Some states do not allow limitations on how
long an implied warranty lasts, so the above limitations may not apply to you.
Your relief for the breach of this warranty is limited to the relief expressly provided above. In no event shall Electrolux be liable for any
consequential or incidental damages you may incur in connection with your purchase or use of the cleaner. Some states do not allow the
exclusion or limitation of incidental or consequential damages, so the above limitation or exclusion may not apply to you.
This warranty gives you specific legal rights.You may also have other rights which vary by state.
16 English