1
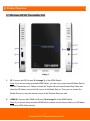
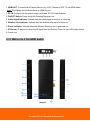
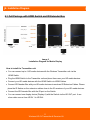
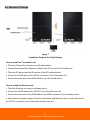
Ma User Manual Wireless HD AV Transmitter & Receiver Kit REV.1.0 Thank you for purchasing this Wireless HD AV Transmitter & Receiver Kit. Please read the following instructions carefully for your safety and prevention of property damage. Do not use the product in the extreme hot, cold, dusty or humid environments. Prevent friction with hard objects, or it may lead to surface abrasion, components falloff or hardware damage. Avoid the product falling down from a high place, or it may damage the hardware. The product is not water proofed so please do not get any liquid into the unit. Do not wipe the surface of the product with alcohol, benzene or thinners. Do not dismantle, assemble or alter the product arbitrarily. When the product is operating, the surface temperature will increase slightly. This is normal. 1 Wireless HD AV Transmitter & Receiver Kit 1. Introduction Wireless HD AV Transmitter & Receiver Kits run at 5GHz operation frequency to deliver uncompressed HD video/audio 20 meters open field and 10 meters through wall with hidden antenna. This device kits make wireless connection by using WHDI Technology from HD Media Source Devices such as HD Disc Player, PC, Game Console, Settop Box to Display Device for example LCD, Plasma or LED TV, Projector… while keep wire-equivalent quality and no latency. 2. Features The Wireless HD AV Transmitter & Receiver Kit allows you to stream your HD contents wirelessly from HD media devices to your television. It is ideal when your media player is located in your living room, while you want to watch your Full HD movies on your LCD, Plasma or LED television in your bedroom. You can just install the Wireless HD Transmitter and Receiver Kit and let the air do the work. Furthermore, you can operate the media player with the original remote control in your bedroom. Up to four different HD media devices such as HD media player, Blue-ray player, Settop Box and game Console can be connected to the transmitter unit via enclosed 4port HDMI switch. You can select one video source to be sent wirelessly to the television which connected with the receiver unit. And you can also choose another video source and display it on the TV which connected with the output port on the switch unit with an HDMI cable (Note: Only one HDMI cable is included in the package). Support HDMI 1.3 video format and HDCP 1.2 with video encryption. Support video resolution up to 1080p (30fps/60fps) including all 3D formats. 2 Wireless HD AV Transmitter & Receiver Kit 3. General Specifications Video Format Support TV: 1080p, 1080i, 720p, 576p, 480p PC: VGA(640x480), SVGA(800x600), XGA(1024x768), SXGA(1280x1024) Audio Format Support PCM, DTS, DOLBY DIGITAL RF Communication System MIMO Modulation OFDM Maximum Transmission Power 12dBm Image Transmission Distance 20 meters open field and 10 meters through wall Image Delay < 1ms Antenna High Performance Internal Antennas Operating Frequency 5.1GHz to 5.9GHz IR Carrier Modulation Frequency Support 38KHz Power Supply AC In 100~240V, DC Out 5V Power Adapter Operation Temperature 0 ℃ to 40 ℃ 3 Wireless HD AV Transmitter & Receiver Kit 4.Package contents Standard Package Wireless HD AV Transmitter, Tx x1 Wireless HD AV Receiver, Rx DC 5V Power Adapter for Tx and Rx x1 x2 HDMI Extension Cable, 1.2M x1 Infrared Eye Extension Cable, 1.5M x1 User Manual x1 Full Package with HDMI Switch and IR Extender Box Wireless HD AV Transmitter, Tx x1 Wireless HD AV Receiver, Rx x1 DC 5V Power Adapter for Tx and Rx x2 HDMI Extension Cable, 1.2M x1 Matrix 4 In 2 Out HDMI Switch x1 Remote Control for the HDMI Switch x1 IR Extender Box x1 Infrared Eye Extension Cable, 1.5M x4 DC 5V Power Adaptor for IR Extender Box x1 User Manual x1 4 Wireless HD AV Transmitter & Receiver Kit 5. Product Overview 5.1 Wireless HD AV Transmitter Unit Image 1 1. IR: Connect with IR Out port (9 in Image 3) of the HDMI Switch. Note: If you are not using enclosed HDMI Switch, you can only connect one HD Media Device with the Transmitter unit: Please connect the IR port with enclosed Infrared Eye Cable and place the IR flasher close to the IR sensor of the Media Device. Then you can control the Media Device by using its remote control at the Wireless Receiver side. 2. HDMI IN: Connect with HDMI Out B port (10 in Image 3) of the HDMI Switch. Note: If you are not using enclosed HDMI Switch, please connect this port with your HD Media Device by HDMI Cable directly. 5 Wireless HD AV Transmitter & Receiver Kit 3. DC IN: Connect with DC Power port (11 in Image 3) of the HDMI Switch. Note: If you are not using enclosed HDMI Switch, please connect this port with enclosed power supply (DC 5V Power Adapter). 1 . ON/OFF Switch: Power on/off the Wireless Transmitter unit. 2 . Wireless Link Indicator: Indicate that the wireless connection is linked up. 3 . Video Signal Indicator: Indicate that the video signal connection is linked up. 4 Power Indicator: Indicate when the Wireless Transmitter Unit is powered on. 5 Future use. 5.2 Wireless HD AV Receiver Unit Image 2 6 Wireless HD AV Transmitter & Receiver Kit 1 HDMI OUT: Connect with a Display Device (e.g. LCD, Plasma or LED TV) via HDMI cable. Note: The display device should have an HDMI IN port. 2 DC IN: Connect with the power supply (enclosed DC 5V Power Adapter). 3 ON/OFF Switch: Power on/off the Wireless Receiver unit. 4 Video Signal Indicator: Indicate that the video signal connection is linked up. 5 Wireless Link Indicator: Indicate that the wireless connection is linked up. 6 Power Indicator: Indicate when the Wireless Receiver Unit is powered on. 7 IR Sensor: IR sensor for receiving IR signal from the Remote Control of your HD media device. 8 Future use. 5.3.1 Matrix 4 In 2 Out HDMI Switch Image 3 7 Wireless HD AV Transmitter & Receiver Kit 1. HDMI IN 1: Connect with HD Media Device via HDMI Cable. 2. HDMI IN 2: Connect with HD Media Device via HDMI Cable. 3. HDMI IN 3: Connect with HD Media Device via HDMI Cable. 4. HDMI IN 4: Connect with HD Media Device via HDMI Cable. 5. HDMI OUT A: Connect with Display Device directly via an HDMI Cable. It can output any Media Source from the HD Media Devices connected with the 4 HDMI IN ports of the switch. 6. ON/OFF Switch: Power on/off the HDMI Switch. 7. A Channel Selection Button: Press the button to switch the media source from HDMI IN 1 to HDMI IN 4 manually. The selected media source will be output from the HDMI OUT A port. 8. B Channel Selection Button: Press the button to switch the media source from HDMI IN 1 to HDMI IN 4 manually. The selected media source will be sent to the Display Device connected with the Receiver unit wirelessly. 9. IR Out: Connect with the IR port on the Wireless Transmitter unit. 10. HDMI OUT B: Connect with the HDMI IN port on the Wireless Transmitter unit. 11. DC Power: Connect with the DC IN port on the Wireless Transmitter unit. 12. IR Remote Sensor: Work with enclosed remote control for media source selection. 13. A Channel Indicator: Indicate selected media input source for HDMI OUT A output. 14. B Channel Indicator: Indicate selected media input source for HDMI OUT B output. 15. DC IN: Connect with the power supply (enclosed DC 5V Power Adapter). 16. IR: Connect with IR Extender Box. User can control up to 4 HD Media Devices by using their original remote control at the Wireless Receiver side. Please find detailed connection guide of the IR Extender Box in the chapter below. 8 Wireless HD AV Transmitter & Receiver Kit 5.3.2 Remote Control Image 4 1. A-1 Select HDMI IN 1 device. Connect HDMI IN 1 to HDMI OUT A Channel. 2. A-2 Select HDMI IN 2 device. Connect HDMI IN 2 to HDMI OUT A Channel. 3. A-3 Select HDMI IN 3 device. Connect HDMI IN 3 to HDMI OUT A Channel. 4. A-4 Select HDMI IN 4 device. Connect HDMI IN 4 to HDMI OUT A Channel. 5. B-1 Select HDMI IN 1 device. Connect HDMI IN 1 to HDMI OUT B Channel. 6. B-2 Select HDMI IN 2 device. Connect HDMI IN 2 to HDMI OUT B Channel. 7. B-3 Select HDMI IN 3 device. Connect HDMI IN 3 to HDMI OUT B Channel. 8. B-4 Select HDMI IN 4 device. Connect HDMI IN 4 to HDMI OUT B Channel. 9 Wireless HD AV Transmitter & Receiver Kit IR Extender Box Note: You only need to use the IR Extender Box when you use the Transmitter unit with the HDMI Switch. Image 5 1-4 IR: Connect up to 4 HD media devices with enclosed IR extension cables. Place the IR flasher on the extension cables close to the IR receivers of the media devices. 5 DC IN: Connect with the power supply (enclosed DC 5V Power Adapter). 6 Link Indicator: Indicate IR signal connection. 7 Power Indicator: Indicate when the extension box is powered on. 8 IR Plug: Connect with IR port on the Switch (16 in Image 3). 10 Wireless HD AV Transmitter & Receiver Kit 6. Installation Diagram 6.1 Full Package with HDMI Switch and IR Extender Box Image 6 Installation Diagram for Matrix Display How to install the Transmitter unit: You can connect up to 4 HD media devices with the Wireless Transmitter unit via the HDMI Switch. Plug the HDMI Switch to the Transmitter unit and place them near your HD media devices. Connect your HD media devices with the HDMI Switch via HDMI Cables. Connect IR Extender Box with your HD media devices via enclosed IR Extension Cables. Please place the IR flasher on the extension cables close to the IR receivers of your HD media devices. Connect the IR Extender Box with the IR port on the Switch. You can connect one display device (Display A) with the Switch via the HD OUT port. It can show video source from HD IN 1 to HD IN 4. 11 Wireless HD AV Transmitter & Receiver Kit How to install the Receiver unit: Place the Receiver unit near your display device (Display B). Connect the HDMI cable to the ‘HD OUT’ port of the Receiver unit. Connect the other side of the HDMI cable to the HDMI connection of your display device (Display B). Now connect the power supply of both the Transmitter and Receiver unit to a wall outlet and to the ‘DC IN’ connection of the Transmitter and Receiver unit. 12 Wireless HD AV Transmitter & Receiver Kit 6.2 Standard Package Image 7 Installation Diagram for Single Display How to install the Transmitter unit: Place the Transmitter unit near your HD media device. Connect the Infrared Eye Extension Cable to the ‘IR’ port on the Transmitter unit. Place the IR flasher near the IR receiver of the HD media devices. Connect the HDMI cable to the ‘HD IN’ connection of the Transmitter unit. Connect the other side of the HDMI cable to your HD media device. How to install the Receiver unit: Place the Receiver unit near your display device. Connect the HDMI cable to the ‘HD OUT’ port of the Receiver unit. Connect the other side of the HDMI cable to the HDMI connection of your display device. Now connect the power supply of both the Transmitter and Receiver unit to a wall outlet and to the ‘DC IN’ connection of the Transmitter and Receiver unit. 13 Wireless HD AV Transmitter & Receiver Kit 7. Using Wireless HD AV Kit The Wireless HD Transmitter & Receiver Kit has now been setup. You can enjoy the full potential of wireless Full HD streaming! Make sure all devices have been started. Bear in mind that starting the Transmitter & Receiver Kit can take up to 12 minutes. Use enclosed remote control to select the video source from HD IN 1 to HD IN 4 to display on Display A. You can also use the remote control to select the video source for showing on Display B. Please make sure you have chosen the right video channel on your display device. If correct, the screen or main menu of the media device will be shown between 5 to 10 seconds when change media source. You can control the media device with its original remote control at the Receiver side. 8. FAQ Q: How to reset the device? A: Shut down the Transmitter and Receiver units by slide the power switch to OFF. Wait for a few second and slide the power switch’s to ON again. Q: Why I cannot control my media device at the Receiver side? A: Please check the Transmitter side. If you are not using the switch, please make sure the Infrared Eye Cable is connected with the IR port and the IR flasher is placed close to your media device’s IR receiver. If you are using the HDMI switch, please check the connection between the IR Extender Box and the switch. Please also check the connection between the IR Extender Box and your media devices. Make sure the IR flashers are placed close to your media devices’ IR receivers. 14 Wireless HD AV Transmitter & Receiver Kit All information on this manual is subject to change without notice due to technical reasons. Please contact our hotline for after sales support. User Manual Wireless HD AV Transmitter & Receiver Kit 15 Wireless HD AV Transmitter & Receiver Kit