1
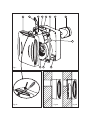
5. Connect a 100-mm diameter tube to the
discharge flange (9).
6. Secure the fan body (2) using 4 screws and
plugs that are appropriate for the kind of surface.
7. Connect to the terminals, passing the cable
through as indicated in figure 3.
8. Follow the electrical diagram applying to the
EEB version that is being installed (fig. 5 to 8)
9. Close the connections cover (5) with the
screw.
10.Assemble the front cover (1) again by
tightening the upper and lower clips and pressing
each corner to ensure that it fits properly in place.
11.Switch the extractor on to check that it is
working properly.
- If the device is used for more than 50 seconds
the timing is controlled automatically by the
device. It is proportional to the time of use (time of
use / x 2, with a maximum of 30 minutes).
Position 2': Timing set to 2 minutes
Position 15': Timing set to 15 minutes
Position 30': Timing set to 30 minutes
ELECTRICAL CONNECTION (fig. 5 to 8)
- Before working on the fan, make sure that it is
fully disconnected from the electricity supply,
even if it is switched off.
- Make sure that the voltage and frequency
values of the electricity supply are the same as
those indicated on the name plate of the device
(maximum voltage and frequency variation: 5%).
- EBBs are class II (double insulation) devices
and do not require earth connection
- Follow the connections diagram applying to the
version installed
Recommendations:
- In order to modify the factory settings, the
potentiometers situated beside the connections
cover (fig. 9B) will have to be operated. These
potentiometers are fragile and must be handled
with care.
- For correct humidity detection, the device must
be installed in an area in which there is good air
circulation.
- Do not change the humidity setting outside the
area in which the device is installed.
EBB version “S”
Basic version with two-speed motor, which can
also be voltage regulated. For this model proceed
according to one of the following diagrams:
Fig. 5A- Single-speed operation with an
independent switch.
Fig. 5B- F Single-speed operation using the same
switch as the light
Fig. 6A- 2-speed operation with a switch
Fig. 6B- Operation with an REB-type voltage
regulator
EBB version “T”
Models equipped with adjustable timing. The
timing enables the device to operate for the time
set, when the switch has been turned off (fig. 7A).
In timer mode, the EBB operates at slow speed.
ATTENTION: The device is timed to start up 50
seconds after being switched on, which
means that for the first 50 seconds it does not
work.
Fig. 7B Timer-based operation so that the device
starts up by means of the same switch as the
light.
To set this timer function (fig. 9A), turn the
potentiometer situated beside the connections
cover (5).
The device can be set to 4 different timer
positions:
Auto Position:
- If the device is used for less than 50 seconds,
the timing will not come into operation
EBB version “HT”
Models equipped with an electronic humidistat
that can be regulated between 60 and the 90%
RH (Relative Humidity %) and with timing that can
be set between 1 and 30 minutes.
When in the timer mode the EBB works at slow
speed.
Settings:
The extractors are preset to 60% RH for humidity
and 1 minute for timing.
- If the humidity level in the area is below 60% RH,
the extractor will not start up.
- If the humidity level in the area is above 60% RH,
the extractor will start up automatically.
- If the humidity level is always above 90% RH the
extractor will operate constantly.
- If you wish to modify the settings; that is,
maintain a humidity level of over 60% RH in the
area, turn the “%Hr” potentiometer clockwise.
- If you wish to increase the timer setting; that is,
increase the time during which the extractor
operates once the humidity level is under the set
level, turn the potentiometer “T min.“ clockwise.
ATTENTION: You should not attempt to adjust
the extractor settings when the extractor is in
timer mode. You must wait until the set time
has elapsed before adjusting the settings.
Operation
Case 1: In automatic working mode (fig. 8A) the
device switches on automatically at fast speed
when the humidity level in the area is above the
selected value. It stops when the humidity level
drops below this value and when the time set by
the timer has elapsed. When the device is in timer
mode, it works at slow speed.
Case 2: Automatic operation with possibility of
turning on the device by means of the light switch
(fig. 8B). Automatic operation similar to case 1 but
with the device will start up even if the humidity
level in the area is below the set value. In this
case, when the switch is turned off (the light is