1
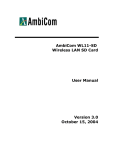
Quick Installation Guide
Wireless Printer Adapter
Model: WP-SA
INTRODUCTION
Thank you for purchasing AmbiCom’s Wireless Printer Adapter. AmbiCom’s Wireless Printer
Adapter offers the ideal solution for wireless connectivity between common PCs and USB inkjet
printers. The Wireless Printer Adapter enables the user to expand an existing Wireless Printer
network installation to wirelessly connect up to 30 additional PC systems and laptops to a shared
printer.
IMPORTANT
This installation guide is intended for customers who have already purchased
AmbiCom’s Wireless Printer Kit (WP-KIT), which includes a Master Printer Adapter
and Slave PC Adapter. In order to use the Wireless Printer Adapter (Slave), you will
need a Master Printer Adapter (not included) installed for your Inkjet printer. The
following procedures will guide you to add additional Slave PC Adapters to an existing
AmbiCom Wireless Printer Network setup.
Make sure your printer’s USB driver is installed before starting the following
installation. Refer to the printer manufacturer’s instructions to install the USB driver
for your printer.
WP-SA Quick Installation Guide v.1.0
Page 1
Product Illustrations
Connects between Adapter
A and the Extension Cable
Green LED
Light
Slave USB
Extension
Cable
Slave Adapter for
PCs
Connects to
PC’s USB
Port
WP-SA Quick Installation Guide v.1.0
Page 2
Additional Slave PC Adapter Installation
This section provides installation procedures for users with existing AmbiCom Wireless Printer
setup to add addition Slave PC Adapter. You can add up to 30 Slave PC Adapters to one Master
Printer Adapter. However, during normal operations, only ONE Slave PC Adapter will be able
to connect to the printer at a time.
Mac Users : The instructions in this section apply to both PCs and Macs as long as you install
the USB driver to your printer according to the printer manufacturer’s instructions.
1. Power on the PC and printer.
2. If you have not already installed your printer’s USB driver onto the PC in which you’re
installing the Slave PC Adapter, please follow the printer manufacturer’s instructions to do so
now.
3. Unplug previously paired Slave PC Adapters in the printer network.
4. Unplug the Master Printer Adapter from the Printer’s USB port.
When the Master Printer Adapter is unplugged from the printer, it will flash once and then
remain off temporarily.
5. Disconnect the AC Power plug from the Master Printer Adapter, leaving the power adapter
connected to the power outlet.
WP-SA Quick Installation Guide v.1.0
Page 3
6. Plug the new Slave PC Adapter into an available USB port on the PC to be added to the
Wireless Printer Network. The green LED light on the new Slave PC Adapter will blink
once and then remain off.
New Slave PC Adapter
7. Connect the AC power plug into Master Printer Adapter.
At this time, the green LED light on the Master Printer Adapter will blink once and remain
off. When both Master Printer Adapter and Slave PC Adapter have detected each other, the
LED lights on the Master Printer Adapter will blink continuously while the LED light on the
Slave PC Adapter will turn on, indicating successful pairing.
8. Plug the Master Printer Adapter back into the printer’s USB port.
9. Insert all other previously paired Slave PC Adapter into the PC’s USB port again. Now you
have successfully installed a Wireless Printer Network.
WP-SA Quick Installation Guide v.1.0
Page 4
INSTALLATION CONSIDERATIONS
Important considerations must be followed for the successful installation of additional
Slave PC Adapters to an existing Wireless Printer Network installation:
•
The installation of a new Slave PC Adapter can only be made with one Master Printer
Adapter at a time.
•
Successful searching and pairing cannot be accomplished if a Master Printer Adapter, other
than the one being used during the installation procedures above, is unplugged from its
printer’s USB port and left powered-on.
PRINTING CONSIDERATIONS
•
In a Wireless Printer Network, idle Slave PC Adapters will blink periodically
•
When installing additional Slave PC Adapters, the LED lights will turn green for a few
seconds and then will turn off after a brief timeout period.
•
Printing is performed through a polling process in which the Master Printer Adapter surveys
all paired Slave PC Adapters for print requests. The polling sequence begins with the first
paired Slave PC Adapter (supplied in the Wireless Printer Kit). The rest of the print requests
will be processed in the order the Slave PC Adapter was paired with the Master Printer
Adapter.
•
Only one adapter can be actively printing at a time. After the current print queue is
completed, the Slave PC Adapter’s connection will be released after a timeout period. Then
other active Slave PC Adapters will be polled in sequence to see if print requests are pending.
•
If the Slave PC Adapter is not connected to the Master Printer Adapter, the printer status may
appear to be either Offline or Not Responding, depending on your operating system and
printer software. At this time, when a print job is submitted, it will be entered in the offline
printer queue and processed when the printer comes online. However, depending on the
operating system and the printer software, an error message may appear (see example below)
and either 1) disappear when the printer comes online and process the job or 2) require the
print job to be resubmitted.
WP-SA Quick Installation Guide v.1.0
Page 5
WP-SA Quick Installation Guide v.1.0
Page 6
TROUBLESHOOTING
If you encounter any problems during the installation process, please refer to the following table
for possible solutions.
Problem
Possible Solutions
1. The installation wizard cannot find the
USB printer/connection during the
USB driver installation.
• Unplug the AC power adapter for the Master Printer
Adapter from the power outlet, unplug and re-plug the
Slave PC Adapter from/to the PC, and re-plug the AC
power adapter into the power outlet to reset the link.
2. The LED on the Slave PC Adapter
does not turn on when both the Master
Printer and Slave PC Adapters are
plugged in.
• When plugging in the Slave PC Adapter, the LED light
will blink and turn off. It will then blink periodically,
showing that it has been paired but is waiting to be reached
in the polling sequence. If this periodic blinking does not
occur, follow the directions in “Additional Slave PC
Adapter Installation” for pairing.
3. Both LED lights are on, but I am not
able to print.
• Make sure that the print job is being sent to the correct
printer connected by the Wireless Printer Network and
that the printer is powered on.
• Unplug the AC power adapter for the Master Printer
Adapter from the power outlet, unplug and re-plug the
Slave PC Adapter from/to the PC, and re-plug the AC/DC
power supply into the power outlet to reset the link.
• Power the printer off, then on again to reset printer.
• Confirm that the Master Printer and Slave PC Adapters
being used are from the same -paired package.
4. The LED light on the Master Printer
Adapter does not turn on when it is
plugged into the printer and the power
supply connections are made.
• Make sure the Master Printer Adapter is plugged in
correctly.
5. A print job has been sent to the printer,
but there is no response. The status in
the Print Monitor window is blank.
• Make sure that the print job is being sent to the correct
printer connected by the Wireless Printer Network and
that printer is powered on.
• Check the power supply connections to the Master Printer
Adapter.
• Check if the Slave PC Adapter’s LED light is on. In an
environment with multiple Slave PC Adapters, a delay is
possible while the polling sequence moves past idle or
disconnected Slave PC Adapters. Wait for a few minutes
to ensure the polling sequence has reached the Slave PC
Adapter in question.
• The print status will not appear to be online until the
polling sequence has reached the Slave PC Adapter in
question.
WP-SA Quick Installation Guide v.1.0
Page 7
Problem
Possible Solutions
6. The directions in this installation guide
were followed, but the Slave PC
Adapter did not pair with the Master
Printer Adapter.
• Unplug the AC power adapter for the Master Printer
Adapter from the power outlet, unplug and re-plug the
Slave PC Adapter from/to the PC, and re-plug the AC
power adapter into the power outlet. Repeat instructions
from the beginning of the installation guide.
WP-SA Quick Installation Guide v.1.0
Page 8
Technical Support
If you have any questions or problems installing the Wireless Printer Adapter, please contact
Technical Support.
Hours: 9 a.m. to 6 p.m. M-F
E-mail: [email protected]
Tel:
(408) 562-0168
Fax:
(408) 562-0178
WP-SA Quick Installation Guide v.1.0
Page 9
Warranty
1 Year Warranty
As the original purchaser, you receive a 1-year warranty from AmbiCom:
This warranty gives you specific legal rights. Yo u may also have other rights that vary from state to state.
1 Year Limited Warranty: AmbiCom, Inc. warrants its WP-SA products to be free from defects in materials and
workmanship, under normal use and service, for 1 year from the date of purchase from its Authorized Reseller.
During the warranty period, AmbiCom will, at its option, either repair or replace defective products with similar
parts and products. Should the product be identified as defective, the end user is responsible for returning the
pro duct to the place of purchase and the cost of shipping and handling. Any replaced or repaired product has a
ninety-day (90-day) warranty or the remainder of the initial warranty period, whichever is longer.
AmbiCom, Inc. shall not be responsible for any software, firmware, information or memory data of customer
contained in, stored on, or integrated with any products returned to AmbiCom, Inc. pursuant to any warranty.
Exclusion: The warranty on your WP-SA products shall not apply to defect or damages resulting from:
a.
b.
c.
d.
e.
Improper or inadequate installation of the product operation outside the environmental specification for the
products.
Power spikes or other power related damage
Compatibility problems with any other software of hardware products.
Installation of any other software of hardware products.
Incidental, contingent, or consequential charges
Warranty Limitations
WARRANTY LIMITATIONS: THE WARRANTY SET FORTH ABOVE IS EXCLUSIVE AND NO OTHER
WARRANTY, WHETHER WRITTEN OR ORAL IS EXPRESSED OR IMPLIED.
AMBICOM, INC.
SPECIFICALLY DISCLAIMS THE IMPLIED WARRANTEIS OF MERCHANTABILITY AND FITNESS FOR
A PARTICULAR PURPOSE. AMBICOM, INC. ALSO SPECIFICALLY DISCLAIMS ANY RESPONSIBILITY
FOR ANY INCIDENTAL OR CONSEQUENTIAL DAMAGES THAT ITS PRODUCTS MAY CAUSE. A
BUYER’S RECOURSE SHALL BE STRICTLY LIMITED TO THOSE CONTAINED IN THIS WARRANTY.
SOME STATES DO NOT ALLOW THESE LIMITATIONS ON THE LENGTH OF AN IMPLIED WARRANTY,
SO THE ABOVE LIMITATIONS OR EXCLUSIONS MY NOT APPLY TO YOU. HOWEVER, ANY IMPLIED
WARRANTY OR MERCHANTABILITY OF FITNESS FOR A PARTICULAR PURPOSE IS FOR A PERIOD
OF 1 YEAR ON THIS WRITTEN WARRANTY.
WP-SA Quick Installation Guide v.1.0
Page 10
FCC Information
This device complies with Part 15 of the FCC Rules. Operation is subject to the following two conditions: (1) this
device may not cause harmful interference, and (2) this device must accept any interference received, including
interference that may cause undesired operation.
NOTE: This equipment has been tested and found to comply with the limits for a Class B digital device, pursuant to
Part 15 of the FCC Rules. These limits are designed to provide reasonable protection against harmful interference in
a residential installation. This equipment generates, uses and can radiate radio frequency energy and, if not installed
and used in accordance with the instructions, may cause harmful interference to radio communications. However,
there is no guarantee that interference will not occur in a particular installation. If this equipment does cause harmful
interference to radio or television reception, which can be determined by turning the equipment off and on, the user
is encouraged to try to correct the interference by one or more of the following measures:
-- Reorient or relocate the receiving antenna.
-- Increase the separation between the equipment and receiver.
-- Connect the equipment into an outlet on a circuit different from that to which the receiver is connected.
-- Consult the dealer or an experienced radio/TV technician for help.
WP-SA Quick Installation Guide v.1.0
Page 11