1
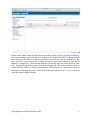
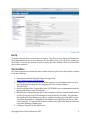
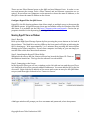
QOS 8-Bay RAID Quick Setup Guide Not for Redistribution Copyright Ocean Tides Productions 2012 1 Introduction The QOS is a standalone storage array, part of a file-‐based workflow involving one or more users and one centralized storage system. The extraordinary power and versatility of the QOS is one of the key features of this product. The QOS can be used to integrate multiple users on shared storage volumes or function as a direct attached drive array. It is powered by a multi-‐core processor, which is housed inside an ultra-‐quiet, durable case. The MDC is the embedded RAID controller housed in the QOS chassis. It acts as a server that interacts with computers connected to it called clients and grants them access to the RAID storage drives. Read-‐write processes sent to the drives can be shared between mul-‐ tiple clients with the use of Rorke HyperFS SAN management, allowing instantaneous col-‐ laboration between workstations connected directly to the back or through a Fibre switch. Frontpane The front panel of the QOS allows the user to gain access to the drive bay and view the drive status indicator lights. Green lights represent OK status and a red light indicates a drive is failing. The QOS drives are hot swappable. For detailed instructions on drive re-‐ placement, please refer to the QOS 8-‐Bay Owners Manual. Backpane The backside of the QOS hosts all the adapters, Ethernet, Fibre Channel, 10GigE, power, diagnostic VGA and USB cables. Data ports such as Ethernet and Fibre Channel have green activity lights that indicate a healthy connection. On the back of the QOS there is a small power button, which can be used to initialize and shut down the device; when the activity lights on the front panel go out the unit is fully shut down. On some models a 0/1 power switch on the back panel sends power to the power supply and should be shut off before unplugging the unit, and needs to be turned on (‘1’ position) before powering on. HyperFS HyperFS is a file system supported by the QOS for hosting multiple clients and accessing the same files simultaneously. It acts much like a gatekeeper of information. HyperFS is a simple multi-‐OS solution to efficient file and block level storage. After installing the client software from the Rorke website, you can create a file system export using a Web user interface. It is possible to configure multiple export entries from a single location on the server, allowing you to customize permissions for different users. The address of the GUI is the Ethernet IP address followed by :82 (Ex: 10.0.1.100:82), which allow users to change the volume structure of the QOS. The password for the WebGUI is ‘fsadmin’ and ‘password’. The HyperFS WebGUI is only accessible after the HyperFS client software package from http://support.rorke.com/hyperfs is downloaded and installed on the computer. To create a mountable volume users go to the Export Management tab. Select the File System – there should be only one – from the drop down at the top. Then click button labeled “Create.” This entire process is outlined below. Copyright Ocean Tides Productions 2012 2 In the Create Exports page use the directory browse button to select or create a folder on the server named as you wish the drive to appear (ex “HyperFS/VIDEO/”). Keep in mind the volumes on the QOS are folders in a directory on the Server that are shared out. Be-‐ side “Specify IP” type an asterisk * to allow all users to mount this volume or type the IP address of a single user. The next row allows you to specify read and write access or read only. Read and write access means that users can open the files in the volume as well as create new files, delete, or change existing ones. “Read only access” restricts the users of this export to opening files only. Next set “Root Access Control” to “all,” or “no_root”, and leave the other settings the same. Copyright Ocean Tides Productions 2012 3 Boot Up To begin using the QOS press the power button. The drive activity lights will illuminate. Wait approximately two to three minutes for the QOS to fully boot up before turning on the clients. If clients are already booted, re-‐insert the Fibre Channel cable or reboot after two or three minutes. Client Installation For client computers to mount the data volume from the QOS server they will be required to do the following: 1. Download and Install HyperFS Client Package from http://support.rorke.com/HyperFS. 2. Change one or more Ethernet ports of the computer to an IP address that can con-‐ nect to the Ethernet port you are plugging into. Use a Subnet Mask of 255.255.255.0. 3. Install an 8Gbps Fibre Channel HBA card (ATTO HBA’s are recommended) with the appropriate drivers, and 250nm SFPs. 4. Establish the cabling from the QOS to the computer via Fibre Channel and Ethernet port #0 (First one to the left looking at it from the back of the QOS). Use an Ether-‐ net switch to double Ethernet port #0, or configure both ports on the QOS to sepa-‐ rate IPs as described in “Changing the IP Address of the QOS Ethernet Ports. (end of the manual)” It’s a good idea to attach a label to the QOS indicating the two most up-‐to-‐date Ethernet IP addresses. 5. Configure HyperFS for the QOS Server. Copyright Ocean Tides Productions 2012 4 Download and Install HyperFS Client Package from support.rorke.com/hyperfs Using the computer’s Internet connection, go to http://support.rorke.com/hyperfs and choose the client install package for your operating system. Double-‐click the installer file and follow the on-‐screen instructions. The HyperFS client application will appear in the Mac OSX Applications/Utilities folder, or in the Windows Start Menu. Change Ethernet port on the computer to the IP address range of the port on the QOS Look up detailed information about your computers Operating System for instructions on changing the Ethernet IP settings of a given Ethernet Port. The last number in the four-‐ number IP can be any number from 102 up to 255. The first three numbers must be on the same IP range (must be the same value) as the QOS Server, while the last number in the sequence must differ from the server. If you will be connecting one computer to each of the ports on the back, the two Ethernet ports will need to be on separate IP ranges. To do this, the best way is to change the third number of the IP as well as any changes that take place in the fourth number. When connecting to a single port over an Ethernet switch this is obviously not required. Ethernet Network Setup Example QOS Ethernet Settings 2 Clients Through Ethernet Switch or Router Ethernet Port A: 10.0.1.100 Corresponding User #1 IP: 10.0.1.102 User #2 IP: 10.0.1.103 QOS Ethernet Settings 2 Clients Directly Attached to the Back Ethernet Port A: 10.0.1.100 Port B: 10.0.2.100 Corresponding User#1 IP: 10.0.1.102 User #2: 10.0.2.102 The two Ethernet ports on the QOS have different IP settings, which can be changed using the method described under “Changing the IP Address of the QOS Ethernet Ports.” They should be written on a sticker attached to the case. The two-‐four Ethernet ports on the back of the QOS should always be on a different IP range from each other (ex: 10.0.4.100 and 10.0.5.100). The Subnet Mask on the computers network settings should be set to 255.255.255.0. Install an 8Gb/sec Fibre Channel HBA card with appropriate drivers Make sure that the appropriate drivers and firmware are loaded for your Fibre Channel HBA. There will be activity lights on most standard Fibre Channel Cards that indicate a valid connection. Establish the cabling from the QOS to the computer via Fibre Channel and Ethernet Copyright Ocean Tides Productions 2012 5 There are two Fibre Channel ports on the QOS and two Ethernet Ports. In order to con-‐ nect and mount the storage, both a Fibre Channel and an Ethernet connection are re-‐ quired. Do not allow two computers on the network to share the same IP Address, or for the QOS to share the same IP Address as the clients. Configure HyperFS for the QOS Server HyperFS is the file sharing software that allows single or multiple users to the mount the QOS RAID system. A HyperFS mount client app is available online for Windows, Mac OSX, and Linux. It is available via the URL: http://support.rorke.com/hyperfs. Choose the ap-‐ propriate installer for the Operating System type and the version. Mounting HyperFS Shares on Windows Step 1: Boot Up Boot up the High-‐Speed Storage System by first pressing the power button on the back of the enclosure. The Hard Drive activity LEDs on the front panel will light up indicating the QOS is booting up. Wait approximately 2 to 3 minutes after pressing the button before turning on the client computers. If your client computer is already on, you can simply re-‐ seat the Fibre cable after about three minutes. Step 2: Launching the HyperFS Client Utility When both the server and the client are booted up, launch the Hyper FS Client on the Windows launch-‐bar. The logo for the software is a red toolbox. Step 3: Connecting to the Server In the HyperFS Client you will see a window on the left with an icon and the word ‘Serv-‐ ers’ along with a list of the currently added IP addresses. You must add the QOS to the list of servers. Right click the IP address of the server and create an entry for the QOS Ether-‐ net port, and then right-‐click and select ‘Connect to Server.’ A dialogue window will prompt you for a username and password, select Anonymous. Copyright Ocean Tides Productions 2012 6 Step 4: Mounting the HyperFS Volume The right hand window will show the list of mountable volumes currently available on the server. To create an mountable volume you must log into the server through the WebGUI by opening a web browser and typing the IP address of the server followed by :82. De-‐ tailed instructions are available on Page 1 under ‘HyperFS.’ Select the mountable volume by left clicking, and then click the blue mount triangle to mount the volume. You can also right click the mount path and choose Mount. You will now see the status of the path change from unmounted to mounted and the Hy-‐ perFS drive will be accessible as E:\HyperFS. Mounting HyperFS Shares on Mac OSX Step 1: Boot Up Boot up the High-‐Speed Storage System by pressing the power button on the back of the unit. The Hard Drive activity LEDs on the front panel should light up and the unit will ini-‐ tialize. Wait approximately two to three minutes before turning on the client computers, or reboot. This will not be required in some cases, where all that is required is to re-‐ insert the Fibre Channel cable. Step 2: The HyperFS Client Utility Copyright Ocean Tides Productions 2012 7 In the Mac dock, select the HyperFS icon or launch from Applications>Utilities The HyperFS application will display the list of available server IP addresses (the High-‐ Speed Storage System’s Port 1 and Port 2 IP is written on a sticker attached to the case). Click on the High-‐Speed Storage System’s IP to display the list of available drives. Click the blue triangle beside the Volume you wish to mount. The Hyper FS drive will now appear on the desktop and in the Mac Finder. Automount The volumes in HyperFS client can mount automatically on startup on both Mac OSX and Windows platforms. Mac Automount Copyright Ocean Tides Productions 2012 8 Open the server and select individual volumes in HyperFS and change the automount set-‐ ting to ‘enabled.’ PC Automount Check ‘automount’ in the connect to server dialog, and for each volume to be automount-‐ ed, right click and choose ‘properties’ and check the ‘share the drive on network after au-‐ tomount succeeded’ checkbox. Changing the IP Address of the QOS Ethernet Ports To configure the Ethernet IP Addresses of the ports on the QOS to work in DHCP mode, or another static IP address than the default, access the Linux part of the MDC server (using keyboard and monitor or SSH protocol) as root using username: root password: rdserdse. Type in the Linux command: system-‐config-‐network-‐tui This command will start up the application used to configure the IP settings of the QOS. Choose the Ethernet port to configure (eth0, eth1) and enter the desired IP, Subnet and connection type settings using the space bar. Note: If you plan to connect two clients into the two different Ethernet Ports, put the two ports on different IP Ranges (Ex. 10.0.1.101 and 10.0.2.101) in order to avoid IP conflicts. A reboot is required for the IP to be successfully changed. Copyright Ocean Tides Productions 2012 9