1
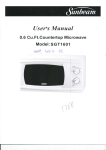
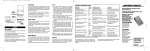
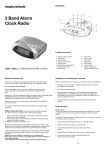
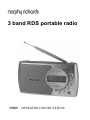
3 band RDS portable radio 27005 OPERATING INSTRUCTIONS ILLUSTRATION Handle grip Telescopic aerial Alarm button Sleep button +/- Distance local switch ○ ○ ○ ○ AC Input socket Snooze Volume Memory Tone control Text AF Band switch Head phone socket Display PTY Key lock Traffic Time set 1 1/6...5/10 preset buttons On/Off CONTROLS HEADPHONES - for headphones with 3.5mm jack plug. When connecting a headphone to this socket, the built-in loudspeaker is automatically switched off. ON/OFF - to switch the radio on and off -To switch off the alarm (radio or buzzer) when alarm function is activated -To switch off the radio before the preset sleep time has elapsed VOLUME - to adjust the volume TONE - For adjusting the treble/bass settings. +/- - when radio is off, for setting the day of the week, clock time and alarm time. -When the radio is on, to start the station search (AUTO TUNING) or to advance the frequency step by step (MANUAL TUNING) -To select the respective alarm mode (radio alarm or buzzer alarm) - Used with +/- to set the alarm time. SNOOZE - to interrupt radio or buzzer alarm for approximately 5 minutes. -When the radio is off, used with +/- to set the day of the week. -To switch off the radio before the preset sleep time has elasped. SLEEP -To switch on the radio for max. 90 minutes. MEMORY - this button is used to store the tuned station in the memory position you choose TEXT -to switch the radiotext display on and off. -Press and hold to scroll the radio text quickly DIST/LOCAL - to reduce sensitivity during FM reception -Local = Nearby stations -DIST. = remote stations = normal setting 1/6 ....5/10 - station memory presets (press once for a number from 1 to 5 and twice for a number from 6 to 10) AF - for switching to alternative frequencies (RDS) FM/MW/LW - to select the waveband FM (VHF) = VHF waveband MW = Mediumwave band LW = Longwave band DISPLAY - When the radio is off, used to display the alarm time -When the radio is on, used to switch display information between RDS Name (if any), frequency and clock. 2 CONTROLS PTY - press once to display the programme type of the current programme. -Press repeatedly to select a desired programme type and use the +/- keys to search a station of the desired programme type. TRAFFIC - When the radio is on, to switch the traffic announcement/EON function on and off. TIME SET - When the radio is off, use with the +/- to set the time manually. - When the radio is on, used to enable and disable the auto-time function. BASE OF THE RADIO Key lock - to lock and unlock all buttons REAR OF THE RADIO AC mains input socket - for connecting the mains cable BATTERY COMPARTMENT -Insert four R14/size C batteries in the polarity indicated for radio operation. -Insert two R03/AAA station memory backup batteries. RESET -Static charges of carpets etc. can effect the internal electronics which may require resetting. Reset as follows: 1 Remove the batteries and disconnect the mains plug. 2 Reinstall them again after one minute. -This resets the unit to its initial state. The stored data for the individual station memory positions, the clock settings and the last station memory are cleared. DEMO MODE Press the DISPLAY key for two seconds. -The display will show a demo introducing briefly the RDS features available in the radio. - Press any key to stop the demo mode. 3 POWER SUPPLY BATTERY OPERATION • Open the lid of the battery compartment (found at rear of unit) • Insert 4 x R14/size C batteries. Ensuring correct polarity is observed. • Close the battery compartment lid. (These batteries serve as a power supply for radio operation without mains connection. Back up batteries for clock and preset memory • Place these batteries size RO3, AAA, alkaline type in the battery compatment. These batteries should always be inserted, regardless of the power supply (mains voltage or batteries). If the unit is not to be used for a prolonged period, remove the batteries to avoid leakage. In the interests of environmental safety, dispose of batteries safely. MAINS FAILURE If the back-up batteries are fitted, the clock will continue to operate during mains failure and the preset stations will be retained in the memory. However, the display will not be illuminated and the alarm will not sound unless the mains supply is restored within 90 minutes of the preset alarm time. MAINS OPERATION The unit is designed to operate from a mains supply of 230v 50/60Hz. • Connect one plug of the mains lead to the AC socket and the other to the radio.The internal batteries will be automatically isolated. Notes: • Switch off the radio when connecting or disconnecting the mains cable. • Remove the AC plug from the unit to use on the batteries. The unit is only fully isolated from the mains when the wall plug is removed from the wall socket. If the socket outlets in your home are not suitable for the plug supplied with this appliance the plug should be removed and the appropriate one fitted. IMP0RTANT : THE PLUG REMOVED FROM THE MAINS LEAD, IF SEVERED, MUST BE DESTROYED AS A PLUG WITH A BARED FLEXIBLE CORD IS HAZARDOUS IF ENGAGED INTO A LIVE SOCKET OUTLET. Should the fuse in the 13 amp mains plug require changing a 3 amp BS1362 fuse must be fitted. The socket outlet should be installed near the equipment and shall be easily accessible. 4 RDS FEATURES The Radio Data System (RDS) is an information system transmitted in addition to the VHF (FM) radio programme. STATION NAME The station name or an abbreviation is shown in the display instead of the tuned frequency (Example: GALAXY). ALTERNATIVE FREQUENCIES (AF) It is possible to switch to a frequency with the same programme using the button AF. With AF selected the radio will search for the strongest station. TRAFFIC INFORMATION During travel information the volume will be increased. EON (ENHANCED OTHER NETWORK) If your broadcasting station is using EON, you will also hear traffic flashes of other programmes when EON is enabled. CLOCK AUTO ADJUSTMENT Automatic time setting and synchronizing the built in clock from the RDS signal (FM only). PROGRAMME TYPE (PTY) Each station can broadcast a code (PTY) that characterizes the actual programme in pop - classics etc. RADIOTEXT Radiotext is additional information on the station and programme being broadcast. Radiotext information appears as running text in the display. PLAYING YOUR RADIO When the unit is connected for the first time to the power supply or after a power failure (without standby batteries fitted), the Automatic Memory and Time set system (AMT) will perform the following. 5 Automatic memory • The tuner starts searching automatically the FM band and stores the received stations into the 10 preset memories (regardless of the position of the waveband switch). -The RDS stations have a higher priority than other stations and will be stored first. -To interrupt the automatic memory set up process, press the MEMORY button once. The automatic time set process as described below will then be skipped. -The first time the set is switched to LW or MW, it stores the received stations in this band into the preset memories (10 for each band). Automatic time set -After having performed the automatic memory set up process, the display will show a DEMO introducing briefly the RDS features available in the radio. The radio sound is muted. • The tuner searches automatically for an RDS station in the FM presets. flashes, indicating that the radio is waiting for -The Auto-Time indicator the time signal. -If the clock is not set after 3-4 minutes, the tuner will automatically change to another station until the clock is set. -The indicator stops flashing when the time is set • To interrupt the automatic time set or to stop the demo mode, press any button once. Notes: Before connecting the radio to the power supply, it is recommended to fully extend the telescopic aerial, to place the unit at a position where radio reception is best and set the DIST./LOCAL switch to the DIST. position. If no RDS station or clock time information is received, or the automatic time set process is interrupted prior to the clock set, the time display will flash indicating the clock is not yet set. Set the clock and the preset memories manually. The radio is ready for operation after the automatic memory and time set has been completed. However, the stored preset memories can be changed if desired. 6 RADIO OPERATION • Switch on and off with the ON/OFF switch. • Adjust the volume with the VOLUME control. • The tone can be adjusted with the TONE control. Aerials -The telescopic aerial is intended for receiving FM (VHF) stations. -The aerial should be fully extended and rotated until best results are achieved. For receiving MW and LW stations there is a ferrite rod aerial inside the radio. The best position for receiving a station will be found by rotating the radio. Wavebands -Select the waveband with the switch FM/MW/LW. The selected waveband is shown on the display. On FM (VHF) the frequency is shown in MHz, and on MW (mediumwave) and LW (longwave) in kHz Sensitivity switch (LOCAL/DIST) -Normally this switch should be set to the DIST position - remote stations. -If the signal received is too strong (distortions), set the switch to LOCAL + nearby stations. The switch functions only on FM reception. Last station memory function The station to which the radio was tuned prior to switch off will automatically be selected on switch on. When changing the waveband, the last station to which the radio was tuned in each waveband will also be stored in the memory. Tuning to stations • Select the waveband with the BAND switch FM/MW/LW. • Start the station search with the + button (in the direction of higher frequencies) or with the - button (in the direction of lower frequencies). -Pressing briefly + tuning in steps -Pressing longer + tuning automatically -The tuning steps are 50kHz for FM, 9 kHz for MW and 1kHz for LW. 7 As a result of poor reception conditions during automatic station search, the station received may not optimally be tuned. In this case, briefly press the + or - button once or twice until the station is correctly tuned. If the tuned station contains the RDS (Radio Data System) information, the symbol is shown on the display and after a short time the station name will be displayed. The RDS feature is available on the FM band only. Note: When the battery voltage decreases, the automatic station search may function incorrectly. In this case, change the batteries. Display mode After tuning to an RDS station, the display indicates its frequency for 1.5 seconds and then the station name continuously. • To display the time, press the DISPLAY button once. • To briefly display the station name again, briefly press the + or - button once. • To display the station name continuously, press the DISPLAY button again. -If the station is not transmitting an RDS signal or if the signal is too weak, the frequency will be displayed instead of the station name. Using alternative frequencies If the tuned station contains the RDS feature ALTERNATIVE FREQUENCY, the button AF can be used to switch between stations to find a station with a stronger signal. -Some stations transmit their programme on several frequencies. -After pressing the AF button the set tunes to such an alternative frequency. -If no alternative frequency can be found the display shows NO AF. -If no more frequencies are available, the radio switches back to the original tuned station. Note: All RDS features as such the AF feature are only available on the FM band. RDS stations with weak reception will be ignored. 8 Storing stations There are 10 memory locations in each waveband available for storing stations (in total 30 memory locations). RDS • Tune to the station you want to store. FM • Press the MEMORY button. -The indication MEMORY will flash on the display for RDS FM 8 seconds. • Press the button (1...10) to which you wish to assign a station. -Press the button once for a number from 1 to 5 and twice for a number from 6 to 10. -Press MEMORY again to store the station. -Select and store in this way all desired stations. MEMORY MEMORY Note: If no station is stored within the 8 seconds that MEMORY is flashing, the storing mode is abandoned with no change to the current memory. Calling up a stored station • To call up a stored station, simply press the corresponding button. -Press the button once for a number from 1 to 5 and twice for a number from 6 to 10. The unit switches to the station and the display indicates the frequency, MEMORY and the memory location number. Traffic information/Enhanced other networks (EON) Some RDS radio stations broadcast traffic information at certain times. These stations are indicated by the symbol on the display. The EON function is additional RDS feature to switch to a station broadcasting traffic information. • Switch on the radio with the ON/Off button. • Tune to an RDS station. RDS • The symbol appears. FM • Press the TRAFFIC button once. • If the tuned station provides traffic information, the symbol will light up on the display. • If the tuned station does not provide traffic information, the symbol will not light up and you hear a beep tone RDS when pressing TRAFFIC button. FM • If the tuned station provides EON, the EON indicator on the display lights up, next to the symbol. EON 9 -With the EON symbol displayed, the radio will automatically tune to a station transmitting a traffic announcement. -The radio will automatically tune to the station broadcasting a traffic announcement. -During the EON traffic announcement the EON symbol on the display flashes and the volume will be increased. • When the announcement is over, the radio will return to the previous station. • To immediately switch back to the previous station, press the TRAFFIC button. • To disable this function, press TRAFFIC button again. The and EON indicators disappear. Programme type • Tune to an RDS station. -The symbol appears. • Press the PTY button once. -The display shows the programme type of the current programme. -If the station does not broadcast the programme type, the display briefly indicates NO PTY. • By pressing the PTY button you can call up the programme types one after another. • Then press + or - once. The unit starts scanning the stations to find a station broadcasting the required programme type. As soon as such a station is found it is tuned in. -During the search PTY flashes on the display. -The search can be stopped by pressing + or - once. Radiotext display • Tune to an RDS station. -The symbol appears. • Press the TEXT button once. -If the tuned station broadcasts radiotext, the text information appears as running text on the display. -If the station does not broadcast radiotext or if the information is not yet received, the display briefly indicates NO TEXT. • To disable this function, press TEXT again. • Press and hold the TEXT button to display the Radio Text scrolling quickly. 10 CLOCK SETTING Setting the clock automatically The time and the day of the week can be set automatically when receiving on RDS station which transmits the clock time (CT) information. Please note that not every RDS station transmits the clock time information. This information (when available) is transmitted by the RDS radio station once every minute. The clock is set within one or two minutes, if the RDS station has enough signal strength. • Switch on the radio with the ON/OFF button. • Search for an RDS station. RDS -The Auto-time indicator flashes, indicating that the FM set is waiting for the time signal. RDS -The indicator stops flashing when the time and day FM of the week is set. The quartz clock starts to run with the received time. • If the clock is not set after 3-4 minutes, try another RDS station. The clock time and day of the week are updated automatically each time the radio is switched on and when you tune to an RDS station, as long as the Auto-Time function is enabled. To enable and disable this function, the radio must be switched on. To disable the Auto time function, press the TIME SET button briefly. To enable the function again, press the TIME SET button once again. Setting the clock time manually • Make sure that the radio is off. • Press the TIME SET button and hold. • Set the clock time with the + or - buttons. -A single press of the respective button switches to the next or preceding minute. -If the button is held, the setting changes, rapidly (after 4 seconds, at a higher speed). Setting the day of the week manually • Make sure that the radio is off. • Press and hold the SNOOZE button and set the day of the week with the +/- buttons. (in the same way as the clock time). 11 Setting the alarm time • Press the ALARM button. -The display shows the present alarm time. • Press and hold down the ALARM button and set the alarm time with the +/- buttons ( in the same way as the clock time). Displaying the alarm time The alarm time can be checked with the DISPLAY button, without changing the alarm mode: • Make sure that the radio is off. • Press DISPLAY once to see the alarm time. -After 3 seconds the display will return to show the clock time again. ALARM Wake-up by radio • Switch on the radio with the ON/OFF button. • Select a station which will be broadcasting at the alarm time and adjust the volume to the required level. • Switch off the radio with the ON/OFF button. • Press the ALARM button briefly until the radio alarm indicator appears on the display. -At the preselected alarm times the radio will switch on and switch off again automatically in 90 minutes. -During the alarm function, the alarm indicator is flashing on the display. Wake up by buzzer tone • Press the ALARM button briefly until the buzzer alarm indicator appears on the display. -At the preselected alarm times the buzzer sound will switch on and off again automatically in 90 minutes. -During the alarm function, the alarm indicator is flashing on the display. Interrupting and repeating the alarm • The radio alarm or electronic sound alarm can be interrupted with the SNOOZE button. -The alarm indicator flashes on the display. -After about 5 minutes, the alarm comes on again. • It is possible to interrupt the alarm function several times during the 90 minutes switch-on period. 12 Switching off the alarm • The alarm function can be switched off by pressing the ON/OFF button. -The alarm remains set to operate the next day. -If you wish to switch off the alarm completely, press the ALARM button briefly until the alarm indicator disappears. Going to sleep while listening to the radio • Press the SLEEP button briefly. RDS -The unit switches on the radio and the display will show FM previously set sleep period and the indicator . -The sleep time can be adjusted from 90 minutes-> 10 minutes by pressing the SLEEP button several times or continuously. -After the preset sleep time has elapsed, the radio will switch off automatically. • The SLEEP function can be terminated prematurely by pressing the SNOOZE or ON/OFF button. Display backlight The display backlight will be switched on for 8 seconds when any button is pressed. Key lock The key lock function is used to prevent accidental operation or changes to the settings (e.g. when travelling etc.) • Set the key lock switch to the position. -The indication LOCKED lights up on the display when any button is pressed. • To disable this function, set the key lock switch back to the position. 13 GENERAL Technical specification Wavebands FM 87.5 - 108 MHz MW 522 - 1620 kHz LW 144 - 281 kHz Power output AC mains lead : Batteries Radio Back-up : : 230v 50/60Hz 4 x R14 / C size (not included) 2 x RO3 / AAA batteries (not included) Warning labels WARNING: to reduce the risk of electric shock, do not expose this appliance to rain or moisture or dripping or splashing. ATTENTION: To reduce the risk of electric shock, do not remove the cover. There are no user serviceable parts inside the unit. Refer any servicing to qualified personnel. 14 GUARANTEE Morphy Richards products are manufactured to internationally accepted quality standards. In addition to your statutory rights, Morphy Richards guarantee your product to be free from manufacturing and component defects for a period of TWO YEARS from date of purchase. If your product proves to be defective within 28 days of purchase, your Morphy Richards dealer from whom the product was purchased will be pleased to replace it free of charge. Should your product develop a defect within the guarantee period but after the replacement period, please return the product to the following address, together with the proof of purchase, brief details of the symptoms and your own name and address. Morphy Richards Limited Talbot Road Mexborough South Yorkshire S64 8AJ Your post office will provide a certificate of posting. The product will be repaired and returned to you promptly. If you need any further advice, please call our Helpline (UK local rate) on: 08450 777700 (Mon-Fri) Morphy Richards Website: www.morphyrichards.co.uk 446/8001/70 Rev 1 Imported by : Morphy Richards Ltd, Talbot Road, Mexborough, S64 8AJ