1
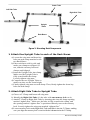
Note: for even more flexible positioning of your Snare Pad, you can choose to use your
favorite snare drum stand. The Snare Pad will easily fit any basket-style snare drum stand.
Attach High Tom
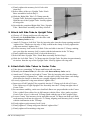
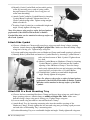
a) Choose a Hardware Clamp and loosen large wing nut until clamp’s large opening
releases. Attach clamp to the Center Tube just to the right of the Snare, making
sure that the clamp’s large wing nut is facing you. Tighten large wing nut.
b) Loosen small wing nut and hex nut on Hardware Clamp.
c) Identify Tom Arm and attach it to Center Tube
by inserting its open tube end into the
Hardware Clamp. Evenly tighten the hex nut
and wing nut, providing equal pressure on both
sides of Tom Arm.
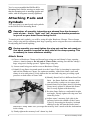
d) Choose a Tom Pad – all three Tom pads are
identical to each other and can be used
interchangeably.
e) Attach Tom Pad to Tom Arm by inserting Tom
Arm’s splined L-Mount into Tom Pad. Loosely
tighten with drum key.
f) Position Tom Pad at a comfortable height and
angle. Firmly tighten all wing nuts and drum key bolts.
Note: Tom Pads do not require a memory
lock. You can add memory locks to the DM
Pro Kit’s Toms if you wish. These memory
locks can be purchased at any drum retailer.
Attach Mid Tom
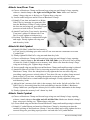
a) Choose a Hardware Clamp and loosen
large wing nut until clamp’s large opening
releases. Attach clamp to far right side of
Center Tube. Make sure that the clamp’s
large wing nut is facing you. Tighten large
wing nut.
b) Loosen small wing nut and hex nut on Hardware Clamp.
c) Identify Tom Arm and attach it to Center
Tube by inserting its open tube end into
the Hardware Clamp. Evenly tighten the
hex nut and wing nut, providing equal
pressure on both sides of Tom Arm.
d) Attach Tom Pad to Tom Arm by inserting
Tom Arm’s splined L-Mount into Tom
Pad. Loosely tighten with drum key.
e) Position Tom Pad at a comfortable height
and angle. Firmly tighten all wing nuts
and drum key bolts.
DM Pro Kit Setup Guide
7