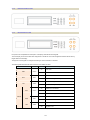
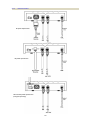
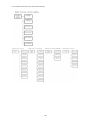
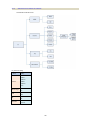
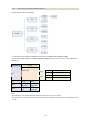
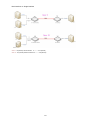
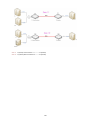
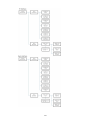
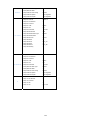
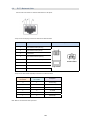
1
SHDTU03b NTU Series
G.SHDSL.bis TDM NTU
CTC Union Technologies Co., Ltd.
Far Eastern Vienna Technology Center (Neihu Technology Park)
8F, No. 60 Zhouzi St.
Neihu District
Taipei 114
Taiwan
Tel: +886-2-26591021
Fax: +886-2-27991355
Email:
[email protected]
URL: http://www.ctcu.com
SHDTU03b NTU Series User Manual
This manual supports the entire G.SHDSL.bis TDM family of modems
SHDTU03b-E1 NTU
SHDTU03b-Data (V.35,X.21,RS530/449) NTU
SHDTU03b-ET100 (Ethernet bridge, TDM) NTU
SHDTU03b-31 (3-in-1 E1, Data, Ethernet) NTU
SHDTU03b-31T (4-in-1 E1/T1, Data, Ethernet) NTU
Version 0.9a (draft)
Version 1.0 March 2010 (Release)
Copyright © 2008~2010, CTC Union Technologies, Inc.
All rights reserved.
All specifications are subject to change without prior notice.
Legal
The information in this publication has been carefully checked and is believed to be entirely accurate at the
time of publication. CTC Union Technologies assumes no responsibility, however, for possible errors or
omissions, or for any consequences resulting from the use of the information contained herein. CTC Union
Technologies reserves the right to make changes in its products or product specifications with the intent to
improve function or design at any time and without notice and is not required to update this documentation to
reflect such changes.
CTC Union Technologies makes no warranty, representation, or guarantee regarding the suitability of its
products for any particular purpose, nor does CTC Union assume any liability arising out of the application or
use of any product and specifically disclaims any and all liability, including without limitation any
consequential or incidental damages.
CTC Union products are not designed, intended, or authorized for use in systems or applications intended to
support or sustain life, or for any other application in which the failure of the product could create a situation
where personal injury or death may occur. Should the Buyer purchase or use a CTC Union product for any
such unintended or unauthorized application, the Buyer shall indemnify and hold CTC Union Technologies
and its officers, employees, subsidiaries, affiliates, and distributors harmless against all claims, costs,
damages, expenses, and reasonable attorney fees arising out of, either directly or indirectly, any claim of
personal injury or death that may be associated with such unintended or unauthorized use, even if such claim
alleges that CTC Union Technologies was negligent regarding the design or manufacture of said product.
TRADEMARKS
Microsoft is a registered trademark of Microsoft Corp.
HyperTerminal™ is a registered trademark of Hilgraeve Inc.
WARNING:
This equipment has been tested and found to comply with the limits for a Class A digital device, pursuant to
Part 15 of the FCC Rules. These limits are designed to provide reasonable protection against harmful
interference when the equipment is operated in a commercial environment. This equipment generates, uses,
and can radiate radio frequency energy and if not installed and used in accordance with the instruction
manual may cause harmful interference in which case the user will be required to correct the interference at
his own expense. NOTICE: (1) The changes or modifications not expressively approved by the party
responsible for compliance could void the user's authority to operate the equipment. (2) Shielded interface
cables and AC power cord, if any, must be used in order to comply with the emission limits.
CISPR PUB.22 Class A COMPLIANCE:
This device complies with EMC directive of the European Community and meets or exceeds the following
technical standard. EN 55022 - Limits and Methods of Measurement of Radio Interference Characteristics of
Information Technology Equipment. This device complies with CISPR Class A.
CE NOTICE
Marking by the symbol CE indicates compliance of this equipment to the EMC and LVD directives of the
European Community. Such marking is indicative that this equipment meets or exceeds the following
technical standards: EN 55022:2006, Class A, EN55024:1998+A1:2001+A2:2003, and EN60950-1:2001
Tables of Contents
1.
INTRODUCTION ................................................................................................................................... 9
1.1
1.2
1.3
2.
FEATURES........................................................................................................................................... 10
SPECIFICATION ................................................................................................................................... 10
APPLICATIONS .....................................................................................................................................11
GETTING TO KNOW THE SHDSL.BIS NTU ................................................................................. 12
2.1
FRONT PANEL ..................................................................................................................................... 12
2.1.1. E1 interface model................................................................................................................... 12
2.1.2. Serial interface model ............................................................................................................. 12
2.1.3. Ethernet interface model......................................................................................................... 13
2.1.4. Multi-interfaces model ............................................................................................................. 13
2.2
REAR PANEL ....................................................................................................................................... 15
2.2.1. E1/T1 Interface Model............................................................................................................. 15
2.2.2. Serial Interface Model ............................................................................................................. 16
2.2.3. Ethernet Interface Model ........................................................................................................ 17
2.2.4. Multi-interfaces in one Model ................................................................................................. 18
2.3
INSTALLATION ..................................................................................................................................... 19
2.3.1. E1/T1 Interface......................................................................................................................... 20
2.3.2. Serial Interface ......................................................................................................................... 21
2.3.3. Ethernet Interface .................................................................................................................... 22
3.
CONFIGURATION WITH KEYPAD AND LCD ............................................................................... 24
3.1
KEYPAD............................................................................................................................................... 24
3.2
MAIN MENU TREE ............................................................................................................................... 25
3.3
MENU TREE FOR SHOW STATUS.................................................................................................... 27
3.4
MENU TREE FOR SHOW STATISTICS ............................................................................................ 29
3.4.1. Show Statistic on E1 Interface ............................................................................................... 31
3.4.2. Show Statistic on Serial/Ethernet/T1 Interface.................................................................... 32
3.5
MENU TREE FOR SYSTEM SETUP.................................................................................................. 33
3.5.1. Sub-Menu tree for SETUP SHDSL ....................................................................................... 34
3.5.2. Sub-Menu tree for SETUP E1 Interface ............................................................................... 35
3.5.3. Sub-Menu tree for SETUP SERIAL Interface...................................................................... 39
3.5.4. Sub-menu tree for SETUP Ethernet Interface ..................................................................... 42
3.5.5. Sub-menu tree for SETUP T1 Interface ............................................................................... 43
3.5.6. Application of STU-R configuration follow STU-C .............................................................. 45
3.5.7. Application of Multi-interface .................................................................................................. 46
3.6
SUB-MENU TREE FOR REBOOT SYSTEM ...................................................................................... 61
3.7
SUB-MENU TREE FOR DIAGNOSTIC............................................................................................... 62
3.7.1. Loopback function.................................................................................................................... 62
3.7.2. BER Test function .................................................................................................................... 65
4.
PARAMETERS TABLE ...................................................................................................................... 66
4.1
SHDTU03B-E1 ................................................................................................................................. 66
4.1.1. SHDTU03b-E1l -- E1 interface mode ................................................................................... 66
4.1.2. SHDTU03b-E1/T1 -- T1 interface mode............................................................................... 66
4.2
SHDTU03B-DATA.............................................................................................................................. 67
4.2.1. SHDTU03b-Data -- Serial interface mode............................................................................ 67
4.3
SHDTU03B-ET100 .......................................................................................................................... 68
4.3.1. SHDTU03b-ET100 -- Ethernet interface mode ................................................................... 68
4.4
SHDTU03B-31.................................................................................................................................. 69
4.4.1. SHDTU03b-31 -- E1 Interface mode .................................................................................... 69
4.4.2. SHDTU03b-31 -- Serial Interface mode ............................................................................... 70
4.4.3. SHDTU03b-31 -- Ethernet Interface mode .......................................................................... 71
4.4.4. SHDTU03b-31 -- E1+Serial Interface mode ........................................................................ 72
4.4.5. SHDTU03b-31 -- E1+Ethernet Interface mode ................................................................... 73
4.5
SHDTU03B-E1/T1............................................................................................................................ 74
4.5.1. SHDTU03b-E1/T1 -- E1 Interface mode .............................................................................. 74
4.5.2. SHDTU03b-E1/T1 -- T1 Interface mode............................................................................... 75
4.6
SHDTU03B-31T ............................................................................................................................... 76
4.6.1. SHDTU03b-31T -- E1 Interface mode .................................................................................. 76
4.6.2. SHDTU03b-31T -- T1 Interface mode .................................................................................. 77
4.6.3. SHDTU03b-31T -- Serial Interface mode............................................................................. 78
4.6.4. SHDTU03b-31T -- Ethernet Interface mode ........................................................................ 79
4.6.5. SHDTU03b-31T -- E1+ Serial Interface mode..................................................................... 80
4.6.6. SHDTU03b-31T -- E1 + Ethernet Interface mode............................................................... 81
4.6.7. SHDTU03b-31T -- T1+ Serial Interface mode..................................................................... 82
4.6.8. SHDTU03b-31T -- T1 + Ethernet Interface mode............................................................... 83
5.
CONFIGURATION WITH CONSOLE PORT .................................................................................. 84
5.1
LOGIN PROCEDURE ............................................................................................................................ 85
5.2
WINDOW STRUCTURE......................................................................................................................... 86
5.3
MAIN MENU SUMMARY....................................................................................................................... 87
5.4
CONFIGURATION ................................................................................................................................. 88
5.4.1. Configure NTU Interface......................................................................................................... 89
5.4.2. Configure SHDSL parameters ............................................................................................... 91
5.4.3. Configure E1 parameters ....................................................................................................... 94
5.4.4. Configure Serial parameters ................................................................................................ 102
5.4.5. Configure Ethernet parameter ............................................................................................. 106
5.4.6. Configure T1 parameter........................................................................................................ 109
5.4.7. Remote configuration .............................................................................................................113
5.4.8. Restore factory default...........................................................................................................114
5.5
REBOOT .............................................................................................................................................117
5.6
VIEW THE SYSTEM STATUS ................................................................................................................118
5.6.1. View the SHDSL status..........................................................................................................118
5.6.2. View the Interface status .......................................................................................................119
5.6.3. View the Statistics.................................................................................................................. 122
5.7
VIEW SYSTEM CONFIGURATION ....................................................................................................... 127
5.7.1. Show system Information ..................................................................................................... 127
5.7.2. Show system with listing format .......................................................................................... 129
5.7.3. Show system with script format ........................................................................................... 131
5.8
UPGRADE ......................................................................................................................................... 135
5.9
DIAGNOSTIC ..................................................................................................................................... 139
5.10
EXIT .............................................................................................................................................. 142
6.
APPENDIX ......................................................................................................................................... 144
6.1
6.2
6.3
6.4
6.5
6.6
6.7
6.8
6.9
6.10
6.11
6.12
ABBREVIATIONS ................................................................................................................................ 144
SERIAL INTERFACE PIN ASSIGNMENTS ............................................................................................ 147
V.35 DB25(M) TO M.34(F) ADAPTOR CABLE ................................................................................. 148
X.21 DB25(M) TO DB15(F) ADAPTOR CABLE ................................................................................ 150
CONSOLE CABLE .............................................................................................................................. 152
E1/T1 BALANCED CABLE ................................................................................................................. 153
E1 UNBALANCED CABLE .................................................................................................................. 154
ETHERNET CABLE ............................................................................................................................ 155
DSL CABLE ...................................................................................................................................... 156
POWER CORD .............................................................................................................................. 157
ILLUSTRATION OF LOOPBACK CONNECTION DEVICE (E1)............................................................ 158
ILLUSTRATION OF LOOPBACK CONNECTION DEVICE (SERIAL)..................................................... 159
1. Introduction
The G.SHDSL.bis NTU offers four different interfaces (E1,T1, Serial and Ethernet) connecting
customers to high-speed TDM services. This series have 12 models as following:E1 interface model
(SHDTU03b-E1):
This modem offers two different ways to connect customers to G.703 E1 interfaces. Either balanced 120Ω with RJ45 jack or
unbalanced 75Ω with dual BNCs. The G.703 interface can carry data at rates of 64kbps to 2.048Mbps.
E1/T1 interface model
(SHDTU03b-E1/T1):
This modem offers both European standard E1 and ANSI standard T1 with either balanced 120Ω with RJ45 jack or
unbalanced 75Ω with dual BNCs for E1 or balanced 100Ω with RJ45 jack for T1. The G.703 interface can carry data at rates
of 64kbps to 2.048Mbps.
Serial interface model
(SHDTU03b-Data):
This modem offers the customer premise a high-speed TDM serial data service with a DB25 interface. The industry standard
DB25 interface can be configured for V.35/RS530 or V.36/X.21 connection. The DB25 interface can transfers data up to
5.696Mbps (for 2-wire model) or up to 11.392Mbps (for 4-wire model).
Ethernet interface model
(SHDTU03b-ET100):
This modem offers the customer premise high-speed TDM services with a LAN interface. The industry standard LAN
interface can detect a 10M or 100M connection automatically. The Ethernet LAN traffic is encapsulated into standard HDLC
packets.
(3 in 1)Multi-interface model (E1+Serial+Ethernet)
(SHDTU03b-31):
This modem offers three types of interfaces: E1 interface (balanced 120Ω RJ45 jack or unbalanced 75Ω dual BNCs), Serial
interface (DB25 female connector) and Ethernet interface (RJ-45 connector).You can select one of the following: (a) E1
interface only (b)Serial interface only (c) Ethernet interface only (d) E1 and Serial interface (e)E1 and Ethernet interface.
(4 in 1)Multi-interface model (E1+T1+Serial+Ethernet)
(SHDTU03b-31T):
This modem offers four types of interfaces: E1 interface (balanced 120Ω RJ45 jack or unbalanced 75Ω dual BNCs), T1
interface (balanced 100Ω RJ45 jack), Serial interface (DB25 female connector) and Ethernet interface (RJ-45 connector).You
can select one of the following: (a) E1 interface only (b) T1 interface only (c)Serial interface only (d) Ethernet interface only (e)
E1 and Serial interface (f)E1 and Ethernet interface (g) T1 and Serial interface (h)T1 and Ethernet interface.
The modems in this series can all be configured locally with either menu driven LCD and menu keys or with menu-driven
VT100 compatible Asynchronous Terminal Interface. Remote configuration is supported when DSL link exists via EOC
(Embedded Operations Channel) and when using VT100 Asynchronous Terminal Interface.
The G.SHDSL.Bis NTU is equipped with an auto rate capability that identifies the maximum line rate supported by the copper
loop. This powerful automatic configuration capability makes installation and service provisioning simple and painless.
Further flexibility is provided as the ability to manually set the maximum NTU speed at different levels for different
customer-tailored service offerings.
9
1.1
Features
y
Standard G.SHDSL.Bis ITU G.991.2 (2004) supports improved reach/speed and greater interoperability
y
Fast and cost-effective provisioning of traditional frame relay (FR or T-HDLC) or TDM leased line services
y
Uses existing copper loop infrastructures
y
Can operate in point to point connection
y
Efficient single wire pair usage
y
Up to 5.696Mbps(2-wire) or 11.392Mbps(4-wire) symmetric service bit rate
y
Auto rate installation maximizes data rate based on loop conditions
y
Auto configuration wetting current to protect SHDSL line
y
Local management interface with LCD display
y
Remote line loopback
y
SHDSL Line performance monitoring
y
Raw and per time interval statistics
y
Bandwidth guaranteed transmission equipment
y
Remote firmware upgrade
1.2
Specification
WAN Interface
y
Line Rate: ITU G.991.2 (2004)
y
Coding: trellis coded pulse amplitude modulation (TC-PAM16 and TC-PAM32)
y
Support: Annex A ,B , F and G
y
Payload rates: 64Kps to 5.696Mbps (N=1 to 89) for 2-wire model
128Kbps to11.392Mbps (N=2 to 178) for 4-wire model
y
Connection: RJ-45 jack (2-wire or 4-wire)
y
Impedance: 135 ohms
G.703 Interface (as E1)
y
Connection: RJ-48C for balanced 120Ω E1 cable and BNC for unbalanced 75Ω E1 coaxial cable
y
Line Rate : 2048KHz +/- 50ppm
y
Line code: HDB3/AMI
y
Framing : PCM30/PCM30C/PCM31/PCM31C and Unframed
y
Data Rate : 64Kbps to 2.048Mbps ( Nx64Kbps , N=1 to 32)
y
Operation : Full E1 and Fractional E1
G.703 Interface (as T1)
y
Connection: RJ-48C for balanced 100Ω T1 cable
y
Line Rate : 1544KHz +/- 50ppm
y
Line code: B8ZS
y
Framing: SF/ESF/Unframed
y
Data Rate : 64kbps to 1.536Mbps ( N=1 to 24)
y
Operation : Clear Channel and Factional T1
Serial Interface (as RS-530/V.35/X.21)
•
Payload rates: Up to 5.696Mbps(for 2-wire model) or Up to 8.192Mbps(for 4-wire model)
•
Support V.35/RS-530 or V.36/X.21 with cable solution
LAN Interface (as Ethernet)
•
Single Ethernet Interface
•
10/100Mpbs Half/Full Duplex, Auto-sensing, Auto-Crossover
•
Up to 1024 MAC address learning, filtering bridge
DSL Timing
•
Internal
•
From E1/T1 Recovery (as E1/T1)
•
From DTE ( as V.35 and Ethernet)
10
Performance Monitoring
•
ES, SES, UAS, LOWS for SHDSL
•
ES, SES, UAS for E1
•
Alarms and Errors for SHDSL or interface
Loopback Tests (for E1, T1 and V.35 interface only)
y
Local Digital Loopback
y
Local Loopback
y
Remote Line Loopback
y
Remote Payload Loopback
y
Far-end Line Loopback
y
Far-end Payload Loopback
y
V.54 Loopback (for V.35 interface)
11
y
Build-in 2047(2 -1) bit BER tester
Management
•
Configuration with keypads and LCD display
•
Console port (RJ45 , RS232C)
•
Support firmware upgradeable
Physical/Electrical
•
Dimensions: 19.8 x 4.6 x 16.8 cm
•
AC Input: 90~240V with 50~60Hz
•
DC Input: -48V
•
Power Consumption: 10W Max
•
Operation temperature: 0 to 50°C
•
Humidity: Up to 95% (non-condensing)
•
External screw for frame grounding
Products Information:
Interface
1.3
2-wire
4-wire
Single Interface E1
SHDTU03b-E1
SHDTU03bA-E1
model
SHDTU03b-V35
SHDTU03bA-V35
Serial
Ethernet
SHDTU03b-ET100 SHDTU03bA-ET100
Multi
E1+T1
SHDTU03b-E1/T1 SHDTU03bA-E1/T1
Interface
E1+Series+Ethernet
SHDTU03b-31
SHDTU03bA-31
model
E1+T1+Serial+Ethernet
SHDTU03b-31T
SHDTU03bA-31T
Applications
11
2.
Getting to know the SHDSL.bis NTU
This chapter shows the front and rear panel and how to install the hardware.
The models listing on G.SHDSL .bis NTU series:
Interface type
AC Power supply
DC Power supply
2
SHDTU03b-E1-AC
SHDTU03b-E1-DC
SHDTU03b-E1-AD
4
SHDTU03bA-E1-AC
SHDTU03bA-E1-DC
SHDTU03bA-E1-AD
2
SHDTU03b-V35-AC
SHDTU03b-V35-DC
SHDTU03b-V35-AD
4
SHDTU03bA-V35-AC
SHDTU03bA-V35-DC
SHDTU03bA-V35-AD
2
SHDTU03b-ET100-AC
SHDTU03b-ET100-DC
SHDTU03b-ET100-AD
E1
Serial
Ethernet
4
2
E1+T1
E1+Serial+Ethernet
E1+T1+Serial+Ethernet
2.1
AC & DC
2/4 wires
4
SHDTU03bA-ET100-AC SHDTU03bA-ET100-DC SHDTU03bA-ET100-AD
SHDTU03b-E1/T1-AC
E1 interface model
2.1.2.
Serial interface model
SHDTU03b-E1/T1-DC
SHDTU03bA-E1/T1-AC SHDTU03bA-E1/T1-DC
SHDTU03b-E1/T1-AD
SHDTU03bA-E1/T1-AD
2
SHDTU03b-31-AC
SHDTU03b-31-DC
SHDTU03b-31-AD
4
SHDTU03bA-31-AC
SHDTU03bA-31-DC
SHDTU03bA-31-AD
2
SHDTU03b-31T-AC
SHDTU03b-31T-DC
SHDTU03b-31T-AD
4
SHDTU03bA-31T-AC
SHDTU03bA-31T-DC
SHDTU03bA-31T-AD
Front Panel
2.1.1.
Dual Power supply
12
2.1.3.
Ethernet interface model
2.1.4.
Multi-interfaces model
Front panel can be separated into three parts: LCD display, LED indicator and Keypads.
The LCD display can show the status and configuration of the device. The local management interface will be done by
keypad with this LCD display.
The purpose of the keypad is to configure the setting or function selection on this NTU.
The following table describes the LEDs’ functions of the SHDSL.bis NTU:
LED
Color
PWR
Green
ALM
Action
Description
On
Power is on.
Off
Power is off.
On
System loss.
Off
System is working nomarally.
On
System is testing for connection.
Off
System is working nomarlly.
On
SHDSL line is connected.
Red
TST
Yellow
SYN
Green
Blink
Off
Blink
SHDSL
ERR
LPB
Data transmit in SHDSL line.
SHDSL line is dropped.
Error second occurs.
Red
Off
No error second.
On
Loopback is on.
Off
Loopback is off.
Yellow
13
SYN
On
E1 line is connected.
Off
E1 line is dropped.
Green
Blink
E1
ERR
LPB
TD
RD
V.35
Yellow
Off
There is not any error second.
On
Loopback is on.
Off
Loopback is off.
On
Data transmit in V.35.
Off
No data transmit in V.35.
On
Data receive in V.35.
Off
No data reveive in V.35.
Green
Green
Blink
ERR
LINK
ETH
100M
Error second occurs.
Red
Off
No error second.
On
Data transmit in Ethernet.
Off
No data transmit in Ethernet.
On
Data receive in 100M.
Off
No data receive in 100M.
Green
Green
Blink
COL
There are error seconds.
Red
Error collision occurs.
Red
Off
Blink
No error collision.
E1 Data tramsmit and receive
Green
E1
Red
On
E1 cable cable connected
On
No E1 cable connected
Blink
Serial Data tramsmit and receive
Green
MODE
SER
Red
On
DTE Connected
On
DTE Disconnect
Blink
Ethernet Data tramsmit and receive
Green
ETH
Red
On
Ethernet cable connected
On
No Ethernet cable connected
14
2.2
Rear Panel
2.2.1.
E1/T1 Interface Model
AC power input version
The rear panel of this model is including power switch, AC power socket, RJ-45 console, G.703 RJ-48C jack or BNC jack for
transmitting and receiving and RJ-45 for DSL cable from left to right.
DC power input version
The rear panel of this model is including power switch, DC power socket, RJ-45 console, G.703 RJ-48C jack or BNC jack for
transmitting and receiving and RJ-45 for DSL cable from left to right.
AC & DC dual power input version
The rear panel of this model is including DC power socket, AC power switch, AC power socket, RJ-45 console, G.703 RJ-48C
jack or BNC jack for transmitting and receiving and RJ-45 for DSL cable from left to right.
Connector Description
ON
Power switch. Press 1 for turn on and press 0 for off
90~240V AC
IEC-320 C6 AC input connector. It has power adapting function from 90V to 240V
-48V
DC power input connector (-48V)
GND
CONSOLE
G.703
RJ-45 for system configuration and maintenance
RJ-48C for 120Ω E1/T1 connection with PABX (Private Automatic Branch Exchange) or E1
Router
TX
BNC for 75Ω E1 transmitting
RX
BNC for 75Ω E1 receiving
SHDSL
RJ-45 for DSL connection
15
2.2.2.
Serial Interface Model
AC power input version
The rear panel of this model is including power switch, AC power socket, RJ-45 for console cable, DB-25(Female) for serial
cable and RJ-45 for DSL cable from left to right.
DC power input version
The rear panel of this model is including power switch, DC power socket, RJ-45 for console cable, DB-25(Female) for serial
cable and RJ-45 for DSL cable from left to right.
AC & DC dual power input version
The rear panel of this model is including DC power socket, AC power switch, AC power socket, RJ-45 for console cable,
DB-25(Female) for serial cable and RJ-45 for DSL cable from left to right.
Connector Description
ON
Power switch. Press 1 for turn on and press 0 for off.
90~240V AC
IEC-320 C6 AC input connector. It has power adapting function from 90V to 240V
-48V
DC power input connector (-48V)
GND
CONSOLE
RJ-45 for system configuration and maintenance
SERIAL
DB-25(F) for RS-530 and V.35 or X.21(with adaptor cable)
SHDSL
RJ-45 for DSL Connection
16
2.2.3.
Ethernet Interface Model
AC power input version
The rear panel of this model is including power switch, AC power socket, RJ-45 for console cable, LAN for Ethernet cable and
RJ-45 for DSL cable from left to right.
DC power input version
The rear panel of this model is including power switch, DC power socket, RJ-45 for console cable, LAN for Ethernet cable and
RJ-45 for DSL cable from left to right.
AC & DC dual power input version
The rear panel of this model is including DC power socket, AC power switch, AC power socket, RJ-45 for console cable, LAN
for Ethernet cable and RJ-45 for DSL cable from left to right.
Connector Description
ON
Power switch. Press 1 for turn on and press 0 for turn off.
90~240V AC
IEC-320 C6 AC input connector. It has power adapting function from 90V to 240V.
-48V
DC power input connector (-48V)
GND
CONSOLE
RJ-45 for system configuration and maintenance.
ETH
RJ-45 LAN port for Ethernet cable
SHDSL
RJ-45 for DSL Connection
17
2.2.4.
Multi-interfaces in one Model
DC power input version
The rear panel of this model is including power switch, AC power socket, RJ-45 for console cable, LAN for Ethernet cable,
G.703 RJ-48C or BNC jacks for transmitting and receiving, DB-25(Female) for serial cable and RJ-45 for DSL cable from left
to right.
DC power input version
The rear panel of this model is including power switch, DC power socket, RJ-45 for console cable, LAN for Ethernet cable,
G.703 RJ-48C or BNC jacks for transmitting and receiving, DB-25(Female) for serial cable and RJ-45 for DSL cable from left
to right.
AC & DC dual power input version
The rear panel of this model is including DC power socket, AC power switch, AC power socket, RJ-45 for console cable, LAN
for Ethernet cable, G.703 RJ-48C or BNC jacks for transmitting and receiving, DB-25(Female) for serial cable and RJ-45 for
DSL cable from left to right.
Connector Description
ON
Power switch. Press 1 for turn on and press 0 for off
90~240V AC
IEC-320 C6 AC input connector. It has power adapting function from 90V to 240V
-48V
DC power input connector (-48V)
GND
CONSOLE
RJ-45 for system configuration and maintenance
ETH
RJ-45 LAN port for Ethernet cable
E1
SERIAL
RJ-48C for 120Ω E1/T1 connection with PABX (Private Automatic Branch Exchange) or
E1 Router
DB-25(F) for RS-530 and V.35 or X.21(with adaptor cable)
TX
BNC for 75Ω E1 transmitting
RX
BNC for 75Ω E1 receiving
DSL
RJ-45 for DSL connection
18
2.3
Installation
Note: To avoid possible damage to this NTU, do not turn on the product before hardware installation.
(a)
(b)
(c)
(d)
(e)
Plug the power cord in the power socket.
Plug the console port in console if you want to configure the NTU with VT100 program of NB or PC.
Plug the E1/T1 cable ( 75Ω BNC cables for E1 or 120Ω cable for E1 or T1)
or/and SERIAL cable
or/and Ethernet cable
Plug SHDSL cable
Power on
19
2.3.1.
E1/T1 Interface
AC power input version
DC power input version
AC & DC dual power input version
(Using DC input only)
20
2.3.2.
Serial Interface
AC power input version
DC power input version
AC & DC dual power input version
(Using DC input only)
21
2.3.3.
Ethernet Interface
AC power input version
DC power input version
AC & DC dual power input version
(Using DC input only)
22
Protective earth:
The marked lug or terminal should be connected to the building protective earth bus.
The function of protective earth does not serve the purpose of providing protection against electrical shock, but instead
enhances surge suppression on the DSL lines for installations where suitable bonding facilities exist.
We strongly recommend grounding this device for lightning protection purposes.
The connector type is M3 machine screw.
!
Warning! High voltage. Do not open the housing
There are no user serviceable parts inside the modem. Opening the unit while still connected to power source could cause
exposure to danger high voltages. All service should be done by trained personnel.
Product servicing
Do not attempt to service this product yourself, as opening or removing covers may expose you to dangerous voltage points
or other risks, Refer all servicing to qualified service personnel.
1.
Unplug this product from the wall outlet and refer servicing to qualified service personnel when:
2.
The power card or plug is damaged, cut or frayed
3.
Liquid was spilled into the product
4.
The product was exposed to rain or water
5.
The product has been dropped or the case has been damaged
6.
The product exhibits a distinct change in performance, indicating a need for service
7.
The product does not operate normally after following the operating instructions
Note: Adjust only those controls that are covered by the operating instructions, since improper adjustment of other controls
may result in damage and will often require extensive work by a qualified technician to restore the product to normal
condition.
Disposal instructions
Do not throw this electronic device into the trash when discarding.
To minimize pollution and ensure utmost protection of the global environment, please recycle this device.
23
3. Configuration with Keypad and LCD
This chapter provides information about the configuration of your G.SHDSL .Bis NTU via front panel LCD display and keypads.
3.1
Keypad
The G.SHDSL.bis NTU is designed to provide an user-friendly configuration and management by using keypad and LCD
display on the front panel without a computer with the VT100 terminal software connected.
Key Pad
Description
ESC
Return to previous configuration menu.
Enter
Skip to next configuration menu or configure this item.
L-
Select other parameter in the same level menu.
R+
Select other parameter in the same level menu.
24
3.2
Main menu Tree
Model vs. Interface modes support (table 1):
Model
Interface modes support
SHDTU03b-E1; SHDTU03bA-E1
E1 interface
E1 interface model
SHDTU03b-E1/T1; SHDTU03bA-E1/T1
E1 interface
E1 + T1 interface model
T1 interface
SHDTU03b-V35; SHDTU03bA-V35
Serial interface (V.35 , X.21)
Serial interface model
SHDTU03b-ET100; SHDTU03bA-ET100
Ethernet interface
Ethernet interface model
E1 interface
SHDTU03b-31; SHDTU03bA-31
Serial interface (V.35 , X.21)
E1+Serial+Ethernet
Ethernet interface
interface model
E1+Serial(V.35 , X.21)
E1+Ethernet interface
E1 interface
T1 interface
Serial interface (V.35 , X.21)
SHDTU03b-31T; SHDTU03bA-31T
Ethernet interface
E1+T1+ Serial +Ethernet
E1+Serial (V.35 , X.21)
interface model
E1+Ethernet interface
T1 + Serial (V.35 , X.21)
T1 + Ethernet interface
Model vs. Interface modes support (table 2):
Interface
E1
Model *
2-wire
4-wire
-E1
A-E1
●
-E1/T1
A-E1/T1
●
-V35
A-V35
-ET100
A-Et100
-31
A-31
●
-31T
A-31T
●
T1
Serial
Ethernet
E1+Serial
E1+Ethernet
T1+Serial
T1+Ethernet
●
●
●
●
●
●
●
●
●
●
●
●
●
●
* = SHDTU03b
25
After turning on device, the LCD display will prompt G.SHDSL .BIS NTU. Press Enter to enter. The display will follow the
sub-menus as in the following graphic:
Please notice that the Ethernet interface mode does not have SYSTEM DIAGNOSTIC.
For more detail on these sub-menus, please refer to each chapter.
26
3.3
Menu tree for SHOW STATUS
You can check the status via LCD display.
The SHOW STATUS menu tree is as following.
27
For more detail on these sub-menus, please refer to following:
28
3.4
Menu tree for SHOW STATISTICS
The product can display two kinds of statistics data:
(a)
Current 15 minutes period and 96 previous 15-minutes periods of SHDSL performance.
(b)
Current 24 hour period and 7 previous 24-hours periods of SHDSL performance.
SHDSL’s statistics data:
SHDSL
ES
SES
UAS
LOSW
If using the E1 interface mode, it can also show the E1 performance data.
(c)
Current 15 minutes period and 96 previous 15-minutes periods of E1 performance.
(d)
Current 24 hours period and 7 previous 24-hours periods of E1 performance.
E1’s statistics data:
E1
ES
SES
UAS
Abbrev of statistics terms:
ES
Error Second
SES
Severely Error Second
UAS
Unavailable Second
LOWS
Loss of Synchronization word
29
Model vs. Interface modes and statistics support:
SHDSL
Model
Interface modes support
statistics support
E1
statistics support
ES ,SES,UAS,LOSW
ES,SES,UAS
E1 interface
●
●
E1 interface
●
●
T1 interface
●
SHDTU03b-V35, A-V35
Serial interface model
Serial interface (V.35 , X.21)
●
SHDTU03b-ET100, A-ET100
Ethernet interface model
Ethernet interface
●
E1 interface
●
Serial interface (V.35 , X.21)
●
Ethernet interface
●
E1+Serial(V.35 , X.21) interface
●
●
E1+Ethernet interface
●
●
E1 interface
●
●
T1 interface
●
Serial interface (V.35 , X.21)
●
Ethernet interface
●
E1+Serial (V.35 , X.21) interface
●
●
E1+Ethernet interface
●
●
T1 + Serial (V.35 , X.21) interface
●
T1 + Ethernet interface
●
SHDTU03b-E1, A-E1
E1 interface model
SHDTU03b-E1/T1, A-E1/T1
E1 + T1 interface model
SHDTU03b-31, A-31
E1+Serial+Ethernet
interface model
SHDTU03b-31T, A-31T
E1+T1+ Serial +Ethernet
interface model
30
●
3.4.1.
Show Statistic on E1 Interface
31
3.4.2.
Show Statistic on Serial/Ethernet/T1 Interface
32
3.5
Menu tree for SYSTEM SETUP
You can setup five interface modes via LCD display.
33
3.5.1.
Sub-Menu tree for SETUP SHDSL
SETUP SHDSL
SETUP MODE
Selection items
STU-R, STU-C-INTCLK, STU-C-EXTCLK
SETUP ANNEX
A,
SETUP STARTUP MARGIN
-10
B,
to
F,
G
21
SETUP PSD
SYM,
ASYM
SETUP PAIR MODE
1 Pair,
2 Pair
The following are commonly used acronyms for SETUP MODE:
STU-R
RT side, where the clock source is set to external
STU-C-INTCLK
CO side, where the clock source is set to internal
STU-C-EXTCLK
CO side, where the clock source is set to external
34
3.5.2.
Sub-Menu tree for SETUP E1 Interface
SYSTEM SETUP Î SETUP E1
E1 parameter setting:
E1 Items
Setting
PCM31
PCM31C
Channel
PCM30
PCM30C
FULL
Pass Through
Code
AIS
Build Outs
Off
On
HDB3
AMI
On
Off
120 ohms
75 ohms
35
Framer Setting:
Framer
Slot Number
First Slot
PCM31
FAS
1 to 31
1 to 31
PCM31C
FAS+CRC4
1 to 31
1 to 31
PCM30
FAS+CAS
1 to 30
1 to 31 (can’t use 16)
PCM30C
FAS+CAS+CRC4
1 to 30
1 to 31 (can’t use 16)
FULL
UNFRAMED
st
The table of number of time slot vs. 1 time slot:
Annex A/B/F/G
2-wire
st
Channel
Number of
1 slot
FULL (UNFRAMED)
-----
-----
PCM31
31
1
30
1~2
29
1~3
28
1~4
27
1~5
26
1~6
25
1~7
24
1~8
23
1~9
22
1~10
21
1~11
20
1~12
19
1~13
18
1~14
17
1~15
16
1~16
15
1~17
14
1~18
13
1~19
12
1~20
11
1~21
slot
PCM30
PCM31C
PCM30C
10
1~22
9
1~23
8
1~24
7
1~25
6
1~26
5
1~27
4
1~28
3
1~29
2
1~30
1
1~31
30
1
29
1~2
28
1~3
27
1~4
26
1~5
36
Annex A/B/F/G
25
1~6
24
1~7
23
1~8
22
1~9
21
1~10
20
1~11
19
1~12
18
1~13
17
1~14
16
1~15
15
1~15,17
14
1~15,17~18
13
1~15,17~19
12
1~15,17~20
11
1~15,17~21
10
1~15,17~22
9
1~15,17~23
8
1~15,17~24
7
1~15,17~25
6
1~15,17~26
5
1~15,17~27
4
1~15,17~28
3
1~15,17~29
2
1~15,17~30
1
1~15,17~31
Number of
1 slot
4-wire
Channel
st
slot
FULL (UNFRAMED)
-----
-----
PCM31
30
1~2
28
1~4
26
1~6
24
1~8
22
1~10
20
1~12
18
1~14
16
1~16
14
1~18
12
1~20
10
1~22
8
1~24
6
1~26
4
1~28
2
1~30
30
1
28
1~3
26
1~5
24
1~7
22
1~9
PCM30
PCM31C
PCM30C
20
1~11
18
1~13
37
16
1~15
14
1~15,17~18
12
1~15,17~20
10
1~15,17~22
8
1~15,17~24
6
1~15,17~26
4
1~15,17~28
2
1~15,17~30
Note:
When SHDSL.bis uses 2-pairs(4-wires), the time slot number can only use even numbers.
When E1 framer is PCM31C or PCM30C and set pass through ON, no fractional function can be used.
38
3.5.3.
Sub-Menu tree for SETUP SERIAL Interface
SYSTEM SETUP Î SETUP SERIAL
39
Serial interface control signals settings:
Serial Items
INTERFACE
Setting
V.35
X.21(RS-530)
T1 mode
Nx64K (Rate)
2-wires
Nx64K mode
4-wires
CLOCK
RTS
1 ~ 36
Annex F/G
1 ~ 89
Annex A/B
2 ~ 72 (even number only)
Annex F/G
2 ~ 128 (even number only)
Normal
Inverse
On
CTS
From DTE
On
Off
DSR
From RTS
On
Off
DCD
From DTR
On
Off
DELAY
Annex A/B
From DSL
0mS
1mS
2mS
3mS
Note:
When SHDSL.bis uses 2-pairs (4-wires), the Nx64K(Rate) number can only use even numbers.
When other side has T1 interface and unframed mode connected to this side as Serial interface, we must set Serial rate type
as T1 mode.
40
The handshake signal direction between DCE and DTE
The below diagram shows CTS follow RTS, DSR follow DTR
The RTS delay time is used to control CTS on delay to RTS signal, It works only for the setting:
CTS follow RTS and RTS follow from DTE .
41
3.5.4.
Sub-menu tree for SETUP Ethernet Interface
SYSTEM SETUP Î SET UP ETHERNET
If you set Ethernet Auto Negotiation to Enable, the default setting for Duplex is Full and Speed is 100M.
If you set Ethernet Auto Negotiation to Enable, the Duplex and Speed cannot be set up and it will use auto negotiation per
IEEE802.3u.
Ethernet Items
Setting
T1 mode
Nx64K mode
2-wires
Rate
4-wires
Auto
Duplex
Speed
Disable
Enable
Full-Duplex
Auto
Half-Duplex
Configuration
100M
Auto
10M
Configuration
Annex A/B
1 ~ 36
Annex F/G
1 ~ 89
Annex A/B
2 ~ 72 (even number only)
Annex F/G
2 ~ 178 (even number only)
Note:
When SHDSL.bis uses 2-pairs(4-wires), the Nx64(Rate) number can only use even numbers.
When other side is T1 interface and unframed mode connects to this side as Ethernet interface, we must set Ethernet rate as
T1 mode.
42
3.5.5.
Sub-menu tree for SETUP T1 Interface
SYSTEM SETUP Î SETUP T1
T1 parameter setting:
T1 Items
Setting
SF
Channel
ESF
Unframed
Slot Number
1~24
First Slot
1 to (25 -Slot Number)
0 ~133ft
133 ~ 266ft
LBO
266 ~399 ft
399 ft ~ 533ft
533ft ~ 655ft
AIS
Off
On
The T1 interface can encode/decode its transmit/receive signals using Bipolar with Eight Zero Suppression (B8ZS) coding.
43
st
The table of number of time slot vs. 1 time slot:
Annex A/B/F/G
2-wire
st
Channel
Number of slot 1 slot
SF
24
1
ESF
23
1~2
22
1~3
21
1~4
20
1~5
19
1~6
18
1~7
17
1~8
16
1~9
15
1~10
14
1~11
13
1~12
12
1~13
11
1~14
10
1~15
9
1~16
8
1~17
7
1~18
6
1~19
5
1~20
4
1~21
3
1~22
2
1~23
1
1~24
Annex A/B/F/G
4-wire
st
Channel
Number of slot 1 slot
SF
24
1
ESF
22
1~3
20
1~5
18
1~7
16
1~9
14
1~11
12
1~13
10
1~15
8
1~17
6
1~19
4
1~21
2
1~23
Note:
When SHDSL.bis uses 2-pairs(4-wires), the time slot number can only use even numbers.
44
3.5.6.
Application of STU-R configuration follow STU-C
Some configurations on STU-R side can follow STU-C side after DSL link up is finish.
Such that on STU-R side, you do not care about the settings of the E1 channel/slot number/first slot, serial data rate or
Ethernet data rate. When the DSL link up is finished, these configurations will follow the STU-C side.
STU-R
`
STU-C
E1 Interface
E1 Interface
E1 Channel
E1 Slot Number
E1 First Slot
E1 Channel
E1 Slot Number
E1 First Slot
STU-R
STU-C
Serial Interface
Serial Interface
Serial Data Rate
Serial Data Rate
STU-R
STU-C
Ethernet Interface
Ethernet Interface
Ethernet Data Rate
Ethernet Data Rate
STU-R
STU-C
T1 Interface
T1 Interface
T1 Channel
T1 Slot Number
T1 First Slot
T1 Channel
T1 Slot Number
T1 First Slot
#
If STU-C is as T1 interface and set T1 channel is unframed mode, STU-R cannot follow.
#
When E1/T1 model time slot and Serial/Ethernet model date rate set 1 of 2 on STU-C side, STU-R cannot follow.
#
For the application on multi-interface, this function is not available. User must setup the configuration for both as the same
time before DSL link.
45
3.5.7.
Application of Multi-interface
Dual interface vs. Dual interface
Case 1
E1(Unframed)+ Serial interface Å---------Æ E1(Unframed)+ Serial interface
Case 2
E1(Framed)+ Serial interface Å---------Æ E1(Framed)+ Serial interface
Case 3
E1(Framed)+ Ethernet interface Å---------Æ E1(Framed)+ Ethernet interface
Case 4
E1(Framed)+ Serial interface Å---------Æ E1(Framed)+ Ethernet interface
46
Table of E1+ Serial interface or E1+Ethernet interface mode on both sides
Annex A /B (2-wires)
E1 interface
Serial interface
Ethernet interface
Channel
st
Number of slot
1 slot
FULL (UNFRAMED)
-----
-----
1~4
PCM31
31
1
1~5
30
1
1~6
29
1
1~7
28
1
1~8
27
1
1~9
26
1
1~10
PCM30
PCM31C
PCM30C
Nx64K (Rate)
25
1
1~11
24
1
1~12
23
1
1~13
22
1
1~14
21
1
1~15
20
1
1~16
19
1
1~17
18
1
1~18
17
1
1~19
16
1
1~20
15
1
1~21
14
1
1~22
13
1
1~23
12
1
1~24
11
1
1~25
10
1
1~26
9
1
1~27
8
1
1~28
7
1
1~29
6
1
1~30
5
1
1~31
4
1
1~32
3
1
1~33
2
1
1~34
1
1
1~35
30
1
1~6
29
1
1~7
28
1
1~8
27
1
1~9
26
1
1~10
25
1
1~11
24
1
1~12
23
1
1~13
22
1
1~14
21
1
1~15
20
1
1~16
19
1
1~17
18
1
1~18
17
1
1~19
47
16
1
1~20
15
1
1~21
14
1
1~22
13
1
1~23
12
1
1~24
11
1
1~25
10
1
1~26
9
1
1~27
8
1
1~28
7
1
1~29
6
1
1~30
5
1
1~31
4
1
1~32
3
1
1~33
2
1
1~34
1
1
1~35
Annex F/G (2-wire)
E1 interface
Serial interface
Ethernet interface
Channel
st
Number of slot
1 slot
FULL (UNFRAMED)
-----
-----
1~57
PCM31
31
1
1~58
30
1
1~59
29
1
1~60
28
1
1~61
27
1
1~62
26
1
1~63
25
1
1~64
24
1
1~65
23
1
1~66
22
1
1~67
21
1
1~68
20
1
1~69
19
1
1~70
18
1
1~71
17
1
1~72
16
1
1~73
15
1
1~74
14
1
1~75
13
1
1~76
12
1
1~77
11
1
1~78
10
1
1~79
9
1
1~80
8
1
1~81
7
1
1~82
6
1
1~83
5
1
1~84
4
1
1~85
3
1
1~86
2
1
1~87
1
1
1~88
PCM31C
Nx64K (Rate)
48
PCM30
PCM30C
30
1
1~59
29
1
1~60
28
1
1~61
27
1
1~62
26
1
1~63
25
1
1~64
24
1
1~65
23
1
1~66
22
1
1~67
21
1
1~68
20
1
1~69
19
1
1~70
18
1
1~71
17
1
1~72
16
1
1~73
15
1
1~74
14
1
1~75
13
1
1~76
12
1
1~77
11
1
1~78
10
1
1~79
9
1
1~80
8
1
1~81
7
1
1~82
6
1
1~83
5
1
1~84
4
1
1~85
3
1
1~86
2
1
1~87
1
1
1~88
Annex A /B (4-wires)
E1 interface
Serial interface
Ethernet interface
st
Channel
Number of slot
1 slot
Nx64K (Rate)
FULL (UNFRAMED)
-----
-----
1~40
PCM31
30
1
1~42
28
1
1~44
26
1
1~46
24
1
1~48
22
1
1~50
20
1
1~52
18
1
1~54
16
1
1~56
14
1
1~58
12
1
1~60
10
1
1~62
8
1
1~64
6
1
1~66
4
1
1~68
PCM30
PCM31C
PCM30C
2
1
1~70
30
1
1~42
28
1
1~44
49
26
1
1~46
24
1
1~48
22
1
1~50
20
1
1~52
18
1
1~54
16
1
1~56
14
1
1~58
12
1
1~60
10
1
1~62
8
1
1~64
6
1
1~66
4
1
1~68
2
1
1~70
Annex F/G (4-wire)
E1 interface
Serial interface
Ethernet interface
st
Channel
Number of slot
1 slot
Nx64K (Rate)
FULL (UNFRAMED)
-----
-----
1~96
PCM31
30
1
1~98
28
1
1~100
26
1
1~102
24
1
1~104
22
1
1~106
20
1
1~108
18
1
1~110
16
1
1~112
14
1
1~114
12
1
1~116
10
1
1~118
8
1
1~120
6
1
1~122
PCM30
PCM31C
PCM30C
4
1
1~124
2
1
1~126
30
1
1~98
28
1
1~100
26
1
1~102
24
1
1~104
22
1
1~106
20
1
1~108
18
1
1~110
16
1
1~112
14
1
1~114
12
1
1~116
10
1
1~118
8
1
1~120
6
1
1~122
4
1
1~124
2
1
1~126
50
Case 5
T1(Unframed)+ Serial interface Å---------Æ T1(Unframed)+ Serial interface
Case 6
T1(Framed)+ Serial interface Å---------Æ T1(Framed)+ Serial interface
Case 7
T1(Framed)+ Ethernet interface Å---------Æ T1(Framed)+ Ethernet interface
Case 8
T1(Framed)+ Serial interface Å---------Æ T1(Framed)+ Ethernet interface
51
Table of T1+ Serial interface or T1+Ethernet interface mode on both sides
Annex A/B (2-wire)
T1 interface
Serial interface
Ethernet interface
st
Channel
Number of slot
1 slot location
Nx64K (Rate) range
Unframed
--
--
1~12
SF
23
1
1~13
ESF
22
1
1~14
21
1
1~15
20
1
1~16
19
1
1~17
18
1
1~18
17
1
1~19
16
1
1~20
15
1
1~21
14
1
1~22
13
1
1~23
12
1
1~24
11
1
1~25
10
1
1~26
9
1
1~27
8
1
1~28
7
1
1~29
6
1
1~30
5
1
1~31
4
1
1~32
3
1
1~33
2
1
1~34
1
1
1~35
Annex G/F (2-wire)
T1 interface
Serial interface
Ethernet interface
st
Channel
Number of slot
1 slot location
Nx64K (Rate) range
SF
24
1
1~65
ESF
23
1
1~66
22
1
1~67
21
1
1~68
20
1
1~69
19
1
1~70
18
1
1~71
17
1
1~72
16
1
1~73
15
1
1~74
14
1
1~75
13
1
1~76
12
1
1~77
11
1
1~78
10
1
1~79
9
1
1~80
8
1
1~81
7
1
1~82
52
6
1
1~83
5
1
1~84
4
1
1~85
3
1
1~86
2
1
1~87
1
1
1~88
Annex A/B (4-wire)
T1 interface
Serial interface
Ethernet interface
st
Channel
Number of slot
1 slot location
Nx64K (Rate) range
Unframed
--
--
1~48
SF
24
1
1~48
ESF
22
1
1~50
20
1
1~52
18
1
1~54
16
1
1~56
14
1
1~58
12
1
1~60
10
1
1~62
8
1
1~64
6
1
1~66
4
1
1~68
2
1
1~70
Annex G/F (4-wire)
T1 interface
Serial interface
Ethernet interface
st
Channel
Number of slot
1 slot location
Nx64K (Rate) range
Unframed
--
--
1~104
SF
24
1
1~104
ESF
22
1
1~106
20
1
1~108
18
1
1~110
16
1
1~112
14
1
1~114
12
1
1~116
10
1
1~118
8
1
1~120
6
1
1~122
4
1
1~124
2
1
1~126
53
Dual interface vs. Single interface
Case 9
Case 10
E1(framed)+ Serial interface
Å---------Æ E1(framed)
E1(framed)+Ethernet interface Å---------ÆE1(framed)
54
Table of E1+ Serial interface to E1 interface and E1+Ethernet interface to E1 interface mode on both sides
Annex A /B/F/G (2-wires)
E1 interface
Serial interface
Ethernet interface
Channel
PCM31
PCM30
PCM31C
PCM30C
st
Number of slot
1 slot
Nx64K (Rate)
30
1
1
29
1
1~2
28
1
1~3
27
1
1~4
26
1
1~5
25
1
1~6
24
1
1~7
23
1
1~8
22
1
1~9
21
1
1~10
20
1
1~11
19
1
1~12
18
1
1~13
17
1
1~14
16
1
1~15
15
1
1~16
14
1
1~17
13
1
1~18
12
1
1~19
11
1
1~20
10
1
1~21
9
1
1~22
8
1
1~23
7
1
1~24
6
1
1~25
5
1
1~26
4
1
1~27
3
1
1~28
2
1
1~29
1
1
1~30
29
1
1
28
1
1~2
27
1
1~3
26
1
1~4
25
1
1~5
24
1
1~6
23
1
1~7
22
1
1~8
21
1
1~9
20
1
1~10
19
1
1~11
18
1
1~12
17
1
1~13
16
1
1~14
15
1
1~15
14
1
1~16
55
13
1
1~17
12
1
1~18
11
1
1~19
10
1
1~20
9
1
1~21
8
1
1~22
7
1
1~23
6
1
1~24
5
1
1~25
4
1
1~26
3
1
1~27
2
1
1~28
1
1
1~29
Annex A /B/F/G (4-wires)
E1 interface
Serial interface
Ethernet interface
Channel
PCM31
PCM30
PCM31C
PCM30C
st
Number of slot
1 slot
Nx64K (Rate)
29
1
1
28
1
2
27
1
1,3
26
1
2,4
25
1
1,3,5
24
1
2,4,6
23
1
1,3,5,7
22
1
2,4,6,8
21
1
1,3,5,7,9
20
1
2,4,6,8,10
19
1
1,3,5,7,9,11
18
1
2,4,6,8,10,12
17
1
1,3,5,7,9,11,13
16
1
2,4,6,8,10,12,14
15
1
1,3,5,7,9,11,13,15
14
1
2,4,6,8,10,12,14,16
13
1
1,3,5,7,9,11,13,15,17
12
1
2,4,6,8,10,12,14,16,18
11
1
1,3,5,7,9,11,13,15,17,19
10
1
2,4,6,8,10,12,14,16,18,20
9
1
1,3,5,7,9,11,13,15,17,19,21
8
1
2,4,6,8,10,12,14,16,18,20,22
7
1
1,3,5,7,9,11,13,15,17,19,21,23
6
1
2,4,6,8,10,12,14,16,18,20,22,24
5
1
1,3,5,7,9,11,13,15,17,19,21,23,25
4
1
2,4,6,8,10,12,14,16,18,20,22,24,26
3
1
1,3,5,7,9,11,13,15,17,19,21,23,25,27
2
1
2,4,6,8,10,12,14,16,18,20,22,24,26,28
1
1
1,3,5,7,9,11,13,15,17,19,21,23,25,27,29
29
1
1
28
1
2
27
1
1,3
26
1
2,4
25
1
1,3,5
56
24
1
2,4,6
23
1
1,3,5,7
22
1
2,4,6,8
21
1
1,3,5,7,9
20
1
2,4,6,8,10
19
1
1,3,5,7,9,11
18
1
2,4,6,8,10,12
17
1
1,3,5,7,9,11,13
16
1
2,4,6,8,10,12,14
15
1
1,3,5,7,9,11,13,15
14
1
2,4,6,8,10,12,14,16
13
1
1,3,5,7,9,11,13,15,17
12
1
2,4,6,8,10,12,14,16,18
11
1
1,3,5,7,9,11,13,15,17,19
10
1
2,4,6,8,10,12,14,16,18,20
9
1
1,3,5,7,9,11,13,15,17,19,21
8
1
2,4,6,8,10,12,14,16,18,20,22
7
1
1,3,5,7,9,11,13,15,17,19,21,23
6
1
2,4,6,8,10,12,14,16,18,20,22,24
5
1
1,3,5,7,9,11,13,15,17,19,21,23,25
4
1
2,4,6,8,10,12,14,16,18,20,22,24,26
3
1
1,3,5,7,9,11,13,15,17,19,21,23,25,27
2
1
2,4,6,8,10,12,14,16,18,20,22,24,26,28
1
1
1,3,5,7,9,11,13,15,17,19,21,23,25,27,29
Note: the E1 first time slot should be 1
57
Case 11
T1(framed)+ Serial interface
Å---------Æ T1(framed)
Case 12
T1(framed)+Ethernet interface Å---------ÆT1(framed)
58
Table of T1+ Serial interface to T1 interface and T1+Ethernet interface to T1 interface mode on both sides
Annex A /B/F/G (2-wires)
E1 interface
Serial interface
Ethernet interface
st
Channel
Number of slot
1 slot
Nx64K (Rate)
SF
23
1
1
ESF
22
1
1~2
21
1
1~3
20
1
1~4
19
1
1~5
18
1
1~6
17
1
1~7
16
1
1~8
15
1
1~9
14
1
1~10
13
1
1~11
12
1
1~12
11
1
1~13
10
1
1~14
9
1
1~15
8
1
1~16
7
1
1~17
6
1
1~18
5
1
1~19
4
1
1~20
3
1
1~21
2
1
1~22
1
1
1~23
Note: the T1 first time slot should be 1
Annex A /B/F/G (4-wires)
T1 interface
Serial interface
Ethernet interface
st
Channel
Number of slot
1 slot
Nx64K (Rate)
SF
23
1
1
ESF
22
1
2
21
1
1,3
20
1
2,4
19
1
1,3,5
18
1
2,4,6
17
1
1,3,5,7
16
1
2,4,6,8
15
1
1,3,5,7,9
14
1
2,4,6,8,10
13
1
1,3,5,7,9,11
12
1
2,4,6,8,10,12
11
1
1,3,5,7,9,11,13
10
1
2,4,6,8,10,12,14
9
1
1,3,5,7,9,11,13,15
8
1
2,4,6,8,10,12,14,16
59
7
1
1,3,5,7,9,11,13,15,17
6
1
2,4,6,8,10,12,14,16,18
5
1
1,3,5,7,9,11,13,15,17,19
4
1
2,4,6,8,10,12,14,16,18,20
3
1
1,3,5,7,9,11,13,15,17,19,21
2
1
2,4,6,8,10,12,14,16,18,20,24
1
1
1,3,5,7,9,11,13,15,17,19,21,23
Note: the T1 first time slot should be 1
60
3.6
Sub-menu tree for REBOOT SYSTEM
REBOOT SYSTEM -> * REBOOT * YES -> press ”ENTER” key
Some settings request system reboot for the setting to take effect.
61
3.7
Sub-Menu tree for DIAGNOSTIC
3.7.1.
Loopback function
SYSTEM DIAGNOSTIC Î DIAG LOOPBACK
Note : there is no SYSTEM DIAGNOSTIC menu on the Ethernet Interface Model
If the device hasn’t connected or it is under handshake, it will not support farend line, farend payload and V.54.
Stand alone NTU, no connection with other NTU:
E1/T1 interface
Serial interface
CO side
CO side
Local digital
Local digital
Local
Local
Remote line
Remote line
Remote payload
Remote payload
E1 /T1interface
Serial interface
CPE side
CPE side
Local digital
Local digital
Remote line
Remote line
Remote payload
Remote payload
After connection both CO side and CPE side:
E1/T1 interface
Serial interface
CO side
CO side
Local digital
Local digital
Local
Local
Remote line
Remote line
Remote payload
Remote payload
Farend line
Farend line
Farend payload
Farend payload
V.54
E1/T1 interface
Serial interface
CPE side
CPE side
Local digital
Local digital
Remote line
Remote line
Remote payload
Remote payload
Farend line
Farend line
Farend payload
Farend payload
V.54
62
63
64
3.7.2.
BER Test function
SYSTEM DIAGNOSTIC Î DIAG BER TEST
This is the internal Bit Error Rate Tester (BERT) for complete testing of local and remote modem and the link quality without
any external test equipment.
11
This built-in Bit Error Rate Test generator can generate a standard 2047 (2 -1) test pattern.
DIAG
BER TEST
*BERT 2047*
RUN
When the BERT doesn’t have Bit Errors, it shows zero. Otherwise, it will show some number counter.
RUN(SEC) item shows the time elapsed in seconds
RUN(SEC): 00001
BIT ERR:
00000
If there is NO SYNC on bit error message, it is because the testing path hasn’t been connected.
RUN(SEC):
00001
BIT ERR: NO SYNC
Press ENTER key on this display message, it will re-sync again.
*BERT 2047*
RESYNC
Press ENTER key on this display message, it will show the real time status of this testing.
*BERT 2047*
INFO
If you want to exit the BERT, please press ENTER key from this display message.
*BERT 2047*
DISABLE
65
4. Parameters Table
There are many parameters tables for end user easily to write down all setting of devices before installing those on sites.
4.1
4.1.1.
NTU
SHDSL
SHDTU03b-E1
SHDTU03b-E1l -- E1 interface mode
Type
□STU-R
□STU-C-INTCLK
Annex
□A
□F
PSD
□SYM
SNR Margin
(-10~21)
Pair Mode
□1 Pair
□2 pair
Channel
□PCM31
□PCM31C
Pass Through
□Off
□On
□B
□STU-C-EXTCLK
□G
□ASYM
(For SHDTU03bA-E1 only)
□PCM30
□PCM30C
□Unframed
Slot Number
E1
First Slot
Code
□HDB3
□AMI
AIS
□Off
□On
Build Outs
□75 Ohm
□120 Ohm
When SHDSL.bis using 2-pairs (4-wires), the E1 time slot number can only use even number
When E1 framer is PCM31C and PCM30C and set pass through ON, no fractional function can be use.
4.1.2.
SHDTU03b-E1/T1 -- T1 interface mode
Channel
□SF
□ESF
□Unframed
Slot Number
T1
First Slot
LBO
□0~133ft
AIS
□Off
□133~266ft
□266~399ft
□399ft~533ft
□On
When SHDSL.bis using 2-pairs (4-wires), the T1 time slot number can only use even number
66
□533~655ft
4.2
4.2.1.
NTU
SHDSL
SHDTU03b-Data
SHDTU03b-Data -- Serial interface mode
Type
□STU-R
□STU-C-INTCLK
Annex
□A
□F
PSD
□SYM
SNR Margin
(-10~21)
Pair Mode
□1 Pair
Interface
□V.35
Data Rate
□Nx64K
□B
□G
□ASYM
□2 pair
(For SHDTU03bA-Data only)
□X.21
□T1 mode
1 Pair
2 Pair
Serial
□STU-C-EXTCLK
Annex A/B
(1~36)
Annex F/G
(1~89)
Annex A/B
(2~72)
Annex F/G
(2~128)
Clock
□Normal
□Inverse
RTS
□On
□From DTE
CTS
□On
□Off
□From RTS
DSR
□On
□Off
□From DTR
DCD
□On
□Off
□From DSL
Delay
□0mS
□1mS
□2mS
□3mS
When SHDSL.bis using 2-pairs (4-wires), the Serial Nx64K data rate number can only use even number
67
4.3
4.3.1.
NTU
SHDSL
SHDTU03b-ET100
SHDTU03b-ET100 -- Ethernet interface mode
Type
□STU-R
□STU-C-INTCLK
Annex
□A
□F
PSD
□SYM
SNR Margin
(-10~21)
Pair Mode
□1 Pair
□2 pair
□Nx64K
□T1 mode
□B
1 Pair
Date Rate
2 Pair
Ethernet
□STU-C-EXTCLK
□G
□ASYM
(For SHDTU03bA-ET100 only)
Annex A/B
(1~36)
Annex F/G
(1~89)
Annex A/B
(2~72)
Annex F/G
(2~178)
Auto Config
□Disable
□Enable
Duplex
□Full
□Half
Speed
□100M
□10M
When SHDSL.bis using 2-pairs (4-wires), the Ethernet Nx64K data rate number can only use even number
68
4.4
4.4.1.
NTU
SHDSL
SHDTU03b-31
SHDTU03b-31 -- E1 Interface mode
Interface
E1
□Serial
□Ethernet
□E1+Serial
Type
□STU-R
□STU-C-INTCLK
Annex
□A
□F
PSD
□SYM
SNR Margin
(-10~21)
Pair Mode
□1 Pair
□2 pair
Channel
□CM31
□PCM31C
Pass Through
□Off
□B
□E1+Ethernet
□STU-C-EXTCLK
□G
□ASYM
(For SHDTU03bA-31 only)
□PCM30
□PCM30C
□Unframed
□On
Slot Number
E1
First Slot
Code
□HDB3
□AMI
AIS
□Off
□On
Build Outs
□75 Ohm
□120 Ohm
When SHDSL.bis using 2-pairs (4-wires), the E1 time slot number can only use even number
When E1 framer is PCM31C and PCM30C and set pass through ON, no fractional function can be use.
69
4.4.2.
NTU
SHDSL
SHDTU03b-31 -- Serial Interface mode
Interface
□E1
Type
□STU-R
□STU-C-INTCLK
Annex
□A
□F
PSD
□SYM
SNR Margin
(-10~21)
Pair Mode
□1 Pair
Interface
□V.35
Serial
□B
□E1+Serial
□E1+Ethernet
□STU-C-EXTCLK
□G
□ASYM
□2 pair
(For SHDTU03bA-31 only)
□X.21
□Nx64K
□T1 mode
1 Pair
Data Rate
2 Pair
Serial
□Ethernet
Annex A/B
(1~36)
Annex F/G
(1~89)
Annex A/B
(2~72)
Annex F/G
(2~128)
Clock
□Normal
□Inverse
RTS
□On
□From DTE
CTS
□On
□Off
□From RTS
DSR
□On
□Off
□From DTR
DCD
□On
□Off
□From DSL
Delay
□0mS
□1mS
□2mS
□3mS
When SHDSL.bis using 2-pairs (4-wires), the Serial Nx64K data rate number can only use even number
70
4.4.3.
NTU
SHDSL
SHDTU03b-31 -- Ethernet Interface mode
Interface
□E1
□Serial
Type
□STU-R
□STU-C-INTCLK
Annex
□A
□F
PSD
□SYM
SNR Margin
(-10~21)
Pair Mode
□1 Pair
□2 pair
□Nx64K
□T1 mode
1 Pair
Annex A/B
(1~36)
Annex F/G
(1~89)
Annex A/B
(2~72)
Annex F/G
(2~178)
□B
Date Rate
2 Pair
Ethernet
Ethernet
□E1+Serial
□E1+Ethernet
□STU-C-EXTCLK
□G
□ASYM
(For SHDTU03bA-31 only)
Auto Config
□Disable
□Enable
Duplex
□Full
□Half
Speed
□100M
□10M
When SHDSL.bis using 2-pairs (4-wires), the Ethernet Nx64K data rate number can only use even number
71
4.4.4.
NTU
SHDSL
SHDTU03b-31 -- E1+Serial Interface mode
Interface
□E1
□Serial
Type
□STU-R
□STU-C-INTCLK
Annex
□A
□F
PSD
□SYM
SNR Margin
(-10~21)
Pair Mode
□1 Pair
□2 pair
Channel
□PCM31
□PCM31C
□B
□Ethernet
E1+Serial
□E1+Ethernet
□STU-C-EXTCLK
□G
□ASYM
(For SHDTU03bA-31 only)
□PCM30
□PCM30C
□Unframed
Slot Number
E1
First Slot
Code
□HDB3
□AMI
AIS
□Off
□On
Build Outs
□75 Ohm
□120 Ohm
Interface
□V.35
□X.21
□Nx64K
□T1 mode
Clock
□Normal
□Inverse
RTS
□On
□From DTE
CTS
□On
□Off
□From RTS
DSR
□On
□Off
□From DTR
DCD
□On
□Off
□From DSL
Delay
□0mS
□1mS
Data Rate
Serial
□2mS
□3mS
When SHDSL.bis using 2-pairs (4-wires), the E1 time slot number and Serial Nx64K data rate number can only use even
number.
When E1 framer is PCM31C and PCM30C and set pass through ON, no fractional function can be use.
72
4.4.5.
NTU
SHDSL
SHDTU03b-31 -- E1+Ethernet Interface mode
Interface
□E1
□Serial
Type
□STU-R
□STU-C-INTCLK
Annex
□A
□F
PSD
□SYM
SNR Margin
(-10~21)
Pair Mode
□1 Pair
□2 pair
Channel
□PCM31
□PCM31C
□B
□Ethernet
□E1+Serial
E1+Ethernet
□STU-C-EXTCLK
□G
□ASYM
(For SHDTU03bA-31 only)
□PCM30
□PCM30C
□Unframed
Slot Number
E1
First Slot
Code
□HDB3
AIS
□Off
□On
Build Outs
□75 Ohm
□120 Ohm
□Nx64K
□T1 mode
Auto Config
□Disable
□Enable
Duplex
□Full
□Half
Speed
□100M
□10M
Date Rate
Ethernet
□AMI
When SHDSL.bis using 2-pairs(4-wires), the E1 time slot number and Ethernet Nx64K data rate number can only use even
number
When E1 framer is PCM31C and PCM30C and set pass through ON, no fractional function can be use.
73
4.5
4.5.1.
SHDTU03b-E1/T1
SHDTU03b-E1/T1 -- E1 Interface mode
Interface
NTU
SHDSL
E1
□T1
Type
□STU-R
□STU-C-INTCLK
Annex
□A
□F
PSD
□SYM
SNR Margin
(-10~21)
Pair Mode
□1 Pair
□2 pair
Channel
□PCM31
□PCM31C
Pass Through
□Off
□On
□B
□STU-C-EXTCLK
□G
□ASYM
(For SHDTU03bA-E1/T1 only)
□PCM30
□PCM30C
□Unframed
Slot Number
E1
First Slot
Code
□HDB3
□AMI
AIS
□Off
□On
Build Outs
□75 Ohm
□120 Ohm
Channel
□SF
□ESF
□Unframed
Slot Number
T1
First Slot
LBO
□0~133ft
AIS
□Off
□133~266ft
□266~399ft
□399ft~533ft
□On
When SHDSL.bis using 2-pairs(4-wires), the E1 or T1 time slot number can only use even number
When E1 framer is PCM31C and PCM30C and set pass through ON, no fractional function can be use.
74
□533~655ft
4.5.2.
NTU
SHDSL
SHDTU03b-E1/T1 -- T1 Interface mode
T1
Interface
□E1
Type
□STU-R
□STU-C-INTCLK
Annex
□A
□F
PSD
□SYM
SNR Margin
(-10~21)
Pair Mode
□1 Pair
Channel
□SF
□B
□STU-C-EXTCLK
□G
□ASYM
□2 pair
□ESF
(For SHDTU03bA-E1/T1 only)
□Unframed
Slot Number
T1
First Slot
LBO
□0~133ft
AIS
□Off
□133~266ft
□266~399ft
□399ft~533ft
□On
When SHDSL.bis using 2-pairs(4-wires), the T1 time slot number can only use even number
75
□533~655ft
4.6
4.6.1.
NTU
SHDSL
SHDTU03b-31T
SHDTU03b-31T -- E1 Interface mode
Interface
E1
□Serial
□T1
□Ethernet
□T1+Serial
□E1+Serial
Type
□STU-R
□STU-C-INTCLK
Annex
□A
□F
PSD
□SYM
SNR Margin
(-10~21)
Pair Mode
□1 Pair
□2 pair
Channel
□CM31
□PCM31C
Pass Through
□Off
□B
□E1+Ethernet
□T1+Ethernet
□STU-C-EXTCLK
□G
□ASYM
(For SHDTU03bA-31T only)
□PCM30
□PCM30C
□Unframed
□On
Slot Number
E1
First Slot
Code
□HDB3
□AMI
AIS
□Off
□On
Build Outs
□75 Ohm
□120 Ohm
When SHDSL.bis using 2-pairs(4-wires), the E1 time slot number can only use even number
When E1 framer is PCM31C and PCM30C and set pass through ON, no fractional function can be use.
76
4.6.2.
NTU
SHDSL
SHDTU03b-31T -- T1 Interface mode
Interface
□E1
□Serial
T1
□Ethernet
□T1+Serial
□E1+Serial
□T1+Ethernet
Type
□STU-R
□STU-C-INTCLK
Annex
□A
□F
PSD
□SYM
SNR Margin
(-10~21)
Pair Mode
□1 Pair
Channel
□SF
□B
□E1+Ethernet
□STU-C-EXTCLK
□G
□ASYM
□2 pair
□ESF
(For SHDTU03bA-31T only)
□Unframed
Slot Number
T1
First Slot
LBO
□0~133ft
AIS
□Off
□133~266ft
□266~399ft
□399ft~533ft
□On
When SHDSL.bis using 2-pairs(4-wires), the T1 time slot number can only use even number
77
□533~655ft
4.6.3.
NTU
SHDSL
SHDTU03b-31T -- Serial Interface mode
Interface
□E1
Serial
□T1
□T1+Serial
□Ethernet
□E1+Serial
Type
□STU-R
□STU-C-INTCLK
Annex
□A
□F
PSD
□SYM
SNR Margin
(-10~21)
Pair Mode
□1 Pair
Interface
□V.35
□B
□E1+Ethernet
□T1+Ethernet
□STU-C-EXTCLK
□G
□ASYM
□2 pair
(For SHDTU03bA-31T only)
□X.21
□Nx64K
□T1 mode
1 Pair
Data Rate
2 Pair
Annex A/B
(1~36)
Annex F/G
(1~89)
Annex A/B
(2~72)
Annex F/G
(2~128)
Serial
Clock
□Normal
□Inverse
RTS
□On
□From DTE
CTS
□On
□Off
□From RTS
DSR
□On
□Off
□From DTR
DCD
□On
□Off
□From DSL
Delay
□0mS
□1mS
□2mS
□3mS
When SHDSL.bis using 2-pairs(4-wires), the Serial Nx64K data rate number can only use even number
78
4.6.4.
NTU
SHDSL
SHDTU03b-31T -- Ethernet Interface mode
Interface
□E1
□Serial
□T1
□T1+Serial
Ethernet
□E1+Serial
Type
□STU-R
□STU-C-INTCLK
Annex
□A
□F
PSD
□SYM
SNR Margin
(-10~21)
Pair Mode
□1 Pair
□2 pair
□Nx64K
□T1 mode
1 Pair
Annex A/B
(1~36)
Annex F/G
(1~89)
Annex A/B
(2~72)
Annex F/G
(2~178)
□B
Date Rate
2 Pair
Ethernet
□E1+Ethernet
□T1+Ethernet
□STU-C-EXTCLK
□G
□ASYM
(For SHDTU03bA-31T only)
Auto Config
□Disable
□Enable
Duplex
□Full
□Half
Speed
□100M
□10M
When SHDSL.bis using 2-pairs(4-wires), the Ethernet Nx64K data rate number can only use even number
79
4.6.5.
NTU
SHDSL
SHDTU03b-31T -- E1+ Serial Interface mode
Interface
□E1
□Serial
□Ethernet
□T1
□T1+Serial
□E1+Ethernet
□T1+Ethernet
Type
□STU-R
□STU-C-INTCLK
Annex
□A
□F
PSD
□SYM
SNR Margin
(-10~21)
Pair Mode
□1 Pair
□2 pair
Channel
□PCM31
□PCM31C
□B
E1+Serial
□STU-C-EXTCLK
□G
□ASYM
(For SHDTU03bA-31T only)
□PCM30
□PCM30C
□Unframed
Slot Number
E1
First Slot
Code
□HDB3
□AMI
AIS
□Off
□On
Build Outs
□75 Ohm
□120 Ohm
Interface
□V.35
□X.21
□Nx64K
□T1 mode
Clock
□Normal
□Inverse
RTS
□On
□From DTE
CTS
□On
□Off
□From RTS
DSR
□On
□Off
□From DTR
DCD
□On
□Off
□From DSL
Delay
□0mS
□1mS
Data Rate
Serial
□2mS
□3mS
When SHDSL.bis using 2-pairs(4-wires), the E1 time slot number and Serial Nx64K data rate number can only use even
number
When E1 framer is PCM31C and PCM30C and set pass through ON, no fractional function can be use.
80
4.6.6.
NTU
SHDSL
SHDTU03b-31T -- E1 + Ethernet Interface mode
□E1
□Serial
Interface
□T1
□T1+Serial
Type
□STU-R
□STU-C-INTCLK
Annex
□A
□F
PSD
□SYM
SNR Margin
(-10~21)
Pair Mode
□1 Pair
□2 pair
Channel
□PCM31
□PCM31C
□B
□Ethernet
□E1+Serial
E1+Ethernet
□T1+Ethernet
□STU-C-EXTCLK
□G
□ASYM
(For SHDTU03bA-31T only)
□PCM30
□PCM30C
□Unframed
Slot Number
E1
First Slot
Code
□HDB3
□AMI
AIS
□Off
□On
Build Outs
□75 Ohm
□120 Ohm
□Nx64K
□T1 mode
Auto Config
□Disable
□Enable
Duplex
□Full
□Half
Speed
□100M
□10M
Date Rate
Ethernet
When SHDSL.bis using 2-pairs(4-wires), the E1 time slot number and Ethernet Nx64K data rate can only use even number.
When E1 framer is PCM31C and PCM30C and set pass through ON, no fractional function can be use.
81
4.6.7.
NTU
SHDSL
SHDTU03b-31T -- T1+ Serial Interface mode
Interface
□E1
□Serial
□T1
□Ethernet
T1+Serial
□E1+Serial
□T1+Ethernet
Type
□STU-R
□STU-C-INTCLK
Annex
□A
□F
PSD
□SYM
SNR Margin
(-10~21)
Pair Mode
□1 Pair
Channel
□SF
□B
□E1+Ethernet
□STU-C-EXTCLK
□G
□ASYM
□2 pair
□ESF
(For SHDTU03bA-31T only)
□Unframed
Slot Number
T1
First Slot
LBO
□0~133ft
AIS
□Off
Interface
□V.35
□133~266ft
□266~399ft
□399ft~533ft
□533~655ft
□On
□X.21
□Nx64K
□T1 mode
Clock
□Normal
□Inverse
RTS
□On
□From DTE
CTS
□On
□Off
□From RTS
DSR
□On
□Off
□From DTR
DCD
□On
□Off
□From DSL
Delay
□0mS
□1mS
Data Rate
Serial
□2mS
□3mS
When SHDSL.bis using 2-pairs(4-wires), the T1 time slot number and Serial Nx64K data rate can only use even number.
82
4.6.8.
NTU
SHDSL
SHDTU03b-31T -- T1 + Ethernet Interface mode
Interface
□E1
□Serial
□T1
□T1+Serial
□Ethernet
□E1+Serial
Type
□STU-R
□STU-C-INTCLK
Annex
□A
□F
PSD
□SYM
SNR Margin
(-10~21)
Pair Mode
□1 Pair
Channel
□SF
□B
□E1+Ethernet
T1+Ethernet
□STU-C-EXTCLK
□G
□ASYM
□2 pair
□ESF
(For SHDTU03bA-31T only)
□Unframed
Slot Number
T1
First Slot
LBO
AIS
□0~133ft
□Off
□133~266ft
□266~399ft
□399ft~533ft
□533~655ft
□On
□Nx64K
□T1 mode
Auto Config
□Disable
□Enable
Duplex
□Full
□Half
Speed
□100M
□10M
Date Rate
Ethernet
When SHDSL.bis using 2-pairs(4-wires), the T1 time slot number and Ethernet Nx64K data rate number can only use even
number.
83
5. Configuration with Console Port
This chapter will deal with the details of configuration and operation of this product via console port with terminal emulation
program. The configuration of the SHDSL.bis NTU is performed via a menu-driven embedded software, using a standard ASCII
terminal or a PC running a terminal emulation application connected to the rear panel CONSOLE port.
Windows includes a terminal emulation program called HyperTerminal. Connect the appropriated communication port from the
PC to this device. After the physical connection is made, you are ready to configure this product. Make sure you have
connected the supplied RS-232C serial cable (DB9F to RJ-45 Plug) to the console port on the rear panel of this product.
Run the terminal emulation program such as Hyper Terminal with the following setting:
Emulation: VT-100 compatible
Band rate: 115200, Data bits: 8, Parity: None, Stop Bits: 1, Flow Control: None
The following example uses HyperTerminal, supplied with Windows up until Vista release. It can be found by the start path
Start>All Programs> Accessories> Communication> HyperTerminal. Since HyperTerminal is no longer included with Vista or
Windows 7, please use a free terminal emulation program such as TeraTerm or PuTTY.
84
5.1
Login Procedure
At the start up screen, you will see:
Press the SPACE key until the login screen appears. When you see the login screen, you can logon to device. Username use
“admin”. When the system prompts you for a password, type “admin” to enter is O.K.
85
5.2
Window structure
After you type the password, it will display the main menu.
Above captured screen shows the common structure for all windows used throughout the configuration console terminal.
From top to bottom, the window is divided into four major sections.
The very top line displays the product name as “SHDSL.BIS NTU”.
Next a block of commands is listed where the ">>" symbol indicates the current cursor placeholder.
The next block down is the "command" section. The command that is selected and ready for execution is displayed after the
"Command:" prompt. The "<more…> designation indicates that there are other sub menus for this command. The
"Message:" field is used to display any special system messages or warnings.
Finally, at the very bottom of the screen is a help command line and reminder of the currently available command keys. In
most cases, the keyboards four cursor keys can be used to navigate all the menu system. If for some reason your
keyboard's cursor keys are not supported in the terminal emulation software, you may use the keys listed on the help
command line.
Menu Commands
Before changing the configuration, familiarize yourself with the operations listed in the following table. The operation list will be
shown on the window.
Keypads
Description
[UP] or I
Move to above field in the same level menu
[DOWN] or K
Move to below field in the same lever menu
U
Move to top field in the same level menu
O
Move to bottom field in the same level menu
[LEFT] or J
Move back to previous menu (Exit)
[RIGHT] , L or [ENTER]
Move forward to submenu(Enter)
[TAB]
To choose another parameters
Ctrl + C
To quit the show data display screen
86
5.3
Main Menu Summary
The main menu is prompted as following:
Menu Title
Function
Setup
Use this menu to setup SHDSL type, SHDSL parameters and E1/V.35/Ethernet parameters or
restore factory default setting.
Status
Use this menu to show SHDSL status, E1 /V.35/Ethernet status and statistics or clear the
statistics
Show
Use this menu to show general information, all configurations and all configurations in
command script.
Reboot
Diag
Upgrade
Exit
Use this menu to reset and reboot the system
Use this menu to setup diagnostic utility
Use this menu to upgrade kernel and FPGA.
Use this menu to exit
When using one of the following cases, there will not be a diagnostic function on the main menu.
(1) Ethernet interface model.
(2) Multi-interfaces model, but working as Ethernet interface only.
Menu Tree
87
5.4
Configuration
This section provides information about the configuration of SHDSL .Bis NTU. Follow the procedures:
In the main menu, select setup and press [ENTER] or [RIGHT]
The screen will prompt as following:
For setup the local side, select LocCH and press [ENTER] or [RIGHT].
Otherwise, setup the remote side by select RmtCH.
88
5.4.1.
Configure NTU Interface
Setup Interface
89
If the SHDSL.bis NTU is a multi-interface model, it will display more types of interfaces that can be selected. Use the [TAB] key
to choose the different interface types.
Model
SHDTU03b-E1
E1 interface model
SHDTU03b-E1/T1
E1 + T1 interface model
Interface modes
support
E1
E1
T1
SHDTU03b-Data
Serial interface model
Serial
SHDTU03b-ET100
Ethernet interface model
Ethernet
E1
Serial
SHDTU03b-31
E1+Serial+Ethernet
interface model
Ethernet
E1+Serial
E1+Ethernet
E1
T1
Serial
SHDTU03b-31T
E1+T1+ Serial +Ethernet
interface model
Ethernet
E1+Serial
E1+Ethernet
T1 + Serial
T1 + Ethernet
90
5.4.2.
Configure SHDSL parameters
This section shows how to setup the SHDSL parameters: SHDSL Mode, Annex type, Psd Mask, SNR margin.
Select Shdsl, and press [ENTER] or [RIGHT].
Setup SHDSL Parameter, Mode
Press [TAB] to select the operating type and press enter to finish setting.
The SHDSL modes have three types: STU-R, STU-C-INTCLK and STU-C-EXTCLK
INTCLK: The device will generate the appropriate clock speed defined by the speed setting of the interface.
EXTCLK: The device will accept the clock from the interface and will use that clock to receive and transmit data across the
interface.
Most point-to-point applications use Internal Clock. If the DTE provides a clock with TX data, the clock can be set to External
Clock.
For Ethernet interface model, since Ethernet does not provide a clock, the correct setting for CO side NTU should always be
STU-C-INTCLK.
91
To set the SHDSL Annex type, move the cursor to Annex and press [ENTER]. Select the annex type by using [TAB] key.
Set Up SHDSL parameter, Annex
The Annex has four types: A, B, F and G.
To configure the SHDSL PSD, move the cursor to psd and press [ENTER]. Select the parameter via [TAB] key.
Set up SHDSL parameter, PSD
The PSD has two types: SYM and ASYM.
92
To set the SHDSL Margin, move the cursor to margin and press [ENTER]. Select the margin via [TAB] key and key in the Next
margin.
Setup SHDSL parameter, SNR Margin
SNR margin is an index of line connection. You can see the actual SNR margin in STATUS SHDSL. The larger the SNR
margin, the better the line connection. For example, if you set SNR margin in the field as 3, the SHDSL connection will drop
down and reconnect when the SNR margin is lower than 3. The setting range is -10 to 21.
Setup SHDSL parameter, Pair Mode
When using 4-wires (2-pair) model, it will show Pair Mode item here. User can select 1 Pair or 2 Pair for the DSL connection.
93
5.4.3.
Configure E1 parameters
When using E1 interface, select the E1 item and press [ENTER] or [RIGHT].
The E1 setting includes the Channel (frame mode), line code, AIS and build out settings.
Setup E1 Parameter, Channel
94
Framing
Framing is required to recover the channelized E1. In transparent operation, the framing is configured as Unframed. In this
case the G.SHDSL framer must be set to Nx64 with N=32. For any framing such as FAS or CAS, the G.SHDSL framer must be
set to E1, then the E1 framing here may be set accordingly.
Channel
Framing
PCM31
FAS
PCM31C
FAS+CRC4
PCM30
FAS+CAS
PCM30C
FAS+CAS+CRC4
FULL
Unframed
FAS
Frame Alignment Signal uses a 7-bits pattern to establish and maintain the frame
synchronization. The FAS word is located in timeslot 0 of frame. In FAS mode there are
1~31 timeslot available for use data.
CAS
Also known as time slot 16 multi-framing. It requires a multi-framing alignment signal to
be present for frame sync. The Multi-frame Alignment Signal (MFAS) is inserted into the
16th timeslot of frame 0 of the 16-frame multi-frame.
In CAS mode, there are 30 channels available for user data. If timeslot 16 is included in
the unit’s mapping, it will be disregarded.
CRC4
The CRC-4 checksum bits are transmitted in the outgoing E1 data stream. Also the
received signal is checked for errors.
CRC-4 checksum cannot be sent in unframed mode.
Unframed
In this mode, user data is inserted into all 32 channels (64k x 32 = 2048k) of the E1
stream. The object of running without framing is to utilize the full bandwidth of the E1 line.
95
ITU 991.2 (2004) (G.SHDSL .Bis) supports data rate up to 5696Kbps, but G.703 (E1 standard) only supports data rate of
2048kbps so the maximum data rate of SHDSL line, connected with E1 DCEs, depends on data rate of E1, 2048kbps.
E1
DTE
SHDSL
E1
STU-R (E1)
STU-C (E1)
DTE
Frame E1
Data rate # of TS
If the connection is E1 vs V.35 or V.35 vs E1, the framer has to use N x 64k. In this case, the data rate depends on value of N.
Same as above case, SHDSL and V35 can support up to 5696kbps (89 x 64k) data rate, but E1 supports maximum data rate of
2048kbps (32 x 64k).
E1
DTE
SHDSL
STU-R
(V.35)
STU-C (E1)
V.35
DTE
Unframed N=32
V.35
DTE
SHDSL
STU-R (E1)
STU-C (V.35)
E1
DTE
Frame N x 64 (N=1~31)
Time slots, N value, are placed in the frame. If time Slot Number is1 from 1~31 (N=1~31), it is Fractional E1. For unframed E1,
the time Slot Number would be set at 32 (N=32).
Fractional E1, PCM31 and PCM31C
For fractional E1(FE1), the data rate can be from 64k(N=1) to 1984k(N=31), according to the E1 framing. If the E1 frame is
PCM31(FAS) or PCM31C(FAS+CRC4), there are 1~31 available time slot for use. For example, if the data rate of SHDSL line
set to be 512k, the time slot number is 8 and first time slot number is 1. The frame is shown as below.
Time Slots
0
1
2
3
4
5
6
7
8
FAS
Data
Data
Data
Data
Data
Data
Data
Data
64k
64k
64k
64k
64k
64k
64k
64k
64k
9 ~ 30
31
1408k
64k
The First Time Slot setting of PCM31(FAS) and PCM31C(FAS+ CRC4) have to follow the rule:
First Time Slot
31 - Time Slot Number
96
Fractional E1, PCM30 and PCM30C
Using the E1 framing of PCM30(FAS+CAS) or PCM30C(FAS+CAS+CRC4), the FAS will occupy Time Slot 0 and CAS Time
Slot 16. There are only 30 Time Slot left for data. On the other hand, the maximum data rate is 1920kbps.
Time Slots
0
1
2
3
4
16
5 ~ 15
FAS
64k
17 ~ 30
31
896k
64k
CAS
64k
64k
64k
704k
64k
64k
The First Time Slot setting of PCM30(FAS+CAS) and PCM30C(FAS+CAS+CRC4) have to follow the rule:
First Time Slot
30 - Time Slot Number
TS16 cannot be used for data.
Unframed E1
Time Slots
0
1
2
3
4
5
6
7
8
9 ~ 30
31
Data
Data
Data
Data
Data
Data
Data
Data
Data
Data
Data
64k
64k
64k
64k
64k
64k
64k
64k
64k
1408k
64k
In Unframed E1, there is no framing or channelization. User data are inserted into all 32 channels (64k x 32 = 2048k) of the E1
stream. The object of running without framing is to utilize the full bandwidth of the E1 line. Also, when run in unframed mode,
the G.SHDSL.bis modems are completely transparent to any framing when deployed in E1 extension applications.
97
Setup E1 Parameter, Pass Through
When SHDSL.bis using 2-pairs(4-wires), the time slot number can only use even number
When setting the E1 channel on PCM31C, PCM31, PCM30C and PCM30, there is also an E1 Pass Through selection item.
Table of Pass through function with user data rate vs. DSL line rate (for 2-wires)
Pass Through :
On
st
PCM31/PCM31C
PCM30/PCM30C
PCM31/PCM31C
PCM30/PCM30C
PCM31/PCM31C
PCM30/PCM30C
PCM31/PCM31C
PCM30/PCM30C
PCM31/PCM31C
PCM30/PCM30C
PCM31/PCM31C
PCM30/PCM30C
PCM31/PCM31C
PCM30/PCM30C
Time Slot
number
31
30
30
29
29
28
28
27
27
26
26
25
25
24
PCM31/PCM31C
PCM30/PCM30C
PCM31/PCM31C
PCM30/PCM30C
15
14
14
13
10
10
5
5
PCM31/PCM31C
PCM30/PCM30C
10
9
PCM31/PCM31C
PCM30/PCM30C
PCM31/PCM31C
PCM30/PCM30C
PCM31/PCM31C
PCM30/PCM30C
PCM31/PCM31C
4
3
3
2
2
1
1
Channel
Pass Through :
Off
1 Time User data
Slot
rate
1
31
1
30
1
30
1
29
1
29
1
28
1
28
1
27
1
27
1
26
1
26
1
25
1
25
1
24
DSL line rate
DSL line rate
32
32
32
32
30
30
29
29
28
28
27
27
26
26
31
30
30
29
29
28
28
27
27
26
26
25
25
24
15
14
14
13
16
16
15
15
15
14
14
13
5
5
10
9
11
11
10
9
1
1
1
1
1
1
1
4
3
3
2
2
1
1
5
5
4
4
3
3
3
4
3
3
3
3
3
3
98
For example, when channel framing is PCM30 or PCM30C (with time slot number is 30 and first time slot is 1) refer to the
following graphic. When Pass Through is set Off, the DSL transfer data will not include the time slots of FAS and CAS. The
information of FAS and CAS on remote is re-created.
Warning: When the E1 is carrying signaling information for voice, do NOT set pass through Off. Pass through must be set to
ON or signaling and other information will be lost.
Setup E1 Parameter, Line Code
The G.SHDSL .Bis NTU supports two different line codings. HDB3 is the most popular and preferred line coding and is also the
default setting. AMI line coding is also selectable.
`
In this line coding, the transmitter substitutes a deliberate bipolar violation when excessive
zeros in the data stream are detected. The receiver recognizes these special violations
HDB3
and decodes them as zeros. This method enables the network to minimize pulse density
requirements. Unless AMI is required for your application, HDB3 should be used
whenever possible.
AMI
Alternate Mark Inversion defines a pulse as a “mark,” a binary one, as opposed to a zero.
In an E1 network connection, signals are transmitted as a sequence of one and zero. One
is sent as pulse, and zero is sent as spaces, i.e. no pulse. Every other pulse is inverted
from the previous pulse in polarity, so that the signal can be effectively transmitted. This
means, however, that a long sequence of zeros in data stream will cause problems, since
the NTU receiving the signal relies on the signal to recover the 2048kbps clock.
99
Setup E1 Parameter, AIS
AIS (Alarm Indication Signal) is a method to inform the remote connection that there is a signal or sync problem with the E1.
AIS is only valid in framed mode E1, not in Unframed E1. The setting here of AIS enabled (on) or not (off) and is for testing with
AIS. When enabled, the E1 will transmit the AIS and it should be confirmed at the remote device (AIS indication lit). After testing,
please turn AIS back off.
z
Example 1: When STU-R E1 RX line is dropped, STU-R sends the status to STU-C via EOC or command, and then
STU-C will send AIS (Alarm Indication Signal) to DTE while AIS function is enabled.
z
Example 2: When SHDSL connection drops, STU-R and STU-C both send AIS (Alarm Indication Signal) to DTE in the
same time while AIS function is enabled.
100
Setup E1 Parameter, Build Out
The SHDSL.Bis NTU can support both unbalanced E1 at 75 ohms (BNC) and balanced E1 at 120 ohms (RJ-48C). The settings
for impedance are made here under the build out menu setting.
101
5.4.4.
Configure Serial parameters
When using the Serial interface, select the Serial item and press [ENTER] or [RIGHT].
The serial settings include the data rate, clocking and handshaking lines setup.
Setup Serial Parameter, Interface
There are two interfaces types : V.35 and X.21. (For RS530/449 please select the X.21 interface.)
Setup Serial Parameter, Data Rate - Rate type
There are two rate type modes: Nx64K model and T1 mode. When other remote side has T1 interface and unframed mode
connect to this side as Serial interface, we must set Serial rate mode as T1 mode.
102
Setup Serial Parameter, Data Rate
For 2-wires with Annex A and B, the rate can be adjusted in increments of 64kbps from 64kbps to 2304kbps (N=1~36).
For 2-wires with Annex F and G, the rate can be adjusted in increments of 64kbps from 192kbps to 5696kbps (N=3~89).
For 4-wires with Annex A and B, the rate can be adjusted in increments of 64kbps from 128kbps to 4608kbps (N=2~72 , even
number only).
For 4-wires with Annex F and G, the rate can be adjusted in increments of 64kbps from 384kbps to 8192kbps
(N=6~128, even number only ).
Setup Serial Parameter, Clock Polarity
The data port clock polarity may be adjusted to solve some rare clocking issues. The default setting is 'Normal' clock polarity,
where data is sent on the negative transition of the clock, while the option exists to set inverse clock polarity where data is sent
on the positive clock transition.
103
Setup Serial Parameter, RTS
The behavior of the RTS (Request To Send) signal may be set in one of two ways. When set 'on', the RTS signal is always
forced on (active low), when set 'from DTE' the RTS signal will follow the DTE's condition. The default setting for RTS is on.
Setup Serial Parameter, CTS
The behavior of the CTS (Clear To Send) signal may be set in one of three ways. When set 'on', the CTS signal is always
forced on (active low), when set 'off' the signal is always forced off, or CTS will follow RTS (Request To Send) condition of 'on'
for RTS on 'off' for RTS off. The default setting for CTS is to follow RTS.
104
Setup Serial Parameter, DSR
The behavior of the DSR (Data Set Ready) signal may be set in one of three ways. When set 'on', the DSR signal is always
forced on (active low), when set 'off' the signal is always forced off or DSR will follow DTR (Data Terminal Ready) condition of
'on' for DTR on or 'off' for DTR off. The default setting for DSR is on.
Setup Serial Parameter, DCD
The behavior of the DCD (Data Carrier Detect) signal may be set in one of three ways. When set 'on', the DCD signal is always
forced on (active low), when set 'off' the signal is always forced off, or DCD will follow the DSL condition of 'on' for DSL link or
'off' for no link. The default setting for DCD is to follow the DSL link status.
105
Setup Serial Parameter, Delay
The delay setting is used to cause a delay for CTS to follow RTS. The delay setting may be set 0, 1, 2 or 3 milliseconds. The
default setting is 3 milliseconds.
It works only for the setting: CTS follow RTS and RTS follow from DTE .
5.4.5.
Configure Ethernet parameter
When using the Ethernet interface mode, select the Ethernet item and press [ENTER] or [RIGHT].
The Ethernet settings include the data rate plus the port setting between auto-negotiation (default) or forced mode for duplex
and speed.
106
Setup Ethernet Parameter, Data Rate – Rate type
There are two modes: Nx64K model and T1 mode. When the remote side has T1 interface and unframed mode connect to
this side as Ethernet interface, we must set Ethernet rate mode as T1 mode.
Setup Ethernet Parameter, Data Rate
For 2-wires with Annex A and B, the rate can be adjusted in increments of 64kbps from 64kbps to 2304kbps (N=1~36).
For 2-wires with Annex F and G, the rate can be adjusted in increments of 64kbps from 192kbps to 5696kbps (N=3~89).
For 4-wires with Annex A and B, the rate can be adjusted in increments of 64kbps from 128kbps to 4608kbps (N=2~72, even
number only).
For 4-wires with Annex F and G, the rate can be adjusted in increments of 64kbps from 384kbps to 11392kbps (N=6~178, even
number only).
107
Setup Interface Parameter, Negotiation
The Ethernet settings include the choice between auto-negotiation (default) or forced mode for duplex and speed. Be very
careful to set both Ethernet devices on a link to both auto or forced and do not mix or a duplex mismatch could result.
Setup Ethernet Parameter, Duplex
When auto negotiation setup is disable, there has to be a selection of duplex mode: Full-Duplex and Half-Duplex. Be very
careful to set both Ethernet devices on a link to the same duplex setting or a duplex mismatch could result.
108
Setup Ethernet Parameter, Speed
When auto negotiation is Disable, the forced mode settings for speed can be set between: 10M and 100M. If auto negotiation
is Enable, the items Duplex and Speed cannot be set. The message will display “Ethernet is in auto negotiate”.
5.4.6.
Configure T1 parameter
When using the T1 interface mode, select the T1 item and press [ENTER] or [RIGHT].
The T1 settings include the Channel, Number of time slots , First time slots, LBO and AIS.
109
Setup T1 Parameter, Channel
The Superframe(SF) (also called D4 or 193S) framing format defines a superframe as 12 frames.
The Extended Superframe (ESF) (also called 193E) frame format groups 24 frames into its superframe.
Both the SF and ESF framing formats provide an actual payload data rate of 1.536 Mbps (192/193 = 1.536/1.544).
The T1 interface can be programmed to encode/decode its transmit/receive signals using Bipolar with Eight Zero Suppression
(B8ZS) coding.
Each T1 frame contains 1 byte of voice data for each of the 24 channels, that system needs then 8000 frames per second to
maintain those 24 simultaneous voice channels. Because each frame of a T1 is 193 bits in length (24 channels X 8 bits per
channel + 1 framing bit = 193 bits), 8000 frames per second is multiplied by 193 bits to yield a transfer rate of 1.544 Mbit/s
(8000 X 193 = 1544000).
The T1 format provides a 64 Kbps channel for each of 24 individual channels. Each of these channels is called a DS-0
channel or a time slot and consists of an eight-bit sample. A T1 frame is constructed by time division multiplexing these 24
time slots and inserting a framing bit at the beginning of the series. This results in 192 bits of channel data, plus a framing bit
(F-bit), for a total of 193 bits in a frame. Multiple frames are then grouped into superframes of 12 or 24 frames to provide for
framing synchronization and signaling.
110
Setup T1 Parameter, Time Slot number and First time slot
For fractional T1, the data rate is from 64k(N=1) to 1536k(N=24), according to the T1 framing.
When SHDSL.bis is using 2-pairs(4-wires), the time slot number can only use even number
Setup T1 Parameter, Channel use Unframed mode
Unframed: All transmitted bits are used as data bits. This selection must be used when the clock rate of the remote unit is set
at 1.544 Mbps. In this mode the T1 signal is passed transparently without regard to framing.
111
st
The table of number of time slot vs. 1 time slot:
st
Channel
Number of slot
1 slot
SF
24
1
ESF
23
1~2
22
1~3
21
1~4
20
1~5
19
1~6
18
1~7
17
1~8
16
1~9
15
1~10
14
1~11
13
1~12
12
1~13
11
1~14
10
1~15
9
1~16
8
1~17
7
1~18
6
1~19
5
1~20
4
1~21
3
1~22
2
1~23
1
1~24
Setup T1 Parameter, LBO
LBO (Line build-out) setting is an inherent part of T1 network element transmission circuitry. Because cable lengths between
T1 device and NTU vary, LBO settings are designed to adjust the output power of the transmission signal to achieve equal
level point (ELP) at the NTU.
For short distance of T1 cable, this device must decreases outgoing signal strength.
There are five type T1 LBO for selection : 0 ~133ft , 133 ~ 266ft , 266 ~399 ft , 399 ft ~ 533ft , 533ft ~ 655ft
112
Setup T1 Parameter, AIS
AIS (Alarm Indication Signal) is a method to inform the remote connection that there is a signal or sync problem with the T1.
5.4.7.
Remote configuration
You can set the “Enable/Disable function” to let the remote side configure parameters to this device remotely.
113
5.4.8.
Restore factory default
The G.SHDSL .Bis NTU can restore all settings to the original factory settings simply by going to the setting menu, selecting the
Default item, and then press ENTER. The system will ask for a y(es) or n(o) confirmation followed by an ENTER.
The default values are in the following table:
Interface
SHDSL
E1
Serial
Setup Parameter
Default value
setup Interface
E1
setup Shdsl Mode
STU-R
setup Shdsl Annex
Annex-G
setup Shdsl Psd
SYM
setup Shdsl Startup Margin
0
setup Shdsl Pair Mode
1 Pair
setup E1 Channel
PCM31C
setup Pass Through
Off
setup E1 Slot Number
31
setup E1 First Slot
1
setup E1 code
HDB3
setup E1 AIS
Off
setup E1 Build Outs
120 Ohm
setup Serial Interface
V35
setup Serial Data Rate Type
Nx64K
setup Serial Data Rate
32
setup Serial Clock
normal
setup Serial Rts
on
setup Serial Cts
from_rts
setup Serial Dsr
on
setup Serial Dcd
from_dsl
setup Serial Delay
3
114
*Notes 1*
*Notes 2*
Ethernet
E1+ Serial
E1+Ethernet
T1
Setup Ethernet Rate Type
Nx64K
Setup Ethernet Rate
36
setup Ethernet Auto Config
Enable
setup Ethernet Speed
Auto negotiate
setup Ethernet Duplex
Auto negotiate
setup E1 Channel
PCM31C
setup E1 Slot Number
31
setup E1 First Slot
1
setup E1 code
HDB3
setup E1 AIS
Off
setup E1 Build Outs
120 Ohm
setup Serial Interface
V35
setup Serial Data Rate Type
Nx64K
setup Serial Data Rate
32
setup Serial Clock
normal
setup Serial Rts
on
setup Serial Cts
from_rts
setup Serial Dsr
on
setup Serial Dcd
from_dsl
setup Serial Delay
3
setup E1 Channel
PCM31C
setup E1 Slot Number
31
setup E1 First Slot
1
setup E1 code
HDB3
setup E1 AIS
Off
setup E1 Build Outs
120 Ohm
Setup Ethernet Rate Type
Nx64K
Setup Ethernet Rate
36
setup Ethernet Auto Config
Enable
setup Ethernet Speed
Auto negotiate
setup Ethernet Duplex
Auto negotiate
setup T1 Channel
SF
setup T1 Slot Number
24
setup T1 First Slot
1
setup T1 AIS
off
setup T1 Lbo
0 to 133ft
115
T1+ Serial
T1+ Ethernet
setup T1 Channel
SF
setup T1 Slot Number
24
setup T1 First Slot
1
setup T1 AIS
Off
setup T1 Lbo
0 to 133ft
setup Serial Interface
V35
setup Serial Data Rate Type
Nx64K
setup Serial Data Rate
32
setup Serial Clock
normal
setup Serial Rts
on
setup Serial Cts
from_rts
setup Serial Dsr
on
setup Serial Dcd
from_dsl
setup Serial Delay
3
setup T1 Channel
SF
setup T1 Slot Number
24
setup T1 First Slot
1
setup T1 AIS
Off
setup T1 Lbo
0 to 133ft
setup Ethernet Rate Type
Nx64K
setup Ethernet Rate
36
setup Ethernet Auto Config
Enable
setup Ethernet Speed
100M
setup Ethernet Duplex
Full-Duplex
*Notes1*
For Multi-interface models only (SHDTU03b-31, SHDTU02bA-31, SHDTU03b-31T and SHDTU03bA-31T)
*Notes 2*
For 2 pairs (4-wires) model only (SHDTU03bA-E1, SHDTU03bA-E1/T1, SHDTU03bA-Data, SHDTU03bA-ET100,
SHDTU03bA-31 and SHDTU03bA-31T)
116
5.5
Reboot
In main menu, move the cursor to reboot and press [ENTER]. The device will reboot after confirming.
After the reboot operation has finished, RAM test will start.
117
5.6
View the system status
You can use the status command to view the status of SHDSL, E1, Serial and Ethernet as well as statistic and clear the
statistic log. Select status and press [ENTER].
5.6.1.
View the SHDSL status
Select SHDSL command to show the status of SHDSL.
118
The SHDSL status will display a real-time status of the DSL on local side and remote side if connected. The monitoring window
displays the DSL line parameters, such as SNR margin and attenuation. The lower half of the window displays the loopback
and BER test status. While in this display mode the terminal window will not timeout. To exit the window, press CTRL-C to quit.
5.6.2.
View the Interface status
Select Interface command to show the status of Interface
119
The interface status will display a real-time status of the interface on local side and remote side if connected. The monitoring
window displays the STU type, interface mode, status on E1, Serial and Ethernet. While in this display mode the terminal
window will not timeout. To exit the window, press CTRL-C to quit.
120
The table of SHDSL line rate vs. data rate:
SHDSL Line rate
Data Rate (kbps)
Number of time
Nx64K for Serial
slot for E1
and Ethernet
5696(n=89)
Cannot use
89
5632(n=88)
Cannot use
88
5568(n=87)
Cannot use
87
…………..
………..
…
…………..
………..
…
…………..
………..
…
…………..
………..
…
2368(n=37)
Cannot use
37
2304(n=36)
Cannot use
36
2240(n=35)
Cannot use
35
2176(n=34)
Cannot use
34
2112(n=33)
Cannot use
33
2048(n=32)
32(unframed)
32
1984(n=31)
31
31
1920(n=30)
30
30
1856(n=29)
29
29
1792(n=28)
28
28
…………..
………..
…
…………..
………..
…
…………..
………..
…
…………..
………..
…
384(n=6)
6
6
320(n=5)
5
5
256(n=4)
4
4
192(n=3)
3
3
192(n=3)
2
2
192(n=3)
1
1
Because standard SHDSL.bis working DSL line rate starts up from 192kbps (n=3), all settings on all interfaces with apply
64kbps(n=1) and 128kbps(n=2) will actually be using 192kbps DSL line rate.
The above table applies to Annex F and G. When using Annex A and B, there are no N values greater than 36.
121
5.6.3.
View the Statistics
Select Loc_statistics command to show the Local statistics information in 15 minutes or 24 hour via [TAB] to choose.
The statistics display window will display performance monitor data for the selected interval (15 minutes or 24 hours). The
display will show the recorded results for ES (errored seconds), SES (severely errored seconds), UAS (unavailable seconds),
and LOSW (loss of sync word). While in this display mode the terminal window will not timeout. The 15 minute display window
will display all the performance information for each 15 minutes interval in the current 24 hours period. There are a total of 96
15 minute intervals in a 24 hour period. Press the ENTER key to display the next page of intervals. To exit the window, press
CTRL-C and then ENTER.
The performance monitor is capable of storing and retrieving performance information for each 24 hours interval, up to 7 days.
122
For E1 Interface model, there are SHDSL and E1 items.
View the performance monitor data for the selected interval 15 minutes:
View the performance monitor data for the selected interval 7days:
123
For Serial and Ethernet Interface model, there is only the SHDSL item.
View the performance monitor data for the selected interval 15 minutes:
View the performance monitor data for the selected interval 7 days:
124
When clear the statistic log file, select clear and press [ENTER].
If you want to show the remote side’s statistics, please use the Rmt-statistics function as the following.
125
The following are commonly used acronyms:
ES
Number of errored seconds in which one or more CRC (Cyclic Redundancy Check) error
events occurred during the current interval. This value is updated every second.
UAS
Number of unavailable seconds in which a failed signal occurred during the current
interval. This value is updated every second.
SES
Number of severely errored seconds in which 832 or more CRC error events occurred
during the current interval. This value is updated every second.
LOSW
Number of seconds with loss of sync word during the current interval. This value is
updated every second.
126
5.7
View System Configuration
By using show command, you can view the system configuration. Select show and press [ENTER] or [RIGHT].
5.7.1.
Show system Information
To show system information, please select system and press [ENTER] or [RIGHT]. The screen will prompt the system
information.
127
Our cursor is already on the System command, so press ENTER and the following screen will display the general system
information.
Most of the information on this screen is either self-explanatory or it is simply irrelevant for the end user. However, two items,
the Kernel (Software) and FPGA (Field Programmable Gate Array) version will give the software and hardware versions
respectively of NTU. These are important to know in case new firmware becomes available in the future to add extra functions
of fixing unknown bugs from the original manufactured equipment.
128
5.7.2.
Show system with listing format
To show the system configuration, please select Config and press [ENTER] or [RIGHT]. The screen will prompt the all
configuration data.
For E1 interface mode:
For Serial interface mode:
129
For Ethernet interface mode:
For E1 and Serial interface mode:
130
For E1 and Ethernet interface mode:
5.7.3.
Show system with script format
To show the system script file, please select Script and press [ENTER] or [RIGHT]. The screen will prompt the configuration in
script type.
131
For E1 interface mode:
For Serial interface mode:
132
For Ethernet interface mode:
For E1 + Serial interface mode:
133
For E1 + Ethernet interface mode:
134
5.8
Upgrade
This section will introduce how to upgrade the kernel and FPGA code of G.SHDSL .Bis NTU. Select upgrade in main menu
and press [ENTER] or [RIGHT].
Please notice that when you use Remote Upgrade feature. It means you can use that feature to update firmware to remote
side. It will be described below.
During an upgrade and re-flash, the normal transmissions will be halted, so the upgrade should be done when the system is
taken offline or done during a time of extremely low impact to the line of customer.
The upgrade procedures use the Xmodem protocol via the serial console port of rear panel.
Following shows how to select the upgrade feature:
Before upgrading the NTU, you must have the main software or FPGA code in your computer.
If you want to upgrade the kernel code: select Kernel and press [ENTER] or [RIGHT].
Click Send file in terminal access program, hyper terminal, to send the file. Make sure the sending protocol is Xmodem.
Select the source file in shown window and then press OK.
135
During the upgrade, you can see the following:
If you want to upgrade the FPGA code: Select FPGA and press [ENTER] or [RIGHT].
136
During the upgrade process, you will see the following:
Below shows the remote upgrade feature:
137
During the upgrade, the display will look like the following:
Before upgrading the NTU, you must have the Kernel code and FPGA code on your computer's hard drive.
WARNING!!:
Do not allow any interruption of power during the erase and re-write operation or the Flash will be left
in an unknown state and the device will no longer be able to function. The device must then be returned to the
factory for repair.
138
5.9
Diagnostic
The diagnostic facility allows you to test the different aspects of your G.SHDSL .Bis NTU to determine if it is working properly.
Select diag and press [ENTER] or [RIGHT].
Loopback can test whether if the NTU is working properly with the connected device.
Press [ENTER] or [RIGHT] to setup the loopback.
For E1/T1 Interface model at CO side, there are loopbacks for: Local Digital, local, remote line, remote payload, farend line
and farend payload.
For Serial Interface model at CO side, there are loopbacks for: Local Digital, local, remote line, remote payload, farend line,
farend payload and V.54.
For E1/T1 Interface model at CPE side, there are loopbacks for: Local Digital, remote line, remote payload, farend line and
farend payload.
For Serial Interface model at CPE side, there are loopbacks for: Local Digital, remote line, remote payload, farend line, farend
payload and V.54.
139
If the device has just been connected or the DSL is still under handshaking, there will not are farend line, farend payload and
V.54.There are no diagnostic function on Ethernet interface model as Ethernet that is looped back would cause a broadcast
storm.
Stand alone NTU, no connection with other NTU:
E1/T1 interface
Serial interface
CO side
CO side
Local Digital
Local Digital
Local
Local
Remote line
Remote line
Remote payload
Remote payload
E1/T1 interface
CPE side
Serial interface
CPE side
Local Digital
Local Digital
Remote line
Remote line
Remote payload
Remote payload
After connection both CO side and CPE side:
E1/T1 interface
Serial interface
CO side
CO side
Local Digital
Local Digital
Local
Local
Remote line
Remote line
Remote payload
Remote payload
Farend line
Farend line
Farend payload
Farend payload
V.54
E1/T1 interface
CPE side
Serial interface
CPE side
Local Digital
Local Digital
Remote line
Remote line
Remote payload
Remote payload
Farend line
Farend line
Farend payload
Farend payload
V.54
About V.54 : An ITU standard (1976) for various loopback tests which can be incorporated into modems for testing the
telephone circuit and isolating transmission problems. Operating modes include local and remote digital loopback and local
and remote analog loopback.
140
The SHDSL.bis NTU supports Bit Error Rate Testing (BERT). To configure the BERT, move the cursor to BerTest and press
[ENTER] or [RIGHT].
The BER Test screen is as following:
The G.SHDSL Bis NTU includes an internal Bit Error Rate Tester (BERT) for complete testing of local and remote modem and
the link quality without any need for any external test equipment. This built-in Bit Error Rate Test generator can generate a
11
standard 2047 (2 -1) test pattern.
11
Test Pattern: 2047
Use the standard 2047 (2 -1) test pattern
Time Elapsed
Shows the time elapsed count
Pattern Framing
Shows the linking is sync or no sync
Bit Error Count
Shows the bit error counter
Refresh counter
Page refresh counter
You can press CTRL-C to quit this page anytime.
11
About 2047 (2 -1) test pattern: This is the pseudorandom sequence, based on an eleven (11) bit shift register, a
pseudorandom pattern with a maximum of 10 sequential zeros and 11 sequential ones.
141
5.10
Exit
For exiting the system without saving any configuration, you can use exit command to exit. Select exit and press [ENTER] or
[RIGHT]. Answer y(es) to confirm.
After pressing [ENTER], the system will be disconnected.
142
When the system has been disconnected, user can see the close screen. You can press Space key to restart.
The new login screen will be shown again, you can type username and password again to enter.
143
6. Appendix
6.1
Abbreviations
AIS
Alarm Indication Signal
AMI
Alternate mark inversion
ASYM
Asymmetric
ATM
Asynchronous Transfer Mode
B8ZS
Bipolar with 8 zero substitution
BER
Bit error rate
BERT
Bit Error Rate Tester
BNC
Bayonet Neill-Concelman (a common RF connector for coaxial cable)
bps
Bits per second
CAS
Channel Associated Signaling
CEPT
European Conference of Postal and Telecommunications Administrations.
CERR
CRC Errors
CO
Central Office
CPE
Customer Premises Equipment
CPU
Central processing unit
CRC
Cyclic redundancy check
CRC4
Cyclic redundancy check 4 bit
CRS
Carrier Sense
CSU
Channel service unit
CTS
Clear to send
DCD
Data carrier detect
DCE
Data communication equipment
DSL
Digital subscriber loop
DSR
Data set ready
DSLAM
DSL Access Multiplexer
DTE
Data terminal equipment
DTR
Data terminal ready
E BIT GEN
Remote End Block Error Bit generation
EOC
Embedded operations channel
ES
Number of Error second (Errors/Second)
ESF
Extended super frame
ETSI
European Telecommunications Standardization Institute
FAS
Frame alignment signal
FCS
Frame Check Sequence
HDB3
High-Density Bipolar of order 3
HDLC
High-Level Data Link Control
HEC
Header error check
144
I/F
Interface
ITU
International Telecommunication Union
ITU-T
ITU-Telecommunication Standardization Sector
LBO
Line Build Out
LIU
Line Interface Unit
LOC
Loss of Connection
LOF
Loss of frame
LOS
Loss of signal
LOSW
Loss of synchronization word
LTU
Line Termination Unit
MAS
Multi-frame Alignment Sequence (CAS Format)
MFAS
Multi-frame Alignment Sequence (CRC4 Format)
MHz
MegaHertz
NI
Network Interface
NRZ
Non-Return to Zero
NTU
Network Termination Unit
PABX
Private Automatic Branch Exchange
PAM
Pulse Amplitude Modulation
PLL
Phase-locked loop
POTS
Plain Old Telephone Service
PRBS
Pseudo-Random Bit Sequence
PSD
Power spectral density
QRSS
Quasi-Random Signal Source
RAI
Remote alarm indication
RESYNC
Resynchronization
RJ-45
Registered Jack-45
RTS
Request to send
RX
Receiver
SES
Number of Severely error seconds (more than 832 CRC errors / second.
Approximately equivalent to a bit error rate of 1 x 10
SDLC
Synchronous data Link Control
SF
Super Frame
SHDSL
Symmetric High-Bitrate Digital Subscriber Loop
SLC
Subscriber Loop Carrier
SMF
Sub-Multi frame
SNA
System Network Architecture
SNR MARGIN
Signal to noise ration margin
STU
SHDSL Terminal Unit
STU-C
SHDSL Terminal Unit - Central office side
STU-R
SHDSL Terminal Unit - Remote side
STU-C-INTCLK
STU-C internal clock
145
-3
STU-R-EXTCLK
STU-R external clock
SYM
Symmetric
SYNC
Synchronization
TC-PAM
Trellis Coded Pulse Amplitude Modulation
TDM
Time Division Multiplexing
TPS-TC
Transmission Protocol Specific TC layer
TX
Transmitter
Tx Power
Transmission power
UAS
Unavailable second
UI
User interface
WAN
Wide Area Network
xDSL
“Any” DSL , (ADSL , HDSL ,SHDSL or VDSL etc)
146
6.2
Serial Interface Pin Assignments
The table below displays Serial Interface Pin Assignments for the DCE Mode
.
RS-530
V.35
X.21
DB-25(F)
M.34(F)
DB-15(F)
N/A
1
A
1
TD
Input
2
P
2
Receive Data
RD
Output
3
R
4
Request to Send
RTS
Input
4
C
3
Clear to Send
CTS
Output
5
D
Data Set Ready
DSR
Output
6
E
Signal Ground
SG
N/A
7
B
8
Data Carrier Detect
DCD
Output
8
F
5
Secondary Receiver Clock
(S)RC
Output
9
X
13
Secondary Data Carrier Detect
(S)DCD
Output
10
Secondary External Transmitter Clock (S)ETC
Input
11
W
Secondary Transmitter Clock
(S)TC
Output
12
AA
Secondary Clear to Send
(S)CTS
Output
13
Secondary Transmit Data
(S)TD
Input
14
S
Transmitter Clock
TC
Output
15
Y
Secondary Receive Data
(S)RD
Output
16
T
11
Receiver Clock
RC
Output
17
V
6
Function
Abbrev.
Direction
Frame Ground
FG
Transmit Data
Local Loopback
12
7
9
18
Secondary Request to Send
(S)RTS
Input
19
Data Terminal Ready
DTR
Input
20
Remote Loopback
10
H
21
Secondary Data Set Ready
(S)DSR
Output
22
Secondary Data Terminal Ready
(S)DTR
Input
23
External Transmitter Clock
ETC
Input
24
Test Indicator
25
The front view of DB-25(F) Serial interface connector on rear panel:
147
U
14
6.3
V.35 DB25(M) to M.34(F) adaptor Cable
If the DTE (Data Terminal Equipment) connector is using 34-pin Winchester type, we must use the cable adaptor from
DB-25 to Winchester (M.34).
The pin out of cable on DB-25(male) Connector to M.34(female) Connector:
DB-25 Pin
Signal
M.34 Pin
Description
2
TD
P
Transmit Data
14
TD
S
Transmit Data
3
RD
R
Receive Data
16
RD
T
Receive Data
4
RTS
C
Ready To Send
5
CTS
D
Clear To Send
6
DSR
E
Data Set Ready
20
DTR
H
Data Terminal Ready
24
XTC
U
DTE Transmit Clock
11
XTC
W
DTE Transmit Clock
15
TC
Y
Transmit Clock
12
TC
AA
Transmit Clock
17
RC
V
Receive Clock
9
RC
X
Receive Clock
1
FGND
A
Protective Ground
7
GND
B
Signal Ground
8
DCD
F
Data Carrier Detect
V.35 is a partially balanced, partially single-ended interface specification. The data leads and clock leads are balanced;
the handshake leads are single-ended.
TD, RD, TC, RC and XTC are differential signals which conform to RS-422/V.11. Remaining unbalanced control and
handshake signals (RTS, CTS, DSR and DTR) conform to RS-232.
The front view of DB-25(M) connector and V.35(F) connector on this cable:
148
V.35 interface (34-pin Winchester type) contains the following signals:
Pin
Signal
Abbr.
DTE
DCE
A
Chassis Ground
FGND
---
---
B
Signal Ground
GND
---
---
C
Request To Send
RTS
Out
In
D
Clear To Send
CTS
In
Out
E
Data Set Ready
DSR
In
Out
F
Data Carrier Detect
DCD
In
Out
H
Data Terminal Ready
DTR
Out
In
J
Unassigned
K
Unassigned
L
Unassigned
M
Unassigned
N
Unassigned
P
Send Data A
SD(A)
Out
In
R
Receive Data A
RD(A)
In
Out
S
Send Data B
SD(B)
Out
In
T
Receive Data B
RD(B)
In
Out
U
Terminal Timing A
SCTE(A)
Out
In
V
Receive Timing A
SCR(A)
In
Out
W
Terminal Timing B
SCTE(B)
Out
In
X
Receive Timing B
SCR(B)
In
Out
Y
Send Timing A
SCT(A)
In
Out
Z
Unassigned
AA
Send Timing B
SCT(B)
In
Out
BB
Unassigned
CC
Unassigned
DD
Unassigned
EE
Unassigned
FF
Unassigned
HH
Unassigned
JJ
Unassigned
KK
Unassigned
LL
Unassigned
MM
Unassigned
NN
Unassigned
149
6.4
X.21 DB25(M) to DB15(F) adaptor Cable
For X.21 applications, we must use the DB-25 to DB-15 adaptor cable to connect to a X.21 DTE DB-15 male cable.
The pin out of cable on DB-25(male) Connector to DB-15(Female) (X.21) Connector
DB-25 Pin
Signal
DB-15 (X.21) Pin
Description
1
FGND
1
Protective Ground
7
GND
8
Signal Ground
2
T
2
Transmit Data
14
T
9
Transmit Data
3
R
4
Receive Data
16
R
11
Receive Data
4
C
3
Request To Send
19
C
10
Request To Send
8
I
5
Data Carrier Detect
10
I
12
Data Carrier Detect
17
S
6
Receive Clock
9
S
13
Receive Clock
All signals are balanced. Meaning there is always a pair (+/-) for each signal, like those used in RS422. The X.21
signals are the same as RS422, so please refer to RS422 for the exact details.
The front view of DB-25(M) connector and DB-15(F) connector on this cable:
150
The pin out of DB-15 connector on X.25 adaptor cable:
Pin
Signal
Abbr.
DTE
DCE
1
Shield
--
--
--
2
Transmit (A)
TA
Out
In
3
Control (A)
CA
Out
In
4
Receive (A)
RA
In
Out
5
Indication (A)
IA
In
Out
6
Signal Timing (A)
SA
In
Out
7
Unassigned
8
Ground
--
--
--
9
Transmit (B)
TB
Out
In
10
Control (B)
CB
Out
In
11
Receive (B)
RB
In
Out
12
Indication (B)
IB
In
Out
13
Signal Timing (B)
SB
In
Out
14
Unassigned
15
Unassigned
Functional Description:
The Signal Element Timing (clock) (S) is provided by the DCE. This means that the NTU will output the correct
clocking and that X.21 is a synchronous interface. Hardware handshaking is done by the Control (C) and Indication
( I ) lines. The Control is used by the DTE and the Indication is used by the DCE.
151
6.5
Console Cable
The front view of RJ-45 console cable socket on rear panel:
The wire connection of console cable DB-9(Female) to RJ-45:
DB9 (Female)
RJ-45
1
DCD
1
DSR
2
RXD
2
DCD
3
TXD
3
DTR
4
DTR
4
GND
5
GND
5
RXD
6
DSR
6
TXD
7
RTS
7
CTS
8
CTS
8
RTS
9
NC
The signal direction of console cable:
The pin assignment of RJ-45 modular jack on the console cable:
Pin
Number
Abbrev.
Description
Figure
1
DSR
DCE ready
2
DCD
Received Line Signal Detector
3
DTR
DTE ready
4
GND
Signal Ground
5
RXD
Received Data
6
TXD
Transmitted Data
7
CTS
Clear to Send
8
RTS
Request to Send
152
6.6
E1/T1 Balanced Cable
The front view of RJ-48C E1/T1 balance cable socket on rear panel:
The pin out of RJ-48C plug on the G.703 120Ω E1/T1 balanced cable:
Pin Number
Description
1
E1/T1 interface receive pair-ring
2
E1/T1 interface receive pair-tip
3
No connection
4
E1/T1 interface transmit pair-ring
5
E1/T1 interface transmit pair-tip
6
No connection
7
No connection
8
No connection
Figure
The pin out of cable on DB-15(female) Connector to RJ-48C Connector:
DB15(Female)
RJ-48C
Pin Number
Pin number
11
4
Transmit Ring
5
3
Rx Shield
9
1
Receive Ring
6
6
TX Shield
3
5
Transmit Tip
1
2
Receive Tip
Description
Note: DB15 for E1 follows the AT&T pub 62411.
153
6.7
E1 Unbalanced Cable
Connections to the E1 BNC ports are made using a 75-ohm coaxial cable with a bayonet-style twist-lock BNC connector.
We do not provide the cable. It is widely available from other sources.
The front view of BNC sockets on rear panel:
The internal wiring between BNC sockets and RJ-48C:
Signal Name
BNC Connecters
RJ-48C Connector
Transmit Tip
Center pin of Tx Connector
5
Transmit Ring
Shield of Tx Connector
4
Receive Tip
Center pin of Rx Connector
2
Receive Ring
Shield of Rx Connector
1
154
6.8
Ethernet Cable
The Ethernet cables should be 4 pair unscreened cable (UTP) or screened (STP) of type CAT5 (or higher). Both crossed
and normal wiring styles are supported by the auto-crossover feature of the NTU.
We do not provide the cable. It is widely available from other sources.
The front view of RJ-45 Ethernet cable socket on rear panel:
The pin out of RJ-45 Ethernet Connector:
Pin number
Signal Name
1
Transmit Data +
2
Transmit Data -
3
Receive Date +
4
Not used
5
Not used
6
Receive Date -
7
Not used
8
Not used
155
6.9
DSL Cable
The front view of DSL cable socket on rear panel:
The pin out of RJ-45 modular jack on DSL cable:
Pin Number
Description
1
No connection
2
No connection
3
LOOP 2 Input/Output
4
LOOP 1 Input/Output
5
LOOP 1 Input/Output
6
LOOP 2 Input/Output
7
No connection
8
No connection
Figure
DSL loop
2-wires (1 Pair) Model
4-wires (2 Pair) Model
Pin 4,5
DSL loop A
DSL loop B
Pin 4,5
Pin 3,6
156
6.10
Power Cord
The front view of IEC-320 C6 type AC Inlet on rear panel:
The pin out of AC Inlet connector:
Pin number
Description
E
Earth conductor
L
Live, hot or active conductor
N
Neutral or identified conductor
The socket of the power cord is using IEC-320 C5 type. This 3-conductor connector is colloquially called “Mickey Mouse”
or “Clover Leaf” type.
The front view of C5 line socket of the power cord:
157
6.11
Illustration of Loopback connection device (E1)
RJ-48C
Description
Pin number
4
Transmit Ring
3
Rx Shield
1
Receive Ring
6
TX Shield
5
Transmit Tip
2
Receive Tip
Make the short circuit/wiring with a RJ-45 module jack of the following:
PIN1Å----ÆPIN4
PIN2 Å----ÆPIN5
The top view of RJ-45 module jack on short circuit/wiring:
158
6.12
Illustration of Loopback connection device (Serial)
DB-25(M) Pin
number
Signal
Description
2
TD(A)
Transmit Data
14
TD(B)
Transmit Data
3
RD(A)
Receive Data
16
RD(B)
Receive Data
4
RTS
Ready To Send
5
CTS
Clear To Send
6
DSR
Data Set Ready
20
DTR
Data Terminal Ready
24
XTC
DTE Transmit Clock
11
XTC
DTE Transmit Clock
15
TC(A)
Transmit Clock
12
TC(B)
Transmit Clock
17
RC(A)
Receive Clock
9
RC(B)
Receive Clock
1
FGND
Protective Ground
7
GND
Signal Ground
8
DCD
Data Carrier Detect
Make the short circuit/wiring with a DB-25(male) connector of the following:
PIN2 Å----ÆPIN3
PIN14Å---ÆPIN16
PIN4 Å----ÆPIN5
PIN6 Å---ÆPIN20
The back side view of DB-25(male) connector on short circuit/wiring:
159