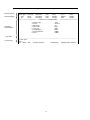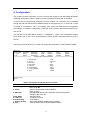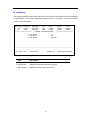
1
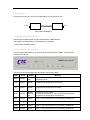
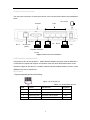
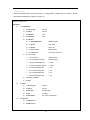
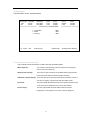
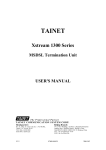
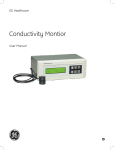
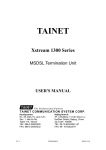
SHDTU03b-ET100BS 1 pair G.SHDSL LAN Extender 2 LEGAL The information in this publication has been carefully checked and is believed to be entirely accurate at the time of publication. CTC Union Technologies assumes no responsibility, however, for possible errors or omissions, or for any consequences resulting from the use of the information contained herein. CTC Union Technologies reserves the right to make changes in its products or product specifications with the intent to improve function or design at any time and without notice and is not required to update this documentation to reflect such changes. CTC Union Technologies makes no warranty, representation, or guarantee regarding the suitability of its products for any particular purpose, nor does CTC Union assume any liability arising out of the application or use of any product and specifically disclaims any and all liability, including without limitation any consequential or incidental damages. CTC Union products are not designed, intended, or authorized for use in systems or applications intended to support or sustain life, or for any other application in which the failure of the product could create a situation where personal injury or death may occur. Should the Buyer purchase or use a CTC Union product for any such unintended or unauthorized application, the Buyer shall indemnify and hold CTC Union Technologies and its officers, employees, subsidiaries, affiliates, and distributors harmless against all claims, costs, damages, expenses, and reasonable attorney fees arising out of, either directly or indirectly, any claim of personal injury or death that may be associated with such unintended or unauthorized use, even if such claim alleges that CTC Union Technologies was negligent regarding the design or manufacture of said product. TRADEMARKS Microsoft is a registered trademark of Microsoft Corp. HyperTerminal™ is a registered trademark of Hilgraeve Inc. WARNING: This equipment has been tested and found to comply with the limits for a Class A digital device, pursuant to Part 15 of the FCC Rules. These limits are designed to provide reasonable protection against harmful interference when the equipment is operated in a commercial environment. This equipment generates, uses, and can radiate radio frequency energy and if not installed and used in accordance with the instruction manual may cause harmful interference in which case the user will be required to correct the interference at his own expense. NOTICE: (1) The changes or modifications not expressively approved by the party responsible for compliance could void the user's authority to operate the equipment. (2) Shielded interface cables and AC power cord, if any, must be used in order to comply with the emission limits. CISPR PUB.22 Class A COMPLIANCE: This device complies with EMC directive of the European Community and meets or exceeds the following technical standard. EN 55022 - Limits and Methods of Measurement of Radio Interference Characteristics of Information Technology Equipment. This device complies with CISPR Class A. WARNING: This is a Class A product. In a domestic environment this product may cause radio interference in which case the user may be required to take adequate measures. CE NOTICE Marking by the symbol CE indicates compliance of this equipment to the EMC directive of the European Community. Such marking is indicative that this equipment meets or exceeds the following technical standards: EN 55022:1994/A1:1995/A2:1997 Class A and EN61000-3-2:1995, EN61000-3-3:1995 and EN50082-1:1997 3 CTC Union Technologies Co., Ltd. Far Eastern Vienna Technology Center (Neihu Technology Park) 8F, No. 60, Zhouzi St. Neihu, Taipei, 114 Taiwan Phone: +886-2-2659-1021 FAX: +886-2-2799-1355 SHDTU03b-ET100BS 1-Pair G.SHDSL LAN Extender. User Manual Version 0.4 November 2009 This manual supports the following models: SHDTU03b-ET100BS This document is the current official release manual. Please check CTC Union's website for any updated manual or contact us by E-mail at [email protected]. Please address any comments for improving this manual or to point out omissions or errors to [email protected]. Thank you. ©2008~2009 CTC Union Technologies Co.,Ltd. All Rights Reserved 4 Table of Contents 1. DESCRIPTION·········································································································································· 7 1.1 PRODUCT DESCRIPTION ··················································································································· 7 1.2 SPECIFICATION ································································································································ 7 1.3 APPLICATION ··································································································································· 8 1.4 SHDSL SYSTEM COMPONENTS ········································································································ 8 1.5 FRONT PANEL LEDS INDICATORS ····································································································· 8 1.6 REAR PANEL CONNECTORS ·············································································································· 9 2. PACKAGING ··········································································································································· 10 2.1 CHECKING PACKAGE CONTENTS ···································································································· 10 2.2 PREPARE FOR INSTALLATION ·········································································································· 10 3. LOG ON···················································································································································· 11 3.1 MENU TREE ··································································································································· 12 3.2 MAIN MENU ·································································································································· 13 3.3 CONSOLE SCREEN CONVENTION ···································································································· 13 4. CONFIGURATION································································································································· 15 4.1 CONFIGURE DEVICE TYPE ············································································································· 16 4.2 CONFIGURE ANNEX MODE ············································································································ 16 4.3 CONFIGURE DSL RATE ·················································································································· 16 4.4 CONFIGURE DSL MODE ················································································································ 16 4.5 CONFIGURE LAN INTERFACE ········································································································ 16 4.6 CONFIGURE VLAN SETTING ·········································································································· 17 4.7 FACTORY DEFAULT SETTING ········································································································· 17 4.8 SAVE CONFIGURATION ··················································································································· 18 5. PERFORMANCE MONITORING······································································································· 18 6. INVENTORY ··········································································································································· 19 5 6 1. Description 1.1 Product Description The SHDTU03b-ET100BS, a SHDSL (Single-pair High-bit-rate Digital Subscriber Line) LAN Extender, provides a broadband transmission with bandwidth up to 5.696Mbps over a single pair of copper wires for LAN connection between two local area networks. SHDTU03b-ET100BS provides a console port for users to configure the settings and to monitor the DSL connection status. SHDTU03b-ET100BS conforms to ITU-T G.991.2, the GSHDSL requirements. Each SHDTU03b-ET100BS can be configured as either STU-C for the central side or STU-R for the remote side. A pair of SHDTU03b-ET100BS offers a cost effective symmetrical broadband solution for bandwidth-hungry applications such as LAN-to-LAN connection, Internet Features: z ITU G.991.2 Annex F z Symmetrical downstream and upstream data rates from 192Kbps to 5.696Mbps z Auto-Negotiation for 10/100 BaseT z Auto-MDIX for Auto Ethernet Tx/Rx Swap 1.2 Specification G.SHDSL line z Line Coding: 16 TC-PAM or 32 TC-PAM z Line Rate: 192K bps ~ 5696 Kbps z Standard: ITU-T G.991.2, Annex F LAN interface z Mac Address filtering bridge up to 2K Mac address learning z Bridge: IEEE 802.1D transport, self-learning Physical interfaces z 4 x RJ45 10/100Mbs Ethernet ports z 1 x RJ-11 port for G.SHDSL.bis connection z One console port: DB-9 Female z DC 5 V power input 7 1.3 Application Following Figure shows a point to point application for user interface LAN LAN LAN Figure Ethernet Bridging 1.4 SHDSL system components SHDTU03b-ET100BS SHDSL provide SHDTU03b-ET100BS desktop: SHDTU03b-ET100BS desktop include following components: - SHDTU03b-ET100BS Desktop 1.5 Front Panel LEDs Indicators There are eight LED indicators on the front panel of SHDTU03b-ET100BS. They show the statuses of the device. The functions of LED indicators are described in the following table: LED Color Status Meaning PWR Orange Steady Off The device is on. The device is off. COT Orange Steady The device is configured to COT mode RT Orange Steady The device is configured to RT mode DSL Orange Steady Blinking Off The device is Sync Status. The link is synchronizing - this may take several minutes. The device is unplugged or disconnected. LAN1 Orange Steady Link 1 - The LAN connection is successfully established. LAN2 Orange Steady Link 2 - The LAN connection is successfully established. LAN3 Orange Steady Link 3 - The LAN connection is successfully established. LAN4 Orange Steady Link 4 - The LAN connection is successfully established. 8 1.6 Rear Panel Connectors The rear panel connectors connecting the device to the LAN and xDSL network are illustrated as below. Power Adapter Console LAN RS-232 RJ-11 PC RJ-45 Phone Line PC (xDSL) Emulator Terminal VT-100 Figure 1 Rear Panel and Installation LAN Interface characteristic LAN Interface ( RJ-45 port )located in SHDTU03b-ET100BSS rear panel meets to IEEE 802.3 or IEEE 802.3u request and supports 10/100 Base-Tauto test and half/all touble works model operation, bridge can provide up to 128 MAC address and MAC address filtration function, meets IEEE 802.1d protocol requestment. RJ-45 wire Figures separably shows as following : Figure 1.9: RJ-45 pin out 8 Pin NO. 1 Function Table1.14: 10/100 Base-Tpin out Data Direction Designation 1 TX Transmitting Data Toward the LAN network TX+ 2 TX Transmitting Data Toward the LAN network TX- 3 RX Receiving Data Toward the LAN Equipment RX+ 6 RX Receiving Data Toward the LAN Equipment RX- 9 2. Packaging 2.1 Checking Package Contents SHDTU03b-ET100BSSDesktop is shipped with the following contents: One 110/220V power adaptor One SHDTU03b-ET100BS User Manual 2.2 Prepare for Installation Connecting the SHDTU03b-ET100BS If configured from the Craft port, your are encouraged to use the virtual terminal emulator from Window / Microsoft and set the COM Port of PC to the following communication parameters: DTE speed 38.4Kbps 8 Data Bit Non – Parity Bit One Stop Bit No Flow Control Selection of “VT100“ for Terminal Configuration 10 3. Log On To access the VT-100 console screen, check that the CID port speed matches the terminal emulation program currently being used. The default value for the CID port is 38.4k bps, 8 data bit, No Parity, 1 stop bit. The VT-100 console uses a blinking cursor to select various menus, sub menus and fields within those menus. To pop up the console, press the “ Enter “ key several times to display the Log On Screen illustrated in the following screen. \Main Device Type Line CNT Data Rate Port 1 Port 2 L: COT SYNC 4032 kbps LINK DOWN R: RT SYNC 4032 kbps LINK DOWN ====================== G.SHDSL.bis LAN EXTENDER 1. Configration 2. Status 3. Inventory Port 3 Port 4 DOWN DOWN LINK DOWN ====================== <DIR> <DIR> <DIR> --------------------------------------------------------------------------------------------------------------------------------- 1..3] Select Item Enter] Accept ESC]Escape SPACE] Screen Refresh Main Screen Cursor Operation To select a specific field or navigate the console screen, refer to the table below for further details. Keyboard Command Description Tab Tabs to previous item. Space Refreshes the entire screen. Esc Escapes to previous page 1 …N] Fields enclosed in brackets [ ] offer a list of selections. Enter Validates the fields selected.. 11 3.1 Menu Tree Viewing from Main Menu, the second layer “ 1. Configuration, 2.Status and 3. Inventory “ and all its tributary parameters are shown in Figure 3.1. Figure 3.1: Menu Tree Main Menu >> 1. Configuration >> 1. Device Type COT; RT >> 2. Annex Annex F >> 3. DSL Rate 3~89 >> 4. DSL Mode Fixed >> 5. LAN Port >> >> >> >> 1. Auto Negotiation Disable; Enable >> 2. Speed 10M; 100M >> 3. Duplex Half; Full >> 4. Flow control Eable;Disable >> 5. Packet size 1518;1522;1536;1784 6. VLAN setting >> 1.VLAN Mode Unware;Aware >> 2.P-P Segmented Channel Disable;Enable >> 3.Ingress VID Range Start 0 - 4095 >> 4. Ingress VID Range length 0 - 4095 >> 5.Port 1 Bandwidth value 1 - 89 >> 6.Port 2 Bandwidth value 1 - 89 >> 7.Port 3 Bandwidth value 1 - 89 >> 8.Port 4 Bandwidth value 1 - 89 >> 7. Factory Default >> 8. Save 2. Status >> 1. Device Type COT; RT >> 2. Annex Annex F >> 3. DSL Rate 64~5696 kbps >> 4. S/N (0~20dB) >> 5. DSL Status Idel; SYN; Handshaking 3. Inventory >> 1. H/W version >> 2. S/W version 12 3.2 Main Menu The Main Menu Screen, illustrated below, \Main Device Type Line CNT Data Rate Port 1 Port 2 L: COT SYNC 4032 kbps LINK DOWN R: RT SYNC 4032 kbps LINK DOWN ====================== G.SHDSL.bis LAN EXTENDER 1. Configration 2. Status 3. Inventory Port 3 Port 4 DOWN DOWN LINK DOWN ====================== <DIR> <DIR> <DIR> --------------------------------------------------------------------------------------------------------------------------------- 1..3] Select Item Enter] Accept ESC]Escape SPACE] Screen Refresh 3.3 Console Screen Convention The Console Screen Convention contains five user operating areas. Menu Sequence: The one-line top most area that shows sequence for bringing the menu to the current hierarchy. Status/ Alarm message: This is the two-line area above the double dotted line that provides network and user interface status and alarm message. Sub-Menu or Result Display: This is the area above the single dotted line that provides content of sub-menu or display of performance data and testing result. Input field: The area beneath the dotted line that shows options specific tomenu or sub-menu items and allows user to enter value desired. Function Keys: The area right beneath the input field that lists the function keysspecific to the operation of the menu currently displayed. 13 Menu Sequence Status Message Sub-Menu Result Display \Main\ Cfg Device Type Line CNT Data Rate Port 1 Port 2 L: COT SYNC 4032 kbps LINK DOWN R: RT SYNC 4032 kbps LINK DOWN ====================== G.SHDSL.bis LAN EXTENDER 1. 2. 3. 4. 5. 6. 7. 8. Device Type Annex DSL Rate DSL Mode LAN port VLAN setting Factory Ddfault Save Port 3 Port 4 DOWN DOWN LINK DOWN ====================== : COT : Annex F : 03 Fixed <DIR> <DIR> <CMD> <CMD> Input Field Function Key --------------------------------------------------------------------------------------------------------------------------------1). COT, 2) RT Input: 1 1..6] Select Item Enter] Accept Item ESC]Escape SPACE] Screen Refresh 14 4. Configuration This chapter provides instructions on how to access and configure your SHDTU03b-ET100BS, displaying configuration options, restoring to factory default and saving the configuration. In other words, the provisioning parameters for each SHDSL unit could also only be provided through the CID and SHDTU03b-ET100BS Desktop functioning as STU-C. or as STU-R. In case of STU-R is connected to STU-C successfully then STU-R will download the configuration automatically. It means the configuration of the both units are same paramenters except STU-C and STU-R. The first Item on the Main Menu Screen is “ Configuration “ option. The Configuration Screen below allows you to view, set or make changes to certain specific parameters about the unit in service. The following Screen allows you to view and change the parameters of SHDTU03b-ET100BS. \Main\ Cfg Device Type Line CNT Data Rate Port 1 Port 2 L: COT SYNC 4032 kbps LINK DOWN R: RT SYNC 4032 kbps LINK DOWN ====================== G.SHDSL.bis LAN EXTENDER 1. 2. 3. 4. 5. 6. 7. 8. Device Type Annex DSL Rate DSL Mode LAN port VLAN setting Factory Ddfault Save Port 3 Port 4 DOWN DOWN DOWN DOWN ====================== : COT : Annex A : 03 Fixed <DIR> <DIR> <CMD> <CMD> --------------------------------------------------------------------------------------------------------------------------------1). COT, 2) RT Input: 1 Table 5.1Configure Parameters Screen Content Item Description Specifies whether the unit is configured as COT, or RT. 1. Device Type Entry: COT; RT Sets the transmission mode for SHDSL. 2. Annex Entry: Annex F Specifies data rate for DSL. Data rate could be configured in 3. DSL Rate multiple of 64k. N=3~89. Sets DSL Mode 4.DSL Mode Configure LAN Port 5. LAN Port VLAN setting 6.VLAN setting Sets SHDTU03B-ET100BS to factory default 7. Factory Default Save the parameters to SHDTU03B-ET100BS 8. Save 15 4.1 Configure Device Type To configure the Device Type , apply the menu selection sequence: Local >> Configure. Move cursor to 1. Device Type and specify whether the unit is configured as COT, or RT. 4.2 Configure Annex Mode To configure the Annex Mode , apply the menu selection sequence: Local >> Configure. Move cursor to 2. Annex and specify whether the DSL is configured as Annex F. 4.3 Configure DSL Rate To configure the DSL Rate , apply the menu selection sequence: Local >> Configure. Move cursor to 3. DSL Rate and Specifies data rate for DSL. Data rate could be configured in multiple of 64k. Annex F, N=3~89. 4.4 Configure DSL Mode To configure the DSL Mode , apply the menu selection sequence: Local >> Configure. Move cursor to 4. DSL Mode is Fixed. 4.5 Configure LAN Interface To access LAN Port, apply the menu selection sequence: Local >> Configure >> LAN port >> as shown below. \Mainl\ Cfg\LAN Port Device Type Line CNT Data Rate Port 1 Port 2 C: COT SYNC 4032 kbps LINK DOWN R: RT SYNC 4032 kbps LINK DOWN ===================== G.SHDSL.bis LAN EXTENDER 1. 2. 3. 4. 5. Auto Negotiation Speed Duplex Flow control Packet size Port 3 Port 4 DOWN DOWN DOWN DOWN ===================== : Disable : 100M : Full : Enable :1518 --------------------------------------------------------------------------------------------------------------------------------1). Disable, 2) Enable Input: 1 1..4] Select Item Enter] Accept ESC]Escape SPACE] Screen Refresh 16 The Ethernet interface pameters,described now,are provided in the following table. Table 5.2: LAN Port Screen Content Item Description 1. Auto Negotitation Specifies whether the Ethernet interface is being operating in auto-detecting or Manually mode. Entry: Disable; Enable Specifies the operating speed of LAN port 2. Mode Entry: 10M; 100M Specifies whether the Ethernet interface is being 3. Duplex operating in Half or Full duplex mode. Entry: Half; Full 4. 802.3 flow control Specifies whether the flow control is enabled or not. Entry: Enable; Disable 1518;1522;1536;1784 5.Packet size 4.6 Configure VLAN setting To set VLAN, apply the menu selection sequence: Local >> Configure >> VLAN setting >> as shown below. \Mainl\ Cfg\LAN Port Device Type Line CNT Data Rate Port 1 Port 2 C: COT SYNC 4032 kbps LINK DOWN R: RT SYNC 4032 kbps LINK DOWN ===================== G.SHDSL.bis LAN EXTENDER 1. 2. 3. 4. 5. 6. 7. 8. Port 3 Port 4 DOWN DOWN DOWN DOWN ===================== : Unaware : Disable :0 :0 :0Kbps :0Kbps :0Kbps :0Kbps VLAN Mode P-P Segmented Channel Ingress VID Range Start Ingress VID Range length Port 1 Bandwidth value Port 2 Bandwidth value Port 3 Bandwidth value Port 4 Bandwidth value --------------------------------------------------------------------------------------------------------------------------------1). Unaware, 2) Aware Input: 1 1..4] Select Item Enter] Accept ESC]Escape SPACE] Screen Refresh 4.7 Factory Default setting Default configuration setup is provided. To default the setting, follow the steps described below. The “ Local\Cfg.” screen appears when the Local\Configuration menu sequence is entered. Position the cursor at option 5 “ Factory Default “ of Configuration menu and press “ Enter “ to restore setting to factory default. After setting default value, the system prompts you for a “ Set default succeed ! Press any key to continue..” message displayed in reverse video. 17 4.8 Save configuration Regardless of STU-C or STU-R, SHDTU03b-ET100BSS is provided with 2M byte non-volatile flash memory which stores all provisioning parameters of the unit. When change are made to the selection option through the Configuration\Save sequence, the changes must be saved to take effect. 5. Performance Monitoring This chapter provides information on the display the status of SHDTU03b-ET100BS that include the the data rate of DSL, current signal-to-noise ration (SNR), the status of DSL and displaying the total number of received/transmitted Packets for each LAN port, follow the menu entering sequence: Local >>> Statue \Main\ Status Device Type Line CNT Data Rate Port 1 Port 2 C: COT SYNC 4032 kbps LINK DOWN R: RT SYNC 4032 kbps LINK DOWN ====================== G.SHDSL.bis LAN EXTENDER 1. 2. 3. 4. 5. 6. 7 8 9 Device Type Annex DSL Rate S/N DSL status LAN 1 Rx/Tx packet LAN 2 Rx/Tx packet LAN 3 Rx/Tx packet LAN 4 Rx/Tx packet Port 3 Port 4 DOWN DOWN DOWN DOWN ====================== : COT : Annex A : 4032Kbps : 30 : Synch :0 :0 :0 :0 :0 :0 :0 :0 --------------------------------------------------------------------------------------------------------------------------------- 1..5] Select Item Enter] Accept ESC]Escape SPACE] Screen Refresh Table 6.1: Display Status Screen Content Item 1. Device Type 2. Annex 3. DSL Rate Description Displays the Device Type which you set SHDTU03B-ET100BS Displays the Annex mode which you set SHDTU03B-ET100BS Displays the DSL Rate. 4. S/N Displays the current signal-to-noise ration (SNR) 5. DSL Status Display the current DSL Status. 6. LAN 1 Rx/Tx packet Displays the total number of received/transmitted Packets through the LAN port 1 7. LAN 2 Rx/Tx packet Displays the total number of received/transmitted Packets through the LAN port 2 8. LAN 3 Rx/Tx packet Displays the total number of received/transmitted Packets through the LAN port 3 18 9. LAN 4 Rx/Tx packet Displays the total number of received/transmitted Packets through the LAN port 4 6. Inventory This chapter provides identity information for the unit’s services and revision state as illustrated in the figure below.. To access this maintenance service, select “ 3. Inventory “ of main menu and hit “ Enter “ key to take effect. \Main\ Inventory Device Type Line CNT Data Rate Port 1 Port 2 C: COT SYNC 4032 kbps LINK DOWN R: RT SYNC 4032 kbps LINK DOWN ====================== G.SHDSL.bis LAN EXTENDER 1. H/W version 2. S/W version 3. DSL version Port 3 Port 4 DOWN DOWN DOWN DOWN ====================== : 10 : 08 : 06.00.02 --------------------------------------------------------------------------------------------------------------------------------- 1..3] Select Item Item Enter] Accept ESC]Escape SPACE] Screen Refresh Description 1 S/W Version : Displays the software version currently used for the unit. 2 H/W Version : Displays the hardware version of circuitry. 3 DSL Vserion : Displays the DSL version of circuitry. 19