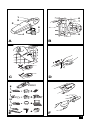
1
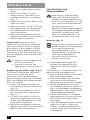
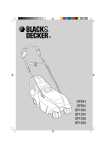
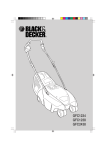
www.blackanddecker.com
V4800
V4810
V4820
V7210
V9650
1
2
1
6
7
2
3
5
4
6
A
B
1
C
8
D
V9650
9
10
11
E
F
3
2
3
G
H
12
12
13
13
I
J
3
14
K
4
L
ENGLISH
Dustbuster® V4800/V4810/
V4820/V7210/V9650
Thank you for choosing
Black & Decker. We hope that
you will enjoy using this product
for many years.
Denotes risk of personal
injury, loss of life or damage
to the product in case of
non-observance of the
instructions in this manual.
OVERVIEW (fig. A)
1. On/off switch
2. Release button
3. Dust bowl
4. Charging base
5. Charger
EC DECLARATION OF
CONFORMITY
V4800/V4810/V4820/V7210/
V9650
Black & Decker declares that
these products conform to:
98/37/EC, 89/336/EEC, 73/23/EEC,
EN 55014, EN60335, EN 61000
LpA (sound pressure)
dB(A)
80
m/s2
< 2.5
Hand/arm weighted
vibration value
WARNING SYMBOLS
The following symbols are used
in this manual:
Colin Wills
Director of Engineering
BDCI, 4/F, 2 Dai Wang Street
Tai Po Industrial Estate
Tai Po NT, Hong Kong
INTENDED USE
Your Black & Decker Dustbuster®
hand held vacuum cleaner has
been designed for light dry
vacuum cleaning purposes.
This product is intended for
household use only.
SAFETY INSTRUCTIONS
◆ Warning! When using
battery-powered appliances,
basic safety precautions,
including the following,
should always be followed to
reduce the risk of fire, leaking
batteries, personal injury and
material damage.
◆ Read all of this manual carefully
before using the appliance.
◆ The intended use is described
in this manual. The use of any
accessory or attachment or
the performance of any
operation with this appliance
other than those recommended
in this instruction manual may
present a risk of personal injury.
◆ Retain this manual for future
reference.
Using your appliance
◆ Do not use the appliance to
pick up liquids.
◆ Do not use the appliance to
pick up any materials that
could catch fire.
◆ Do not use the appliance
near water. Do not immerse
the appliance in water.
◆ Keep the motor draught away
from your eyes and face.
◆ Keep children and animals at
a safe distance when using
this appliance.
5
ENGLISH
◆
Never pull the charger lead to
disconnect the charger from
the socket. Keep the charger
lead away from heat, oil and
sharp edges.
After use
◆ Unplug the charger before
cleaning the charger or
charging base.
◆ When not in use, the appliance
should be stored in a dry place.
Children should not have
access to stored appliances.
Inspection and repairs
◆ Before use, check the appliance
for damaged or defective
parts. Check for breakage of
parts, damage to switches
and any other conditions that
may affect its operation.
◆ Do not use the appliance if any
part is damaged or defective.
◆ Have any damaged or
defective parts repaired or
replaced by an authorised
repair agent.
◆ Regularly check the charger
lead for damage. Replace the
charger if the lead is
damaged or defective.
◆ Never attempt to remove or
replace any parts other than
those specified in this manual.
Battery
◆ Never attempt to open the
battery for any reason.
◆ Do not expose the battery to
water.
◆ Do not incinerate the battery.
◆ When disposing of batteries,
follow the instructions given
in the section “Protecting the
Environment”.
Charger
◆ Do not expose the charger to
water.
◆ Do not open the charger.
6
ELECTRICAL SAFETY
Your charger has been designed
for a specific mains voltage.
Always check that the mains
voltage corresponds to the
voltage on the rating plate.
Your charger is double
insulated in accordance with
EN 60335; therefore no
earth wire is required.
Never attempt to replace
the charger unit with a
regular mains plug.
INSTALLATION
Fitting the charging base to the
wall (fig. B)
The charging base can be fitted
to the wall to provide a
convenient storage and charging
point for the appliance.
◆ Find a suitable indoor
location near a mains outlet.
◆ Position the charging base as
shown and mark the location
of the mounting holes (6) on
the wall.
◆ Drill a hole (ø 6 mm, approx.
35 mm deep) at each of the
marked locations.
◆ Insert the wall plugs provided
into the holes.
◆ Fit the charging base to the
wall using the screws provided.
Make sure to guide the charger
lead through the slot (7).
Excess lead can be stored at
the rear of the charging base.
BEFORE FIRST USE
Before first use, the battery must
be charged for at least 16 hours.
◆ Before charging, preferably
discharge the battery by
operating the appliance until
the motor stops.
◆ Charge the battery as
described below.
ENGLISH
USE
- a soft brush (10) for keyboards
and lamp shades (V4820)
Charging the battery (fig. C)
◆ Make sure that the appliance
is switched off. The battery
will not be charged with the
on/off switch in the on
position.
◆ Place the appliance on the
charging base as shown.
◆ Plug in the charger. Switch on
at the mains.
◆ Leave the appliance to
charge for at least 16 hours.
Whilst charging, the charger may
become warm. This is normal and
does not indicate a problem. The
appliance can be left connected
to the charger indefinitely. When
the battery is fully charged,
the power consumption of the
charger is negligible.
Important! Place the appliance on
the charging base whenever it is
not in use. After fully charging the
battery, the average effective usage
time is approx. 8 to 15 minutes
(depeding on the model). It may
take several charging cycles before
the battery attains full capacity.
Do not charge the battery at
ambient temperatures
below 4 °C or above 40 °C.
Operating the appliance (fig. D)
◆ To switch on, slide the on/off
switch (1) forward.
◆ To switch off, slide the on/off
switch back.
Accessories (fig. E & F)
V4810/V4820/V7210/V9650
These models are supplied with
the following accessories (fig. E):
- a hard brush (8) for furniture
and stairs (not for V4820)
- a crevice tool (9) for confined
spaces
V9650
Two additional accessories are
stored in a portable caddy located
in the charging base:
- a soft brush (10) for keyboards
and lamp shades
- an extendable crevice tool (11)
for longer reach in confined
spaces
To fit an accessory, proceed as
follows (fig. F):
◆ Take the accessories from the
appliance.
◆ Insert the appropriate
accessory into the front of the
appliance.
TROUBLESHOOTING
If the product does not work,
follow the instructions below.
If this does not solve the problem,
please contact your local
Black & Decker repair agent.
◆ Make sure the battery is fully
charged.
◆ If the battery cannot be
charged, check if the charger
is plugged in correctly and
the mains is working.
Make sure the on/off switch is
in the off position.
CLEANING AND
MAINTENANCE
Regularly clean the filters.
Cleaning the dust bowl and
filters (fig. G, H, I & J)
The filters are re-usable and
should be cleaned regularly.
◆ Press the release button (2)
and remove the dust bowl (3)
(fig. G).
◆ Remove any dust from the
dust bowl (fig. H).
◆ Remove the filters (12 & 13) by
twisting them clockwise (fig. I).
7
ENGLISH
◆
◆
◆
◆
◆
Brush any loose dust off the
filters.
Wash the filters in warm,
soapy water. The bowl can
also be washed if necessary
(fig. J).
Make sure the dust bowl and
filters are dry.
Refit the filters (12 & 13) onto
the appliance, twisting them
counterclockwise until they
lock into place.
Refit the dust bowl onto the
appliance. Make sure the dust
bowl clicks into place.
PROTECTING THE
ENVIRONMENT
Should you find one day
that your Black & Decker
product needs replacement,
or if it is of no further use to
you, think of the protection
of the environment.
Black & Decker repair agents
will accept old Black & Decker
products and ensure that
they are disposed of in an
environmentally safe way.
Battery (fig. L)
Important! Optimum dust
collection will only be achieved
with clean filters and an empty
dust bowl. If dust begins to fall
back out of the appliance after
switching it off, this indicates that
the dust bowl is full and must be
emptied.
◆
◆
Never use the appliance
without the filters.
Do not immerse the
appliance in water (fig. K).
Replacing the filters (fig. G & I)
The filters should be replaced
every 6 to 9 months and
whenever worn or damaged.
Replacement filters are available
from your Black & Decker dealer
(cat. no. VF20).
◆ Press the release button (2)
and remove the dust bowl (3)
(fig. G).
◆ Remove the filters (12 & 13)
by twisting them clockwise
(fig. I).
◆ Fit the new filters (12 & 13)
onto the appliance, twisting
them counterclockwise until
they lock into place.
◆ Refit the dust bowl onto the
appliance. Make sure the dust
bowl clicks into position.
8
Cd
If you want to dispose of the
product yourself, the battery
must be removed as
described below and
disposed of in accordance
with local regulations.
Do not short-circuit the
battery terminals.
Preferably discharge the
battery by operating the
appliance until the motor
stops.
The battery is located under the
back end of the appliance.
◆ Remove the crevice tool from
the accessory holder.
◆ Push the slider (14) towards
the front of the product.
◆ Remove the accessory holder.
◆ Strike the product on a firm
and stable surface as shown in
fig. L to dislodge the battery.
Alternatively, use a screwdriver
to dislodge the battery.
◆ Place the battery in suitable
packaging to ensure that the
terminals cannot be shortcircuited.
◆ Take the battery to your service
agent or a local recycling
station. Collected batteries
will be recycled or disposed
of properly.
◆
ENGLISH
Once removed, the battery
cannot be refitted.
Guarantee
Black & Decker is confident of
the quality of its products and
offers an outstanding guarantee.
This guarantee statement is in
addition to and in no way
prejudices your statutory rights.
The guarantee is valid within the
territories of the Member States
of the European Union and the
European Free Trade Area.
To claim on the guarantee,
you will need to submit proof of
purchase to the seller or an
authorised repair agent. You can
check the location of your nearest
authorised repair agent by
contacting your local
Black & Decker office at the
address indicated in this manual.
Alternatively, a list of authorised
Black & Decker repair agents and
full details of our after-sales service
and contacts are available on the
Internet at: www.2helpU.com.
If a Black & Decker product
becomes defective due to faulty
materials, workmanship or lack of
conformity, within 24 months
from the date of purchase,
Black & Decker guarantees to
replace defective parts,
repair products subjected to fair
wear and tear or replace such
products to ensure minimum
inconvenience to the customer
unless:
◆ The product has been used
for trade, professional or hire
purposes;
◆ The product has been
subjected to misuse or neglect;
◆ The product has sustained
damage through foreign
objects, substances or
accidents;
◆ Repairs have been attempted
by persons other than
authorised repair agents or
Black & Decker service staff.
9
10
V4800 - V4810 - V4820
V7210 - V7210B - V9650
TYP.
1
101
109
110
120
130
140
102
180
103
104
160
111
150
105
106
107
170
108
GLOBAL DUSTBUSTER
www.2helpU.com
18 - 02 -02
11
Australia
New Zealand
South Africa
United Kingdom
12
571908-2
DEWALT Industrial Power Tool Company
Tel. 03 9895 9200
7 Clarice Road, Box Hill, Victoria 3128
Fax 03 9899 7465
Black & Decker
Tel. 09 579 7600
81 Hugo Johnson Drive
Fax 09 579 8200
Penrose, Auckland, New Zealand
Black & Decker South Africa (Pty) Ltd
Tel. (011) 653-1400
Physical address:
Fax (011) 653-1499
39 Commerce Crescent
Eastgate, ext. 12, Sandton, Kramerville 2148
Postal address:
Postnet Suite 107, Private Bag X65
Halfway House 1685
Black & Decker
Tel. 01753 511234
210 Bath Road
Fax 01753 551155
Slough, Berkshire SL1 3YD
Helpline 01753 574277