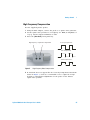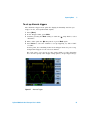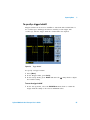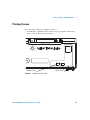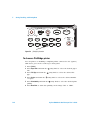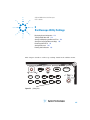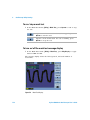
1
Agilent 1000 Series Oscilloscopes User’s Guide Notices © Agilent Technologies, Inc. 2008-2009 Warranty No part of this manual may be reproduced in any form or by any means (including electronic storage and retrieval or translation into a foreign language) without prior agreement and written consent from Agilent Technologies, Inc. as governed by United States and international copyright laws. The material contained in this document is provided “as is,” and is subject to being changed, without notice, in future editions. Further, to the maximum extent permitted by applicable law, Agilent disclaims all warranties, either express or implied, with regard to this manual and any information contained herein, including but not limited to the implied warranties of merchantability and fitness for a particular purpose. Agilent shall not be liable for errors or for incidental or consequential damages in connection with the furnishing, use, or performance of this document or of any information contained herein. Should Agilent and the user have a separate written agreement with warranty terms covering the material in this document that conflict with these terms, the warranty terms in the separate agreement shall control. Manual Part Number 54130-97014 Edition Second Edition, October 2009 Printed in Malaysia Agilent Technologies, Inc. 1900 Garden of the Gods Road Colorado Springs, CO 80907 USA Safety Notices Technology Licenses The hardware and/or software described in this document are furnished under a license and may be used or copied only in accordance with the terms of such license. Restricted Rights Legend U.S. Government Restricted Rights. Software and technical data rights granted to the federal government include only those rights customarily provided to end user customers. Agilent provides this customary commercial license in Software and technical data pursuant to FAR 12.211 (Technical Data) and 12.212 (Computer Software) and, for the Department of Defense, DFARS 252.227-7015 (Technical Data - Commercial Items) and DFARS 227.7202-3 (Rights in Commercial Computer Software or Computer Software Documentation). CAUTION A CAUTION notice denotes a hazard. It calls attention to an operating procedure, practice, or the like that, if not correctly performed or adhered to, could result in damage to the product or loss of important data. Do not proceed beyond a CAUTION notice until the indicated conditions are fully understood and met. WA R N I N G A WARNING notice denotes a hazard. It calls attention to an operating procedure, practice, or the like that, if not correctly performed or adhered to, could result in personal injury or death. Do not proceed beyond a WARNING notice until the indicated conditions are fully understood and met. See also Appendix A, “Safety Notices,” starting on page 151. Agilent 1000 Series Oscilloscopes User’s Guide Agilent 1000 Series Oscilloscopes—At a Glance The Agilent 1000 Series oscilloscopes are low- cost portable digital storage oscilloscopes (DSOs) that deliver these powerful features: • Two and four- channel, 60 MHz, 100 MHz, and 200 MHz bandwidth models. • Bright 5.7 inch QVGA (320 x 240) TFT color LCD display and small footprint (to save bench space). • Up to 2 GSa/s sample rate. • Up to 20 kpts memory. • Up to 400 wfms/s refresh rate. • Automatic voltage and time measurements (22) and cursor measurements. • Powerful triggering (edge, pulse width, video, pattern, and alternate modes) with adjustable sensitivity (to filter noise and avoid false triggers). • Math function waveforms: add, subtract, multiply, FFT. • USB ports (2 host, 1 device) for easy printing, saving, and sharing of waveforms, setups, screen BMP files, and CSV data files. • Internal storage for 10 waveforms and 10 setups. • Special digital filter and waveform recorder. • Built- in 6- digit hardware frequency counter. • Multi- language (11) user interface menus and built- in help. Table 1 Agilent 1000 Series Oscilloscope Models Input Bandwidth (Maximum Sample Rate, Memory) Channels 200 MHz (1-2 GSa/s, 10-20 kpts) 100 MHz (1-2 GSa/s, 10-20 kpts) 60 MHz (1-2 GSa/s, 10-20 kpts) 4 channel DSO1024A DSO1014A DSO1004A 2 channel DSO1022A DSO1012A DSO1002A Agilent 1000 Series Oscilloscopes User’s Guide 3 In This Book This guide shows how to use the Agilent 1000 Series oscilloscopes. 1 Getting Started Describes the basic steps to take when first using the oscilloscope. 2 Displaying Data Describes how to use the horizontal and vertical controls, channel settings, math waveforms, reference waveforms, and display settings. 3 Capturing Data Describes acquisition modes and how to set up triggers. 4 Making Measurements Describes voltage, time, and cursor measurements. 5 Saving, Recalling, and Printing Data Describes how to save, recall, and print data. 6 Oscilloscope Utility Settings Describes other oscilloscope settings found in the Utility menu. 7 Specifications and Characteristics Describes the 1000 Series oscilloscopes’ specifications and characteristics. 4 Agilent 1000 Series Oscilloscopes User’s Guide Contents Agilent 1000 Series Oscilloscopes—At a Glance In This Book Figures Tables 1 3 4 13 15 Getting Started 17 Step 1. Inspect the package contents Step 2. Turn on the oscilloscope 18 19 Step 3. Load the default oscilloscope setup Step 4. Input a waveform 20 21 21 Step 5. Use Auto-Scale 22 Step 6. Compensate probes 24 Low Frequency Compensation High Frequency Compensation 24 25 Step 7. Become familiar with the Front Panel Controls Front Panel Overlays for Different Languages 27 Using the Oscilloscope Softkey Menus 28 26 Step 8. Become familiar with the oscilloscope display 30 Step 9. Use the Run Control keys 31 Step 10. Access the built-in help 32 Agilent 1000 Series Oscilloscopes User’s Guide 5 Contents Securing the Oscilloscope 2 Displaying Data 33 35 Using the Horizontal Controls 36 To adjust the horizontal scale 37 To adjust the horizontal position 38 To display the zoomed time base 39 To change the horizontal time base (Y-T, X-Y, or Roll) To view the sample rate 42 40 Using the Vertical Controls 43 To turn waveforms on or off (channel, math, or reference) To adjust the vertical scale 44 To adjust the vertical position 44 To specify channel coupling 45 To specify a bandwidth limit 47 To specify the probe attenuation 48 To use a digital filter 49 To change the Volts/Div control sensitivity 50 To invert a waveform 50 To specify the channel units 52 43 Using Math Function Waveforms 53 To add, subtract, or multiply waveforms 54 To display the frequency domain using FFT 54 Using Reference Waveforms 57 To save a reference waveform 57 To export or import reference waveforms 57 To return the reference waveform to its default scale 6 58 Agilent 1000 Series Oscilloscopes User’s Guide Contents Changing the Display Settings 59 To display waveforms as vectors or dots 59 To clear the display 60 To set waveform persistence 60 To adjust waveform intensity 60 To display graded waveform intensity 61 To change the grid 61 To change the menu display time 62 To adjust the grid brightness 62 To invert screen colors 62 To select screen persistence 63 3 Capturing Data 65 Overview of Sampling 66 Sampling Theory 66 Aliasing 66 Oscilloscope Bandwidth and Sample Rate Oscilloscope Rise Time 69 Oscilloscope Bandwidth Required 70 Real-Time Sampling 71 Memory Depth and Sample Rate 72 67 Choosing the Acquisition Mode 73 To select the Normal acquisition mode 73 To select the Average acquisition mode 74 To select the Peak Detect acquisition mode 75 To turn OFF/ON sine(x)/x interpolation 77 Recording/Playing-back Waveforms 78 To record waveforms 78 To play-back waveforms 79 To store recorded waveforms 81 Agilent 1000 Series Oscilloscopes User’s Guide 7 Contents Adjusting the Trigger Level 83 To adjust the trigger level 83 To force a trigger 84 Choosing the Trigger Mode 85 To set up edge triggers 85 To set up pulse width triggers 86 To set up video triggers 87 To set up pattern triggers 90 To set up alternate triggers 91 Setting Other Trigger Parameters 92 To set the trigger sweep 92 To set the trigger coupling 92 To set the trigger high-frequency reject coupling To change the trigger sensitivity 94 To specify a trigger holdoff 95 Using the External Trigger Input 4 Making Measurements 93 96 97 Displaying Automatic Measurements 98 To display an automatic measurement 98 To clear automatic measurements from the display 99 To display or hide all automatic measurements 99 To select channels for delay/phase measurements 99 8 Agilent 1000 Series Oscilloscopes User’s Guide Contents Voltage Measurements 100 Vmax (Maximum Voltage) 100 Vmin (Minimum Voltage) 101 Vpp (Peak-to-Peak Voltage) 101 Vtop (Top Voltage) 101 Vbase (Base Voltage) 101 Vamp (Amplitude Voltage = Vtop - Vbase) Vavg (Average Voltage) 101 Vrms (Root-Mean-Square Voltage) 102 Overshoot 102 Preshoot 102 101 Time Measurements 103 Period 103 Frequency 104 Rise Time 104 Fall Time 104 Positive Pulse Width 105 Negative Pulse Width 105 Positive Duty Cycle 105 Negative Duty Cycle 105 Delay Between Rising Edges 106 Delay Between Falling Edges 106 Phase Between Rising Edges 107 Phase Between Falling Edges 107 Counter (Frequency) 108 Making Cursor Measurements 109 To use manually adjustable cursors 110 To use tracking cross-hair cursors 111 To display cursors for automatic measurements Agilent 1000 Series Oscilloscopes User’s Guide 112 9 Contents 5 Saving, Recalling, and Printing Data 113 Saving and Recalling Data 114 To save and recall waveforms 114 To save and recall oscilloscope setups 115 To save screens to BMP or PNG format files 116 To save data to CSV format files 117 Using the Disk Manager 118 To switch between files, path, and directory panes To navigate the directory hierarchy 119 To create new folders 119 To edit folder/file names 120 To delete folders 121 To rename folders 121 To delete files 121 To recall files 122 To rename files 122 To display disk information 122 119 Printing Screens 123 To choose a PictBridge printer 124 To print with inverted screen colors 125 To choose color or grayscale printing 125 To copy a screen to the printer 126 6 Oscilloscope Utility Settings Displaying System Information Turning Sound ON or OFF 127 128 128 Setting and Displaying the Date and Time Setting the Language (Menu and Help) 10 129 130 Agilent 1000 Series Oscilloscopes User’s Guide Contents Performing Mask Tests 131 To enable/disable mask tests 131 To select the source channel for mask tests 131 To run/stop a mask test 132 To turn on/off the mask test message display 132 To set the mask test output condition 133 To stop a mask test on the output condition 133 To set up masks 133 Setting Preferences 136 To set up the screen saver 136 To select the vertical scale reference level 136 To select the USB device port function 137 Running Self-Calibration 7 138 Specifications and Characteristics 139 Environmental Conditions 140 Overvoltage Category 140 Pollution Degree 140 Pollution Degree Definitions 140 Measurement Category 141 Measurement Category Definitions 141 Transient Withstand Capability 141 141 Specifications A 142 Characteristics 143 Safety Notices 151 Warnings 151 Safety Symbols 152 Agilent 1000 Series Oscilloscopes User’s Guide 11 Contents Index 12 153 Agilent 1000 Series Oscilloscopes User’s Guide Figures Figure 1. Power Switch 19 Figure 2. [Default Setup] Key 20 Figure 3. [Auto-Scale] Key 22 Figure 4. Low Frequency Probe Compensation 24 Figure 5. High Frequency Probe Compensation 25 Figure 6. Front Panel 26 Figure 7. Softkey Menus 28 Figure 8. Oscilloscope Display 30 Figure 9. Run Control Keys 31 Figure 10. [Help] Key 32 Figure 11. Securing the Instrument 33 Figure 12. Horizontal Controls 36 Figure 13. Status Bar, Trigger Position, and Horizontal Scale Control Indicators 37 Figure 14. Zoomed Time Base Window 40 Figure 15. X-Y Display Format Showing Out-of-Phase Waveforms 41 Figure 16. Vertical Controls 43 Figure 17. DC Coupling Control 46 Figure 18. AC Coupling Control 46 Figure 19. BW Limit Control OFF 47 Figure 20. BW Limit Control ON 48 Figure 21. Waveform Before Inversion 51 Figure 22. Waveform After Inversion 51 Figure 23. Math Scale Setting Value 53 Figure 24. FFT Waveform 56 Figure 25. [Display] Key 59 Figure 26. Alaising 67 Figure 27. Theoretical Brick-Wall Frequency Response 68 Agilent 1000 Series Oscilloscopes User’s Guide 13 Figures Figure 28. Figure 29. Figure 30. Figure 31. Figure 32. Figure 33. Figure 34. Figure 35. Figure 36. Figure 37. Figure 38. Figure 39. Figure 40. Figure 41. Figure 42. Figure 43. Figure 44. Figure 45. Figure 46. Figure 47. Figure 48. Figure 49. Figure 50. Figure 51. Figure 52. Figure 53. Figure 54. Figure 55. Figure 56. 14 Sample Rate and Oscilloscope Bandwidth 69 Real-Time Sampling Mode 71 Acquire Key 73 Noisy Waveform Without Averaging 74 Noisy Waveform With Averaging 75 Peak Detect Waveform 76 Trigger Controls 83 Line Synchronization 89 Field Synchronization 89 Alternate Triggers 91 Trigger Holdoff 95 [Measure] Key 98 Voltage Measurement Points 100 Period and Frequency Measurements 103 Rise Time and Fall Time Measurements 104 Positive Pulse Width and Negative Pulse Width Measurements Delay Measurements 106 Phase Measurements 107 [Cursors] Key 109 USB Host Port on Front Panel 113 [Save/Recall] Key 114 Disk Manager 118 Editing Folder/File Names in Disk Manager 120 USB Ports on Back Panel 123 [Print] Key Location 124 [Utility] Key 127 Mask Test Display 132 Mask Test Mask Setting 134 Calibration Screen 138 105 Agilent 1000 Series Oscilloscopes User’s Guide Tables Table 1. Agilent 1000 Series Oscilloscope Models 3 Table 2. Auto-Scale Default Settings 23 Table 3. Front Panel Controls 27 Table 4. FFT Window Characteristics 55 Table 5. Specifications 142 Table 6. Acquisition System Characteristics 143 Table 7. Vertical System Characteristics 143 Table 8. Horizontal System Characteristics 145 Table 9. Trigger System Characteristics 146 Table 10. Display System Characteristics 146 Table 11. Measurement Features 147 Table 12. FFT Measurement Features 147 Table 13. Storage 148 Table 14. I/O 148 Table 15. General Characteristics 149 Table 16. Power Requirements 149 Table 17. Environmental Characteristics 150 Table 18. Other 150 Agilent 1000 Series Oscilloscopes User’s Guide 15 Tables 16 Agilent 1000 Series Oscilloscopes User’s Guide Agilent 1000 Series Oscilloscopes User’s Guide 1 Getting Started Step 1. Inspect the package contents 18 Step 2. Turn on the oscilloscope 19 Step 3. Load the default oscilloscope setup 20 Step 4. Input a waveform 21 Step 5. Use Auto-Scale 22 Step 6. Compensate probes 24 Step 7. Become familiar with the Front Panel Controls 26 Step 8. Become familiar with the oscilloscope display 30 Step 9. Use the Run Control keys 31 Step 10. Access the built-in help 32 Securing the Oscilloscope 33 This chapter describes the basic steps to take when first using the oscilloscope. 17 1 Getting Started Step 1. Inspect the package contents 1 Inspect the shipping container for damage. Keep a damaged shipping container or cushioning material until you have inspected the contents of the shipment for completeness and have checked the oscilloscope mechanically and electrically. 2 Verify that you received the following items in the oscilloscope packaging: • Oscilloscope. • Power cord. • N2862A 10:1 10 M passive probes (60 MHz and 100 MHz models), quantity = number of oscilloscope channels. • N2863A 10:1 10 M passive probes (200 MHz model), quantity = number of oscilloscope channels. • User’s guide (this manual). • Additional documentation and software CD. • Front panel overlay (if language option other than English is chosen). If anything is missing, or if you need to order additional probes, power cords, etc., contact your nearest Agilent Technologies sales office. 3 Inspect the oscilloscope. • If there is mechanical damage or a defect, or if the oscilloscope does not operate properly or does not pass performance tests, notify your Agilent Technologies sales office. • If the shipping container is damaged, or the cushioning materials show signs of stress, notify the carrier; then, contact your nearest Agilent Technologies sales office. Keep the shipping materials for the carrier’s inspection. The Agilent Technologies sales office will arrange for repair or replacement at Agilent’s option without waiting for claim settlement. 18 Agilent 1000 Series Oscilloscopes User’s Guide Getting Started 1 Step 2. Turn on the oscilloscope The next few steps (turning on the oscilloscope, loading the default setup, and inputting a waveform) will provide a quick functional check to verify the oscilloscope is operating correctly. 1 Connect the power cord to a power source. Use only power cords designed for your oscilloscope. Use a power source that delivers the required power (see Table 16 on page 149). WA R N I N G To avoid electric shock, be sure the oscilloscope is properly grounded. 2 Turn on the oscilloscope. Figure 1 Power Switch Agilent 1000 Series Oscilloscopes User’s Guide 19 1 Getting Started Step 3. Load the default oscilloscope setup You can recall the factory default setup any time you want to return the oscilloscope to its original setup. 1 Press the front panel [Default Setup] key. Push Push for Zoom to Zero Run Stop Menu Zoom Cursors Measure Acquire Display Help Single Push for 50% AutoScale Figure 2 Default Setup Save Recall Print Utility [Default Setup] Key 2 When the Default menu appears, press [Menu On/Off] to turn off the menu. (The Undo softkey in the Default menu lets you cancel the default setup and go back to the previous setup.) 20 Agilent 1000 Series Oscilloscopes User’s Guide Getting Started 1 Step 4. Input a waveform 1 Input a waveform to a channel of the oscilloscope. Use one of the supplied passive probes to input the Probe Comp signal from the front panel of the oscilloscope. CAUTION To avoid damage to the oscilloscope, make sure that the input voltage at the BNC connector does not exceed the maximum voltage (300 Vrms maximum). Agilent 1000 Series Oscilloscopes User’s Guide 21 1 Getting Started Step 5. Use Auto-Scale The oscilloscope has an auto- scale feature that automatically sets the oscilloscope controls for the input waveforms present. Push Push for Zoom to Zero Run Stop Menu Zoom Cursors Measure Acquire Display Help Single Push for 50% AutoScale Figure 3 Default Setup Save Recall Print Utility [Auto-Scale] Key Auto- scale requires waveforms with a frequency greater than or equal to 50 Hz and a duty cycle greater than 1%. 1 Press the front panel [Auto-Scale] key. 2 When the AUTO menu appears, press [Menu On/Off] to turn off the menu. The oscilloscope turns on all channels that have waveforms applied and sets the vertical and horizontal scales appropriately. It also selects a time base range based on the trigger source. The trigger source selected is the highest- numbered channel that has a waveform applied. (The Undo softkey in the AUTO menu lets you cancel the auto- scale and go back to the previous setup.) 22 Agilent 1000 Series Oscilloscopes User’s Guide Getting Started 1 The oscilloscope is configured to the following default control settings: Table 2 Auto-Scale Default Settings Menu Setting Horizontal time base Y-T (amplitude vs. time) Acquisition mode Normal Vertical coupling Adjusted to AC or DC according to the waveform. Vertical "V/div" Adjusted Volts/Div Coarse Bandwidth limit OFF Waveform invert OFF Horizontal position Center Horizontal "S/div" Adjusted Trigger type Edge Trigger source Measure the channel with input waveform automatically. Trigger coupling DC Trigger voltage Midpoint setting Trigger sweep Auto Agilent 1000 Series Oscilloscopes User’s Guide 23 1 Getting Started Step 6. Compensate probes Compensate probes to match your probe to the input channel. You should compensate a probe whenever you attach it for the first time to any input channel. Low Frequency Compensation For the supplied passive probes: 1 Set the Probe menu attenuation to 10X. If you use the probe hooktip, ensure a proper connection by firmly inserting the tip onto the probe. 2 Attach the probe tip to the probe compensation connector and the ground lead to the probe compensator ground connector. 3 Press the [Auto-Scale] front panel key. Low frequency compensation adjustment Correctly Compensated Over Compensated Under Compensated Figure 4 Low Frequency Probe Compensation 4 If waveform does not appear like the Correctly Compensated waveform shown in Figure 4, then use a nonmetallic tool to adjust the low frequency compensation adjustment on the probe for the flattest square wave possible. 24 Agilent 1000 Series Oscilloscopes User’s Guide Getting Started 1 High Frequency Compensation For the supplied passive probes: 1 Using the BNC adapter, connect the probe to a square wave generator. 2 Set the square wave generator to a frequency of 1 MHz, an amplitude of 3 Vp- p, and an output termination of 50. 3 Press the [Auto-Scale] front panel key. High frequency compensation adjustments Correctly Compensated Over Compensated Under Compensated Figure 5 High Frequency Probe Compensation 4 If waveform does not appear like the Correctly Compensated waveform shown in Figure 5, then use a nonmetallic tool to adjust the 2 high frequency compensation adjustments on the probe for the flattest square wave possible. Agilent 1000 Series Oscilloscopes User’s Guide 25 1 Getting Started Step 7. Become familiar with the Front Panel Controls Before using the oscilloscope, familiarize yourself with the front panel controls. The front panel has knobs, keys, and softkeys. Knobs are used most often to make adjustments. Keys are used for run controls and to change other oscilloscope settings via menus and softkeys. Entry knob Measure controls DSO1024A Oscilloscope Display controls Horizontal controls 200MHz Push 2GSa/s Run controls Push to Zero for Zoom Run Stop Menu Zoom Single Push to Select Cursors Measure Acquire AutoScale Default Setup Save Recall Display Help Push for 50% Softkeys Print Push Push for Vernier for Vernier Utility Menu Force 1 1 Math 2 REF 3 4 Push Push to Zero to Zero 2 3 Local 4 All Inputs 1MW_15pF 400Vrms CATI Setup controls Figure 6 26 Menu controls Vertical controls Trigger controls Front Panel Agilent 1000 Series Oscilloscopes User’s Guide Getting Started 1 The definitions of the front panel knobs, keys, and softkeys are as follows: Table 3 Front Panel Controls Controls Consists of these knobs and keys Measure controls [Measure] and [Cursors] front panel keys. Waveform controls [Acquire] and [Display] front panel keys. Menu controls [Save/Recall] and [Utility] front panel keys. Vertical controls Vertical position knobs, vertical scale knobs, channel ([1], [2], etc.) [Math], and [REF] front panel keys. Horizontal controls Position knob, [Menu/Zoom] front panel key, and scale knob. Trigger controls Trigger [Level] knob, [Menu], and [Force] front panel keys. Run controls [Run/Stop] and [Single] front panel keys. Setup controls [Auto-Scale] and [Default Setup] front panel keys. Softkeys Five gray keys from top to bottom on the right-hand side of the screen, which select the adjacent menu items in the currently displayed menu. entry knob For the adjustment defined controls. Front Panel Overlays for Different Languages If you choose a language option other than English, you get a front panel overlay for your language option. To install a front panel overlay: 1 Insert the tabs on the left side of the overlay into the appropriate slots on the front panel. 2 Gently press the overlay over the knobs and buttons. 3 When the overlay is against the front panel, insert the tabs on the right side of the overlay into the slots on the front panel. 4 Let the overlay flatten out. It should remain secure on the front panel. Agilent 1000 Series Oscilloscopes User’s Guide 27 1 Getting Started Using the Oscilloscope Softkey Menus Figure 7 Softkey Menus When one of the oscilloscope front panel keys turns on a menu, you can use the five softkeys to choose items from the menu. Some common menu item choices are: Accesses the next page of items in the menu. Accesses the previous page of items in the menu. 28 Agilent 1000 Series Oscilloscopes User’s Guide Getting Started 1 Returns to the previous menu in the hierarchy. The [Menu On/Off] front panel key turns off the menu or turns on the last accessed menu on again. The Menu Display item in the Display menu lets you select the amount of time menus are displayed (see “To change the menu display time” on page 62). Agilent 1000 Series Oscilloscopes User’s Guide 29 1 Getting Started Step 8. Become familiar with the oscilloscope display Waveform window position in memory Trigger position in memory Trigger position in waveform window Acquisition Status Trigger, rising edge, channel 1, 154 mV Timebase Status, 500 us per division Waveform Channel 1 Reference Channel 1 Status, DC coupling, 50 mV per division Figure 8 30 Oscilloscope Display Agilent 1000 Series Oscilloscopes User’s Guide Getting Started 1 Step 9. Use the Run Control keys There are two front panel keys for starting and stopping the oscilloscope’s acquisition system: [Run/Stop] and [Single]. Push Push for Zoom to Zero Run Stop Menu Zoom Cursors Measure Acquire Display Help Single Push for 50% AutoScale Figure 9 Default Setup Save Recall Print Utility Run Control Keys • When the [Run/Stop] key is green, the oscilloscope is acquiring data. To stop acquiring data, press [Run/Stop]. When stopped, the last acquired waveform is displayed. • When the [Run/Stop] key is red, data acquisition is stopped. To start acquiring data, press [Run/Stop]. • To capture and display a single acquisition (whether the oscilloscope is running or stopped), press [Single]. After capturing and displaying a single acquisition, the [Run/Stop] key is red. Agilent 1000 Series Oscilloscopes User’s Guide 31 1 Getting Started Step 10. Access the built-in help The oscilloscope has built- in quick help information. To access the built- in help: 1 Press the [Help] front panel key. Push Push for Zoom to Zero Run Stop Menu Zoom Cursors Measure Acquire Display Help Single Push for 50% AutoScale Figure 10 Default Setup Save Recall Print Utility [Help] Key 2 Press the front panel key, softkey, or pushable knob on which you would like quick help information. The built- in help is available in 11 different languages (see “Setting the Language (Menu and Help)” on page 130). 32 Agilent 1000 Series Oscilloscopes User’s Guide Getting Started 1 Securing the Oscilloscope To secure a 1000 Series oscilloscope to its location, you can use a Kensington lock or the security loop. Security loop Hole for Kensington lock Figure 11 Securing the Instrument Agilent 1000 Series Oscilloscopes User’s Guide 33 1 34 Getting Started Agilent 1000 Series Oscilloscopes User’s Guide Agilent 1000 Series Oscilloscopes User’s Guide 2 Displaying Data Using the Horizontal Controls 36 Using the Vertical Controls 43 Using Math Function Waveforms 53 Using Reference Waveforms 57 Changing the Display Settings 59 This chapter describes how to use the horizontal and vertical controls, channel settings, math waveforms, reference waveforms, and display settings. 35 2 Displaying Data Using the Horizontal Controls The horizontal controls consist of: • The horizontal scale knob — changes the oscilloscope’s time per division setting using the center of the screen as a reference. • The horizontal position knob — changes the position of the trigger point relative to the center of the screen. • The [Menu/Zoom] key — displays the Horizontal menu which lets you display the zoomed (delayed) time base, change the time base mode, and display the sample rate. Menu Zoom Scale knob Figure 12 Position knob Horizontal Controls Figure 13 shows the screen icon descriptions and control indicators. 36 Agilent 1000 Series Oscilloscopes User’s Guide Displaying Data Displayed waveform window ([ ]) position in memory Trigger position in memory 2 Trigger position in waveform window Horizontal scale setting Sample rate Figure 13 Status Bar, Trigger Position, and Horizontal Scale Control Indicators To adjust the horizontal scale • Turn the horizontal scale knob to change the horizontal time per division (time/div) setting (and the oscilloscope’s sample rate — see “Memory Depth and Sample Rate” on page 72). The time/div setting changes in a 1- 2- 5 step sequence. The time/div setting is also known as the sweep speed. Agilent 1000 Series Oscilloscopes User’s Guide 37 2 Displaying Data When the time/div is set to 50 ms/div or slower, the oscilloscope enters Slow Scan mode (see “Slow Scan Mode” below). When the horizontal scale is set to 20 ns or faster, the oscilloscope uses sine(x)/x interpolation to expand the horizontal time base. • Push the horizontal scale knob to toggle between the zoomed time base and the normal time base display (see “To display the zoomed time base” on page 39). The time/div setting is displayed in the status bar at the top left of the screen. Because all channels are displayed in the same time base (except in the Alternate trigger mode), the oscilloscope displays one time/div setting for all channels. Slow Scan Mode When the horizontal scale is set to 50 ms/div or slower, the oscilloscope enters Slow Scan mode. In the Slow Scan mode, peak detect acquisition is used so that no data is missed (even the though the Acquire menu may show a different acquisition mode setting). The oscilloscope acquires sufficient data for the pre- trigger part of the display, then waits for the trigger. When the trigger occurs, the oscilloscope continues to capture data for the post- trigger part of the display. When using the Slow Scan mode to view low frequency signals, the channel coupling should be set to “DC”. The Slow Scan mode lets you see dynamic changes (like the adjustment of a potentiometer) on low frequency waveforms. For example, Slow Scan mode is often used in applications like transducer monitoring and power supply testing. To adjust the horizontal position • Turn the horizontal position knob to change the position of the trigger point relative to the center of the screen. The position knob adjusts the horizontal position of all channels, math functions, and reference waveforms. 38 Agilent 1000 Series Oscilloscopes User’s Guide Displaying Data 2 • Push the horizontal position knob to “zero” the trigger point (in other words, move it to the center of the screen). To display the zoomed time base The zoomed time base (also known as delayed sweep time base), magnifies a portion of the original waveform display (now on the top half of the screen) and displays it in a zoomed time base on the bottom half of the screen. 1 To toggle the zoomed time base “ON” or “OFF”, either push the horizontal scale knob or press [Menu/Zoom] key followed by the Zoom softkey in the Horizontal menu. 2 When the zoomed time base is “ON”: • The top half of the display shows the original waveform and the portion being magnified. • The horizontal scale knob changes the magnification (widens or narrows the area of magnification). • The horizontal position knob moves the area of magnification forward and backward on the original waveform. • The bottom half of the display shows the magnified data in the zoomed time base. Agilent 1000 Series Oscilloscopes User’s Guide 39 2 Displaying Data Zoomed window Zoomed window view Figure 14 Zoomed Time Base Window To change the horizontal time base (Y-T, X-Y, or Roll) 1 Press [Menu/Zoom]. 2 In the Horizontal menu, press Time Base. 3 Continue pressing the Time Base softkey or turn the select between: 40 entry knob to Y-T Amplitude vs. time. This is the typical horizontal time base setting. X-Y Channel 2 (X- axis) vs. Channel 1 (Y- axis), see “X- Y Format” on page 41. Agilent 1000 Series Oscilloscopes User’s Guide Displaying Data Roll 2 In Roll mode, the waveform display rolls from right to left, and the minimum horizontal scale setting is 500 ms/div. No trigger or horizontal position control is available. Roll mode is used in applications similar to the ones for which Slow Scan mode is used (see “Slow Scan Mode” on page 38). X-Y Format This format compares the voltage level of two waveforms point by point. It is useful for studying phase relationships between two waveforms. This format only applies to channels 1 and 2. Choosing the X- Y display format displays channel 1 on the horizontal axis and channel 2 on the vertical axis. The oscilloscope uses the untriggered sample acquisition mode and waveform data is displayed as dots. The sampling rate can vary from 4 kSa/s to 100 MSa/s, and the default sampling rate is 1 MSa/s. Figure 15 X-Y Display Format Showing Out-of-Phase Waveforms Agilent 1000 Series Oscilloscopes User’s Guide 41 2 Displaying Data The following modes or functions are not available in X- Y format: • Automatic voltage or time measurements. • Cursor measurements. • Mask testing. • Math function waveforms. • Reference waveforms. • Zoomed time base display. • Displaying waveforms as vectors. • Horizontal position knob. • Trigger controls. To view the sample rate 1 Press [Menu/Zoom]. 2 In the Horizontal menu, the Sa Rate menu item displays the sample rate used for the current horizontal scale setting. See Also 42 “Memory Depth and Sample Rate” on page 72. Agilent 1000 Series Oscilloscopes User’s Guide Displaying Data 2 Using the Vertical Controls The vertical controls consist of: • The channel ([1], [2], [3], and [4]), [Math], and [REF] front panel keys — turn waveforms on or off (and display or hide their menus). • The vertical scale knobs — change the amplitude per division setting for a waveform, using either ground or the center of the screen as a reference (depending on a preference setting). • The vertical position knobs — change the vertical position of the waveform on the screen. Scale knobs 1 Math 2 REF 3 4 Position knobs Figure 16 Vertical Controls To turn waveforms on or off (channel, math, or reference) Pressing the channel ([1], [2], [3], and [4]), [Math], and [REF] front panel keys have the following effect: • If the waveform is off, the waveform is turned on and its menu is displayed. • If the waveform is on and its menu is not displayed, its menu will be displayed. • If the waveform is on and its menu is displayed, the waveform is turned off and its menu goes away. Agilent 1000 Series Oscilloscopes User’s Guide 43 2 Displaying Data To adjust the vertical scale When an input channel waveform is on: • Turn its vertical scale knob to change the amplitude per division setting. The amplitude/div setting changes in a 1- 2- 5 step sequence from 2 mV/div to 5 V/div (with “1X” probe attenuation). Either ground or the center of the screen is used as a reference, depending on the “Expand Reference” preference setting (see “To select the vertical scale reference level” on page 136). The “center of screen” reference is not available for math function or reference waveforms. • Push its vertical scale knob to toggle between vernier (fine scale) adjustment and normal adjustment. With vernier adjustment, the amplitude/div setting changes in small steps between the normal (coarse scale) settings. The Volts/Div item in a channel’s menu also toggles between vernier and normal adjustment (see “To change the Volts/Div control sensitivity” on page 50). Vernier adjustment is not available for math function or reference waveforms. The amplitude/div setting is displayed in the status bar at the bottom of the screen. To adjust the vertical position Adjusting their vertical position lets you compare waveforms by aligning them above one another or on top of each other. When an input channel waveform is on: • Turn the vertical position knob to change the vertical position of the waveform on the screen. Notice that the ground reference symbol on the left side of the display moves with the waveform. • Push the vertical position knob to “zero” the ground reference (in other words, move it to the center of the screen). 44 Agilent 1000 Series Oscilloscopes User’s Guide Displaying Data 2 Notice that, as you adjust the vertical position, a message showing the position of the ground reference relative to the center of the screen is temporarily displayed in the lower left- hand corner of the screen. To specify channel coupling 1 If the channel’s menu is not currently displayed, press the channel key ([1], [2], [3], or [4]). 2 In the Channel menu, press Coupling. 3 Continue pressing the Coupling softkey or turn the select between: DC entry knob to Passes both DC and AC components of the input waveform to the oscilloscope. See Figure 17. You can quickly measure the DC component of the waveform by simply noting its distance from the ground symbol. AC Blocks the DC component of the input waveform and passes the AC component. See Figure 18. This lets you use greater sensitivity (amplitude/div settings) to display the AC component of the waveform. GND The waveform is disconnected from the oscilloscope input. Agilent 1000 Series Oscilloscopes User’s Guide 45 2 Displaying Data DC Coupling DC Coupling Status Figure 17 DC Coupling Control AC Coupling AC Coupling Status Figure 18 46 AC Coupling Control Agilent 1000 Series Oscilloscopes User’s Guide Displaying Data 2 To specify a bandwidth limit When high frequency components of a waveform are not important to its analysis, the bandwidth limit control can be used to reject frequencies above 20 MHz. See Figure 20 and Figure 19. 1 If the channel’s menu is not currently displayed, press the channel key ([1], [2], [3], or [4]). 2 In the Channel menu, press BW Limit to toggle the bandwidth limit setting “ON” and “OFF”. Bandwidth limit OFF Figure 19 BW Limit Control OFF Agilent 1000 Series Oscilloscopes User’s Guide 47 2 Displaying Data 20 MHz Bandwidth Bandwidth ON Status Figure 20 BW Limit Control ON To specify the probe attenuation For correct measurements, you must match the oscilloscope’s probe attenuation factor settings with the attenuation factors of the probes being used. The probe attenuation factor setting changes the vertical scaling of the oscilloscope so that the measurement results reflect the actual voltage levels at the probe tip. 1 If the channel’s menu is not currently displayed, press the channel key ([1], [2], [3], or [4]). 2 In the Channel menu, press Probe. 3 Continue pressing the Probe softkey or turn the between: 48 0.001X For 1:1000 probes. 0.01X For 1:100 probes. entry knob to select Agilent 1000 Series Oscilloscopes User’s Guide Displaying Data 0.1X For 1:10 probes. 1X For 1:1 probes. 10X For 10:1 probes. 100X For 100:1 probes. 1000X For 1000:1 probes. 2 To use a digital filter You can apply a digital filter to the sampled waveform data. 1 If the channel’s menu is not currently displayed, press the channel key ([1], [2], [3], or [4]). 2 In the Channel menu, press Digital Filter. 3 In the Filter menu, press Filter Type, and continue pressing the Filter Type softkey or turn the entry knob to select between: LPF (Low Pass Filter). HPF (High Pass Filter). BPF (Band Pass Filter). BRF (Band Reject Filter). 4 Depending on the type of filter selected, press Upper Limit and/or Lower Limit, and turn the entry knob to adjust the limit. The horizontal scale control sets the maximum value for the upper and lower limits. Digital filters are not available when: • The horizontal scale is 20 ns/div or lower. • The horizontal scale is 50 ms/div or higher. Agilent 1000 Series Oscilloscopes User’s Guide 49 2 Displaying Data To change the Volts/Div control sensitivity When you need to adjust the amplitude/div setting in smaller increments, you can change the sensitivity ofthe vertical scale control. 1 If the channel’s menu is not currently displayed, press the channel key ([1], [2], [3], or [4]). 2 In the Channel menu, press Volts/Div to toggle between: Coarse The verical scale knob changes the amplitude/div setting in a 1- 2- 5 step sequence from 2 mV/div to 10 V/div (with “1X” probe attenuation). Fine Also known as vernier, the vertical scale knob changes the amplitude/div setting in small steps between the normal (coarse scale) settings. You can also toggle between coarse and fine settings by pushing the vertical scale knob (see “To adjust the vertical scale” on page 44). To invert a waveform You can invert a waveform with respect to the ground level. 1 If the channel’s menu is not currently displayed, press the channel key ([1], [2], [3], or [4]). 2 In the Channel menu, press Invert to toggle between “ON” and “OFF”. Figure 21 and Figure 22 show the changes before and after inversion. 50 Agilent 1000 Series Oscilloscopes User’s Guide Displaying Data Figure 21 Waveform Before Inversion Figure 22 Waveform After Inversion Agilent 1000 Series Oscilloscopes User’s Guide 2 51 2 Displaying Data To specify the channel units 1 If the channel’s menu is not currently displayed, press the channel key ([1], [2], [3], or [4]). 2 In the Channel menu, press Unit. 3 Continue pressing the Unit softkey or turn the between: 52 V Volts, used with voltage probes. A Amperes, used with current probes. W Watts. U Unknown. entry knob to select Agilent 1000 Series Oscilloscopes User’s Guide Displaying Data 2 Using Math Function Waveforms The math functions control allows the selection of the math functions: • Add. • Subtract. • Multiply. • FFT (Fast Fourier Transform). The mathematical result can be measured using the grid and cursor controls. The amplitude of the math waveform can be adjusted using a menu item selection in the Math menu and the entry knob. The adjustment range is in a 1- 2- 5 step from 0.1% to 1000%. The math scale setting is shown at the bottom of the display. Math Scale Figure 23 Math Scale Setting Value Agilent 1000 Series Oscilloscopes User’s Guide 53 2 Displaying Data To add, subtract, or multiply waveforms 1 Press [Math]. 2 In the Math menu, press Operate. 3 Continue pressing the Operate softkey or turn the select “A + B”, “A - B”, or “A x B”. entry knob to 4 Press Source A, and continue pressing the softkey to select the desired input channel. 5 Press Source B, and continue pressing the softkey to select the desired input channel. 6 To invert the result of the addition, subtraction, or multiplication (with respect to the reference level), select Invert to toggle between “ON” and “OFF”. To display the frequency domain using FFT The FFT math function mathematically converts a time- domain waveform into its frequency components. FFT waveforms are useful for finding the harmonic content and distortion in systems, for characterizing noise in DC power supplies, and for analyzing vibration. To display a waveform’s FFT: 1 Press [Math]. 2 In the Math menu, press Operate. 3 Continue pressing the Operate softkey or turn the select “FFT”. entry knob to 4 In the FFT menu, press Source, and continue pressing the softkey to select the desired input channel. NOTE The FFT of a waveform that has a DC component or offset can cause incorrect FFT waveform magnitude values. To minimize the DC component, choose AC Coupling on the source waveform. To reduce random noise and aliasing components (in repetitive or single-shot waveforms), set the oscilloscope acquisition mode to averaging. 54 Agilent 1000 Series Oscilloscopes User’s Guide Displaying Data 5 Press Window, and continue pressing the softkey or turn the knob to select the desired window: 2 entry There are four FFT windows. Each window has trade- offs between frequency resolution and amplitude accuracy. What you want to measure and your source waveform characteristics help determine which window to use. Use the guidelines in Table 4 to select the best window. Table 4 FFT Window Characteristics Window Characteristics Best for measuring Rectangle Best frequency resolution, worst magnitude resolution. This is essentially the same as no window. Transients or bursts, the waveform levels before and after the event are nearly equal. Equal-amplitude sine waves with fixed frequencies. Broadband random noise with a relatively slow varying spectrum. Hanning, Hamming Better frequency, poorer magnitude accuracy than Rectangular. Hamming has slightly better frequency resolution than Hanning. Sine, periodic, and narrow-band random noise. Transients or bursts where the waveform levels before and after the events are significantly different. Blackman Best magnitude, worst frequency resolution. Single frequency waveforms, to find higher order harmonics. 6 Press Display to toggle between a “Split” screen display and a “Full Screen” display. 7 Press and turn the position of the FFT waveform. entry knob to adjust the vertical 8 Press and turn the of the FFT waveform. entry knob to adjust the vertical scale 9 Press Scale to toggle between “VRMS” and “dBVRMS” units. NOTE To display FFT waveforms with a large dynamic range, use the dBVrms scale. The dBVrms scale displays component magnitudes using a log scale. Agilent 1000 Series Oscilloscopes User’s Guide 55 2 Displaying Data 10 Use the horizontal position knob to adjust the frequency per division. The frequency scale is displayed on the screen. Use this to display the frequencies associated with the peaks in the FFT waveform. Figure 24 NOTE FFT Waveform FFT Resolution The FFT resolution is the quotient of the sampling rate and the number of FFT points (fS/N). With a fixed number of FFT points (1024), the lower the sampling rate, the better the resolution. NOTE Nyquist Frequency and Aliasing in the Frequency Domain The Nyquist frequency is the highest frequency that any real-time digitizing oscilloscope can acquire without aliasing. This frequency is half of the sample rate. Frequencies above the Nyquist frequency will be under sampled, which causes aliasing. The Nyquist frequency is also called the folding frequency because aliased frequency components fold back from that frequency when viewing the frequency domain. 56 Agilent 1000 Series Oscilloscopes User’s Guide Displaying Data 2 Using Reference Waveforms You can save a reference waveform to an internal, nonvolatile memory location and then display it on the oscilloscope along with other captured waveforms. You can also export/import reference waveforms to/from an external USB drive when it is connected to the front panel USB host port. Reference waveforms are displayed (that is, turned on/off) just like other waveforms (see page 43). NOTE The reference waveform function is not available in X-Y mode. To save a reference waveform 1 Before saving a waveform as a reference, set the waveform’s scale and position as desired. These settings will become the reference waveform’s defaults. 2 Press [REF]. 3 In the REF menu, press Source, and continue pressing the softkey or turn the entry knob to select the waveform you want to save. 4 Press Location to choose “Internal”. 5 Press Save. To export or import reference waveforms To export or import from external storage (when a USB drive is connected to the front panel USB host port): 1 Press [REF]. 2 If exporting a waveform, in the REF menu, press Source, and continue pressing the softkey or turn the entry knob to select the waveform you want to export. Agilent 1000 Series Oscilloscopes User’s Guide 57 2 Displaying Data 3 Presh Location to choose “External”. 4 Press Save or Import. 5 Use the disk manager dialog to navigate to the folder where you want to export the file or to select the file you want to import (see “To navigate the directory hierarchy” on page 119). 6 In the Save or Import menu: • To export the waveform, press New File, enter the filename (see “To edit folder/file names” on page 120), and press Save. • To load the selected waveform (.wfm file), press Import. To return the reference waveform to its default scale 1 Press [REF]. 2 In the REF menu, press Reset. The scale and position of the waveform as originally saved are restored. 58 Agilent 1000 Series Oscilloscopes User’s Guide Displaying Data 2 Changing the Display Settings Push Push for Zoom to Zero Run Stop Menu Zoom Cursors Measure Acquire Display Help Single Push for 50% AutoScale Figure 25 Default Setup Save Recall Print Utility [Display] Key To display waveforms as vectors or dots 1 Press [Display]. 2 In the Display menu, press Type to toggle the waveform display between: Vectors The oscilloscope connects the sample points by using digital interpolation. Digital interpolation maintains linearity by using a sin(x)/x digital filter. The digital interpolation is suitable for real time sampling and is most effective at 20 ns or faster horizontal scale settings. Dots The sample points are displayed. Agilent 1000 Series Oscilloscopes User’s Guide 59 2 Displaying Data To clear the display 1 Press [Display]. 2 In the Display menu, press Clear. To set waveform persistence 1 Press [Display]. 2 In the Display menu, press Persist to toggle the waveform display between: Infinite Sample points remain displayed until the display is cleared or persistence is set to “OFF”. OFF To adjust waveform intensity 1 Press [Display]. 2 In the Display menu, press Intensity and turn the adjust the waveform intensity. 60 entry knob to Agilent 1000 Series Oscilloscopes User’s Guide Displaying Data 2 To display graded waveform intensity While the oscilloscope is running, waveforms show data from multiple acquisitions. You can cause acquisition data to gradually disappear (similar to analog oscilloscopes). 1 Press [Display]. 2 In the Display menu, press Grading to toggle the waveform display between: ON The most recent data in the waveform is displayed at the highest intensity, and it gradually disappears over time. OFF All data in the waveform is displayed at the same intensity. While waveforms are displayed with graded intensity, you can adjust the normal waveform intensity to bring out the graded detail. To change the grid 1 Press [Display]. 2 In the Display menu, press Grid, and continue pressing the softkey or turn the entry knob to select between: Display grid and coordinates on the axes. Displays coordinates on the axes. Turns off the grid and coordinates. Agilent 1000 Series Oscilloscopes User’s Guide 61 2 Displaying Data To change the menu display time The menu display time is how long menus remain on the screen after a front panel key or softkey has been pressed. 1 Press [Display]. 2 In the Display menu, press Menu Display, and continue pressing the softkey or turn the entry knob to select “1 S”, “2 S”, “5 S”, “10 S”, “20 S”, or “Infinite” menu display time. To adjust the grid brightness 1 Press [Display]. 2 In the Display menu, press GridBright and turn the adjust the grid brightness. entry knob to To invert screen colors 1 Press [Display]. 2 In the Display menu, press Screen to toggle the screen between “Normal” or “Inverted” colors. Inverted screen colors are sometimes useful when printing or saving screens. 62 Agilent 1000 Series Oscilloscopes User’s Guide Displaying Data 2 To select screen persistence The screen persistence setting specifies what is displayed on the screen when acquisitions are stopped. To change the screen persistence setting: 1 Press [Display]. 2 In the Display menu, press Screen Persist to toggle between: When acquisitions are stopped, the screen may show data from many acquistions. When acquisitions are stopped, the last acquisition is displayed. Agilent 1000 Series Oscilloscopes User’s Guide 63 2 64 Displaying Data Agilent 1000 Series Oscilloscopes User’s Guide Agilent 1000 Series Oscilloscopes User’s Guide 3 Capturing Data Overview of Sampling 66 Choosing the Acquisition Mode 73 Choosing the Acquisition Mode 73 Recording/Playing-back Waveforms 78 Adjusting the Trigger Level 83 Choosing the Trigger Mode 85 Setting Other Trigger Parameters 92 Using the External Trigger Input 96 This chapter describes sampling and acquisition modes and how to set up triggers. 65 3 Capturing Data Overview of Sampling To understand the oscilloscope’s sampling and acquisition modes, it is helpful to understand sampling theory, aliasing, oscilloscope bandwidth and sample rate, oscilloscope rise time, oscilloscope bandwidth required, and how memory depth affects sample rate. Sampling Theory The Nyquist sampling theorem states that for a limited bandwidth (band- limited) signal with maximum frequency fMAX, the equally spaced sampling frequency fS must be greater than twice the maximum frequency fMAX, in order to have the signal be uniquely reconstructed without aliasing. fMAX = fS/2 = Nyquist frequency (fN) = folding frequency Aliasing Aliasing occurs when signals are under- sampled (fS < 2fMAX). Aliasing is the signal distortion caused by low frequencies falsely reconstructed from an insufficient number of sample points. 66 Agilent 1000 Series Oscilloscopes User’s Guide Capturing Data Figure 26 3 Alaising Oscilloscope Bandwidth and Sample Rate An oscilloscope’s bandwidth is typically described as the lowest frequency at which input signal sine waves are attenuated by 3 dB (- 30% amplitude error). At the oscilloscope bandwidth, sampling theory says the required sample rate is fS = 2fBW. However, the theory assumes there are no frequency components above fMAX (fBW in this case) and it requires a system with an ideal brick- wall frequency response. Agilent 1000 Series Oscilloscopes User’s Guide 67 3 Capturing Data 0dB Attenuation -3dB fN fS Frequency Figure 27 Theoretical Brick-Wall Frequency Response However, digital signals have frequency components above the fundamental frequency (square waves are made up of sine waves at the fundamental frequency and an infinite number of odd harmonics), and typically, for 1 Ghz bandwidths and below, oscilloscopes have a Gaussian frequency response. 68 Agilent 1000 Series Oscilloscopes User’s Guide Capturing Data 3 0dB Attenuation -3dB Aliased frequency components fS/4 fN fS Frequency Limiting oscilloscope bandwidth (fBW) to 1/4 the sample rate (fS/4) reduces frequency components above the Nyquist frequency (fN). Figure 28 Sample Rate and Oscilloscope Bandwidth So, in practice, an oscilloscope’s sample rate should be four or more times its bandwidth: fS = 4fBW. This way, there is less aliasing, and aliased frequency components have a greater amount of attenuation. See Also Evaluating Oscilloscope Sample Rates vs. Sampling Fidelity: How to Make the Most Accurate Digital Measurements, Agilent Application Note 1587 (http://cp.literature.agilent.com/litweb/pdf/5989- 5732EN.pdf) Oscilloscope Rise Time Closely related to an oscilloscope’s bandwidth specification is its rise time specification. Oscilloscopes with a Gaussian- type frequency response have an approximate rise time of 0.35/fBW based on a 10% to 90% criterion. Agilent 1000 Series Oscilloscopes User’s Guide 69 3 Capturing Data An oscilloscope’s rise time is not the fastest edge speed that the oscilloscope can accurately measure. It is the fastest edge speed the oscilloscope can possibly produce. Oscilloscope Bandwidth Required The oscilloscope bandwidth required to accurately measure a signal is primarily determined by the signal’s rise time, not the signal's frequency. You can use these steps to calculate the oscilloscope bandwidth required: 1 Determine the fastest edge speeds. You can usually obtain rise time information from published specifications for devices used in your designs. 2 Compute the maximum “practical” frequency component. From Dr. Howard W. Johnson’s book, High- Speed Digital Design – A Handbook of Black Magic, all fast edges have an infinite spectrum of frequency components. However, there is an inflection (or “knee”) in the frequency spectrum of fast edges where frequency components higher than fknee are insignificant in determining the shape of the signal. fknee = 0.5 / signal rise time (based on 10% - 90% thresholds) fknee = 0.4 / signal rise time (based on 20% - 80% thresholds) 3 Use a multiplication factor for the required accuracy to determine the oscilloscope bandwidth required. See Also 70 Required accuracy Oscilloscope bandwidth required 20% fBW = 1.0 x fknee 10% fBW = 1.3 x fknee 3% fBW = 1.9 x fknee Choosing an Oscilloscope with the Right Bandwidth for your Application, Agilent Application Note 1588 (http://cp.literature.agilent.com/litweb/pdf/5989- 5733EN.pdf) Agilent 1000 Series Oscilloscopes User’s Guide Capturing Data 3 Real-Time Sampling The 1000 Series oscilloscopes provide real- time sampling. In other words, waveforms are sampled at uniformly spaced intervals. See Figure 29. N = Waveform Sample is From 1 1 1 Figure 29 1 Trigger Time Real-Time Sampling Mode The 1000 Series oscilloscopes provide real- time sampling rates up to 2 GSa/s. Agilent 1000 Series Oscilloscopes User’s Guide 71 3 Capturing Data Memory Depth and Sample Rate The number of points of oscilloscope memory is fixed (except when divided between channel pairs), and there is a maximum sample rate associated with oscilloscope’s analog- to- digital converter; however, the actual sample rate is determined by the time of the acquisition (which is set according to the oscilloscope’s horizontal time/div scale). sample rate = number of samples / time of acquisition For example, when storing 10 us of data in 10,000 points of memory, the actual sample rate is 1 GSa/s. Likewise, when storing 1 s of data in 10,000 points of memory, the actual sample rate is 10 kSa/s. The actual sample rate, is displayed in the horizontal Horizontal menu (see “To view the sample rate” on page 42). The oscilloscope achieves the actual sample rate by throwing away (decimating) unneeded samples. 72 Agilent 1000 Series Oscilloscopes User’s Guide Capturing Data 3 Choosing the Acquisition Mode The osilloscope can operate in normal, average, or peak detect acquisition modes. You can choose the oscilloscope’s acquisition mode in the Acquire menu (accessed by pressing the [Acquire] front panel key). Push Push for Zoom to Zero Run Stop Menu Zoom Cursors Measure Acquire Help Display Single Push for 50% AutoScale Figure 30 Default Setup Save Recall Print Utility Acquire Key To select the Normal acquisition mode In the Normal acquisition mode, acquisitions are made and displayed one after the other. To select the Normal acquisition mode: 1 Press [Acquire]. 2 In the Acquire menu, press Acquisition. 3 Continue pressing the Acquisition softkey or turn the select “Normal”. Agilent 1000 Series Oscilloscopes User’s Guide entry knob to 73 3 Capturing Data To select the Average acquisition mode In the Average acquisition mode, acquisitions are made, and the running average over the specified number of acquisitions is displayed. Use the Average acquisition mode to remove random noise from the waveform and to improve measurement accuracy. Figure 31 74 Noisy Waveform Without Averaging Agilent 1000 Series Oscilloscopes User’s Guide Capturing Data Figure 32 3 Noisy Waveform With Averaging The Average acquisition mode decreases the screen refresh rate. To select the Average acquisition mode: 1 Press [Acquire]. 2 In the Acquire menu, press Acquisition. 3 Continue pressing the Acquisition softkey or turn the select “Average”. entry knob to 4 Press Averages and turn the entry knob to select the desired number (2, 4, 8, 16, 32, 64, 128, or 256). To select the Peak Detect acquisition mode In Normal or Average acquisition modes, at longer horizontal time/div settings, the oscilloscope’s analog- to- digital converter samples at a rate that yields more samples than can be stored in a limited amount of oscilloscope memory. Consequently, samples are thrown away (decimated), and you can miss narrow excursions on a signal. Agilent 1000 Series Oscilloscopes User’s Guide 75 3 Capturing Data However, in the Peak Detect acquisition mode, acquisitions are made at the fastest sample rate, and the minimum and maximum values for the period associated with the actual sample rate are stored. This way, you can capture narrow excursions on a signal at longer horizontal time/div settings. Figure 33 Peak Detect Waveform Because minimum and maximum values for a sample period are stored, you can use the Peak Detect acquisition mode to avoid waveform aliasing. To select the Peak Detect acquisition mode: 1 Press [Acquire]. 2 In the Acquire menu, press Acquisition. 3 Continue pressing the Acquisition softkey or turn the select “Peak Detect”. 76 entry knob to Agilent 1000 Series Oscilloscopes User’s Guide Capturing Data 3 To turn OFF/ON sine(x)/x interpolation When sample points are displayed as vectors (instead of dots) and sine(x)/x interpolation is on, curved lines are drawn between sample points. When sine(x)/x interpolation is off, straight lines are drawn. The effects of sine(x)/x interpolation are only noticeable when the horizontal scale is set to 20 ns or faster. 1 Press [Acquire]. 2 In the Acquire menu, press Sinx/x to turn sine(x)/x interpolation “OFF” or “ON”. Agilent 1000 Series Oscilloscopes User’s Guide 77 3 Capturing Data Recording/Playing-back Waveforms You can record waveforms from input channels or from the mask test output, with a maximum acquisition depth of 800 frames. The ability to record mask test output is especially useful for capturing abnormal waveforms over a long period of time. To record waveforms To record waveforms: 1 Press [Acquire]. 2 In the Acquire menu, press Sequence. 3 In the Sequence menu, press Mode. 4 Continue pressing the Mode softkey or turn the Record. entry knob to select To select the source channel for recording 1 In the Sequence menu ([Acquire]>Sequence>Mode=Record), press Source. 2 Continue pressing the Source softkey or turn the entry knob to select the desired input channel or the mask test output. To specify the mask test output, see “To set the mask test output condition” on page 133. To select the number of frames to record 1 In the Sequence menu ([Acquire]>Sequence>Mode=Record), press End Frame. 2 Turn the 78 entry knob to select a number from 1 to 800. Agilent 1000 Series Oscilloscopes User’s Guide Capturing Data 3 To start/stop recording 1 In the Sequence menu ([Acquire]>Sequence>Mode=Record), press Operate to start or stop recording. Appears on the menu when not recording; press Operate to start recording. Appears on the menu when recording; press Operate to stop recording. To select the interval between recorded frames 1 In the Sequence menu ([Acquire]>Sequence >Mode=Record), press Interval. 2 Turn the entry knob to select an interval from 1 ms to 1000 s. To play-back waveforms To play- back waveforms: 1 Press [Acquire]. 2 In the Acquire menu, press Sequence. 3 In the Sequence menu, press Mode. 4 Continue pressing the Mode softkey or turn the “Play back”. entry knob to select To play-back/stop the recording 1 In the Sequence menu ([Acquire]>Sequence>Mode=Play back), press Operate to play- back or stop the recording. Appears on the menu when not playing- back; press Operate to start playing- back the recording. Appears on the menu when playing- back; press Operate to stop playing- back. Agilent 1000 Series Oscilloscopes User’s Guide 79 3 Capturing Data To select continuous or one-time play-back 1 In the Sequence menu ([Acquire]>Sequence>Mode=Play back), press Play Mode to toggle between: Continuous play- back. One- time play- back. To select the interval between played-back frames 1 In the Sequence menu ([Acquire]>Sequence>Mode=Play back), press Interval. 2 Turn the entry knob to select an interval from 1 ms to 20 s. To select the start frame 1 In the Sequence menu ([Acquire]>Sequence>Mode=Play back), press Start Frame. 2 Turn the entry knob to select a number from l to 800. To select the current frame 1 In the Sequence menu ([Acquire]>Sequence>Mode=Play back), press Current Frame. 2 Turn the entry knob to select a number from l to 800. To select the end frame 1 In the Sequence menu ([Acquire]>Sequence>Mode=Play back), press End Frame. 2 Turn the 80 entry knob to select a number from l to 800. Agilent 1000 Series Oscilloscopes User’s Guide Capturing Data 3 To store recorded waveforms To store recorded waveforms: 1 Press [Acquire]. 2 In the Acquire menu, press Sequence. 3 In the Sequence menu, press Mode. 4 Continue pressing the Mode softkey or turn the “Storage”. entry knob to select To select the start frame 1 In the Sequence menu ([Acquire]>Sequence>Mode=Storage), press Start Frame. 2 Turn the entry knob to select a number from l to 800. To select the end frame 1 In the Sequence menu ([Acquire]>Sequence>Mode=Storage), press End Frame. 2 Turn the entry knob to select a number from l to 800. To select internal/external recording storage location 1 In the Sequence menu ([Acquire]>Sequence>Mode=Storage), press Location to toggle between Internal and External. Internal Recordings are saved and loaded from oscilloscope internal memory. External Recordings are saved, loaded, exported, and imported from an external USB drive. To save a recording 1 In the Sequence menu ([Acquire]>Sequence>Mode=Storage), press Save. 2 If the External location has been selected, use the Disk Manager to name and save the waveform recording file. See “Using the Disk Manager” on page 118. Agilent 1000 Series Oscilloscopes User’s Guide 81 3 Capturing Data To load a recording 1 In the Sequence menu ([Acquire]>Sequence>Mode=Storage), press Load. 2 If the External location has been selected, use the Disk Manager to select and load the waveform recording file. See “Using the Disk Manager” on page 118. To import/export recordings 1 Because you can only export and import waveform recordings from an external drive, select the External location. See “To select internal/external recording storage location” on page 81. 2 In the Sequence menu ([Acquire]>Sequence>Mode=Storage), press Imp./Exp.. 3 Use the Disk Manager to select the file and import or export the waveform recording. See “Using the Disk Manager” on page 118. 82 Agilent 1000 Series Oscilloscopes User’s Guide Capturing Data 3 Adjusting the Trigger Level Trigger level knob Menu Force Figure 34 Trigger Controls To adjust the trigger level • Turn the trigger [Level] knob. Two things happen: • The trigger level value is displayed at the lower left- hand corner of the screen. • A line is displayed showing the location of the trigger level with respect to the waveform (except when using AC coupling or LF reject coupling modes). • Push the trigger [Level] knob to set the level at 50% of the signal’s vertical amplitude. Agilent 1000 Series Oscilloscopes User’s Guide 83 3 Capturing Data To force a trigger To make an acquisition even if no valid trigger has been found: 1 Press [Force]. Forcing a trigger is useful, for example, when you want to display the DC voltage of a level signal. The [Force] key has no effect if the acquisition is already stopped. When the oscilloscope’s front panel is locked by a remote program (shown by a red “Rmt” on the upper- right part of the display), pressing the [Force] key returns the front panel to Local control. 84 Agilent 1000 Series Oscilloscopes User’s Guide Capturing Data 3 Choosing the Trigger Mode The trigger determines when captured data should be stored and displayed. When a trigger is set up properly, it can convert unstable displays or blank screens into meaningful waveforms. When the oscilloscope starts to acquire a waveform, it collects enough data so that it can draw the waveform to the left of the trigger point. The oscilloscope continues to acquire data while waiting for the trigger condition to occur. After it detects a trigger, the oscilloscope continues to acquire enough data so that it can draw the waveform to the right of the trigger point. The oscilloscope provides these trigger modes: Edge Can be used with analog and digital circuits. An edge trigger occurs when the trigger input passes through a specified voltage level with the specified slope. Pulse Is used to find pulses with certain widths. Video Is used to trigger on fields or lines for standard video waveforms. Pattern Is used to trigger on patterns from all input channels. Alternate Is used to trigger on non- synchronized signals. To set up edge triggers 1 Press [Menu]. 2 In the Trigger menu, press Mode. 3 Continue pressing the Mode softkey or turn the “Edge”. 4 Then, either push the Agilent 1000 Series Oscilloscopes User’s Guide entry knob to select entry knob or press Mode again. 85 3 Capturing Data 5 Press Source and continue pressing the softkey or turn the knob to select the waveform to trigger on: CH1 - CH4 The oscilloscope input channel. EXT The external trigger input. EXT/5 The (5:1) attenuated external trigger input. AC Line The AC power line. 6 Press Slope and continue pressing the softkey or turn the to select the edge to trigger on: entry entry knob Rising edge. Falling edge. Both rising and falling edges. To set up pulse width triggers A pulse width trigger occurs when a pulse that matches the pulse definition is found in a waveform. The width setting can be adjusted from 20 ns to 10 s. 1 Press [Menu]. 2 In the Trigger menu, press Mode. 3 Continue pressing the Mode softkey or turn the “Pulse”. 4 Then, either push the 86 entry knob to select entry knob or press Mode again. Agilent 1000 Series Oscilloscopes User’s Guide Capturing Data 5 Press Source and continue pressing the softkey or turn the knob to select the waveform to trigger on: CH1 - CH4 The oscilloscope input channel. EXT The external trigger input. EXT/5 The (5:1) attenuated external trigger input. 6 Press When and continue pressing the softkey or turn the knob to select the type of pulse to trigger on: 3 entry entry Positive pulse greater than the width setting. Positive pulse less than the width setting. Negative pulse greater than the width setting. Negative pulse less than the width setting. 7 Press Setting and turn the entry knob to adjust the width setting. To set up video triggers Video triggering is used to trigger on fields or lines of NTSC, PAL, or SECAM standard video waveforms. When the video trigger mode is selected, the trigger coupling is set to AC. 1 Press [Menu]. 2 In the Trigger menu, press Mode. 3 Continue pressing the Mode softkey or turn the “Video”. 4 Then, either push the Agilent 1000 Series Oscilloscopes User’s Guide entry knob to select entry knob or press Mode again. 87 3 Capturing Data 5 Press Polarity to toggle between: Normal polarity — trigger on the negative edge of the sync pulse. Inverted polarity — trigger on the positive edge of the sync pulse. NOTE Normal Polarity Sync triggers always occur on negative-going horizontal sync pulses. If the video waveform has positive-going horizontal sync pulses, use the Inverted Polarity selection. 6 Press Sync and continue pressing the softkey or turn the to select what to trigger on: All Lines Trigger on all lines. Line Num Trigger on a selected line. entry knob If you select “Line Num”, press the following Line Num menu item and turn the entry knob to select the line number. Odd Field Trigger on an odd field. Even Field Trigger on an even field. 7 Press Standard to toggle between: 88 NTSC Trigger on an NTSC video waveform. PAL/ SECAM Trigger on a PAL or SECAM video waveform. Agilent 1000 Series Oscilloscopes User’s Guide Capturing Data Figure 35 Line Synchronization Figure 36 Field Synchronization Agilent 1000 Series Oscilloscopes User’s Guide 3 89 3 Capturing Data To set up pattern triggers 1 Press [Menu]. 2 In the Trigger menu, press Mode. 3 Continue pressing the Mode softkey or turn the “Pattern”. 4 Then, either push the entry knob to select entry knob or press Mode again. 5 Press Channel and continue pressing the softkey or turn the entry knob to select the input channel whose value you want to specify: CH1 - CH4 The oscilloscope input channel. EXT The external trigger input. EXT/5 The (5:1) attenuated external trigger input. 6 Press Code and continue pressing the softkey or turn the to select the value for the selected channel: H Logical high value. L Logical low value. X Don’t care value. entry knob Rising edge. Falling edge. 7 Repeat steps 5 through 6 to select the desired values for all input channels. The oscilloscope triggers when all the values in the pattern occur at the same time. 90 Agilent 1000 Series Oscilloscopes User’s Guide Capturing Data 3 To set up alternate triggers The Alternate trigger mode splits the display horizontally and lets you trigger on two, non- synchronized signals. 1 Press [Menu]. 2 In the Trigger menu, press Mode. 3 Continue pressing the Mode softkey or turn the “Alternate”. 4 Then, either push the entry knob to select entry knob or press Mode again. 5 Press Select to select the channel to set up triggering on, either “CH1” or “CH2”. At this point, the remaining items in the Trigger menu let you set up independent triggers for the selected channel. For each source, you can set up edge, pulse width, or video triggering. You can also specify other trigger setup options, except trigger sweep. Figure 37 Alternate Triggers Agilent 1000 Series Oscilloscopes User’s Guide 91 3 Capturing Data Setting Other Trigger Parameters These are trigger system parameters that apply in all trigger modes. To set the trigger sweep Trigger sweep specifies whether acquisitions occur without a triggern or only with a trigger. 1 Press [Menu]. 2 In the Trigger menu, press Sweep. 3 Continue pressing the Sweep softkey or turn the one of these trigger sweep settings: entry knob to select Auto Acquire waveform even when no trigger occurs. Normal Acquire waveform when trigger occurs. To set the trigger coupling Trigger coupling is used to filter low frequency signal components or DC offsets from the trigger path when they interfere with achieving stable triggers. Trigger coupling is similar to channel coupling (see page 45), but it only affects the triggering system and does not change how the signal is displayed. To set the trigger coupling: 1 Press [Menu]. 2 In the Trigger menu, press Set Up. 3 In the Set Up menu, press Coupling. 92 Agilent 1000 Series Oscilloscopes User’s Guide Capturing Data 4 Continue pressing the the Coupling softkey or turn the select one of these trigger coupling settings: 3 entry knob to DC Sets the trigger coupling to DC. AC Sets the trigger coupling to AC — use for waveforms greater than 50 Hz. LF Reject Sets the trigger coupling to low frequency reject (10 kHz cutoff). To set the trigger high-frequency reject coupling Trigger high- frequency reject coupling (100 kHz cutoff) is used to filter high frequency signal components from the trigger path when they interfere with achieving stable triggers. To set the trigger high- frequency reject coupling: 1 Press [Menu]. 2 In the Trigger menu, press Set Up. 3 In the Set Up menu, press HF Reject to toggle between “ON” and “OFF”. Agilent 1000 Series Oscilloscopes User’s Guide 93 3 Capturing Data To change the trigger sensitivity Trigger sensitivity specifies the vertical change that must occur in order for a trigger to be recognized. In the 1000 Series oscilloscopes, you can adjust the trigger sensitivity. For example, to reduce the influence of noise, you can lower the trigger sensitivity (by increasing the vertical change required to trigger). To change the trigger sensitivity: 1 Press [Menu]. 2 In the Trigger menu, press Set Up. 3 In the Set Up menu, press Sensitivity and turn the adjust the sensitivity setting. entry knob to The trigger sensitivity can be adjusted from 0.1 div to 1 div. 94 Agilent 1000 Series Oscilloscopes User’s Guide Capturing Data 3 To specify a trigger holdoff Trigger holdoff can be used to stabilize a waveform. The holdoff time is the oscilloscope's waiting period before starting a new trigger. The oscilloscope will not trigger until the holdoff time has expired. Figure 38 Trigger Holdoff To specify a trigger holdoff: 1 Press [Menu]. 2 In the Trigger menu, press Set Up. 3 In the Set Up menu, press Holdoff and turn the the holdoff setting. entry knob to adjust To reset the trigger holdoff 1 In the Set Up menu, select the Holdoff Reset menu item to return the trigger holdoff setting to the 100 ns minimum value. Agilent 1000 Series Oscilloscopes User’s Guide 95 3 Capturing Data Using the External Trigger Input You can trigger on external inputs by selecting “EXT” or “EXT/5” (5:1 attenuated) as the trigger source in all trigger modes except Alternate. 96 Agilent 1000 Series Oscilloscopes User’s Guide Agilent 1000 Series Oscilloscopes User’s Guide 4 Making Measurements Displaying Automatic Measurements 98 Voltage Measurements 100 Time Measurements 103 Counter (Frequency) 108 Making Cursor Measurements 109 This chapter shows how to make automatic voltage measurements, automatic time measurements, and cursor measurements. 97 4 Making Measurements Displaying Automatic Measurements You can use the [Measure] key to display automatic measurements. The oscilloscope has 22 automatic measurements and a hardware frequency counter (see “Voltage Measurements” on page 100 and “Time Measurements” on page 103). Push Push for Zoom to Zero Run Stop Menu Zoom Cursors Measure Acquire Display Help Single Push for 50% AutoScale Figure 39 Default Setup Save Recall Print Utility [Measure] Key To display an automatic measurement 1 Press [Measure]. 2 In the Measure menu, press Source to select the input channel on which to make the automatic measurement. 3 Press Voltage (for voltage measurements) or Time (for time measurements) and turn the entry knob to select the desired measurement. 4 Then, either push the entry knob or press Voltage or Time again to add the measurement to the bottom of the display. If the measurement result is displayed as "*****", the measurement cannot be performed with the current oscilloscope settings. 98 Agilent 1000 Series Oscilloscopes User’s Guide Making Measurements 4 A maximum of three measurements can be displayed at the bottom of the display. When three measurements are displayed and you add a new one, the measurements shift to the left, pushing the first measurement result off screen. See Also “To display cursors for automatic measurements” on page 112. To clear automatic measurements from the display 1 Press [Measure]. 2 In the Measure menu, press Clear to clear all automatic measurements from the display. To display or hide all automatic measurements 1 Press [Measure]. 2 In the Measure menu, press Display All to toggle the display of all automatic measurements “ON” or “OFF”. To select channels for delay/phase measurements 1 Press [Measure]. 2 In the Measure menu, press Delay/Phase. 3 In the Delay/Phase menu, press DelayA, DelayB, PhaseA, or PhaseB to select the input channel for the respective measurement. Agilent 1000 Series Oscilloscopes User’s Guide 99 4 Making Measurements Voltage Measurements There are 10 automatic voltage measurements: • Vmax (Maximum Voltage). • Vmin (Minimum Voltage). • Vpp (Peak- to- Peak Voltage). • Vtop (Top Voltage). • Vbase (Base Voltage). • Vamp (Amplitude Voltage = Vtop - Vbase). • Vavg (Average Voltage). • Vrms (Root- Mean- Square Voltage). • Overshoot. • Preshoot. Overshoot Vmax Vtop Vamp Vpp Vbase Vmin Figure 40 Preshoot Voltage Measurement Points Vmax (Maximum Voltage) The maximum amplitude. The most positive peak voltage measured over the entire waveform. See Figure 40 on page 100. 100 Agilent 1000 Series Oscilloscopes User’s Guide Making Measurements 4 Vmin (Minimum Voltage) The minimum amplitude. The most negative peak voltage measured over the entire waveform. See Figure 40 on page 100. Vpp (Peak-to-Peak Voltage) Peak- to- peak voltage. See Figure 40 on page 100. Vtop (Top Voltage) Voltage of the waveform's flat top, useful for square and pulse waveforms. See Figure 40 on page 100. Vbase (Base Voltage) Voltage of the waveform's flat base, useful for square and pulse waveforms. See Figure 40 on page 100. Vamp (Amplitude Voltage = Vtop - Vbase) Voltage between Vtop and Vbase of a waveform. See Figure 40 on page 100. Vavg (Average Voltage) The arithmetic mean over the entire waveform. Agilent 1000 Series Oscilloscopes User’s Guide 101 4 Making Measurements Vrms (Root-Mean-Square Voltage) The true root- mean- square voltage over the entire waveform. n xi2 RMS = i=1 --------------n Where: xi = value at ith point. n = number of points. Overshoot Defined as (Vmax- Vtop)/Vamp, useful for square and pulse waveforms. See Figure 40 on page 100. Preshoot Defined as (Vmin- Vbase)/Vamp, useful for square and pulse waveforms. See Figure 40 on page 100. 102 Agilent 1000 Series Oscilloscopes User’s Guide Making Measurements 4 Time Measurements There are 12 automatic time measurements plus the hardware frequency counter: • Period. • Frequency. • Rise Time. • Fall Time. • + Pulse Width. • - Pulse Width. • + Duty Cycle. • - Duty Cycle. • Delay A- B, rising edges. • Delay A- B, falling edges. • Phase A- B, rising edges. • Phase A- B, falling edges. Period Measures the period of a waveform. Time origin line Top 50% Base Period Figure 41 Period and Frequency Measurements Agilent 1000 Series Oscilloscopes User’s Guide 103 4 Making Measurements Frequency Measures the frequency of a waveform. See Figure 41 on page 103. Rise Time Measures the rise time of a waveform. Time origin line Vtop 90% (upper) 50% (middle) 10% (lower) Vbase Rising edge Figure 42 Falling edge Rise Time and Fall Time Measurements Fall Time Measures the fall time of a waveform. See Figure 42 on page 104. 104 Agilent 1000 Series Oscilloscopes User’s Guide Making Measurements 4 Positive Pulse Width Measures the positive pulse width of a waveform. Time origin line Time origin line 90% Amplitude Base 0 Volts Base 0 Volts +Width -Width Figure 43 50% Amplitude 50% 10% Top Top Positive Pulse Width and Negative Pulse Width Measurements Negative Pulse Width Measures the negative pulse width of a waveform. See Figure 43 on page 105. Positive Duty Cycle Measures the positive duty cycle of a waveform. Negative Duty Cycle Measures the negative duty cycle of a waveform. Agilent 1000 Series Oscilloscopes User’s Guide 105 4 Making Measurements Delay Between Rising Edges Measures the delay between two waveforms using the rising edges. Time origin line Channel 1 50% 50% Channel 2 Delay from channel 1 to channel 2 falling edge Figure 44 Delay Measurements Delay Between Falling Edges Measures the delay between two waveforms using the falling edges. See Figure 44 on page 106. 106 Agilent 1000 Series Oscilloscopes User’s Guide Making Measurements 4 Phase Between Rising Edges Measures the phase between two waveforms using the rising edges. Phase is the calculated phase shift from source 1 to source 2, expressed in degrees. Negative phase shift values indicate that the rising edge of source 1 occurred after the rising edge of source 2. Delay Phase = -------------------------------------- 360 Source 1 Period Time origin line Period Channel 1 50% Delay 50% Channel 2 Phase from channel 1 to channel 2 rising edge Figure 45 Phase Measurements Phase Between Falling Edges Measures the phase between two waveforms using the falling edges. See Figure 45 on page 107. Agilent 1000 Series Oscilloscopes User’s Guide 107 4 Making Measurements Counter (Frequency) The 1000 Series oscilloscopes have an integrated 6- digit hardware frequency counter. The counter operates on the currently selected trigger source and can measure frequencies from 5 Hz to the bandwidth of the oscilloscope. The counter uses the trigger comparator to count the number of cycles within a period of time (known as the gate time), so the trigger level must be set correctly. The frequency counter is not available in the Alternate trigger mode. To turn the hardware frequency counter on or off: 1 Press [Measure]. 2 In the Measure menu, press Counter to toggle the frequency counter display “ON” or “OFF”. 108 Agilent 1000 Series Oscilloscopes User’s Guide Making Measurements 4 Making Cursor Measurements You can use the [Cursors] front panel key to select between these cursor measurement modes: Manual Gives you manually adjustable, parallel cursors for measuring time or amplitude between cursors. Track Gives you one or two manually adjustable, cross- hair cursors that track the points of a waveform, measuring time and amplitude. Auto Gives you automatically adjusted cursors for the most recently displayed voltage or time measurement. OFF Cursors are tuned off. Push Push for Zoom to Zero Run Stop Menu Zoom Cursors Measure Acquire Display Help Single Push for 50% AutoScale Figure 46 Default Setup Save Recall Print Utility [Cursors] Key Agilent 1000 Series Oscilloscopes User’s Guide 109 4 Making Measurements To use manually adjustable cursors You can set up two parallel, manually adjustable cursors to make amplitude (vertical) or time (horizontal) measurements on a selected waveform. 1 Press [Cursors]. 2 In the Cursors menu, press Mode. 3 Continue pressing the Mode softkey or turn the “Manual”. entry knob to select 4 Press Type to toggle between: Time To use cursors to measure time parameters. Amplitude To use cursors to measure amplitude parameters. 5 Press Source, and continue pressing the softkey or turn the entry knob to select the channel or math waveform on which to make the measurement. 6 To adjust the cursors: • Press CurA and turn the entry knob to adjust the “A” cursor. • Press CurB and turn the entry knob to adjust the “B” cursor. • Press CurA and CurB and turn the cursors at the same time. entry knob to adjust both The cursor values displayed are: • CurA. • CurB. • X or Y — difference between CurA and CurB values. • 1/X — when measuring time parameters, shows the frequency associated with the time period. 110 Agilent 1000 Series Oscilloscopes User’s Guide Making Measurements 4 To use tracking cross-hair cursors You can set up one or two manually adjustable, tracking cross- hair cursors to make amplitude (vertical) and time (horizontal) measurements at different points of a selected channel’s waveform. 1 Press [Cursors]. 2 In the Cursors menu, press Mode. 3 Continue pressing the Mode softkey or turn the “Track”. entry knob to select 4 Press Cursor A, and continue pressing the softkey or turn the entry knob to select the channel on which to make the measurement (or “None” to turn off the cursor). 5 Press Cursor B, and continue pressing the softkey or turn the entry knob to select the channel on which to make the measurement (or “None” to turn off the cursor). 6 To adjust the cursors: • Press CurA and turn the entry knob to adjust the “A” cursor. • Press CurB and turn the entry knob to adjust the “B” cursor. The A cursor values displayed are: • A- >X • A- >Y. The B cursor values displayed are: • B- >X. • B- >Y If both A and B cursors are used, these values are also displayed: • X — difference between CurA and CurB time values. • 1/X — shows the frequency associated with the time value difference. • Y — difference between CurA and CurB amplitude values. Agilent 1000 Series Oscilloscopes User’s Guide 111 4 Making Measurements To display cursors for automatic measurements 1 Press [Cursors]. 2 In the Cursors menu, press Mode. 3 Continue pressing the Mode softkey or turn the “Auto”. entry knob to select In the “Auto” cursors mode: • Cursors appear for the most recently displayed automatic measurement (see “To display an automatic measurement” on page 98). • No cursors are displayed if there are no automatic measurements. 112 Agilent 1000 Series Oscilloscopes User’s Guide Agilent 1000 Series Oscilloscopes User’s Guide 5 Saving, Recalling, and Printing Data Saving and Recalling Data 114 Using the Disk Manager 118 Printing Screens 123 This chapter describes how to save, recall, and print data. The oscilloscope has internal, nonvolatile memory locations for saving and recalling waveforms and setups. The oscilloscope also has rectangular USB host ports on its front and back panel to which you can connect a USB drive (for saving and recalling data). Figure 47 USB Host Port on Front Panel 113 5 Saving, Recalling, and Printing Data Saving and Recalling Data Using the oscilloscope’s [Save/Recall] key, you can save and recall oscilloscope waveforms and setups, and you can save oscilloscope display screens and data. Push Push for Zoom to Zero Run Stop Menu Zoom Cursors Measure Acquire Display Help Single Push for 50% AutoScale Figure 48 Default Setup Save Recall Print Utility [Save/Recall] Key When turning off the oscilloscope after saving or recalling data from an external USB drive, allow at least five seconds for the data transfer to complete. To save and recall waveforms You can save/recall oscilloscope waveforms and setups to/from 10 internal, nonvolatile memory locations in the oscilloscope. You can also save/recall waveforms and setups to an external USB drive when it is connected to a rectangular USB host port. 1 Press [Save/Recall]. 2 In the Storage menu, press Storage. 114 Agilent 1000 Series Oscilloscopes User’s Guide Saving, Recalling, and Printing Data 3 Continue pressing the Storage softkey or turn the select “Waveform”. 5 entry knob to To save to or recall from internal storage: a Press Internal. b In the Internal menu, press Location. c Continue pressing the Location softkey or turn the select the desired internal storage location. entry knob to The “(N)” suffix shows that nothing has been saved to the location. The “(S)” suffix shows waveforms have been previously saved to the location. d Press Save or Recall. To save to or recall from external storage (when a USB drive is connected to the front panel USB host port): a Press External. b Use the disk manager dialog to navigate to the folder where you want to save the file or to select the file you want to load (see “To navigate the directory hierarchy” on page 119). c In the External menu: To save the waveform, press New File, enter the filename (see “To edit folder/file names” on page 120), and press Save. To load the selected waveform (.wfm file), press Recall. To save and recall oscilloscope setups You can save/recall oscilloscope setups to/from 10 internal, nonvolatile memory locations in the oscilloscope. You can also save/recall setups to an external USB drive when it is connected to the front panel USB host port. 1 Press [Save/Recall]. 2 In the Storage menu, press Storage. 3 Continue pressing the Storage softkey or turn the select “Setups”. Agilent 1000 Series Oscilloscopes User’s Guide entry knob to 115 5 Saving, Recalling, and Printing Data To save to or recall from internal storage: a Press Internal. b In the Internal menu, press Location. c Continue pressing the Location softkey or turn the select the desired internal storage location. entry knob to The “(N)” suffix shows that nothing has been saved to the location. The “(S)” suffix shows waveforms have been previously saved to the location. d Press Save or Recall. To save to or recall from external storage (when a USB drive is connected to the front panel USB host port): a Press External. b Use the disk manager dialog to navigate to the folder where you want to save the file or to select the file you want to load (see “To navigate the directory hierarchy” on page 119). c In the External menu: To save the setup, press New File, enter the filename (see “To edit folder/file names” on page 120), and press Save. To recall the selected setup (.stp file), press Recall. To save screens to BMP or PNG format files You can save oscilloscope display screens (in BMP or PNG format) to an external USB drive when it is connected to a rectangular USB host port. 1 Press [Save/Recall]. 2 In the Storage menu, press Storage. 3 Continue pressing the Storage softkey or turn the select one of: 116 8-Bitmap 8- bit BMP format. 24-Bitmap 24- bit BMP format. PNG Portable Network Graphics format. entry knob to Agilent 1000 Series Oscilloscopes User’s Guide Saving, Recalling, and Printing Data 5 4 To specify whether oscilloscope parameters be saved along with the screen, press Para Save to toggle between on and off. 5 Press External. 6 Use the disk manager dialog to navigate to the folder where you want to save the file (see “To navigate the directory hierarchy” on page 119). 7 In the External menu, press New File, enter the filename (see “To edit folder/file names” on page 120), and press Save. To save data to CSV format files You can save captured data (in CSV, comma- separated value format) to an external USB drive when it is connected to the front panel USB host port. 1 Press [Save/Recall]. 2 In the Storage menu, press [Storage]. 3 Continue pressing the Storage softkey or turn the select “CSV”. entry knob to 4 To specify the amount of data to be saved, press Data Depth to toggle between “Displayed” and “Maximum”. 5 To specify whether oscilloscope parameters be saved along with the data, press Para Save to toggle between “ON” and “OFF”. 6 Press External. 7 Use the disk manager dialog to navigate to the folder where you want to save the file (see “To navigate the directory hierarchy” on page 119). 8 In the External menu, press New File, enter the filename (see “To edit folder/file names” on page 120), and press Save. Agilent 1000 Series Oscilloscopes User’s Guide 117 5 Saving, Recalling, and Printing Data Using the Disk Manager When a USB drive is connected to the front panel USB host port, you can use the Disk Manager to select and name files and folders. To access the Disk Mana. menu: 1 Press [Save/Recall]. 2 In the Storage menu, press Disk Mana.. The Disk Manager screen appears. It looks similar to: Figure 49 118 Disk Manager Agilent 1000 Series Oscilloscopes User’s Guide Saving, Recalling, and Printing Data 5 To switch between files, path, and directory panes 1 In the Disk Mana. menu ([Save/Recall]>Disk Mana.), press Explorer to switch between: Files Places the cursor in the files pane. Path Places the cursor in the path pane. Directories Places the cursor in the directories pane. In each of these panes, the entry knob is used to select items. To navigate the directory hierarchy In the directory pane (see “To switch between files, path, and directory panes” on page 119): • Turn the entry knob to select folders. • Push the entry knob to navigate into the selected folder. To create new folders 1 In the Disk Mana. menu ([Save/Recall] >Disk Mana.), press New Folder. 2 Use the folder/file naming dialog to enter the folder name. See “To edit folder/file names” on page 120. 3 In the New Folder menu, press Save. Agilent 1000 Series Oscilloscopes User’s Guide 119 5 Saving, Recalling, and Printing Data To edit folder/file names Figure 50 Editing Folder/File Names in Disk Manager In the folder/file name edit dialog: • Select the dialog. • Turn the menu item to move the cursor between fields in the entry knob to select: • A character in the filename (when the cursor is in the name field). • A key (when the cursor is in the keypad field). • When the cursor is in the keypad field, push the entry knob to: • Choose an alphanumeric character for the name (and move to the next name character). • On “Aa”, change from upper to lower case characters on the keypad. • On “En”, change from single- byte to multi- byte character entry fields. • Select the 120 menu item to delete a character from the name. Agilent 1000 Series Oscilloscopes User’s Guide Saving, Recalling, and Printing Data 5 To delete folders In the directory pane (see “To switch between files, path, and directory panes” on page 119): 1 Turn the entry knob to select folders. 2 Press Del Folder to delete the selected folder. 3 Press Ok to confirm the deletion. To rename folders In the directory pane (see “To switch between files, path, and directory panes” on page 119): 1 Turn the entry knob to select the folder. 2 Press Rename. 3 Use the folder/file naming dialog to edit the folder name. See “To edit folder/file names” on page 120. 4 In the Rename menu, press Ok. To delete files In the files pane (see “To switch between files, path, and directory panes” on page 119): 1 Turn the entry knob to select the file. 2 Press Delete File to delete the selected file. 3 Press Ok to confirm the deletion. Agilent 1000 Series Oscilloscopes User’s Guide 121 5 Saving, Recalling, and Printing Data To recall files In the files pane (see “To switch between files, path, and directory panes” on page 119): 1 Turn the entry knob to select the file. 2 Press Recall to load the selected file. To rename files In the files pane (see “To switch between files, path, and directory panes” on page 119): 1 Turn the entry knob to select the file. 2 Press Rename. 3 Use the folder/file naming dialog to edit the file name. See “To edit folder/file names” on page 120. 4 In the Rename menu, press Ok. To display disk information 1 In the Disk Mana. menu ([Save/Recall] >Disk Mana.), press Disk info. 122 Agilent 1000 Series Oscilloscopes User’s Guide Saving, Recalling, and Printing Data 5 Printing Screens You can print oscilloscope display screens to: • A PictBridge compliant printer connected to the (square) USB device port on the oscilloscope’s back panel. USB Device Port Figure 51 USB Host Port USB Ports on Back Panel Agilent 1000 Series Oscilloscopes User’s Guide 123 5 Saving, Recalling, and Printing Data Push Push for Zoom to Zero Run Stop Menu Zoom Cursors Measure Acquire Display Help Single Push for 50% AutoScale Figure 52 Default Setup Save Recall Print Utility [Print] Key Location To choose a PictBridge printer You can print to a PictBridge compliant printer connected to the (square) USB device port on the oscilloscope’s back panel. 1 Press [Print]. 2 Press Paper Size and turn the size. 3 Press File Type and turn the type. 4 Press Copies and turn the of copies. 5 Press Print Quality and turn the quality. entry knob to select the desired paper entry knob to select the desired file entry knob to select the desired number entry knob to select the desired print 6 Press Date Print to turn date printing on the image “ON” or “OFF”. 124 Agilent 1000 Series Oscilloscopes User’s Guide Saving, Recalling, and Printing Data NOTE 5 The back panel’s (square) USB device port is also used for remote programming control of the oscilloscope, so the PictBridge compliant printing and remote programming features cannot be used at the same time. For more information on remote programming, see the Agilent 1000 Series Oscilloscopes Programmer’s Guide. If there are problems when connecting the USB device port to a PictBridge compliant printer or remote computer, see “To select the USB device port function” on page 137. To print with inverted screen colors 1 Press [Print]. 2 In the Print menu, press Inverted to choose between: ON This option changes the black background of display image to white. This can be used to reduce the amount of black ink that takes to print the oscilloscope display images. OFF This option prints the display image as shown on the screen. To choose color or grayscale printing 1 Press [Print]. 2 Press Palette to choose between: Grayscale When this option is selected, the traces are printed in shades of gray rather than in color. Color When this option is selected, the traces are printed in color. Agilent 1000 Series Oscilloscopes User’s Guide 125 5 Saving, Recalling, and Printing Data To copy a screen to the printer 1 Press [Print]. 2 In the Print menu, press the Print softkey. 126 Agilent 1000 Series Oscilloscopes User’s Guide Agilent 1000 Series Oscilloscopes User’s Guide 6 Oscilloscope Utility Settings Displaying System Information 128 Turning Sound ON or OFF 128 Setting and Displaying the Date and Time 129 Setting the Language (Menu and Help) 130 Performing Mask Tests 131 Setting Preferences 136 Running Self-Calibration 138 This chapter describes oscilloscope settings found in the Utilities menu. Push Push for Zoom to Zero Run Stop Menu Zoom Cursors Measure Acquire Display Single Help Push for 50% AutoScale Figure 53 Default Setup Save Recall Print Utility [Utility] Key 127 6 Oscilloscope Utility Settings Displaying System Information To display the oscilloscope’s system information: 1 Press [Utility]. 2 In the Utilities menu, press System Info. The system information contains: • Model number. • Serial number. • Software version. • Installed module information. To exit, press Run/Stop. Turning Sound ON or OFF To turn the oscilloscope’s beeper sound on or off: 1 Press [Utility]. 2 In the Utilities menu, press Sound to toggle between on and off. Appears on the menu when sound is off; press Sound to run the test. Appears on the menu when sound is on; press Sound to stop the test 128 Agilent 1000 Series Oscilloscopes User’s Guide Oscilloscope Utility Settings 6 Setting and Displaying the Date and Time To set and display the oscilloscope’s date and time: 1 Press [Utility]. 2 In the Utilities menu, press Date/Time. 3 In the Date/time menu, press: Display To turn the date/time display “ON” or “OFF”. Dates and times on the display can be useful when recording mask test output waveforms over long periods of time (see “Recording/Playing- back Waveforms” on page 78). To move the cursor between the date and time settings. To move the cursor between fields within the date or time. Ok To apply the date/time setting. Agilent 1000 Series Oscilloscopes User’s Guide 129 6 Oscilloscope Utility Settings Setting the Language (Menu and Help) To set the language used in menus and quick help: 1 Press [Utility]. 2 In the Utilities menu, press Language. 3 Continue pressing the Language softkey or turn the select the desired language. entry knob to You can select from the following languages: • Simplified Chinese. • Traditional Chinese. • Korean. • Japanese. • English. • German. • French. • Portuguese. • Spanish. • Italian. • Russian. If quick help is unavailable in a particular language, English is displayed. 130 Agilent 1000 Series Oscilloscopes User’s Guide Oscilloscope Utility Settings 6 Performing Mask Tests The mask test function monitors waveform changes by comparing the waveform to a predefined mask. NOTE The Mask Test function is not available in the X-Y horizontal timebase mode. To access the Mask Test menu: 1 Press [Utility]. 2 In the Utilities menu, press Mask Test. To enable/disable mask tests 1 In the Mask Test menu ([Utility]>Mask Test), press Enable Test to toggle between OFF and ON. To select the source channel for mask tests 1 In the Mask Test menu ([Utility]>Mask Test), press Source. 2 Continue pressing the Source softkey or turn the select the desired input channel. Agilent 1000 Series Oscilloscopes User’s Guide entry knob to 131 6 Oscilloscope Utility Settings To run/stop a mask test 1 In the Mask Test menu ([Utility]>Mask Test), press Operate to run or stop the test. Appears on the menu when the test is stopped; press Operate to run the test. Appears on the menu when the test is running; press Operate to stop the test To turn on/off the mask test message display 1 In the Mask Test menu ([Utility]>Mask Test), press Msg Display to toggle between OFF and ON. The message display shows the failed, passed, and total number of waveforms. Figure 54 132 Mask Test Display Agilent 1000 Series Oscilloscopes User’s Guide Oscilloscope Utility Settings 6 To set the mask test output condition 1 In the Mask Test menu ([Utility]>Mask Test), press Output. 2 Continue pressing the Output softkey to select the desired output condition: Fail Fail + Pass Pass + A mask failure sets the output. A mask failure sets the output and causes a beep. A passing waveform sets the output. A passing waveform sets the output and causes a beep. The output condition can be used to stop a running mask test or as a source for the waveform recording function (see “Recording/Playing- back Waveforms” on page 78). To stop a mask test on the output condition To turn on/off stopping the mask test when the output condition occurs: 1 In the Mask Test menu ([Utility]>Mask Test), press Stop On Output to toggle between OFF and ON. To set up masks You can create masks by adding horizontal and vertical margins to a signal. You can save and load masks from internal memory or an external USB drive. And you can export and import masks from an exteral USB drive. To access the Mask menu: 1 Press [Utility]. 2 In the Utilities menu, press Mask Test. 3 In the Mask Test menu, press MaskSetting. Agilent 1000 Series Oscilloscopes User’s Guide 133 6 Oscilloscope Utility Settings Figure 55 Mask Test Mask Setting To adjust a mask’s horizontal failure margin 1 In the Mask menu ([Utility] >Mask Test>MaskSetting), press X Mask. 2 Turn the entry knob to adjust the horizontal failure margin. The margin can be set from 0.04 div to 4.00 div. To adjust a mask’s vertical failure margin 1 In the Mask menu ([Utility]>Mask Test>MaskSetting), press Y Mask. 2 Turn the entry knob to adjust the vertical failure margin. The margin can be set from 0.04 div to 4.00 div. To create a mask using the failure margin settings 1 In the Mask menu ([Utility]>Mask Test>MaskSetting), press Create Mask. 134 Agilent 1000 Series Oscilloscopes User’s Guide Oscilloscope Utility Settings 6 To select internal/external mask storage location 1 In the Mask menu ([Utility]>Mask Test>MaskSetting), press Location to toggle between: Internal Masks are saved and loaded from oscilloscope internal memory. External Masks are saved, loaded, exported, and imported from an external USB drive. To save a mask 1 In the Mask menu ([Utility]>Mask Test>MaskSetting), press Save. 2 If the External mask storage location has been selected, use the Disk Manager to name and save the mask file. See “Using the Disk Manager” on page 118. To recall a mask 1 In the Mask menu ([Utility]>Mask Test>MaskSetting), press Recall. 2 If the External mask storage location has been selected, use the Disk Manager to select and load the mask file. See “Using the Disk Manager” on page 118. To export/import masks 1 Because you can only export and import masks from an external drive, select the External mask location. See “To select internal/external mask storage location” on page 135. 2 In the Mask menu ([Utility]>Mask Test>MaskSetting), press Imp./Exp.. 3 Use the Disk Manager to select the file and import or export the mask. See “Using the Disk Manager” on page 118. NOTE When importing a mask while the Location is Internal or when importing or recalling a mask while the Location is External, the mask is imported or recalled to internal memory. To activate the mask, you must set the Location to Internal, then Recall from internal memory. Agilent 1000 Series Oscilloscopes User’s Guide 135 6 Oscilloscope Utility Settings Setting Preferences The oscilloscope’s Preference menu lets you set screen saver, expand reference, and screen persistence options. To access the Preference menu: 1 Press [Utility]. 2 In the Utilities menu, press Preference. To set up the screen saver To set up the screen saver: 1 In the Preference menu ([Utility]>Preference), press Screen saver. 2 Continue pressing the Screen saver softkey or turn the select the desired time or to turn the screen saver off. entry knob to Using the screen saver can extend the life of the LCD backlight. To select the vertical scale reference level When changing the vertical scale of a signal on the display, the expansion (or contraction) takes place about the selected reference level. To set the expand reference level: 1 In the Preference menu ([Utility]>Preference), press Expand Refer. to toggle between: See Also 136 Ground Vertical scale changes take place about the signal ground (ground position remains at same display location). Center Vertical scale changes take place about the center of the display. “To adjust the vertical scale” on page 44. Agilent 1000 Series Oscilloscopes User’s Guide Oscilloscope Utility Settings 6 To select the USB device port function The (square) USB device port on the oscilloscope’s back panel can be used for: • Connecting to a PictBridge compliant printer. • Remote programming control of the oscilloscope. Normally, the USB device port auto- detects the type of host that is connected. However, if there are auto- detect problems, you can manually choose the type of host that is (or will be) connected. To select the USB device port function: 1 In the Preference menu ([Utility]>Preference), press USB Device to toggle between: Auto Detect Lets the USB device port auto- detect the type of host that is connected. Computer Specifies the that the USB device port will be connected to a computer host. PictBridge Specifies the that the USB device port will be connected to a PictBridge compliant printer host. Agilent 1000 Series Oscilloscopes User’s Guide 137 6 Oscilloscope Utility Settings Running Self-Calibration The automatic calibration routine adjusts the internal circuitry of the oscilloscope for the best measurement accuracy. The automatic calibration should be run when the ambient temperature changes by 5 C or more. NOTE Before performing the automatic calibration, let the oscilloscope warm-up at least 30 minutes. To run the oscilloscope’s self- calibration: 1 Press [Utility]. 2 In the Utilities menu, press Self-Cal. 3 Follow the instructions on the Calibration screen. Figure 56 138 Calibration Screen Agilent 1000 Series Oscilloscopes User’s Guide Agilent 1000 Series Oscilloscopes User’s Guide 7 Specifications and Characteristics Environmental Conditions 140 Measurement Category 141 Specifications 142 Characteristics 143 This chapter describes the 1000 Series oscilloscopes’ specifications and characteristics. 139 7 Specifications and Characteristics Environmental Conditions Overvoltage Category This product is intended to be powered by MAINS that comply to Overvoltage Category II, which is typical of cord- and- plug connected equipment. Pollution Degree The 1000 Series oscilloscope may be operated in environments of Pollution Degree 2 (or Pollution Degree 1). Pollution Degree Definitions Pollution Degree 1: No pollution or only dry, non- conductive pollution occurs. The pollution has no influence. Example: A clean room or climate controlled office environment. Pollution Degree 2. Normally only dry non- conductive pollution occurs. Occasionally a temporary conductivity caused by condensation may occur. Example: General indoor environment. Pollution Degree 3: Conductive pollution occurs, or dry, non- conductive pollution occurs which becomes conductive due to condensation which is expected. Example: Sheltered outdoor environment. 140 Agilent 1000 Series Oscilloscopes User’s Guide Specifications and Characteristics 7 Measurement Category The 1000 Series oscilloscope is intended to be used for measurements in Measurement Category I. Measurement Category Definitions Measurement category I is for measurements performed on circuits not directly connected to MAINS. Examples are measurements on circuits not derived from MAINS, and specially protected (internal) MAINS derived circuits. In the latter case, transient stresses are variable; for that reason, the transient withstand capability of the equipment is made known to the user. Measurement category II is for measurements performed on circuits directly connected to the low voltage installation. Examples are measurements on household appliances, portable tools and similar equipment. Measurement category III is for measurements performed in the building installation. Examples are measurements on distribution boards, circuit- breakers, wiring, including cables, bus- bars, junction boxes, switches, socket- outlets in the fixed installation, and equipment for industrial use and some other equipment, for example, stationary motors with permanent connection to the fixed installation. Measurement category IV is for measurements performed at the source of the low- voltage installation. Examples are electricity meters and measurements on primary overcurrent protection devices and ripple control units. Transient Withstand Capability CAUTION Maximum input voltage for analog inputs: • CAT I 300 Vrms, 400 Vpk; transient overvoltage 1.6 kVpk • with N2862A/N2863A 10:1 probe: CAT I 600 V (DC + peak AC) Agilent 1000 Series Oscilloscopes User’s Guide 141 7 Specifications and Characteristics Specifications NOTE All specifications are warranted. Specifications are valid after a 30-minute warm-up period and ±5 °C from last calibration temperature. Table 5 Specifications Name Value Bandwidth (-3 dB)1: DSO1024A, DSO1022A: 200 MHz DSO1014A, DSO1012A: 100 MHz DSO1004A, DSO1002A: 60 MHz DC vertical gain accuracy: 2 mV/div to 5 mV/div: ±4.0% full scale 10 mV/div to 5 V/div: ±3.0% full scale Timebase accuracy: ±50 ppm from 0 °C to 30 °C ±50 ppm + 2 ppm per °C from 30 °C to 45 °C + 5 ppm * (years since manufacture) Trigger sensitivity Ch 1, 2, 3, 4 (DC coupling): 5 mV/div: 1 div from DC to 10 MHz, 1.5 div from 10 MHz to full bandwidth < 5 mV/div: 1 div from DC to 10 MHz, 1.5 div from 10 MHz to 20 MHz 120 MHz when vertical scale is set to < 5 mV (1X probe attenuation). 142 Agilent 1000 Series Oscilloscopes User’s Guide Specifications and Characteristics 7 Characteristics NOTE All characteristics are the typical performance values and are not warranted. Characteristics are valid after a 30-minute warm-up period and ±5 °C from last calibration temperature. Table 6 Acquisition System Characteristics Name Typical Value Max sample rate: 2 GSa/s half channel2, 1 GSa/s each channel Memory depth: 20 kpts half channel2, 10 kpts each channel Vertical resolution: 8 bits Peak detection: 4 ns Averaging: Selectable from 2, 4, 8, 16, 32, 64, 128, or 256 Sequence: Selectable 1 to 800 acquisition frames can be recorded and played back. Interpolation: Sin(x)/x 2Half channel is when only one channel of channel pair 1-2 is turned on, or one channel of channel pair 3-4 is turned on. Table 7 Vertical System Characteristics Name Typical Value Oscilloscope channels: DSO1xx2A: Ch 1 and 2 simultaneous acquisition DSO1xx4A: Ch 1, 2, 3, and 4 simultaneous acquisition Bandwidth (–3dB)1, 3: DSO102xA: DC to 200 MHz DSO101xA: DC to 100 MHz DSO100xA: DC to 60 MHz 1 20 MHz when vertical scale is set to < 5 mV (1X probe attenuation). 3 Denotes warranted specifications, all others are typical. Specifications are valid after a 30-minute warm-up period and ±10° C from firmware calibration temperature. Agilent 1000 Series Oscilloscopes User’s Guide 143 7 Specifications and Characteristics Table 7 Vertical System Characteristics (continued) Name Typical Value AC coupled1: DSO102xA: 5 Hz to 200 MHz DSO101xA: 5 Hz to 100 MHz DSO100xA: 5 Hz to 60 MHz Calculated rise time (= 0.35/bandwidth in GHz): DSO102xA: 1.8 ns DSO101xA: 3.5 ns DSO100xA: 5.8 ns Range: 2 mV/div to 10 V/div (1 M) Maximum Input: Maximum input voltage for analog inputs: • CAT I 300 Vrms, 400 Vpk; transient overvoltage 1.6 kVpk • with N2862A/N2863A 10:1 probe: CAT I 600 V (DC + peak AC) Offset Range: ±2 V on ranges <500 mV/div; ±40 V on ranges 500 mV/div to 5 V/div; Dynamic range: ±6 div Input impedance: 1 M ± 1% || 18 ±3 pF Coupling: AC, DC, ground BW limit: 20 MHz selectable DC vertical gain accuracy3: 2 mV/div to 5 mV/div: ±4.0% full scale 10 mV/div to 5 V/div: ±3.0% full scale Channel-to-channel isolation: DC to max bandwidth >40 dB Noise peak-to-peak: 3% full scale or 4.5 mV, whichever is greater 120 MHz when vertical scale is set to < 5 mV (1X probe attenuation). 3Denotes warranted specifications, all others are typical. Specifications are valid after a 30-minute warm-up period and ±10° C from firmware calibration temperature. 144 Agilent 1000 Series Oscilloscopes User’s Guide Specifications and Characteristics Table 8 7 Horizontal System Characteristics Name Typical Value Range: DSO102xA: 1 ns/div to 50 s/div DSO101xA: 2 ns/div to 50 s/div DSO100xA: 5 ns/div to 50 s/div Timebase accuracy3: ±50 ppm from 0 °C to 30 °C ±50 ppm + 2 ppm per °C from 30 °C to 45 °C + 5 ppm * (years since manufacture) Vernier: 1-2-5 increments when off, 1% minor increments between major settings when on. Modes: Main, Zoom, Roll, XY XY: Bandwidth: Max bandwidth 3Denotes warranted specifications, all others are typical. Specifications are valid after a 30-minute warm-up period and ±10° C from firmware calibration temperature. Agilent 1000 Series Oscilloscopes User’s Guide 145 7 Specifications and Characteristics Table 9 Trigger System Characteristics Name Typical Value Sources: DSO1xx2A: Ch 1, 2, line, ext, ext/5 DSO1xx4A: Ch 1, 2, 3, 4, line, ext, ext/5 Modes (sweep): Auto, Normal (triggered), single Holdoff time: ~100 ns to 1.5 s Selections: Edge, pulse width, video, pattern, alternate AutoScale: Finds and displays all active channels, sets edge trigger mode on highest-numbered channel, sets vertical sensitivity on channels, time base to display ~2.0 periods. Requires minimum voltage > 20 mVpp, 1% duty cycle and minimum frequency > 50 Hz. Coupling: AC (~10 Hz), DC, HF reject, and LF reject Sensitivity Ch 1, 2, 3, 4 (DC coupling)3: 5 mV/div: 1 div from DC to 10 MHz, 1.5 div from 10 MHz to full bandwidth < 5 mV/div: 1 div from DC to 10 MHz, 1.5 div from 10 MHz to 20 MHz 3Denotes warranted specifications, all others are typical. Specifications are valid after a 30-minute warm-up period and ±10° C from firmware calibration temperature. Table 10 146 Display System Characteristics Name Typical Value Display: 5.7-inch (145 mm) diagonal color TFT LCD Display update rate: Up to 400 waveforms/s Resolution: QVGA 320 x 240 dots Backlight intensity 300 cd/m2 Persistence: Off, infinite Display types: Dots, vectors Real-time clock: Time and date (user adjustable) Agilent 1000 Series Oscilloscopes User’s Guide Specifications and Characteristics Table 11 7 Measurement Features Name Typical Value Automatic measurements: Measurements are continuously updated. Cursors track last selected measurement. Voltage: Peak-to-peak, maximum, minimum, average, amplitude, top, base, overshoot, preshoot, RMS Time: Frequency, period, +width, -width, +duty cycle, -duty cycle, delay rising edge, delay falling edge, phase rising edge, phase falling edge, rise, fall Display all: Mode to display all single-channel automatic measurements simultaneously on the display. Counter: Built-in 6-digit frequency counter on any channel. Counts up to the oscilloscope’s bandwidth. Cursors: Manual, track waveform, or automatic measurement selections. Manual and track waveform selections provide readout of Horizontal (X, X, 1/X) and Vertical (Y, Y). Waveform math: One function displayed selected from A+B, A-B, AxB, and FFT. Source selection for A and B can be any combination of oscilloscope channels 1 or 2 (or 3 or 4 on DSO1xx4A only). Table 12 FFT Measurement Features Name Typical Value Points: Fixed at 1024 points Source of FFT: Oscilloscope channels 1 or 2 (or 3 or 4 on DSO1xx4A only) Window: Rectangular, blackman, hanning, hamming Amplitude: Display in dBVrms and Vrms Agilent 1000 Series Oscilloscopes User’s Guide 147 7 Specifications and Characteristics Table 13 Storage Name Typical Value Save/Recall internal: 10 setups and 10 waveforms can be saved and recalled using internal non-volatile memory locations. 1 reference waveform can be saved and recalled using an internal volatile memory location for visual comparisons. Save/Recall external USB flash drive: USB 2.0 compliant host ports on front and rear panel compatible with full-speed USB flash drives. • Setups: STP saved and recalled. • Waveforms: WFM saved and recalled, CSV saved. • Reference waveforms: REF saved and recalled for visual comparisons. • Images: 8-bit BMP, 24-bit BMP, PNG saved. USB flash drive compatibility Table 14 148 Most FAT formatted <2 GB or FAT32 formatted <32 GB flash drives. I/O Name Typical Value Standard ports: 1 USB device, two USB host ports Max transfer rate: USB 2.0 full-speed up to 12 Mb/sec Printer compatibility: PictBridge compatible printer Agilent 1000 Series Oscilloscopes User’s Guide Specifications and Characteristics Table 15 7 General Characteristics Name Typical Value Physical size: 32.46 cm wide x 15.78 cm high x 12.92 cm deep Weight, net: DSO1xx2A: 2.93 kg (6.46 lbs) DSO1xx4A: 3.03 kg (6.68 lbs) Weight, shipping: DSO1xx2A: approximately 4.75 kg (10.47 lbs) DSO1xx4A: approximately 4.87 kg (10.74 lbs) Probe comp output: Frequency ~1 kHz, Amplitude ~3 V Kensington lock: Connection on rear panel for security Security loop Thread a security cable through the built-in security loop on the rear panel. Table 16 Power Requirements Name Typical Value Line rating: ~Line 60 W max 100-120 V/50/60/400 Hz, ±10% 100-240 V/50/60 Hz, ±10% Agilent 1000 Series Oscilloscopes User’s Guide 149 7 Specifications and Characteristics Table 17 Environmental Characteristics Name Typical Value Ambient temperature: Operating 0 °C to +40 °C Non-operating –20 °C to +60 °C Humidity: Operating 90% RH (non-condensing) at +40 °C for 24 hr Non-operating 60% RH (non-condensing) at +60 °C for 24 hr Altitude: Operating to 4,400 m (15,000 ft) Non-operating to 15,000 m (49,213 ft) Vibration: Agilent class GP and MIL-PRF-28800F; Class 3 random Shock: Agilent class GP and MIL-PRF-28800F; (operating 30 g, 1/2 sine, 11-ms duration, 3 shocks/axis along major axis. Total of 18 shocks) Pollution degree 2: Normally only dry non-conductive pollution occurs. Occasionally a temporary conductivity caused by condensation must be expected. Indoor use: Table 18 WA R N I N G Rated for indoor use only. Other Name Typical Value Measurement categories: CAT I: Mains isolated Use this instrument only for measurements within its specified measurement categories. The N2739A rack mount kit is available for placing a 1000 Series oscilloscope into Electronic Industries Association (EIA) standard 19- inch (487- mm) rack cabinets. Installation instructions are included in the kit. 150 Agilent 1000 Series Oscilloscopes User’s Guide Agilent 1000 Series Oscilloscopes User’s Guide A Safety Notices Warnings 151 Safety Symbols 152 This apparatus has been designed and tested in accordance with IEC Publication 1010, Safety Requirements for Measuring Apparatus, and has been supplied in a safe condition. This is a Safety Class I instrument (provided with terminal for protective earthing). Before applying power, verify that the correct safety precautions are taken (see the following warnings). In addition, note the external markings on the instrument that are described under "Safety Symbols." Warnings • Before turning on the instrument, you must connect the protective earth terminal of the instrument to the protective conductor of the (mains) power cord. The mains plug shall only be inserted in a socket outlet provided with a protective earth contact. You must not negate the protective action by using an extension cord (power cable) without a protective conductor (grounding). Grounding one conductor of a two- conductor outlet is not sufficient protection. • Only fuses with the required rated current, voltage, and specified type (normal blow, time delay, etc.) should be used. Do not use repaired fuses or short- circuited fuse holders. To do so could cause a shock or fire hazard. • If you energize this instrument by an auto transformer (for voltage reduction or mains isolation), the common terminal must be connected to the earth terminal of the power source. 151 A Safety Notices • Whenever it is likely that the ground protection is impaired, you must make the instrument inoperative and secure it against any unintended operation. • Service instructions are for trained service personnel. To avoid dangerous electric shock, do not perform any service unless qualified to do so. Do not attempt internal service or adjustment unless another person, capable of rendering first aid and resuscitation, is present. • Do not install substitute parts or perform any unauthorized modification to the instrument. • Capacitors inside the instrument may retain a charge even if the instrument is disconnected from its source of supply. • Do not operate the instrument in the presence of flammable gasses or fumes. Operation of any electrical instrument in such an environment constitutes a definite safety hazard. • Do not use the instrument in a manner not specified by the manufacturer. Safety Symbols ! Instruction manual symbol: the product is marked with this symbol when it is necessary for you to refer to the instruction manual in order to protect against damage to the product. Hazardous voltage symbol. Earth terminal symbol: Used to indicate a circuit common connected to grounded chassis. 152 Agilent 1000 Series Oscilloscopes User’s Guide Index Numerics 50% trigger level, 83 A AC channel coupling, 45 AC coupling, 54 AC trigger coupling, 87, 93 accuracy, measurement, 74 acquisition mode, 73 actual sample rate, 72 add math function, 53 add waveforms, 54 aliasing, 56, 66, 76 alternate trigger, 85, 91 Alternate trigger mode, 108 ampere units, 52 amplitude/div setting, 44 at a glance, 3 attenuation, probe, 48 Auto cursor measurements, 109 auto-detect, USB device port setting, 137 automatic calibration, 138 automatic measurements, 98 automatic measurements, clear, 99 automatic measurements, cursors for, 112 automatic measurements, display or hide, 98, 99 automatic time measurements, 103 automatic voltage measurements, 100 Auto-Scale key, 22 Average acquisition mode, 54, 74, 75 B backlight, LCD, 136 band pass filter, 49 band reject filter, 49 bandwidth limit, 47 bandwidth required, oscilloscope, 70 bandwidth, oscilloscope, 67 beeper sound, 128 Blackman FFT window, 55 brick-wall frequency response, 67 brightness, grid, 62 built-in help, 3, 32 C calibration, 138 calibration temperature, 142 center of screen reference, 44, 136 channel coupling, 38, 45 channel pairs, 72 channel units, 52 characteristics, 143 clear automatic measurements, 99 clear the display, 60 coarse adjustment, 50 color printing, 125 colors (screen), invert, 62 comma-separated value files, 117 compensate probes, 24 computer host, USB device port setting, 137 coordinates, grid, 61 counter, frequency, 3 counter, hardware frequency, 108 coupling, trigger, 92 cross-hair cursors, 111 CSV format files, save data to, 117 cursor measurements, 3, 42, 109 cursors for automatic measurements, 112 Cursors key, 109 Agilent 1000 Series Oscilloscopes User’s Guide D dBVrms scale, 55 DC channel coupling, 45 DC trigger coupling, 93 DC voltage of a level signal, 84 decimated samples, 72, 75 default scale, reference waveform, 58 Default Setup key, 20 Delay Between Falling Edges measurement, 106 Delay Between Rising Edges measurement, 106 delay/phase measurements, selecting channels, 99 delayed sweep time base, 39 digital filter, 3, 49 disk information, displaying, 122 Disk Manager, 118 display all automatic measurements, 99 display, clear, 60 distortion, 54 dots waveform type, 59 dynamic range, 55 E edge speeds, 70 edge trigger, 85 English language, 130 environmental conditions, 140 Expand Reference preference setting, 44 EXT/5, 96 external trigger input, 96 F factory default, 20 153 Index Fall Time measurement, 104 FFT (Fast Fourier Transform) math function, 53, 54 FFT resolution, 56 FFT windows, 55 field synchronization, 89, 91 file names, editing, 120 files, deleting, 121 files, loading, 122 files, renaming, 122 filter, digital, 49 fine scale adjustment, 44, 50 folder names, editing, 120 folders, creating new, 119 folders, deleting, 121 folders, renaming, 121 folding frequency, 66 force a trigger, 84 French language, 130 frequency counter, hardware, 3, 108 frequency domain, 54 Frequency measurement, 104 frequency scale, 56 frequency, Nyquist, 66 front panel control, 26 functions, math, 53 G gate time, frequency counter, 108 Gaussian frequency response, 68 German language, 130 GND channel coupling, 45 graded waveform intensity, 61 grayscale printing, 125 grid brightness, 62 grid, changing, 61 ground reference, 44 ground reference level for vertical scaling, 136 ground reference symbol, 44 154 H Hanning FFT window, 55 hardware frequency counter, 3, 103, 108 harmonic content, 54 Help key, 32 hide all automatic measurements, 99 high frequency probe compensation, 25 high pass filter, 49 high-frequency reject coupling, trigger, 93 holdoff, trigger, 95 horizontal controls, 36 horizontal failure margin (mask), 134 horizontal position knob, 36, 38, 39, 42 horizontal scale, 37, 77 horizontal scale controls indicators, 37 horizontal scale knob, 36, 38 horizontal time base, 40 horizontal time/div, 75 LF reject trigger coupling, 93 line synchronization, 89 loading data, 114 Local function of [FORCE] key, 84 log scale, 55 low frequency probe compensation, 24 low pass filter, 49 M Japanese language, 130 Manual cursor measurements, 109 manually adjustable cursors, 110 mask test, 42, 131 mask, creating, 134 mask, loading, 135 mask, saving, 135 masks, exporting/importing, 135 masks, setting up, 133 math function waveforms, 3, 42, 53 math scale setting, 53 maximum sample rate, 72 measurement accuracy, 74 measurement category, 141 measurements, cursor, 109 memory, 3 memory depth and sample rate, 72 menu display time, 62 Menu On/Off button, 20, 22, 29 Menu/Zoom key, 36, 39 menus, 28, 130 model number, 128 module information, 128 multiply math function, 53 multiply waveforms, 54 K N Korean language, 130 N2862A passive probe, 18 N2863A passive probe, 18 Negative Duty Cycle measurement, 105 Negative Pulse Width measurement, 105 noise in DC power supplies, characterizing, 54 non-synchronized signals, 91 I infinite persistence, 60 input voltage, 21 installed module information, 128 intensity, waveform, 60 internal memory locations, 113 internal storage, 3 invert a waveform, 50 invert screen colors, 62 Italian language, 130 J L language, setting the, 130 LCD backlight, 136 LCD display, 3 Agilent 1000 Series Oscilloscopes User’s Guide Index nonvolatile memory locations, 113 Normal acquisition mode, 73 normal adjustment, 44 NTSC standard, 87, 88 Nyquist frequency, 56 Nyquist sampling theory, 66 O oscilloscope bandwidth, 67 oscilloscope bandwidth required, 70 oscilloscope display, 30 oscilloscope rise time, 69 oscilloscope sample rate, 69 oscilloscope setups, saving and loading, 115 overshoot measurement, 102 overvoltage category, 140 P package contents, 18 PAL standard, 87, 88 parallel cursors, 110 passive probes, 18 pattern trigger, 85, 90 Peak Detect acquisition mode, 75 Period measurement, 103 persistence, screen, 63 persistence, waveform, 60 Phase Between Falling Edges measurement, 107 Phase Between Rising Edges measurement, 107 phase/delay measurements, selecting channels, 99 PictBridge compliant printer, 123, 124 PictBridge printer host, USB device port setting, 137 play-back waveforms, 78, 79 pollution degree, 140 Portuguese language, 130 Positive Duty Cycle measurement, 105 Positive Pulse Width measurement, 105 potentiometer adjustment, 38 power cord, 19 power source, 19 power supply testing, 38 power switch, 19 preferences, setting, 136 preshoot measurement, 102 printing data, 123 probe attenuation, 48 Probe Comp signal, 21 programming, remote, 125 pulse width trigger, 85, 86 Q quick help, 130 R random noise, 74 real-time sampling mode, 71 recalling data, 114 record waveforms, 78 recorded waveforms, storing, 81 recording waveforms, 78 Rectangle FFT window, 55 reference, 44 reference level for vertical scaling, 136 reference waveform, saving, 57 reference waveforms, 42, 57 reference waveforms, export or import, 57 refresh rate, 3, 75 remote program, 84 remote programming, 125 required oscilloscope bandwidth, 70 Rise Time measurement, 104 rise time, oscilloscope, 69 rise time, signal, 70 Rmt on oscilloscope display, 84 Roll time base, 41 Run Control keys, 31 Run/Stop key, 31 Russian language, 130 Agilent 1000 Series Oscilloscopes User’s Guide S safety notices, 151 symbols, 152 sample rate, 3, 42 sample rate and memory depth, 72 sample rate, oscilloscope, 67, 69 sampling rate, 41 sampling theory, 66 sampling, overview, 66 save data to CSV format files, 117 save screens to BMP or PNG files, 116 Save/Recall key, 114 saving data, 114 screen colors, invert, 62 screen persistence, 63 screen refresh rate, 75 screen saver, 136 screens, saving to BMP or PNG files, 116 SECAM standard, 87, 88 self-calibration, 138 sensitivity, trigger, 94 sensitivity, Volts/Div control, 50 serial number, 128 setups, saving and loading, 115 shipping container, 18 Simplified Chinese language, 130 sine(x)/x interpolation, 38, 77 Single key, 31 Slow Scan mode, 38 softkeys, 28 software version, 128 sound, turning on/off, 128 Spanish language, 130 specifications, 142 square waves, 68 status bar, 37 store recorded waveforms, 81 subtract math function, 53 subtract waveforms, 54 sweep speed, 37 symbols, safety, 152 155 Index system information, displaying, 128 T temperature at last calibration, 142 theory, sampling, 66 time measurements, 3, 42, 103, 109 Track cursor measurements, 109 tracking cross-hair cursors, 111 Traditional Chinese language, 130 transducer monitoring, 38 transient withstand capability, 141 trigger controls, 42 trigger coupling, 92 trigger high-frequency reject coupling, 93 trigger holdoff, 95 trigger holdoff, reset, 95 trigger level, 83, 108 trigger mode, 85 trigger position, 37 trigger sensitivity, 94 trigger sweep, 91, 92 trigger system controls, 83 triggering, 3 U under-sampled signals, 66 units, channel, 52 unknown units, 52 untriggered sample acquisition mode, 41 USB device port, 123 USB Device port function, 137 USB ports, 3 Utility key, 127 V Vamp (amplitude voltage = Vtop - Vbase) measurement, 101 Vavg (average voltage) measurement, 101 Vbase (base voltage) measurement, 101 vectors, 42 vectors waveform type, 59 vernier adjustment, 44, 50 156 vertical failure margin (mask), 134 vertical position, 44 vertical position knob, 43, 44 vertical scale, 44 vertical scale knob, 43, 44, 50 vertical scale reference level, 136 vertical scaling, 48 vibration, analyzing, 54 video trigger, 85, 87 Vmax (maximum voltage) measurement, 100 Vmin (minimum voltage) measurement, 101 volt units, 52 voltage measurements, 3, 42, 100, 109 Volts/Div control sensitivity, 50 Vpp (peak-to-peak voltage) measurement, 101 Vrms (root-mean-square voltage) measurement, 102 Vtop (top voltage) measurement, 101 zoomed time base display, 42 W warnings, 151 watt units, 52 waveform intensity, 60 waveform intensity, graded, 61 waveform math, 53 waveform persistence, 60 waveforms, recording/playing-back, 3, 78 waveforms, turning on or off, 43 window, FFT, 55 X X-Y format, 41 X-Y time base, 40 Y Y-T time base, 40 Z zoomed time base, 39 Agilent 1000 Series Oscilloscopes User’s Guide www.agilent.com Agilent Technologies, Inc. 2008-2009 Printed in Malaysia 10/09 Second Edition, October 2009 *54130-97014* 54130-97014