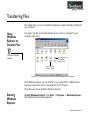
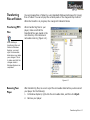
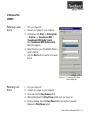
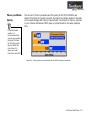
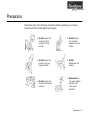
1
User Manual
Creative TravelSound MP3
Information in this document is subject to change without notice and does not represent a commitment on the part of Creative
Technology Ltd. No part of this manual may be reproduced or transmitted in any form or by any means, electronic or mechanical,
including photocopying and recording, for any purpose without the written permission of Creative Technology Ltd. The software
described in this document is furnished under a license agreement and may be used or copied only in accordance with the terms of
the license agreement. It is against the law to copy the software on any other medium except as specifically allowed in the license
agreement. The licensee may make one copy of the software for backup purposes.
Copyright © 1998-2002 Creative Technology Ltd. All rights reserved.
Version 1.1
October 2002
The Creative logo and Sound Blaster are registered trademarks and Creative TravelSound MP3, Inspire and Creative Inspire are
trademarks of Creative Technology Ltd. in the United States and/or other countries. Microsoft, MS-DOS, and Windows are registered
trademarks of Microsoft Corporation. All rights reserved. All other products are trademarks or registered trademarks of their
respective owners. All specifications are subject to change without prior notice. Use of this product is subject to a limited warranty.
Actual contents may differ slightly from those pictured.
Contents
Contents
Introduction
Before You Begin . . . . . . . . . . . . . . . . . . . . . . . . . . . . . . . . . . . . . . . . . . . . . . . . . . . i
Package Contents . . . . . . . . . . . . . . . . . . . . . . . . . . . . . . . . . . . . . . . . . . . . . . . i
README File . . . . . . . . . . . . . . . . . . . . . . . . . . . . . . . . . . . . . . . . . . . . . . . . . . . i
System Requirements . . . . . . . . . . . . . . . . . . . . . . . . . . . . . . . . . . . . . . . . . . . ii
Document Conventions . . . . . . . . . . . . . . . . . . . . . . . . . . . . . . . . . . . . . . . . . ii
1 About Creative TravelSound MP3
Front View . . . . . . . . . . . . . . . . . . . . . . . . . . . . . . . . . . . . . . . . . . . . . . . . . . . . . .
Top View . . . . . . . . . . . . . . . . . . . . . . . . . . . . . . . . . . . . . . . . . . . . . . . . . . . . . . .
Back View . . . . . . . . . . . . . . . . . . . . . . . . . . . . . . . . . . . . . . . . . . . . . . . . . . . . . .
Bottom View . . . . . . . . . . . . . . . . . . . . . . . . . . . . . . . . . . . . . . . . . . . . . . . . . . . .
Fold Out View . . . . . . . . . . . . . . . . . . . . . . . . . . . . . . . . . . . . . . . . . . . . . . . . . . .
Player Controls . . . . . . . . . . . . . . . . . . . . . . . . . . . . . . . . . . . . . . . . . . . . . . . . . .
Player Connectors . . . . . . . . . . . . . . . . . . . . . . . . . . . . . . . . . . . . . . . . . . . . . . .
Player LED Indicators . . . . . . . . . . . . . . . . . . . . . . . . . . . . . . . . . . . . . . . . . . . . .
Other Parts of the Player . . . . . . . . . . . . . . . . . . . . . . . . . . . . . . . . . . . . . . . . . .
1-1
1-2
1-3
1-4
1-4
1-5
1-6
1-7
1-8
2 Setting Up Creative TravelSound MP3
Inserting Batteries . . . . . . . . . . . . . . . . . . . . . . . . . . . . . . . . . . . . . . . . . . . . . . . . 2-1
Using the Universal Power Adapter . . . . . . . . . . . . . . . . . . . . . . . . . . . . . . . . . . 2-2
Inserting the SmartMedia Memory Card . . . . . . . . . . . . . . . . . . . . . . . . . . . . . . 2-3
3 Installing Creative TravelSound MP3
Installing Your Player . . . . . . . . . . . . . . . . . . . . . . . . . . . . . . . . . . . . . . . . . . . . . .
In Windows 98 SE/Me . . . . . . . . . . . . . . . . . . . . . . . . . . . . . . . . . . . . . . . . .
Verifying Installation in Windows 98 SE/Me . . . . . . . . . . . . . . . .
In Windows 2000 . . . . . . . . . . . . . . . . . . . . . . . . . . . . . . . . . . . . . . . . . . . .
In Windows XP . . . . . . . . . . . . . . . . . . . . . . . . . . . . . . . . . . . . . . . . . . . . . .
Verifying Installation in Windows 2000/XP . . . . . . . . . . . . . . . .
Uninstalling Your Player . . . . . . . . . . . . . . . . . . . . . . . . . . . . . . . . . . . . . . . . . . .
In Windows 98 SE/Me/2000 . . . . . . . . . . . . . . . . . . . . . . . . . . . . . . . . . . . .
In Windows XP . . . . . . . . . . . . . . . . . . . . . . . . . . . . . . . . . . . . . . . . . . . . . .
3-1
3-1
3-3
3-3
3-4
3-5
3-5
3-5
3-6
4 Transferring Files
Using Windows Explorer to Transfer Files . . . . . . . . . . . . . . . . . . . . . . . . . . . .
Starting Windows Explorer . . . . . . . . . . . . . . . . . . . . . . . . . . . . . . . . . . . . . . . .
Transferring Files or Folders . . . . . . . . . . . . . . . . . . . . . . . . . . . . . . . . . . . . . . .
Transferring MP3 Files . . . . . . . . . . . . . . . . . . . . . . . . . . . . . . . . . . . . . . . .
Removing Your Player . . . . . . . . . . . . . . . . . . . . . . . . . . . . . . . . . . . . . . . . .
4-1
4-1
4-2
4-2
4-2
5 Using Creative TravelSound MP3
Player Mode . . . . . . . . . . . . . . . . . . . . . . . . . . . . . . . . . . . . . . . . . . . . . . . . . . . . .
Wide Stereo Effect . . . . . . . . . . . . . . . . . . . . . . . . . . . . . . . . . . . . . . . . . . .
Playback Mode . . . . . . . . . . . . . . . . . . . . . . . . . . . . . . . . . . . . . . . . . . . . . . .
Setting playback modes . . . . . . . . . . . . . . . . . . . . . . . . . . . . . . . .
Voice Mode . . . . . . . . . . . . . . . . . . . . . . . . . . . . . . . . . . . . . . . . . . . . . . . . . . . . .
Making a voice
recording 5-2
Playing recorded tracks . . . . . . . . . . . . . . . . . . . . . . . . . . . . . . . .
Deleting recorded tracks . . . . . . . . . . . . . . . . . . . . . . . . . . . . . .
5-1
5-1
5-2
5-2
5-2
5-3
5-3
USB Mode . . . . . . . . . . . . . . . . . . . . . . . . . . . . . . . . . . . . . . . . . . . . . . . . . . . . . .
Volume Levels . . . . . . . . . . . . . . . . . . . . . . . . . . . . . . . . . . . . . . . . . . . . . . . . . . .
Formatting a SmartMedia Memory Card . . . . . . . . . . . . . . . . . . . . . . . . . . . . . .
In Windows 98 SE . . . . . . . . . . . . . . . . . . . . . . . . . . . . . . . . . . . . . . . . . . . .
In Windows Me/2000/XP . . . . . . . . . . . . . . . . . . . . . . . . . . . . . . . . . . . . . .
Performing a quick format . . . . . . . . . . . . . . . . . . . . . . . . . . . . .
Performing a full format . . . . . . . . . . . . . . . . . . . . . . . . . . . . . . .
5-3
5-3
5-4
5-4
5-5
5-5
5-5
Appendixes
A Technical Specifications
B FAQs and Troubleshooting
FAQs and Troubleshooting . . . . . . . . . . . . . . . . . . . . . . . . . . . . . . . . . . . . . . . .
General . . . . . . . . . . . . . . . . . . . . . . . . . . . . . . . . . . . . . . . . . . . .
About power sources . . . . . . . . . . . . . . . . . . . . . . . . . . . . . . . . .
About accessories . . . . . . . . . . . . . . . . . . . . . . . . . . . . . . . . . . . .
Problems with software installation . . . . . . . . . . . . . . . . . . . . . .
Problems with uninstalling your player . . . . . . . . . . . . . . . . . . . .
Problems with voice recordings . . . . . . . . . . . . . . . . . . . . . . . . .
Problems using your player . . . . . . . . . . . . . . . . . . . . . . . . . . . . .
Problems in Windows XP . . . . . . . . . . . . . . . . . . . . . . . . . . . . . .
B-1
B-1
B-2
B-2
B-3
B-3
B-3
B-4
B-6
C Note on USB Compatibility
D An MP3 and WMA Primer
About MP3 and WMA . . . . . . . . . . . . . . . . . . . . . . . . . . . . . . . . . . . . . . . . . . . . D-1
Memory and Audio Quality . . . . . . . . . . . . . . . . . . . . . . . . . . . . . . . . . . . . D-3
E Precautions
Introduction
Introduction
Creative TravelSound™ MP3 is a digital audio player with speakers that give superb
sound quality. With its titanium drivers and built-in digital amplifier, Creative
TravelSound MP3 delivers sound clarity and bass strength unheard of in this class
of players. Your player supports multiple audio file formats, including MP3 and
WMA.
Being compact, light and foldable, Creative TravelSound MP3 is entirely portable.
Its great battery life makes it an ideal companion to other portable devices such as
a portable DVD player or notebook. It is a must-have for those who want great
sound on the go!
Your player comes with accessories such as a universal power adapter, a carrying
case and lots more.
Before You
Begin
Package Contents
The items described
may vary depending
on country of
purchase.
README File
Your Creative TravelSound MP3 package contains the following items:
• Creative TravelSound MP3
• Carrying Case
• Universal Power Adapter
• Power Cable
• USB Cable
• Quick Start Guide
• Registration Card
• Creative TravelSound MP3 Installation CD, which includes this manual.
The README file on the CD-ROM contains information not available at the time of
printing. Read it before you begin installing Creative TravelSound MP3.
Introduction i
System
Requirements
• Genuine Intel® Pentium® 200 MHz (Intel Pentium II recommended for MP3
encoding) or faster processor
• 64 MB RAM on motherboard (128 MB or more recommended)
• 30 MB free hard disk space (or more for audio content storage)
• Available USB port or self-powered USB hub
• Microsoft Windows® 98 Second Edition (SE), Windows Millennium Edition (Me),
Windows 2000 or Windows XP
• CD-ROM drive with digital audio extraction support
• Sound Blaster® Live!™, Sound Blaster Audigy™, Sound Blaster Extigy™ or
Sound Blaster Audigy 2 for EAX™ enhanced MP3 encoding
• Installed mouse
• SVGA graphics adapter 256 colors, 800 x 600 pixels
Document
Conventions
We use icons to highlight useful or urgent information for you:
❍ Tip. This tells you about shortcuts or hints relating to a
feature.
❍ Note. This highlights additional or important information
about a feature.
❍ Caution! This highlights proper usage of your player. Use this
information to avoid situations involving risk.
❍ Warning! This warns you of possible hazards that may result
in injury to you, or damage to your player.
Introduction ii
1
About Creative TravelSound MP3
About Creative TravelSound MP3
In this chapter, you can read about your player’s exterior features and accessories.
We will show and explain your player’s buttons, controls and connectors.
Front View
Microphone
Stop
button
Play/Pause
button
Reverse button
Blue and Orange
LED indicators
Forward button
Figure 1-1: Creative TravelSound MP3 - Front View
About Creative TravelSound MP3 1-1
Top View
With your Creative
TravelSound MP3, you
can augment your
audio experience by
using the Wide Stereo
Effect feature. This
feature can make it
seem as if your
speakers are placed
further apart than they
really are.
Volume Up
button
Power On/Off
switch
Wide Stereo
Effect switch
USB
connector
Volume Down
button
Universal
Power
Adapter
connector
Headphones
connector
Line-in
connector
Figure 1-2: Creative TravelSound MP3 - Top View
About Creative TravelSound MP3 1-2
Back View
SmartMedia Memory card Eject
lever
SmartMedia
Memory card slot
Figure 1-3: Creative TravelSound MP3 - Back View.
About Creative TravelSound MP3 1-3
Bottom View
Normal/Repeat All/
Random switch
Figure 1-4: Creative TravelSound MP3 - Bottom View
Fold Out View
Battery compartment
Figure 1-5: Creative TravelSound MP3 - Fold Out View
About Creative TravelSound MP3 1-4
Player
Controls
Controls
POWER ON/OFF
BUTTON
PLAY/PAUSE BUTTON
STOP BUTTON
The controls help you access many of your player’s features. The table below
describes each control and its function.
Function
❍ turns on and turns off your player
❍ starts, pauses or continues playback
❍ press to start, pause or unpause
playback
❍ starts or stops playback/recording
❍ press and hold to start recording
❍ press to stop playback/recording
FORWARD BUTTON
❍ skips to the next track
❍ skips forward to portions of a track when you
press and hold the button
REVERSE BUTTON
❍ skips to the beginning of the current track,
or to the previous track
❍ skips to previous portions of a track when
you press and hold the button
VOLUME UP/
VOLUME DOWN
❍ increases or decreases the volume
BUTTONS
NORMAL/REPEAT ALL/
RANDOM SWITCH
❍ sets the playback mode to Normal, Repeat
All or Random
WIDE STEREO EFFECT
❍ enhances the spatial separation of the
speakers
SWITCH
BLUE AND ORANGE LED
INDICATORS
Notes
❍ lights up to show your player’s status and
operating modes
❍ press and hold to change the volume
level
❍ see "Player LED Indicators" on page
1-7 for details
About Creative TravelSound MP3 1-5
Player
Connectors
Part
UNIVERSAL
POWER ADAPTER
CONNECTOR
HEADPHONES
CONNECTOR
LINE-IN CONNECTOR
USB CONNECTOR
Your player has external connectors that are used for connecting to other devices.
The table below explains what each connector is used for.
Function
Notes
❍ connects to your player’s universal power
adapter
❍ use only the supplied adapter
❍ connects to your headphones
❍ speaker output automatically mutes
when headphones are plugged in
❍ connects to external audio devices, such as a
portable CD player
❍ audio from the line-in source is mixed
with currently playing audio
❍ connects your player to your computer
❍ connect a USB cable from your player
to your computer to transfer data/
audio or to upgrade your player’s
firmware
About Creative TravelSound MP3 1-6
Player LED
Indicators
When both LEDs are
blinking and you are
not recording
anything, it means
that battery power is
low. Recharge or
replace the batteries
as soon as possible.
Your player’s LED indicators show you the current mode or state. The table below
explains what these modes or states are.
Blue LED
state
Orange LED
state
ON
OFF
❍ Player mode
BLINKING
OFF
❍ playback is paused
ON
ON
❍ Voice mode
❍ playback of recorded tracks
OFF
ON
❍ USB mode
❍ player controls are inactive
OFF
BLINKING
❍ player is entering USB mode
❍ file transfer in progress
BLINKING
BLINKING
❍ starting recording
❍ when not recording, this indicates low
battery power
RAPID BLINKING
RAPID BLINKING
❍ not enough memory left for recording
Meaning / notes
About Creative TravelSound MP3 1-7
Other Parts of
the Player
Part
SMARTMEDIA MEMORY
CARD SLOT
SMARTMEDIA MEMORY
CARD EJECT LEVER
MICROPHONE
BATTERY COMPARTMENT
Function
Notes
❍ holds the SmartMedia Memory card
❍ your player supports 3.3 V cards up
to 128 MB only
❍ ejects the SmartMedia Memory card
(available separately) from the slot
❍ push down to eject
❍ records audio
❍ recorded audio is stored in your
player’s internal memory as a .WAV
file; recordings cannot be stored in
the SmartMedia Memory card
❍ holds the player’s batteries
❍ use any type of AAA size batteries
❍ use only one type of battery at a
time; for example, do not mix acid
and alkaline batteries
About Creative TravelSound MP3 1-8
2
Setting Up Creative TravelSound
MP3
Setting Up Creative TravelSound MP3
You can power your player with batteries or AC power. This chapter shows you how
to insert batteries into your player, and how to connect the supplied universal
power adapter.
Inserting
Batteries
You will need four AAA batteries. Figure 2-1 shows you how to insert batteries into
your player.
1
You can use any type
of AAA size batteries.
However, you should
not use different types
of batteries together.
Remove the
battery
compartment
cover.
2
Insert the
batteries. Take
note of the
correct polarity.
Figure 2-1: Inserting Batteries
Setting Up Creative TravelSound MP3 2-1
Using the
Universal
Power Adapter
Figure 2-2 shows you how to connect the universal power adapter. You can fold out
the stand to prevent your player from falling over.
2
Disconnect the
universal power
adapter if you do not
intend to use your
player for a long period
of time.
1
Stand
Connect the universal
power adapter to your
player. When the
adapter is connected,
internal batteries are
not used.
Connect the power
cable to the
universal power
adapter, then
connect the power
cable to your wall
socket. Turn on the
power switch, if
needed.
The universal power adapter may vary,
depending on country of purchase.
3
Power On/Off switch
Turn on your player.
Figure 2-2: Using the universal power adapter
Setting Up Creative TravelSound MP3 2-2
Inserting the
SmartMedia
Memory Card
Figure 2-3 shows you how to insert the SmartMedia Memory card (available
separately) into your Creative TravelSound MP3.
Remove the SmartMedia Memory
card by pushing down this lever.
1
Insert your SmartMedia
Memory card here. Refer to
the indicator on the right for
insertion direction and card
orientation.
SmartMedia
Memory
card
orientation
indicator
Figure 2-3: Inserting the SmartMedia Memory card
Setting Up Creative TravelSound MP3 2-3
3
Installing Creative TravelSound
MP3
Installing Creative TravelSound MP3
This chapter tells you how to quickly install the software for Creative TravelSound
MP3.
Installing Your
Player
Use the installation procedures for your operating system.
In Windows 98 SE/
Me
1.
For Windows 98 SE and Windows Me users, see “In Windows 98 SE/Me” in the
section that follows.
For Windows 2000 and Windows XP users, see "In Windows 2000" on page 3-3
and "In Windows XP" on page 3-4.
Do not connect your player to your computer before installing the drivers.
If you accidentally begin installation with your player connected, the
InstallShield Wizard dialog box appears. Click the Cancel button.
2.
Insert the Installation CD into your CD-ROM drive.
3.
The CD supports Windows AutoPlay mode and starts running automatically.If
not, either enable your CD-ROM drive’s auto-insert notification feature, or click
Start -> Run and type D:\CTRUN\CTRUN.EXE in the Open box (where D:
represents your CD-ROM drive).
4.
Follow the instructions on the screen to complete the installation.
5.
If prompted, restart your computer.
Installing Creative TravelSound MP3 3-1
6.
• You can safely install
your player with your
computer turned on.
• The USB port(s) on your
computer may be found
on the front panel
instead of the back
panel.
• You can daisy-chain your
player through another
USB device or attach it
to a self-powered USB
hub.
Connect your player’s USB cable to an available USB port on your computer
(Figure 3-1). Place your player on a flat surface.
Windows automatically detects the device. The orange LED indicator lights up
to show that your player is in USB mode.
USB port
Figure 3-1: Connecting your player to your computer
i. If you are prompted to insert the Windows 98 SE CD, replace the
Installation CD with the appropriate CD.
ii. In the Insert Disk dialog box, click the OK button.
To test the installation,
see “Verifying
Installation in Windows
98 SE/Me” on page 3-3
and follow the
instructions.
iii. Follow the instructions on the screen.
7.
Click the Finish button, and then restart your computer if you are prompted
to do so.
Installing Creative TravelSound MP3 3-2
Verifying Installation
in Windows 98 SE/
Me
1.
Right-click the My Computer icon on your
desktop.
2.
On the menu that appears, click Properties.
3.
In the System Properties dialog box, click
the Device Manager tab (Figure 3-2).
4.
The Creative TravelSound MP3 icon should
appear. If it does not, repeat the steps in “In
Windows 98 SE/Me” on page 3-1.
Figure 3-2: System Properties
dialog box
In Windows 2000
1.
Do not connect your player to your computer before installing the drivers.
If you accidentally begin installation with your player connected, the Found
New Hardware Wizard dialog box appears. Click the Cancel button.
2.
Insert the Installation CD into your CD-ROM drive.
3.
Click the names of the drivers and applications you want to install on your
computer.
4.
Follow the instructions on the screen to complete the installation. You may be
asked, after an application is installed, if you want to restart your computer.
Do not restart your computer until all the drivers and applications are
installed.
Installing Creative TravelSound MP3 3-3
To test the installation,
see “Verifying
Installation in Windows
2000/XP” on page 3-5
and follow the
instructions.
In Windows XP
If a Microsoft warning
dialog box appears,
ignore the message and
click the Continue
Anyway button. For
more details on this
warning message, see
"Problems in Windows
XP" on page B-6.
To test the installation,
see “Verifying
Installation in Windows
2000/XP” on page 3-5
and follow the
instructions.
5.
Connect your player’s USB cable to an available USB port on your computer
(Figure 3-1). Place your player on top of your computer monitor or another
flat surface.
Windows automatically detects the device. The orange LED indicator lights up
to show that your player is in USB mode.
6.
Follow the instructions on the screen.
7.
Click the Finish button, and restart your computer if you are prompted to do
so.
1.
Do not connect your player to your computer before installing the drivers.
If you accidentally begin installation with your player connected, the Found
New Hardware Wizard dialog box appears. Click the Cancel button.
2.
Insert the Installation CD into your CD-ROM drive.
3.
Click the names of the drivers and applications you want to install on your
computer.
4.
Follow the instructions on the screen to complete the installation. You may be
asked, after an application is installed, if you want to restart your computer.
Do not restart your computer until all the drivers and applications are
installed.
5.
Connect your player’s USB cable to an available USB port on your computer
(Figure 3-1). Place your player on top of your computer monitor or another
flat surface.
Windows automatically detects the device. The orange LED indicator lights up
to show that your player is in USB mode.
6.
When the Found New Hardware Wizard dialog box appears, select Install
the software automatically (Recommended), and then click the Next
button.
Installation will be complete in a while.
7.
Click the Finish button, and then restart your computer if you are prompted
to do so.
Installing Creative TravelSound MP3 3-4
Verifying Installation
in Windows 2000/
XP
1.
Right-click the My Computer icon
on your desktop.
2.
On the menu that appears, click
Properties.
3.
In the System Properties dialog
box, click the Hardware tab.
4.
Click the Device Manager button.
A window appears (Figure 3-3).
5.
The Creative TravelSound MP3
icon should be appear as a device
under Disk Drives. If it does not,
repeat the steps in “In Windows
2000” on page 3-3 or “In Windows
XP” on page 3-4.
Figure 3-3: Device Manager dialog
box
Uninstalling
Your Player
In Windows 98 SE/
Me/2000
1.
Disconnect the player from your computer first.
2.
Click Start -> Settings -> Control Panel.
3.
Click the Add/Remove Programs icon.
4.
Click Creative TravelSound MP3, and then click the Add/Remove button.
Installing Creative TravelSound MP3 3-5
In Windows XP
5.
In the Confirm File
Deletion dialog box, click
the OK button.
6.
In the dialog box that
appears, click Finish to
complete the uninstallation.
Figure 3-4: Confirm File Deletion
dialog box
1.
Click Start -> Control Panel.
2.
Follow steps 3 to 6 of "In Windows 98 SE/Me/2000" above.
Installing Creative TravelSound MP3 3-6
4
Transferring Files
Transferring Files
This chapter tells you how to transfer files between Creative TravelSound MP3 and
your computer.
Using
Windows
Explorer to
Transfer Files
Your player acts like a removable storage device once it is connected to your
computer (Figure 4-1).
You cannot transfer
playlists.
removable memory
(SmartMedia
Memory card)
player’s internal
memory (32MB)
Figure 4-1: Creative TravelSound MP3 as a storage device in your computer
Using Windows Explorer, you can transfer to your player MP3 or WMA files that
have been ripped from a CD or downloaded from the Internet.
These files can also be deleted in Windows Explorer.
Starting
Windows
Explorer
To start Windows Explorer: Click Start -> Programs -> Windows Explorer.
The Windows Explorer window appears.
Transferring Files 4-1
Transferring
Files or Folders
You can manage files or folders by using standard Windows techniques for moving
files or folders. You can employ the cut-and-paste or the drag-and-drop method.
Transferring MP3
When transferring files to your
player, make sure that the
transferred files are placed in the
root directory of the internal or
removable memory (figure 4-2).
Files
While the transfer is in progress, the orange LED indicator blinks.
After deleting or
transferring files and
folders in Windows
Explorer, you must
eject the removable
disks where you made
your changes. This is
to make sure that the
changes made in
Windows Explorer are
completed.
Figure 4-2
Removing Your
Player
After transferring files, be sure to eject the removable disks before you disconnect
your player. Do the following:
1. In Windows Explorer, right-click the removable disks, and then click Eject.
2.
Remove your player.
Transferring Files 4-2
5
Using Creative TravelSound MP3
Using Creative TravelSound MP3
This chapter shows you how to get the most out of your Creative TravelSound MP3
and its three modes:
• Player mode
• Voice mode
• USB mode
Player Mode
In Player mode, you can play tracks downloaded into your player, apply a Wide
Stereo effect, and change track playback order.
Use the Play/Pause, Stop, Reverse and Forward buttons to control the
playback of tracks.
Press the Forward and Reverse buttons simultaneously to switch between Player
and Voice mode. For more information on switching between modes, refer to
“Player LED Indicators” on page 1-7.
Wide Stereo Effect
You can augment your audio experience by using the Wide Stereo Effect feature.
This feature enhances the spatial separation of your speakers. That is, when Wide
Stereo Effect is enabled, your speakers seem to be placed further apart than they
really are.
• To enable the Wide Stereo Effect, slide the Wide Stereo Effect switch
in the direction of the arrow.
• To disable the Wide Stereo Effect, slide the Wide Stereo Effect switch in the
opposite direction of the arrow.
Using Creative TravelSound MP3 5-1
Playback Mode
You can use the three playback modes to change how your player plays back
tracks.
Repeat All
Normal
Random
Setting playback
modes
Slide the switch to the desired position to select a playback mode.
•
In Normal mode, playback ends at the last track.
•
In Repeat All mode, your player plays all the tracks before repeating them.
Playback continues until you press the Stop button.
•
In Random mode, your player plays back tracks at random.
Playback continues until you press the Stop button, until all the tracks have
been played.
Voice Mode
In Voice mode, you can create and play back voice or audio recordings.
Press the Forward and Reverse buttons simultaneously to switch between Player
and Voice modes. For more information on switching between modes, refer to
“Player LED Indicators” on page 1-7.
The blue and orange LED indicators light up to show that your player is in Voice
mode.
Making a voice
recording
Make sure that your player is placed as close as possible to the recording source.
1. Press and hold the Stop button to start recording.
The blue and orange LED indicators blink while you record.
2.
If the internal memory
reaches capacity, the
blue and orange LED
indicators blink
rapidly, and recording
stops automatically.
Press the Stop button to stop recording.
The blue and orange LED indicators stop blinking when you stop recording.
The recorded audio is stored in your player’s internal memory as a .WAV file, in the
directory E:\VOICE (where E:\ is the drive letter of your internal memory).
Recorded audio cannot be stored in the removable memory (SmartMedia Memory
card).
Using Creative TravelSound MP3 5-2
Playing recorded
tracks
You cannot rename or
move Voice recordings
from the "Voice"
directory. Your player
only recognizes
recordings if they are
in the "Voice"
directory.
There are a few ways to play back recorded tracks:
•
Press the Play/Pause button once to play the current track.
•
Press the Forward button to play the next track. For example, if track 8 is
the current track, track 9 is played.
•
Press the Reverse button to play the previous track. For example, if track
8 is the current track, track 7 is played.
•
During playback, press the Play/Pause button to pause playback, or press
the Stop button to stop playback and return to the last recorded track.
Note: Press and hold the Play/Pause button for a short while if you want to play all the
previous tracks in reverse order. For example, if track 8 is the current track, playback starts
from track 8, followed by track 7 and so on, and ends after track 1 is played. The Forward
button and Reverse button cannot be used during this time.
Both the blue and orange LED indicators light up when you play recorded tracks.
Deleting recorded
tracks
Use Windows Explorer to delete the recordings.
USB Mode
In USB mode, you can transfer files to and from your player’s internal memory
and removable memory. See "Using Windows Explorer to Transfer Files" on page
4-1.
Volume Levels
When you turn on your player for the first time, your player will play at its default
volume. Press and hold the Volume Up or Volume Down buttons to adjust the
volume. Your player remembers the volume used before it is turned off, and plays
at that volume when you turn on your player again.
The player will reset to its default volume when:
•
A quick format or full format is performed on the internal memory.
•
The setting.dat file in the root directory of the internal memory is deleted.
Using Creative TravelSound MP3 5-3
Formatting a
SmartMedia
Memory Card
If your Smart Media Memory card is corrupted, or if you have purchased an offthe-shelf card, you will need to format your SmartMedia Memory card.
You can format your SmartMedia Memory card using either Quick Format or Full
Format. Use Quick Format if you have performed a Full Format of the card before.
Use Full Format if the SmartMedia Memory card has never been formatted before.
Your player’s internal
memory is
pre-formatted. You do
not need to format it
unless it gets
corrupted.
In Windows 98 SE
1.
Turn your player off.
2.
Connect your player to your computer.
3.
In Windows, click Start -> Programs ->
Creative -> TravelSound MP3 ->
TravelSound MP3 Media Format.
The TravelSound MP3 Media Format
dialog box appears.
4.
Click the Quick format check box to select
a quick format. If the Quick format check
box is left unselected, a full format will be
performed.
5.
Click the Start button to perform the
format.
Figure 5-1: TravelSound MP3 Media
Format dialog box
Using Creative TravelSound MP3 5-4
In Windows Me/
2000/XP
Performing a quick
format
1.
Turn your player off.
2.
Connect your player to your computer.
3.
In Windows, click Start -> All Programs > Creative -> TravelSound MP3 ->
TravelSound MP3 Media Format.
The TravelSound MP3 Media Format
dialog box appears.
4.
Select the drive (your SmartMedia Memory
card) to format.
5.
Click the Start button to perform the quick
format.
Figure 5-2: TravelSound MP3 Media
Format dialog box
Performing a full
format
1.
Turn your player off.
2.
Connect your player to your computer.
3.
Press and hold the Play/Pause button.
4.
While holding down the Play/Pause button, turn your player on.
5.
Continue holding down the Play/Pause button for another 5 seconds.
Release the Play/Pause button.
Using Creative TravelSound MP3 5-5
6.
In Windows, click Start -> All Programs -> Creative -> TravelSound MP3
-> TravelSound MP3 Media Format.
The TravelSound MP3 Media Format dialog box appears.
7.
Select the drive (your SmartMedia Memory card) to format.
8.
Click the Start button to peform the full format.
9.
To transfer audio tracks into your player after formatting the card, you must
disconnect and reconnect your player to your computer.
Using Creative TravelSound MP3 5-6
Appendixes
A
Technical Specifications
Technical Specifications
Power Source
4 x AAA batteries / 5 V DC Universal Power Adapter
Weight
280 g
320 g with batteries
Satellite Power
2 watts RMS per channel
Signal-to-noise ratio
78 dB
Frequency Response
150 Hz to 20 KHz
Battery Life (at total
10mw output)
~ 12 hours of MP3/voice playback, based on standard alkaline batteries
Interface
USB Version 1.1
Internal Memory
32 MB
External Memory
Interface
1 x SmartMedia Memory card slot
External Memory
Capacity
Up to 128 MB using SmartMedia Memory card
Audio Codec Support
• MPEG Audio layer 3 (MP3), 32 Kbps to 320 Kbps
• Windows Media Audio (WMA), 32 Kbps to 192 Kbps
Voice Recording
Format
ADPCM 4 bit 8 KHz Mono Wave, encoding up to 2 hours per 32 MB of memory
Technical Specifications A-1
B
FAQs and Troubleshooting
Frequently Asked Questions (FAQs) and Troubleshooting
FAQs and
Troubleshooting
In this chapter, we cover common problems you might encounter or questions you
might have while using your Creative TravelSound MP3.
General
Can I organise songs downloaded into my player?
No. The order of songs is determined by the order in which your computer’s
operating system transfers them to the player. If you want songs to play in a
specific order, transfer them one by one, in the order you prefer.
This chapter is divided into different categories for your easy reference.
Can I store my MP3 files in any directory in the internal memory or
SmartMedia Memory card?
No. MP3 files have to be stored in the root directory of the internal memory or
removable memory (SmartMedia Memory card).
What kind of audio devices can I connect to the player?
Creative TravelSound MP3 supports just about any audio device that comes with a
3.5mm stereo Line-out. This includes NOMADTM Jukebox series players, CD
players, DVD players and more.
Can I format my SmartMedia Media card or internal memory using the
Windows Formatter instead of the TravelSound MP3 Media Format
application?
It is recommended that you use the TravelSound MP3 Media Format application at
all times. This is to avoid memory corruption or other unforeseen problems.
B-1
Can I use Creative TravelSound MP3 near magnetically senstive devices
like a computer monitor?
Yes, the Creative TravelSound MP3 speakers are magnetically shielded and they
should not affect the monitor when placed close to it.
About power
sources
What kind of batteries can I use?
You can use any type of AAA size battery (1.5V) — such as Alkaline, Zinc Chloride,
Manganese, or Rechargeable. Just remember to use only one type at a time. For
example, do not mix Alkaline with Zinc Chloride.
Note that when you use the universal power adapter with your player, the internal
batteries will not be used.
Can I charge batteries using the universal power adapter?
No, the Universal Power Adapter does not charge batteries.
About accessories
How can I be sure that the SmartMedia Memory card I bought is the
correct type?
SmartMedia Memory cards are available in 5 V and 3.3 V types.
To tell them apart, place your card with the gold part facing upward. The 5V card
has a notch at the upper left corner, while the 3.3 V type has a notch at the upper
right corner. The card will also have the memory capacity and voltage indicated on
the surface.
Creative TravelSound MP3 only supports 3.3 V cards. You can use cards with 2, 4,
8, 16, 32, 64 and 128 MB capacities.
B-2
Problems with
software installation
The setup program for Creative TravelSound MP3 does not run
automatically after I insert the installation CD into the drive.
The AutoPlay feature in your Windows system may not be enabled.
You can:
1. Insert the installation CD in the CD-ROM drive.
2. Click Start -> Run.
3. In the Run dialog box, click D:\CTRUN\SETUP.EXE (where D: is your CDROM drive)
4. Follow the instructions on the screen to complete the installation.
My computer stops responding when I try to reinstall my software.
You may have uninstalled your player incorrectly. See "Problems with uninstalling
your player" in the section below.
Problems with
uninstalling your
player
My computer stops responding when I try to uninstall my player.
Your computer may have stopped responding because you did not disconnect the
player from your computer first.
Do not restart your computer as this will give you problems when you try to
reinstall the software. See "Problems with software installation" on page B-3.
Disconnect the USB cable that connects the player to your computer, and your
computer will continue uninstalling the player without any problems.
Problems with voice
recordings
I can’t find the voice recordings that I made.
You may have renamed the voice recordings, or moved/copied them out of the
default Voice directory.
Voice recordings cannot be renamed, nor can they reside anywhere else except in
the Internal memory’s Voice directory. See "Making a voice recording" on page 52.
B-3
Problems using your
player
There is no USB port available to connect my player.
You can:
•
•
•
Unplug the USB device currently connected
Add a self-powered USB hub
Add a PCI USB card
Creative TravelSound MP3 cannot be found in Windows.
To correct this problem:
•
•
Ensure that Creative TravelSound MP3’s USB connector is properly inserted,
and that the USB connector is enabled in the BIOS. Refer to your
computer’s documentation for information on the BIOS.
Reinstall the Creative TravelSound MP3’s drivers and restart your computer.
For more information, refer to "Installing Creative TravelSound MP3" on
page 3-1.
There are insufficient system resources reserved for the USB port, causing
my computer to lose funtionality.
There are too many devices in or connected to your computer, causing IRQ
problems with your computer’s USB controller.
You can:
1. Remove some devices from your computer.
2. Restart your computer.
Your computer will automatically reallocate resources.
Creative TravelSound MP3 cannot start up. The LED indicators do not light
up, even though there is power supplied.
Your player’s internal storage may need formatting. You can perform a Quick
Format.
For details on formatting your player, see "Formatting a SmartMedia Memory Card"
on page 5-4.
B-4
Files and folders cannot be deleted from the internal memory or
removable memory.
After deleting or transferring files and folders in Windows Explorer, you must eject
the removable disks where you made your changes. This is to make sure that the
changes made in Windows Explorer are completed.
To eject your removable disks in Windows Explorer, right-click the removable disks
and select the Eject option.
Can the internal memory and removable memory (SmartMedia Memory
card) be treated as a single contiguous storage space?
No. The 32 MB of internal memory and the removable memory (SmartMedia
Memory card) must be treated as two separate removable drives.
This also means that you cannot store files across the two types of memory. For
example, if the internal memory does not have enough space for a file, the entire
file is copied into the removable memory. The file does not reside partly in the
internal memory and partly in the removable memory.
B-5
Problems in
Windows XP
A Hardware Installation error message appears on my Windows XP
operating system when applications are being installed.
At the time of Window XP's release, Microsoft strongly encouraged companies to
submit their hardware solutions for certification. If a hardware device driver is not
submitted, or does not qualify, for Microsoft certification, a warning message
similar to the one below appears.
You may see this message when installing a TravelSound MP3 driver. If you do, you
may choose to click the Continue Anyway button. Creative has tested all drivers
on Windows XP, and it does not impair or destablize your computer.
If you need more XP-related information, go to the product web site's Help or
speak with Creative Technical Support staff.
B-6
C
Note on USB Compatibility
Note on USB Compatibility
While testing Creative TravelSound MP3 on PC motherboards with integrated
Universal Serial Bus (USB) ports, we encountered a small number of motherboards
that do not meet the USB specification exactly. These and other non-USBcompliant motherboards may not operate correctly with Creative TravelSound
MP3. Fortunately, the manufacturers of some of these motherboards have released
new versions of motherboards or BIOS to address the problem.
If the setup program warns you that your motherboard’s USB port is incompatible
with Creative TravelSound MP3, or if the player does not work with your system
and you suspect that the problem may be related to your PC’s USB port, the
following is a list of available options:
1. Contact your PC vendor.
Your PC vendor may be able to upgrade your motherboard or its BIOS to a
newer version that addresses USB incompatibilities.
To look for a USB
compatible product, you
can visit the product
search page at the
official USB Web site:
http://www.usb.org/
app/search/products.
2.
Use a PCI host adapter that provides USB connectors.
If you are not able to upgrade your motherboard or its BIOS, we recommend
this approach.
3.
Attach Creative TravelSound MP3 to a powered USB hub.
Some USB devices (such as monitors) also operate as powered USB hubs; you
can also buy dedicated powered USB hubs which are to be attached to your
PC’s USB port. However, in some cases, attaching a powered USB hub to a
non-USB-compliant USB motherboard connector will not solve the problem.
Note on USB Compatibility C-1
D
An MP3 and WMA Primer
An MP3 and WMA Primer
About MP3
and WMA
It is illegal to encode
MP3 or WMA files for
trade or sale unless you
have the express and
explicit permission of
the copyright holder(s).
MP3 is the acronym for Moving Picture Experts Group (MPEG) Audio Layer 3, a
type of audio data compression technology developed by a group of companies
working together as a subgroup of the International Standards Organization (ISO).
The term went on to become an official standard in 1992 as a part of the MPEG-1
standard. The company primarily associated with MP3 is Fraunhofer Gesellschaft
(FhG) in Germany, who owns key patents to the technology.
The MP3 format can significantly reduce a digital audio file's size by as much as
one-twelfth of the original, with virtually no loss in quality. It is an efficient way to
store high-quality music or other audio content on your computer. MP3 digital
audio files have the file extension .MP3.
WMA is a similar compressed audio format. Developed by Microsoft, it is touted to
offer audio quality similar to the MP3 format but at half the file size. WMA files
have the file extension .WMA.
Take note that WMA files may be protected. They may be created with a digital
protection system, or may require a fee before usage. Creative TravelSound MP3
can only play back unprotected WMA files. Protected files need to be 'unlocked' on
your computer before being transferred to the Creative TravelSound MP3 for
playback. Do note that for WMA files, they can be created with digital protection or
attached business rules such as requiring monetary payment before they can be
played. These are known as protected WMA files.
The choice between MP3 and WMA file format depends largely on your preference.
You can sample these files by downloading them from various Internet sites. You
can also legally produce them from original audio CDs, provided they are for
personal use only.
An MP3 and WMA Primer D-1
Making MP3s or WMAs — audio extraction
The first phase in making an MP3 or WMA file is extracting audio data from an
audio CD. To extract audio data, you will need a CD-ROM drive that can extract
digital audio data, and a program known as a Ripper. This program uses the CDROM drive to read the audio tracks from the audio CD and stores it on your hard
disk. The time needed for a successful audio extraction depends on:
• CD-ROM drive speed
• defects, like scratches on the audio CD
• error-checking features on the CD-ROM drive
Making MP3s or WMAs — encoding
Encoding is the second phase of making an MP3 or WMA file. Encoders are used to
convert the stored audio tracks, usually WAV files, into these formats. The
encoding process is considered lossy compression, which means that some data is
lost during compression. However, using the standard sampling rate and bitrates
will ensure that your MP3 or WMA files retain much of their audio quality.
The standard bitrate of most MP3 files is 128 Kbps, although some are set higher,
at 160 or 192 Kbps. Higher bitrates will result in larger MP3 file sizes, with better
audio quality. For WMA, it is touted that audio tracks encoded with half an MP3
file's bitrate can offer similar audio quality. As such, 64 Kbps WMA files are quite
common.
Use Creative PlayCenter, Creative MediaSource or a number of third party
applications (not bundled) to extract audio tracks and encode MP3s or WMAs.
When creating unprotected WMA files, ensure that the digital rights management
function is disabled. For example, in Windows Media Player, under Options, click
the CD Audio tab, and then click the Enable Personal Rights Management
check box to deselect it.
An MP3 and WMA Primer D-2
Memory and Audio
Quality
The amount of memory available and the quality of the MP3or WMA file are
related. The higher the quality required, the higher the bitrate needed. This leads
to more data storage and memory requirements. The amount of memory required
in your Creative TravelSound MP3 player is proportionate to the audio playback
time.
For optimal audio
quality, it is
recommended that
you set your encoding
bitrate at 128 Kbps
for MP3 files and 64
Kbps for WMA files
(see Figure D-1)
when you create
them from audio CDs.
Figure D-1: Playing time versus encoding rate for different memory capacities.
An MP3 and WMA Primer D-3
E
Precautions
Precautions
Please take note of the following precautions before operating your Creative
TravelSound MP3 portable digital audio player.
❍ Do Not expose the
product to direct
sunlight for long
periods.
❍ Do Not subject
the product to
excessive force or
impact.
❍ Do Not expose the
product to strong
magnetic fields.
❍ Do Not
disassemble the
product.
❍ Do Not expose the
product to excessive
moisture.
❍ Please Use only
the power adapter
provided, with
main outlets
specified.
Precautions E-1
Battery Usage
Do Not load batteries with polarities (-/+) reversed.
Keep batteries away from children.
Do Not force batteries into the battery compartment.
Batteries may become hot after prolonged use. You can avoid minor burns by
letting them cool down before removing them from the player.
Do Not short-circuit the batteries with metallic objects such as keys or jewelry.
Do Not allow metallic objects to come into contact with the batteries’ terminals.
This can cause the batteries to lose their electrical charge.
Environment
Do Not expose or subject the batteries to excessive heat from direct flames or
other heat sources.
Do Not immerse the batteries in water or expose them to excessive moisture.
Store batteries in cool, well-ventilated and dry storage areas.
Do Not store batteries in areas with temperatures outside of -10°C to 45°C (14°F
to 113°F).
Physical
Do Not attempt to disassemble, solder or alter the batteries.
Do Not remove the label.
If batteries are swallowed, seek medical attention immediately.
Do Not pierce or crush the batteries, as it may cause the electrolyte to leak.
Contact with the electrolyte is hazardous to your health.
Avoid dropping the batteries or subjecting them to severe impact. This may cause
electrolyte leakage.
Electrolyte leakage
If there is electrolyte leakage, smoke, discoloration, deformation or noxious odors
while using or charging the batteries, dispose of the batteries immediately using
protective hand gear. Wash your hands thoroughly after the disposal.
Dispose of batteries safely, complying with relevant local laws.
Precautions E-2
Do Not dispose of batteries in containers with flammable material.
If the inner contents of the batteries come into contact with any part of your body
or clothing, flush with water immediately. In the case of accidental contact with
your eyes or mouth, flush with water and seek medical assistance.
Precautions E-3