1
Instruction Manual
DV-153 DVD-Player
DV-251 DVD-Player
DV-252 DVD-Player
Content
Content
Safety Precautions
Important Safety Instructions
Caution
Features
Front and Rear Panel
Connection to a TV Set
Connection to an Analog AV Receiver
Connection a Digital AV Receiver
Remote Control Preparation
Remote Control
Remote Control Operation
The Setup Menu
MPEG4 and MP3 Playback
USB Input and card reader
Playing a JPEG file
Troubleshooting
Specifications
2
3
4
6
7
8
9
10
11
12
13
15
21
34
35
36
37
38
2
Safety Precautions
A triangle with a lightning symbol draws the user's
attention to “dangerous voltage” without insulation
in the housing which may be high enough to entail
a risk of electric shock.
A triangle with an exclamation mark draws the
user's attention to important instructions for use
and maintenance in the accompanying manual
which should be studied.
Symbol for Class II (double insulation).
WARNING:
TO MINIMISE THE RISK OF FIRE AND ELECTRIC SHOCK,DO NOT
EXPOSE DEVICE TO RAIN OR MOISTURE. DO NOT OPEN THE
HOUSING AS IT CONTAINS DANGEROUS VOLTAGE. ONLY
SKILLED TECHNICIANS ARE ALLOWED TO CARRY OUT REPAIR
AND SERVICE.
CAUTION:
If the power cord plug is to be replaced, it is important that the
replacement is identical to the plug to be replaced, or that the new plug
has been recommended by the manufacturer.
TO AVOID THE RISK OF ELECTRIC SHOCK, IT IS IMPORTANT TO
INSERT THE PLUG CORRECTLY INTO THE SOCKET.
This DVD player includes a laser system.
There is a risk of dangerous radiation from the laser beam if buttons,
controls and procedures are not used or carried out as described in
this manual. To avoid contact with the laser beam, do not open the
device.
DO NOT LOOK DIRECTLY INTO THE LASER BEAM.
3
Important Safety Instructions
WARNING: IT IS IMPORTANT THAT YOU STUDY AND OBSERVE BOTH THE INSTRUCTIONS IN THIS MANUAL AND
THE INSTRUCTIONS ON THE DEVICE. KEEP THIS MANUAL FOR FUTURE USE.
This device was developed and made with a view to providing maximum safety for the user. Incorrect use of the device
may cause electric shock or fire. The protection built into this device will protect the user if the procedure below is
observed in connection with installation, use and repair. This device is fully electronic and contains no parts which can be
repaired by the user.
THE HOUSING MUST NOT BE REMOVED. RISK OF DANGEROUS VOLTAGE. ONLY SKILLED TECHNICIANS ARE
ALLOWED TO REPAIR THE DEVICE.
Heat
Do not place the device near
sources of heating such as
radiator, register, stove or other
heat-producing devices (including
amplifiers).
Read the manual
On unpacking the device,
please read the manual
carefully and observe all
instructions given.
Power supply
Only the power supply indicated on the
rating plate must be used for this
device. If you are not sure which power
supply you have, please contact the
distributor or the local electricity
supplier.
Water and moisture
The device must not be placed
close to water, such as bath
tub, wash basin, kitchen sink or
wash tub, in a damp cellar or
close to a swimming pool, etc.
Cleaning
Unplug the device before
cleaning. Do not use liquid
detergents and aerosol cleaning
agents. Use a dry cloth.
Earthing or polarization
If the plug cannot be inserted properly into the
socket, or if the plug does not fit, the device must
not be used in your country.
Power cords
Wiring must be organised to
prevent people from stepping on
the cables and to avoid pinching
by objects placed on or beside
them. Take special care around
sockets and plug boxes and
where the cable leaves the
device.
Ventilation
The housing is provided with slots and
openings to ensure ventilation and reliable
operation and protect the device against
overheating. Do not block or cover these
openings. The openings must never be
blocked, for example by placing the device
on a bed, a sofa, a carpet or similar surface.
Overloading
Make sure that sockets,
extension flexes and plug
boxes are not overloaded as
this may lead to fire or electric
shock.
4
Important Safety Instructions
Lightning
Unplug the device for additional
protection during thunder or when
the device is not used for prolonged
periods. This will prevent damage to
the device from lightning and surges.
Discs
Do not use scratched, deformed or
repaired discs. Such discs will break
easily and may cause serious injury
and damage to the device.
Damage
Unplug the device and contact skilled technicians in
the following cases:
Penetration of objects and liquid
Never push any objects through the
openings into the device, as they may
touch dangerous voltage points or
short circuit parts and cause fire or
electric shock. Do not spill liquid on
the DVD player.
A) If power cord or plug is damaged.
B) If liquid has been spilled on the device or objects
have fallen into the device.
C) If the device has been exposed to rain or water.
D) If the device does not work properly after
adhering to the instructions in the user manual.
Make only the setups mentioned in the manual,
as incorrect setup may cause damage and will
often make it difficult for a skilled technician to
make the device work properly again.
E) If the device has been dropped or damaged in
any other way.
F) When the operation of the device changes
drastically, the device requires service.
Accessories
The device must not be placed on unstable surfaces
such as a trolley, stand, tripod, shelf or table.
The device may fall and injure children or
adults or be damaged. Use only trolley,
stand, tripod, shelf or table which are very
stable or provided with the device. The
Device must be installed in accordance with the
manufacturer's instructions and by means of
installation equipment recommended by the
manufacturer. If the device is placed on a trolley, the
trolley must be moved carefully. Sudden stops,
unnecessary force and uneven surfaces may cause
the trolley to turn over.
Service
Do not attempt to carry out any
service work yourself. By opening or
removing the housing, you will be
exposed to dangerous voltage, etc.
Any service work should be carried
out by skilled technicians.
Disc drive
Keep your hands off the drive
when it closes to avoid trapping
your fingers.
Spare parts
If spare parts are required, make sure that the
technician uses spare parts specified by the
manufacturer or with the same characteristics as the
original component. Unauthorised spare parts may
cause fire, electric shock, etc.
Loads
Do not place heavy loads on the
DVD player, and do not step on it.
The load may fall and cause
serious injury or damage to the
device.
Safety check
After service or repairs on the DVD
player, ask the service technician to
carry out a safety check to ensure
that the device is ready for use.
5
Caution
Handling instructions
Condensation
Condensation may occur in the following cases:
The DVD player's top and back panel may
become warm after prolonged use. This is not due
to a defect.
When the DVD player is moved directly from a
cold to a warm place.
When the DVD player is not used, remove the
disc and turn off the device.
When the DVD player is used in a room where
the radiator has just been switched on or where
the cold air from the air condition plant is directed
at the device.
If the DVD player is not used for a long period, its
function may deteriorate. Therefore, the DVD
player should be turned on and used now and
then.
Protect the power cord
If the DVD player is used in the summer in a
warm and humid room just after it has been
removed from an air conditioned room.
Follow the instructions below to avoid irregular
function, electric shock, fire, or injury:
If there is steam or a high level of humidity in the
room.
Hold the plug firmly when inserting it into the
socket
Avoid heat-producing devices
Do not place objects on the power cord
Do not carry out service work on or change the
power cord
In case of condensation, the DVD player will not
work properly. Remove the disc and turn off the
device. Unplug the device and leave it for 2-3
hours. The DVD player will then have adapted to
the environment and any condensation will have
disappeared.
Positioning
Do not place the device in any of the following
places:
In sunlight, close to heat-producing devices and
in a closed trolley
At high temperatures (40ºC or above) or high
relative humidity (90% or more)
In dirty places as some internal parts may be
damaged
Do not put your fingers or any
other objects into the device
Touching the internal parts is dangerous and may
cause injury or damage. Do not open the
housing.
Do not place foreign matter on the drive.
NOTE:
An Ø may appear on the screen when the
device is turned on. This means that the
required operation is not available.
Interference
Placing the DVD player near a television set,
radio or video player may cause poor picture and
sound quality. In that case, move the DVD player
further from television set, radio or video player.
6
Features
!Full compatibility with DIVX(MPEG4),DVD, CD, MP3, Kodak Picture CD, CDR and CD-R W ( f i n a l i z e d )
Multiple playback modes: Program, Search
!Coaxial digital audio output
!S-video, composite video and component (Y, Pb, Pr) video outputs
Disc formats supported by this player:
MPEG4 files on discs
9
Dolby Digital
32
KODAK picture CD
8
MP3 files on CD-R/CD-RW
DVD video
Multi-angle
Subtitle choices
Audio choices
16:9 LB
TV Aspect Ratio modes
R RESTRICTED Parental Lock
This product incorporates copyright protection technology that is protected by method claims of
certain U.S.patents and other intellectual property rights owned by Macrovision Corporation and other
rights owners. Use of this copyright protection technology must be authorized by Macrovision
Corporation, and is intendedfor home and other limited viewing uses only unless otherwise authorized
by Macrovision Corporation. Reverse engineering or disassembly is prohibited.
The product complies with the KODAK Picture CD format and will display KODAK Picture CDs. The "KODAK
Picture CD Compatible" logo is a trademark of Eastman Kodak Company and is used with permission.
Manufactured under license from Dolby Laboratories. "Dolby" and the double-D symbol are trademarks of
Dolby Laboratories. Confidential Unpublished Works. c 1992-1997 Dolby Laboratories, Inc. All rights reserved.
7
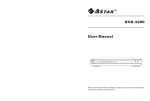
Front and Rear Panel
3
6
DV-153
ON
OFF
DVD-PLAYER
1
2
1
2
4
3
4
6 7 8 9 10
5
11
1 POWER
5 DISPLAY
9 STOP BUTTON
2 DVD TRAY
6 PLAY/PAUSE BUTTON
10 CARD READER
3 OPEN/CLOSE BUTTON
7 PREV BUTTON
4 IR RECEIVER
8 NEXT BUTTON
DVD-PLAYER
VIDEO
Y
Pb
Pr
S-VIDEO
L
R
COAXIAL
(Only in DV-252)
11
USB PORT
MODEL:
DV-153
POWER SOURCE:
110-240V 50~60Hz
POWER CONSUMPTION:
15W
11032.01
ITEM NO.:
SERIAL NO.:
XXXXXXXXXXXXXX
SCART OUT
VIDEO OUT
3
1
1
110-240V
50~60Hz
COMPONENT VIDEO / AUDIO OUT
4 7
6 5
2
3
4 5 6
1 SCART OUT
4 S-VIDEO output jack
2 5.1CH Audio output
5 Component Video output
(Y, Pb, Pr)
(FL, FR, SL, SR,CEN,SW )
3 COMPOSITE VIDEO output jack
6 Digital Audio COAXIAL output jack
7 2 CH audio output
8
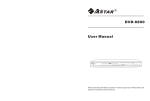
Connecting to a TV set
SCART input
NOTE:
There are 4 ways of connecting the DVD player to a TV set:
!Use a Scart cable
!Use a S-VIDEO cable along with the stereo RCA outputs (Remember to set the
video output to S-Video)
!Use a Composite video cable along with the stereo RCA outputs
!Use a Component video cable along with the stereo RCA outputs (Remember to
set the video output to YPbPr)
9
Connecting to an Analog AV amplifier
(This function is only available in DV-251 and DV-252)
YELLOW
RED
WHITE
VIDEO
VIDEO
IN
Amplifier
VOLUME
INPUT SELECTOR
POWER
BYPASS
PRO LOGIC
3 STEREO
MODE
TEST
CHANNEL
KARAOKE
MUTE
UP
DOWN
BASS
1
MIC
2
1
MIC VOL
2
MIC
TREBLE
ECHO
EXCITE
DVD IN
FRONT-R
SUR-R
SW
FRONT-L
SUR-L
CENT
Note:
1. Set the TV to the AV input connected to the DVD player.
2. Set the Amplifier to the AV input connected to the DVD player.
Remember to set the DOWNMIX settings to 5.1 in the DVD players setup menu
10
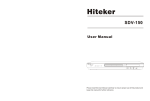
Connecting to a Digital AV amplifier
Coaxial cable
Coaxial
Digital Amplifier
VOLUME
INPUT SELECTOR
POWER
BYPASS
PRO LOGIC
3 STEREO
MODE
TEST
CHANNEL
KARAOKE
MUTE
UP
DOWN
BASS
1
MIC
2
1
MIC VOL
2
MIC
TREBLE
ECHO
EXCITE
Notes:
1. Set the SPDIF Audio out to Raw or PCM in the DVD players setup menu
2. Set the digital Amplifier to the coaixial input connected to the DVD player.
11
Remote Control Preparation
Using the remote control
Insert batteries
1
1. Open the cover.
Point the remote control at the remote
sensor.
2
2. Insert batteries.
OPEN/CLOSE
POWER
SUBTITLE
1
2
3
4
5
6
7
8
AUDIO
TITLE
9
TIME
10+
0
ZOOM
SLOW
PAUSE
ANGLE
VOL
PLAY
STOP
DISPLAY
MENU
ENTER
SETUP
Make sure to match the "+" and "-" of
GOTO
REV
FWD
PREV
NEXT
A-B
REPEAT
MUTE
RETURN
PROG
P/N
PBC
RANDOM
DIGEST
L/R
MODE
PSCAN/
NORMAL
the batteries with the marks inside the
battery compartment.
3
3. Close the cover.
Remarks: Do not expose the remote sensor
of the DVD Player to a strong light source,
such as direct sunlight.
Notes:
Notes:
! Point the remote control directly at the
Improper use of batteries may cause battery
leakage and corrosion. To operate the
remote control correctly,follow the
instructions below:
! Do not insert the batteries in the wrong
direction.
! Do not charge, heat, open, or short-circuit
the batteries.
! Do not throw batteries into a fire.
! Do not leave dead batteries in the Remote
Control.
! Do not use different types of batteries
together, or mix old and new batteries.
! If you do not use the remote control for a
long period of time, remove the batteries to
avoid possible damage from battery
corrosion.
! If the remote control does not function
correctly or the operating range becomes
reduced, replace all batteries with new
ones.
! If battery leakage occurs, clean the battery
compartment, then insert new ones.
player's remote sensor.
! Do not leave the remote control in an
extremely hot or humid place.
! Do not spill water or put anything wet
on the remote control.
! Battery life is ~1 year under normal
conditions.
12
Remote Control
Remote Control for DV-153
SUBTITLE
AUDIO
STANDBY
OPEN/CLOSE
POWER
SUBTITLE AUDIO OPEN/CLOSE
TITLE
ANGLE
TITLE
ANGLE
PLAY/PAUSE
SETUP
FAST FORWARD
FAST REVERSE
PLAY/PAUSE
ENTER
ENTER
)
0-10+ DIGITS
DISPLAY
VOL-
PROG
L/R
PBC
MENU
MENU
PROGRAM
SETUP
MOVE(
VOL+
INCREASE VOLUME
DECREASE VOLUME
STOP
L/R
1
STOP
2
3
GOTO
GOTO
4
5
6
10+
7
8
9
0
REV
FWD
PREV
NEXT
PBC
DISPLAY
ZOOM
SLOW
MUTE
A-B
REPEAT
VIDEO/
MODE
PREVIOUS
NEXT
SLOW
ZOOM
VIDEO MODE
MUTE
REPEAT
A-B
NOTE:
! In this manual
will be used to represent the different navigation
buttons on the remote.
! In order to use the functions on this remote you must first turn the DVD player on
by pressing the power button on the front panel.
13
Remote Control
Remote Control for DV-251 and DV-252
OPEN/CLOSE
OPEN/CLOSE
0-10+ DIGITS
SUBTITLE
1
2
3
4
SUBTITLE
5
6
TITLE
7
SLOW
8
9
TIME
PAUSE
MENU
10+
0
ZOOM
SLOW
)
VOL
PLAY
PAUSE
ANGLE
STOP
DISPLAY
MENU
SETUP
SETUP
GOTO
REV
FWD
PREV
NEXT
REPEAT
A-B
REPEAT
MUTE
RETURN
PROG
P/N
PBC
RANDOM
DIGEST
L/R
MODE
PSCAN/
NORMAL
P/N
36
DIGEST
37
L/R
TIME
VOL+
VOL-
PLAY
DISPLAY
A-B REPEAT
35
ANGLE
ENTER
FWD
PROG
AUDIO
TITLE
STOP
REV
34
OPEN/CLOSE
AUDIO
ZOOM
MOVE(
POWER
ENTER
GOTO
34
35
36
37
NEXT
PREV
RETURN
MUTE
RANDOM
PBC
MODE
PSCAN/NORMAL
NOTE:
! In this manual
will be used to represent the different navigation
buttons on the remote.
! In order to use the functions on this remote you must first turn the DVD player on
by pressing the power button on the front panel.
14
Remote Control Operation
POWER
During playback, press POWER to stop the player and return
to standby mode.
When the player is in standby, press STANDBY button on the
remote to turn the player on.
OPEN/
CLOSE
To open the disc tray, press OPEN/CLOSE.
To close the disc tray, press OPEN/CLOSE again.
0-10+ keys
These keys are used to input the time, as well as title, chapter
and track numbers.
When a numeric item is displayed on the screen, press the 0-10+
keys to select the desired entry, and press SELECT to confirm.
A-B
During playback, press A-B to select point A.
Press it again to select point B. The player will repeat the section
from A to B automatically.
Press A-B third time to cancel A-B repeat and clear points A and B.
Note: 1. During CD playback, points A and B must be within the same track.
During DVD playback, points A and B can be selected from different chapters.
2. This function is subject to the disc.
SLOW
During DVD or CD playback press corel hold slow. The player will
review the disc at 1/2,1/3,1/4,1/5,1/6,1/7 times normal speed at
follows. Slow SF 1/2 1/3 1/4 1/5 1/6 1/7 play
RETURN
During DVD or CD playback press RETURN. The player will
return to the menu.
During DVD or CD playback, press
to scan forward.
The player will review the disc at 2, 4, 8 and 20 times normal
speed as follows:
Press PLAY to resume normal playback.
During DVD or CD playback, press
to scan in reverse. The
player will review the disc at 2, 4, 8 and 16 times normal speed
as follows:
Press PLAY to resume normal playback.
15
Remote Control Operation
PREV
Press PREV to skip to previous chapter or track.
NEXT
Press NEXT to skip to the next chapter or track.
STOP
Press STOP once during playback to stop and hold playback.
Press PLAY to resume playback from the point you pressed STOP.
Press STOP twice to stop playback completely.
PLAY
Press PLAY from stop mode to start play.
PAUSE
Press PAUSE during playback to pause playback.
Press PLAY to resume normal playback.
MENU
During DVD, playback, press MENU to return to the program menu.
Note: This function can vary from disc to disc
TITLE
During DVD, playback, press TITLE to display the DVD title
menu or play the first title.
Note: This function can vary from disc to disc
MODE
REPEAT
Press the MODE button to change the Video Output .There are 4
different outputs INTERLACE-YUV,P-SCAN YPbPr,TV-RGB,
S-VIDEO. When you have selected the incorrect output your
screen will go blank. Continue to hit the Mode button to retrieve
the correct connection.
Select to press REPEAT to select Repeat Title, Repeat chapter,
Repeat off During DVD playback.
Press REPEAT to select Repeat Single, Repaet all and Repeat
off (CD or Other).
16
Remote Control Operation
VOL+ VOL-
MUTE
ZOOM
Press Volume < VOL+> button to increase Volume.
Press < VOL-> button to reduce Volume till to no volume output.
Press MUTE to mute the Audio output.
Press MUTE again to resume normal Audio output.
During DVD playback, press ZOOM to magnify the image as
follows:
Q2
Q3
Q4
Q1/2
Q1/3
Q1/4
QOFF
ANGLE
During DVD playback
Press ANGLE to view scenes from different camera angles.
Press ANGLE repeatedly to change from one camera angle to
another.
Note: This function can vary from disc to disc
LANGUAGE
During DVD playback
Press LANGUAGE repeatedly to select from up to 8 Audio
language/formats.
Note: This function can vary from disc to disc
SUBTITLE
During DVD playback
Press SUBTITLE repeatedly to select from up to 32 subtitle
languages.
Note: This function can vary from disc to disc
P/N
During playback press P/N to select PAL, AUTO, NTSL.
DIGEST
During playback press DIGEST to display picture
(This function is only available on VCD.)
17
Remote Control Operation
PROG
When [PROGRAM] is on, press ENTER to display the [Program] submenu:
CD
Others
Program Input
1__
4__
7__
10__
2__
5__
8__
11__
3__
6__
9__
12__
Play Program
Clear All
Input the track numbers in the order you
would like them to play. When finished,
select[Play Program] and then press
ENTER to play the tracks in the new
programmed order. Select [Clear All] and
press ENTER to clear all the numbers you
have input.
DVD
Program Input
Title / chapter
1__:__
4__:__
7__:__
10__:__
2__:__
5__:__
8__:__
11__:__
3__:__
6__:__
9__:__
12__:__
Play Program
Clear All
Input the title number and the chapter
number in the desired order. Then
select[Play Program] and press ENTER to
play the chapters in the order you have
set. Select [Clear All] and press ENTER to
clear all the numbers you have input.
L/R
When a DVD is played, the active dubbing languang will be
shown. When a SVCD or VCD is played the left track,right track
or stereo will be displayed accordingly.
When a bilingual story VCD is played, you may press the button
to select the language desired.
PSCAN/NORMAL
During play back press PSCAN/NORMAL for video scan output
mode.
(This function is only available in DV-251 and DV-252)
18
Remote Control Operation
DISPLAY
During playback,press DISPLAY to show the current time counter
position.
Disc type
Current title
Total title
Play time of the current title
Total Chapter
Current Chapter
Press DISPLAY to show the Audio and Subtitle message menu.
Language
Audio type
Angle
Subtitle
TIME
During playback,press TIME to show the TIME SEARCH menu .
Disc type
Current title
Total title
Play time of the current title
Total Chapter
Current Chapter
19
Remote Control Operation
Press Time again to show the remain play time .
Current title
Total title
Remain play time
Total Chapter
Current Chapter
GOTO
During playback,press GOTO show the current time counter
position.
Enter number to choose
the Play time.
Enter number to
choose the title
Total Chapter
Enter number to choose
the Chapter.
Use the number keys to input the desired Time, Title or Chapter, then
press ENTER to confirm.
20
The Setup Menu
1. General Steps of setup menu
A) Press the setup button, the main setup menu appears.
SYSTEM SETUP
SOURCE
TV SYSTEM
VIDEO
TV TYPE
PASSWORD
RATING
DEFAULT
EXIT SETUP
B) Press the Left and Right arrow buttons to highlight the icon of the desired
page, then press the Down or Right arrow button to activate that page; For
example, if you want to setup the video page, press Right to highlight the
video icon, the video page will be displayed on the screen.
AUDIO SETUP
AUDIO OUT
KEY
PRO LOGIC
EXIT SETUP
C) Press the Down arrow button to highlight the desired option. Press Enter
or press Right to select. The choices of that option appear on the right; For
example, press the Down arrow button to highlight the BRIGHTNESS
option, the press Enter to select, the brightness choices appear on the right.
21
The Setup Menu
AUDIO SETUP
AUDIO OUT
KEY
+4
+2
0
-2
-4
PRO LOGIC
EXIT SETUP
A) Press the Arrow buttons to highlight the Exit Setup option,then press
Enter or Setup again to exit Setup Menu .
2. Setup Items Introduction
2.1 SYSTEM SETUP
The system setup options are illustrated below:
2.1.1 SOURCE
There are 2 kinds of sources illustrated below.
(The USB function is only available on DV-251 and DV-252)
(The Card reader is only available on DV-252)
SYSTEM SETUP
SOURCE
DISC
TV SYSTEM
USB
VIDEO
CARD READER
TV TYPE
PASSWORD
RATING
DEFAULT
EXIT SETUP
22
The Setup Menu
2.1.2 TV SYSTEM
According to the Color System of the TV, you can choose the TV System.
Note:
NTSC is primarily used in the United States
SYSTEM SETUP
SOURCE
TV SYSTEM
PAL
VIDEO
NTSC
TV TYPE
AUTO
PASSWORD
RATING
DEFAULT
EXIT SETUP
2.1.3 VIDEO
According to the output jack of TV set, you can chooseS-VIDEO, YUV,RGB,
P-SCAN YPBPR.
Note:
Only choose PSCAN if your DVD player is connected to a Progressive
scan TV with Y, Pb, Pr cables.
SYSTEM SETUP
SOURCE
TV SYSTEM
VIDEO
INTERLACE YUV
TV TYPE
P-SCAN YPbPr
PASSWORD
RGB
RATING
S-VIDEO
DEFAULT
EXIT SETUP
23
The Setup Menu
2.1.4 TV TYPE
According to the TV type,you can choose 16:9,4:3LB or 4:3PS.
SYSTEM SETUP
SOURCE
TV SYSTEM
VIDEO
TV TYPE
4:3PS
PASSWORD
4:3LB
RATING
16:9
DEFAULT
EXIT SETUP
2.1.5 PASSWORD
The password option is initialized locked, and you can not set the ratings limit
or change the password. In order for the Ratings feature to work, the
password mode must be turned on. If you want to set the ratings limit , you
will need to enter the default password. Which is 6666, then press Enter to
confirm. To change the password , you will be prompted for the old password
, then be prompted for anew. Enter a 4-digit number ( this is you password).
Press remember your PASSWORD, as the DEFAULT setting will revert
everything.But the PASSWORD to the factory defaults.
SYSTEM SETUP
SOURCE
TV SYSTEM
VIDEO
TV TYPE
PASSWORD
----
RATING
DEFAULT
EXIT SETUP
24
The Setup Menu
2.1.6 RATING
The Rating feature is a rating limit system, like movie ratings. It works with
DVD discs that have been assigned a rating. This helps you control the types
for DVDs that your family watches.
SYSTEM SETUP
SOURCE
1G
TV SYSTEM
2
VIDEO
3 PG
TV TYPE
4 PG13
PASSWORD
5
RATING
6R
DEFAULT
7 NC-17
EXIT SETUP
8
2.1.7 DEFAULT
The DEFAULT setup options are RESTORE factory setup. Let your player work
on best state.
SYSTEM SETUP
SOURCE
TV SYSTEM
VIDEO
TV TYPE
PASSWORD
RATING
DEFAULT
RESTORE
EXIT SETUP
When your unit does not work properly, it may probably result from some wrong
settings.Please try the Restore Factory Setting function to see if thr unit can
restore to its normal working status.
2.2 LANGUAGE SETUP
The language setup options are illustrated below:
2.2.1 OSD LANGUAGE
Highlight the OSD LANGUAGE option, and press the Arrow buttons to choose
the OSD language you prefer. Press Enter to confirm, and it will display OSD
in that language.
25
The Setup Menu
LANGUAGE SETUP
OSD LANGUAGE
ENGLISH
AUDIO LANG
GERMAN
SUBTITLE LANG
SPANISH
MENU LANG
FRENCH
DUTCH
DANISH
EXIT SETUP
2.2.2
AUDIO LANG
Highlight the AUDIO LANG option,and press the Arrow buttons to choose the
audio language you prefer.Press Enter to confirm.If the disc you are playing
has that language available,it will output that language.
LANGUAGE SETUP
OSD LANGUAGE
ENGLISH
AUDIO LANG
GERMAN
SUBTITLE LANG
SPANISH
MENU LANG
FRENCH
DUTCH
ITALIAN
DANISH
EXIT SETUP
PORTUGUESE
2.2.3 SUBTITLE LANG
Highlight the SUBTITLE LANG option, and press the Arrow buttons to
choose the subtitle language you prefer. Press Enter to confirm. If the disc
you are playing has that language available, it will displays subtitles in that
language.
LANGUAGE SETUP
OSD LANGUAGE
ENGLISH
AUDIO LANG
GERMAN
SUBTITLE LANG
SPANISH
MENU LANG
FRENCH
DUTCH
ITALIAN
DANISH
EXIT SETUP
OFF
2.2.4 MENU LANG
Highlight the MENU LANG option, and press the Arrow buttons to choose
the menu languageyou prefer. Press Enter to confirm. If the disc you are
playing has that Language, Availabel.It will display the menu in the
language.
26
The Setup Menu
Notes:
If your preferred language is not availabel, the disc s default language
will be played.
LANGUAGE SETUP
OSD LANGUAGE
ENGLISH
AUDIO LANG
GERMAN
SUBTITLE LANG
SPANISH
MENU LANG
FRENCH
DUTCH
ITALIAN
DANISH
EXIT SETUP
PORTUGUESE
2.3 AUDIO SETUP
The audio setup options are illustrated below:
2.3.1 AUDIO OUT
Highlight the AUDIO OUT option, and press the Arrow buttons to choose the
audiooutput mode you prefer. Press ENter to confirm; There are 3 optional
audio outputmodes: SPDIF/OFF, SPDIF / RAW, and SPDIF/ PCM.
AUDIO SETUP
AUDIO OUT
SPDIF OFF
KEY
SPDIF RAW
PRO LOGIC
SPDIF PCM
EXIT SETUP
2.3.2 KEY
Use the Up and Down arrow button to move the scroll and adjust the key.
AUDIO SETUP
AUDIO OUT
KEY
PRO LOGIC
+4
+2
0
-2
-4
EXIT SETUP
27
The Setup Menu
2.3.3 PROLOGIC
There are 3 optional PROLOGIC: MOVIE MODE, MUSIC MODE, OFF.
(This function is only available on DV-251 and DV-252)
AUDIO SETUP
AUDIO OUT
OFF
KEY
MOVIE MODE
PRO LOGIC
MUSIC MODE
EXIT SETUP
2.4 VIDEO SETUP
The video setup options are illustrated below:
VIDEO SETUP
BRIGHTNESS
CONTRAST
HUE
SATURATION
EXIT SETUP
2.4.1 BRIGHTNESS
Use the Up and Down arrow buttons to move the scroll and adjust the brightness
VIDEO SETUP
BRIGHTNESS
12
10
8
6
4
2
0
CONTRAST
HUE
SATURATION
EXIT SETUP
28
The Setup Menu
2.4.2 CONTRAST
Use the Up and Down arrow buttons to move the scroll and adjust the
contrast.
VIDEO SETUP
BRIGHTNESS
12
10
8
6
4
2
0
CONTRAST
HUE
SATURATION
EXIT SETUP
2.4.3 HUE
Use the Up and Down arrow buttons to move the scroll and adjust the hue.
VIDEO SETUP
BRIGHTNESS
+6
+4
+2
0
-2
-4
-6
CONTRAST
HUE
SATURATION
EXIT SETUP
2.4.4 SATURATION
Use the Up and Down arrow buttons to move the scroll and adjust the
saturation.
VIDEO SETUP
BRIGHTNESS
12
10
8
6
4
2
0
CONTRAST
HUE
SATURATION
EXIT SETUP
29
The Setup Menu
2.5 SPEAKER SETUP
The speaker setup options are illustrated below:
(This function is only available on DV-251 and DV-252)
2.5.1 DOWNMIX
A) LT / RT
Choose this setting when you are connected to a
2 Channel Analog Audio Input.
B) STEREO Choose this setting when the DVD player is
connected to a TV or therefore modulator.
D) 5.1CH
Choose this setting when the DVD player is
connected to a 5.1Channel Surround Sound
System.
(This function is only available in DV-251 and DV-252)
SPEAKER SETUP
DOWNMIX
LT / RT
SUBWOOFER
STEREO
BASS MODE
5.1
CENTER DELAY
REAR DELAY
EXIT SETUP
2.5.2 SUBWOOFER
There are two settings in this option:OFF/ON.When ON is chosen,the player
will automatically detect and play the subwoofer.When OFF is chosen the
subwoofer will not play.
(This function is only available on DV-251 and DV-252)
SPEAKER SETUP
DOWNMIX
SUBWOOFER
OFF
BASS MODE
ON
CENTER DELAY
REAR DELAY
EXIT SETUP
30
The Setup Menu
2.5.3 BASS MODE
There are Two settings in this option: ALL LG SPK and ALL SM SPK
(This function is only available on DV-251 and DV-252)
SPEAKER SETUP
DOWNMIX
SUBWOOFER
BASS MODE
ALL LG SPK
CENTER DELAY
ALL SM SPK
REAR DELAY
EXIT SETUP
2.5.4 CENTER
You can adjust the center by using the Up and Down buttons to move the scroll
the scroll bar.
(This function is only available on DV-251 and DV-252)
SPEAKER SETUP
DOWNMIX
SUBWOOFER
BASS MODE
CENTER DELAY
REAR DELAY
+
4 MS
2 MS
0 MS
EXIT SETUP
31
The Setup Menu
2.5.5 REAR DELAY
You can adjust the Center and the Rear delay by using the Up and
Down buttons to move the scroll bar.
(This function is only available on DV-251 and DV-252)
SPEAKER SETUP
DOWNMIX
SUBWOOFER
BASS MODE
CENTER DELAY
REAR DELAY
+
12 MS
6 MS
0 MS
EXIT SETUP
2.6 DIGITAL SETUP
The DIGITAL SETUP options are illustrated below:
2.6.1 DYNAMIC RANGE:
To avoid disturbing the neighbours at night, you can use this function to reduce
the sound effects volume without changing the original tone.
DIGITAL SETUP
DYNAMIC RANGE
FULL
6/8
4/8
2/8
OFF
DUAL MONO
EXIT SETUP
32
The Setup Menu
2.6.2 DUAL MONO (LEFT + RIGHT)
Choose to setup the L and R mono output mode. There are four
modes in this option: STEREO, MONO L, MONO R,and MIX MONO.
DIGITAL SETUP
DYNAMIC RANGE
DUAL MONO
STEREO
MONO L
MONO R
MIXED MONO
EXIT SETUP
REFERENCE:
1. To protect your DVD player, the interval between turning the unit on and off,
via the Main Power button, should be more than 30 seconds.
2. If the unit will not be used for an extended period of time, please disconnect
the power plug from the outlet.
3. The player should only be operated with the correct power supply that
corresponds to the marking label. The incorrect power supply could damage
the unit.
4. The player may not be compatible with some encrypted discs.
5. If the player stops during playback, eject the disc and power off the unit. Wait
10 minutes and power the unit back on.
33
MPEG4 and MP3 Playback
When a MPEG and a Mp3 disc is loaded, the screen will display as follows:
Current MP3/JPEG file
name. If a JPEG file is
playing, the name should
have a JPEG extension.
Current
directory
name
File Switch Region: Displays
the file typa of the playing
and the switching.
The playing file
is a Mp3 audio
file.
The playing file is
a JPEG picture file.
Current MP3 file name.
If a JPEG file is playing,
the name should have a
JPEG extension.
Current
directory
name
File Switch Region: Displays
the file typa of the playing
and the switching.
The playing file
is a Mp3 audio
file.
The playing file is
a JPEG picture file.
Press
to select the file when the cursor appears in the file
window.Press select to play the current file select by the cursor.
Press
to switch between the directory window and the file
window.
Note:
During Mp3 playback, Forward Scan and Reverse Scan are not
available.
Note:
The player will not identify or play a MP3 disc under the following
conditions: the recording format is not supported(make sure the files
are in MP3 format),the disc is badly scratched, damaged or dirty, the
disc is not finalized.
34
USB Input and card reader
USB input
This unit have a USB jack,when no disc in the player, you can insert a
USB DISC or a Mp3 Player with USB Interface to play the Mp3 music and
JPEG files. All the operating functions are the same as playing JPEG- or Mp3
discs.
See the instructions on the previous side.
Card reader
This unit have a 5 in1 card reader, that is available when there is no disc
loaded in the player. You can insert the five kind of cards in the card reader to
play mp3 music and JPEG files. All the operating functions are the same as
playing JPEG- or Mp3 discs.
The card reader is compatible with the following type of cards:
CSM , XD, MMD, SD and MS
See the instructions on the previous side.
35
Playing a JPEG file
1. When a JPEG disc is loaded in the DVD-player, an automatic slide show will be launched.
Each picture will be displayed and scaled to fit the screen.
Press STOP to enter the file library.
Use the SCROLL key to navigate the pictures, and press PLAY to display a picture.
When the a picture has been chosen, the slide show will resume with the next picture in
the library.
2. Press SCROLL to rotate the picture. These operations are allowed only when a picture
is being displayed normally and will be cancelled automatically when a new picture is
displayed.
3. Press ZOOM to execute the zoom function and select the zoom enlarging scale with I<<
and >>I. In zoom mode, press the SCROLL buttons to move the picture on the screen.
With zoom mode off, the next picture will be scaled to fit the screen.
Press PLAY to cancel the zoom mode and resume the slide show.
JPEG limitations
- JPEG files containing CMYK colors is not supported by this DVD-player.
- The range of pixels should not be exceeding 3840 X 3840 pixels, in order to achieve the
best Performance.
36
Troubleshooting
This troubleshooting guide may help you find a possible cause of and solution to a problem. If there are still
problems, please contact the local service centre or distributor.
PROBLEMS AND POSSIBLE SOLUTIONS
Common sympton
Possible cause
Remedy
No function
Mains power is not connected
Power is OFF
Connect to mains power outlet
Turn the power ON.
No playback
No disc is inserted
("no disc" will be shown on screen).
Disc is upside down.
("no disc" will be shown on screen).
Insert a disc.
Dirty disc
Deformed/scratched disc
Condensation in unit
Reload disc.
The label side should face
upward.
Clean disc surface.
Replace disc.
Turn power on for 1-2 hours
before using the unit.
No sound
Sound in one or more
channel(s) is missing
Wrong audio output setting
Poor or missing cable connection
Check audio output setting
Check connections
No sound in centre/
surround speakers
Downmix settings are wrong
Disc or TV program is recorded
in stereo
Change downmix settings
Set prologic II on.
Sound on scart connecter
is very weak or missing
Sound in scart connecter is Volume
regulated.
Turn the volume up to max..
(Can only be used without
speakers connected)
No picture
Disconnection of video equipment
Wrong output setting of video output
Check video connections
Check video output setting of
Video output in general setup
37
Specifications
DV-153
Power requirements: AC 100-240 Volt, 50/60Hz
Power consumption: 15W
Video standard: NTSC/PAL/AUTO
Unit Weight: 1.4kg
Video out
Video out: 1.0V(p-p)/75 , sync, negative polarity, RCA pin jack x 1
S-video output connector(separate Y¡C signal output connector):
Y output: 1.0V(p-p)/75 , sync, negative polarity
C output: 0.286V(p-p)/75
Audio out
2 channel out: RCA pin jack(L,R) x 2
Coaxial out: 0.5V(p-p)75 ,RCA pin Jack x l
Frequency response: 20Hz to 20kHz
S/N ratio:>90dB
Total harmonic distortion: <0.0025%
Specifications are subject to change without notice.
Weight and dimensions are approximate.
38
Specifications
DV-251 and DV-252
Power requirements: AC 100-240 Volt, 50/60Hz
Power consumption: 15W
Video standard: NTSC/PAL/AUTO
Unit Weight: 2,1kg)
Video out
Video out: 1.0V(p-p)/75 , sync, negative polarity, RCA pin jack x 1
S-video output connector(separate Y¡C signal output connector):
Y output: 1.0V(p-p)/75 , sync, negative polarity
C output: 0.286V(p-p)/75
Audio out
5.1 channel out: RCA pin jackx6
Coaxial out: 0.5V(p-p75 ,RCA pin Jack x l
Frequency response: 20Hz to 20kHz
S/N ratio:>90dB
Total harmonic distortion: <0.0025%
Specifications are subject to change without notice.
Weight and dimensions are approximate.
39
For further information please visit our website:
www.eltax.com
Item no. 40177