1
Introduction
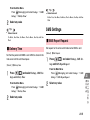
Vodafone 804N User Guide
Thank you for purchasing the Vodafone 804N handset.
Note
●Read this guide thoroughly before using the
Vodafone 804N handset to ensure proper usage.
• Unauthorised copying of any part of this guide is
●After reading this guide, keep it for later reference.
●Accessible services may be limited to contract
conditions or service area.
The Vodafone 804N handset is compatible with the
W-CDMA and GSM network systems.
February 2006 Version 1
prohibited.
Vodafone K.K.
• The guide contents are subject to change without
prior notice.
• Steps have been taken to ensure the accuracy of
descriptions in this guide. If you find inaccurate or
missing information, please contact Customer
Service (zP.30-38).
*For more information, please dial
157 from a Vodafone handset for
Customer Service or visit your
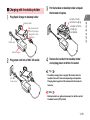
To help protect the environment and recycle valuable
nearest Vodafone Shop.
resources, mobile phone and PHS shops displaying
the above mark accept mobile phones, batteries and
chargers of all manufacturers.
※Mobile phones, batteries and chargers collected for
recycling cannot be returned.
※To protect your privacy, delete any personal information
(telephone numbers, call logs, messages, etc.) before
taking your handset to the shop.
Model name: Vodafone 804N
Manufacturer: NEC Corporation
MDY-000031-JEA0
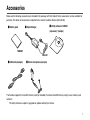
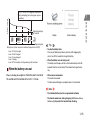
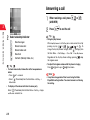
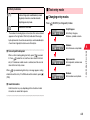
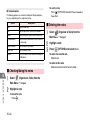
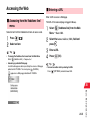
Accessories
Make sure the following accessories are included in the package with the handset: Some accessories are also available for
purchase. For details on accessories or optional items, contact Customer Service (zp.30-38).
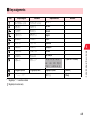
■ Battery pack
■ Utility software CD-ROM
(Japanese)* (sample)
■ Rapid Charger
NEBAB1
NECL01
■ Stereo microphone (sample)
voda
■ USB cable (sample)
fone
The handset supports the microSD memory card (not included). Purchase microSD memory card(s) to use memory card
functions.
*
The utility software is subject to upgrades or updates without prior notice.
i
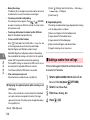
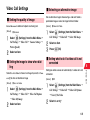
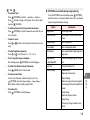
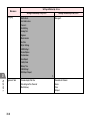
Contents
Basic Operation
Accessories . . . . . . . . . . . . . . . . . . . . . . . . . . . . . . . . . . . . i
Contents . . . . . . . . . . . . . . . . . . . . . . . . . . . . . . . . . . . . . . ii
Guide to This Manual . . . . . . . . . . . . . . . . . . . . . . . . . . . xiii
Safety Precautions . . . . . . . . . . . . . . . . . . . . . . . . . . . . . xvi
General Notes . . . . . . . . . . . . . . . . . . . . . . . . . . . . . . . xxvii
1
Getting Started
Main Features . . . . . . . . . . . . . . . . . . . . . . . . . . . . . . . . . 1-2
USIM Card . . . . . . . . . . . . . . . . . . . . . . . . . . . . . . . . . . . . 1-4
Before using the USIM card. . . . . . . . . . . . . . . . . . . . 1-4
General notes regarding the USIM card . . . . . . . . . . 1-5
Inserting/removing the USIM card . . . . . . . . . . . . . . . 1-5
PIN . . . . . . . . . . . . . . . . . . . . . . . . . . . . . . . . . . . . . . . 1-7
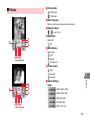
Handset Parts & Functions . . . . . . . . . . . . . . . . . . . . . . 1-8
Handset . . . . . . . . . . . . . . . . . . . . . . . . . . . . . . . . . . . 1-8
Display . . . . . . . . . . . . . . . . . . . . . . . . . . . . . . . . . . . 1-11
External display . . . . . . . . . . . . . . . . . . . . . . . . . . . . 1-12
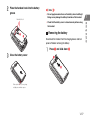
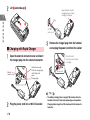
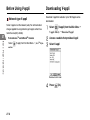
Battery & Charger. . . . . . . . . . . . . . . . . . . . . . . . . . . . . 1-13
Notes on using battery & charger . . . . . . . . . . . . . . 1-13
Inserting/removing the battery . . . . . . . . . . . . . . . . . 1-16
ii
Charging with Rapid Charger. . . . . . . . . . . . . . . . . . 1-18
Charging with the desktop holder . . . . . . . . . . . . . . 1-19
Charging with the in-car charger . . . . . . . . . . . . . . . 1-20
Turning the Handset On/Off . . . . . . . . . . . . . . . . . . . . 1-21
Turning the handset on . . . . . . . . . . . . . . . . . . . . . . 1-21
Turning the handset off . . . . . . . . . . . . . . . . . . . . . . 1-22
Initial Settings. . . . . . . . . . . . . . . . . . . . . . . . . . . . . . . . 1-22
Setting date & time . . . . . . . . . . . . . . . . . . . . . . . . . 1-22
Retrieving network information . . . . . . . . . . . . . . . . 1-23
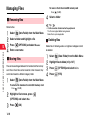
Changing the Language Mode . . . . . . . . . . . . . . . . . . 1-24
Changing the display language to English. . . . . . . . 1-24
Changing the display language to Japanese . . . . . . 1-24
Keys & Menus. . . . . . . . . . . . . . . . . . . . . . . . . . . . . . . . 1-24
Softkeys . . . . . . . . . . . . . . . . . . . . . . . . . . . . . . . . . . 1-24
Main Menu . . . . . . . . . . . . . . . . . . . . . . . . . . . . . . . . 1-25
My Menu . . . . . . . . . . . . . . . . . . . . . . . . . . . . . . . . . 1-27
OPTIONS. . . . . . . . . . . . . . . . . . . . . . . . . . . . . . . . . 1-27
Multitasking . . . . . . . . . . . . . . . . . . . . . . . . . . . . . . . . . 1-28
Launching new tasks . . . . . . . . . . . . . . . . . . . . . . . . 1-28
Switching tasks . . . . . . . . . . . . . . . . . . . . . . . . . . . . 1-29
Ending tasks . . . . . . . . . . . . . . . . . . . . . . . . . . . . . . 1-29
Handset Codes . . . . . . . . . . . . . . . . . . . . . . . . . . . . . . . 1-30
Security Code . . . . . . . . . . . . . . . . . . . . . . . . . . . . . 1-30
Centre Access Code . . . . . . . . . . . . . . . . . . . . . . . . 1-30
Network Password . . . . . . . . . . . . . . . . . . . . . . . . . . 1-30
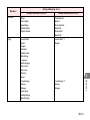
2
Making an international call outside Japan . . . . . . . 2-12
Making an emergency call. . . . . . . . . . . . . . . . . . . . . . 2-12
Dialling restrictions and emergency calls. . . . . . . . . 2-12
Basic Handset Operations
Making a call . . . . . . . . . . . . . . . . . . . . . . . . . . . . . . . . . . 2-2
Making a call from call logs. . . . . . . . . . . . . . . . . . . . . . 2-3
Dialled Calls . . . . . . . . . . . . . . . . . . . . . . . . . . . . . . . . 2-3
Received Calls . . . . . . . . . . . . . . . . . . . . . . . . . . . . . . 2-4
Checking missed calls or new messages . . . . . . . . . 2-5
Answering a call . . . . . . . . . . . . . . . . . . . . . . . . . . . . . . . 2-6
Rejecting an incoming call . . . . . . . . . . . . . . . . . . . . . . 2-7
Preventing prank calls . . . . . . . . . . . . . . . . . . . . . . . . . . 2-7
Operations during a call . . . . . . . . . . . . . . . . . . . . . . . . 2-7
Adjusting the earpiece volume. . . . . . . . . . . . . . . . . . 2-7
Putting a call on hold . . . . . . . . . . . . . . . . . . . . . . . . . 2-8
Recording a call (Call Memo). . . . . . . . . . . . . . . . . . . 2-8
Switching to handsfree. . . . . . . . . . . . . . . . . . . . . . . . 2-8
Checking call time . . . . . . . . . . . . . . . . . . . . . . . . . . . . . 2-9
Checking call time . . . . . . . . . . . . . . . . . . . . . . . . . . . 2-9
Resetting total call time . . . . . . . . . . . . . . . . . . . . . . . 2-9
Checking owner information. . . . . . . . . . . . . . . . . . . . 2-10
Calling from outside Japan (Roaming) . . . . . . . . . . . 2-10
Switching the network mode . . . . . . . . . . . . . . . . . . 2-10
Setting mobile phone provider . . . . . . . . . . . . . . . . . 2-10
Selecting preferred provider. . . . . . . . . . . . . . . . . . . 2-11
3
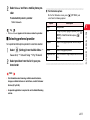
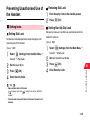
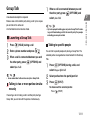
Manner Mode
Minding Mobile Manners . . . . . . . . . . . . . . . . . . . . . . . . 3-2
Setting/Releasing Manner Mode . . . . . . . . . . . . . . . . . . 3-2
4
Entering Characters
Entering Characters . . . . . . . . . . . . . . . . . . . . . . . . . . . . 4-2
Text entry window . . . . . . . . . . . . . . . . . . . . . . . . . . . 4-2
Text entry mode . . . . . . . . . . . . . . . . . . . . . . . . . . . . . 4-3
Key assignments . . . . . . . . . . . . . . . . . . . . . . . . . . . . 4-5
Entering Characters in Mode1 . . . . . . . . . . . . . . . . . . . 4-6
Entering Kanji/Hiragana . . . . . . . . . . . . . . . . . . . . . . . 4-6
Entering Katakana . . . . . . . . . . . . . . . . . . . . . . . . . . . 4-7
Entering alphanumerics . . . . . . . . . . . . . . . . . . . . . . . 4-7
Entering numbers . . . . . . . . . . . . . . . . . . . . . . . . . . . 4-8
Entering symbols/pictographs . . . . . . . . . . . . . . . . . . 4-8
Entering emoticons . . . . . . . . . . . . . . . . . . . . . . . . . . 4-9
Entering spaces . . . . . . . . . . . . . . . . . . . . . . . . . . . . . 4-9
Breaking a line . . . . . . . . . . . . . . . . . . . . . . . . . . . . . . 4-9
Using other functions . . . . . . . . . . . . . . . . . . . . . . . . . 4-9
Changing Input Mode . . . . . . . . . . . . . . . . . . . . . . . . . 4-12
iii
Entering characters in T9. . . . . . . . . . . . . . . . . . . . . 4-12
Entering characters in 2-touch . . . . . . . . . . . . . . . . . 4-16
Editing Characters . . . . . . . . . . . . . . . . . . . . . . . . . . . . 4-17
Editing characters . . . . . . . . . . . . . . . . . . . . . . . . . . 4-17
Deleting characters . . . . . . . . . . . . . . . . . . . . . . . . . 4-18
Copying/cutting/pasting . . . . . . . . . . . . . . . . . . . . . . 4-18
Moving the cursor to the beginning/end of the text . 4-19
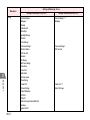
5
Phone Book
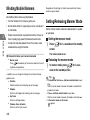
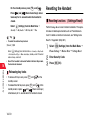
Storing contacts in Phone Book. . . . . . . . . . . . . . . . . . 5-2
Phone Book items . . . . . . . . . . . . . . . . . . . . . . . . . . . 5-2
Creating contacts . . . . . . . . . . . . . . . . . . . . . . . . . . . . 5-3
Adding a number from call logs . . . . . . . . . . . . . . . . . 5-4
Setting Groups . . . . . . . . . . . . . . . . . . . . . . . . . . . . . . . . 5-5
Group setting screen . . . . . . . . . . . . . . . . . . . . . . . . . 5-5
Using Phone Book . . . . . . . . . . . . . . . . . . . . . . . . . . . . . 5-6
Making a call using a contact. . . . . . . . . . . . . . . . . . . 5-6
Exchanging data between handset and USIM card. . 5-8
Editing Contacts. . . . . . . . . . . . . . . . . . . . . . . . . . . . . . . 5-9
Editing contacts . . . . . . . . . . . . . . . . . . . . . . . . . . . . . 5-9
Deleting contacts . . . . . . . . . . . . . . . . . . . . . . . . . . . 5-10
6
Video Call
Before Using Video Calls. . . . . . . . . . . . . . . . . . . . . . . . 6-2
iv
Video call screen . . . . . . . . . . . . . . . . . . . . . . . . . . . . 6-2
Making a Video Call . . . . . . . . . . . . . . . . . . . . . . . . . . . . 6-2
Answering a Video Call . . . . . . . . . . . . . . . . . . . . . . . . . 6-3
Operations during a Video Call. . . . . . . . . . . . . . . . . . . 6-4
Video Call Settings. . . . . . . . . . . . . . . . . . . . . . . . . . . . . 6-5
Setting the quality of image . . . . . . . . . . . . . . . . . . . . 6-5
Setting the image to show when dialling . . . . . . . . . . 6-5
Selecting an alternative image. . . . . . . . . . . . . . . . . . 6-5
Setting what to do if a video call is not connected . . . 6-5
Setting screen mode during a video call . . . . . . . . . . 6-6
Setting Night Mode . . . . . . . . . . . . . . . . . . . . . . . . . . 6-6
Setting call time display during a call . . . . . . . . . . . . . 6-6
7
Camera
Before Using the Camera . . . . . . . . . . . . . . . . . . . . . . . 7-2
Notes on capturing images . . . . . . . . . . . . . . . . . . . . 7-2
General notes on camera . . . . . . . . . . . . . . . . . . . . . 7-2
Display . . . . . . . . . . . . . . . . . . . . . . . . . . . . . . . . . . . . 7-3
Macro switch . . . . . . . . . . . . . . . . . . . . . . . . . . . . . . . 7-4
Capturing Images . . . . . . . . . . . . . . . . . . . . . . . . . . . . . . 7-4
Capturing images. . . . . . . . . . . . . . . . . . . . . . . . . . . . 7-4
Viewing images . . . . . . . . . . . . . . . . . . . . . . . . . . . . . 7-6
Capturing Videos . . . . . . . . . . . . . . . . . . . . . . . . . . . . . . 7-6
Capturing videos . . . . . . . . . . . . . . . . . . . . . . . . . . . . 7-6
Playing videos . . . . . . . . . . . . . . . . . . . . . . . . . . . . . . 7-8
Sending images or videos. . . . . . . . . . . . . . . . . . . . . . . 7-8
Illumination . . . . . . . . . . . . . . . . . . . . . . . . . . . . . . . . . . . 8-8
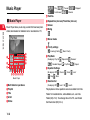
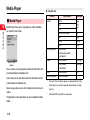
Bar Code Reader . . . . . . . . . . . . . . . . . . . . . . . . . . . . . . 7-8
9
8
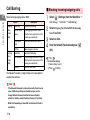
Display and Lighting
Sounds
Mode . . . . . . . . . . . . . . . . . . . . . . . . . . . . . . . . . . . . . . . . 9-2
Display . . . . . . . . . . . . . . . . . . . . . . . . . . . . . . . . . . . . . . 8-2
Setting a calendar or image on the display . . . . . . . . 8-2
Selecting the external display clock . . . . . . . . . . . . . . 8-3
Hiding notification on the external display . . . . . . . . . 8-3
Displaying a clock when the display light is turned off
on the external display . . . . . . . . . . . . . . . . . . . . . . 8-3
Sound Settings . . . . . . . . . . . . . . . . . . . . . . . . . . . . . . . . 9-3
Ringtone . . . . . . . . . . . . . . . . . . . . . . . . . . . . . . . . . . 9-3
Alarm volume . . . . . . . . . . . . . . . . . . . . . . . . . . . . . . . 9-4
Vibrator . . . . . . . . . . . . . . . . . . . . . . . . . . . . . . . . . . . 9-5
Other settings . . . . . . . . . . . . . . . . . . . . . . . . . . . . . . 9-5
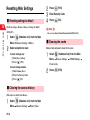
Display Light. . . . . . . . . . . . . . . . . . . . . . . . . . . . . . . . . . 8-4
Customising the display light
settings. . . . . . . . . . . . . . . . . . . . . . . . . . . . . . . . . . 8-4
Setting the display power saving function . . . . . . . . . 8-4
Customising the external display light settings . . . . . 8-4
Adjusting the contrast of external display . . . . . . . . . 8-5
10 Entertainment
Using Desktop Icons . . . . . . . . . . . . . . . . . . . . . . . . . . . 8-5
Adding desktop icons. . . . . . . . . . . . . . . . . . . . . . . . . 8-6
Accessing a function or data from a desktop icon . . . 8-6
Checking desktop icon properties . . . . . . . . . . . . . . . 8-6
Changing desktop icon designs . . . . . . . . . . . . . . . . . 8-6
Setting a captured image as desktop icon . . . . . . . . . 8-7
Moving desktop icons . . . . . . . . . . . . . . . . . . . . . . . . 8-7
Deleting desktop icons. . . . . . . . . . . . . . . . . . . . . . . . 8-7
Changing Main Menu Icons. . . . . . . . . . . . . . . . . . . . . . 8-7
Font Settings . . . . . . . . . . . . . . . . . . . . . . . . . . . . . . . . . 8-8
Music Player . . . . . . . . . . . . . . . . . . . . . . . . . . . . . . . . . 10-2
Music Player . . . . . . . . . . . . . . . . . . . . . . . . . . . . . . 10-2
Playback . . . . . . . . . . . . . . . . . . . . . . . . . . . . . . . . . 10-3
Creating a playlist . . . . . . . . . . . . . . . . . . . . . . . . . . 10-5
Editing a playlist . . . . . . . . . . . . . . . . . . . . . . . . . . . . 10-6
Playing tracks with the handset closed . . . . . . . . . . 10-6
Downloading music (Music Download) . . . . . . . . . . 10-7
Media Player . . . . . . . . . . . . . . . . . . . . . . . . . . . . . . . . . 10-8
Media Player . . . . . . . . . . . . . . . . . . . . . . . . . . . . . . 10-8
Viewing pictures. . . . . . . . . . . . . . . . . . . . . . . . . . . . 10-9
Editing pictures . . . . . . . . . . . . . . . . . . . . . . . . . . . 10-10
Playing videos . . . . . . . . . . . . . . . . . . . . . . . . . . . . 10-11
Video player display. . . . . . . . . . . . . . . . . . . . . . . . 10-11
Setting Media Player . . . . . . . . . . . . . . . . . . . . . . . 10-12
v
Vodafone live! CAST . . . . . . . . . . . . . . . . . . . . . . . . . 10-13
Vodafone live! CAST . . . . . . . . . . . . . . . . . . . . . . . 10-13
Subscribing/unsubscribing . . . . . . . . . . . . . . . . . . . 10-13
Viewing information updates . . . . . . . . . . . . . . . . . 10-13
Downloading information manually . . . . . . . . . . . . 10-14
Checking History . . . . . . . . . . . . . . . . . . . . . . . . . . 10-14
11 Memory Card
Before Using the Memory Card. . . . . . . . . . . . . . . . . . 11-2
Using the microSD memory card . . . . . . . . . . . . . . . 11-2
Installing/attaching the microSD memory card . . . . 11-3
Using the Memory Card . . . . . . . . . . . . . . . . . . . . . . . . 11-4
Formatting (initialising) the microSD memory card . 11-4
Checking data on the microSD memory card . . . . . 11-5
Transferring Data . . . . . . . . . . . . . . . . . . . . . . . . . . . . . 11-6
12 Data Management (Data Folder)
Data Folder . . . . . . . . . . . . . . . . . . . . . . . . . . . . . . . . . . 12-2
Data Folder tree . . . . . . . . . . . . . . . . . . . . . . . . . . . . 12-2
Viewing Stored Files . . . . . . . . . . . . . . . . . . . . . . . . . . 12-3
Opening files . . . . . . . . . . . . . . . . . . . . . . . . . . . . . . 12-3
Using Image Files. . . . . . . . . . . . . . . . . . . . . . . . . . . . . 12-4
Setting pictures as wallpaper . . . . . . . . . . . . . . . . . . 12-4
Using Sound Files . . . . . . . . . . . . . . . . . . . . . . . . . . . . 12-4
vi
Setting sound files as ringtone. . . . . . . . . . . . . . . . . 12-4
Using vfiles . . . . . . . . . . . . . . . . . . . . . . . . . . . . . . . . . . 12-5
vfiles. . . . . . . . . . . . . . . . . . . . . . . . . . . . . . . . . . . . . 12-5
Creating (saving) vfiles . . . . . . . . . . . . . . . . . . . . . . 12-6
Acquiring vfiles for each feature. . . . . . . . . . . . . . . . 12-6
Managing Folders . . . . . . . . . . . . . . . . . . . . . . . . . . . . 12-7
Creating folders . . . . . . . . . . . . . . . . . . . . . . . . . . . . 12-7
Renaming folders. . . . . . . . . . . . . . . . . . . . . . . . . . . 12-7
Deleting folders . . . . . . . . . . . . . . . . . . . . . . . . . . . . 12-7
Managing Files . . . . . . . . . . . . . . . . . . . . . . . . . . . . . . . 12-8
Renaming files . . . . . . . . . . . . . . . . . . . . . . . . . . . . . 12-8
Moving files . . . . . . . . . . . . . . . . . . . . . . . . . . . . . . . 12-8
13 External Connection
Bluetooth . . . . . . . . . . . . . . . . . . . . . . . . . . . . . . . . . . . 13-2
Bluetooth . . . . . . . . . . . . . . . . . . . . . . . . . . . . . . . . . 13-2
Activating Bluetooth . . . . . . . . . . . . . . . . . . . . . . . . . 13-3
Searching/Registering devices . . . . . . . . . . . . . . . . 13-3
Using Bluetooth to transfer data . . . . . . . . . . . . . . . 13-4
Using Bluetooth to connect a device . . . . . . . . . . . . 13-5
Using Bluetooth for dial-up connection . . . . . . . . . . 13-6
Connecting to a PC . . . . . . . . . . . . . . . . . . . . . . . . . . . 13-7
Bundled Utilities CD-ROM . . . . . . . . . . . . . . . . . . . . 13-7
Data communication . . . . . . . . . . . . . . . . . . . . . . . . 13-8
Transferring data . . . . . . . . . . . . . . . . . . . . . . . . . . . 13-8
Reading/Writing files on the microSD memory card 13-9
14 Handset Security
15 Organiser & Tools
Changing the Security Code . . . . . . . . . . . . . . . . . . . . 14-2
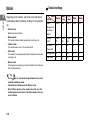
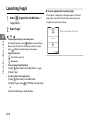
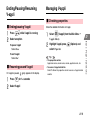
Scheduling (Calendar) . . . . . . . . . . . . . . . . . . . . . . . . . 15-2
Viewing the Calendar. . . . . . . . . . . . . . . . . . . . . . . . 15-2
Changing the format . . . . . . . . . . . . . . . . . . . . . . . . 15-2
Adding schedules . . . . . . . . . . . . . . . . . . . . . . . . . . 15-3
Setting holidays . . . . . . . . . . . . . . . . . . . . . . . . . . . . 15-4
Checking appointments, holidays and events . . . . . 15-4
Editing appointments, holidays and events . . . . . . . 15-4
Deleting appointments, holidays and events . . . . . . 15-5
Setting PIN Code . . . . . . . . . . . . . . . . . . . . . . . . . . . . . 14-2
Changing PIN Code . . . . . . . . . . . . . . . . . . . . . . . . . 14-2
Enabling PIN1 authentication. . . . . . . . . . . . . . . . . . 14-3
Releasing PIN lock. . . . . . . . . . . . . . . . . . . . . . . . . . 14-3
Changing Private PIN. . . . . . . . . . . . . . . . . . . . . . . . . . 14-4
Preventing Unauthorised Use of the Handset . . . . . . 14-5
Setting locks. . . . . . . . . . . . . . . . . . . . . . . . . . . . . . . 14-5
Restricting Incoming/Outgoing Calls . . . . . . . . . . . . . 14-6
Restricting outgoing calls
(Fixed Dialling) . . . . . . . . . . . . . . . . . . . . . . . . . . . 14-6
Rejecting calls from unknown phone numbers
(Unknown) . . . . . . . . . . . . . . . . . . . . . . . . . . . . . . 14-7
Rejecting calls without caller ID
(Ignore If No ID) . . . . . . . . . . . . . . . . . . . . . . . . . . 14-7
Saving Secret Contacts/Events . . . . . . . . . . . . . . . . . 14-8
Saving secret contacts/events . . . . . . . . . . . . . . . . . 14-8
Displaying/hiding secret data . . . . . . . . . . . . . . . . . . 14-8
Locking Keys . . . . . . . . . . . . . . . . . . . . . . . . . . . . . . . . 14-9
Resetting the Handset . . . . . . . . . . . . . . . . . . . . . . . . 14-10
Resetting functions (Settings Reset). . . . . . . . . . . 14-10
Deleting personal data Memory Reset) . . . . . . . . . 14-11
Resetting/deleting all functions and personal data
(All Reset) . . . . . . . . . . . . . . . . . . . . . . . . . . . . . 14-11
Using the Alarms . . . . . . . . . . . . . . . . . . . . . . . . . . . . . 15-6
Setting alarms . . . . . . . . . . . . . . . . . . . . . . . . . . . . . 15-6
Changing/cancelling alarm settings . . . . . . . . . . . . . 15-6
Deleting alarms . . . . . . . . . . . . . . . . . . . . . . . . . . . . 15-7
Using Tasks . . . . . . . . . . . . . . . . . . . . . . . . . . . . . . . . . 15-8
Creating tasks . . . . . . . . . . . . . . . . . . . . . . . . . . . . . 15-8
Checking tasks . . . . . . . . . . . . . . . . . . . . . . . . . . . . 15-9
Editing tasks . . . . . . . . . . . . . . . . . . . . . . . . . . . . . . 15-9
Deleting tasks . . . . . . . . . . . . . . . . . . . . . . . . . . . . . 15-9
Using the Calculator/Converter . . . . . . . . . . . . . . . . 15-10
Using the Calculator. . . . . . . . . . . . . . . . . . . . . . . . 15-10
Using the Converter . . . . . . . . . . . . . . . . . . . . . . . . 15-11
Taking Notes (Notepad) . . . . . . . . . . . . . . . . . . . . . . . 15-11
Adding notes . . . . . . . . . . . . . . . . . . . . . . . . . . . . . 15-11
Checking/Using the notes . . . . . . . . . . . . . . . . . . . 15-12
Deleting the notes . . . . . . . . . . . . . . . . . . . . . . . . . 15-12
vii
Recording Your Voice
(Voice Recorder) . . . . . . . . . . . . . . . . . . . . . . . . . . . 15-13
Recording your voice . . . . . . . . . . . . . . . . . . . . . . . 15-13
Playing the records . . . . . . . . . . . . . . . . . . . . . . . . 15-13
Call Barring . . . . . . . . . . . . . . . . . . . . . . . . . . . . . . . . . . 17-4
Blocking incoming/outgoing calls . . . . . . . . . . . . . . . 17-4
Cancelling all restrictions . . . . . . . . . . . . . . . . . . . . . 17-5
Changing Network Password. . . . . . . . . . . . . . . . . . 17-5
Advanced operations during a call. . . . . . . . . . . . . . . 16-2
Sending push tones (Dial Pause) . . . . . . . . . . . . . . 16-2
Displaying the duration during a call . . . . . . . . . . . . 16-3
Caller ID Settings . . . . . . . . . . . . . . . . . . . . . . . . . . . . . 17-5
Send Caller ID . . . . . . . . . . . . . . . . . . . . . . . . . . . . . 17-5
Block Caller ID . . . . . . . . . . . . . . . . . . . . . . . . . . . . . 17-5
Network Default . . . . . . . . . . . . . . . . . . . . . . . . . . . . 17-6
Manually Send Caller ID . . . . . . . . . . . . . . . . . . . . . 17-6
Manually Block Caller ID . . . . . . . . . . . . . . . . . . . . . 17-6
Setting a Call Handling Operation When
the Handset is Closed (Close Setting) . . . . . . . . . . 16-3
Display Caller ID . . . . . . . . . . . . . . . . . . . . . . . . . . . . . . 17-6
Confirm Subscription Status . . . . . . . . . . . . . . . . . . 17-6
Using a Stereo Microphone. . . . . . . . . . . . . . . . . . . . . 16-4
Using the speaker . . . . . . . . . . . . . . . . . . . . . . . . . . 16-4
Making calls with a single operation . . . . . . . . . . . . 16-4
Receiving calls with a single operation . . . . . . . . . . 16-4
Receiving calls automatically (Auto Answer) . . . . . . 16-5
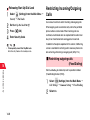
Call Forwarding . . . . . . . . . . . . . . . . . . . . . . . . . . . . . . 17-6
Activating Call Forwarding . . . . . . . . . . . . . . . . . . . . 17-7
Deactivating Call Forwarding . . . . . . . . . . . . . . . . . . 17-7
Checking settings automatically. . . . . . . . . . . . . . . . 17-8
16 Advanced Settings
Sending Push Tones . . . . . . . . . . . . . . . . . . . . . . . . . . 16-5
17 Optional Services
Optional Services Overview . . . . . . . . . . . . . . . . . . . . 17-2
Using Optional Services . . . . . . . . . . . . . . . . . . . . . . . 17-2
Using the menus . . . . . . . . . . . . . . . . . . . . . . . . . . . 17-2
Entering the service codes. . . . . . . . . . . . . . . . . . . . 17-2
Operating from a landline. . . . . . . . . . . . . . . . . . . . . 17-3
viii
Voice Mail . . . . . . . . . . . . . . . . . . . . . . . . . . . . . . . . . . . 17-8
Playing Voice Mail messages . . . . . . . . . . . . . . . . . 17-8
Setting the Voice Message Centre number . . . . . . . 17-9
Activating/Deactivating Missed Call Notification . . . 17-9
Call Waiting. . . . . . . . . . . . . . . . . . . . . . . . . . . . . . . . . 17-10
Activating/deactivating Call Waiting . . . . . . . . . . . . 17-10
Answering another call while on the phone . . . . . . 17-10
Group Talk . . . . . . . . . . . . . . . . . . . . . . . . . . . . . . . . . 17-11
Launching a Group Talk . . . . . . . . . . . . . . . . . . . . 17-11
Vodafone live!
18 Vodafone live!
Creating slides . . . . . . . . . . . . . . . . . . . . . . . . . . . . . . . 20-6
Adding slides . . . . . . . . . . . . . . . . . . . . . . . . . . . . . . 20-6
Slide interval . . . . . . . . . . . . . . . . . . . . . . . . . . . . . . 20-7
Send Option . . . . . . . . . . . . . . . . . . . . . . . . . . . . . . . . . 20-7
Drafts . . . . . . . . . . . . . . . . . . . . . . . . . . . . . . . . . . . . . . . 20-8
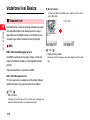
Vodafone live! Basics . . . . . . . . . . . . . . . . . . . . . . . . . 18-2
Vodafone live! . . . . . . . . . . . . . . . . . . . . . . . . . . . . . 18-2
Retrieving network information . . . . . . . . . . . . . . . . 18-3
Customising handset address . . . . . . . . . . . . . . . . . . 18-4
19 Receiving Messages
Checking a New Message . . . . . . . . . . . . . . . . . . . . . . 19-2
Checking messages on the external display . . . . . . 19-2
Retrieving MMS . . . . . . . . . . . . . . . . . . . . . . . . . . . . 19-3
Using the received message . . . . . . . . . . . . . . . . . . 19-4
20 Sending Messages
Creating a message . . . . . . . . . . . . . . . . . . . . . . . . . . . 20-2
Selecting Message type. . . . . . . . . . . . . . . . . . . . . . 20-3
Entering Address . . . . . . . . . . . . . . . . . . . . . . . . . . . 20-3
Entering Subject. . . . . . . . . . . . . . . . . . . . . . . . . . . . 20-4
Entering Text . . . . . . . . . . . . . . . . . . . . . . . . . . . . . . 20-4
Sending . . . . . . . . . . . . . . . . . . . . . . . . . . . . . . . . . . 20-4
File Attachment . . . . . . . . . . . . . . . . . . . . . . . . . . . . . . 20-5
Files from Data Folder . . . . . . . . . . . . . . . . . . . . . . . 20-5
21 Mail Box
Checking Messages . . . . . . . . . . . . . . . . . . . . . . . . . . . 21-2
Checking message list . . . . . . . . . . . . . . . . . . . . . . . 21-2
Operations on the message screen . . . . . . . . . . . . . 21-3
Folder Management . . . . . . . . . . . . . . . . . . . . . . . . . . . 21-4
Changing folder names . . . . . . . . . . . . . . . . . . . . . . 21-4
Move messages to other folders . . . . . . . . . . . . . . . 21-5
Automatic sorting to a specified folder . . . . . . . . . . . 21-5
Reply Message . . . . . . . . . . . . . . . . . . . . . . . . . . . . . . . 21-6
Forwarding Message . . . . . . . . . . . . . . . . . . . . . . . . . . 21-7
Message from Outbox . . . . . . . . . . . . . . . . . . . . . . . . . 21-7
Message Protection . . . . . . . . . . . . . . . . . . . . . . . . . . . 21-8
Message Deletion . . . . . . . . . . . . . . . . . . . . . . . . . . . . . 21-8
Delete a specified messaged. . . . . . . . . . . . . . . . . . 21-8
Delete all the messages under message box
or folder . . . . . . . . . . . . . . . . . . . . . . . . . . . . . . . . 21-9
Using Phone Number, Email Address and URL . . . 21-10
Phonebook entry . . . . . . . . . . . . . . . . . . . . . . . . . . 21-10
Phone to, Message to, and Internet access. . . . . . 21-10
ix
Using attachments . . . . . . . . . . . . . . . . . . . . . . . . . . . 21-11
Check attachments . . . . . . . . . . . . . . . . . . . . . . . . 21-11
Save in data folder . . . . . . . . . . . . . . . . . . . . . . . . . 21-12
Operation from Message detail screen . . . . . . . . . . 21-12
Sort messages . . . . . . . . . . . . . . . . . . . . . . . . . . . . 21-12
22 Mail Server
Using Message List . . . . . . . . . . . . . . . . . . . . . . . . . . . 22-2
Message List Retrieval. . . . . . . . . . . . . . . . . . . . . . . 22-2
Receiving MMS from message list. . . . . . . . . . . . . . 22-3
Deleting MMS on the server using message list . . . 22-3
Forwarding Messages on the Server . . . . . . . . . . . . . 22-4
23 Other Mail Settings
Common to MMS/SMS . . . . . . . . . . . . . . . . . . . . . . . . . 23-2
Scroll . . . . . . . . . . . . . . . . . . . . . . . . . . . . . . . . . . . . 23-2
Heading text/signature/quote indicator . . . . . . . . . . 23-2
Font size . . . . . . . . . . . . . . . . . . . . . . . . . . . . . . . . . 23-2
MMS Settings . . . . . . . . . . . . . . . . . . . . . . . . . . . . . . . . 23-3
Auto Receive . . . . . . . . . . . . . . . . . . . . . . . . . . . . . . 23-3
Automatic Play . . . . . . . . . . . . . . . . . . . . . . . . . . . . . 23-3
Creation Mode . . . . . . . . . . . . . . . . . . . . . . . . . . . . . 23-4
Send Reports . . . . . . . . . . . . . . . . . . . . . . . . . . . . . . 23-4
Validity Period . . . . . . . . . . . . . . . . . . . . . . . . . . . . . 23-4
Delivery Time . . . . . . . . . . . . . . . . . . . . . . . . . . . . . . 23-5
x
SMS Settings . . . . . . . . . . . . . . . . . . . . . . . . . . . . . . . . 23-5
SMS Report Request . . . . . . . . . . . . . . . . . . . . . . . . 23-5
Validity Period . . . . . . . . . . . . . . . . . . . . . . . . . . . . . 23-6
SMS Centre . . . . . . . . . . . . . . . . . . . . . . . . . . . . . . . 23-6
3D Pictogram Settings . . . . . . . . . . . . . . . . . . . . . . . . . 23-7
Reset Settings . . . . . . . . . . . . . . . . . . . . . . . . . . . . . . . 23-7
Settings Reset . . . . . . . . . . . . . . . . . . . . . . . . . . . . . 23-7
24 Basic Web Operations
Before Using the Web . . . . . . . . . . . . . . . . . . . . . . . . . 24-2
Accessing the Web . . . . . . . . . . . . . . . . . . . . . . . . . . . 24-3
Accessing from the Vodafone live! menu. . . . . . . . . 24-3
Entering a URL . . . . . . . . . . . . . . . . . . . . . . . . . . . . 24-3
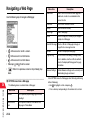
Navigating a Web Page . . . . . . . . . . . . . . . . . . . . . . . . 24-4
Using phone numbers, mail addresses or
URLs on Web pages . . . . . . . . . . . . . . . . . . . . . . 24-6
25 Using Information
Saving Pictures and Melodies . . . . . . . . . . . . . . . . . . 25-2
Saving files to Data Folder. . . . . . . . . . . . . . . . . . . . 25-2
Using Melodies . . . . . . . . . . . . . . . . . . . . . . . . . . . . . . . 25-2
Playing melodies . . . . . . . . . . . . . . . . . . . . . . . . . . . 25-2
Using Other Files . . . . . . . . . . . . . . . . . . . . . . . . . . . . . 25-3
Using data with content key . . . . . . . . . . . . . . . . . . . 25-3
Using streaming content . . . . . . . . . . . . . . . . . . . . . 25-3
Saving Pages . . . . . . . . . . . . . . . . . . . . . . . . . . . . . . . . 25-4
Saving pages . . . . . . . . . . . . . . . . . . . . . . . . . . . . . . 25-4
Viewing saved pages . . . . . . . . . . . . . . . . . . . . . . . . 25-4
Editing titles . . . . . . . . . . . . . . . . . . . . . . . . . . . . . . . 25-4
Deleting saved pages . . . . . . . . . . . . . . . . . . . . . . . 25-5
Bookmarks . . . . . . . . . . . . . . . . . . . . . . . . . . . . . . . . . . 25-5
Bookmarking . . . . . . . . . . . . . . . . . . . . . . . . . . . . . . 25-5
Accessing bookmarks . . . . . . . . . . . . . . . . . . . . . . . 25-6
Editing content . . . . . . . . . . . . . . . . . . . . . . . . . . . . . 25-6
Deleting bookmarks . . . . . . . . . . . . . . . . . . . . . . . . . 25-6
Security Settings . . . . . . . . . . . . . . . . . . . . . . . . . . . . . 26-3
Setting Cookies . . . . . . . . . . . . . . . . . . . . . . . . . . . . 26-3
Manufacture Number notification . . . . . . . . . . . . . . . 26-3
Checking Root Certificates . . . . . . . . . . . . . . . . . . . 26-3
Resetting Web Settings . . . . . . . . . . . . . . . . . . . . . . . . 26-4
Resetting settings to default . . . . . . . . . . . . . . . . . . 26-4
Clearing the access history . . . . . . . . . . . . . . . . . . . 26-4
Clearing the cache . . . . . . . . . . . . . . . . . . . . . . . . . . 26-4
27 Basic V-appli Operations
History . . . . . . . . . . . . . . . . . . . . . . . . . . . . . . . . . . . . . . 25-7
Before Using V-appli . . . . . . . . . . . . . . . . . . . . . . . . . . 27-2
Other Settings . . . . . . . . . . . . . . . . . . . . . . . . . . . . . . . 25-8
Changing character code. . . . . . . . . . . . . . . . . . . . . 25-8
Changing scroll settings. . . . . . . . . . . . . . . . . . . . . . 25-8
Changing font size . . . . . . . . . . . . . . . . . . . . . . . . . . 25-8
Viewing page information. . . . . . . . . . . . . . . . . . . . . 25-8
Checking server certificate. . . . . . . . . . . . . . . . . . . . 25-8
Updating a page. . . . . . . . . . . . . . . . . . . . . . . . . . . . 25-9
Searching for a word on a page. . . . . . . . . . . . . . . . 25-9
Copying text on a page . . . . . . . . . . . . . . . . . . . . . . 25-9
Creating a message with a URL or picture . . . . . . . 25-9
Downloading V-appli . . . . . . . . . . . . . . . . . . . . . . . . . . 27-2
26 Other Web Settings
28 Using V-appli
Image Display/Sound Playback Settings . . . . . . . . . . 26-2
Setting V-appli Security Levels. . . . . . . . . . . . . . . . . . 28-2
Launching V-appli . . . . . . . . . . . . . . . . . . . . . . . . . . . . 27-4
Ending/Pausing/Resuming
V-appli . . . . . . . . . . . . . . . . . . . . . . . . . . . . . . . . . . . . 27-5
Ending/pausing V-appli . . . . . . . . . . . . . . . . . . . . . . 27-5
Resuming paused V-appli . . . . . . . . . . . . . . . . . . . . 27-5
Managing V-appli . . . . . . . . . . . . . . . . . . . . . . . . . . . . . 27-5
Checking properties . . . . . . . . . . . . . . . . . . . . . . . . . 27-5
Moving V-appli . . . . . . . . . . . . . . . . . . . . . . . . . . . . . 27-6
Deleting V-appli . . . . . . . . . . . . . . . . . . . . . . . . . . . . 27-6
xi
Setting security levels . . . . . . . . . . . . . . . . . . . . . . . 28-2
Resetting security levels . . . . . . . . . . . . . . . . . . . . . 28-2
Emotions . . . . . . . . . . . . . . . . . . . . . . . . . . . . . . . . . . . 30-27
Memory Capacity . . . . . . . . . . . . . . . . . . . . . . . . . . . . 30-28
Specifications . . . . . . . . . . . . . . . . . . . . . . . . . . . . . . . 30-29
29 Other V-appli Settings
Making Incoming Settings. . . . . . . . . . . . . . . . . . . . . . 29-2
Making Volume/Vibration Settings . . . . . . . . . . . . . . . 29-2
Adjusting the volume . . . . . . . . . . . . . . . . . . . . . . . . 29-2
Setting the vibration . . . . . . . . . . . . . . . . . . . . . . . . . 29-2
Making Light Settings . . . . . . . . . . . . . . . . . . . . . . . . . 29-3
Resetting V-appli Settings. . . . . . . . . . . . . . . . . . . . . . 29-3
Resetting V-appli settings to default . . . . . . . . . . . . 29-3
Deleting all V-appli . . . . . . . . . . . . . . . . . . . . . . . . . . 29-3
30 Appendix
Features . . . . . . . . . . . . . . . . . . . . . . . . . . . . . . . . . . . . 30-2
Settings to be Reset. . . . . . . . . . . . . . . . . . . . . . . . . . . 30-7
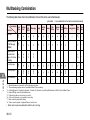
Multitasking Combination . . . . . . . . . . . . . . . . . . . . . 30-13
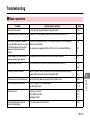
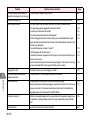
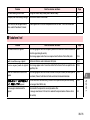
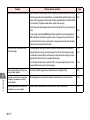
Troubleshooting . . . . . . . . . . . . . . . . . . . . . . . . . . . . . 30-14
Basic operations . . . . . . . . . . . . . . . . . . . . . . . . . . 30-14
Vodafone live! . . . . . . . . . . . . . . . . . . . . . . . . . . . . 30-16
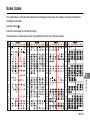
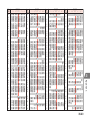
Kuten Codes . . . . . . . . . . . . . . . . . . . . . . . . . . . . . . . . 30-18
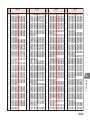
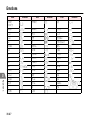
Symbols/Pictographs. . . . . . . . . . . . . . . . . . . . . . . . . 30-24
Symbols . . . . . . . . . . . . . . . . . . . . . . . . . . . . . . . . . 30-24
Pictographs . . . . . . . . . . . . . . . . . . . . . . . . . . . . . . 30-25
xii
Warranty and After Sales Service. . . . . . . . . . . . . . . 30-37
Customer Service. . . . . . . . . . . . . . . . . . . . . . . . . . . . 30-38
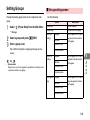
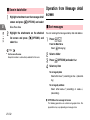
Guide to This Manual
In this manual, "handset" refers to Vodafone 804N.
Procedures
Procedures are described using simplified notations in this
manual. For understanding the notations, see "Keys &
Menus" in "Getting Started".
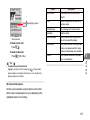
Display images
• Screen illustrations in this manual are provided as
a melody or video by following the procedure described in
"Media Player" or "Data Management", a message asking
whether to play the data may appear.
Trademarks
• Licensed by QUALCOMM Incorporated under one or
more of the following United States Patents and/or their
counterparts in other nations:
4,901,307 5,490,165 5,056,109 5,504,773 5,101,501
examples. Items or numbers in the illustrations may differ
5,506,865 5,109,390 5,511,073 5,228,054 5,535,239
from those actually appearing on your handset display.
5,267,261 5,544,196 5,267,262 5,568,483 5,337,338
• Some illustrations may be enlarged for easier viewing.
5,600,754 5,414,796 5,657,420 5,416,797 5,659,569
5,710,784 5,778,338
Screen messages
• This manual describes instructions using mainly default
• T9 Text Input® and the T9 logo are registered
trademarks of Tegic Communications.
settings. If settings are changed, the display images or
T9 Text Input has applied for or obtained global
handset actions may differ from those in this manual.
patents.
When a message appears on the display, read it carefully.
Example 1: If call restriction settings have been changed
and you attempt to make a call, a warning indicating that
the call cannot be made appears.
• microSD™ is a trademark of the SD Association.
• Part of the software in this product incorporates a module
developed by the Independent JPEG Group.
Example 2: If Manner Mode is set and you attempt to play
xiii
• This product is licensed in accordance with MPEG-4
• Java and Java-based trademarks and logos are
Visual Patent Portfolio License. Personal and noncom-
trademarks of Sun Microsystems, Inc. in the
mercial use is only permitted when:
United States and other countries.
• Capturing a video that complies with the MPEG-4
Visual standards (MPEG-4 Video)
• Playing a MPEG-4 Video captured by a consumer who
engages in personal and nonprofit activities
• Playing MPEG-4 Video provided by a party licensed by
MPEG-LA
Contact MPEG LA, LLC, a company in the United States,
when using this product for promotion, in-house use, forprofit or other purposes.
• QR Code is a registered trademark of Denso Wave
Incorporated.
• JBlend™ is incorporated in this product.
JBlend™ is a Java™ execution environment
developed by Aplix Corporation for implement-
• 着うた® and 着うたフル® are registered trademarks of
Sony Music Entertainment Inc.
• This product incorporates NetFront Browser and NetFront
Messaging Client of ACCESS CO., LTD. as Internet
browser and mailer.
Copyright© 2004-2006 ACCESS CO., LTD.
• ACCESS and NetFront are registered trademarks or
trademarks of ACCESS CO., LTD. in Japan and other
countries.
• The Bluetooth® word mark and logos are owned by the
Bluetooth SIG, Inc. and any use of such marks by NEC is
under license. Other trademarks and trade names are
those of their respective owners.
• Microsoft and Windows are registered trademarks or
ing advanced performance and fast operation on small-
trademarks of Microsoft Corporation in the United States
memory systems.
and other countries.
Powered by JBlend™, ©1997-2006 Aplix Corporation. All
rights reserved.
JBlend and JBlend logos are registered trademarks of
Aplix Corporation in Japan and other countries.
xiv
• Windows 2000 Professional is an abbreviation of
Microsoft® Windows® 2000 Professional operating system.
• Windows XP is an abbreviation of Microsoft® Windows®
XP Professional operating system or Microsoft®
Windows® XP Home Edition operating system.
• Windows® 2000 Professional is referred to as Windows
2000 in this manual.
In the frequency bandwidth of the Bluetooth® function of
this equipment, industrial device, scientific device, medical
device like microwave ovens, licensed premises radio station and non-licensed specified low-power radio station for
mobile object identification system (RF-ID) that is used in
• Windows® XP Professional and Windows® XP Home
product line of factories, and amateur radio station
Edition are referred to as Windows XP in this manual.
(referred to as Other Radio Stations hereinafter) are used.
• Vodafone, Vodafone live! and the speech mark symbol are
1. Please make sure before using the Bluetooth® function
trademarks or registered trademarks of Vodafone Group
Plc.
that no Other Radio Stations are used in the neighborhood.
2. In case that RF interference occurs to Other Radio Sta-
• V-appli is a trademark of Vodafone K.K.
• "マルチタスク/MULTITASK", "ワード予測" and "NEC
SUPER TOWN" are registered trademarks or trademarks
tions from this equipment, please change promptly the
place to use, or stop using the Bluetooth® function (emitting radio).
3. Please contact Customer Service (zp.30-38) if you
of NEC Corporation.
®
• Powered by mascot Capsule /Micro3D Edition™ ascot
®
Capsule are trademarks of HI CORPORATION.
• All other company and product names are trademarks or
registered trademarks of their respective companies.
have a problem, such as interference from this equipment
to Other Radio Stations.
The Bluetooth® function of this equipment uses the frequency bandwidth of 2.4GHz and FH-SS modulation. The
interference range of this equipment is less than 10m.
xv
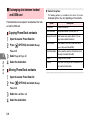
Safety Precautions
• To ensure safe use of the handset, please read
these safety precautions carefully before use. After
reading them, please keep these safety precautions for future reference.
• The following precautions are provided for your
benefit to protect you and others and to avoid damage to property. Please observe these Safety Precautions.
Symbols
This manual uses various symbols to facilitate understanding of the
contents, ensure correct use to prevent injury to yourself and others
and prevent damage to property. The symbols used and their meanings are described below. Read the remainder of this manual only
after thoroughly familiarising yourself with these symbols and their
meanings.
Danger
Improper handling poses a great risk of
death or serious injury.
Warning
Improper handling poses a potential risk of
death or serious injury..
Caution
Improper handling poses a risk of injury or
damage to the product or other property.
Symbols
The action is prohibited.
The action is compulsory.
Vodafone shall not be liable for any damages incurred by
you or a third party as a result of improper use of this product, failure during use, memory loss or any other nonconformity.
xvi
The power cord must be unplugged.
Danger
Handset, battery & charging device
Use only approved battery and charging device
(zp.i). Using unauthorised devices may cause
the battery to leak, overheat, burst or ignite.
part of the handset body to become hot and possibly cause
burns.
Battery
To prevent battery leakage, overheating, burst-
Do not get the handset, battery and charging
device wet. Exposure of these devices to liquids
such as water or pet urine may cause overheating,
electric shock, fire, malfunction, injury, etc.
ing or ignition, do not:
Do not attempt to disassemble or modify the
handset, battery and charging device, and do
not solder them. Doing so may cause fire, injury
or electric shock. Also, doing so may cause the battery to
leak, overheat, explode or ignite. For repair and maintenance, contact Customer Service (zp.30-38).
• Dispose of the battery in fire.
• Use excessive pressure to force the battery into
place. (Insert the battery in the correct direction and orientation.)
• Short-circuit the positive and negative poles of the battery
with metallic items. Also, do not carry or store the battery
with metallic items such as a necklace that may accidentally touch the terminals.
• Puncture the battery, hammer it or step on it.
Do not use or leave the handset, battery and
charging device in places subject to high temperatures, such as near fire, near a heater, in
direct sunlight or inside a car on a hot day. Doing so may
cause the battery to leak, overheat, explode or ignite, cause
those devices to be deformed or malfunction, lower the performance or shorten the life. Also, doing so may cause the
If battery fluid gets into your eyes, do not rub
them. Rinse them immediately with clean water
and consult a doctor as soon as possible. Failure to do so may cause a loss of eyesight.
xvii
Warning
Handset, battery & charging device
Do not subject the battery or charging device
to strong impacts. Doing so may cause the battery to leak, overheat, burst, ignite, or cause other
equipment to fail or catch fire.
Keep the charging terminals, external connector, microSD memory card holder and USIM
card slot away from liquids or conductive foreign objects (metal, pencil lead, etc.). Do not insert such
objects inside. Failure to observe these precautions may
result in short circuits, causing those devices to ignite or
Do not use the handset, battery and charging
malfunction.
device in a place where there is a risk of ignition or explosion. Using these devices in places
If you notice something unusual such as an
such as a filling station where there is an inflammable atmosphere such as from propane gas, petrol fumes, or coal,
abnormal sound, smoke or smell, remove the
handset, battery and charging device from
dust, metal, etc., may result in an explosion or fire.
their power supplies as indicated below and
contact Customer Service (zp.30-38).
Do not place the handset, battery and charging
Be careful not to burn or hurt yourself when removing
device in a cooking unit such as a microwave
these devices.
oven or pressure cooker. Doing so may cause
• Handset: Turn the handset off and then remove the bat-
the battery to leak, overheat, burst or ignite, or may cause
the handset or charging device to overheat, smoke, ignite, or
cause damage to the circuits.
tery.
• Rapid Charger: Unplug the power cord from the AC
socket.
• In-car charger: Unplug the power cord from the cigarette
lighter socket.
xviii
Handset
Do not use the handset while driving a vehicle.
As of 1 November, 2004, using a mobile phone
while driving is a legal offence. When using the
If you hear thunder while using the handset
outdoors, turn the handset off, and move to a
safe place immediately. Failure to do so may
expose you to lightning or electric shock.
handset while walking, be aware of your surroundings and
If you have a weak heart, be careful with the
the road conditions.
vibration/speaker volume settings.
Do not swing the handset by the stereo micro-
If you are wearing a medical electronic device,
phone or hand strap. Doing so may cause bodily
do not place the handset in a breast pocket or
injury, malfunction or damage to the handset.
inner pocket. If you use the handset near medical
Turn off the handset near electronic devices.
The handset may affect the operation of those
devices, such as hearing aids, implanted cardiac
pacemakers or defibrillators, other medical electronic equipment, fire alarms, automatic doors and other automatic con-
electronic devices, the magnet in the handset may cause
them to malfunction.
Do not hold the handset to your ear during
hands-free operation. Failure to do so may affect
your hearing.
trol devices. Consult with the manufacturer or distributor of
the medical device about radio wave effects.
Do not put the handset on the dashboard, etc.
as doing so may cause problems in the event
Turn off the handset in areas where usage is
of air bag inflation. Air bag inflation may cause
prohibited. The handset may affect the operation
the handset to hit you or another person, which may cause
of medical or other electronic devices. Follow the
rules of individual hospitals or health care facilities that pro-
injury, malfunction or damage to the handset.
hibit carrying or using mobile phones. Breaking the law may
result in punishment.
xix
Battery
If charging is not completed within the normal
charging time, stop charging (zp.1-13). Failure to do so may cause the battery to leak, over-
Charging device
Use the specified socket and voltage. Using the
charging device with a non-specified socket or
voltage may cause fire or equipment failure.
heat, burst, or ignite.
Power cord
If you notice any of these danger signs,
Rapid Charger
remove the battery from the handset: abnormal
smell, overheating, discolouration or deformation. Do not use the battery and contact Customer Service (zp.30-38). Failure to do so may cause the battery to
leak, overheat, burst or ignite.
If battery fluid gets on your skin or clothing,
rinse immediately with clean water. Failure to do
so may result in inflammation of the skin.
• Rapid Charger
AC100 V to 240 V (Plug only into
home AC outlet)
The power cord included in accessories is for use with
the Rapid Charger (NECL01). Do not use it for other purposes.
Also this power cord is for use in Japan only. Vodafone is not
liable for any problems resulting from charging outside Japan.
• In-car charger
DC12/24 V (only for cars with negative grounding).
If the battery is leaking or smells strange,
immediately move it away from any heat
sources. Failure to do so may result in fire or
bursting caused by ignition of the leaked battery fluid.
xx
The in-car charger is only for cars with negative grounding. Do not use it in cars with positive
grounding as doing so may cause fire.
If the power cord becomes damaged, stop
using it and contact Customer Service
(zp.30-38). Continuing to use it may cause electric shock, smoke or fire.
• Overload electrical sockets or cables. Doing so may
cause overheating or fire.
If fluids such as water seep into the charging
device, immediately unplug them from the
Use only approved fuse to replace the fuse of
electrical socket or cigarette lighter socket. Do
the in-car charger. Using it with unauthorised
not attempt to repair the device yourself. Stop
fuses may cause fire or equipment failure.
using them and contact Customer Service
(zp.30-38). Failure to do so may cause electric shock,
To prevent overheating, ignition, bursting, fire,
smoke, or fire.
electric shock or equipment failure when handling the charging device, do not:
Wipe any dust off the plug. Failure to do so may
• Touch the charging device, power cord, or electrical
cause fire.
socket with wet hands.
Plug the Rapid Charger into an electrical
• Charge a wet battery.
socket securely. Do not allow it to touch metal.
• Place the charging device in an unstable place while
Doing so may cause electric shock, short circuit, or
charging. Cover or wrap the charging device with a cloth
fire.
or futon.
• Use the charging device in a very humid place.
• Short-circuit the charging terminals or connector termi-
If you hear thunder, do not touch the handset
and charging device. Failure to do so may
expose you to lightning or electric shock.
nals while the charging device is connected to an electrical socket or cigarette lighter socket.
• Touch the terminals with any part of your body.
Do not apply excessive force when the power
cord cannot be unplugged. Doing so may damage the power cord and cause electric shock or
malfunction.
xxi
Handset use & electronic medical
equipment
This section is based on “Guidelines on the Use of Radio
Communications Equipment such as Cellular Telephones
and Safeguards for Electronic Medical Equipment” (Electro-
Observe the following inside hospitals and
health care facilities.
• Do not bring the handset into operating rooms,
intensive care units (ICU) or coronary care units (CCU).
• Keep the handset turned off in hospital waiting rooms or
magnetic Compatibility Conference, April 1997) and “Report
wards, as there may be electronic medical devices in your
of Investigation of the Effects of Radio Waves on Medical
vicinity.
Equipment, etc.” (Association of Radio Industries and Business, March 2001).
• Follow the rules of individual hospitals or health care facilities that prohibit carrying or using mobile phones.
If you use an implanted cardiac pacemaker or
Patients receiving medical treatment away
implantable cardioverter-defibrillator, keep the
from a hospital or medical facility (e.g. home
handset at least 22 cm away. Radio waves may
treatment) who are using electronic medical
affect the operation of implanted cardiac pacemakers or
equipment other than implanted cardiac pacemakers or
implanted cardioverter-defibrillators if used in close proxim-
implanted cardioverter-defibrillators should consult the
ity.
respective manufacturers or distributors for information
Turn off the handset in crowded places such as
rush-hour trains in case somebody nearby is
using an implantable cardiac pacemaker or
implantable cardioverter-defibrillator. Radio waves may
affect the operation of implanted cardiac pacemakers or
implanted cardioverter-defibrillators if used in close proximity.
xxii
about the effects of radio waves on the equipment.
Caution
Handset, battery & charging device
Do not keep the handset, battery and charging
device in a dusty, humid or hot place. Doing so
may cause equipment failure.
Do not place the handset, battery and charging
device on an unstable surface from which they
may fall, causing injury or equipment failure.
Charging the battery, shooting/playing videos,
talking on video calls, accessing websites or
using V-appli repeatedly or for a long period of
time may increase the temperature of the handset, battery or charging device. Exposing your skin directly to the
high-temperature part for a long period of time may cause
skin irritations, a rash or eczema. Take great care especially
when using the handset connected to the charging device
continuously for a long period of time.
If the user is a child, the parent or guardian
should teach the child how to handle the
device safely. Also, watch to make sure the hand-
set, battery and charging device are being properly used.
Failure to observe instructions may cause injury.
Keep the handset, battery and charging device
away from infants. They may mistakenly swallow
these devices or sustain injury in other ways.
When you attach the stereo microphone to the
handset to play games or music, do not make
the volume too loud. Excessive high volume may
damage your hearing. Also it may prevent you from hearing
the ambient sounds and cause an accident.
Handset
If you use the handset in a car, in rare cases it
may affect electronic equipment in the car,
depending on the type of car. Confirm with your
car dealer whether sufficient magnetic protection measures
are implemented in your car. Failure to do so may compromise safe driving.
xxiii
Do not close the handset with an object such
as the hand strap inserted between the keypad
and display. Doing so may cause malfunction or
damage to the handset.
Do not place magnetic cards near the handset
or clamp them in the fold of the handset. Magnetic data on debit cards, credit cards, telephone
cards, or floppy disks, etc. may be erased.
Depending on your physical characteristics and other conditions, skin irritations, a rash or eczema may
develop in some rare cases. In such cases, immediately stop using the handset and consult a doctor.
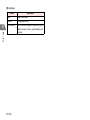
Materials and surface finishes
Part
Outer case
Display side, keypad side, external display side, battery side, battery
cover
Macro switch
Material
Surface finish
PC resin
Acrylic UV cured coating
ABS resin
Acrylic UV cured coating
Internal camera and external camera lenses, display and external display screens
Acrylic resin
ー
Rubber pads (above display)
Silicon rubber
ー
Screw covers (below display), lamp lens
PC resin
ー
Hinge cushion
Polyethylene
Operation
keys
ー
Multi selector
PC resin, ABS resin
Centre key
PC resin
Left Softkey/Message key, Right Softkey/Vodafone live! key, Menu/
Task Menu key, Music key, Start/Call Log key, Clear/Back key,
Power/End key,
key, #/Manner Mode key, dial keys
PC resin
Acrylic urethane UV
cured coating
Music Assist key, Side keys
ABS resin
Chrome plating
Earphone jack cover, external connector cover
Elastomer resin
Logo badge
Aluminium, PC resin
Charging terminals
Beryllium copper
xxiv
Chrome plating
ー
ー
ー
Rhodium plating
Part
Battery
compartment
Battery
Material
Surface finish
Shield cover (metal)
Beryllium copper
ー
USIM slot (metal part)
Stainless
ー
USIM slot (plastic part)
LCP
USIM slot (terminal part)
Phosphor bronze
Gold plating
microSD card holder (metal part)
Stainless
Gold plating
microSD card holder (plastic part)
Glass fibre, LCP
microSD card holder (terminal part)
Phosphor bronze
Gold plating
ー
ー
Battery terminals
Copper alloy
Gold plating
Outer package (laminated part)
Aluminium
PET
Outer package (plastic part)
PP resin, PC resin
Terminals
Copper
Do not leave the handset for long periods of
ー
Gold plating
However, touching the broken display or camera lens may
cause injury.
time in a place where bright light enters the
camera lens. Light entering through a lens is con-
If the display is broken and the liquid crystal
centrated and may cause fire or equipment failure.
leaks, do not lick or inhale the liquid or get the
Take care not to pinch your finger in the hinge
when you open the handset. This may cause
injury.
liquid on your skin. If the liquid comes into
contact with your eyes or mouth, immediately rinse your
eyes or mouth with clean water and see a doctor. If the
liquid comes into contact with your skin or clothes,
Watch out for broken glass if the display or
immediately wipe it off with alcohol, and wash with
camera lens is damaged. The surfaces of the
water and soap. This liquid may cause loss of eyesight or
display and camera lens are covered by plastic
skin problems.
panels so as to minimise the possibility of glass scattering.
xxv
Battery
Do not dispose of batteries as municipal
waste. Doing so may cause fire or environmental
Before cleaning the charging device, unplug it
from the electrical socket or cigarette lighter
socket. Failure to do so may cause electric shock.
destruction. Insulate the terminals with tape and
bring them to a Vodafone Shop or dispose of them separately beforehand according to local regulations.
Charging device
When unplugging the charger from an electrical socket or cigarette lighter socket, do not
pull the power cord. Doing so may damage the
power cord and cause fire or electric shock.
Do not use the in-car charger while the engine
is not running. Doing so may cause the car battery to run down.
Do not place heavy objects on the power cord.
Doing so may cause electric shock, fire or equipment failure.
After charging is completed, unplug the charging device from an electrical socket or cigarette lighter socket. Failure to do so may cause
fire or equipment failure.
xxvi
General Notes
• As the handset uses radio waves, it cannot be used
where signals are weak or when the handset is out
of service area. Moving to such places during a call
may cause the call to be disconnected.
• Do not disturb others when using the handset in
public places.
• If receiving a call while walking, move to a safe
place before answering.
• On rare occasions, using the handset on public
transportation such as a train, may affect the
vehicle’s electronic equipment.
• Vodafone is not liable for any damages resulting
from accidental loss or alteration of the handset
data. Please back up the data such as Phone
Book, images or sounds.
• The handset is a wireless station as stipulated by
Japanese Radio Law. Your handset must be
submitted for inspection upon request.
• The time appearing on the handset may not be
completely accurate.
• Observe the following instructions to avoid
connection errors or excessive noise.
• Keep away from extremely cold places such as frozen
storage. The handset may not operate properly.
• Keep away from metal furniture. Signals may be
blocked.
• Keep away from magnetic field or where magnetic
waves are emitted (near electric appliances, AV or OA
equipment such as computers, microwave ovens,
speakers, TV’s, radios, facsimiles, fluorescent lights,
word processing devices, electric heaters, inverter
air-conditioners, induction cooking ranges, etc.).
• Noise may become louder, or calls may become
unavailable due to the effects of strong magnetic or
electric fields. In particular, using a microwave oven has
the potential to affect the handset.
xxvii
• If receiving too much noise during a call near a
broadcasting or radio station, move around to avoid
noise. If the signals from the station are too strong, the
handset may not function.
• When a vehicle is passing by, you may hear noise.
• If you use the handset near a landline phone, TV or
radio, the handset may affect the operation of these
devices. Use the handset as far as possible from
these devices.
• Be Aware of Eavesdropping
The handset employs a digital signal that provides
a high level of privacy protection. However, the
possibility of eavesdropping by a third party using
special means cannot be ruled out.
Eavesdropping:
Interception of radio signals by a third party during
communication, either intentionally or accidentally
Using the handset in a vehicle
• Do not use the handset while driving a vehicle.
Doing so may compromise safe driving and cause
an accident. Breaking the law may result in
punishment.
xxviii
• Pull off the road before using the handset.
• If you use the handset in a car, in rare cases it may
affect electronic equipment in the car, depending
on the type of car. Confirm with your car dealer
whether sufficient magnetic protection measures
are implemented in your car. Failure to do so may
compromise safe driving.
Using the handset in an aircraft
Do not turn on and use the handset in an aircraft.
Doing so may interfere with flight safety and cause an
accident. Breaking the law may result in punishment.
Handling the handset
• Do not allow the handset to become wet. The
handset, battery and charging device are not
water-proof. Do not use them in very humid places
or in the rain. When you carry the handset in your
shirt pocket, moisture from sweat may corrode
internal parts and cause equipment failure.
Damage caused by those devices becoming wet is
not covered by the warranty and repair of such
devices may be impossible. Even if possible, you
are liable for the cost of repairs.
• Clean with a soft dry cloth. Wiping with a wet cloth
may cause equipment failure. Also, wiping with
alcohol, thinner, benzene or liquid soap may cause
print or label to fade or other discolouration.
• Clean terminals with a dry cloth or cotton swab
occasionally. Dirty terminals may cause poor
contact and the handset may turn off. Also, dirty
terminals may prevent proper charging.
• Do not place the handset near the airflow of an
air-conditioner. Sudden temperature changes may
cause condensation and doing so may corrode
internal parts.
• Do not apply extreme force to the handset. Placing
the handset in a bag with many other items, or
sitting down with the handset in your pocket may
damage the display or internal circuit boards and
may cause equipment failure.
• The handset keys or battery may become warm
during a voice call, video call, or while charging.
This is normal as long as they do not become
extremely hot.
• The operating temperature range is from 5 to
40qC and the humidity range is from
35 to 85 percent.
• Do not leave the camera under direct sunlight.
Doing so may discolour or burn the element.
• Do not attach a sticker, etc. to the display or
keypad. Doing so may wrongly press a key when
the handset is folded, or may damage the handset.
• Do not rub or scratch the display with metal, etc.
Doing so may damage the display.
• Do not leave the battery removed or uncharged for
an extended period of time (i.e. 6 months or so).
Doing so may alter or erase the setting or data you
saved. Vodafone is not liable for any damages
incurred by loss or alteration of data in such cases.
xxix
• Do not leave the battery uncharged. If you want to
store the battery for an extended period of time,
remove it from the handset, put it into the plastic
bag provided with the product and keep it in a dry
and cool place.
• Even if you do not use the handset for an extended
period of time, charge the battery at least every six
months. Failure to do so may lower the
performance or shorten the life.
• Keep the earphone jack and external connector
covers closed when not in use. Failure to do so
may cause dust or water to seep in and cause
equipment failure.
• When pulling the stereo microphone out of the
earphone jack, hold the plug instead of the cord.
Failure to do so may cause disconnection or
equipment failure.
Handling the camera
If you break the law while using the handset, you may
be liable to prosecution under applicable laws and
regulations (such as the Public Nuisance Law).
xxx
Copyrights
Music, images, computer programs, databases, other
copyrighted materials and their respective copyright
holders are protected by copyright laws. Duplicating
these materials is permitted only for individual or
home use. If duplication (including conversion of data
types), modifications, transfer of duplicates or distribution on networks are performed beyond the above
limits without permission of the copyright holders, this
constitutes “Literary Piracy” and an “Infringement of
Copyright Holder Rights”, potentially causing claims
for reparations or criminal punishment. Always
observe applicable copyright laws when using the
data, duplication features and camera functions.
SAR certification information
This handset 804N meets the MPHPT’s technical
standards regarding radio wave absorption by a
human body. These technical standards are established on a scientific basis to prevent radio waves
emitted from wireless devices such as mobile phones
that are used close to a human head from affecting
human health. These standards assure that the SAR
(Specific Absorption Rate), an indicator of the amount
of average energy absorbed in the side of a human
head, must not exceed the permissive value of
2 W/kg*. This value includes a substantial safety margin designated to assure the safety of all persons,
regardless of age and physical size. The value is
equal to the international guideline recommended by
International Commission on Non-Ionizing Radiation
Protection (ICNIRP) that has a cooperative relationship with the World Health Organization (WHO).
The highest SAR value for this handset 804N is
0.197 W/kg. This value is obtained in accordance with
the MPHPT testing procedure with the mobile phone
transmitting at its highest permitted power level. While
there may be differences in the SAR levels depending
on phones, they all meet the MPHPT’s permissible
value. Because mobile phones are designed to
employ the minimum power level required for the
communication with the base station, the SAR of the
phone during a call is usually below the maximum
value.
For further information about SAR, please see the following websites:
MPHPT: http://www.tele.soumu.go.jp/e/ele/index.htm
ARIB: http://www.arib-emf.org/initiation/sar.html
(Japanese only)
* The guideline is defined by relevant laws and regulations
associated with the Radio Law (No. 2 of Article 14 of Ordinance
Regulating Radio Equipment).
FCC RF Exposure Information
Your handset is a radio transmitter and receiver.
It is designed and manufactured not to exceed the
emission limits for exposure to radio frequency (RF)
energy set by the Federal Communications Commission of the U.S. Government.
The guidelines are based on standards that were
developed by independent scientific organisations
through periodic and thorough evaluation of scientific
studies. The standards include a substantial safety
margin designed to assure the safety of all persons,
regardless of age and health.
The exposure standard for wireless handsets
employs a unit of measurement known as the Specific
xxxi
Absorption Rate, or SAR. The SAR limit set by the
FCC is 1.6 W /kg.
The tests are performed in positions and locations
(e.g., at the ear and worn on the body) as required by
the FCC for each model. The highest SAR value for
this model handset when tested for use at the ear is
0.906 W/kg and when worn on the body, as described
in this user guide, is 0.157 W/kg.
Body-worn Operation; This device was tested for typical body-worn operations with the back of the handset kept 1.5 cm from the body. To maintain
compliance with FCC RF exposure requirements, use
accessories that maintain a 1.5 cm separation distance between the user's body and the back of the
handset. The use of beltclips, holsters and similar
accessories should not contain metallic components
in its assembly.
The use of accessories that do not satisfy these
requirements may not comply with FCC RF exposure
requirements, and should be avoided.
The FCC has granted an Equipment Authorisation for
this model handset with all reported SAR levels evaluxxxii
ated as in compliance with the FCC RF emission
guidelines. SAR information on this model handset is
on file with the FCC and can be found under the Display Grant section of
http://www.fcc.gov/oet/fccid after searching on FCC
ID GKRKMP7N2H1.
Additional information on Specific Absorption Rates
(SAR) can be found on the Cellular Telecommunications & Internet Association (CTIA) website at http://
www.phonefacts.net.
European RF Exposure Information
Your mobile device is a radio transmitter and receiver.
It is designed not to exceed the limits for exposure to
radio waves recommended by international guidelines. These guidelines were developed by the independent scientific organization ICNIRP and include
safety margins designed to assure the protection of
all persons, regardless of age and health.
The guidelines use a unit of measurement known as
the Specific Absorption Rate, or SAR. The SAR limit
for mobile devices is 2 W/kg and the highest SAR
value for this device when tested at the ear was 0.571
W/kg*. As mobile devices offer a range of functions,
they can be used in other positions, such as on the
body as described in this user guide**. In this case,
the highest tested SAR value is 0.270 W/kg.
** Please see General Notes (Electromagnetic
Waves) on page p.xxvii for important notes regarding
body worn operation.
As SAR is measured utilizing the devices highest
transmitting power the actual SAR of this device while
operating is typically below that indicated above. This
is due to automatic changes to the power level of the
device to ensure it only uses the minimum level
required to reach the network.
The World Health Organization has stated that
present scientific information does not indicate the
need for any special precautions for the use of mobile
devices. They note that if you want to reduce your
exposure then you can do so by limiting the length of
calls or using a hands-free
device to keep the mobile phone away from the head
and body.
* The tests are carried out in accordance with international guidelines for testing.
xxxiii
xxxiv
Date: 12th January 2006
Reg Office: Level 3 , Imperium, Imperial Way, Reading RG2 0TD, UK
Product Accreditation Manager
Reading, Berks, UK
Title:
Reg No 4072718
S.J Marshall
Name:
Signature:
Model Number KMP7N2H1
Trade name Vodafone 804N
Product(s):
WCDMA2100 Class 3 + Dualband GSM900 Class 4, GSM1800
Class 1 Digital Portable Cellular Telephone, including Bluetooth
European Union Directive 1999/5/EC
Radio and Telecommunications
Terminal Equipment Directive
Essential Requirements 3.1(a), 3.1(b), 3.2
declare under our sole responsibility that the product(s)
listed below, and in combination with our accessories,
conform with the essential requirements of
We, NEC Technologies (UK) Ltd
Level 3
The Imperium
Imperial Way
Reading
Berkshire
RG2 0TD
United Kingdom,
Declaration of Conformity
Getting Started
Main Features
1
USIM Card
Key Lock Functions
Getting Started
Contains information such as
your phone number. Insert it
into a USIM card-compatible
Vodafone handset.
Disable all key operations to
prevent key operating errors.
External Display
External Keys Lock
Check missed calls or new
messages on the display.
Disable external key operations
when the handset is closed.
Manner Mode
Phone Book
Use this mode to silence
ringtone and keypad tone.
Store up to 500 contacts on the
handset. Phone numbers and
mail addresses can also be
stored on the USIM card.
International Roaming
Private
Supports W-CDMA and GSM.
Use the same phone number to
make calls from Japan or from
outside Japan.
Make a Phone Book contact
secret to prevent others from
viewing the contact.
Ringtone
Video Calls
Set your favourite pattern or
melody for the ringtone.
Make video calls with compatible Vodafone handsets.
1-2
Camera
Personal Dictionary
Shoot a picture or video.
For easy access to frequently
used Japanese words, save a
reading. Just enter the reading
to access the word.
Desktop
Calculator
Set frequently used functions or
phone numbers as desktop
icons for easy access.
Calculator function is available.
Language
Currency Conversion
Change the display language to
English.
Set the exchange rate and
convert foreign currencies.
Music Player
Alarm
Listen to your favourite music
downloaded from websites or
CDs.
Use the handset as an alarm
clock.
Media Player
World Clock
Use Media Player to view captured pictures or videos or
create a playlist to play videos in
your preferred order.
Set and display the time around
the world.
microSD memory card
Store files on the microSD
memory card.
Vodafone live! CAST
Optional Services
Call Barring
Save files to Data Folder.
Subscribe to Vodafone live!
CAST content to receive
updates automatically.
Call Forwarding
Restrict all incoming/outgoing
calls to domestic only or set the
handset to receive or make calls
only.
Bluetooth
Use Bluetooth to exchange
data.
USB
Messaging
Connect your handset to a PC
to transfer files.
Exchange messages, pictures
or melodies with Vodafone
handsets, email compatible
devices or PCs.
Call Rejection
Web
Reject calls from specified
phone numbers.
Access Vodafone live! Web to
obtain information, pictures or
melodies.
Bar code reader
V-appli
Use information scanned from
bar codes (QR codes) to easily
access websites or send
messages.
Download V-appli from
websites.
Forwards an incoming call to
another phone number. If the
Voicemail Centre is set as the
forwarding number, the Centre
keeps the other party's
message.
Caller ID Notification
Show or hide your Caller ID
(phone number) when calling
another party.
Voice Mail
Multiparty Call
Callers can leave messages at
Voicemail Centre, when you
cannot answer an incoming call.
Talk to multiple parties
simultaneously or switch
between parties.
Call Waiting
Answer or make a call during
another call. Switch between
parties.
3D Pictogram
Displays pictographs or text in
3D graphics.
1-3
1
Getting Started
Data Folder
USIM Card
• Do not apply excessive force when removing or inserting
the USIM card. (Excessive force may cause malfunction.
Carefully handle the card to avoid injury.)
1
Getting Started
■ Before using the USIM card
The USIM card is an IC card that contains your phone number or other owner information. The USIM card must be
inserted before using a USIM card compatible handset.
Without the USIM card, network connections such as making/receiving calls, messaging and web access are not available.
• Phone Book contacts and SMS can be stored on the
USIM card.
• The data stored on the USIM card are available on other
USIM card-compatible Vodafone handsets.
• Use the USIM card with compatible devices. Using noncompatible devices may cause data loss or malfunction.
• Do not put the USIM card in a cooking unit such as a
microwave oven or pressure cooker. Doing so may cause
the USIM card to melt, overheat, smoke, lose data, or
malfunction.
• Keep the USIM card away from small children. They may
swallow it, or the card may cause bodily injury.
1-4
• Vodafone shall not be liable for any malfunction caused by
inserting the USIM card into a third party IC card reader.
• The USIM card may become warm during use. This is
normal.
• Keep the IC chip clean. (Touching the IC chip may cause
data loss or equipment failure. Avoid touching the IC chip.)
• Do not put labels on the USIM card. The thickness of
labels may cause read/write errors or data corruption.
• For more details on the USIM card, read the instructions
that came with the USIM card.
■ General notes regarding the USIM
card
• Information stored in Saved Pages become inaccessible
after replacing the USIM card.
1
• The USIM card is the property of Vodafone.
Getting Started
IC
• The USIM card will be re-issued for a fee if the card is lost
or damaged.
• Return the USIM card to Vodafone when cancelling your
subscription.
• Returned USIM cards are recycled.
• The specifications and performance of the USIM card are
subject to change without prior notice.
• The data you save to the USIM card may be lost or altered
due to accident or malfunction. Keep a backup of data
stored in the USIM card.
■ Inserting/removing the USIM card
Remove the battery before inserting or removing the USIM
card (zp.1-16).
Inserting the USIM card
Insert a USIM card into the slot with the gold
plate (IC) facing down until it clicks into place
Vodafone shall not be liable for any loss or alteration of
data.
• If you have lost the USIM card or the handset with the
USIM card inserted or if they have been stolen, immedi-
IC
ately contact Customer Service (zp.30-38) to prevent
your handset and USIM card from being used.
• Files stored on the handset or microSD memory card may
become inaccessible after handset repairs, handset
upgrades or USIM is replaced.
1-5
B Slide the USIM card in the direction of the
arrow
1
Getting Started
Removing the USIM card
A Press down the lock
Note
• Forcing the USIM card into the handset may cause damage to
the card.
• Keep the USIM card in a safe place.
• When inserting/removing the USIM card, do not carelessly
touch or scratch the IC part. Also, do not touch battery terminals.
• Inserting another USIM card will erase the cookies/cache
stored in the handset to protect private information.
1-6
■ PIN
For security purposes, the USIM has two codes: PIN1 and
PIN1
PIN1 is a 4 to 8 digit code to prevent unauthorised use of
Vodafone handsets by others.
• PIN1 is set to 9999 by default.
• PIN1 can be changed.
• If Activate PIN1 is enabled, all operations other than PIN1
entry are locked until you enter PIN1. You are required to
enter PIN1 whenever turning on the handset or re-inserting the USIM card.
PIN2
If PIN1 or PIN2 is incorrectly entered three times consecutively, the current PIN1 or PIN2 becomes invalid. This is
called PIN lock. To release a PIN lock, enter a PUK code.
• To obtain a PUK code, contact Customer Service
(z p.30-38).
Note
• If a PUK code to unlock PIN1 is entered incorrectly ten times
in a row, the USIM card is locked. Once USIM card is locked,
all operations are blocked.
• If a PUK code to unlock PIN2 is entered incorrectly ten times
in a row, no operations requiring PIN2 can be performed.
• Write down the PUK codes and keep them in a safe place for
future reference.
• To unlock the USIM card, contact Customer Service
(zp.30-38).
PIN2 is a 4 to 8 digit code that authorises a user to access
on-line services.
• PIN2 is set to 9999 by default.
• PIN2 can be changed.
1-7
1
Getting Started
PIN2.
PUK (Personal Unblocking Key)
Handset Parts & Functions
1
Getting Started
■ Handset
rExternal
Camera
aEarpiece
fInternal Camera
qLamp
bDisplay
gLeft Softkey/
Message Key
hRight Softkey/
Vodafone live! Key
iMulti Selector
jCentre Key
kMusic Key
cStart/Call Log Key
eMicrophone
1-8
tExternal
Display
uMusic
Assist Key
vEarphone
Jack
wSpeaker
lMenu/Task Menu Key
xBattery
Cover
mPower/End Key
yStrap
Hole
nClear/Back Key
d* Key
sMacro
Switch
o#/Manner Mode Key
pKeypad
zSide Keys
ACharging
Terminals
BExternal
Connector
aEarpiece
bDisplay
cStart/Call Log Key
d
Key
In text entry, open pictographs or symbols list. Press for 1+
seconds to select a mode (Normal, Meeting, Outdoor,
Driving or Manner).
eMicrophone
fInternal Camera
Used for capturing self-portraits in photo/video modes or sending
your image during a video call.
gLeft Softkey/Message Key
Activate the function indicated at the lower left of the display.
hRight Softkey/Vodafone live! Key
Activate the function indicated at the lower right of the display.
iMulti Selector
Scroll through menus or contacts, move cursor or adjust the
volume.
a Left/Received Calls Key
Move cursor left or display Received Calls.
b
Move cursor up or select a
desktop shortcut.
1
c Right/Call Log Key
Move cursor right or display
Dialled Calls.
c
a
d Down/Phone Book Key
Move cursor down or display
Phone Book.
d
jCentre Key
Select an item/option.
kMusic Key
Start Music Player.
lMenu/Task Menu Key
Display Main Menu or Task Menu.
mPower/End Key
Turn the handset on/off or end a call.
nClear/Back Key
Return to the previous screen or delete characters.
o#/Manner Mode Key
Enter symbols. Press for 1+ seconds to set or cancel manner
mode.
pKeypad
Enter phone numbers or characters.
1-9
Getting Started
Initiate/answer voice calls. Show Dialled Calls in standby mode
and toggle between upper and lower cases while entering text.
b Up/Shortcut Key
qLamp
1
Illuminates while charging or flashes when receiving a call or
message.
! Multi Selector
Use Multi Selector to scroll, select an item or move the cursor.
rExternal Camera
Getting Started
Used for capturing images in photo/video modes or sending
images during a video call.
sMacro Switch
Switch between macro mode (
) and normal mode (
).
tExternal Display
View operation status.
uMusic Assist Key
Control the Music Player.
vEarphone Jack
Connect the stereo microphone.
wSpeaker
xBattery Cover
yStrap Hole
Attach a hand strap.
zSide Keys
Adjust volume, etc.
ACharging Terminals
BExternal Connector
Connect Rapid Charger, in-car charger, USB cable or other
external devices.
1-10
The following notations are used in this manual:
・
: Press
(Up) or
・
: Press
(Left) or
・
: Press
(Up),
(Down)
(Right)
(Down),
(Left) or
(Right)
! Centre Key
Use Centre key to select a highlighted item.
Centre key” in this manual.
means “press
Out of service area
■ Display
f
3G (UMTS) network mode
GSM or GPRS network mode
a bcd efghijk
g
Getting Started
l
m
n
o
1
3G (UMTS), GSM and GPRS network mode
unavailable
Vodafone live! in progress
Vodafone live! available
SSL communication in progress
(Grey) Packet communication available
Sending data in packet communication
Receiving data in packet communication
(Blue) Packet communication requested
Packet communication disconnected
h
USB cable connected
Bluetooth connection is standby
Bluetooth connection in progress
a
b
Battery level
Unread message
Inbox is full
USIM memory for SMS is full
c
Voice Mail message stored at Voicemail Centre
d
(Blue) V-appli in progress
i
Disabled microSD memory card inserted
microSD memory card is being accessed
(Grey) V-appli paused
e
Signal strength (more bars indicate a stronger signal)
USB cable connected and Bluetooth connection is
standby
USB cable connected and Bluetooth connection in
progress
microSD memory card inserted
USB connection to PC
j
Voice call in progress
1-11
Voice call on hold
Video call in progress
1
k
■ External display
One task activated
a b c d efg
Getting Started
Two tasks activated
Three tasks activated
h
i
j
k
Music player running
Music player running and one task activated
Music player running and two tasks activated
l
Alarm ON
m
Manner mode
Meeting mode
a
b
Inbox is full
Outdoor mode
Drive mode
n
Dial Lock On
USIM memory for SMS is full
c
Signal strength (more bars indicate a stronger signal)
Out of service area
d
3G (UMTS) network mode
All Keys Lock active
When External Keys Lock is active
Music assist key locked
GSM or GPRS network mode
Side keys locked
All external keys locked
When External Keys Lock and All Keys Lock are active
Music assist key locked
Side keys locked
All keys locked
o
1-12
All calls is set for Diverts setup (Voice Calls) in
Voicemail/Diverts
Battery level
Unread message
e
3G (UMTS), GSM and GPRS network mode
unavailable
Vodafone live! in progress
Vodafone live! available
SSL communication in progress
(Grey) Packet communication available
Sending data in packet communication
Receiving data in packet communication
(Blue) Packet communication requested
Battery & Charger
Packet communication disconnected
USB cable connected
Bluetooth connection is standby
Bluetooth connection in progress
g
USB cable connected and Bluetooth connection is
standby
USB cable connected and Bluetooth connection in
progress
Music player running
h
(Blue) V-appli in progress
(Grey) V-appli paused
1
■ Notes on using battery & charger
• The handset is powered by a rechargeable lithium-ion battery. Lithium-ion batteries do not have memory effects and
therefore can be recharged without fully draining the battery.
• Charge the battery before using the handset for the first
time or if the handset has not been used for a long period
of time.
• Even if you do not use the handset for a long period of
i
Voice Mail message stored in Voicemail Centre
time, charge the battery at least every six months. If the
j
Manner mode
battery has not been used for a long period of time, it may
Meeting mode
become unable to be fully charged even after charging is
Outdoor mode
completed and operating time may be reduced.
Drive mode
k
Dial Lock On
(Green) All Keys Lock On
(Blue/Orange) External Keys Lock On
(Green/Blue/Orange) All Keys Lock and External
Keys Lock On
• Avoid charging the battery in the following conditions:
• When an ambient temperature is below 5qC or over
40qC
• Humid or dusty places or unstable surfaces (may
cause malfunction)
• A place where magnetic waves are emitted e.g. near
electric appliances (signals from the handset may
cause noises)
1-13
Getting Started
f
• The battery or the charger may become warm during normal charging. However, if they become extremely hot,
1
stop charging immediately and contact Customer Service
Getting Started
(zp.30-38).
• Do not plug too many devices into one electrical socket.
Doing so may cause overheating and result in fire.
• The battery is a consumable item. If the battery runs out
much sooner than usual, replace it with a new one.
• Lithium-ion batteries are valuable and recyclable
resources.
Note
• Use only approved battery and charging device (zp.0-i).
• Insert the battery into the handset before charging. The
handset cannot be charged and powered on without the
battery.
• The lamp blinking in red during charging indicates battery
failure. Contact Customer Service (zp.30-38).
• If Check the power supply immediately. Problem with charging voltage.
appears on the display, turn the handset off and remove the
battery from the handset. Then, recharge the battery. If charging fails again, contact Customer Service (zp.30-38).
• Unplug the charger from the electrical socket or cigarette
lighter socket if you do not intend to use it for a long period of
time.
• Do not dispose of batteries as municipal waste. Insulate
the terminals with tape and bring them to a collection
Battery level
point for recycling batteries or to a Vodafone Shop. Dis-
Check the battery level indicated on the display or external
pose of batteries separately beforehand according to local
display to know when to charge or replace the battery.
regulations.
The battery level indicator varies as shown:
1-14
1
Operating voltage
of handset
Level 4
Level 3
Level 2
Level 1
Display
Getting Started
Battery voltage
Phone is shutting down appears around this
point, prompting you to charge or replace
the battery.
External display
Level 0
Operating time
Battery level (when used in an ambient temperature of 25℃)
Level 4: Fully charged
Level 3: Half charged
Level 2: Low charged
Level 1: Empty
Level 0: The handset will stop working in 60 seconds.
When the buttery runs out
Phone is shutting down appears, the battery alarm sounds for
10 seconds and the handset will turn off in 1 minute.
Tip
• To stop the battery alarm
Press any of Side keys or Music assist key. After stopping the
alarm, turn off the handset to charge the battery.
• When the battery runs out during a call
The battery alarm beeps and the call will automatically end in 20
seconds. End the call and turn off the handset to charge the battery.
• When manner mode works
The alarm tone sounds.
The tone sounds through an earphone when it is connected.
Note
• The indicated battery level is an approximate estimate.
• The vibrator works even during charging. Set Vibration Pattern
to Pattern Off to prevent the handset from vibrating.
1-15
Battery life
1
• The battery also drains faster under the following settings:
The operating environment of the handset, type of per-
• A long time is set in Power Saving.
formed operation or settings affects the battery life.
• High Backlight is set in Backlight under
Getting Started
• The battery may drain quickly if:
• The handset is used or left in an extremely low or high
temperature (the operating temperature range should
be from 5qC to 40qC).
• Calls are made in a weak signal area or the handset is
in standby out of service area.
• The battery is not fully charged due to loose contact
Backlight Settings.
■ Inserting/removing the battery
Inserting the battery
A Press a and slide down b
a
between dirty charging terminals on the handset, battery or charger device.
• The battery drains faster when:
• Communication such as video call or Group Talk is
continued for a long period of time
• V-appli is running
• The camera or access reader is used continuously
• Videos, melodies or music files are played
• The keypad is used continuously for using V-appli,
composing messages, etc.
• The handset is repeatedly opened and closed.
1-16
b
B Place the handset hook into the battery
groove
Handset hook
Note
• Do not apply excessive force on the battery when installing it.
Doing so may damage the battery terminals of the handset.
a
Removing the battery
b
Disconnect the handset from the charging device and turn
power off before removing the battery.
A Press a and slide down b
C Close the battery cover
a
b
Slide up the battery cover giving
a slight press without spaces.
1-17
Getting Started
• Check that the battery cover is closed securely before using
the handset.
1
B Lift a and slide up b
Lamp illuminates red while
charging and goes off when
charging is completed.
1
Plug
Getting Started
b
a
AC 100 V
mains socket
C Remove the charger plug from the handset
■ Charging with Rapid Charger
and unplug the power cord from the socket
A Open the external connector cover and insert
Press both side of
the release levers and pull
out straight
the charger plug into the external connector
External
connector cover
External connector
Push the charger plug
until it clicks into
place.
Charger plug
Release lever
Tip
B Plug the power cord into a 100 V AC socket
1-18
• The battery charging time is roughly 180 minutes when the
handset is turned off, and varies depending on temperature.
Charging takes longer than 180 minutes while the handset is
turned on.
■ Charging with the desktop holder
C Put the handset on desktop holder and push
the handset into place
A Plug Rapid Charger to desktop holder
Desktop holder
External connector
Push the charger
plug until it clicks
into place.
Power cord
Rapid Charger
B Plug power cord into a 100 V AC socket
D Remove the handset from desktop holder
and unplug power cord from the socket
Tip
AC 100 V
mains socket
• The battery charging time is roughly 180 minutes when the
handset is turned off, and varies depending on temperature.
Charging takes longer than 180 minutes while the handset is
turned on.
Note
• Desktop holder is an optional accessory. For details, contact
Customer Service (zp.30-38).
1-19
1
Getting Started
Lamp illuminates
red while charging
and goes off when
charging is
completed.
■ Charging with the in-car charger
1
C Start the car engine to check if the lamp
illuminates in red
A Open the external connector cover and insert
Getting Started
the charger plug into the external connector
The lamp goes off
when charging is
completed.
External
connector
Push the charger plug
until it clicks
into place.
Charger plug
D Remove the charger plug from the handset
and disconnect the power plug from the
cigarette lighter socket
B Connect the power plug into a cigarette
Release tabs
lighter socket
Cigarette lighter
socket
Power plug
In-car charger
1-20
Pull the charger plug
straight out while
pressing the release tabs.
Tip
• For information on how to use an in-car charger, see the in-car
charger user's manual. It is recommended to use an in-car
holder to secure the handset during charging.
Turning the Handset On/Off
1
■ Turning the handset on
Getting Started
• The battery charging time is roughly 180 minutes when the
handset is turned off, and varies depending on temperature.
Charging takes longer than 180 minutes while the handset is
turned on.
A Open the handset
B Press
for 2+ seconds
Note
• Do not charge in a car under direct sunlight in high
temperature.
• The in-car charger is only for cars with negative grounding
(DC 12/24 V).
Standby screen
Tip
• If you have set the PIN1
The PIN1 is required each time you turn the handset on
(zp.14-2).
Note
• Use both hands to open the handset gently. Applying
excessive force may cause damage.
1-21
■ Turning the handset off
1
A Press
for 2+ seconds
Getting Started
Initial Settings
Make initial settings before using the handset.
■ Setting date & time
The Do you wish to set the home time? screen appears the first
time you turn the handset on. Follow the steps below:
• The date that can be set:
From 1 January, 2005 to 31 December, 2015
• To reset the date and time
Select
(Settings) from the Main Menu → Phone Settings →
Date & Time → Set Date & Time, and set the current date and time.
! To set the clock formats on the standby screen
[Default]
■Time Format: 24 Hour Display
■Clock Display: Home Time
■Date Format: yyyy/mm/dd (year/month/date)
a Select
(Settings) from the Main Menu → Phone Settings →
Date & Time → Format
b Set the formats
! To set the time difference from GMT (Dual Time)
A On the Do you wish to set the home time? screen,
press
(YES)
B Set the current date and time
To move the cursor
Use
C Press
(OK)
Tip
• If you enter a wrong number
Use
to move the cursor over the wrong number, and re-enter.
1-22
You can set the time difference from Greenwich Mean Time
(GMT).
[Default]
■GMT+9:00 (Tokyo) (Time difference between
Greenwich and Tokyo/Seoul)
a Select
(Settings) from the Main Menu → Phone Settings →
Date & Time → Set Date & Time
b Highlight the time zone
Press
and select a city from registered ones
• To set Summer Time
a Perform Step a above
b Select Summer Time
• To check the time
Select View Clocks under Date & Time
• To manually retrieve network information
Select
(Settings) from the Main Menu → Connectivity → Network Setup → Retrieve NW info, and press
.
! Dual Time display
If you have selected Dual Time or Home and Dual Times for Clock
Dual Time
Getting Started
Display, the clock is displayed as follows ("・" appears on the left
of Dual Time).
Home and Dual Times
■ Retrieving network information
When turning the handset on for the first time, the Retrieve
NW info screen appears following the Set Date & Time
screen.
A Press
(YES) on the Retrieve NW info
screen
Tip
• If you cancel Step 1 (or fail to retrieve network information)
The standby screen appears. When you press
,
,
, the Retrieve NW info screen appears again.
1
or
1-23
Changing the Language Mode
1
[Default]
Keys & Menus
■日本語 (Japanese)
Getting Started
■ Softkeys
■ Changing the display language to
English
A Select
Each Softkey corresponds to a function/action indicated at
the bottom of the display (Softkey area). Press the corre-
(⸳ቯ (Settings)) from the Main
Menu → ৻⥸⸳ቯ (Phone Settings) →
sponding Softkey to select/execute the item/task.
(OPTIONS)
(NEW)
登録
Language
B Select English and press
(OK)
Softkey area
■ Changing the display language to
Japanese
A Select
(Settings) from the Main Menu →
Phone Settings → ⸒⺆ㆬᛯ (Language)
B Select ᣣᧄ⺆ (Japanese) and press
(OK)
• To access the OPTIONS menu → press
• To create a new message → press
1-24
(OPTIONS)
(NEW)
! Notation
The following notation is used for Softkey operations:
1
/
(OPTIONS)
Getting Started
Press
Item or task name at the Softkey area
Softkey to press
Standby screen
Main Menu item
■ Main Menu
Opening the Main Menu
Press
or
Function
V-appli
Access V-appli from Library or customise the V-appli settings.
Vodafone live!
Access Web or Mobile Internet.
Entertainment
View or play images, videos or music.
Camera
Capture images or videos with the
selected mode, or use Bar Code
Reader.
Data Folder
Check or use files saved in 6 types of
folders.
Messaging
Create messages or check received or
sent messages.
Organiser & Tools
Activate applications such as Calendar,
Calculator/Converter and Voice Recorder.
on the standby screen to open the Main
Menu.
The Main Menu includes 9 items. Highlight a Main Menu
item and press
Main Menu
to open the menu.
1-25
Main Menu item
Function
Phone Book
Open the Phone Book menu to save or
search contacts or customise settings.
Settings
Open the Settings menu to customise
your handset.
1
Getting Started
Accessing a menu item and sub menu
item
Select a menu item from the displayed menu and then select
a sub menu item.
• To cancel the current operation
Press
to cancel the current operation and return to the
standby or previous screen. A message asking whether to cancel
the operation may appear. Press
to return to the operation
screen.
! Selecting menu items
Selecting Phone Settings from the Settings menu and
selecting Date & Time.
Settings
Tip
• To close a menu
Press
to close a menu and return to the standby screen. If
more than one task is running, another task becomes active.
Phone Settings
Date & Time
The following notation is used for procedures to select a Main
Menu item, menu item and sub menu item in order:
A Select
(Settings) from the Main Menu →
Phone Settings→ Date & Time → Set Date & Time
"Highlight" instructs you to move the cursor (
an item.
or frame) to
! Selecting menu items with the keypad
Press a corresponding number key for quick access to numbered
menu items.
Press
1-26
(Highlight Date
& Time)→
! Accessing options quickly
To quickly access options for which a number starting with M
appears on the upper right of a screen, press
and dial keys
of the number on the standby screen.
Accessing Date & Time options
M913: Press
A Highlight an item to add to My Menu on a
, [9], [1] and [3]
menu screen
! Selecting multiple items
B Press
aPress
,
bRepeat a.
,
or
to select an item and press
To select consecutive items, press
highlight the last item and press
several times after a to
.
(Shortcut) and select Add To My
Menu
.
Tip
• To create a desktop shortcut on the standby screen
Press
(Shortcut) and select Add To Desktop.
■ OPTIONS
■ My Menu
Add frequently-used applications and functions to My Menu
When "OPTIONS" Softkey appears, press
for quick access to them. Up to 8 items can be added to My
OPTIONS items that enables you to perform various opera-
Menu.
tions.
Accessing My Menu items
A Press
press
twice on the standby screen or
(My Menu) on the Main Menu
screen
B Highlight an item and press
to open the
• To perform an OPTIONS item, highlight the item and
press
• Use
.
to switch pages on an OPTIONS item that con-
sists of multiple pages (a page number such as
1
Getting Started
Use the following procedure to select multiple items when
copying or deleting Phone Book items, etc.:
or
appears at the top right on the screen).
Selecting Delete from the OPTIONS item of Calendar
Adding items
1-27
Multitasking
Activate one task per Task Group to run up to three tasks
1
Getting Started
simultaneously.
Task Group
(OPTIONS)
(Highlight
Delete)
The following notation is used for procedures to select OPTIONS
items:
(OPTIONS) and select Delete
The above procedure means:
a Press
b Use
c Press
(OPTIONS)
to highlight Delete
Music player
Web/Message
Vodafone live!, Message, Vodafone
live! CAST
Others
Other than the above
Press
! Selecting OPTIONS items
Press
Function
Music Player
You cannot launch another function during a video call.
Some functions cannot be run together with other functions
(zp.30-13).
■ Launching new tasks
If a function is already running and you want to launch
another function, follow the steps below:
A Press
to open the Main Menu
B Select a menu item from a group with no
tasks running
1-28
■ Ending tasks
Tip
• A message appears when you attempt to launch a second task
from the same group. Select Yes to end the running task and
launch a new task.
.
■ Switching tasks
A Press
for 1+ seconds to open the Task
Menu
B Select another task
B Press
(YES)
Tip
• To use the task menu
aPress
for 1+ seconds
bSelect a task to end, and press
cPress
(QUIT)
(YES)
• To end all running tasks
aPress
for 1+ seconds
bPress
(END ALL)
cPress
(YES)
1-29
1
Getting Started
• To launch Music Player, press
A On the screen of the task you want to quit,
press
Handset Codes
1
• To change Centre Access Code, contact Customer Service
(zp.30-38).
Security Code, Centre Access Code and Network Password
Getting Started
are required to use/access some functions/services.
■ Security Code
■ Network Password
Network Password is required to set Call Barring service.
The password is the 4-digit number selected when you sub-
Security Code is required to access some handset func-
scribed to the service. After three consecutive incorrect
tions. The code is set to “9999” by default or the 4-digit num-
password entries, Call Barring settings are locked and you
ber selected when you subscribed to the service.
need to change Network Password and Centre Access
• Security Code can be changed from the handset
(zp.14-2).
• When Security Code is entered, asterisks appear.
Code to unlock. To change Centre Access Code, contact
Customer Service (zp.30-38).
• Network Password can be changed from the handset
(zp.17-5).
• An error message appears if Security Code is entered
incorrectly.
Note
• Do not forget these codes. If you forget any of the codes, you
■ Centre Access Code
Centre Access Code is required to set optional services
from a landline or to subscribe to Web fee-based information
services. The code is the 4-digit number you wrote on your
application form when you subscribed to the service.
• Centre Access Code cannot be changed from the handset.
1-30
must follow certain procedures. For details, contact Customer Service (zp.30-38).
• Keep the codes and password secret. Vodafone shall not be
liable for any damages caused by misuse of the codes by
others.
Basic Handset Operations
b Confirm the phone number and press
Making a call
A Enter a phone number and press
Instead of entering the international access code, press
1+ seconds, and + is automatically entered.
To use the default international prefix, follow the steps below:
Always enter the entire phone number and include the
2
a Enter the country code and then a phone number excluding
the first 0 *
area code for landlines.
Basic Handset Operations
B Press
*
Tip
to delete the number.
• To show/hide caller ID
After Step 1, press
(OPTIONS), select Notify Caller ID and
then Add 184(No caller ID) or Add 186(caller ID).
Alternatively, enter the following prefix before the phone number:
• 186 - Show caller ID
• 184 - Hide caller ID
• Closing the handset while dialling/talking
Terminates dialling/talking. To change the settings, select
(Settings) → Call Settings → Voice Call → Close Setting.
! Making an international call
A separate subscription is required to make an international call.
For more information, contact Customer Service (zp.30-38).
Follow the steps below to make an international call:
a Enter the Vodafone international access code 0046010, country
code and then a phone number excluding the first 0*
2-2
b Press
(OPTIONS), and select Prefix → Intern. Call(Japan)
c Confirm the phone number and press
to end the call
• To correct a number
Use
to move the cursor. Press
for
Do not omit the first 0 when calling a landline in Italy or in Russia.
! Options for phone numbers
Press
(OPTIONS), and select from the following options:
Option
Description
Create Phone Book
Register the entered number to the Phone Book.
Send Message
Launch the Mail.
Copy
Copy the number.
Paste
Paste the copied number.
Notify Caller ID
Select whether to show/hide your caller ID.
Add 184(No caller ID): Hide (only in Japan)
Add 186(caller ID): Show (only in Japan)
Notify(*31#): Show
Not Notify(#31#): Hide
Option
Prefix
Description
Intern. Call(Japan): Add the international access
code 0046010 when making an international call
from Japan
Intern. Call(Oversea): Add the international
access code +81 when calling from outside
Japan
Making a call from call logs
■ Dialled Calls
A Press
2
or
Select
(Phone Book) → Call Log → Dialled Calls
B Highlight the phone number or name and
press
Tip
• To check the details before calling
Select the data to display the details, and press
.
Select
/
List
Details
2-3
Basic Handset Operations
From the Main Menu:
• The latest 20 records of dialled voice and video calls are
stored in Dialled Calls.
Select
• If a number has been dialled more than once
If Duplicate Records is set to On, each dialled record is logged. If it
is set to Off, only the latest dialled record is logged.
2
/
Basic Handset Operations
• If the phone number is stored in the Phone Book
The name appears on the list. To check the phone number, select
the name to display the details.
• To delete a data from Dialled Calls
Highlight a record, press
(OPTIONS), select Delete this Record
or Clear This Log, and press
(YES).
■ Received Calls
From the Main Menu:
(Phone Book) → Call Log → Received
Calls
Tip
2-4
• The latest 20 records of received or missed voice and video
calls are stored in Received Calls respectively. If the caller ID
was not notified, the reason such as Payphone or No Caller ID
and the date and time are displayed.
! Call Logs
Call logs contains the following options:
B Highlight the phone number or name and
press
• To check the details before calling
Select the data to display the details, and press
Details
• To check the ringing time of the missed call
The details screen displays the ringing time in seconds. It is useful
to judge whether or not the missed call was a prank call.
A Press
Select
List
.
Option
Dialled Calls
Description
Display previously-dialled calls.
Received Calls
Display received calls.
Missed Calls
Display missed calls.
Clear All Logs
Delete all logs.
Automatic Delete
Set whether to delete logs when turning the
handset on.
On: Delete automatically
Off: Do not delete automatically
Option
Duplicate Records
Description
●
Set whether to keep records with the same
phone number.
On: Keep them
Off: Do not keep them
●
! Call Logs options
Option
Create Phone Book
Register the log to the Phone Book (zp.5-4).
Add the prefix (184, 186, 㪁31#, #31#) to the
log.
Prefix
Add the international prefix to the log.
Intern. Call(Japan): Add the international
access code (from Japan) to the log
Intern. Call(Oversea): Add the international
access code (from Overseas) to the log
Select
(Phone Book) from the Main Menu → Settings →
Speed Dialling and then select On beforehand.
Dialling using a phone number in text data: Select a phone
number described in a mail message or website. Selecting
Phone Call or Video Call displays a confirmation screen. Press
to select whether to notify your Caller ID.
●
Earphone switch: Press the earphone switch for 1+ seconds. A
call is made using Memory No. 001 in the Phone Book.
●
Auto Redial: Set the Auto Redial to On. The call is redialled if it
was not made.
Description
Notify Caller ID
.
Select
(Settings) from the Main Menu → Call Settings →
Voice Call → Auto Redial.
■ Checking missed calls or new
messages
Send Message
Paste the phone number into a mail message.
Delete this Record
Delete the log.
If there are missed calls or new messages, an indicator
Clear This Log
Delete all the logs in the Calls history.
appears on the standby screen. Select the indicator to check
Clear All Logs
Delete all the logs in the handset.
the contents.
Use Number
Paste the phone number onto the standby
screen. Simply press
to make a call.
A Press
on the standby screen
! Other useful ways to make a call
The following functions are available:
●
Phone Book dialling: Make a call using Phone Book data.
2-5
2
Basic Handset Operations
The following options are available from the details of Dialled
Calls/Received Calls/Missed Calls.
Speed Dialling: Enter a number from 1 to 99 and press
A call is made using Memory No. 001 to 099 in the Phone
Book.
Answering a call
A When receiving a call, press
or
(ANSWER)
2
B Press
Basic Handset Operations
B Select a desktop indicator
:
New messages
:
Missed voice calls
:
Missed video calls
:
New Cast
:
Contents (Melody, Video, etc.)
Tip
• To check missed calls, follow either of the two procedures
below:
• Press
for 1+ seconds.
• Select
(Phone Book) from the Main Menu→ Call Log →
Missed Calls.
• To display all the missed calls from the same party
Select
(Phone Book) from the Main Menu→ Call Log → Duplicate Records and select On.
2-6
to end the call
Tip
• Using Any Key Answer
When Any Key Answer is set to On, you can also answer the call by
pressing any key (
to
,
,
,
or
). To
change the Any Key Answer settings, select
(Settings) from
the Main Menu → Call Settings → Voice Call → Any Key Answer.
Regardless of the Any Key Answer settings, pressing
stops
the ringtone sound.
• To adjust the ringtone volume while the phone is ringing
Press
or to turn up, or
or to turn down.
Note
• It may take a long period of time to sort using the Music
Player/Mail sorting function. You cannot answer a call during
the sorting.
Preventing prank calls
! Incoming Voice Call display
The handset provides you with various functions to prevent
2
Option
Unknown
Rejecting an incoming call
(Settings) from the Main Menu → Call
prank calls. Select
Settings → All Calls.
Description
Reject incoming calls from phone numbers that
are not stored in the handset or USIM card Phone
Book (zp.14-7).
Ignore If No ID
Reject incoming calls without caller IDs (zp.147).
While the phone is ringing, press
, or press
(OPTIONS) and select Reject.
Operations during a call
Tip
• When a call is incoming during a call
Pressing
hangs up the current (held) call.
■ Adjusting the earpiece volume
[Default]
■Level 4
A Press
or
for 1+ seconds during a call
B Adjust the volume
To turn up the volume
Press
or side key
To turn down the volume
Press
or side key
2-7
Basic Handset Operations
When the other party notifies you of his/her phone number, the
phone number appears. If the phone number is stored in the
Phone Book, the registered name appears.
When the other party does not notify you of his/her phone
number, the reason (CallerID Withheld, Payphone, Caller ID
Unavailable) appears.
B Press
Tip
• To adjust the volume from the Main Menu
Select
(Settings) → Call Settings → Common Setting →
Receiver Volume.
2
• To adjust the volume on the standby screen
Press
or side key , or
or side key for 1+ seconds.
Basic Handset Operations
Note
or
(OK) to end record-
Tip
• Five seconds before the recording ends
A beep sounds indicating that five seconds are left. The recording
automatically ends in five seconds.
• To play a voice memo
• When the call ends, the volume returns to the level set under
Receiver Volume (select
(Settings) from the Main Menu → Call
Settings → Common Setting).
■ Putting a call on hold
A Press
(HOLD) during a call
B Press
(RETRIEVE) to return to the call
■ Recording a call (Call Memo)
Record a call for up to 20 seconds. You can keep up to 5
records. 6th and subsequent records will overwrite the older
ones following a confirmation message.
A Press
,
ing
(OPTIONS) during a call, and
aSelect
(Organiser & Tools) from the Main Menu → Voice
Recorder → Call Memo.
bHighlight a record to play, and press
.
• To delete a voice memo
Highlight a record to delete from Call Memo, press
and then
(YES).
(DELETE)
■ Switching to handsfree
Switch to handsfree mode so that you can hear the other party
through the speaker.
A Press
(OPTIONS) during a call, and
select Handsfree On
To switch from handsfree mode to normal mode
Press
(OPTIONS) and select Handsfree Off
select Call Memo
Tip
• If a Bluetooth-compatible headset is attached
Press
for 1+ seconds to switch to speaker or earphone.
2-8
Checking call time
Check the previous or total call time. Total time can be reset to
0 (Reset Call Timer)
A Select
(Settings) from the Main Menu →
Call Settings → Common Setting → Call Time Info.
(Settings) → Call Settings → Com-
mon Setting → Call Time Info. → Total Time
Durat./Voice Calls/Video Calls
2
→ Reset Call Timer
B Enter Security Code
C Press
(OK)
D Select an item to reset, and press
(YES)
B Check the contents
Tip
• The limit of time to be displayed
Up to 999 hours 59 minutes and 59 seconds can be displayed. Time
exceeding the limit remains 999 hours 59 minutes and 59 seconds.
Note
• The displayed call time is intended as an approximate guide
and may differ from the actual time.
! Guide to the call time
The displayed time shows the total from the previous reset to the
latest. It contains Incoming, Outgoing, Network, Roaming, and
the Total of Incoming and Outgoing.
2-9
Basic Handset Operations
■ Checking call time
A Select
■ Resetting total call time
Checking owner information
Check your own phone number. Your mail address can be
checked if it is registered.
2
A Press
Basic Handset Operations
B Select an icon for the information you need,
and then
and check the contents
Tip
• In the Owner Information
Up to 4 phone numbers, up to 3 mail addresses, street address,
memo, etc. can be registered (the first phone number is the handset's).
! To register Owner Information
Select
(Phone Book) from the Main Menu → Settings →
Owner Information, and perform the following:
● Select an item and enter
Name, Phone number, Mail Address, Zip Code, Street
address, etc. can be registered.
On the Owner Information screen, press
(SEND) to send
the registered owner information via Mail or Bluetooth.
Calling from outside Japan
(Roaming)
The handset supports three modes: Automatic, 3G and GSM.
• Automatic: Automatically switches the network among 3G, GSM
and GPRS according to the reception.
• 3G: Uses only 3G network inside and outside Japan.
• GSM: Uses only GSM/GPRS network outside Japan.
■ Switching the network mode
A Select
(Settings) from the Main Menu →
Connectivity → Network Setup → 3G/GSM Setting
B Select an item
■ Setting mobile phone provider
Change your provider depending on the country where you
are. Providers can be automatically changed.
[Default]
■Automatic
A Select
(Settings) from the Main Menu →
Connectivity → Network Setup → Select Network
2-10
B Select Manual and then a mobile phone provider
To automatically select a provider
! Pref. Networks options
On the Pref. Networks screen, press
select from the following options:
Select Automatic.
Option
(OPTIONS), and
Description
2
Add a provider.
Sort
Change the priority. Highlight a provider, press
(MOVE), move the cursor and press
(PLACE).
Set a preferred mobile phone provider for automatic selection.
Replace
Replace the highlighted provider with another provider.
A Select
Delete
Delete the highlighted provider.
Registration Status
View the numbers of registered providers and vacancies.
Tip
• If Select a Network appears on the screen, reselect a provider.
■ Selecting preferred provider
(Settings) from the Main Menu →
Connectivity → Network Setup → Pref. Networks
B Select providers from the list in your preferred order
Note
• For information about roaming, available countries/areas,
charges, available features or restrictions, contact Customer
Service (zp.30-38).
• A separate application is required to use the Global Roaming
service.
2-11
Basic Handset Operations
Store
■ Making an international call outside
Japan
A Enter the entire phone number
2
Include the area code for landline.
Basic Handset Operations
If the other party is in Japan
Press
(OPTIONS) and select Prefix → Intern.
Call(Oversea)
If the other party is in the country
Go on to Step 2
If the other party is outside the country
aPress
for 1+ seconds to display “+”
bEnter the country code
cEnter the phone number excluding the first “0”
Making an emergency call
Make an emergency call such as 110 or 119.
Emergency numbers…110, 118, 119
■ Dialling restrictions and emergency
calls
Even if dialling is restricted, an emergency call can be made following the steps below:
Function Being Set
PIN authentication (zp.14-3)
ber on PIN1 entry
screen →
PIN lock (zp.14-3)
B Press
Tip
Regardless of the country, follow the steps under If the
other party is in Japan.
Enter emergency number on PIN1 unlock entry
screen →
Dial Lock (zp.14-5)
Enter emergency number on Security Code
entry screen →
• If the other party is in Italy or in Russia
In c under Step 1, do not omit “0”.
• To make a call to a Vodafone handset
Dialling
Enter emergency num-
Fixed(FDN) (zp.5-4)
Enter emergency number →
Key Locks (zp.14-9)
Enter emergency number →
Dialling restrictions (zp.17-4)
Enter emergency number →
2-12
Note
• Making an emergency call outside Japan
The operations may vary depending on wireless network/signals
or handset's functions. A call cannot always be made in all
countries or areas.
2
Basic Handset Operations
2-13
2
Basic Handset Operations
2-14
Manner Mode
Minding Mobile Manners
Regardless of the settings, the shutter and auto-timer of Camera
sound at a given volume.
Be mindful of others when using the handset.
3
• Turn the handset off in a theatre, gallery, etc.
Setting/Releasing Manner Mode
• Do not disturb others in a quiet place such as a restaurant
or hotel lobby.
Set the manner mode in order not to disturb others in a public
• Follow announcements or posted instructions in buses or
trains including high-speed (Shinkansen) bullet trains.
Manner Mode
• In order not to disturb pedestrians on the streets, avoid
crowds before using the handset.
! Features that allow you to be well-mannered
●
Manner mode
Press
to immediately set the manner mode that turns off
ringtones or keypad tones.
or quiet place.
Setting the manner mode
A Press
for 1+ seconds on the standby
screen
The manner mode is set.
Releasing the manner mode
A In manner mode, press
for 1+ sec-
onds on the standby screen
In addition, you can change the settings for each feature to keep
good manners.
●
Vibration
Vibrates to notify you of incoming calls or messages.
●
Ringtone
Set to turn off ringtones for incoming calls or messages.
●
Key Tones
Set to turn off keypad tones.
●
3-2
Calendar, Alarm, Schedule
Set to turn off the alarm sound.
Tip
• If a mode other than Manner had been selected under Sound /
Mode
After the manner mode is released, the mode is restored to the
previously-set mode.
• If Manner had been selected under Sound / Mode
After the manner mode is released, the mode is reset to Normal.
• In the manner mode, on the screen
appears.
Entering Characters
Entering Characters
Operation Guidance
You can enter Chinese characters (Kanji), Hiragana, Katakana
(single-byte/double-byte), alphanumeric characters (single-
CHG
Use
Fix Mode/
Fix Mode is available in Mode3(T9).
byte/double-byte), symbols (single-byte/double-byte), picto-
Fix End
graphs and emotions. Some entry modes may be unavailable
/
to convert characters.
Press
on some screens. In some cases you may be unable to switch
to change between upper and lower
cases.
between single-byte and double-byte, enter a space or break a
LF
Press
line.
(
for 1+ seconds to enter a line feed
).
4
The text entry operations vary depending on the Input Mode.
Entering Characters
This chapter mainly describes how to enter in Mode1(Kana) set
assigned to the same key when the Input Mode
at purchase. To enter in Mode2(2-touch) or Mode3(T9), see
is Mode1(Kana) and you are entering Japanese.
Back
Press
to return to the previous character
Changing Input Mode (zp.4-12).
Text Entry Indicators
■ Text entry window
/
Indicates Mode2(2-touch)/Mode3(T9). (Does not
appear in Mode1(Kana).
Indicates Fix Mode in Mode3(T9).
/
/
/
Indicates Insert mode or Overwrite mode.
Text Entry Area
(
)/
/
Indicates the current entry mode.
/
Operation Guidance
Text Entry Indicators
Text Entry Area
:Cursor
4-2
Indicates Kuten entry mode.
Text Entry Indicators
/
Indicates Single-byte mode/Double-byte mode.
Single-byte characters cannot be entered in
Kanji/Hiragana entry mode.
/
*
■ Text entry mode
Changing entry modes
Press
(CHARS.) to change entry modes.
Indicates the case mode.
The number of remaining bytes or characters that can be entered
appears on the right side of Text Entry Indicators. One singlebyte alphanumeric character uses one byte, and one double-byte
character or single-byte katakana uses three bytes.
Kanji/Hiragana
Enter Kanji, Hiragana,
Katakana, symbols and num-
Katakana
Enter Katakana and symbols.
When a call is incoming during text entry, press
to answer
it. Press
to end the call, and the screen returns to the text
entry. If Calendar or another alarm is activated, end the alarm to
return to the text entry screen.
When
is pressed during text entry, a message appears asking
whether to end the entry. If it is OK to discard the contents, press
(YES).
Alphanumerics
Enter alphabets, numbers and
symbols.
Numbers
Enter numbers and symbols.
! Invalid characters
Valid characters may vary depending on the situations. Invalid
characters are converted to spaces.
4-3
4
Entering Characters
! Text entry/edit interrupted
Switching between single-byte and
double-byte
In Katakana, Alphanumeric or Number mode, you can switch
between single-byte and double-byte.
A Press
(OPTIONS) and select Editing
Options
B Select Full (double-byte) or Half (single-byte)
4
Entering Characters
Switching between upper and lower
cases
The lowercase entry mode is useful when you enter a lowercase string such as abc.
A Press
(OPTIONS) and select Editing
Options
B Select Upper or Lower
Tip
• To switch between upper and lower cases during text entry
Move the cursor over a character to switch, and press
. You
can switch between upper and lower cases only when
L/U
(Hiragana/Katakana) appears on the Operation Guidance.
4-4
■ Key assignments
Key
Kanji/Hiragana
Alphanumerics
Numbers
.,@?!-1
1
かきくけこ
カキクケコ
ABCabc2
2
さしすせそ
サシスセソ
DEFdef3
3
たちつてとっ
タチツテトッ
GHIghi4
4
なにぬねの
ナニヌネノ
JKLjkl5
5
はひふへほ
ハヒフヘホ
MNOmno6
6
まみむめも
マミムメモ
PQRSpqrs7
7
やゆよゃゅょ
ヤユヨャュョ
TUVtuv8
8
らりるれろ
ラリルレロ
WXYZwxyz9
9
わをんーゎ
ワヲンーヮ *
.ne.jp .co.jp .ac.jp
www. .com .html http://
https:// vodafone.ne.jp
0, + (press for 1+ seconds)
Pictographs/symbols
Pictographs/symbols
Pictographs/symbols
㪁 (Asterisk)
.@/!?(),
# (Sharp)
4
Entering Characters
アイウエオァィゥェォ
゛ ゜ ー 、。・! ?
*
Katakana
あいうえおぁぃぅぇぉ
Single-byte “ヮ ” cannot be entered.
: Single-byte characters only
4-5
Entering Characters in Mode1
The Kanji candidates for the first
segment appear highlighted
This section explains how to enter characters in Mode1 (Kana).
■ Entering Kanji/Hiragana
Convert Hiragana to Kanji or enter Hiragana left unconverted.
To select the displayed Kanji
Example: Entering 庄司美夏
4
A Press
Press
(CHARS.) to switch to Kanji/
Hiragana entry mode
To change the range of the segment
Use
Entering Characters
B Press keys assigned to characters
D Use
to change the range, and press
to highlight a candidate
To enter Hiragana left unconverted
Press
し:
ょ:
う:
じ:
み:
か:
C Use
twice
three times
(lowercase) once
three times
twice,
once
twice
once
to convert Hiragana to Kanji
E Select the Kanji
Tip
• If you pressed a wrong key
Press
to delete the character.
• To continuously enter a character assigned to the same key
Press
to move the cursor to the right.
• To return to the previous character assigned to the same key
Press side key .
4-6
• When the target Kanji cannot be found
Attempt another reading. If two or more Kanji characters cannot
be converted at a time, change the range to one character and
reconvert.
If a character still cannot be converted, use Kuten code (zp.3018).
■ Entering alphanumerics
Example: Entering double-byte John
A Press
(CHARS.) to switch to Alphanu-
meric entry mode
■ Entering Katakana
B Press
Options
Example: Entering double-byte リーダー
A Press
(CHARS.) to switch to Katakana
C Select Full (double-byte) and press
(OK)
(OPTIONS) and select Editing
Options
C Select Full (double-byte) and press
D Enter Katakana
リ:
ー:
ダ:
ー:
twice
four times
once,
once
four times
(OK)
4
Entering Characters
D Enter alphanumerics
entry mode
B Press
(OPTIONS) and select Editing
Select OPTIONS and then Full
under Editing Options
J:
once
Select OPTIONS and then Lower
under Editing Options
o:
three times
h:
twice
n:
twice
4-7
■ Entering numbers
■ Entering symbols/pictographs
Example: Entering 11:30
For available characters, see Symbols/Pictographs (zp.30-24)
A Press
in Appendix.
(CHARS.) to switch to Number
A Press
entry mode
B Select a symbol or pictograph
B Enter numbers
11:
twice
“:” : Press
(CHARS.) to switch to
4
while entering text
Entering Characters
Alphabet entry mode, press
→
(SWITCH), and select “:” from the
Symbols list
3: Press
(CHARS.) to switch to
Number entry mode, and press
once
0:
once
Tip
• In Number entry mode
Pressing
does not display Pictographs/Symbols.
• To use the option
Press
(OPTIONS) and select Insert Object →
Pictographs/Symbols.
• To switch between Pictographs and Symbols
Press
(SWITCH).
• Entering symbols
Is categorised into Fullwidth Symbols, Special Symbols, Halfwidth
to switch
Symbols, Halfwidth Katakana and GSM Symbols. Use
between them.
• To enter symbols by converting characters
Enter きごう in Kanji/Hiragana entry mode and attempt to convert
it. The candidates appear. You can enter and convert symbol
names such as かっこ or さんかく.
4-8
■ Entering emoticons
A Enter かお or かおもじ in Kanji/Hiragana entry
mode
B Press
■ Using other functions
Using Prediction
Use predicted candidates based on previously entered words.
to display the candidates, and
select an emoticon
The Prediction function is available in Kanji/Hiragana entry
mode under Mode1(Kana) or in Double-byte entry mode under
Mode2(2-touch).
Tip
A Enter a reading
4
The candidates appear in
Operation Guidance
Entering Characters
• To convert the meaning to the emoticon
Enter and convert a meaning such as ありがとう or ばんざい of
the emoticon (zp.30-27).
■ Entering spaces
Press
(OPTIONS) and select Insert Object → Space.
■ Breaking a line
Press
, press
for 1+ seconds, or press
(OPTIONS) and select Insert Object → New Line.
4-9
B To select one of the candidates, press
D If candidates that should follow the entered
(ASSIST) to move the cursor over to the
word appear and you want to enter one of
Operation Guidance
them, select the candidate
4
Entering Characters
C Select the candidate
Tip
• To use Prediction
Press
(OPTIONS) and select Japanese Settings → On.
• Predicted candidates
Based on previously entered words. Appears in the Operation
Guidance.
• Follower candidates
Predicted words that should follow entered words. Appears when
a word is entered.
Using Kuten codes
Use 4-digit Kuten codes (zp.30-18) to enter characters.
A Press
(OPTIONS) and select Insert Object
→ Insert Kuten Code
4-10
B Enter a Kuten code
Converting easily (personal dictionary)
Register an often-used Word with an easy Reading to convert
easily. For example, entering かい enters (株)××海外営業
部.
• To check the contents
aPerform Step 1
bSelect a word
Editing/deleting words
A Select
(Organiser & Tools) from the Main
Menu → Own Dictionary
Registering a new word
Up to 100 words can be registered (one word can contain up to
10 single-byte/double-byte characters).
(Organiser & Tools) from the Main
Menu → Own Dictionary
B Select <New>
the following
4
To edit the selected word
Press
(EDIT) and edit the word or reading if
necessary
To delete the selected word
Press
(OPTIONS), select Delete and press
C Select Word and enter a word to register
(YES)
D Select Reading and enter a reading for the
Two or more words can be selected at a time (zp.1-
word
E Press
27).
To delete all the registered words
(SAVE)
aPress
(OPTIONS) and select Delete All
bEnter Security Code and press
Tip
• Reading that can be registered
Up to 10 Hiragana characters (う゛is converted to ヴ).
cPress
(OK)
(YES)
4-11
Entering Characters
A Select
B Highlight a word to edit/delete, and perform
Changing Input Mode
■ Entering characters in T9
Select Input Mode from the following three. To switch the
modes, press
(OPTIONS) and select Input Mode, or press
Mode3(T9) is available in Kanji/Hiragana entry mode and in
Katakana entry mode.
for 1+ seconds.
Input Mode
Mode1(Kana)
4
Mode2(2-touch)
Entering Characters
Mode3(T9)
Method
To enter おはよう
Press a key repeatPress
five times,
edly to enter a characonce,
three
ter assigned to the key. times and
three
times.
Enter a 2-digit number
to enter a character.
(zp.4-16)
Press
Enter a key to display
candidates. Select a
candidate.
(zp.4-12)
Press
,
,
and
Entering characters
Example: Entering 静子
A Press
(CHARS.) to switch to Kanji/
Hiragana entry mode
B Press a key to which a character is assigned
.
Press
(さ column),
(さ
column),
(Dakuten) and
(か column)
and select おはよう
from the candidates.
The candidates appear
This section explains how to enter characters in Mode3 and in
Mode2.
If you pressed a wrong key
Press
to delete the character
If you do not want to select any of the candidates
Press
to shorten the range, or enter the reading
directly, or switch to Fix Mode
4-12
C Press
to move the cursor over to the
Operation Guidance, and select a reading
The selected reading appears
Editing a reading candidate
Example: Changing ろーれんと to らんらんと
A Press
(CHARS.) to switch to Kanji/
Hiragana entry mode
B Press a key to which a character is assigned
D Use
Press
umn),
umn) and
to convert it to Kanji
(ら column),
(ら column),
(た column)
(わ col(わ col-
4
C Press
(YOMI)
The cursor moves over to the first
character, and ら column characters
appear in the candidates area
E Press
D Press a key of the displayed number for a character to enter
4-13
Entering Characters
らんらんと does not appear as a
candidate
If it is unnecessary to edit a character under the
cursor
Use
Switch to Fix Mode to enter a reading directly.
to move the cursor
Example: Entering はためく
To end editing the reading
Press
Entering readings in Fix Mode
A Press
(RETURN)
for 1+ seconds
E Press
The reading is fixed. Use
the candidates
to display
4
changes to
Entering Characters
B Press a key to which a character is assigned
Press
(は column), and は
column characters appear
C Press a key of the displayed number for a character to enter
4-14
Press
Key assignments in T9 mode
, and は is entered
Key
Kanji/Hiragana
Katakana
(Single-byte/Double-byte)
あいうえおぁぃぅぇぉ 1 アイウエオァィゥェォ 1
D Repeat the steps to enter a reading
E Press
to end Fix Mode, and press
to display
カキクケコ2
さしすせそ3
サシスセソ3
たちつてとっ 4
タチツテトッ 4
なにぬねの5
ナニヌネノ5
はひふへほ6
ハヒフヘホ6
まみむめも7
マミムメモ7
やゆよゃゅょ 8
ヤユヨャュョ 8
らりるれろ9
ラリルレロ9
わをんゎー 0
ワヲンヮ *ー 0
4
During reading entry: Switch candidates with dakuten or
han-dakuten
After entered: ゛ ゜ 、。・! ?
*
Single-byte “ヮ ” cannot be entered.
4-15
Entering Characters
The reading is fixed. Use
the candidates
かきくけこ2
■ Entering characters in 2-touch
Enter a 2-digit number to enter a character corresponding to
the number.
Key assignments in 2-touch mode
●Double-byte mode
Entering characters
1
Example: Entering はる
A Press
4
2
(CHARS.) to switch to Double-byte
3
mode
Entering Characters
4
Tip
• Press
ble-byte.
Second digit
Key
(CHARS.) to switch between single-byte and dou-
B Enter a 2-digit number corresponding to a
character
Press
First
digit
5
6
7
and
8
9
0
1
2
3
4
5
6
7
8
9
0
あ
ぁ
か
い
ぃ
き
う
ぅ
く
え
ぇ
け
お
ぉ
こ
さ
し
す
せ
そ
た
ち
て
と
な
に
つ
っ
ぬ
ね
の
ひ
ふ
へ
ほ
B
b
G
g
L
l
Q
q
V
v
?
C
c
H
h
M
m
R
r
W
w
!
D
d
I
i
N
n
S
s
X
x
は
A
a
F
f
K
k
P
p
U
u
Z
z
−
E
e
J
j
O
o
T
t
Y
y
/
ま
み
む
め
も
¥
&
や
ゃ
ら
(
)
#
れ
よ
ょ
ろ
*
り
ゆ
ゅ
る
1
2
3
4
※
※
5
わ
ゎ
を
ん
゛
、
゜
。
6
7
8
9
0
※: Switch between uppercase (upper) and lowercase (lower)
■: Space
4-16
●Single-byte mode
Second digit
Key
2
3
4
5
6
7
8
9
0
ア
ァ
カ
イ
ィ
キ
ウ
ゥ
ク
エ
ェ
ケ
オ
ォ
コ
サ
シ
ス
セ
ソ
タ
チ
テ
ト
ナ
ニ
ツ
ッ
ヌ
ネ
ノ
ハ
ヒ
フ
ヘ
ホ
A
a
F
f
K
k
P
p
U
u
Z
z
B
b
G
g
L
l
Q
q
V
v
?
C
c
H
h
M
m
R
r
W
w
!
D
d
I
i
N
n
S
s
X
x
-
E
e
J
j
O
o
T
t
Y
y
/
マ
ミ
ム
メ
モ
¥
&
ヤ
ャ
ラ
@
(
)
#
レ
_
ヨ
ョ
ロ
:
*
リ
/
ユ
ュ
ル
-
1
.ne.jp
2
.co.jp
3
.ac.jp
4
vodafone.
ne.jp
ワ
ヲ
ン
゛
,
゜
.
6
7
www. .com
8
.html
9
http://
2
3
4
5
6
7
8
9
0
~
'
■ Editing characters
Inserting a character
A Use
over a character that will follow a character to
be entered
4
B Enter a character
Overwriting a character
A Use
※
※
5
in Insert mode to move the cursor
in Overwrite mode to move the cur-
sor over a character to be overwritten
B Enter a character
Tip
0
https://
• To switch between Insert and Overwrite mode
Press
(OPTIONS) and select Editing Options →
Insert or Overwrite.
※: Switch between uppercase (upper) and lowercase (lower)
■: Space
4-17
Entering Characters
1
1
First
digit
Editing Characters
■ Deleting characters
Specify a character to delete. Operations vary depending on
the Editing Options (BSP/DEL).
DEL mode (Deletion is not performed if there is no
character under the cursor or after the cursor (on
the right of the cursor).)
To delete the character under the cursor
Move the cursor over the character and press
Setting key operations
A Press
(OPTIONS) and select Editing
cursor
Press
Options
4
To delete all the characters under and after the
B Select BSP or DEL
for 1+ seconds
■ Copying/cutting/pasting
Entering Characters
BSP mode deletes the character before the cursor.
DEL mode deletes the character under the cursor.
Deleting characters
A Press
character before the cursor (on the left of the
repeatedly pasted into another location or text entry screen.
to move the cursor over the first
character of text to copy or cut
B Press
cursor).)
To delete the character before the cursor (on the
left of the cursor)
Press
To delete all the characters before the cursor
4-18
Specify the range, and copy or cut the text. The text can be
A Use
BSP mode (Deletion is not performed if there is no
Press
Copying/cutting text
for 1+ seconds
C Use
(OPTIONS) and select Copy/Cut
to drag to the end, and press
(COPY) or
(CUT)
Tip
• To copy or cut all the text, press
(ALL TEXT) in Step 3.
Pasting text
Paste copied/cut text.
A Use
B Press
to move the cursor to the location
(OPTIONS) and select Paste
Tip
4
Entering Characters
• In Insert mode
The text is pasted into the cursor location.
• In Overwrite mode
The text overwrites old text from the cursor location.
■ Moving the cursor to the beginning/
end of the text
A Press
(OPTIONS) and select Jump
B Select To Beginning or To End
4-19
4
Entering Characters
4-20
Phone Book
Storing contacts in Phone Book
Item
Up to 90 single-byte
characters (Up to 3
addresses)
URL
Up to 256 single-byte
alphanumeric
characters
ー
Group
Group 1 to 16, or no
Group
ー
Image
(Animated GIF)
A picture or video
displayed when you
receive a voice call/
video call
ー
Zip Code
Address
Up to 7 digits
Up to 186 single-byte
(62 double-byte)
characters
ー
Memo
Up to 150 single-byte
(50 double-byte)
characters
ー
Private
Use this setting to hide/
show the contact.
On: Hide the contact
Off: Show the contact
Use this setting to hide/
show the contact.
On: Hide the contact
Off: Show the contact
Memory No.
001 to 500
tacts can also be stored on the USIM card. The number of
contacts that can be stored on a USIM card may vary
depending on the USIM card type. The data stored on the
USIM card are available on other USIM card-compatible
Vodafone handsets.
Contact items:
5
Phone Book
Item
Description
Handset
USIM card
Name
Up to 96 single-byte (32 Up to 96 single-byte (32
double-byte) characters double-byte) characters
Reading
Up to 32 single-byte
characters
Number
5-2
Up to 4 phone numbers
per contact (Up to 32
digits per phone
number)
Up to 8 double-byte/
single-byte katakana
(25 single-byte
alphanumeric)
characters
Up to 2 phone numbers
per contact (Up to 32
digits per phone
number)
USIM card
Mail Address
■ Phone Book items
Save up to 500 contacts to the handset Phone Book. Con-
Description
Handset
Up to 90 single-byte
characters (Only one
address)
ー
D Check the Reading and change it if neces-
Tip
• Four phone numbers, three e-mail addresses and one URL
can be stored in one contact.
• The number of contacts or characters stored on the USIM
card depends on the USIM card type.
• Only one picture and video (animated GIF) respectively can
be stored in the handset Phone Book.
• To prevent others from viewing a contact
Set Private of contact items to On and Privacy Display under Phone
Book Settings to Off. Privacy Display under Phone Book Settings is
set to Off each time the handset is turned on (To change the Privacy Display settings, you must enter the Private PIN).
sary
E Select and enter the items
To add Phone Number and Mail Address
Select Number and Mail Address and enter
To assign a phone number category
Highlight the category field and select Mobile, Mobile
2, Home, Office, Home FAX, Office FAX or Other
To set other items
aPress
■ Creating contacts
A Press
cPress
From the Main Menu:
Select
(Phone Book) → Create New
B Highlight the folder field, and select Handset
Phone Book, USIM Phone Book, Rejected or
Fixed(FDN)
(OPTIONS) and select Edit Phone
Book (zp.5-9)
on the standby screen, press
(OPTIONS) and select Create New
5
contact
Phone Book
Select the saving location and enter necessary items.
(OK) to save the contact
bOpen the Phone Book list and highlight the
F Press
(OK)
Tip
• If assigning Memory No. 001 to 099
Speed Dialling function allows you to make a call to the contact of
the Memory No. simply by entering 1 to 99 and pressing
on
the standby screen. However, if e-mail address or URL is specified
in Set As Default (zp.5-7), a New Message screen or website is activated.
C Enter Name
5-3
• Memory No. change
If the Memory No. is changed to one used for another contact and
the edited contact is saved, the numbers are exchanged.
• If receiving a call while creating/editing
The incoming call screen appears. Press
or
(ANSWER)
to answer an incoming call. When the call ends, the screen returns
to the previous screen.
5
a Select
(Settings) from the Main Menu → Call Settings →
Common Setting → CLI Display
b Select On or Off
! Image display priority
If the settings are duplicated for images displayed while receiving
a call, the display priority is as follows:
Phone Book
• To exchange data between the handset and the USIM card
Open the Phone Book list options (zp.5-8).
a Movie set as Ringtone in the Phone Book contact
• To save a contact to Other Numbers
Select
(Phone Book) from the Main Menu → Create New and
set the saving location to save the contact to another folder.
Rejected: Register up to 100 phone numbers to reject.
Fixed(FDN): Register up to 30 phone numbers to allow dialling.
You are prohibited from making a call to other than the registered
number (PIN2 is required to be entered when registering).
The Fixed(FDN) settings are stored on the USIM card. A call can
be made when the compatible USIM card is inserted.
*As of February 2006, the FDN function is unavailable.
c Image stored in the Phone Book group
• Other useful ways to make a call
Various functions are available to make a call (zp.2-5).
b Image stored in the Phone Book contact
d Movie selected in Ringtone under Sound / Mode
e Image for incoming calls set at purchase
■ Adding a number from call logs
Phone numbers logged in Dialled Calls and Received Calls can
be saved to the Phone Book.
A Select a phone number from Dialled Calls or
Received Calls and press
! Displaying the registered picture while receiving a call
(CLI Display)
B Select Create Phone Book
When a call is received from a contact stored in the Phone Book
C Enter Name, Reading, etc.
and a picture or movie is assigned to the contact, the image
appears on the screen. The setting can be changed not to display
the image (zp.5-9).
D Press
[Default]
5-4
■On (Displayed)
(OK)
(OPTIONS)
Setting Groups
■ Group setting screen
Change the existing group names or set a ringtone for each
Set the following:
group.
A Select
Option
(Phone Book) from the Main Menu
(EDIT)
Voice Call
Settings
Set a picture for the group.
Ringtone
Vibration
C Enter a group name
Description
Name the group.
Group image
→ Groups
B Select a group and press
Group name
Set a ringtone, etc. for incoming voice calls from contacts
in the group.
Illumination colour
Set a different ringtone or outgoing message as nec-
Illumination pattern
essary.
• Group names
Group names can be changed but not deleted. An existing name
cannot be used for a new group.
Ringtone
Vibration
Set a ringtone, etc. for incoming video calls from contacts
in the group.
Illumination colour
Illumination pattern
Message Set- Ringtone
tings
Vibration
Set a ringtone, etc. for incoming messages from contacts
in the group.
Illumination colour
Illumination pattern
5-5
5
Phone Book
Tip
Video Call
Settings
Using Phone Book
bPress
or
to select a contact from the list
To search by mail address
■ Making a call using a contact
Searching for a contact
A Press
, press
(OPTIONS) and select
Search
From the Main Menu:
Select
(Phone Book) → Handset Phone BK or
USIM Phone Book
5
B Select a search method
Phone Book
To search by reading
ters of the address
bPress
or
to select a contact from the list
To search by group
aSelect Search By Group and select a group
bSelect a contact from the list
Tip
• Searching for a contact stored on the USIM card
The same methods are available (excluding Memory No. search).
Searched contacts are listed and categorised into Handset Phone
to switch between the lists.
BK and USIM Phone Book. Press
appears for contacts stored on the USIM card.
aSelect Reading Search and enter the first charac-
• To search by Memory No.
Press Memory No. then
ters of the reading
bPress
or
to select a contact from the list
Making a call
To search by name
aSelect Search Names and enter the first characters
of the name
bPress
or
to select a contact from the list
To search by phone number
aSelect Search Phone No. and enter the first digits
of the phone number
5-6
aSelect Search By Email and enter the first charac-
on the standby screen.
A Select the searched contact to display the
details
B Highlight a phone number and dial
Option
Use
to highlight a phone
Set whether to notify the contact of your
Caller ID.
Prefix
Prefix an international access code, etc. to
the phone number.
number.
Contact details
To make a voice call
Create Message
Send a message to the selected contact.
Delete One
Delete the contact.
Send Phone Book
Save the contact or send in vCard format
(only on the handset Phone Book).
Set As Default
Specify the preferred item among the phone
number, e-mail address and URL if stored.
(The handset Phone Book is only available.)
Shortcut
Paste the phone number onto the standby
screen as a desktop icon.
Press
To make a video call
Press
(VID. CALL)
Description
Notify Caller ID
5
Phone Book
Tip
• To make a voice call from the list
Highlight a contact on the list and press
. If two or more
phone numbers are stored in the contact, a call is made to the
phone number set as default.
! Contact details options
Perform various operations using the options on the contact
details screen. Displayed options may vary depending on the
highlighted contents or the settings.
5-7
■ Exchanging data between handset
and USIM card
Phone Book data can be copied or moved between the handset and the USIM card.
Copying Phone Book contacts
! Contact list options
The following options are available on the contact list screen.
Displayed options may vary depending on the contents.
Option
Create New
Edit Phone Book
Add a phone number, set other items, etc.
Manage Phone BK
Select one or more contacts (zp.1-27), and
copy, move or delete the contacts.
Other Numbers
Select Handset Phone BK, USIM Phone Book,
Services, Rejected or Fixed(FDN).
Send Phone Book
Save or send the contacts in vCard format (available only for Handset Phone BK).
A Open the source Phone Book list
B Press
(OPTIONS) and select Manage
Phone BK
5
C Select Copy or Copy All
Phone Book
D Select the destination
Moving Phone Book contacts
A Open the source Phone Book list
B Press
(OPTIONS) and select Manage
Phone BK
C Select Move or Move All
D Select the destination
5-8
Description
Create a new contact.
Search
Change a search method.
Shortcut
Select Add To Desktop or Add To My Menu to create a shortcut to the contact.
Editing Contacts
■ Editing contacts
To edit Memo
Select Memo
D Select Other Settings
To make the settings for incoming
Edit the contents of contacts. To search for a contact and dis-
Set Set Individual Alerts to On and set Voice Call/
play the details, see Using Phone Book (zp.5-6).
Video Call/Message Settings.
A Highlight a contact on the Phone book list
B Press
(OPTIONS) and select Edit Phone
Book
C Edit the fields
Select Name and Reading
Set Private to On.
To change Memory No.
Select Memory No. between 001 and 500.
To Reset To Default
5
Select Reset To Default.
E Press
(OK)
To edit Phone Number, Category, Mail Address and
URL
Select Number, Category, Mail Address and URL
To change the Group settings
Select Group
Tip
• Pressing
contact.
on the details screen also allows you to edit the
• If the settings are duplicated
The Other Settings take priority over the group settings.
To change the picture
Select Image then another one
To edit Zip Code and Address
Select Zip Code and Address
5-9
Phone Book
To edit Name and Reading
To set Private
■ Deleting contacts
Tip
Delete contacts. You can delete specific items and leave other
• If Privacy Display is set to Off
Even Delete All cannot delete contacts with Private set to On.
items undeleted.
A Highlight a contact to delete on the list
B Press
(OPTIONS) and select Manage
Phone BK
C Select items to delete
To delete a contact
5
Select Delete One and press
(YES)
To delete two or more contacts
Phone Book
aSelect Select Phone Book
bHighlight contacts to delete
You can highlight two or more contacts at a time
(zp.1-27).
cPress
(OPTIONS), select Delete and press
(YES)
To delete all contacts
Select Delete All, press
rity Code and press
5-10
• To delete Fixed(FDN) numbers
PIN2 must be entered.
(YES), enter the Secu(OK)
Video Call
Before Using Video Calls
■ Video call screen
Use video call-compatible Vodafone handsets and talk while
viewing each other's image.
a
! Video calls
aMain image
3G high-speed communication line allows transmission of not
only voices but also images.
●
Video calls are available between any models of video callcompatible Vodafone handsets.
●
Video calls are made at 64K speed.
! Handsfree
●
The handsfree is on when the talk starts. To switch
handsfree off, press
(OPTIONS) and select Handsfree Off.
bSub image
cCall time
dCurrent time
c
b
d
e
eIcons
: Mute on (Does not appear when Mute off)
: Night Mode On (Does not appear when Off)
: Handsfree Off (Does not appear when On)
to
: Zoom
6
Video Call
Making a Video Call
You can use a phone number stored or logged in Phone Book,
Dialled Calls or Received Calls. After the talk starts, each
other's image appears on the screen. To talk while viewing the
other party's image, switch Handsfree On or use the stereo
microphone.
A Enter a phone number
Include the area code for landline.
6-2
B Check the phone number and press
(VID. CALL)
C Press
Tip
• To answer with an alternative image
Press
.
to end the call
Tip
• When a video call cannot be made
A message appears, e.g. Unable to connect. Dialled number is busy.
• When using the stereo microphone
Press the switch for 1+ seconds to answer with an alternative
image.
• To hang up a video call without answering it
Pressing
means Reject.
• To forward an incoming video call
Press
(OPTIONS) and select Diverts.
Note
• The other party's voice comes out of the speaker when the
handsfree is switched on. Be careful not to disturb others.
• Closing the handset while dialling/talking ends the process.
Answering a Video Call
incoming. You can show an alternative image instead of an
• The other party's voice comes out of the speaker when the
handsfree is switched on. Be careful not to disturb others.
• It may take a long period of time to sort using the Music
Player/Mail sorting function. You cannot answer a video call
while sorting.
image of yourself.
A When receiving a video call, press
(ANSWER)
B Press
to end the call
6-3
6
Video Call
Incoming Video Call appears on the display when a video call is
Note
• Any Key Answer is unavailable to answer a video call.
Operations during a Video Call
To set whether to display call time*
Press
A Perform key or options operations
To turn on/off voices and sound
To adjust the earpiece volume*
Press
for 1+ seconds or side key
for 1+ seconds or side key
to turn up, or
to turn down
To switch between a live image of yourself and an
alternative image
Press
(OPTIONS) and select Use Live Video or
Use Photo Instead. When an alternative image is displayed,
(SHOW ME) is also available
To switch between handsfree and normal mode
Press
Tip
• To set other features
Press
(OPTIONS) and select the following:
Option
Video Call
Always turned on during a video call
To switch between rear camera and front camera
Press
(OUT)/
(IN)
To switch display between main image and sub
image*
Press
(OPTIONS) and select Other Settings →
Screen Mode, and select My Side Is Smaller, My Side Is
Larger, Other Side Only or My Side Only
6-4
Description
Contrast Settings
Select Much Brighter, Brighter, Standard, Darker or Much Darker.
Picture Quality
Select Standard, Better Picture (suitable
for objects that do not move much) or
Faster Movement (suitable for smoothly
moving objects).
Night Mode On
(Night Mode Off)
Make the image clear in a dark place
e.g. at night.
Lighting Settings
Select Fine, Cloudy, Auto or Incandescent to create natural lighting.
when the talk starts regardless of the settings.
Display light
(OPTIONS) and select Mute or Unmute
*: The changed settings are kept after the call.
Press
(OPTIONS) and select Other settings →
Handsfree On or Handsfree Off. The handsfree is on
6
(OPTIONS) and select Other Settings →
Show Call Timer
• To change the video call settings in standby mode
Select
(Settings) → Call Settings → Video Call → Camera Settings, and change the settings of Screen Mode/Picture Quality/Night
Mode.
Video Call Settings
■ Setting the quality of image
■ Selecting an alternative image
Set an alternative image to show during a video call. Select a
preinstalled image, or select an image from Data Folder.
Faster Movement is effective if objects are moving fast.
[Default]
[Default]
A Select
■Standard
A Select
(Settings) from the Main Menu →
Call Settings → Video Call → Camera Settings →
Picture Quality
B Select an item
■ Setting the image to show when dialling
■Video Call Photo
(Settings) from the Main Menu →
Call Settings → Video Call → Select Still Image
B Select an item
C Press
(OK)
■ Setting what to do if a video call is not
connected
Select Use Live Video to show a live image of yourself, or Camera Off to show an alternative image.
[Default]
■Use Live Video
A Select
(Settings) from the Main Menu →
Call Settings → Video Call → Video Call Options
→ Show My Image
B Select an item
connected.
[Default]
■Off
A Select
(Settings) from the Main Menu →
Call Settings → Video Call → Video Call Options
→ Voice If No Video
B Select On or Off
6-5
6
Video Call
Setting On redials a voice call automatically if a video call is not
B Select On or Off
Note
• It is not redialled when the other party was on another call or
out of range or the handset was turned off.
■ Setting screen mode during a video
call
Select My Side Is Smaller, My Side Is Larger, Other Side Only or
Set Call Timer Setting to On or Off.
[Default]
■On
A Select
(Settings) from the Main Menu →
My Side Only under Screen Mode.
Call Settings → Video Call → Video Call Options
[Default]
→ Call Timer Setting
■My Side Is Smaller
A Select
(Settings) from the Main Menu →
Call Settings → Video Call → Camera Settings →
Screen Mode
6
■ Setting call time display during a call
B Select an item
Video Call
■ Setting Night Mode
Make the image clear at night or in a dark place.
Default]
■Off
A Select
(Settings) from the Main Menu →
Call Settings → Video Call → Camera Settings →
Night Mode
6-6
B Select On or Off
Camera
Before Using the Camera
External
camera lens
Internal
camera lens
Capture images or videos using the handset camera.
Images are saved in JPEG format and videos in MP4 format.
Tip
• The handset incorporates 2 megapixel CMOS camera on the
rear side, and CIF CMOS camera (approx. 100,000 pixels) on
the front side.
• Captured images or videos are saved in Pictures or Videos
folder in Phone Memory or Memory Card for which Auto Save is
selected (zp.12-3).
■ Notes on capturing images
• Fingerprints or grease on the lens reduce image quality.
Clean the lens with a soft cloth.
7
Camera
• Images captured with even the slightest handset movement may appear blurred. Hold the handset still when
capturing images. Or place the handset on a stable surface and use the Auto Timer.
7-2
■ General notes on camera
• Some pixels may seem brighter or darker than others.
• If the handset is left in a warm place before capturing or
saving images, image quality may be affected.
• If the camera is exposed to direct sunlight for a long
period of time, image colours may change.
• The shutter tone and Auto Timer tone sound at a fixed volume even in manner mode.
• Insert a microSD memory card into the handset before
saving captured images or videos in the card.
aCamera mode
■ Display
:Take Picture
:Take Video
bZoom status bar
Minimum and maximum zoom levels are indicated.
cExposure adjust
∼
:Level -2 to +2
dNight Mode
j
h
a
g
(Blank): Off
: On
eWhite Balance
(Blank): Auto
: Fine
: Cloudy
: Incandescent
bc de f
Image capturing
fPicture Quality
: High
: Standard
: Economy
7
a
g
Camera
gDisplay Settings
j
i
h
Image
: UXGA (1600 x 1200)
: SXGA (1280 x 960)
: VGA (640 x 480)
bc de f
Video capturing
: CIF (352 x 288)
: QCIF (176 x 144)
7-3
: SQCIF (128 x 96)
: WAllpaper (240 x 270)
: CLI & ICON (160 x 160)
hVideo
Use the macro switch beside the external camera to switch between macro
:Display setting: QCIF (176×144)
/File size: 300KB
:Display setting: QCIF (176×144)
/File size: Unlimited
iStorage area
:Handset
:microSD memory card
jSound Settings (video)
(Blank): On (normal)
: Image only
kNumber of captured images/Maximum number of captures
7
■ Macro switch
Timer indicator for Auto Timer
Remaining duration during video capture
mode (
) and normal mode (
).
Keep a distance of approx. 10 cm from a
subject in macro mode, or more than 100 cm in normal
mode.
Capturing Images
Choose an image size that suits your purpose (e.g. attaching to mail, setting as wallpaper). Captured images are
saved in Pictures under Data Folder.
■ Capturing images
Camera
A Select
(Camera) from the Main Menu →
Camera
B Frame the shot on the display
C Press
7-4
to shoot the image
Tip
• To use Auto Timer
Press
(OPTIONS) and select → Auto Timer → On(10sec).
Press
to shoot an image in 10 seconds. To cancel the shooting, press
(CANCEL).
! OPTIONS menu available during image capturing
To use the OPTIONS menu listed below, press
(OPTIONS)
while the camera is activated. Available menu items vary depending on the specified mode or settings.
Option
Description
• To switch between the internal and external cameras
Press
(OPTIONS) and select Camera Direction while the camera is activated.
Image Viewer
Activate Image Viewer.
Camera Direction
• To zoom in or out
Press
or
to zoom in or out by one level (8 levels are available).
Switch between the internal and external
cameras
Display Settings
Select an image size.
Picture Quality
Select an image quality mode.
• To adjust brightness (exposure)
Press
or
to set the level (+2, +1, 0, -1 or -2).
White Balance
Select a mode suitable for light to adjust the
image colour.
• To set a captured image as wallpaper
After shooting, press
(OPTIONS) and select Wallpaper.
Night Mode On
(Night Mode Off)
Set to On for shooting at night or in a dark
place.
• To switch from Picture mode to Video mode
Press
(VIDEO) while in Picture mode.
Auto Timer
Use Auto Timer (zp.7-5).
Camera Settings
・Memory Status
Display the memory status.
• To reduce screen flicker
A screen may flicker due to fluorescent light, etc. Press
• To rename a file
Press
(OPTIONS) and select Rename.
・Shutter Sound
Select from 3 types of sound.
・Image Tuning
Change the setting to reduce screen
flicker.
7-5
7
Camera
(OPTIONS) and select Camera Settings → Image Tuning →
Mode 1 (50Hz) or Mode 2 (60Hz) to adjust flicker.
・Display Settings
Display an image at the same magnification or enlarge it to the size suitable for the
display.
Option
Description
Bar Code Reader
Capturing Videos
Activate Bar Code Reader (zp.7-8).
※Settings except Camera Direction and Auto Timer are kept
after the camera is deactivated.
Videos with/without audio can be captured. The available
! OPTIONS menu available after image capturing
Check the duration indicated on the display. Captured videos
The following menu is available after shooting:
Option
duration of shooting varies depending on the data size.
are saved in Videos under Data Folder.
Description
Rename
Rename a file.
Delete
Delete a saved image.
Send As Message
Create a new message with a captured
image attached.
Wallpaper
Set a captured image as wallpaper.
■ Capturing videos
A Select
B Frame the shot on the display
C Press
■ Viewing images
7
A Select
(Data Folder) from the Main Menu
Camera
→ Pictures
B Select a folder
C Highlight a file and press
(Camera) from the Main Menu →
Video
to shoot the video
Tip
• To switch between the internal and external cameras
Press
(OPTIONS) and select Camera Direction while the camera is activated.
• To capture videos without audio
Press
(OPTIONS) and select Sound Settings → Video Only
while the camera is activated.
• To zoom in or out
Press
or
to zoom in or out by one level (8 levels are available). This operation is also available while shooting.
7-6
• To adjust brightness (exposure)
Press
or
to set the level (+2, +1, 0, -1 or -2).
Option
Camera Settings
• To switch from Video mode to Picture mode
Press
(PICT.) while in Video mode.
・File Size Limit
Set the maximum file size.
• To reduce screen flicker
A screen may flicker due to fluorescent light, etc. Press
・Display Settings
Display an image at the same magnification or enlarge it to a size suitable for the
display.
(OPTIONS) and select Camera Settings → Image Tuning →
Mode 1 (50Hz) or Mode 2 (60Hz) to adjust flicker.
• To rename a file
Press
(OPTIONS) and select Rename.
・Shutter Sound
Select from 3 types of sound.
・Image Tuning
Change the setting to reduce screen
flicker.
! OPTIONS item available during video capturing
The following menu is available while the camera is activated.
Available menu items vary depending on the specified mode or
settings.
Option
Description
Description
・Memory Status
Display the memory status.
Bar Code Reader
Activate Bar Code Reader (zp.7-8).
! OPTIONS item available after video capturing
The following menu is available after shooting:
Videos
Activate Video Player.
Camera Direction
Switch between the internal and external
cameras.
Rename
Rename a file.
Picture Quality
Select an image quality mode.
Delete
Delete a saved image.
While Balance
Select a mode suitable for light to adjust the
image colour.
Send As Message
Create a new message with a captured
video attached.
Night Mode On
(Night Mode Off)
Set to On for shooting at night or in a dark
place.
Sound Settings
Select whether to record sound.
Option
Description
7
Camera
7-7
Bar Code Reader
■ Playing videos
A Select
(Data Folder) from the Main Menu
Use Bar Code Reader to scan bar codes (QR codes)*
including information such as phone numbers, mail
→ Videos
B Select a file on the list or from a folder
addresses, images and melodies. Scanned information data
can be saved in the handset.
*
Sending images or videos
Attach a captured image or video to a message to send it.
A After shooting, press
(SEND)
A large video file may not be attached to a message.
B Enter an address, subject and message on
7
QR code is two-dimensional code type that contains information in
the vertical and horizontal directions.
The handset does not support multiple QR codes sharing the
same information, or bar codes or two-dimensional codes other
than QR code. If a code not supported in the handset is scanned,
a blank appears.
Turn the macro switch to macro mode (
) before scanning
codes. Hold the handset still while scanning codes. Scanned
data can be viewed or saved in the handset (up to 5 data
the New Message screen to send the mes-
files).
sage
A Select
(Camera) from the Main Menu →
Camera
Bar Code Reader
If no data file is saved
Go to Step 2.
If data files are saved
Select <NEW> and go to Step 2.
If 5 data files are saved
Select <NEW> and press
7-8
(YES), or:
aHighlight an unnecessary file, press
To rescan a code
(OPTIONS), select Delete One and press
aPress
(YES)
bRepeat the above procedure from step 1
bSelect <NEW> and go to step 2
B Frame a bar code on the scanning area
Focus on the code to display it as
large as possible.
and
(YES)
D Use or save the scanned information
To save scanned data
Press
(OPTIONS) and select Save.
To add a URL to bookmark
Press
(OPTIONS) and select Add Bookmark.
To add information to Phone Book
Select Phone Book or select Create Phone Book from
the OPTIONS item (zp.5-3).
C Press
to capture the code and view the
To save an image
Move cursor to an image icon, press
(OPTIONS) and select Save File.
To save a melody
Move cursor to a melody icon, press
(OPTIONS) and select Save File.
information
Other available operations
Making voice calls (zp.2-2) or video calls
(zp.6-2), creating messages (zp.20-2), accessing web (zp.24-3), etc.
Scan result
7-9
Camera
The information on the left is the
URL of NEC SUPER TOWN.
7
To copy text on the scan result screen
Press
(OPTIONS), select Copy and select the
start and end points.
7
Camera
7-10
Display and Lighting
cSelect an image from a folder
Display
To set a calendar as standby screen
Set a calendar, image or clock as the standby screen.
aSelect Wallpaper
bSelect Calendar
■ Setting a calendar or image on the
display
cSelect On
To display or hide the name of connected carrier
aSelect Operator Setting
Display and Lighting
[Default] ■Start Up Animation: Animation1
■Start Up Sound: Alarm 2
■Shutdown Image: See You 1
■Set as Wallpaper: Pop Check
■Calendar: Off
■Operator Setting: Off
bSelect On or Off
Tip
• To change the image displayed on the external display, select
(Settings) from the Main Menu → Display Settings →
External Display → Wallpaper.
A Select
(Settings) from the Main Menu →
Display Settings → Internal Display
B Select an item to set
To display an image or create sound when turning
on or off the handset
8
aSelect Greeting
bSet Start Up Animation, Start Up Sound or
Shutdown Image
To change the wallpaper on the standby screen
aSelect Wallpaper
bSelect Set as Wallpaper
8-2
• Pre-installed, downloaded and captured images are available
for this setting.
• The image set as wallpaper is resized to fit into the standby
screen when appearing on it.
■ Selecting the external display clock
[Default] ■Normal Clock
A Select
■ Displaying a clock when the display
light is turned off on the external
display
(Settings) from the Main Menu →
Display Settings → External Display → Clock Style
B Select an item to set
[Default] ■On
A Select
(Settings) from the Main Menu →
Display Settings → External Display →
Tip
Display and Lighting
Indication Info → Display w/o Backlight
• Pressing Side keys or Music Assist key when the handset is
folded also enables you to change the clock display.
B Select On
■ Hiding notification on the external
display
[Default] ■Off
A Select
(Settings) from the Main Menu →
Display Settings → External Display → Standby
8
B Select On
To hide only call notification or message notification
aSelect Indication Info
bSelect Incoming Calls or Receiving Messages → Off
8-3
Display Light
Customise the lighting settings of display, external display and
keypad.
■ Setting the display power saving
function
[Default] ■5 Minutes
■ Customising the display light
settings
A Select
(Settings) from the Main Menu →
Display Settings → Internal Display →
Power Saving
Display and Lighting
[Default] ■Backlight: Medium Backlight
■Backlight time(5s-60s): 15 Sec.
A Select
(Settings) from the Main Menu →
Display Settings → Internal Display →
Backlight Settings
B Select an item to set
aSelect Backlight → High Backlight, Medium Backlight, Low Backlight or Backlight Off
bSelect Backlight time(5s-60s) and set time between
5 and 60 seconds
8
B Enter a time and press
(OK)
■ Customising the external display
light settings
[Default] ■Backlight: On
■Backlight Time(2s-60s): 15 Sec.
A Select
(Settings) from the Main Menu →
Display Settings → External Display →
Backlight Settings
B Select an item to set
aSelect Backlight → On or Off
bSelect Backlight Time(2s-60s) and set time
between 2 and 60 seconds
8-4
Using Desktop Icons
Note
• The brightness of the external display light cannot be
changed.
Add shortcuts to frequently-used functions, files or phone numbers as desktop icons on the standby screen to access them
■ Adjusting the contrast of external
display
using simple steps. Add up to 8 icons.
[Default] ■Level 5
(Settings) from the Main Menu →
Display Settings → External Display → Contrast
B Close the handset and press the Music
Assist key (
or
) to adjust the con-
trast between Level 1 and 9
C Open the handset and press
Desktop icons on the standby screen
The available desktop icons are:
Desktop icon
(OK)
Description
Calendar, Alarm, Tasks, Calculator/Converter, Notepad, Voice
Recorder, Own Dictionary, all
menus under Settings, Bar Code
Reader, Camera, Video, Music
Player, all menus under Media
Player, V-appli, Bookmark, Cast
Activate the corresponding function.
Folders under Data Folder (Pictures,
Ringtones, V-appli, Music, Videos,
Memory Card, Other Folders) and
files
Access the corresponding folder or
file.
Display and Lighting
A Select
8
8-5
Desktop icon
Phone Book contact (phone number, mail address, etc.), URL
Description
Open the screen (Phone Book
contact, website, etc.) including
corresponding data.
B Select a desktop icon
■ Checking desktop icon properties
A Highlight a desktop icon on the standby
Note
• When a calendar is set on the standby screen on which more
than 4 icons are pasted (zp.8-2), only 4 icons at the bottom
appear.
Display and Lighting
■ Adding desktop icons
On a function screen, press
screen
B The property name appears at the bottom of
the screen.
■ Changing desktop icon designs
(SHORTCUT) and select
Add To Desktop to add the icon to the desktop.
A Select a desktop icon on the standby screen
Adding the Display Settings icon
B Press
A Select
(Settings) from the Main Menu →
Display Settings
B Press
8
(SHORTCUT) and select
Add To Desktop
■ Accessing a function or data from a
desktop icon
A Press
8-6
on the standby screen
(OPTIONS) and select Replace Icon
→ Select New Image
C Select an image file
Note
• If the image file size differs from the icon size, select Reduction
or Use Centre Only to resize the file.
■ Setting a captured image as desktop
icon
A Select a desktop icon on the standby screen
B Press
(OPTIONS) and select Replace Icon
→ Create Image
■ Deleting desktop icons
A Select a desktop icon on the standby screen
B Press
(OPTIONS) and select
Delete Shortcut
C Press
(YES)
C Frame the shot on the display
to shoot the image and press
(OK)
Change the Main Menu icon.
■ Moving desktop icons
A Select a desktop icon on the standby screen
B Press
(OPTIONS) and select
Move Shortcut
or
A Highlight an icon on the Main Menu
B Press
(REPLACE) and select an item to
set
To set an image in Data Folder as Main Menu icon
aSelect Select New Image
C Move the cursor to the desired position and
press
Changing Main Menu Icons
Display and Lighting
D Press
(PLACE)
bSelect an image file to set
8
To set a captured image as Main Menu icon
aSelect Create Image
bShoot an image
To reset a changed Main Menu icon
Select Use Default Image.
8-7
Illumination
Tip
• If you attempt to set an image in Data Folder as Main Menu
icon and the image file size differs from the icon size, select
Reduction or Use Centre Only to resize the file.
Customise the settings for illumination that lights up when calls
• Other applications cannot be activated while shooting with
the camera activated by selecting Create Image.
(Green/Red/Orange) x 4 illumination patterns (Pattern One to
Font Settings
Display and Lighting
Select from 2 types of font for display
arrive. Select from 12 illumination patterns (3 LED colours
Three and Link To Melody)). To disable illumination, select
Pattern Off.
[Default] ■Voice Calls: Orange and Pattern One
Video Calls: Green and Pattern One
Messages: Red and Pattern One
.
Tip
• If Font Size is set to Small in Website or Message setting, font
cannot be changed.
[Default] ■Font 1
A Select
(Settings) from the Main Menu →
Display Settings → Font Settings
B Select Font 1 or Font 2
8
A Select
(Settings) from the Main Menu →
Phone Settings → Sound/Mode
B Select a mode (Normal, Meeting, Outdoor or
Drive), press
(EDIT) and select
Illumination
C Set an illumination colour and pattern for
each item
Tip
• In Illumination, set an illumination colour and pattern separately for Voice Calls, Video Calls and Messages.
• The actual illumination colour and pattern can be previewed
before they are set.
• Illumination does not light up during a call.
8-8
Sounds
Mode
9
Default settings
Mode
Depending on the situation, switch the sound and vibrator
Sounds
mode between Normal, Meeting, Outdoor, Driving and Manner.
• Normal mode
Mode for normal situations.
• Meeting mode
The handset vibrates without sound when receiving a call.
• Outdoor mode
The sound volume is set at the maximum level.
• Drive mode
The automatic answering function works instead of vibrator when
receiving a call.
• Manner mode
Pressing one key enables you to set this mode to turn off sounds
that may disturb others.
Tip
• Press
for 1+ seconds to change between the currently
set mode and Manner mode.
• Customise the settings except for Manner mode.
• Even if Manner mode is set or volumes are set to Silent, the
handset makes sounds when in Handsfree mode or the camera is activated.
9-2
Settings
Volume
(Ringtone Volume, Alarm
Normal
Meeting
Outdoor
Drive
Manner
Level 4
Silent
Level 6
Level 4
Silent
Vibration
Pattern
Pattern
Off
Pattern
One
Pattern
One
Pattern
Off
Pattern
Two
Key Tones/
Charge Tone
On
Off
On
On
Off
Volume)
Coverage Tone Off
Off
Off
On
Off
Auto Answer
Off
Off
On
Off
Off
Sound Settings
Ringtone
Set ringtones that sound when Voice Calls, Video Calls or Messages arrive.
[Default] ■Voice Calls: Melody 1
■Video Calls: Melody 1
■Messages: Melody 2
Volume
Select the ringtone volume level from Level 1 to 6 and Silent.
A Select
[Default] ■Level 4
(Settings) from the Main Menu →
Phone Settings → Sound/Mode
A Select
(Settings) from the Main Menu →
Phone Settings → Sound/Mode
B Highlight a mode (Normal, Meeting, Outdoor or
Driving), press
(EDIT) and select Volume
C Select Ringtone Volume and set a level
D Press
(OK)
B Highlight a mode (Normal, Meeting, Outdoor or
Driving), press
(EDIT) and select Ringtone
C Select Voice Calls, Video Calls or Messages
D Select a ringtone
To check a melody before setting it as ringtone
aHighlight a melody and press
(OPTIONS)
bSelect Preview
Tip
• When Manner mode is set
The volume is always set to Silent. When a stereo microphone is
connected, Level 1 is always set.
9
Sounds
■ Ringtone
Tip
• When Manner mode is set
Ringtone for the manner mode cannot be changed. However, if
you use the stereo microphone set, Melody 1 is set for Voice calls
and Video calls, and Melody 2 for Messages.
• Music file formats available for ringtone
The supported file formats are MIDI, SMAF, AMR, MP3 and MP4.
9-3
The following types of files are not available:
• MP4 and MP3 files copied from music CDs, etc.
9
• MP3 files not in DRM SD format
• SMAF files including animation
Sounds
• MP4 movie files as ringtone for Messages
• Pre-installed ringtones and melodies
Note
• Some files may not be set as ringtone.
• Files saved in the microSD memory card cannot be set as
ringtone.
• Movie files cannot be set as ringtone for Messages.
Name
Melody 1
■ Alarm volume
Melody 2
Melody 3
Melody 4
Select the alarm volume level from Level 1 to 6 and Silent.
[Default] ■Level 4
Melody 5
Melody 6
Melody 7
Melody 8
Melody 9
Alarm 1
Alarm 2
Alarm 3
Alarm 4
A Select
(Settings) from the Main Menu →
Phone Settings → Sound/Mode
B Highlight a mode (Normal, Meeting, Outdoor or
Driving), press
(EDIT) and select Volume
C Select Alarm Volume and set a level
D Press
(OK)
Alarm 5
No Sound
Tip
• When Manner mode is set
The volume is always set to Silent. When a stereo microphone is
connected, Level 1 is always set.
9-4
■ Vibrator
■ Other settings
Set the handset to vibrate when voice calls, video calls or mesThree, Link To Melody or Pattern Off.
A Select
(Settings) from the Main Menu →
Phone Settings → Sound/Mode
B Highlight a mode (Normal, Meeting, Outdoor or
Driving), press
(EDIT) and select
Vibration Pattern
C Select a pattern
Tip
• When Manner mode is set
Pattern Two is always set for the vibration pattern.
• When the alarm setting is set to On for Calender or Tasks, the
handset vibrates according to the setting specified for the
application.
Note
• Be careful not to let the vibrating handset get close to fire or
fall off a desk, etc.
Set the handset to make sound when pressing keys, entering
the service area or charging is started/completed.
A Select
(Settings) from the Main Menu →
Phone Settings → Sound/Mode
B Highlight a mode (Normal, Meeting, Outdoor or
Driving), press
(EDIT) and select
Other Settings
To set key tones
aSelect Key Tones
bSet On
To make sound when entering the service area
aSelect Coverage Tone
bSet On
To set the charge tone
aSelect Charge Tone
bSet On
To set the automatic answer
aSelect Auto Answer
bSet On
Tip
• Coverage Tone and Charge Tone sound at the volume level set
in the active mode. Key Tones is always set to Level 3.
9-5
9
Sounds
sages arrive. Select the vibration pattern from Pattern One to
9
Sounds
9-6
Entertainment
Music Player
: Play/
: Paused/
: Fast-forward/
: Stopped/
: Rewind
fTrack No.
■ Music Player
gElapsed time (min:sec)/Track time (min:sec)
Music Player allows you to enjoy sounds that have been prein-
Entertainment
hVolume
10
stalled, downloaded via Vodafone live! or recorded on a PC.
iMuting
jManner mode
kPriority settings
: Incoming Priority/
b
c
d
g
a
e
h
: Music Priority
lPlay Mode
(No display): Play All/
: Repeat All/
: Random Repeat/
: Random/
: Play One/
: Repeat
mEqualizer Settings
ij f k l m n
Music Player
aMulti Selector operations
(No display): Off/
: Pop/
: Classic/
: Vocal/
: Jazz/
: Rock
nBass Control
(No display): Off/
: Level 1 to
: Level 3
bPlaylist
File playback or menu operations are also available from Data
cTitle
Folder. To move/delete files, add subfolders, etc., see Data
dArtist
Folder (zp.12-2). To exchange files with a PC, see Infrared
eStatus
Communication (zp.13-4).
10-2
The Reproducible Time display is based on the Home Time
settings.
! Playable files
Type (format)
Extension
.amr
MIDI (SMF format 0/1, SP-MIDI, GM)
.mid/.midi
MP3
.mp3
MPEG4-AAC (AAC/HE AAC) /
MPEG4 (AMR-NB)
.mp4/.3gp/.3ga/.aac/
.m4a
SMAF
.mmf
XMF (Supported if Mobile DLS is included)
.xmf0/.xmf1
DRM
.dcf
* Files other than the above appear as unsupported files. Files
■ Playback
Play sounds on Music Player. Select a playlist from the
following:
List
Displays all files.
Playlists
Displays playlists containing your favorite files.
Track Folders
Displays a list of folders containing sound files.
Recently Played
Displays recently-played files. There is no difference between the handset and the memory card.
Most Played
Displays often-played files. There is no difference
between the handset and the memory card.
Download
Music Search searches for music on websites.
Music Download displays websites providing downloadable sound files.
Ringtones
Displays melodies.
listed above may also be unplayable.
* MP3 files transferred using Vodafone N-Series music transfer
tool are supported. Titles and artist names are displayed using
MP3 ID tags. Use ID3 tags ver. 2.3/2.4.
* XMF files, SMAF-type DRM files, and untransferable SMAF
files stored on the memory card are unplayable.
! Number of files that can be stored
Music files:
1,000
Melody files:
595
! Using copyrighted (DRM) files
If a downloaded sound file is copyrighted, the playback, usage or
transfer may be restricted. For information on Reproducible Time,
Reproducible Period, Reproducible Number, whether it can be
transferred, etc., press
(OPTIONS) and select File Properties.
Description
All My Tracks
A Select
(Entertainment) from the Main
Menu → Music Player
B Select a type of list to play
To select a file stored on the microSD memory card
Press
(CARD)
10-3
10
Entertainment
AMR-NB
If Playlists or Track Folders is selected, select a folder
containing a file to play
C Select a file
To reselect a file
10
Press
to return to the list screen, and select
for 1+ seconds: Rewind
for 1+ seconds: Fast-forward
/Earphone switch: Pause/Play
/Earphone switch for 1+ seconds: Stop
(OPTIONS): Display options
(MUTE/UNMUTE): Mute/Unmute
: Ends the music player
Entertainment
another file
! Options
The following options are available on the list or player screen.
Displayed options may vary depending on the Music Player
status.
Option
Set As Ringtone
List
Player
To return from the list screen to the player
Press
to return to the list screen then press
! Operations during playback
On the player screen, the following operations are available using
keys or options:
/Side key : Turn up the volume
/Side key : Turn down the volume
/
: Play the previous or next track (or find the beginning of
the track)
10-4
Description
Set the highlighted or played file as a ringtone.
New Playlist
Create a new playlist.
Delete playlist
Delete the highlighted playlist.
Delete all playlist
Delete all playlists.
Rename Playlist
Rename the highlighted playlist.
Edit Playlist
Edit the playlist.
SEND
Send the highlighted or played file attached to a
message.
File Properties
Display properties of the highlighted or played
file.
Delete
Delete the highlighted file.
Clear Playlist
Remove the highlighted file from the playlist.
Clear All Playlist
Remove all files from the playlist.
Edit File Name
Rename the highlighted file.
Option
Description
Option
Description
Add the highlighted file to a playlist.
Bass Control
Sort Files
Sort files in the playlist. Select Artist Name, File
Name, etc. under Sort Criteria, and Ascending
or Descending under Order. Select Ascending
or Descending for playlists in the playlist list.
Amplify low sound.
Select Off or Level 1 to Level 3.
Effective only when sound can be heard from the
earphone microphone.
Priority Settings*
Mute Settings
Set whether to mute Music Player.
Obtain Contents Key
Launch browser to obtain content keys.
Music settings
Make playback settings.
Make priority settings for incoming calls or messages.
Incoming Priority pauses playback before the
incoming screen appears.
Music Priority continues playback and displays
the incoming screen.
Change Animation
Change animations displayed during playback.
! Music settings
Set for playback.
Option
Description
* Incoming messages are notified with a fixed pattern if Vibration
is set to other than OFF.
Backlight Settings
Make display settings for playback.
Select Handset Settings, Always On or Always Off.
Handset Settings follow Backlight Settings under
Display Settings.
Player Auto Stop
Set the end time of Music Player. Select 30 Minutes Later, 60 Minutes Later, 90 Minutes Later or
Off.
A Select
Make playback settings in a playlist.
Select Play All, Repeat All, Random, Random
Repeat, Play One or Repeat.
B Select Playlists and press
Play Mode
Equalizer Settings
Set the sound.
Select Off, Classic, Vocal, Jazz, Pop or Rock.
■ Creating a playlist
(Entertainment) from the Main
Menu → Music Player
(OPTIONS)
C Select New Playlist
D Enter a playlist name in Create New Playlist and
press
(OK)
10-5
10
Entertainment
Add To Playlist
Option
■ Editing a playlist
A Select
(Entertainment) from the Main
Description
Clear All Playlist
Remove all files from the playlist.
File Properties
Display properties of the highlighted file.
Menu → Music Player
10
B Select Playlists
Entertainment
To select a playlist stored on the microSD memory
card
Press
(CARD)
■ Playing tracks with the handset
closed
Use Music Assist Keys to play tracks with the handset closed.
C Highlight a playlist to edit on the list
D Press
(OPTIONS), select Edit Playlist, and
edit the playlist
E After editing, press
(SAVE)
! Edit Playlist
The following options are available for Edit Playlist:
Option
Description
Add To Playlist
Add the highlighted file to a playlist.
Sort
Sort files in the playlist. Select By File Name, By
Date, By Size, etc. under Sort Criteria, and Ascending or Descending under Order.
Move File
Change the file order.
Highlight a file to move, change the location with
MOVE, and confirm with PLACE.
Clear Playlist
Remove the highlighted file from the playlist.
10-6
Music Assist Keys
A Press
for 1+ seconds
B Press
to start playback
■ Downloading music
(Music Download)
Operations during playback
Music Assist Keys enables the following operations:
: Play the previous or next track (or find the begin-
ning of the track)
A Select
(Entertainment) from the Main
Menu → Music Player
B Select Download → Music Search or Music
for 1+ seconds: Rewind
Download to access website and search for a
for 1+ seconds: Fast-forward
track
: Stop/Play
C Press
for 1+ seconds: Exit Music Player
External Display
Check the playback status on external display with the handset
closed.
Playlist
Title
Play Mode
Elapsed time (min:sec)
10-7
10
Entertainment
/
Access website and search for a track.
Media Player
! Playable files
Content
■ Media Player
Pictures
Type (format)
JPEG
Media Player allows you to enjoy pictures, videos, melodies,
Entertainment
JFIF
10
etc. stored in Data Folder.
EXIF
Streaming (Music)
Media Player
options
Videos
GIF (GIF87a/GIF89a)
.gif
BMP
.bmp
WBMP
.wbmp
PNG
.png
MPEG4 level 0
H.263 baseline profile0
H.263 profile3
MPEG4 Level0
.mp4/.3gp
H.263 Profile0/
H.263 Profile3
.mp4/.3gp
DRM
OMA DRM(S/D)
.dcf
Streaming (Videos)
MPEG4-AACAMR
Pictures allows you to enjoy pictures taken with the built-in camera or downloaded via Vodafone live!
Extension
.jpeg
.jpg
.jpe
Videos allows you to play videos taken with the built-in camera
or downloaded via Vodafone live!
Media Settings allows you to set the display size for pictures or
videos.
File playback or menu operations are also available from Data
Folder.
10-8
* Files other than the above appear as unsupported files. Files
listed above may also be unplayable depending on the copyright, etc.
* XMF and SMAF-type DRM are unplayable.
! Using copyrighted files
a
10
c
d
b
Entertainment
If a downloaded melody, picture or video is copyrighted, the
playback, usage or transfer may be restricted. For information on
Reproducible Time, Reproducible Period, Reproducible Number,
whether it can be transferred, etc., press
(OPTIONS) and
select File Properties.
If you do not have the right to use the files, a message appears
indicating that the content key is unavailable. Obtain the content
Key.
efg
Picture playback
■ Viewing pictures
View pictures taken with the handset or downloaded from
aPicture
bFull screen display
websites. View files one by one or create a playlist to view files
cTitle
continuously.
A Select
dFile size
(Entertainment) from the Main
eRepeat Setting
Menu → Media Player → Pictures
B Select a file from the list
If folders have been created, select a folder then select
fSlide
gStop repeat
a file from the folder
10-9
* You cannot apply visual effects if a picture is an animated GIF
! Pictures options
or the Slide is On.
The following options are available for Pictures. Displayed options
may vary depending on the file types.
Option
* You cannot apply visual effects if the size is neither QCIF (176
× 144) nor SQCIF (128 × 96).
Description
10
Set as Wallpaper
Set the displayed picture as wallpaper.
Entertainment
Visual Effect*
Apply visual effects to the displayed picture.
Select Negative Image, Sepia Tone, Mirror
Image, Soften Image, Sharpen Image or
Emboss.
■ Editing pictures
A Select
(Entertainment) from the Main
Menu → Media Player → Pictures
Rename
Rename a file.
Delete
Delete a file.
File Properties
Display file properties.
If folders have been created, select a folder then select
Playlist
Select files to play.
a file from the folder
Take Picture
Launch the camera in Picture mode.
Obtain Contents Key
Launch browser to obtain content keys.
Image Settings
Suboptions:
Display Settings: Select Fit to Screen or Default
Size to set the display size.
Slide Timing: Set the interval at which pictures
are displayed. Press
to pause.
Repeat Settings: Select Repeat On or Repeat
Off to set whether to display repeatedly.
Slide: Select Slide On or Slide Off to set
whether to display all the pictures in the folder
in order.
10-10
B Select a file from the list
C Press
(OPTIONS) and select Visual Effect
D Select your preferred effect
E Press
(SAVE)
■ Playing videos
■ Video player display
Play videos taken with the handset or downloaded from
websites. Play files one by one or create a playlist to play files
a
continuously.
10
A Select
(Entertainment) from the Main
c
d
f
b
Menu → Media Player → Videos
B Select a file from the list
If folders have been created, select a folder then select
a file from the folder
Entertainment
Selecting a video
e gh i
Video player
aPlayed video
bMulti Selector operations
cTitle (not displayed when streaming)
dProgress bar
eElapsed time (min:sec)
fTotal playing time (min:sec)
gMuting/Manner mode
hPlay All Videos
iRepeat Setting
10-11
Operations during playback
The following operations are available during playback:
10
/Side key
: Turn up the volume
/Side key
: Turn down the volume
/
Option
Playlist
Description
Select files to play.
Entertainment
Take Video
Launch the camera in Video mode.
Obtain Contents Key
Launch browser to obtain Contents Key.
Video Settings
Repeat Settings: Select Repeat On or Repeat Off
to set whether to play repeatedly.
Play All Videos: Play all videos in the folder in
order.
: Play the previous or next video (or find the beginning
of the file)
for 1+ seconds: Rewind
for 1+ seconds: Fast-forward
■ Setting Media Player
: Pause/Play
for 1+ seconds: Stop
Set the display size under Media Settings.
(OPTIONS): Display options
[Default]
(SEND): Attach the displayed video to a message
A Select
! Videos options
The following options are available for Videos. Displayed options
may vary depending on the file types.
Option
Description
Set As Ringtone
Set the highlighted or played file as a ringtone.
Mute Settings
Set whether to mute Media Player.
Rename
Rename a file.
Delete
Delete a file.
File Properties
Display file properties.
10-12
■Image Display Size: Default Size
■Video Display Size: Default Size
(Entertainment) from the Main
Menu → Media Player → Media Settings → Image
Display Size or Video Display Size
B Select Fit to Screen or Default Size
Vodafone live! CAST
■ Vodafone live! CAST
Subscribe to information and receive automatic updates. Infor• Separate registration is required to use the Vodafone
live! CAST service.
• The Vodafone live! CAST service is unavailable out-
A Select
(Entertainment) from the Main
Menu → Cast → What’s New?
10
B Select update
Tip
• If there is unread information
An indicator appears on the standby screen. Press
information.
to view the
side Japan.
• Only Japanese information is available (as of February
■ Subscribing/unsubscribing
Access the site and subscribe to/unsubscribe from information.
A Select
Note
• Information may not be delivered e.g. if the handset is turned
off or out of range.
2006).
! Information options
The following options are available on the information display
screen:
(Entertainment) from the Main
Menu → Cast → Casting Settings
B Follow on-screen instructions
Option
Go on to the next page.
Create Phone Book
Register a phone number or mail address
to Phone Book.
Action
Search for or copy words. Save or play
images or pictures.
Send As Message
Attach the displayed file to a message.
Note
• Communication fees apply while you are connected to the
Web.
Description
Forward
10-13
Entertainment
mation updates are delivered during the night.
■ Viewing information updates
Option
Description
Page Setting
Change the encoding, font size or scroll
settings.
Settings
Set the following:
・Images
Select Display or Do Not Display.
・Sounds
Select Play or Do Not Play.
・Reset
Reset the settings to default.
10
M
■ Checking History
Up to six back numbers can be stored. However, information is
automatically deleted if one week has passed since it was
delivered. If the seventh back number is to be saved, the oldest
one is deleted.
Entertainment
A Select
(Entertainment) from the Main
Menu → Cast → History
B Select a date
■ Downloading information manually
Manually download information if the handset is turned off or
out of range during delivery time. Only the latest information on
the delivery day can be downloaded.
A Select
(Entertainment) from the Main
Menu → Cast → Manual Download
B Press
(YES)
Tip
• Even when the message of a request success appears after
Manual Download, no information is updated if the latest
information has already been downloaded,
10-14
Memory Card
Before Using the Memory Card
• Insert the microSD memory card properly. An improperly
inserted card is unusable.
The microSD memory card is available as external storage.
• Do not put labels on the microSD memory card. The thickness of labels may cause read/write errors or data corruption.
Pictures or videos taken with the handset camera can be saved
to the handset or microSD memory card. Various data can be
microSD memory card.
• Keep the microSD memory card away from small children.
They may swallow it, or the card may cause bodily injury.
• A microSD memory card does not come with the handset.
Purchase a commercially available microSD memory
card.
• Use the dedicated microSD memory card. Non-dedicated
microSD memory cards may be unusable or may not
function properly.
• For details on the microSD memory card, see the User
Guide that comes with the purchased microSD memory
card.
• While accessing the microSD memory card, do not turn the
handset off or remove the battery pack. Doing so may
cause data loss, or the microSD memory card may become
unusable.
exchanged (copied/moved) between the handset and the
11
Memory Card
• When using the microSD memory card containing some data
for the first time, back up important data to a PC, etc. before
formatting (zp.11-4).
■ Using the microSD memory card
Note the following:
• The data you save to the microSD memory card may be
lost or altered due to accidents or malfunctions. Keep a
backup of data stored on the microSD memory card.
Vodafone shall not be liable for any loss or alteration of
data.
11-2
• If the battery level is low, the microSD memory card may
be unusable.
Tip
• Supported microSD memory card
Up to 512M-byte microSD memory cards are supported. Purchase a
microSD memory card and its adapter at an electronics store, etc.
! To use the microSD memory card on a PC, etc.
Insert the microSD memory card into a commercially available
microSD memory card adapter to use the card on a compatible
PC, etc.
Connect the handset to a PC via a USB cable to read/write data
on the microSD memory card from the PC (zp.13-7).
A USB driver is required to connect to a PC. Install the driver in
the bundled CD-ROM onto the PC.
Rail
Rail
■ Installing/attaching the microSD memory card
11
Memory Card
Installing
Golden side
A Slide the metal cover and lift it up
When sliding is not smooth,
slide with the cover down.
C Close the metal cover and slide it back until it
locks into place
Tip
B Facing the golden side, gently insert the
microSD memory card along the rails
• When inserting the microSD memory card, on the screen
appears. If the microSD memory card is malfunctioning or was
not be properly formatted,
appears. Format or check the disk.
Note
• Do not apply excessive force, which may damage the
card holder or microSD memory card.
• If the cover is not properly closed in Step 3, lift the cover up,
and check that the card is properly grooved into the rails and
inserted deep.
11-3
Using the Memory Card
Removing
A Slide the metal cover and lift it up
When sliding is not smooth,
slide with the cover down.
■ Formatting (initialising) the microSD
memory card
To use the microSD memory card, format it on the handset.
11
Note that formatting will erase all data.
Memory Card
A Select
B Gently pull out the microSD memory card
Pull out the microSD
memory card.
(Settings) from the Main Menu →
Memory Settings → Memory Card
B Select Format
C Enter Security Code
D Press
(YES)
Note
• Charge the battery fully before formatting.
C Close the metal cover and slide it back until it
locks into place
• Do not remove the microSD memory card or battery pack during formatting. Doing so may damage the handset or microSD
memory card.
• An incoming call or message does not interrupt the formatting process.
• The format will delete the related content keys.
11-4
! Checking the microSD memory card
If the handset is powered off while using the microSD memory
card, the data may be corrupted. The Check Disk function may
restore the data.
a Select
(Settings) from the Main Menu → Memory Settings
→ Memory Card
b Select Check Disk and press
(YES)
■ Checking data on the microSD memory card
Description
! Checking the memory status
11
Check the used and free memory.
a Select
(Settings) from the Main Menu → Memory Settings
b Select Status
Checking from Data Folder
Launch Data Folder to check data stored on the microSD memory card.
Files that can be stored on the microSD
memory card
The following two types of data can be stored on the microSD
memory card:
Data
A Select
(Data Folder) from the Main Menu
B Press
(CARD)
Tip
Description
Pictures, videos, melodies, V- Can be copied or moved between the
appli, vfile (Data stored in the handset and the microSD memory card
Other Folders folder)
(V-appli can only be moved).
• Data Folder
Data Folder is divided into Pictures, Ringtones, V-appli, Music, Videos and Other Folders.
11-5
Memory Card
If the Check Disk could not restore the data e.g. because folders
or data created on the handset were deleted on a PC, etc., reformat the microSD memory card. Back up important data stored on
the card to a PC, etc. before formatting.
Data
Phone Book, Calendar, Tasks Can be exported or imported between
the handset and the microSD memory
card.
Can be imported from the microSD
memory card to the handset one by one.
Checking from Music Player
Launch Music Player to check data stored on the microSD
memory card.
A Select
11
Data can be exchanged between the handset and the microSD
memory card.
(Entertainment) from the Main
Menu → Music Player
B Press
Transferring Data
(CARD)
Memory Card
Checking from Media Player
Copy or move pictures, videos, melodies or vfiles without
changing the file formats.
Copying/moving from the handset to
the microSD memory card
Launch Media Player to check data stored on the microSD
A Select
memory card.
B Highlight a file to copy/move
A Select
(Entertainment) from the Main
Menu → Media Player → Pictures or Videos
C Press
Move
(OPTIONS) and select Copy or
B Press
D Press
(OK)
E Press
(CARD)
(CARD)
(Data Folder) from the Main Menu
F Select a folder
11-6
Copying/moving from the microSD
memory card to the handset
A Select
(Data Folder) from the Main Menu
B Press
(CARD)
C HIghlight a file to copy/move
(OPTIONS) and select Copy or
E Press
(OK)
11
Memory Card
D Press
Move
F Select a folder
Tip
• Copied/moved files are saved to the same named folder on
the other memory (e.g. the Pictures folder for pictures).
• A file being used as a ringtone or wallpaper cannot be
deleted. Cancel the setting before moving.
11-7
11
Memory Card
11-8
Data Management (Data Folder)
Data Folder
Data Folder manages various data. Use prepared folders or
• Number of files
One folder can contain up to 100 files including files stored in
subfolders. Each folder can contain up to 5 subfolders. The Music
folder can contain up to 100 subfolders.
user-created subfolders to organise data.
Folder and file format
The following formats are available for the folders:
•
Pictures
BMP, WBMP, JPEG, JFIF, GIF, PNG
•
Ringtones
MIDI, SMAF, XMF
12
•
V-appli
Data Management (Data Folder)
JAVA (JAD, JAR)
Data Folder list
•
Music
MP3, MP4, AAC, AMR
■ Data Folder tree
•
Videos
MPEG4
Data Folder contains Pictures, Ringtones, V-appli, Music, Videos
•
Other Folders
and Other Folders. Other Folders contains Voice Rec. and More
vCalendar, vCard, vNote
Folder. You can create subfolders under folders other than
•
Data is automatically saved to specified folders depending on
the file formats.
Tip
• Folders on the memory card
The memory card uses the same folder tree as on the handset.
12-2
Voice Rec.
AMR
Other Folders.
•
More Folder
Text and unsupported files
*
*
! microSD memory card
The microSD memory card is available as the data location.
Pictures or videos taken with the handset camera can be saved
directly to the microSD memory card. Data can be exchanged
(copied/moved) between the handset and the microSD memory
card. Data Folder can display data stored on the microSD
memory card.
AUTO appears on the icons for Auto Save folders.
Even if files are set to be automatically saved to a folder on the memory card, files are saved to the corresponding folder on the handset in
the following cases.
• The memory card is used as USB memory
• Data cannot be directly saved into the memory card
• The memory card is not inserted
! Data Folder options
Highlight a folder and press
(OPTIONS). Displayed options
may vary depending on the situation.
Option
Viewing Stored Files
12
Description
Switch between Phone Memory and Memory Card.
Memory Status
View used and free memory for Phone Memory and
Memory Card.
Delete
Delete data in the folder.
Auto Save
Save data automatically to the folder.
Shortcut
Create a shortcut to the folder on the desktop or on
My Menu.
! Saving automatically
If Auto Save is applied to the folders on the handset or memory card,
data can be automatically saved to the folders. Auto Save is available
for Pictures, Ringtones, Music and Videos.
aSelect
(Data Folder) from the Main Menu (For folders
on the memory card, press
(CARD))
■ Opening files
A Select
(Data Folder) from the Main Menu
To view files stored on the microSD memory card
Press
(CARD)
B Select a folder
C Select a file
To temporarily display files in thumbnail
Press
(OPTIONS) and select Thumbnails ψ
Show Thumbnails
bHighlight a folder to apply Auto Save to, press
(OPTIONS) and select Auto Save
12-3
Data Management (Data Folder)
Switch Memory
Using Image Files
Using Sound Files
View image files stored in the Pictures folder, set them as wall-
Use sound files stored in Data folder as a ringtone for incoming
paper, or rename them.
calls or messages. The files may be unusable depending on
the file format or content.
■ Setting pictures as wallpaper
A Select
(Data Folder) from the Main Menu
→ Pictures
12
B Select a file to display the image
Data Management (Data Folder)
C Press
paper
(OPTIONS) and select Set as Wall-
■ Setting sound files as ringtone
A Select
and then select the file location
B Select a file
C Press
tone
12-4
(Data Folder) from the Main Menu,
(OPTIONS) and select Set As Ring-
Using vfiles
Using acquired data
vfiles acquired via messages or websites can be saved to Data
Folder and used for each feature.
■ vfiles
In addition, if inserting the microSD memory card containing
vfiles is a generic term for files that can be used between the
vfiles into the handset, acquire the files for each feature from
handset and another Vodafone handset or PC. Manage the
the microSD memory card.
handset Phone Book or Calendar. Copy data created on
another Vodafone handset or PC to your handset.
The following handset features correspond to the vfiles:
Format
Corresponding feature
Phone Book
vCalendar
Calendar, Tasks
vNote
Notepad
• The microSD memory card formatted on the handset or the
stored vfiles may be unreadable depending on the drive type
of the PC or microSD memory card.
Using the handset data on another
device
Data such as Phone Book or Calendar saved to Data Folder
are automatically converted to vfiles. The created vfiles can be
attached to a message and sent to another Vodafone handset
or PC.
If the microSD memory card is inserted into the handset, created vfiles can be saved to the microSD memory card. Insert
this microSD memory card into another microSD memory
card-compatible Vodafone handset or PC to use the vfiles.
12-5
12
Data Management (Data Folder)
vCard
Note
• To use vfiles on a PC, etc., a vfiles-compatible application is
required. Data may not be acquired to the handset or usable
on a PC depending on the contents.
■ Creating (saving) vfiles
Created vfiles are saved to Other Folders under Data Folder. To
open data, see the pages for the features.
A Open data to be saved
B Save the data
Press
(OPTIONS) and select Send Phone Book
→ Send vCard
Data Management (Data Folder)
Calendar, Tasks
Press
(OPTIONS) and select Synchronisation →
Save vCalendar
Notepad
Press
(OPTIONS) and select Synchronisation →
Save vNote
Note
• vfiles cannot be created for Bookmarks.
12-6
Acquire vfiles for each feature.
A Select
(Data Folder) from the Main Menu
To select a file stored on the microSD memory card
Press
(CARD)
B Select Other Folders
Phone Book
12
■ Acquiring vfiles for each feature
C Select a vfile to acquire
D Press
(OK)
For Notepad
Press
(SAVE)
Managing Folders
D Enter a new name
Note
■ Creating folders
Create subfolders under Pictures, Ringtones, Music or Videos.
A Select
(Data Folder) from the Main Menu
B Select a folder
C Press
(OPTIONS) and select New Folder
Note
Delete user-created folders.
A Select
(Data Folder) from the Main Menu
B Select a folder and highlight a user-created
subfolder
• When creating a new folder in the memory card, do not use “.”
(dot) in the folder name. For example, “xxx.yyy” is not available.
■ Renaming folders
Rename user-created folders.
A Select
■ Deleting folders
C Press
(OPTIONS) and select Delete
D Press
(YES)
Tip
• If the root folder is selected
The folder itself cannot be deleted. However, all files and usercreated subfolders in the folder will be deleted.
(Data Folder) from the Main Menu
B Select a folder and highlight a user-created
subfolder
C Press
(OPTIONS) and select Rename
12-7
12
Data Management (Data Folder)
D Enter a folder name
• When renaming a folder in the memory card, do not use “.”
(dot) in the folder name. For example, “xxx.yyy” is not available.
Managing Files
■ Renaming files
(Data Folder) from the Main Menu
B Select a folder and highlight a file
12
C Press
(OPTIONS) and select Rename
Data Management (Data Folder)
D Enter a new name
■ Moving files
Files can be exchanged between the handset and the memory
card. Two or more files can be moved at a time. However, they
cannot be moved to a different category folder.
A Select
(Data Folder) from the Main Menu
To select a file stored on the microSD memory card
Press
(CARD)
B Highlight a file to move, press
(OPTIONS) and select Move
C Press
12-8
Press
(CARD)
D Select a folder
Tip
Rename files.
A Select
To move a file to the microSD memory card
(OK)
• If a file cannot be transferred but to peripherals
The file is encrypted before being moved.
Some files may be unplayable.
Deleting files
Delete files. A file being used as a ringtone or wallpaper cannot
be deleted.
A Select
(Data Folder) from the Main Menu
B Highlight files to delete (zp.1-27)
C Press
(OPTIONS) and select Delete
D Press
(YES)
External Connection
Bluetooth
Bluetooth specifications
Communication
■ Bluetooth
Headset Profile, Hands-Free Profile, Dial-up Networking Profile, Object Push Profile
Bluetooth refers to a worldwide standard for the wireless
Output
Bluetooth Power Class2
exchange of data between two compatible devices.
Expected communication distance*2
Max. 10m
Frequency
2.4GHz
Use Bluetooth to:
• Establish a dial-up connection
Establish a dial-up connection with a PC using the handset as a modem.
13
Bluetooth standard Ver1.2
Compatible
Bluetooth profile*1
*1
*2
The device must be compatible with the same profile.
The distance may vary depending on obstacles between the device
and the handset, reception, device specifications, etc.
• Transfer data
External Connection
Transfer a Phone Book data to another Bluetooth-compatible device (PC, PDA, 804N handset, etc.). Only one
contact can be transferred.
• Make a call with a headset or in handsfree mode
Connect the handset to a Bluetooth-compatible device
and make a call.
Note
• A connection to a Bluetooth-compatible device is not always
guaranteed.
• Use approved Bluetooth devices that comply with Telecommunications Business Law.
• Use certified Bluetooth devices that comply with the
Bluetooth standards provided by the Bluetooth SIG. A connection or data transfer may be unavailable depending on the
device specifications. Procedures may differ between
devices.
• The handset cannot be connected to two or more devices
simultaneously.
13-2
• For information on how to use a Bluetooth device, see the
User's Guide.
• The 2.4GHz frequency band is used by many devices.
Although the employed technology minimizes the effects of
devices using the same frequency, the effects may slow down
the speed, shorten the effective distance, or even disconnect
the communication.
■ Activating Bluetooth
When receiving Phone Book data or connecting to a Bluetooth
device in the vicinity, activate Bluetooth to enable connection.
While in Bluetooth standby mode,
(Settings) from the Main Menu →
Connectivity → Bluetooth
B Select Discoverable
Tip
• A connection cannot be established until the Bluetooth function is activated.
• The timeout time can be set in Standby Timer under Timeout
Settings. If a connection is not established within the specified time, the connection standby mode is cancelled, and
disappears from the screen.
Search for a Bluetooth device and register it. Register a headset
or handsfree device beforehand. Up to 20 devices can be registered.
Searching/registering Bluetooth
devices
A Select
(Settings) from the Main Menu →
Connectivity → Bluetooth
B Press
(SEARCH)
13
C Select a device from the search result
D Enter the Device Passkey
E Enter the same Device Passkey on the device
to register
Tip
• The common Device Passkey (authentication code) must be
entered on both sending and receiving devices. Set a 16-digitor-less number as the Device Passkey. The available digits
may vary depending on the devices.
• If the Device Passkey has been set on the device to register,
enter it.
13-3
External Connection
A Select
appears on the screen.
■ Searching/Registering devices
• If connecting to a registered device, the Device Passkey is
not required.
• For information on how to set the device to standby, see the
User's Guide of the device.
Connecting from a device to the handset
A Select
(Settings) from the Main Menu →
Connectivity → Bluetooth
B Press
(OPTIONS) and select Pairing
Standby
13
C Request a connection from the device
External Connection
• The timeout time can be set in Pairing Timer under Timeout
Settings. If a connection is not established within the specified time, the pairing standby mode is cancelled, and
disappears from the screen.
Tip
• When pairing, the Device Passkey may be required to be
entered.
■ Using Bluetooth to transfer data
Use Bluetooth to transfer vCard-formatted Phone Book data.
Some devices must be registered before data is sent.
Sending Phone Book data
Make sure Discoverable is OFF beforehand.
A Set the receiving device to standby
B Highlight Phone Book data to send, press
(OPTIONS) and select Send Phone Book ψ
Send vCard Via B.T.
C Select the receiving device from the device
list
Data is sent.
Tip
• Data that can be sent
Only one Phone Book contact can be sent. To send another contact, repeat sending.
• The Device Passkey may be required to be entered even if the
device is already registered.
• The device list displayed in Step 3 shows the latest information on devices regardless of the registration.
13-4
B Select a device from the device list
Receiving data
A Select
(Settings) from the Main Menu →
Connectivity → Bluetooth
B Select Discoverable to set the handset to
standby
C Start the transfer operation on the sending
device
D After receiving the data, press
(OK) to
save the data to the Phone Book
The device is connected, and
appears.
If there are no registered devices (you use
Bluetooth for the first time)
aPress
(SEARCH)
bSelect a device from the search results
Tip
• The Device Passkey may be required to be entered.
Disconnecting a device
A Select
(Settings) from the Main Menu →
• When saving Phone Book data, the Device Passkey may be
required to be entered.
• For information on how to send data from a device, see the
User Guide.
B Select the connected device from the device
list
C Press
(YES)
■ Using Bluetooth to connect a device
Use Bluetooth to connect a device to the handset.
Connecting to a device
A Select
(Settings) from the Main Menu →
Connectivity → Bluetooth
13-5
13
External Connection
Connectivity → Bluetooth
Tip
■ Using Bluetooth for dial-up
connection
Option
Display information on the registered device.
Search
Search for Bluetooth-compatible devices in the
vicinity.
Pairing Standby
Set the handset to pairing standby.
Terminal Info.
Display Bluetooth information on the handset.
The device name can be changed.
Use Bluetooth and a PC to access the Internet.
A Select
(Settings) from the Main Menu →
Connectivity → Bluetooth
B Select Discoverable
C Press
(OPTIONS) and select Pairing
Remove Device
Delete devices from the list.
Stop All
Disconnect all Bluetooth devices.
Timeout Settings
Set the timeout time. To not time out, set 0
(zero) in Standby Timer.
The default is as follows:
Standby Timer: 0 (min.)
Pairing Timer: 3 (min.)
Standby
13
D Enter the Device Passkey
External Connection
After authentication is completed, the device is registered.
E Press
to exit the Bluetooth screen
Tip
• For information on the modem settings or operations of a
Bluetooth device, see the User Guide.
! Bluetooth options
The following options are available for Bluetooth. Displayed
options may vary depending on the registration status.
13-6
Description
Information
! Indicators
Bluetooth inactive:
Bluetooth activated (connection standby):
Bluetooth connected:
Connecting to a PC
■ Bundled Utilities CD-ROM
Connecting the handset to a PC via a USB cable allows the following functions:
Function
Data communication*
• USB driver
Description
Use the handset as an external modem to
establish a packet data communication
(zp.13-8).
Data transfer*
Exchange data, e.g. back up the handset
Phone Book to a PC, transfer music files stored
on a PC to the handset (zp.13-8).
USB memory*
Utilities
• Vodafone 804N data transfer tool (zp.13-8)
• Vodafone N-Series music transfer tool (zp.13-8)
Tip
• For the latest utility software, visit the NEC Mobile Communications website “ワイワイモバイル (Wai Wai Mobile)” at http://
www.n-keitai.com/.
Use the handset as an external drive with the
PC operating environment
* Use the bundled ࡙࠹ࠖ࠹ࠖ࠰ࡈ࠻࠙ࠚࠕ (Utilities)
CD-ROM to install the USB driver beforehand.
Item
13
Description
PC
●
PC/AT compatible with CD-ROM drive
●
One or more USB ports
OS
Microsoft® Windows® 2000/XP (Japanese editions)
CPU
300MHz or higher
Memory
64M or higher (128M or higher recommended)
How to install utilities
The USB driver is required to connect the handset to a PC.
Install this utility first. To install the USB driver, log on as a user
with administrator permissions.
13-7
External Connection
microSD memory card inserted, and read/
write files on the microSD memory card
(zp.13-9).
A Place the ࡙࠹ࠖ࠹ࠖ࠰ࡈ࠻࠙ࠚࠕ (Utilities) CD-ROM into the CD-ROM drive
The menu automatically launches.
• Use ࠕࠢࠬࠗࡦ࠲ࡀ࠶࠻(Access Internet) for Internet access without a provider subscription. Contact Customer Service (zp.30-38) for access points, settings,
services, etc.
If the menu does not appear, double-click
“start.exe” in the CD-ROM.
The instructions are given only in Japanese.
B Select utilities
Follow on-screen instructions.
Tip
13
External Connection
• To uninstall the USB driver
Select 75$࠼ࠗࡃߩࠗࡦࠬ࠻࡞㧛ࠕࡦࠗࡦࠬ࠻࡞ (Install/
Uninstall USB Driver) from the ࡙࠹ࠖ࠹ࠖ࠰ࡈ࠻࠙ࠚࠕ (Utilities) CD-ROM menu, and follow the instructions.
■ Data communication
Use the handset as an external modem to establish a packet
data communication.
• To establish a data communication, connect the handset to a
PC via a USB cable. Bluetooth connection is also available
(zp.13-5).
• For information on establishing communication, see your
provider's or PC's user guide.
13-8
Tip
• Before starting a data communication, exit all handset applications.
* Data can be exchanged during a voice call.
■ Transferring data
Vodafone 804N data transfer tool
This tool allows you to back up the handset data such as
Phone Book or Schedule (excluding non-transferable files) to a
PC, or to edit the data on the PC and save it back to the handset.
For information on how to install the tool, see the ࡙࠹ࠖ
࠹ࠖ࠰ࡈ࠻࠙ࠚࠕ (Utilities) CD-ROM menu.
Vodafone N-Series music transfer tool
This tool allows you to transfer music files stored on a PC to the
handset. It is useful when you edit a playlist and use the handset Music Player.
For information on how to install the tool, see the ࡙࠹ࠖ
࠹ࠖ࠰ࡈ࠻࠙ࠚࠕ (Utilities) CD-ROM menu.
Tip
• MP3 or AAC files transferred to the handset become nontransferable.
■ Reading/Writing files on the microSD
memory card
Follow the Windows safe removal procedure. While reading/writing
files, do not remove the USB cable.
Note
• Do not change the folder tree on the microSD memory card. If
you change/delete folders (e.g. Private) and its files created
on the handset, they may become invisible from the handset.
When the handset is connected to a PC via a USB cable with
USB Memory Mode set to Visible From PC, the PC recognises
the handset as USB memory, and you can directly read/write files
on the microSD memory card.
Tip
13
External Connection
• When connected to a PC in USB Memory Mode
appears on the display.
• While reading/writing files on a PC
The microSD memory card is unusable on the handset. While
using the microSD memory card on the handset, files cannot be
read/written on a PC.
• To switch between Visible From PC and Invisible From PC under
USB Memory Mode
aSelect
(Settings) from the Main Menu → Memory Settings →
Memory Card → USB Memory Mode
bSelect Visible From PC or Invisible From PC
[Default]
■Visible From PC
• To remove a USB cable
13-9
13
External Connection
13-10
Handset Security
Changing the Security Code
Setting PIN Code
[Default] ■9999
■ Changing PIN Code
A Select
(Settings) from the Main Menu →
Security → Set Sec. Codes
B Enter the current Security Code
C Select Chg. Handset Code
D Enter the current Security Code
14
Change PIN1 and PIN2 (secret codes for USIM card) for your
security.
[Default] ■PIN1, PIN2: 9999
A Select
(Settings) from the Main Menu →
Security → Set Sec. Codes
E Enter a new 4-digit Security Code
B Enter Security Code
F Enter the new Security Code again
C Select Change PIN1 or Change PIN2 and enter
G Press
(OK)
the current PIN1 or PIN2
Handset Security
D Enter a new 4 to 8 digit PIN1 or PIN2
E Enter the new PIN1 or PIN2 again
F Press
(OK)
Tip
• Before changing PIN1, set Activate PIN1 to Enable.
14-2
■ Enabling PIN1 authentication
■ Releasing PIN lock
This setting prevents unauthorised use of the USIM card. Set
If PIN1 or PIN2 is entered incorrectly three times in succession,
Enable to require the PIN1 entry when the handset is turned
the current PIN1 or PIN2 becomes invalid. This is called PIN
on.
lock. To release a PIN lock, enter a PUK code.
To obtain PUK1 or PUK2 code to release PIN1 or PIN2 lock,
[Default] ■Disable
A Select
contact Customer Service (zp.30-38). Then use the following
(Settings) from the Main Menu →
Security → Set Sec. Codes
B Enter Security Code
procedures to release PIN lock:
A Enter PUK1 or PUK2 code on the PUK code
entry screen
C Select Activate PIN1
B Enter a new PUK1 or PUK2 code
D Select Enable
C Enter the new PUK1 or PUK2 code again
E Enter PIN1
The following procedures are also available for releasing PIN2
14
lock:
Handset Security
Note
• If PIN1 or PIN2 is incorrectly entered three times consecutively, the current PIN1 or PIN2 becomes invalid.
A Select
(Settings) from the Main Menu →
Security → Set Sec. Codes
B Enter Security Code
C Select Unblock PIN2
D Enter PUK2 code on the PUK2 code entry
screen
14-3
E Enter a new PIN2
F Enter the new PIN2 again
G Press
(OK)
Note
Changing Private PIN
Change Private PIN as follows:
A Select
(Settings) from the Main Menu →
Security → Set Sec. Codes
• If PUK1 code is entered incorrectly ten times consecutively,
the USIM card is locked. Once the USIM card is locked, all
operations are blocked.
B Enter Security Code
• If PUK2 code is entered incorrectly ten times consecutively,
no operations requiring PIN2 can be performed.
D Enter the current Private PIN
• To unlock the USIM card, contact Customer Service
(zp.30-38).
C Select Change Private PIN
E Enter a new Private PIN
F Enter the new Private PIN again
G Press
14
(OK)
Handset Security
Tip
• To set Private PIN for the first time, enter Security Code again
in Step 4 then enter the desired Private PIN twice.
14-4
Preventing Unauthorised Use of
the Handset
Releasing Dial Lock
A Enter Security Code in the standby screen
B Press
■ Setting locks
Setting Dial Lock
Set Dial Lock to disable operations except emergency calls
and turning on/off the handset.
A Select
Setting Start Up Dial Lock
Set Start Up Dial Lock to set Dial Lock automatically when the
handset is turned on.
[Default] ■Off
A Select
[Default] ■Off
(Settings) from the Main Menu →
Security → Dial Locks
(OK)
(Settings) from the Main Menu →
Security → Dial Locks
B Set Start Up Dial Lock to On
B Set Dial Lock to On
C Press
C Press
D Enter Security Code
14
Handset Security
(OK)
(OK)
D Enter Security Code
Tip
• Keys available while in Dial Lock
to answer calls and
to reject calls or turn on/off the
handset
• If the handset is turned off while in Dial Lock, the lock is not
released.
14-5
Releasing Start Up Dial Lock
A Select
(Settings) from the Main Menu →
Restricting Incoming/Outgoing
Calls
Security → Dial Locks
B Set Start Up Dial Lock to Off
Use various functions to restrict incoming and outgoing calls.
C Press
phone numbers can be made. When incoming calls are
(OK)
D Enter Security Code
Tip
• To temporarily cancel Start Up Dial Lock
Enter Security Code on the standby screen.
When outgoing calls are restricted, only calls to the permitted
restricted, unauthorised calls are rejected and the callers hear
busy tone. Unauthorised calls are logged as missed call.
In addition to the options explained in this section, Call Barring
service is available for restricting calls to overseas phone numbers or barring all incoming or outgoing calls (zp.17-4).
■ Restricting outgoing calls
(Fixed Dialling)
14
Handset Security
Set Fixed Dialling to enable only calls to specified numbers
(Fixed Dialling Number (FDN)).
A Select
(Settings) from the Main Menu →
Call Settings → Common Setting → Fixed Dialling
B Select On
14-6
Tip
• To register FDN
Select
(Phone Book) from the Main Menu → Other Numbers
■ Rejecting calls without caller ID
(Ignore If No ID)
→ Fixed(FDN) (zp.5-4).
Set Ignore If No ID to reject calls without caller ID (including
*As of February 2006, the FDN function is not available.
calls from public phones or overseas). Use this setting to prevent you from receiving prank calls, etc.
■ Rejecting calls from unknown phone
numbers
(Unknown)
Set Unknown to reject calls from phone numbers not stored in
the handset or USIM Phone Book.
[Default] ■Accept
A Select
[Default] ■Off
A Select
(Settings) from the Main Menu →
Call Settings → All Calls → Ignore If No ID
B Select On
(Settings) from the Main Menu →
Call Settings → All Calls → Unknown
14
Handset Security
B Select Reject
Note
• This function is invalid for calls without the caller ID.
14-7
Saving Secret Contacts/Events
Save Phone Book contacts or Calendar events you want to
hide as secret data. To view secret data, enter Private PIN for
Phone Book contacts or Security Code for Calendar events.
Saving secret events
A Select
(Organiser & Tools) from the
Main Menu → Calendar
B Select Private in Filter View on the Calendar
Registration screen
■ Saving secret contacts/events
■ Displaying/hiding secret data
[Default] ■Off
Saving secret contacts
[Default] ■Off
A On the Phone Book list, highlight a contact
to save as secret data, press
14
(OPTIONS)
and select Edit Phone Book
Handset Security
B Select Other Settings
C Select On in Private
Tip
• If a contact is saved as secret data, only the phone number
appears on the dialling, incoming call or call log screen.
14-8
Displaying/hiding secret contacts
A Select
(Phone Book) from the Main
Menu → Settings →Privacy Display
B Select On or Off
C Enter Private PIN
D Press
(OK)
Locking Keys
Tip
• When Private PIN is not set
Enter Security Code and set Private PIN.
• When Privacy Display is set to On
Names stored in Phone Book appear on the Phone Book or message screens.
• When the handset is turned off with Privacy Display set to On
Privacy Display is reset to Off.
Displaying/hiding secret events
A Select
(Organiser & Tools) from the
Main Menu → Calendar
B Press
(OPTIONS) and select Filter View
C Select an item
• To show secret events
All Keys Lock
Set All Keys Lock to lock the keypad by following either of the
procedures below.
• On the standby screen, press
• Select
.
and
(Settings) from the Main Menu →
Security → Key Locks → All Keys Lk.
Tip
• If the handset is turned off while in All Keys Lock, the lock is
released.
External Keys Lock
14
[Default] ■Off
Set External Keys Lock to lock external keys (Music Assist keys
and Side keys) by following one of the procedures below.
cPress
(OK)
• To hide secret events
Select Public.
14-9
Handset Security
aSelect All or Private
bEnter Security Code
and
• On the standby screen, press
• Press
and
.
Resetting the Handset
(Music Assist keys) simul-
taneously for 1+ seconds when the handset is
■ Resetting functions
closed.
• Select
(Settings) from the Main Menu →
Security → Key Locks → Ext. Key Lk. → On.
tacts. For details on functions to be reset, see "Settings to be
Tip
Reset" in "Appendix" (zp.30-7).
A Select
[Default] ■All
Select
(Settings) from the Main Menu → Security → Key Locks
→ Ext. Keys Lock Op. → Music Assist keys, Side Keys or All. To lock all
external keys, select All.
• Even if the handset is turned off while in External Keys Lock,
the lock is not released.
Handset Security
Releasing key locks
• To release All Keys Lock, press
standby screen.
and
on the
• To release External Keys Lock, press
and
on the
standby screen, or press
and
(Music Assist keys)
simultaneously for 1+ seconds when the handset is closed.
14-10
Perform Settings Reset to reset functions to defaults. This operation does not delete personal data such as Phone Book con-
• To select the external keys to lock
14
(Settings Reset)
(Settings) from the Main Menu →
Phone Settings → Master Reset → Settings Reset
B Enter Security Code
C Press
(OK)
■ Deleting personal data
(Memory Reset)
■ Resetting/deleting all functions and
personal data
(All Reset)
Perform Memory Reset to delete all personal data such as
Perform All Reset to reset all functions and delete all personal
Phone Book contacts, Schedule events, dialled and received
data. This operation does not delete data stored on the
calls logs, and received and sent messages. This operation
microSD memory card or USIM card (zp.30-7).
does not delete data stored on the microSD memory card or
USIM card (zp.30-7).
A Select
(Settings) from the Main Menu →
Phone Settings → Master Reset → All Reset
(Settings) from the Main Menu →
Phone Settings → Master Reset → Memory Reset
B Enter Security Code
C Press
A Select
(OK)
B Enter Security Code
C Press
(YES)
Tip
• If Memory Reset or All Reset is performed
All content keys are also deleted.
14-11
14
Handset Security
• If the handset is turned off during a reset operation
The reset operation is cancelled. Turn on the handset and perform
the operation again.
14
Handset Security
14-12
Organiser & Tools
Scheduling (Calendar)
Add up to 200 appointments, personal holidays and events to
Tip
• The next time the Calendar is displayed
In the previously set format.
the Calendar.
! Calendar options
The following options are available for Calendar. The same operation
is available on the list and details screens. Displayed options may
vary depending on the registration status.
■ Viewing the Calendar
Option
Monthly
15
Organiser & Tools
■ Changing the format
[Default]
■MONTHLY
A Select
(Organiser & Tools) from the
Main Menu → Calendar
B Press
15-2
Add a new schedule. Select Appointment, Special
Occasion, Multiday Event or Days Off.
Edit
Edit the highlighted schedule.
Copy
Copy the highlighted schedule.
Filter View
Use the filter settings to view existing schedules.
Jump To Date
Specify a date to display the Calendar including the
date.
Memory Status
View the numbers of added and empty schedules.
Synchronisation
Save the highlighted schedule in vCalendar format.
Attach vCalendar to a message.
Delete
Delete the highlighted schedule.
Weekly
View the Calendar in a monthly or weekly format.
(WEEKLY) or
(MONTHLY)
Description
New
Item
■ Adding schedules
Select At The Set Time, 5 Minutes Before, 10
Minutes Before, 15 Minutes Before, 30 Minutes
Before, One Hour Before, 90 Minutes Before or
Two Hours Before.
Repeat
Set the repeat (Off, Monthly, Weekly).
The alarm sound, animation and message notify you at the
scheduled date and time.
A Select
(Organiser & Tools) from the
Main Menu → Calendar
B Press
(Options) and select New →
Appointment
C Set each item
D Press
• If the day of the date set in the start date and the one set in
the Weekly repeat are different
The day set in the Weekly repeat takes priority. The appointment is
scheduled to the first weekly day after the start date.
! When the scheduled time comes
The alarm sounds for about one minute, and the animation appears
on the display and on the external display.
(OK)
To stop the alarm sound, press any key. Press again to clear the
alarm message.
Tip
• Appointment items
Item
Description
Time
Description
Set the filter (Public or Private).
Contents
Enter the contents. (Required)
Start date
Set the start date.
Start time
Set the start time.
End time
Set the end time.
Alarm
Set an alarm on/off.
Sound
Set the alarm sound.
15
Organiser & Tools
Filter
The alarm is ineffective when the handset is turned off.
15-3
■ Setting holidays
A Select
(Organiser & Tools) from the
Main Menu → Calendar
B Press
(Options) and select New → Days
Off
List for the day
Appointment
details
C Select Public Holidays or Weekly Days Off, and
set a date
D Press
(OK)
■ Checking appointments, holidays and
events
Check the contents on the list or details screen of the date.
15
A Select
(Organiser & Tools) from the
Organiser & Tools
Main Menu → Calendar
B Select a date
C Select an item
15-4
Special Occasion
details
■ Editing appointments, holidays and
events
A Select
(Organiser & Tools) from the
Main Menu → Calendar
B Select a date and highlight an item to edit
C Press
(EDIT), or press
and select Edit
D Edit the fields
E Press
(OK)
(Options)
■ Deleting appointments, holidays and
events
A Select
(Organiser & Tools) from the
aOn the Calendar screen, press
Delete
(Options) and select
bSelect Delete Days Off
cSelect Up To Date or Reset Days Off
Main Menu → Calendar
B Select a date and highlight an item to delete
C Press
• To delete all holidays until the selected date or to delete all
holidays
(Options), and select Delete →
dSelect the last date for Up To Date or enter Security Code
for Reset Days Off
ePress
(OK)
Delete Event → This Event or Delete → Delete
Days Off → Select Days Off
D Press
(YES)
Tip
• To delete all appointments until the selected date or to delete
all appointments
aOn the Calendar screen, press
Delete
(Options) and select
15
Organiser & Tools
bSelect Delete Event
cSelect Up To Date or Delete All
dSelect an option (filter)
eSelect the last date for Up To Date or enter Security Code
for Delete All
fPress
(OK)
15-5
Using the Alarms
Item
Description
Snooze
Set the snooze.
The handset displays a message, sounds the tone, or vibrates
at the set alarm time.
! Alarms options
The following options are available for Alarms. Displayed options may
vary depending on the registration status.
■ Setting alarms
Option
Up to five alarms can be set.
A Select
(Organiser & Tools) from the
Description
Edit
Edit the alarm contents.
Delete
Delete or Delete All the alarms.
Main Menu → Alarms
B Select a line without an alarm set
■ Changing/cancelling alarm settings
C Set the items
D Press
A Select
(OK)
(Organiser & Tools) from the
Main Menu → Alarms
15
Tip
B Highlight an alarm
• Alarm items
Organiser & Tools
Item
Time
Description
Set the alarm time. Select AM or PM if the time display is set to a 12 hour format.
Repeat
Select a day to repeat the alarm.
Contents
Make a note of the alarm.
Alarm sound
Select a sound (MIDI compatible).
Vibration
Set the pattern.
15-6
To change the contents
aPress
and change the settings
bPress
(OK)
To skip the repeat alarm once
Press
(SKIP)
To set the alarm off
Press
(OFF)
! At the set alarm time
■ Deleting alarms
The alarm sounds for about three minutes, and the animation
appears on the display and on the external display.
To stop the alarm sound, press any key.
A Select
If Snooze is off, press any key again to clear the alarm message.
B Highlight an alarm
If Snooze is on, the alarm sounds again in five minutes. To
cancel the Snooze, press
(OFF) while the alarm is
sounding, or press
(CANCEL) after stopping the alarm (The
Snooze is automatically cancelled after it is performed 10 times
repeatedly).
(Organiser & Tools) from the
Main Menu → Alarms
C Press
(OPTIONS) and select Delete
To delete the selected alarm
Select Delete
To delete all alarms
Select Delete All and enter Security Code
15
Organiser & Tools
15-7
Using Tasks
Item
Status
Description
Select Done or Not Done.
Use tasks to post an alarm at a specified time, categorise or set
Done Date
Enter the date when the task is done.
priority to schedules, etc.
Alarm
Set an alarm on/off.
Sound
Set the alarm sound.
■ Creating tasks
Alarm date
Set the alarm date.
Alarm time
Set the alarm time.
Up to 200 tasks can be created.
A Select
(Organiser & Tools) from the
Main Menu → Tasks
B Press
15
The following options are available for Tasks. Displayed options may
vary depending on the registration status.
Option
(Options) and select New
C Enter each field
D Press
! Tasks options
Description
New
Add a new task.
Edit
Edit the highlighted task.
Organiser & Tools
Copy
Copy the highlighted task to create new one.
Filter View
Use the filter settings to view existing tasks.
Tip
Memory Status
View the numbers of added and empty tasks.
• Tasks items
Synchronisation
Save the highlighted task in vCalendar format.
Attach vCalendar to a message.
Delete
Delete existing tasks. Select This Task, Delete
Done Tasks or Delete All.
(OK)
Item
Description
Category
Set the category.
Title
Enter a title.
Contents
Enter the contents.
! At scheduled time
Deadline
Set the task deadline.
Priority
Set the priority. Select High, Standard or Low (The
default is Standard).
The alarm sounds for about one minute, and the animation appears
on the display and external display.
15-8
To stop the alarm sound, press any key. Press again to clear the
alarm message.
C Press
press
(OPTIONS) and select Edit, or
then
(EDIT)
D Edit the fields
E Press
(OK)
Tip
• To set the status to Done
Press
(DONE) on the list screen.
The alarm is ineffective when the handset is turned off.
■ Deleting tasks
■ Checking tasks
A Select
(Organiser & Tools) from the
Main Menu → Tasks
B Select a task
A Select
(Organiser & Tools) from the
Main Menu → Tasks
B Highlight a task
C Press
(OPTIONS) and select Delete
15
To delete the selected task
A Select
Organiser & Tools
■ Editing tasks
Select This Task
To delete done tasks only
(Organiser & Tools) from the
Main Menu → Tasks
B Highlight a task to edit
Select Delete Done Tasks
To delete all tasks
Select Delete All and enter Security Code
15-9
Using the Calculator/Converter
To enter a decimal point
Perform basic arithmetic operations or convert currencies (up
To switch between positive and negative
to 10 digits including after the decimal point).
Press
Press
To clear the result/numbers
Press
Tip
• If the result exceeds 10 digits
Range Error appears.
• If the calculation fails, Error appears.
Calculator
Converter
■ Using the Calculator
A Select
15
(Organiser & Tools) from the
Main Menu → Calc./Converter
Organiser & Tools
If the Converter appears
Press
(CALC.)
B Calculate
To enter numbers
Use the dial keys
To enter +, −, ×, ÷ or =
Use the Multi Selector
15-10
• To clear all the numbers on the bottom line
Press
(C).
• To clear the entire calculation
Press
(AC).
■ Using the Converter
Convert currencies using the specified exchange rates.
A Select
(Organiser & Tools) from the
Main Menu → Calc./Converter
If the Calculator appears
Press
(Convert)
aEnter the amount in Total
bSelect the source currency from From
cSelect the destination currency from To
(OPTIONS), select Set Rate and enter
the rate
ePress
(OK)
To change currency names
aPress
Take notes (up to 512 bytes). The notes can be used for a mail
message or alarm message. Up to 8 notes can be stored.
■ Adding notes
A Select
(Organiser & Tools) from the
Main Menu → Notepad
B Convert
dPress
Taking Notes (Notepad)
(OPTIONS) and select Edit Cur. Unit
(NEW), or press
(OPTIONS)
and select New
C Enter the title and contents
D Press
(SAVE)
Tip
• To edit the stored notes
Press
(EDIT) on the details screen, or press
(OPTIONS)
and select Edit. After selecting Edit, select Title or Note Contents.
15-11
15
Organiser & Tools
bSelect a currency and edit the name
B Press
To use the note
! Notepad options
Press
The following options are available for Notepad. Displayed options
may vary depending on the registration status.
Create Task
Option
New
Description
Create a new note.
Edit
Edit the note. Select Title or Note Contents.
Delete
Delete the note(s). Select Delete or Delete All.
Synchronisation
Save the note in vNote format. Attach the note
to a message.
Create Calendar
Use the note for a schedule.
Create Task
Use the note for a task.
Shortcut
Create a shortcut to the note on the desktop or
on My Menu.
(OPTIONS) and select Create Calendar or
■ Deleting the notes
A Select
(Organiser & Tools) from the
Main Menu → Notepad
B Highlight a note
C Press
(OPTIONS) and select Delete
To delete the selected note
Select Delete
To delete all the notes
Select Delete All and enter Security Code
■ Checking/Using the notes
15
Organiser & Tools
A Select
(Organiser & Tools) from the
Main Menu → Notepad
B Highlight a note
To check the note
Press
15-12
Recording Your Voice
(Voice Recorder)
• To rename the recorded file
Press
press
Record your voice in standby mode (up to 100 records, each of
which is up to 180 seconds). The records can be attached to a
(OPTIONS), select Rename, edit the name and
.
• To attach the recorded file to a message
Press
(SEND), or press
(OPTIONS), select Send As
Message and create a new message.
message.
! Voice Recorder options
■ Recording your voice
A Select
Option
(Organiser & Tools) from the
Main Menu → Voice Recorder
Memory Status
Rec. Start Sound
Select the start sound for recording.
Multimedia Player
Launch Media Player to play the record.
Pressing
(PLAY) is also available.
B Select Standby Voice Memo → Record
C Press
Description
View the numbers of added and empty records.
to start recording
■ Playing the records
The recording time is
Counted down from 180 seconds
A Select
To stop/end recording
B Select Standby Voice Memo → Play
To cancel recording without finishing
or
C Select a record
Tip
• To delete the recorded file
Press
(OPTIONS), select Delete, and press
15
Organiser & Tools
Main Menu → Voice Recorder
Press
Press
(Organiser & Tools) from the
(YES).
15-13
Tip
• To play selecting from Data Folder
aSelect
(Data Folder) from the Main Menu → Other
Folders → Voice Rec.
bSelect a file
15
Organiser & Tools
15-14
Advanced Settings
Advanced operations during a
call
■ Sending push tones (Dial Pause)
Send push tones to remotely control a home answering
Press
for 1+ seconds.
Sending push tones
Make a call to send the saved Dial Pause data as push tones.
machine, send messages to pagers or use services that
A Make a call
require push tones.
B During the call, press
Saving Dial Pause data
Save Dial Pause data that will be sent as push tones. 0 to 9,
#, * and "p" (pause) can be saved. Enter "p" where you want
to add a pause to separate push tones. Only one data file (up
to 128 characters) can be saved.
A Select
(Settings) from the Main Menu →
Call Settings → Common Setting →
16
Tip
• To enter "p"
Dial Pause Setting
Advanced Settings
B Enter dialling data
C Press
16-2
(OK)
(OPTIONS) and
select Send Pause Dial
Tip
• Dialling during a call or after a phone number entry can also
send push tones.
■ Displaying the duration during a call
Displaying the duration during a voice
call
Select the type of duration from Current Call, Outgoing Calls,
All Calls and Off.
Set a call handling operation performed when the handset is
closed.
[Default] ■End The Call
[Default] ■Current Call
A Select
Setting a Call Handling Operation When
the Handset is Closed (Close Setting)
(Settings) from the Main Menu →
Call Settings → Common Setting → Call Time Info.
A Select
(Settings) from the Main Menu →
Call Settings → Voice Call → Close Setting
B Select an item
→ Call Timers
B Select an item
Displaying the duration during a video
call
Select one of the followings:
• Mute: Mute sound.
• Hold: Put a call on hold.
• End The Call: End a call.
When Mute or Hold is set, open the handset again to return to the
call.
[Default] ■On
A Select
! Call handling operations
(Settings) from the Main Menu →
B Select On in Call Timer Setting
16
Note
• When a stereo microphone is connected, Close Setting does
not work. To enable this setting, press
(OPTIONS) and
select Unmute, etc.
16-3
Advanced Settings
Call Settings → Video Call → Video Call Options
• When the handset is closed during a video call, the call ends.
If it is closed during a video call using a stereo microphone
and the camera image, a substitute image is sent to the other
party.
■ Making calls with a single operation
Press the switch on a stereo microphone to make calls to the
Phone Book contact with Memory No. 001.
Using a Stereo Microphone
Open the earphone jack cover and insert the microphone
plug into the jack to use a stereo microphone.
■ Using the speaker
Make the speaker emit sound as well as the earphone when a
stereo microphone is connected.
[Default] ■Handsfree Only
A Select
(Settings) from the Main Menu →
Call Settings → Common Setting → Handset
B Select an item
16
A Press the switch for 1+ seconds
B Press the switch for 1+ seconds again to end
the call
Tip
• If e-mail address or URL has priority on the Phone Book contact of Memory No. 001 by Set As Default (zp.5-7), pressing
the switch activates a message screen or website.
■ Receiving calls with a single
operation
A Press the switch for 1+ seconds while the
handset is ringing
B Press the switch for 1+ seconds again to end
Advanced Settings
the call
16-4
! Notes on using a stereo microphone
• Insert the microphone plug into the earphone jack securely.
Failure to do so may cause you to hear no sound.
• You may receive a call if connecting a stereo microphone while
the handset is ringing.
• When you carry on your handset with a stereo microphone in
the bag, pulling out the microphone plug is recommended so
as to avoid pressing the switch and making a call by accident.
Sending Push Tones
Set Send Tones to On to send push tones during a call.
[Default] ■On
A Select
(Settings) from the Main Menu →
Call Settings → Common Setting → Send Tones
B Select an item
■ Receiving calls automatically
(Auto Answer)
Set Auto Answer to answer calls automatically when a stereo
microphone is connected. Set On for this setting to automatically answer a call in five seconds after the handset starts ringing.
A Select
(Settings) from the Main Menu →
Phone Settings → Sound/Mode
16
Driving), press
(EDIT)
C Select Other Settings and set Auto Answer to On
D Press
(OK)
16-5
Advanced Settings
B Highlight a mode (Normal, Meeting, Outdoor or
16
Advanced Settings
16-6
Optional Services
17
Optional Services Overview
Using Optional Services
The following optional services are available:
Set services using menus, service codes or landlines.
Optional Services
Service
Description
Call Barring
Block incoming/outgoing calls or SMS.
Caller ID Notification
Notify the other party of your Caller ID or check
the other party's Caller ID.
Caller ID Information Check the setting for the caller's Caller ID.
Call Forwarding
Forward an incoming call to a specified phone
number. To use the Voice Mail service, select the
Voice Message Centre phone number as a forwarding number.
Voice Mail
Let the caller leave a message in the Voice Message Centre when you cannot answer an incoming call.
Missed Call Notification function
Customers with Voice Mail turned on will automatically receive free SMS notifications on
calls they receive while their handset is turned
off or out of range.
Call Waiting*
Put the current voice call on hold, and answer an
incoming voice call from a third party. You can
switch between the calls.
Group Talk*
Make a call to another party during a call. Up to
six people can talk on the same call.
* A separate subscription is required.
For information on services, contact Customer Service (zp.30-38).
17-2
■ Using the menus
See below for Call Barring, Caller ID notification, Call Forwarding, Voice Mail and Call Waiting.
■ Entering the service codes
A Enter a service code and press
Service
Voice Mail/
Call Forwarding
Option
Activate
Service code
Deactivate
Call Waiting
Call Barring
→Condition code*1→
Activate
→
→
Deactivate
→
→
■ Operating from a landline
Even when the handset is not in your hand or in range, the settings can be changed from a landline. For information on the
operations, contact Customer Service (zp.30-38).
Activate
→Options code*3→
work Password→
→Net-
Deactivate
→Options code*3→
work Password→
→Net-
Change
code
17
→
→
→
→
→Current
→New NetNetwork Password→
→New Network
work Password→
Password→
*1 Condition code
All Calls:
If Busy:
If Unreachable:
If No Answer:
*2 Incoming call type
Voice Calls:
Video Calls:
*3 Options code
All Calls:
17-3
Optional Services
→
→Condition code*1→
→
→Forwarding number→
Incoming call type*2→(Only If No
Answer
→Ring Duration 5, 10, 15,
20, 25, 30)
International Calls:
Except Local & Home:
All Calls:
All If Roamed:
Call Barring
17
■ Blocking incoming/outgoing calls
A Select
Block incoming/outgoing calls or SMS.
Optional Services
Option
Outgoing
(Voice)
(Video)
(SMS)
Incoming
(Voice)
(Video)
(SMS)
Description
Deactivate
Deactivate Call Barring.
Except Local &
Home
Block outgoing calls/SMS to areas
other than home (service area of the
provider you subscribe to).
International
Calls
Block international calls or SMS.
All Calls
Allow emergency calls only.
Deactivate
Deactivate Call Barring.
All If Roamed
Block incoming calls or SMS in areas
other than home (service area of the
provider you subscribe to).
All Calls
Call Settings → All Calls → Call Barring
B Select Outgoing Voice/Video/SMS or Incoming
Voice/Video/SMS
C Select an item
D Enter the Network Password and press
Block all calls or SMS.
The Network Password (a 4-digit number set at subscription) is
required to be entered.
Note
• If the Network Password is entered incorrectly three times in
a row, Call Barring settings are locked and you need to
change Network Password and Centre Access Code to
unlock. For details, contact Customer Service (zp.30-38).
• While Call Forwarding or Voice Mail is activated, All Calls is
unavailable.
17-4
(Settings) from the Main Menu →
(OK)
Tip
• To check the settings
aPerform Step 1 and 2
b Press
(CHECK)
■ Cancelling all restrictions
A Select
(Settings) from the Main Menu →
Caller ID Settings
Set whether to notify the other party of your Caller ID.
17
B Select All CB Stop
C Enter the Network Password and press
■ Send Caller ID
A Select
(Settings) from the Main Menu →
Call Settings → All Calls → Caller ID
(OK)
B Select Send
■ Changing Network Password
A Select
(Settings) from the Main Menu →
Call Settings → All Calls → Call Barring
B Select Set NW Password
C Enter the current Network Password
D Enter a new Network Password
E Re-enter the new Network Password
■ Block Caller ID
A Select
(Settings) from the Main Menu →
Call Settings → All Calls → Caller ID
B Select Withhold
Tip
• The Caller ID notification setting set using the menu is
retained until the setting is changed, All Reset or Memory
Reset is performed, or the SIM card is replaced.
17-5
Optional Services
Call Settings → All Calls → Call Barring
■ Network Default
17
A Select
(Settings) from the Main Menu →
Optional Services
Call Settings → All Calls → Caller ID
B Select Network Default
■ Manually Send Caller ID
Display Caller ID
Your handset will display the incoming caller's Caller ID (unless
you requested otherwise at time of subscription).
■ Confirm Subscription Status
A Select
(Settings) from the Main Menu →
Call Settings → All Calls → Caller ID Info.
A Press
B Enter a phone number
Call Forwarding
C Press
The following are the Conditions:
To make a video call
Press
(VID. CALL)
Condition
Description
All Calls
Forward all calls. The ringtone does not sound and
the missed call indicator does not appear.
If No Answer
A Press
Forward a call if the call is not answered within the
set Ring Duration.
If Busy
Forward a call during another call.
B Enter a phone number
If Unreachable
Forward a call when the handset is turned off or out
of range.
■ Manually Block Caller ID
C Press
To make a video call
Press
17-6
(VID. CALL)
■ Activating Call Forwarding
Set a forwarding number for each Condition. Call Forwarding
Note
• Video calls cannot be forwarded to the Voice Message Centre
phone number.
A Select
(Settings) from the Main Menu →
Call Settings → All Calls → Voicemail/Diverts
B Select Diverts setup
! Forwarding manually
If If Busy is selected, a call can be manually forwarded by pressing
(OPTIONS) and selecting Diverts while the phone is ringing. If
Call Waiting is activated, the same operation is available while the
Call Waiting alert tone sounds.
C Select Voice Calls or Video Calls
D Select an item from Condition
E Select Diverts Calls To and enter a forwarding
■ Deactivating Call Forwarding
Deactivate the service for each incoming call type.
number
To set the Ring Duration for If No Answer
aSelect Ring Duration
bSelect the duration
F Press
(UPDATE)
Tip
• To use the Phone Book to select a forwarding number
Press
(FIND) on the Diverts Calls To screen, and select Phone
Book.
• To check the settings
A Select
(Settings) from the Main Menu →
Call Settings → All Calls → Voicemail/Diverts
B Select Diverts setup
C Select Voice Calls or Video Calls
D Select Diverts Off from Condition
E Press
(UPDATE)
F Press
(YES)
cPerform Step 1 and 2
dPress
17-7
17
Optional Services
and Voice Mail cannot be set at the same time.
B Select Diverts setup
Tip
• To deactivate all forwarding services
17
C Select Voice Calls or Video Calls
aPerform Step 1
bSelect All Deactivate and press
(YES)
Optional Services
■ Checking settings automatically
The forwarding settings (zp.17-6) can be automatically
checked when the handset is turned on or the menu is
D Select an item from Condition
E Select Diverts Calls To
F Press
(FIND) and select Voicemail Centre
G Press
(UPDATE)
launched.
[Default]
■ Playing Voice Mail messages
■Off
A Select
(Settings) from the Main Menu →
Call Settings → All Calls → Voicemail/Diverts
B Select Auto Check
C Select an item
To use the Voice Mail service, set the Voice Message Centre
phone number as a forwarding number for the Call Forwarding
service.
(Settings) from the Main Menu →
Call Settings → All Calls → Voicemail/Diverts
17-8
have a message,
appears on the display, and
on the
external display.
A Select
(Settings) from the Main Menu →
Call Settings → All Calls → Play Voicemail
B Select Listen to Vo-mail and press
Voice Mail
A Select
Play messages stored at the Voice Message Centre. When you
(YES)
■ Setting the Voice Message Centre
number
Receive SMS notifications on calls you receive while the hand-
■1416
A Select
set is turned off or out of range. Also receive notifications on
(Settings) from the Main Menu →
voice messages left during a call.
Call Settings → All Calls → Play Voicemail
Setting Missed Call Notification
B Select V-mail Centre No.
C Select V-mail Centre(ho.) or V-mail Centre(ab.)
D Enter a phone number and press
A Press
and then
(OK)
Tip
• The number is automatically set to V-mail Centre(ab.) while
roaming.
B Follow voice instructions to activate or deactivate the service
Tip
• To set from a landline
Dial 090-665-1414
• To set from overseas
Dial +81-90-665-14191
17-9
17
Optional Services
[Default]
■ Activating/Deactivating Missed Call
Notification
Call Waiting
17
A subscription is required.
Optional Services
■ Activating/deactivating Call Waiting
A Select
(Settings) from the Main Menu →
Call Settings → All Calls → Call Waiting
B Select Activate or Deactivate
Tip
• If the current call ends while another call is waiting
Press
(RETRIEVE) to retrieve the call on hold.
• If you are on a call, another call is waiting, and then another
call is incoming
Press
or
(ANSWER) to end the current call and answer
the incoming call.
• To reject an incoming call
Press
(OPTIONS) and select Reject.
Note
• Call Waiting is unavailable for a video call.
Tip
• To check the settings
cPerform Step 1 and 2
d Press
(CHECK)
■ Answering another call while on the
phone
Put the current voice call on hold and answer an incoming
voice call. You can switch between the calls.
A When you hear the alert tone, press
or
(ANSWER) to answer another call
To switch between the calls
Press
17-10
(SWAP)
A When a call is connected between you and
Group Talk
the other party, press
A fee-based subscription is required.
(OPTIONS) and
17
select Join Calls
ple can talk on the same call.
Tip
• Up to six people including you can join a Group Talk. If receiving a call from/making a call to the seventh party, five people
excluding you are put on hold.
An international call can also be made.
■ Launching a Group Talk
A Press
(HOLD) during a call
B Enter a phone number and press
C When a call is connected between you and
the other party, press
(OPTIONS) and
select Join Calls
Talking to specific people
You can talk to specific people only during a Group Talk. The
selected parties are regarded as disconnected from the Group
Talk.
A Press
(OPTIONS) during a talk, and
select Drop or Split Call
Tip
• A non-subscriber to the service can join a Group Talk.
Talking to two or more parties simultaneously
B Select parties from the participant list
C Press
(SPLIT)
To disconnect the selected parties
Press
(DROP)
If receiving a call or making a call to another party during a
Group Talk, you can talk with the parties simultaneously.
17-11
Optional Services
Make a voice call to another party during a call. Up to six peo-
Tip
17
• While talking to specific parties, the other parties are put on
hold. To switch between hold and talk, press
(SWAP).
Optional Services
• To retrieve parties regarded as disconnected, press
(OPTIONS) and select Join Calls.
17-12
Vodafone live!
Vodafone live! Basics
! Mail art function
To attach multiple files to MMS, add a slide for each file attachment. (zp.20-6)
■ Vodafone live!
18
Vodafone live!
Use Vodafone live! services to exchange multimedia messages
with compatible handsets and download sounds, images, Vappli and browse the Mobile Internet. For information on communication fees, contact Customer Service (zp.30-38).
Mail
MMS(Multimedia Messaging Service)
Use MMS to exchange text messages, images, sounds and
videos with Vodafone handsets, e-mail compatible handsets
and PCs.
*Separate subscription is required to use MMS.
SMS(Short Message Service)
This message service is available for communication between
Vodafone handsets using a phone number for an address.
Tip
• Retry function
If handset is turned off or out of the service area, messages are
stored at the Service Centre and automatically resent.
18-2
Tip
• When attaching videos
You cannot attach the image or sound files together with the video
files.
Web
■ Retrieving network information
Access a wide variety of contents and view pages or download
pictures and sounds on your Vodafone handset.
*Separate subscription is required to use Web.
Access from menus
and retrieve the contents.
retrieve the network information.
A Select
(Settings) from the main menu →
Connectivity → Network Setup → Retrieve NW Info
B Press
(YES)
Mobile Internet
Enter URL and access a Mobile Internet site.
V-appli
V-appli is a Java™-based application dedicated for Vodafone
handset.
*Additional fees are required when downloading V-appli from
websites or using a network-connected type.
To download V-appli
Use the web service to download V-appli from the websites.
To enjoy V-appli
Connect to the network to play a game or retrieve real-time
information.
18-3
18
Vodafone live!
From the Vodafone live! menu, select the item you want to read
To use Vodafone live!, connect to the Service Centre and
Customising handset address
Change the account name (alphanumerics before @) to
reduce the risk of receiving spam.
18
C Select User Support
D Select Messaging Setting
Vodafone live!
The initial account name is a random set of alphanumeric letters.
*Change handset address up to three times within a 24 hour period. You
are limited to a total of 99 changes.
E Move the cursor down to Go to setup and press
<Example>
Initial account name:
[email protected]
F Select English
↓
Customised account name:
[email protected]
H Select Messaging settings
G Input your Pin number and Press OK
The following apply.
*
B Select English
Character count: 3 to 30 single-byte letters
Accepted characters: Single-byte alphanumerics, underscore,
hyphen and period.
*
No numeric characters can be used for the first letter of the
account name.
*
No spaces can be used.
*
Case insensitive
(Example: VODAFONE=Vodafone=vodafone)
*
No dots can be used as the last letter of the account name
(preceding @). Two or more periods in series may prevent from
sending or receiving a mail on some providers.
*
No names related to our company or service can be obtained.
A Press
18-4
(
)
I Select Email address
J Input the email address you want to change
and press OK
Note
• Web information may be updated and the setting procedures
may change without notice. For details, contact Customer
Service (zp.30-38).
Receiving Messages
Checking a New Message
Tip
●
When you set the automatic filter, the User folder may be displayed instead of Inbox.
●
Desktop icon appears
appears when you receive a new message. If you confirm all
notice lists or view the Inbox lists,
disappears.
A desktop indicator notifies you of a new message.
A Press
19
on the standby screen and select
the new message indicator
Receiving Messages
■ Checking messages on the external
display
Inbox list screen
Check messages on the external display when the handset is closed.
When a message arrives, ring tone sounds and notification appears
on the external display. When setting Receiving Messages to On for the
external display, the name and address of the sender are displayed for
15 seconds and the receipt time is indicated.
B Select a message
When setting Receiving Messages to Off for the external display, the
name and address of the sender are not displayed (zp.8-3).
Message screen
19-2
■ Retrieving MMS
The initial text portion of MMS is delivered as a notification in
the following cases.*1
MMS exceeds 128 double-byte characters.
●
There are attached files
●
When Auto Receive function is not set*2
●
Handset memory is full*3
●
During a video call
●
During packet communication with an external device
connected
B Select a new message with
on Inbox
19
Inbox list screen
C Press
*1 When MMS is stored at the service centre or you have
an unread message,
appears at the top of the
screen.
*2 Set Auto Receive to automatically receive the complete
MMS.
*3 When handset memory is full, reception notification cannot be received. Delete unnecessary messages/files,
press
(
) and select Server Mail to download
unretrieved messages.
(RECEIVE)
Message screen
Perform the following steps to retrieve the complete
message.
on the standby screen, and select
the message
Receiving Messages
●
A Press
Tip
●
When the message appears confirming the network connection has been established on operation during roaming, press
(YES).
19-3
■ Using the received message
You can reply (zp.21-6) or forward (zp.21-7) a
message using the received message.
19
Receiving Messages
19-4
Sending Messages
Creating a message
Choose a message type (MMS/SMS) by purpose.
Entry field
The following shows the available entry field per message
type.
Message
20
type
Field
Text
Address
Sending Messages
Subject
Attachment
ー
ー
MMS
SMS
* Address field must be entered.
* Attach files to create slides. (zp.18-2、p.20-6).
MMS screen
SMS screen
Tip
Text size
●
Address
Use phone numbers or e-mail addresses for MMS and phone
numbers for SMS.
●
Total number of addresses
Enter up to 20 addresses for MMS and only one for SMS.
The following table shows the maximum number of characters per message type.
Message type
MMS
SMS
Text size
About 3,400 double-byte or 10,000 single-byte
characters
Note: Total message size (including text, attachments and subject field) cannot exceed 300 KB.
70 double-byte characters (under 140 singlebyte characters) when message includes both
single-byte and double-byte characters. 160 single-byte characters when entire message is
composed in single-byte characters.
Sending a message
A Press
select
(
) on the standby screen or
(messaging) from the Main Menu
B Select Create Message
C Select the message type
D Enter the address
20-2
E Complete the
optional items
F Press
necessary
information
in
D Press
(SEND)
■ Selecting Message type
●
To quote the address from the phonebook
Follow any steps below
・Highlight <New Address> on the address screen to press
(OPTIONS), and then select Open Phone Book
) on the standby screen
(Messaging) from the main menu
20
・Move the cursor to the address field on New Message and press
To use the main menu
Press
(OK) to
・Press
●
(ADDRESS) on New Message
To change the added address type (Cc/Bcc)
aMove the cursor to the address field and press
B Select Create Message
bHighlight the address to be changed
(OPTIONS), then select Address Type
C Select MMS or SMS
and
press
cSelect the type
■ Entering Address
●
Adding more addresses
Up to 20 addresses including Cc or Bcc can be set.
Cc and Bcc are used to send a copy of message. The phone number or message address specified to Cc is displayed on the
message. However, those to Bcc are not displayed.
●
To change address
Enter the address on the message screen.
A Move the cursor to the address field on New
Message, and press
B Highlight <New Address>
C Press
and enter the address
aMove the cursor to the address field and press
bHighlight the address to be changed
(OPTIONS), then select Change
and
press
20-3
Sending Messages
Only one address can be enter for SMS.
message screen appears.
(
or
Tip
●
Select MMS or SMS on the message type screen and a
A Press
then press
go back to on New Message
●
To delete address
■ Sending
aMove the cursor to the address field and press
bHighlight the address to be
(OPTIONS), then select Delete
20
deleted
and
press
■ Entering Subject
Sending Messages
A Move the cursor to the subject field on New
A Press
(SEND) on New Message
Tip
●
To stop sending a message
Press either
,
(Cancel) or
on the Sending screen.
The cancelled message is stored in Drafts.
Message and press
B Enter the subject
C Press
to return to New Message
! New Message screen
The following menus are available on New Message.
Options may be greyed out in some situations.
Option
■ Entering Text
A Move the cursor to the Text field on New Message and press
B Input texts
C Press
to return to the new message
Edit message.
Send
Send message.
Save
Stores message on Drafts
Take Photo
Start Camera to shoot a picture for attachment.
Take Video
Start Camera and take a video for attachment.
Message Type
Change the message type from SMS to MMS.
Send Option
Set Priority, Delivery Report, Delivery Time
and Validity Period.
3D Pictogram
Show the input 3D pictogram as your confirmation. Use this option before sending the message to 3D-pictogram-compatible handset.
screen after
20-4
Description
Edit
File Attachment
Images, sounds and videos can be attached to the MMS
message. 300 KB per one message can be sent including
! Options on file attachment
When a file is already attached, you can add another file on SMIL
Comp. The following Options are available in this screen. Options
may be greyed out in some situations.
Option
the total data size of texts, addresses, subjects and attached
Change
files.
A Move the cursor to the attachment field on
New Message and press
Delete
Delete the attached file.
Add
Attach a file.
Take Photo
Shoot a picture to be attached.
Take Video
Take a video to be attached.
Show/Play
Show or play the attached file.
B Select a file
Tip
●
Adding attachments
When attaching two or more files, choose either Presentation Format (zp.20-6) or Text Format.
Note
●
20
Sending Messages
■ Files from Data Folder
Description
Change the attached file to another file.
Some contents cannot be sent as MMS attachments due to
content copyrights (content key).
20-5
Creating slides
To add a picture
Select Image to choose an image from Data Folder.
■ Adding slides
To add sound
Select Sound to choose a sound file from the music
20
When you attach the second file from New Message, select-
folders of Data Folder
ing Presentation Format opens the SMIL Comp. screen.
To add video
Sending Messages
On SMIL Comp. you can add slides one file before or after
Select Videos to choose a video from Data Folder
the attached file and edit those slides.
To add text
Select Text to input messages.
D Press
(SAVE)
Note
SMIL Comp. screen
Preview screen
A Attach the additional file on New Message
where the first file is already attached.
B Select Presentation format
C Select any file to be added from Data Folder
20-6
●
Check that the other party’s handset supports the presentation format beforehand. If not support, images, sound and
texts in presentation format are a normal attachment.
●
Videos cannot be added to the same slide containing images or
sound. If adding videos, use another slide or delete the image
or sound.
! Options on SMIL Comp.
The following options are available on SMIL Comp.
Option
Description
Delete Item
Delete input data or file from the
selected item.
Add Slide
Add a new slide after the edited slide.
Option
Description
Send Option
Insert Slide
Add a new slide before the edited
slide.
Delete
Delete the edited slide.
set in Settings (zp.23-4) when you send the message. This
Preview This Slide
Preview the edited slide.
option makes only one message available for change.
Preview
Preview all the slides.
Set the details (Text Colour and Background Colour) on each slide.
■ Slide interval
Option
Priority
Display or sort according to priority is available depending on the compatible receiver.
Delivery Report
Confirm arrival of the sent message with the
delivery report.
Delivery Time
Set the time interval for sending a message.
The message is stored on the mail server
until the set interval elapses.
Validity Period
Set the time that the message server keeps
the message. The message is delete after the
set time elapses.
Set the time interval between slides. A range from 1 to 10
seconds can be set.
20
Description
A Move the cursor to the Play Time field on
SMIL Comp.
B Press
or
to set the time interval
A Press
(OPTIONS) on New Message and
select Send Option
B Select item to set value
To set priority
aSelect Priority
bSelect any value
To set the delivery report
aSelect Delivery Report
20-7
Sending Messages
Slide Options
Using Send Option allows you to change the following options
bSelect any value
Drafts
To set the delivery time
aSelect Delivery Time
Save unsent messages to Drafts (zp.21-2). Messages
bSelect any value
saved to Drafts can be edited and sent at a later time.
To set the validity period
20
Sending Messages
aSelect Validity period
bSelect any value
Note
●
Stored messages are automatically deleted from the mail
server after the maximum storage time elapses even when
the validity period is set.
●
Validity Period and SMS Report Request can be set for SMS.
20-8
A Press
select Save
(OPTIONS) on New Message and
Mail Box
Checking Messages
Message list screen
Messages are stored and organized in the mail box and you
Date received
can check them at any time. Mail box is a generic term used
21
Mail Box
to refer to Inbox, Outbox, Drafts, Sent Messages and Mail Fold-
Sender or address
ers.
Message icon
Each folder contains messages according to the type.
Folder
Mail
Inbox
Contain delivered messages.
Outbox
Contain messages failed to be sent.
Drafts
Contain messages that could not be sent.
Sent Messages
Contain sent messages.
Mail Folders*
*
Contain messages automatically sorted or
moved manually from Inbox.
There are 10 Mail Folders (User Folder1 to 10). These folder
names can be changed.
■ Checking message list
A Press
(
) on the standby screen
From the main menu
Select
(Messaging)
B Select a folder
C Select any message on the message list
21-2
Inbox list screen
Indicators for message
:
Unread messages
:
Read messages
:
Replied message
:
Diverted message
:
Protected message
:
Message with attachment file
:
Unsent message stored in the mail server
:
High priority message
:
SMS
:
Sent SMS
:
Sent SMS (request report)
:
Message stored in the USIM card
:
Sender
:
Address
*
Tip
●
To check details such as time stamp
Highlight a message on the message list screen and press
(OPTIONS).
If you click the Image box on Automatic Play, an image is displayed
after the message. (zp.23-3)
Slides
The slide-style messages automatically start playing after
■ Operations on the message screen
A Select a slide-style message on the message
list
To pause during image playing
(Pause)
Press
Content
To resume playing
Press
(Resume)
To start playing from the beginning
(Play)
Press
SMS or MMS without attachments
* Subject is available for MMS.
Tip
●
To change in manual playing
aPress
(
) on the standby screen, or select
saging) from the Main Menu
Attachment file
bSelect Settings → MMS Settings → Receive Options → Automatic Play, and uncheck the Slide box
Content
c Press
●
MMS with attachments
(Mes-
(OK)
To mute the sound
Press either the
to
,
or
key.
21-3
Mail Box
Message screen
21
the message screen is displayed.
Folder Management
! OPTIONS on the message screen
The following operations are available using option items. Dis-
There are 10 Mail Folders for the received messages for
played items may vary depending on the message status.
Option
sorting and storing messages.
Description
21
Show Focus Item
Display the
address.
Mail Box
selected
item
such
as
Save SMIL Contents
Save as an attachment for a slide-style
message.
Mail Folders contain User Folder1 to User Folder10 at default.
Reply
Edit a reply message to the sender.
You can change those folder names as you like.
Reply All
Edit a reply to the sender and all other
addresses.
A Press
Forward
Forward a message to other addresses.
Move
Move a message to another folder.
Delete One
Delete a selected message.
Anchor to...
Run phonebook entry, bookmark addition,
message transfer, voice calls, video calls
and browser.
Message Details
Show message details.
Font Size
Select font size (large, medium or small).
Previous
Show the previous message.
Next
Show the next message.
3D Pictogram
Show 3D graphics for pictograms and
texts.
Protection
Prevent messages from being deleted by
accident. Protected messages are to be
unprotected.
21-4
■ Changing folder names
(
) and highlight Mail Folders
From the Main Menu
Select
(Messaging) → Mail Folders
B Highlight User Folder and press
(OPTIONS) and select Rename
C Enter the folder name
D Press
■ Move messages to other folders
A Press
(
■ Automatic sorting to a specified
folder
)
You can automatically sort messages to a specified folder
From the Main Menu
Select
according to the address.
(Messaging)
)
B Highlight the user folder to be automatically
To move a received message
Select Inbox
sorted
To move messages under user folders
To use the main menu
Select the user folder under Mail Folders
C Highlight
(
a
message
and
Select
press
(OPTIONS), then select Move
D Select a destination folder
(Messaging) and select the user folder to
be automatically sorted.
C Press
(OPTIONS) and select Mail Distrib-
ute
To add sorting conditions
Tip
●
Messages under Inbox can be moved to Mail Folders and the
USIM card. However, SMS is only available for moving to the
USIM card.
●
Messages under the user folder can be moved to the other
user folder and Inbox.
●
Note that SMS is not available for moving to the USIM card if
is indicated on the top of the screen.
aPress
(OPTIONS) and select Add
bEnter the address
To refer to the phonebook
aPress
(OPTIONS) and select Open Phone
Book
To delete the sorting conditions
aHighlight the address
bPress
(OPTIONS) and select Delete
21-5
Mail Box
A Press
B Select a folder
21
To reply to the sender and all addresses
To delete all the sorting conditions
aPress
To change the sorting conditions
aHighlight the address
bPress
21
Select Reply All
(OPTIONS) and select Delete all
(OPTIONS) and select Change
D Select the message type if displayed
E Create and send the message
Mail Box
Tip
Tip
●
Sorting is performed using an address set to the user folder. If
two or more user folders has the same criteria, a message is
sorted to the user folder set first.
Reply Message
A Press
(
)
From the Main Menu
Press
(Messaging)
B Select a folder
To reply to a received message
Select Inbox
To reply to the message under the user folder
Select a folder under Mail Folders
C Highlight a message and press
(OPTIONS) to select Reply
21-6
●
When you create a message using Reply, the address field
already contains the address to be sent and Re: is applied at
the beginning of the subject quoted from the original message.
●
Selecting Reply displays the message type screen. However, if
the address to be returned is an email address type containing
the @ mark, no message type screen appears and New Message for MMS opens.
Forwarding Message
A Press
nal message. Attachments are also diverted except those that
cannot be forwarded.
●
(
)
From the Main Menu
Select
The message type is the same as the original for Forward.
However, if an original is a non-SMS-transferable type, MMS
message type is selected.
21
(Messaging)
To forward a received message
Select Inbox
Message from Outbox
A Press
(
) and select Outbox
From the Main Menu
To forward a message under the user folder
Select
Select a folder under Mail Folders
(Messaging) and select Outbox
C Highlight a message
B Select a message
D Press
C Press
(OPTIONS) and select Forward
E Create and send a message
Mail Box
B Select a folder
●
(OPTIONS) and select Send
To edit unsent messages before sending
Highlight a message on the message
(OPTIONS) to select Edit
list
and
press
Tip
●
When you create a message using Forward, the subject with
Fw: at the beginning and the content are quoted from the origi-
21-7
Message Protection
The protected message is displayed with
A Press
21
(
Message Deletion
in the list.
)
To use the main menu
Mail Box
Select
(Messaging)
B Select a folder
To protect a received message
Select Inbox
To protect a sent message
Select the Sent Messages
To protect a message under the user folder
Select a folder under Mail Folders
C Select a message to be protected
D Press
(OPTIONS) and select Protection
Tip
●
When the selected message in Step 3 has already been protected, protection is cancelled in Step 4.
Note
●
Messages under Outbox and Drafts cannot be protected.
●
Memory Reset or All Reset deletes all protected messages.
21-8
■ Delete a specified messaged
A Press
(
)
From the Main Menu
Select
(Messaging)
B Select the messages box
To delete a received message
Select Inbox
To delete a sent message
Select Sent Messages
To delete a message under the user folder
Select a folder under Mail Folders
To delete a draft message
Select Drafts
To delete an unsent message
Select Outbox
C Select a message
D Press
(OPTIONS) and select Delete One
■ Delete all the messages under message box or folder
You can delete all messages, message boxes or folders.
A Press
(
)
Select
(Messaging)
For protected message
Not deleted.
●
To delete all messages under all message boxes and folders
aPress
(
bPress
(OPTIONS) and select Message Reset
)
21
cEnter the current handset code
Mail Box
To use the main menu
Tip
●
Note that no SMS is deleted on the USIM card.
B Select the message box or folder
To delete a received message
Select Inbox
To delete a unsent message
Select Outbox
To delete a sent message
Select Sent Messages
To delete a message under the user folder
Select a folder under Mail Folders
To delete a draft message
Select Drafts
C Press
(OPTIONS) and select Delete All
D Enter the current handset code
21-9
21
Mail Box
Using Phone Number, Email
Address and URL
■ Phone to, Message to, and Internet
access
Using selectable phone numbers, email addresses and
A Follow the steps on the message detail
URLs allows you to add a phonebook entry, send a message
screen for using the phone number, email
and access the Internet.
address and URL
■ Phonebook entry
A Highlight the phone number or email address
on the message detail screen
B Press
(OPTIONS) and select Anchor to...
→Add to PB
C Follow the steps in phonebook entry(zp.53)
To make a voice call or video call
aSelect the phone number
bSelect Phone Call or Video Call
To send a message
aSelect an email address
bCreate a new message
To send a message using the phone number
aHighlight
the
phone
and
press
bSelect Anchor to... → Message to...
cSelect the message type and create a message
To access the Internet
Highlight the URL and press
21-10
number
(OPTIONS)
To add the bookmark entry
aHighlight the URL and press
(OPTIONS) to
Using attachments
select Anchor to...
bSelect Add Bookmark
URL to... operation
Some selected URL (beginning with rtsp://) may start the streaming such as videos, sounds and music. (zp.25-3)
You can view or play image or sound files attached to the
21
received MMS.
Mail Box
Tip
●
■ Check attachments
A Highlight attachments on the message detail
screen and press
(OPTIONS)
B Select Show Focus Item
To check two or more attachments
aHighlight the attachment to be checked from the
attachment list and press
(OPTIONS)
bSelect Show/Play
Tip
●
If the contents key is required for playback, save the file in the
data folder and follow the operation to obtain the contents
key.(zp.25-3)
21-11
■ Save in data folder
A Highlight attachments on the message detail
screen and press
21
(OPTIONS) and select
■ Sort messages
Show Focus Item
Mail Box
B Highlight the attachments on the attached
list screen and press
(OPTIONS) and
select Save
Tip
●
Operation from Message detail
screen
For the same file name
Sequential number is automatically added to the file name.
You can rearrange the message order by date and address.
A Press
(
)
From the Main Menu
Select
(Messaging)
B Select a folder
C Press
(OPTIONS) and select Sort
D Select any item
To arrange by date
Select either Date↑(ascending) or Date↓(descending)
To arrange by address
Select either Address ↑ (ascending) or Address ↓
(descending)
! OPTIONS on the message list screen
The following operations are available using option items. Displayed items may vary depending on message status.
21-12
●
Inbox/Mail Folders
Option
Option
Description
Open
Open a highlighted message for view or edit.
Reply
Open a return message.
Open a return message to all.
Forward
Divert a message.
Move
Move a message to the other folder or the USIM
card (SMS only).
Rearrange message order by date or by
address.
Filter
List messages by type specified with Show All,
SMS, MMS or High Priority.
●
21
Sent Messages
Option
Description
Open
Open the highlighted message for viewing or
editing.
Edit a message.
Delete One
Delete one message.
Delete All
Delete all messages.
Edit
Sort
Rearrange message order by date or by
address.
Move
Move SMS to the USIM card.
Delete One
Delete one message.
List messages by type specified with Show All,
Read, Unread, SMS, MMS, MMS Notification or
High Priority.
Delete All
Delete all messages.
Sort
Rearrange the message order by date or
address.
Filter
List messages by type specified with Show All,
SMS, MMS or High Priority.
View Report
Display the delivered report.
Protection
Prevent the message from being deleted by
accident. If the message is protected, protection is cancelled.
Filter
Change
Unread
Read/ Change message status to Read or Unread.
Protection
●
Prevent a message from being deleted by accident. If a message is protected, protection is
cancelled.
Drafts/Outbox
Option
Edit
Description
Edit a message.
Delete One
Delete one message.
Delete All
Delete all messages.
21-13
Mail Box
Reply All
Description
Sort
! Mail Folder
Option
Open
21
Description
Open a user folder.
Change folder name.
Mail Distribute
Sort received messages by address or phone
number and put it into a specified folder automatically.
Mail Box
Rename
21-14
Mail Server
Using Message List
22
■ Message List Retrieval
Mail Server
If a new MMS contains more than 129 double-byte characters as text or includes attachments, up to 128 double-byte
characters (including address or subject) are delivered and
remaining messages are temporarily stored in the mail
server of the service centre according to either of the following cases. *1
●
A Press
Select
B Press
(Messaging) → Server Mail
(YES) for confirmation
Tip
2
No memory spaces in the handset*
●
During a video call
●
During packet communications through external
device
*1When MMS is stored in the service centre or there are
unread messages,
appears at the top of the screen.
*2 If no memory space is available in the handset, you
cannot receive notification. Delete unnecessary messages or files and press
(
) to run Server Mail to
receive messages.
When you retrieve the MMS list (message list) stored in the
●
When you have already retrieved the message list
You do not have to retrieve the message list again in Step 1.
●
To check mail server usage
Press
(OPTIONS) on the server mail screen and select Server
mail Capacity. To retrieve the latest information, press
(UPDATE).
! Options for server mail
The following options are available.
Option
Divert messages in the server to another
address.
Delete One
Delete messages from the server (Delete From
Server) or from the message list (Delete From
List)
Delete All
Delete all messages from both the message
list and the server.
Server Mail List
Display messages on the server as a list.
in the server.
For the storage time period in the mail server, refer to the 3G
Description
Forward
mail server, you can receive, delete and forward messages
22-2
) and select Server Mail
From the Main Menu
No automatic receive setting
●
guidebook.
(
Option
Description
Retrieve text and attachments for messages
not received on the handset and stored on the
server.
Receive All
Receive all messages on the server.
Message Details
Display Date, From, Subject and Size.
Server Mail
Capacity
Display the mail server usage.
■ Deleting MMS on the server using
message list
You cannot receive an MMS that has been deleted from the
server.
22
A Display the message list
B Highlight an MMS, press
select Delete One
■ Receiving MMS from message list
To delete a message and list on the server
A Display the message list
B Highlight an MMS and press
(OPTIONS) and
Select Delete From Server
To delete a message from the server message list
(OPTIONS)
Select Delete From List
to select Serv. mail Received
C Press
(YES)
Tip
●
Tip
To receive all MMS messages from the message list
aRetrieve the message list
bPress
(OPTIONS) on Server Mail Box and select Receive
All
Even when running Receive All, all MMS may not be received. In
this case, repeat Steps 1 and 2.
●
To delete an MMS on the message list and all messages on
the server listed on the message list
aRetrieve the message list
bPress
(OPTIONS) on Server Mail Box and select Delete
All
cEnter the current handset code and press
dPress
(OK)
(YES)
Even when running Delete All, all MMS may not be received. In this
case, repeat Steps 1 to 4.
22-3
Mail Server
Serv. mail
Received
Forwarding Messages on the
Server
A Display the message list
22
B Highlight MMS
(OPTIONS) and select
Mail Server
Forward
C Enter an address and Press
(SEND)
Tip
●
When you forward a message using Forward, the subject and
the content are quoted from the original message. Attachments are also forwarded except those that cannot be forwarded.
22-4
Other Mail Settings
Common to MMS/SMS
B Select Heading Text, Signature and Quote Indicator as necessary
C Select Insert or Not Insert and press
■ Scroll
To select Insert
Select the scroll block for the message screen.
[Default
A Press
(
) and select Settings, General
and Scroll Setting
From the Main Menu
Press
aMove down to the input field and press
bInput the heading text, signature or quote indicator
■Scroll One Line
(Messaging) and select Settings, General
and press
cPress
■ Font size
Select the font size for the message screen.
and Scroll Setting
B Select any value
[Default] ■Medium
A Press
23
■ Heading text/signature/quote indicator
Other Settings on
Messaging
(
) and select Settings and Gen-
From the Main Menu
Press
23-2
) and select Settings, General
From the Main Menu
(Messaging) and select Settings, General
and Font Size
eral
eral
(
and Font Size
Press
[Default] ■Not Insert
A Press
(OK)
(Messaging) and select Settings and Gen-
B Select the font size
MMS Settings
■ Automatic Play
Set auto play when opening message if images, sounds or
■ Auto Receive
slides is attached to the received message.
Set normal reception in Japan or roaming reception.
[Default] ■Home:Manual
■Roaming:Manual
A Press
(
) and select Settings, MMS Set-
tings, Receive Options and Auto Receive
From the Main Menu
Press
(Messaging) and select Settings, MMS Set-
tings, Receive Options and Auto Receive
B Click the box for Home or Roaming
For no automatic reception
[Default] ■Image:On
■Sound:Off
■Slide:On
A Press
(
) and select Settings, MMS Set-
tings, Receive Options and Automatic Play
From the Main Menu
Press
(Messaging) and select Settings, MMS Set-
tings, Receive Options and Automatic Play
B Click the box for Image, Sound or Slide
For no auto play
Clear the box.
23
Clear the box.
Other Settings on
Messaging
23-3
■ Creation Mode
■ Send Reports
Set the file attachment for non-MMS-standard and restric-
Set message report delivery when you receive MMS with
tions of additional files.
delivery confirmation.
[Default] ■Free
[Default] ■Send Reports
Create mode
Attached file
Restricted
Only MMS standard files can be
attached or added.
Free
Both MMS-standard and non-MMSstandard files can be attached or
added.
A Press
(
) and select Settings, MMS Set-
tings and Send Reports
From the Main Menu
Press
(Messaging) and select Settings → MMS
Settings → Send Reports
A Press
(
) and select Settings, MMS Set-
B Select any value
tings and Creation Mode
From the Main Menu
Press
23
(Messaging) and select Settings → MMS
Settings → Creation Mode
Other Settings on
Messaging
B Select any value
Tip
●
MMS-standard files
JPEG, GIF, WBM, 3GPP(voice AMR), SP-MIDI, vCalendar and
vCard
23-4
■ Validity Period
Set the storage time of the sent MMS on the mail server. Messages are deleted after the set time elapses.
[Default
■No Delete
A Press
(
) and select Settings, MMS Set-
tings and Validity Period
From the Main Menu
Press
(Messaging) and select Settings → MMS
Settings → Validity Period
B Select any value
Values to be set
Deliver Now, One Hour, Six Hours, Twelve Hours, One Day and One
Week
SMS Settings
Tip
●
Tip
●
Values to be set
No Delete, One Hour, Six Hours, Twelve Hours, One Day and One
Week
■ SMS Report Request
■ Delivery Time
Set the time period until MMS is sent. MMS is stored on the
mail server until the set time elapses.
Set request for the arrival confirmation when SMS is sent.
[Default] ■Not Request
A Press
(
) and select Settings, SMS Set-
tings and SMS Report Request
[Default] ■Delivery Now
From the Main Menu
A Press
(
) and select Settings, MMS Set-
tings and Delivery Time
23
Other Settings on
Messaging
From the Main Menu
Press
(Messaging) and select Settings → SMS
Settings → SMS Report Request
B Select any value
Press
(Messaging) and select Settings → MMS
Settings → Delivery Time
B Select any value
23-5
■ Validity Period
■ SMS Centre
Change the number for the SMS message centre. Do not
[Default] ■No Delete
change this number unless Vodafone tells you the number is
Set the storage time for SMS on the mail server. SMS is
deleted after the set time elapses.
A Press
(
) and select Settings, SMS Set-
tings and Validity Period
From the Main Menu
Press
(Messaging) and select Settings → SMS
Settings → Validity Period
B Select any value
Tip
●
23
Values to be set
No Delete, One Hour, Six Hours, Twelve Hours, One Day and Three
Days
changed. If you accidentally change this number, you cannot
receive SMS. The SMS message centre number is registered on your USIM card. Note that you cannot revert to
default setting.
[Default] ■+819066519300
A Press
) and select Settings, SMS Set-
From the Main Menu
Press
(Messaging) and select Settings → SMS
Settings → SMS Centre
B Press
and enter the SMS message cen-
tre number
Other Settings on
Messaging
C Press
23-6
(
tings and SMS Centre
and
(OK)
3D Pictogram Settings
Reset Settings
Certain characters, pictograms and face symbols in the message
body appear in 3D animation up to 150 characters. 3D pictogram
and colour are available for setting.
[Default] ■3D Pictogram: Unread msgs only
■Colour Settings: White
A Press
(
) and select Settings → General
■ Settings Reset
Initialise message settings or the user folder name, and
delete all messages stored in the mail box.
A Press
Press
B Enter the centre access code and press
(OK)
(Messaging) and select Settings → Gen-
eral → 3D pict. Settings
B Select 3D Pictogram or Colour Settings
C Select any value
Tip
Values to be set on 3D Pictogram
All messages, Unread msgs only, and Off
●
Values to be set on Colour Settings
White, Light Blue, Yellow, Rose, Green and Blue
C Press
(YES) on the confirmation screen
Note
●
Settings for the SMS message centre SMS cannot be
initialised even after resetting.
! Reset items
Menu
●
To send a message to a 3D-pictogram-compatible handset
Press
(OPTIONS) on New Message and select 3D Pitogram to
confirm 3D animation.
Item
General
Scroll Setting, Heading Text, Signature, Quote
Indicator, Font Size and 3D pict. Settings
MMS Settings
Receive Options, Creation Mode, Delivery
Report, Send Reports, Validity Period and
Delivery Time
SMS Settings
SMS Report Request
23-7
23
Other Settings on
Messaging
●
) and select Settings → Settings
Reset
→ 3D pict. Settings
From the Main Menu
(
23
Other Settings on
Messaging
23-8
Basic Web Operations
Before Using the Web
Cache (Temporary Memory)
Information obtained via the Web is saved in a temporary mem-
TLS/SSL
Transport Layer Security (TLS) and Secure Socket Layer (SSL)
use encoding technology to exchange data on the Internet for
higher security, and are normally used to exchange vital data
such as credit card numbers or personal information.
The handset incorporates electronic certificates (Root Certifi-
ory (cache). Information saved in the cache will not be deleted
when leaving the Web or turning the handset off. However, oldest information is overwritten automatically after the predefined space becomes full. When information expires, it is
deleted from the cache automatically.
To empty the cache manually, perform Clear Cache.
cates) issued by certification authorities by default. The con-
If a previously viewed Web page is opened, the copy of the
tents of certificates can be viewed.
page saved in the cache may be opened instead of the Web
page through the Service Centre.
! Notes on using TLS/SSL
24
You are solely responsible for use of TLS/SSL on a secured site
for your intended application and use.
Subject to the terms of any agreement between you and
Vodafone, the licensors VeriSign, Baltimore Technologies Japan
and Entrust Japan shall not be liable for any direct, indirect, special consequential, incidental, or punitive damages of any kind
whatsoever with respect to the use of TLS/SSL.
Basic Web Operations
24-2
Accessing the Web
■ Entering a URL
Enter a URL to access a Web page.
■ Accessing from the Vodafone live!
menu
Select an item from the Vodafone live! menu to access a site.
A Press
(
)
B Select an item
Tip
• To access the Vodafone live! menu from the Main Menu
Select
(Vodafone live!) → Vodafone live!.
• Accessing a protected Web page
A confirmation appears when you attempt to access a Web page
protected with TLS/SSL. To cancel, press
(CANCEL).
appears on a Web page protected with TLS/SSL.
The URL of the accessed page is logged in History.
A Select
(Vodafone live!) from the Main
Menu → Enter URL
B Select the Internet Address (URL) field and
press
C Enter a URL
D Press
(OK)
Tip
• To move to another site by entering its URL
Press
(OPTIONS) and select Enter URL.
24
Basic Web Operations
24-3
Navigating a Web Page
Menu item
Description
Bookmarks
Save a URL of or linked to a Web page as a
bookmark, or select a saved bookmark to
access the site.
Enter URL
Enter a URL to access the site.
Use the following keys to navigate a Web page:
History
Open the access history.
Save Page
Save a Web page.
Action
Search or copy text, save or play an image or
melody on a Web page.
Send As Message Attach a URL of a Web page or image, or
image file to a message to send.
•
:Move cursor or scroll a screen.
Refresh
Refresh the displayed Web page.
•
:Move cursor to an item below.
Page Setting
•
:Move cursor to an item above.
Set the character encoding, scrolling or font
size. In addition, view the certificate authenticated in the displayed Web page or the page
information.
Browser Settings
Perform Browser settings such as security and
downloading image and sound.
• Side keys
•
and : Scroll a screen.
: Return to a previous screen or stop melody playback.
! OPTIONS menu from a Web page
24
The following menu is available from a Web page:
Basic Web Operations
Menu item
Description
Forward
View a previously-opened page again without
reloading it.
Create Phone
Book
Save a phone number of mail address in a
Web page in Phone Book.
24-4
In the OPTION menu of a Web page, select items by performing
either of following:
• Use
to highlight an item and press
.
• Press a dial key corresponding to the number set to an item.
cMenu
Move cursor to a menu item and press
to select the
item.
dCommand button
Move cursor to
and press
to send data or can-
cel.
Authentication
Some Web pages require authentication. If authentication is
Entering text/Selecting items
required, select text entry fields to enter your user ID and password.
bSelection button
cMenu
aText entry field
Password
dCommand button
aText entry field
Move cursor to
and press
24
to enter text.
Move cursor to
the button (
(radio button) and press
to select
).
24-5
Basic Web Operations
bSelection button
Uploading files
Perform the following to upload a file saved on the handset
(except for non-transferable files):
A Select a command button such as Browse on
a Web page
B Select a file from data folders
C Press a command button such as Send
■ Using phone numbers, mail
addresses or URLs on Web pages
Use phone numbers, mail addresses or URLs on Web pages
to make calls, create an MMS or access the Web.
Available phone numbers, mail addresses and URLs are
underlined.
24
A Open a Web page
Basic Web Operations
B Select a phone number, mail address or URL
to perform the desired operation
• To make a voice or video call
aSelect a phone number
bMake a voice or video call (zp.2-2, p.6-2)
24-6
* Press
to select whether to show your caller ID.
• To save a phone number in Phone Book
aSelect a phone number
bSelect Create Phone Book (zp.5-3)
• To create MMS
aSelect a mail address
bCreate MMS to send (zp.20-2)
• To access the Web
Select a URL (zp.24-3)
Note
• To make a video call to a phone number on a Web page, save
the page and open it from Saved Pages.
Using Information
Saving Pictures and Melodies
25
Using Melodies
Save picture or audio files embedded on a Web page to Data
Using Information
Folder. Use stored files as wallpaper, ringtone, etc.
■ Saving files to Data Folder
A Open a Web page
B Press
(OPTIONS) and select Action →
Object
C Select a picture or melody file
(OK)
Tip
• To view pictures on Media Player
Launch Media Player and select pictures (zp.10-8).
• To change a file name or destination to be saved
Press
(MODIFY) on Step 5.
25-2
A Open a Web page
B Press
(OPTIONS) and select Action →
Object
C Select a melody file
D Select Play
Tip
D Select Save
E Press
■ Playing melodies
• Melodies are played
At the volume set under Ringtone Volume. In Manner mode, the
Manner mode settings take priority. The volume cannot be
adjusted during playback on the Web.
• To play melodies on Music Player
Launch Music Player and select melodies (zp.10-2).
Using Other Files
A Select a data to play on a Web page
Tip
Download copyrighted content and obtain the content key. This
content key is required to play the file.
25
• If a message or other text contains a string (URL) of singlebyte alphanumeric characters starting with rtsp://, using the
URL (zp.21-10) may start streaming.
• Even if playback is stopped, communications continue and
packet communications charges will apply.
Tip
• Some contents can be downloaded by clicking a link on a
Web page.
• If you attempt to play a file for which you have not obtained
the content key, a message appears prompting you to obtain
the key.
• The content key may not be obtained during data download,
but received later. In this case, the content key indicator
appears on the standby screen.
• Up to 2,000 content keys can be stored. If you attempt to save
the 2,001st content key, an application launches to delete an
older key. Follow the instructions to delete. If a content key
must be deleted, an indicator appears.
• If there is no available space in the handset memory and messages cannot be received, content keys cannot be received.
Delete unnecessary messages before retrieving content keys.
■ Using streaming content
Some videos, voices or melodies can be played during download (streaming content).
25-3
Using Information
■ Using data with content key
• Media Player automatically launches (zp.10-8).
Saving Pages
Tip
• To check the title or URL of a saved page
25
Saving a page you want to view later provides easy access to
Using Information
the page. Pages themselves are saved, and communication
will not take place when viewing. Up to 100 pages can be
aWhile the page is opened, press
(OPTIONS) and
select Page Setting → Page Information
bSelect an option
saved.
■ Editing titles
■ Saving pages
A Open a Web page
B Press
(OPTIONS) and select Save Page
• If the number of saved pages has already reached the limit
Delete saved pages to save new pages.
■ Viewing saved pages
(Vodafone live!) from the Main
Menu → Saved Pages
B Select a saved page
25-4
A Select
(Vodafone live!) from the Main
Menu → Saved Pages
B Highlight (select) a saved page, press
Tip
A Select
Edit the titles of saved pages.
(OPTIONS) and select Edit Title
C Edit the title
D Press
■ Deleting saved pages
A Select
(Vodafone live!) from the Main
B Delete
Bookmark often-used URLs to easily access them later. Up to
100 bookmarks can be saved.
■ Bookmarking
To delete one by one
aHighlight (select) a saved page, press
(OPTIONS) and select Delete
bPress
(YES)
cPress
(OK)
To delete all pages
A Open a Web page
B Press
(OPTIONS) and select Bookmarks
C Select Current Page
Tip
aPress
bPress
(OPTIONS) and select Delete All
(YES) and enter the Security Code
• If the number of saved pages has already reached the limit
Delete saved bookmarks to save new bookmarks.
cPress
(OK)
• To bookmark a link on a page
aPerform Step 1
bMove the cursor over an underlined link
cPerform Step 2
dSelect Selected Link
ePress
(YES)
25-5
25
Using Information
Menu → Saved Pages
Bookmarks
■ Accessing bookmarks
25
A Select
■ Deleting bookmarks
(Vodafone live!) from the Main
Using Information
Menu → Bookmarks
A Select
(Vodafone live!) from the Main
Menu → Bookmarks
B Select a bookmark
B Delete
To delete one by one
■ Editing content
aHighlight a bookmark, press
(OPTIONS) and
select Delete
Edit the titles or URLs of saved bookmarks.
bPress
(YES)
A Select
cPress
(OK)
(Vodafone live!) from the Main
To delete all bookmarks
Menu → Bookmarks
B Highlight a bookmark, press
(OPTIONS)
and select Edit
C Use
press
D Press
25-6
aPress
bPress
(OPTIONS) and select Delete All
(YES) and enter the Security Code
cPress
(OK)
to select Edit Title or Edit URL, and
to edit the title or URL
then
(OK)
! Bookmark list options
The following options are available for bookmark list:
Option
Description
Send As Message
Paste the URL into a message.
Add To Desktop
Create a shortcut to the bookmark on the desktop.
Add To My Menu
Add a bookmark to My Menu.
History
! History options
Up to the last 300 accessed URLs are added to History. Easily
A Select
25
Send As Message: Paste the URL into a message.
●
Using Information
access previously-viewed pages from the History.
The following option is available for History:
(Vodafone live!) from the Main
Menu → History
B Perform log operation
To access pages
aSelect a log
bPress
(OK)
To delete one by one
aHighlight a log, press
(OPTIONS) and select
Delete
bPress
(YES)
cPress
(OK)
To delete all logs
aPress
bPress
(OPTIONS) and select Delete All
(YES) and enter the Security Code
cPress
(OK)
25-7
Other Settings
25
■ Changing character code
Using Information
If characters are not properly displayed, change the code.
[Default]
■Shift-JIS
A Press
(OPTIONS) on a Web page and
■ Changing font size
[Default]
■Medium
A Press
(OPTIONS) on a Web page and
select Page Setting → Font Size
B Select an option
select Page Setting → Encoding
B Select a code
■ Viewing page information
Check the URL or title of the page.
■ Changing scroll settings
[Default]
■Scroll One Line
A Press
(OPTIONS) on a Web page and
select Page Setting → Scroll Settings
B Select an option
A Press
(OPTIONS) on a Web page and
select Page Setting → Page Information
B Select Check URL or Check Page Title
■ Checking server certificate
Check server certificates used for TLS/SSL communications.
A Press
(OPTIONS) on a Web page and
select Page Setting → Page Information
B Select Server Certificate
25-8
Tip
• Server certificate
Verifies the authenticity of the server for SSL communication.
• To cancel the search
Press
.
25
■ Copying text on a page
Copy text on a page to paste somewhere else.
■ Updating a page
A Press
Update a page. Some pages may not be updated.
A Press
(OPTIONS) on a Web page and
(OPTIONS) on a Web page and
select Action → Copy as Text
B Use
to highlight text, and press
(COPY)
select Refresh
To cancel the highlighted text
Press
■ Searching for a word on a page
To highlight all text
Search for a word on a page. If it is found, it will be highlighted.
Without any text highlighted, press
A Press
TEXT)
(OPTIONS) on a web page and
select Action → Search In Page
B Enter a word
C Press
(SEARCH)
■ Creating a message with a URL or
picture
Send a message with the page URL, a picture's URL or the picture itself.
Tip
• To search for the word repeatedly
Press
(SEARCH).
SEARCH appears in the Softkey area
celled.
(ALL
A Press
until the search is can-
(OPTIONS) on a Web page and
select Send As Message
25-9
Using Information
• Server certificates to view
Can be changed using
.
B Select Current Page URL, Image URL or Image
File
25
If selecting Image URL or Image File, select the
Using Information
image.
C Select MMS or SMS and create a message
Tip
• To send a message
See p.20-2.
25-10
Other Web Settings
Image Display/Sound Playback
Settings
Set whether to display images or play sounds contained in the
26
content.
Other Web Settings
[Default]
■Images: Display ■Sounds: Play
A Select
(Vodafone live!) from the Main
Menu ψ Browser Settings
B Select an option and set
To set image display
aSelect Display Settings
bSelect Images
cSelect Display or Do Not Display
To set sound playback
aSelect Sounds
bSelect Play or Do Not Play
Tip
• Browser Settings
Can also be selected by pressing
content.
(OPTIONS) while displaying
• To set whether to save images to Saved Pages
[Default]
26-2
■Save With Images
aPerform Step 1
bSelect Display Settings → Saved Page Options
cSelect an option
• Sound is played
At the volume set under Ringtone Volume. Manner mode takes priority. The volume cannot be adjusted while playing on the Web.
Security Settings
notified for some information. Set whether to comply with the
notification request.
[Default]
■ Setting Cookies
Cookies are small data files automatically written to the handwhether to save Cookies. Cookies can be deleted.
[Default]
■Accept All
A Select
(Vodafone live!) from the Main
A Select
(Vodafone live!) from the Main
Menu ψ Browser Settings ψ Manufacture Number
B Select On or Off
■ Checking Root Certificates
Menu ψ Browser Settings ψ COMM Settings ψ
Check the preinstalled Root Certificates.
Cookie Settings
B Select an option and set
To set whether to save Cookies
aSelect Cookies
A Select
(Vodafone live!) from the Main
Menu ψ Browser Settings ψ Root Certificates
B Select a certificate
bSelect an option
To delete all Cookies
aSelect Clear Cookies
bSelect
(YES)
Tip
• To switch between Valid and Invalid
[Default]
■Valid
aPerform Step 1
■ Manufacture Number notification
The Manufacture Number is not a phone number but an ID to
identify a user. The Manufacture Number may be required to be
bHighlight a certificate, press
Valid or Invalid
26
Other Web Settings
set and used by information providers to identify users. Set
■Off
(OPTIONS), and select
• Root Certificate
Verifies the server certificate.
26-3
Resetting Web Settings
B Press
(YES)
C Enter Security Code
■ Resetting settings to default
26
Reset Saved Pages, History or Browser Settings to default
Other Web Settings
(zp.30-7).
A Select
To reset settings only
aSelect Reset Settings
(YES)
To reset settings and data
aSelect Memory Reset
bEnter the Security Code
(OK)
■ Clearing the access history
Web access is stored. Clear History.
A Select
(Vodafone live!) from the Main
Menu ψ Browser Settings ψ History Clear
26-4
Note
(Vodafone live!) from the Main
B Select an option to reset
cPress
(OK)
• History Clear does not clear the access list (zp.25-7).
Menu ψ Browser Settings ψ Reset
bPress
D Press
■ Clearing the cache
Delete all data temporarily stored in the cache.
A Select
(Vodafone live!) from the Main
Menu ψ Browser Settings ψ COMM Settings ψ
Clear Cache
B Press
(YES)
Basic V-appli Operations
Before Using V-appli
Network-type V-appli
Some V-appli run on the network (web). For communication
charges applied for using network-type V-appli, contact Customer Service (zp.30-38).
27
・ To check JavaTM and JBlendTM licences
Basic V-appli Operations
Select
(V-appli) from the Main Menu → JavaTM Infor-
Downloading V-appli
Download V-appli from websites. Up to 100 V-appli can be
downloaded.
A Select
(V-appli) from the Main Menu →
V-appli Library → Download V-appli
B Access a website that provides V-appli
C Select V-appli
mation.
Download confirmation
D Press
27-2
(DL)
Note
• V-appli cannot be downloaded if:
• The file is invalid
• The size is too large
• The number of V-appli will exceed the limit
• The memory is low
• It cannot be saved
Download completion
(BACK)
To launch V-appli immediately
Press
(LAUNCH) to open V-appli Library
Tip
• If some V-appli is paused
A confirmation screen appears.
• To upgrade V-appli
If you attempt to download an upgrade version of stored V-appli, a
confirmation message appears. Press
(REPLACE) to
overwrite the older version.
• To cancel the download
Press
.
• To check the memory status
Select
(Settings) from the Main Menu → Memory Settings →
Status.
• Replacing the USIM card prevents you from using the
downloaded V-appli.
! Download confirmation screen
When you select V-appli to download on the website, a confirmation
screen appears for you to check the size. The signature information
can also be checked for network-type V-appli. To cancel the download, press
(CANCEL).
Data size in downloading
from Websites
27-3
Basic V-appli Operations
E Press
27
• If the battery is low, V-appli may not be successfully
downloaded. Before downloading, check that there is
sufficient battery power.
Launching V-appli
A Select
(V-appli) from the Main Menu →
V-appli Library
! A screen appears when launching V-appli
If the V-appli is a network type, a message appears. To continue
using V-appli, select YES. The confirmation screen type can be
changed in the security level settings.
B Select V-appli
27
When connecting to the Internet
Tip
Basic V-appli Operations
• To open V-appli Library on the memory card
After performing Step 1, press
(Options) and select Change
Memory Card. To switch from the memory card to the handset,
press
(Options) and select Change Phone Memory.
• V-appli Library icons
: Preinstalled at purchase
: Downloaded
• To launch V-appli from Data Folder
aSelect
(Data Folder) from the Main Menu → V-appli
bSelect V-appli
• To create a shortcut to V-appli Library
aSelect
(Data Folder) from the Main Menu
bHighlight V-appli, press
cut
(OPTIONS) and select Short-
cSelect Add To Desktop or Add To My Menu
27-4
Connecting to the network.
Procedd?
Ending/Pausing/Resuming
V-appli
Managing V-appli
■ Checking properties
■ Ending/pausing V-appli
A Press
while V-appli is running
A Select
(V-appli) from the Main Menu →
V-appli Library
B Highlight V-appli, press
To pause V-appli
(Options) and
select Properties
Select Pause
To end V-appli
Tip
Select End
• The properties contain
Application name, vendor name, version, application size, etc.
■ Resuming paused V-appli
If a V-appli is paused,
A Press
(grey) appears on the display.
• To access a V-appli-related link
Select To Web on the properties screen to access a V-appli-related
website.
for 1+ seconds
B Select V-appli
27-5
27
Basic V-appli Operations
B Select an option
Check the detailed information on V-appli.
C Select Yes
■ Moving V-appli
Exchange V-appli between the handset and the memory card.
A Select
(V-appli) from the Main Menu →
V-appli Library
To open V-appli Library on the memory card
27
Press
Basic V-appli Operations
Card
(Options) and select Change Memory
B Highlight V-appli, press
(Options) and
select Change Entry (Move)
C Select YES
Tip
• If the V-appli cannot be transferred
Change Entry (Move) does not appear.
■ Deleting V-appli
A Select
(V-appli) from the Main Menu →
V-appli Library
B Highlight V-appli, press
select Delete
27-6
(Options) and
Note
• V-appli preinstalled at purchase cannot be moved or deleted.
Using V-appli
Setting V-appli Security Levels
• Disable: The function is disabled.
Note
• Disabled options do not appear.
■ Setting security levels
Some V-appli are connected to the network while running.
■ Resetting security levels
Set whether to confirm connection function use for each
V-appli.
Reset security settings to default.
Set Web access.
A Select
28
[Default]
Using V-appli
A Select
V-appli Library
■Prompt At Startup
(V-appli) from the Main Menu →
(Options) and
select Security
C Select Net Access then an option
Tip
• Security options
• Prompt At First Only: A confirmation appears only the first time
the V-appli is launched.
• Prompt At Startup: A confirmation appears each time the
V-appli is launched.
• Prompt Each Time: A confirmation appears each time the connection function is used.
28-2
B Highlight V-appli, press
select Security
V-appli Library
B Highlight V-appli, press
(V-appli) from the Main Menu →
C Select Setting Reset
D Press
(YES)
(Options) and
Other V-appli Settings
Making Incoming Settings
Make incoming or alarm settings for V-appli.
Making Volume/Vibration Settings
[Default]
In manner mode, the manner mode settings take priority over
■Call Priority
A Select
(V-appli) from the Main Menu →
V-appli Settings → Incoming Priority
B Select Call Priority or Alert Display
V-appli settings.
■ Adjusting the volume
Adjust the volume of sound effects.
! When a call is incoming or the alarm time has come during V-appli running
29
●
Call Priority is selected
V-appli is paused, and the phone rings or the alarm sounds.
Other V-appli Settings
●
Alert Display is selected
The V-appli continues running, and a message appears at the
top of the display indicating that a call is incoming or the alarm
time has come. To pause or end V-appli, press
.
To answer an incoming call, press
. Answering a call
pauses V-appli.
[Default]
■Level 4
A Select
(V-appli) from the Main Menu →
V-appli Settings → Volume/Vibration → Volume
B Use
to adjust the volume, and press
■ Setting the vibration
Enable or disable the vibration set for V-appli.
[Default]
■On
A Select
(V-appli) from the Main Menu →
V-appli Settings → Volume/Vibration → Vibration
B Select On or Off
29-2
Making Light Settings
Resetting V-appli Settings
Make light settings for V-appli.
Option
Description
Always On
Always turn on the light.
Always Off
Always turn off the light.
Link To Backlight
Press keys to turn on the light.
■ Resetting V-appli settings to default
A Select
(V-appli) from the Main Menu →
V-appli Settings → Reset V-appli → Reset Settings
Enable or disable the blink operation set for V-appli.
B Enter Security Code and press
[Default]
C Press
■Backlight Set.: Link To Backlight
■V-appli Blink: On
A Select
(V-appli) from the Main Menu →
B Select an option
To make light settings
aSelect Backlight Set.
bSelect an option
To make blink settings
aSelect V-appli Blink
(YES)
■ Deleting all V-appli
29
Delete all downloaded V-appli stored in V-appli Library.
A Select
(V-appli) from the Main Menu →
V-appli Settings → Reset V-appli → Memory Reset
B Enter Security Code and press
C Press
(OK)
(YES)
bSelect On or Off
29-3
Other V-appli Settings
V-appli Settings → Light Settings
(OK)
Appendix
Features
Main
V-appli
Sub
V-appli Settings
Vodafone live!
Branch
V-appli Library
Description
Use stored V-appli programs.
Page
p.27-2
Incoming Priority
Set the incoming or alarm operations for V-appli.
p.29-2
Volume/Vibration
Set the volume or vibrator for V-appli.
p.29-2
Light Settings
Make light settings for V-appli.
p.29-3
Reset V-appli
Reset V-appli settings.
p.29-3
JavaTM Information
View JavaTM and JBlendTM licences.
p.27-2
Vodafone live!
Offer a variety of websites and services for Vodafone
handsets (Mainly in Japanese).
p.18-2
p.24-3
Bookmarks
Access bookmarked websites.
p.25-5
Enter URL
Access websites by manually entering URLs.
p.24-3
Display access logs.
p.25-7
Saved Pages
Display saved pages off-line.
p.25-4
Display Settings
Set display.
p.26-2
Sounds
Set sound.
p.26-2
COMM Settings
Set cookies or clear cache.
p.26-3
Root Certificates
View the certificate list in the handset and set valid/
invalid.
p.26-3
Manufacture Number
Set whether to answer the Manufacture Number
request when using the Internet.
p.26-3
History Clear
Delete the logs.
p.26-4
Reset
Reset the browser settings to default.
p.26-4
Browser Settings
31
Appendix
History
30-2
Main
Entertainment
Sub
Music Player
Media Player
Cast
Camera
31
Appendix
Data Folder
Description
Page
Play all tracks.
p.10-3
Playlists
Play a playlist.
p.10-3
Track Folders
Select a folder to play tracks.
p.10-3
Recently Played
Play the most recently played track.
p.10-3
Most Played
Play the most often played track.
p.10-3
Download
Download tracks from websites.
p.10-3
Ringtones
Play melodies.
p.10-3
Pictures
View pictures.
p.10-9
Videos
Play videos.
p.10-11
Media Settings
Set Media Player.
p.10-12
What's New?
View the latest information.
p.10-13
History
View previously-downloaded contents.
p.10-14
Casting Settings
Subscribe/unsubscribe contents.
p.10-13
Manual Download
Download contents manually.
p.10-14
Camera
Launch the camera.
p.7-4
Video
Launch the video.
p.7-6
Bar Code Reader
Launch the bar code reader.
p.7-8
Pictures
Store pictures.
p.12-2
Ringtones
Store downloaded ringtones.
p.12-2
V-appli
Store downloaded V-appli.
p.12-2
Music
Store music files.
p.12-2
Videos
Store videos.
p.12-2
Voice Rec.
Store voices recorded by Voice Recorder.
p.12-2
More Folder
Store other files.
p.12-2
Other Folders
30-3
Branch
All My Tracks
Main
Messaging
Sub
Description
Page
Received messages are saved here.
p.21-2
Create Message
Create a new message.
p.20-2
Outbox
Unsent, returned or cancelled messages are saved
here.
p.21-2
Drafts
Unsent draft messages are saved here.
p.21-2
Sent Messages
Sent messages are saved here.
p.21-2
Mail Folders
Filtered messages are saved here.
p.21-2
Server Mail
Retrieve, delete or forward messages stored on the mail
server.
p.22-2
General
Customise the display style, heading text/signature/
quote, etc. for MMS and SMS.
p.23-2
MMS Settings
Set the auto receive function, delivery time, etc. for
MMS.
p.23-3
SMS Settings
Set the report request, validity period and centre
address for SMS.
p.23-5
Settings Reset
Settings
Organiser & Tools
Branch
Inbox
p.23-7
Set appointments, events or holidays.
p.15-2
Alarms
Set alarm clock.
p.15-6
31
Tasks
Manage schedules.
p.15-8
Calc./Converter
Calculate or converts currencies.
p.15-10
Notepad
Voice Recorder
Own Dictionary
Make a note.
p.15-11
Call Memo
Play voice memos recorded during calls.
p.2-8
Standby Voice Memo
Record voice memos in standby mode and play them.
p.15-13
Register a reading and its word to enter the word simply
by entering the reading.
p.4-11
30-4
Appendix
Reset Messaging Settings to default.
Calendar
Main
Phone Book
Sub
Branch
Description
Create a contact or settings for incoming items.
Handset Phone BK
Open the handset Phone Book.
p.5-6
USIM Phone Book
Open the USIM card Phone Book.
p.5-6
Groups
Manage Phone BK
Other Numbers
Settings
Call Log
Change a group name or function settings.
p.5-9
Copy the entire Phone Book.
p.5-8
Move All
Move the entire Phone Book.
p.5-8
Delete All
Delete the entire Phone Book.
p.5-10
Services
Register the service number stored on the USIM card.
p.5-8
Rejected
Register a phone number to reject.
p.5-8
Fixed(FDN)
Register a phone number that can be dialled.
p.5-8
Memory Status
Set Phone Book.
p.5-2
p.14-8
Owner Information
p.2-10
Speed Dialling
p.5-3
Dialled Calls
Received Calls
Missed Calls
Appendix
Clear All Logs
Automatic Delete
Duplicate Records
30-5
p.5-3
Copy All
Privacy Display
31
Page
Create New
View call logs.
p.2-3
Main
Settings
Sub
Phone Settings
Display Settings
Call Settings
Security
Memory Settings
Description
Page
Set the Normal/Meeting/Outdoor/Drive/Manner mode.
p.9-3
言語選択
Switch between Japanese and English.
p.8-8
Date & Time
Set date and time.
p.1-22
Master Reset
Reset settings to default.
p.14-10
Internal Display
Set display.
p.8-2
External Display
Set external display.
p.8-3
Font Settings
Set screen font.
p.8-8
Common Setting
Make common settings for calling.
p.2-7,
p.5-7,
p.16-2,
p.16-3
Voice Call
Set Voice Call.
p.2-5,
p.2-6
Video Call
Set Video Call.
p.6-5
All Calls
Make incoming and outgoing settings.
p.16-2
Key Locks
Lock keys to prevent you from pressing them.
p.14-9
Dial Locks
Lock the handset with Security Code to prevent others
from using it without your consent.
p.14-5
Set Sec. Codes
Set Security Codes.
p.14-2
Bluetooth
Set Bluetooth.
p.13-3
Network Setup
Set network.
p.2-10
p.18-3
Status
View details of memory capacity.
p.11-4
Memory Card
Set memory card.
p.11-4
31
Appendix
Connectivity
Branch
Sound / Mode
30-6
Settings to be Reset
Main menu
Settings initialised by All Reset
Settings initialised by Settings Reset
V-appli
・Net Access
・Incoming Priority
・Volume/Vibration
・Light Settings
Vodafone live!
・Scroll settings
・Font settings
<Browser Settings>
Settings initialised by Memory Reset
・Downloaded V-appli
*1
・Display Settings
・Bookmark settings
・Sounds
・Cookie Settings
・Root Certificates 1 to 8
・Manufacture Number
31
*2
・Bookmarks
・Saved Pages
・History
・Cache
・Cookie
*3, *4
Appendix
Entertainment
<Music Player>
・Playlists
・Player settings
・Common settings
<Media Player>
・Image settings
・Video settings
30-7
*4
<Music Player>
・Recently Played
・Most Played
・Download
Main menu
Camera
Settings initialised by All Reset
Settings initialised by Settings Reset
Settings initialised by Memory Reset
<Camera>
・Display Settings
・Picture Quality
・White Balance
・Night Mode Off (Night Mode On)
・Auto Timer
・Display Settings under Camera Settings
・Shutter Sound under Camera Settings
・Image Tuning under Camera Settings
<Video>
・Picture Quality
・White Balance
・Night Mode Off (Night Mode On)
・Sound Settings
・Memory Status under Camera Settings
・File Size Limit under Camera Settings
・Display Settings under Camera Settings
・Shutter Sound under Camera Settings
・Image Tuning under Camera Settings
31
Appendix
<Bar Code Reader>
・Stored data
Data Folder
・Sort Files
・Thumbnails
・Auto Save
・All data stored in Data Folder
30-8
Main menu
Settings initialised by All Reset
Settings initialised by Settings Reset
Messaging
・Mail Distribute
・User Folder names
<General>
・Scroll Setting
・Heading Text
・Signature
・Quote Indicator
・Font Size
・3D pict. Settings
<MMS Settings>
・Receive Options
・Creation Mode
・Send Reports
・Validity Period
・Delivery Time
<SMS Settings>
・SMS Report Request
Organiser & Tools
・Calendar display, Filter View
・Rate settings for Calc./Converter
・Own Dictionary
31
Settings initialised by Memory Reset
・Messages*6
*5
Appendix
30-9
・Stored data for Calendar
・Alarms
・Tasks
・Notepad
Main menu
Settings initialised by All Reset
Settings initialised by Settings Reset
Settings initialised by Memory Reset
Phone Book
・Groups
・Privacy Display
・Speed Dialling
・Automatic Delete
・Duplicate Records
・Phone Book data
・Groups*7
・Owner Information
・Dialled Calls
・Received Calls
・Missed Calls
Settings
<Sound / Mode>
・Volume
・Ringtone
・Illumination
・Vibration Pattern
・Other Settings
<Language>
・Display language
<Date & Time>
・Date & Time
・Dual Time
・Format
<Sound / Mode>*7
・Ringtone
<Internal Display>
・Greeting
・Wallpaper
・Power Saving
・Backlight Settings
・Operator Setting
<Internal Display>*7
・Greeting
・Wallpaper
31
Appendix
30-10
Main menu
Settings
31
Appendix
30-11
Settings initialised by All Reset
Settings initialised by Settings Reset
Settings initialised by Memory Reset
<External Display>
・Wallpaper
・Standby
・Indication Info
・Clock Style
・Backlight Settings
・Contrast
<Font Settings>
<External Display>*7
・Wallpaper
<Common Settings>
・Receiver Volume
・Call Time Info.
・Headset
・CLI Display
・Dial Pause Setting
・Send Tones
<Voice Call>
・Auto Redial
・Any Key Answer
・Close Setting
<Common Settings>
・Call Time Info.
<Video Call>
・Camera Settings
・Video Call Options
<All Calls>
・Caller ID
・Auto Check under Voicemail/Diverts
・Unknown
・Ignore If No ID
<Video Call>*7
・Select Still Image
Main menu
Settings
Other features
*1
*2
*3
*4
*5
Settings initialised by All Reset
Settings initialised by Settings Reset
Settings initialised by Memory Reset
<Security>
・Key Locks
・Dial Locks
<Connectivity>
・3G/GSM under Network Setup
・Select Network under Network Setup
<Memory Settings>
・USB Memory Mode
<Connectivity>
・Bluetooth
Manner mode
Input mode
Initialised by V-appli Reset Settings.
Initialised by V-appli Memory Reset.
Initialised by Vodafone live! Reset Settings.
Initialised by Vodafone live! Memory Reset.
Initialised by Messaging Settings Reset.
*6 SMS data stored on the USIM card are not initialised by Memory
Reset or All Reset. Use Delete One/Delete All for messages.
*7 Initialised by Memory Reset if a data that is not preinstalled at the time
of purchase is set as an alternative image.
Tip
• Data initialised only by All Reset
All Reset initialises Retrieve NW Info.
31
Appendix
• Memory Reset or All Reset deletes content keys, which invalidates the right to use copyrighted data.
30-12
Multitasking Combination
The following table shows the main combinations of tasks that can be used simultaneously:
: Available ー : Unavailable Blank: Cannot be used simultaneously
Running task Music
Player
Task to run
Vodafone
Vodafone
live!
Messaging
live!
CAST
V-appli
EntertainCamera
ment
Data
Folder
Packet
Organiser Phone
Settings Communication
& Tools Book
*1
Voice
Calls
Video
Calls
*7
ー
Music Player
*4
Vodafone live!/Vodafone
live! CAST/Messaging
(SMS/MMS)
V-appli/Entertainment/
Camera/Data Folder/
Organiser & Tools/Phone
Book/Settings
*2
*4
*4
*4
*3, 4
*4
*4
*4
ー
*8
Voice calls in progress
ー
*5
Video calls in progress
31
*5
Appendix
Packet communication
*1
*1
*2
*3
*4
*5
*6
*7
*8
*6
*6
*6
ー
ー
ー
ー
ー
ー
ー
ー
ー
*6
ー
ー
ー
When the handset is connected to a PC and used as a modem.
The new message ringtone does not sound while Music Player is running.
Activating Camera or V-appli stops playback. To launch a file that emits a sound from Entertainment or Data Folder, exit Music Player.
Retrieve NW Info cannot be run simultaneously.
Playback stops when a call is made or received.
A call cannot be made or received while connecting.
Music cannot be played while talking.
Videos cannot be played. V-appli and Camera cannot be run.
• Some tasks may be unusable while another task is running.
30-13
ー
ー
ー
ー
Troubleshooting
■ Basic operations
Problem
Point to check or solutions
Page
Cannot turn on the handset
Is the battery fully charged? Replace or charge the battery.
p.1-13
Cannot operate after the handset is turned
on
Activate PIN1 may be enabled. Follow the on-screen instruction to enter PIN1.
p.14-3
Please insert the USIM card. or Unable to
Is the USIM card properly attached? If a message still appears with the card properly
recognize this USIM card. Please use a differ- attached, it may be broken.
ent USIM card. appears after handset is
Are you using an unsupported USIM card? Check that it is a dedicated USIM card.
powered on or when using handset
functions.
p.1-4
p.1-4
Reading data stored on the USIM card. Wait until handset reads data.
p.1-4
Key operation does not work
Is Dial Locks or Key Locks set to On? Set Dial Locks or Key Locks to Off.
p.14-5
p.14-9
After dialling, a busy tone sounds
Does OUT appear? Move to a location where there is good reception before dialling.
Did you dial the entire phone number starting with 0 (zero)?
p.1-11
p.2-2
OUT appears and a call cannot be made
You are out of range. Move to a place where the reception is clear.
p.xxvii
A call is interrupted or disconnected
Does OUT appear or is the reception poor?
Has the battery run out?
p.xxvii
p.1-13
Cannot make a call
Is Dial Locks set to On?
Is Fixed(FDN) set to On?
Is dialling restricted?
p.14-5
p.14-6
p.17-4
Incoming call/mail indicator does not
appear on external display.
Is the contact stored as secret contact?
p.14-8
30-14
31
Appendix
Presently reading from USIM card. Please
wait a moment and try again. appears
Problem
Point to check or solutions
The external display does not display an
Is external display's Standby setting set to On?
indicator for incoming call or mail message
Page
p.8-3
A beep sounds during a call
This may indicate the reception is becoming weak and you are switching base stations.
p.xxvii
Cannot charge the battery
Is the rapid charger connector properly attached to the handset or desktop holder?
Is the rapid charger properly plugged into the electrical socket?
Is the battery pack attached to the handset?
Is the handset properly placed into the desktop holder?
Check the charging terminals of the handset, battery pack and desktop holder, the rapid
charger connector, the handset external connector, and the desktop holder connector. If dirty,
clean with a dry cotton swab.
Is the ambient temperature between 5q and 40q?
Is something wrong with the battery pack?
If the battery is repeatedly charged but not fully charged, it is time to replace the battery pack.
Replace it with a new one.
Does the handset or battery pack become hot during charging? If it becomes hot, the charging may be interrupted. Wait and recharge after battery pack has cooled.
p.1-18
p.1-18
p.1-16
p.1-19
p.1-13
p.1-13
p.1-13
p.1-13
p.1-13
Charging time is short
If the battery has not run out, the charging time is short.
p.1-13
31
Battery alarm does not sound before
handset powers down.
Is manner mode set? The alarm does not sound in manner mode.
p.1-15
Appendix
Devices become hot
The rapid charger or desktop holder may become hot during charging.
The handset may become hot during charging or if you talk for a long time. This is normal as
p.1-13
p.1-13
long as you can touch it. If it becomes too hot and you cannot touch it, immediately stop
charging/using and contact Customer Service (zp.30-38).
The battery runs out fast
The battery consumption depends on the usage environment (temperature/charging/reception), operations or settings. Making a video call or using V-appli rapidly consumes battery
power.
p.1-16
The display flickers
Do you use the handset near a fluorescent lamp?
p.xxvii
30-15
Problem
Point to check or solutions
Page
The video shooting screen flickers
Change the mode in Image Tuning under Camera Settings.
p.7-7
The display is dim when backlight setting is
off.
This is normal and not a malfunction.
p.8-4
Some characters do not appear when a
vfile is used for Phone Book, Calendar,
etc.
A blank appears for a character incompatible with Shift-JIS code. This is not a malfunction.
■ Vodafone live!
Problem
Point to check or solutions
Page
The connection was lost. appears
This message appears when the reception is poor and the connection cannot be established.
Check the signal strength and retry.
This message appears when there is no response from the Service Centre. Retry later.
p.xxvii
Unable to send the message. appears
The Service Centre is under maintenance. Retry later.
p.18-3
p.18-3
There is no response from the site. appears This message appears when it cannot be verified that the Service Centre accepted the mes- p.18-3
sage. Retry later.
You are not a subscriber to this network.
appears
This message appears when the handset is unable to camp on a network (no subscription on
the network). Connect to the Service Centre and retrieve the network information.
p.18-3
ౣធ⛯ߒ߹ߔ߆㧫 or ធ⛯߇ਛᢿߐࠇ߹
ߒߚޓౣធ⛯ߒ߹ߔ߆㧫 appears
The connection was disconnected e.g. because the reception became poor while sending
the message. Select YES to retry.
p.18-3
The message is not delivered to the
recipient.
Check whether the recipient sets security by address filter.
A message cannot be sent if 184 or 186 is added to the recipient address. Remove 184 or
186 and retry.
31
30-16
Appendix
p.2-2
Problem
31
Point to check or solutions
Page
Appendix
Cannot send MMS with picture attachment Does the recipient's handset support MMS? A Long Mail-compatible handset cannot receive
a mail message whose size exceeds 6K bytes, and a Super Mail-compatible handset cannot
receive a mail message whose size exceeds 12K bytes (up to 30K bytes if a JPEG or MPEG4 file is attached). (The figures include address, subject and message.)
Does the recipient's handset support the format of the attached file? If not, you cannot send a
picture.
Has the recipient subscribed to MMS, Super Mail or Long Mail? A separate subscription to
MMS, Super Mail or Long Mail is required to receive a message with a picture attached. A
non-subscriber to these services cannot receive a message whose size exceeds 384 bytes
(or whose character count exceeds the limit).
p.18-2,
p.20-2
There is insufficient free space to store
received messages
A message appears indicating that there is insufficient memory and you cannot receive a
message. Delete unnecessary received messages. The Service Centre keeps messages
that could not be received. (When sufficient space is allocated to store messages, the messages kept at the Service Centre are automatically received.)
Even if the total of used memory is lower than 100%, you may be unable to receive a new
message. Delete unnecessary received messages.
p.11-4
p.21-5
Unable to download the file. The file size
exceeds the limit. appears
The memory is full for V-appli Library. Delete unnecessary V-appli and retry.
p.27-6
Download operation has been cancelled.
The number of maximum to save had
reached. appears
100 V-appli programs are stored on the handset. Delete unnecessary V-appli and retry.
p.27-6
Download operation has been cancelled.
Invalid data was received. appears
The data cannot be downloaded to the 804N handset. Cancel the download.
p.27-2
30-17
p.20-5
p.20-5
p.21-9
Kuten Codes
The 3-digit numbers in each left column indicate the first three digits of kuten codes. The numbers at each top row indicate the
fourth digit of kuten codes.
Example: Entering ઇ
Enter the first three digits 012 then the fourth digit 4.
Actual characters or symbols on the screen may look different from the ones in the kuten code list.
31
Appendix
30-18
区点
1∼3桁目
0
1
2
3
区点4桁目
4 5 6
7
8
9
お
178
179
180
181
182
凹央
押
鴎黄
牡乙
奥
旺
岡
俺
往
横
沖
卸
於汚甥
応
欧殴王翁襖鴬
荻億屋憶臆桶
恩温穏音
か
31
Appendix
182
183
184
185
186
187
188
189
190
191
192
193
194
195
196
197
198
199
200
201
202
203
204
205
206
207
仮
家
禍
蝦
我
介
恢
蟹
慨
馨
拡
赫
顎
恰
叶
噛
勘
幹
款
竿
諌
舘
贋
何
寡
禾
課
牙
会
懐
魁
開
概
蛙
撹
較
掛
括
椛
鴨
粥
勧
患
歓
管
貫
丸
雁
伽
科
稼
嘩
画
解
戒
晦
階
涯
垣
格
郭
笠
活
樺
栢
刈
巻
感
汗
簡
還
含
頑
価
暇
箇
貨
臥
回
拐
械
貝
碍
柿
核
閣
樫
渇
鞄
茅
苅
喚
慣
漢
緩
鑑
岸
顔
佳
果
花
迦
芽
塊
改
海
凱
蓋
蛎
殻
隔
橿
滑
株
萱
瓦
堪
憾
澗
缶
間
巌
願
加
架
苛
過
蛾
壊
可
歌
茄
霞
賀
廻
嘉
河
荷
蚊
雅
快
下
夏
火
華
俄
餓
怪
化
嫁
珂
菓
峨
駕
悔
灰
劾
街
鈎
獲
革
梶
葛
兜
界
外
該
劃
確
学
鰍
褐
竃
皆
咳
鎧
嚇
穫
岳
潟
轄
蒲
絵
害
骸
各
覚
楽
割
且
釜
芥
崖
浬
廓
角
額
喝
鰹
鎌
乾
姦
換
潅
翰
閑
玩
侃
完
敢
環
肝
関
癌
冠
官
柑
甘
艦
陥
眼
寒
寛
桓
監
莞
韓
岩
刊
干
棺
看
観
館
翫
き
207
208
209
210
211
212
213
基奇嬉
旗既期
機帰
紀徽規
鬼亀偽
犠疑祇
30-19
寄
棋
毅
記
儀
義
岐
棄
気
貴
妓
蟻
企伎危喜器
希幾忌揮机
汽
起
宜
誼
畿
軌
戯
議
祈
輝
技
掬
季
飢
擬
菊
稀
騎
欺
鞠
区点
1∼3桁目
214
215
216
217
218
219
220
221
222
223
224
225
226
区点4桁目
4 5 6
0
1
2
3
吉
客
宮
究
巨
禦
吃
脚
弓
窮
拒
魚
供
叫
教
郷
局
錦
菌
喫
虐
急
笈
拠
亨
侠
喬
橋
鏡
曲
斤
衿
桔
逆
救
級
挙
享
僑
境
況
響
極
欣
襟
卿
挟
蕎
業
巾
芹
橘
丘
朽
糾
渠
京
兇
峡
狂
饗
玉
欽
謹
7
8
9
詰
久
求
給
虚
砧
仇
汲
旧
許
杵
休
泣
牛
距
黍
及
灸
去
鋸
却
吸
球
居
漁
競
強
狭
驚
桐
琴
近
共
彊
矯
仰
粁
禁
金
凶
怯
胸
凝
僅
禽
吟
協
恐
脅
尭
勤
筋
銀
匡
恭
興
暁
均
緊
区点
1∼3桁目
249
250
251
252
253
254
255
256
257
258
259
260
261
0
1
効勾
后
巧巷
拘控
江洪
紅紘
航荒
砿鋼
号合
告国
忽惚
此
昏昆
区点4桁目
4 5 6
2
3
厚
喉
幸
攻
浩
絞
行
閤
壕
穀
骨
頃
根
口
坑
広
昂
港
綱
衡
降
拷
酷
狛
今
梱
倶句区狗
駒具愚虞
串櫛釧屑
掘窟沓
栗繰桑鍬
郡
玖
喰
屈
靴
勲
卦
型
敬
罫
芸
欠
倦
憲
検
肩見
鹸元
絃舷
係
径
渓
蛍
劇
穴
券
捲
犬
軒
幻
限
九
矩苦躯駆駈
空偶寓遇隅
轡窪熊隈粂
君薫訓群軍
け
232
233
234
235
236
237
238
239
240
241
242
243
珪
携
繋
鶏
傑
倹
建
袈
契
景
茎
迎
決
健
懸
権
謙
原
言
祁
形
桂
荊
鯨
潔
兼
拳
牽
賢
厳
諺
傾
恵
畦
計
戟
結
剣
刑
慶
稽
詣
撃
血
喧
兄
慧
系
警
激
訣
圏
啓
憩
経
軽
隙
月
堅
圭
掲
継
頚
桁
件
嫌
献研硯絹県
遣鍵険顕験
弦減源玄現
こ
243
244
245
246
247
248
姑
糊
顧
御
乞
孤
袴
鼓
悟
鯉
己
股
五
梧
交
庫
胡
互
檎
佼
弧
菰
伍
瑚
侯
乎
戸
虎
午
碁
候
好
康
更
甲
考
貢
香
豪
黒
孔
弘
杭
皇
肯
購
高
轟
獄
孝
恒
校
硬
肱
郊
鴻
麹
漉
8
宏
慌
梗
稿
腔
酵
剛
克
腰
9
工
抗
構
糠
膏
鉱
劫
刻
甑
坤墾婚恨懇
痕紺艮魂
さ
く
226
227
228
229
230
231
232
向
垢
庚
晃
溝
耕
講
項
濠
鵠
込
困
混
7
個
故
誇
呉
語
倖
古
枯
跨
吾
誤
光
呼
湖
鈷
娯
護
公
固
狐
雇
後
醐
功
261
262
263
264
265
266
267
268
269
270
271
272
273
佐
詐
哉
災
載
堺
咋
鮭
叉
鎖
塞
采
際
榊
搾
笹
察
鯖捌
惨撒
讃賛
唆
裟
妻
犀
剤
肴
昨
匙
拶
錆
散
酸
嵯
坐
宰
砕
在
咲
朔
冊
撮
鮫
桟
餐
左
座
彩
砦
材
崎
柵
刷
擦
皿
燦
斬
沙
催
栽
細
冴
鷺
索
瑳
再
歳
菜
坂
作
錯
些
砂
最
済
裁
阪
削
桜
差
挫
才
祭
罪
埼
窄
査
債
採
斎
財
碕
策
札
晒
珊
暫
殺薩雑皐
三傘参山
産算纂蚕
残
し
273
274
275
276
277
278
279
280
281
282
283
284
285
使
子
施
紙
諮
字
耳
軸
湿
屡
社
刺
屍
旨
紫
資
寺
次
自
宍
漆
蕊
紗
司
市
枝
肢
賜
慈
滋
蒔
雫
疾
縞
者
史
師
止
脂
雌
持
治
辞
七
質
舎
謝
嗣
志
死
至
飼
時
爾
汐
叱
実
写
車
四
思
氏
視
歯
士
指
獅
詞
事
仕
始
支
祉
詩
似
仔
姉
孜
私
試
侍
伺
姿
斯
糸
誌
児
璽
鹿
執
蔀
射
遮
痔
式
失
篠
捨
蛇
磁
識
嫉
偲
赦
邪
示
鴫
室
柴
斜
借
而
竺
悉
芝
煮
勺
区点
1∼3桁目
286
287
288
289
290
291
292
293
294
295
296
297
298
299
300
301
302
303
304
305
306
307
308
309
310
311
312
313
314
315
区点4桁目
4 5 6
0
1
2
3
尺
惹
腫
綬
杓
主
趣
需
宗
繍
週
戎
宿
俊
楯
順
書
鋤
勝
娼
承
梢
症
肖
象
丞
擾
錠
拭
辱
慎
真
辛
甚
灼
取
酒
囚
就
習
酋
柔
淑
峻
殉
処
薯
除
匠
宵
抄
樟
省
菖
賞
乗
条
嘱
植
尻
振
神
進
尽
爵
守
首
収
州
臭
酬
汁
祝
春
淳
初
藷
傷
升
将
招
樵
硝
蒋
醤
冗
杖
埴
殖
伸
新
秦
針
腎
終
輯
従
夙
述
旬
醇
署
恕
妾
彰
松
照
紹
詳
丈
情
醸
蝕
心
疹
身
尋
酌
手
儒
周
修
舟
集
渋
縮
瞬
準
所
諸
償
召
小
掌
沼
礁
蕉
鉦
剰
浄
飾
燭
信
晋
紳
震
訊
7
8
9
釈錫若寂弱
朱殊狩珠種
受呪寿授樹
愁
蒐
醜
獣
粛
竣
潤
暑
助
拾
衆
什
縦
塾
舜
盾
曙
叙
洲
襲
住
重
熟
駿
純
渚
女
秀
讐
充
銃
出
准
巡
庶
序
秋
蹴
十
叔
術
循
遵
緒
徐
哨
少
捷
消
祥
衝
鍾
城
状
商
尚
昇
渉
称
裳
鐘
場
畳
唱
庄
昌
湘
章
訟
障
壌
穣
嘗
床
昭
焼
笑
証
鞘
嬢
蒸
奨
廠
晶
焦
粧
詔
上
常
譲
織
侵
森
臣
人
迅
職
唇
榛
芯
仁
陣
色
娠
浸
薪
刃
靭
触
寝
深
親
塵
食
審
申
診
壬
す
笥諏
逗吹垂帥推水
衰遂酔錐錘随
数枢趨雛据杉
裾
315
316
317
318
319
320
須
炊
瑞
椙
320
321
322
世瀬畝是凄制
勢姓征性成政整星晴棲
栖正清牲生盛精聖声製
酢
睡
髄
菅
澄
図
粋
崇
頗
摺
厨
翠
嵩
雀
寸
せ
区点
1∼3桁目
323
324
325
326
327
328
329
330
331
332
0
1
西
脆
籍
接
蝉
扇
煽
誠
隻
績
摂
仙
撰
旋
繊
選遷
全禅
区点4桁目
4 5 6
2
3
誓
席
脊
折
先
栓
穿
羨
銭
繕
請
惜
責
設
千
栴
箭
腺
銑
膳
逝
戚
赤
窃
占
泉
線
舛
閃
糎
醒
斥
跡
節
宣
浅
青
昔
蹟
説
専
洗
7
8
9
静
析
碩
雪
尖
染
斉
石
切
絶
川
潜
税
積
拙
舌
戦
煎
船薦詮賎践
鮮前善漸然
区点
1∼3桁目
359
360
361
362
363
0
1
丁兆
帖
暢朝
調諜
直朕
区点4桁目
4 5 6
2
3
凋
帳
潮
超
沈
喋
庁
牒
跳
珍
曽
組
倉
捜
漕
草
霜
噌
礎
鼠
宋
早
窓
装
岨
租
創
匝
巣
総
送
措
粗
双
惣
槍
綜
遭
曾
素
叢
想
槽
聡
鎗
狙
訴
壮
挿
争
葬
像
蔵
測
其
疏
阻
奏
掻
痩
蒼
増
贈
足
揃
疎
遡
爽
操
相
藻
憎
造促側則即息
速俗属賊族続
存孫尊損村遜
他
柁
岱
腿
台
宅
諾
太
楕
待
袋
第
択
凧
但
狸
旦
胆
段
汰
陀
怠
貸
醍
拓
蛸
達
鱈
歎
蛋
男
詑
駄
態
退
題
沢
只
辰
樽
淡
誕
談
棚
担
綻
暖
唾
騨
戴
逮
鷹
濯
堕
体
替
隊
滝
琢
妥
堆
泰
黛
瀧
託
惰
対
滞
鯛
卓
鐸
打
耐
胎
代
啄
濁
奪
誰
湛
鍛
脱
丹
炭
団
巽
単
短
壇
竪
嘆
端
弾
辿
坦
箪
断
智
畜
中
註
池
竹
仲
酎
痴
筑
宙
鋳
稚
蓄
忠
駐
置
逐
抽
樗
張
眺
長
鎮
彫徴懲挑
聴脹腸蝶
頂鳥勅捗
陳
津墜椎
槌追鎚痛通塚栂掴槻佃
漬柘辻蔦綴鍔椿潰坪壷
嬬紬爪吊釣鶴
剃貞呈堤
悌抵挺提
艇訂諦蹄
邸鄭釘
的笛適鏑
鉄典填天
転顛点伝
定
梯
逓
鼎
溺
展
殿
亭低停偵
帝底庭廷弟
汀碇禎程締
泥
哲
店
澱
摘
徹
添
田
擢敵滴
撤轍迭
纏甜貼
電
杜
努
唐
東
当
兎
登
土
塘
梼
祷
と
373
374
375
376
377
378
379
380
381
382
383
384
385
386
堵
賭
怒
宕
盗
答
鐙
憧
鴇
独
寅
頓
塗
途
倒
島
淘
筒
董
陶
撞
匿
読
酉
呑
妬
都
党
嶋
湯
糖
蕩
頭
洞
得
栃
瀞
曇
屠
鍍
冬
悼
涛
統
藤
騰
瞳
徳
橡
噸
鈍
徒
砥
凍
投
灯
到
討
闘
童
涜
凸
屯
値
致
秩
昼
瀦
知
蜘
窒
柱
猪
地
遅
茶
注
苧
弛
馳
嫡
虫
著
恥
築
着
衷
貯
0
斗
砺
刀
搭
燈
謄
働
胴
特
突
惇
豆
動
萄
督
椴
敦
渡
度
塔
桃
痘
踏
同
道
禿
届
沌
逃
堂
銅
篤
鳶
豚
吐
菟
奴
套
棟
等
透
導
峠
毒
苫
遁
386
387
388
奈那内乍凪薙
謎灘捺鍋楢馴縄畷南楠
軟難汝
388
389
二尼弐迩匂賑肉
虹廿日乳入
に
1
2
3
区点4桁目
4 5 6
7
8
9
0
1
2
3
区点4桁目
4 5 6
濡禰
祢寧葱猫熱年念捻撚燃
粘乃廼之埜嚢悩濃納能
脳膿農覗蚤
422
423
424
425
426
丙
幣平弊柄並蔽閉
僻壁癖碧別瞥蔑
片篇編辺返遍便
鞭
波
拝
倍
陪
柏
爆
畑
抜
半
犯
頒
派
排
培
這
泊
縛
函
畠
筏
反
班
飯
琶
敗
媒
蝿
白
莫
箱
八
閥
叛
畔
挽
破
杯
梅
秤
箔
駁
硲
鉢
鳩
帆
繁
晩
婆
盃
楳
矧
粕
麦
箸
溌
噺
搬
般
番
巴
罵
牌
煤
萩
舶
把
芭
背
狽
伯
薄
播
馬
肺
買
剥
迫
覇
俳
輩
売
博
曝
杷
廃
配
賠
拍
漠
肇
発
塙
斑
藩
盤
筈
醗
蛤
板
販
磐
櫨
髪
隼
氾
範
蕃
幡
伐
伴
汎
釆
蛮
肌
罰
判
版
煩
ひ
405
406
407
408
409
410
411
412
413
414
415
卑
比
誹
枇
肘
百
評
蛭
敏
否
泌
費
毘
鼻
弼
謬
豹
鰭
瓶
妃
疲
避
琵
柊
必
俵
廟
品
庇
皮
非
眉
稗
畢
彪
描
彬
彼
碑
飛
美
匹
筆
標
病
斌
匪
悲扉批披斐
秘緋罷肥被
樋簸備尾微
疋
逼
氷
秒
浜
髭
桧
漂
苗
瀕
彦
姫
瓢
錨
貧
膝
媛
票
鋲
賓
菱
紐
表
蒜
頻
ふ
415
416
417
418
419
420
421
422
府
膚
武
伏
怖
芙
舞
副
福
物鮒
粉糞
不
扶
譜
葡
復
腹
分
紛
付
敷
負
蕪
幅
複
吻
雰
埠
斧
賦
部
服
覆
噴
文
夫
普
赴
封
8
9
併
陛
箆
勉
兵
米
偏
娩
塀
頁
変
弁
ほ
は
393
394
395
396
397
398
399
400
401
402
403
404
405
7
へ
ぬ∼の
390
391
392
393
区点
1∼3桁目
如尿韮任妊忍認
390
な
ち
354
355
356
357
358
366
367
368
369
370
371
372
373
区点
1∼3桁目
婦
浮
阜
楓
富
父
附
風
冨
符
侮
葺
布
腐
撫
蕗
淵弗払沸仏
墳憤扮焚奮
聞
426
427
428
429
430
431
432
433
434
435
436
穂
俸
抱
蜂
亡
望
鉾
牧
本
保
募
包
捧
法
褒
傍
某
防
睦
翻
舗
墓
呆
放
泡
訪
剖
棒
吠
穆
凡
鋪
慕
報
方
烹
豊
坊
冒
頬
釦
盆
圃
戊
奉
朋
砲
邦
妨
紡
北
勃
捕歩甫補輔
暮母簿菩倣
宝峰峯崩庖
縫
鋒
帽
肪
僕
没
胞
飽
忘
膨
卜
殆
芳
鳳
忙
謀
墨
堀
萌
鵬
房
貌
撲
幌
蓬
乏
暴
貿
朴
奔
ま
436
437
438
439
440
摩磨魔麻埋妹
昧枚毎哩槙幕膜枕鮪柾
鱒桝亦俣又抹末沫迄侭
繭麿万慢満
漫蔓
440
441
味未魅巳箕岬密
蜜湊蓑稔脈妙粍民眠
み
む
441
442
務
夢無牟矛霧鵡椋婿娘
め
442
443
444
冥
名命明盟迷銘鳴姪牝滅
免棉綿緬面麺
も
444
445
446
447
摸模茂妄
孟毛猛盲網耗蒙儲木黙
目杢勿餅尤戻籾貰問悶
紋門匁
447
也冶夜爺耶野弥
や
30-20
31
Appendix
楚
蘇
喪
掃
燥
荘
騒
臓
捉束
卒袖
多
舵
帯
苔
大
托
茸
叩
谷
探
耽
檀
9
て
塑
祖
僧
層
曹
糟
走
た
343
344
345
346
347
348
349
350
351
352
353
354
8
つ
363
364
365
366
そ
332
333
334
335
336
337
338
339
340
341
342
寵
弔
町
銚
賃
7
区点
1∼3桁目
0
1
2
3
区点4桁目
4 5 6
7
8
9
448
449
矢厄役約薬訳躍靖柳薮
鑓
449
450
451
452
愉
諭
悠憂
祐裕
愈
輸
揖
誘
油
唯
有
遊
癒
佑優勇友宥幽
柚湧涌猶猷由
邑郵雄融夕
452
453
454
455
456
余
揚
窯
養
誉
擁
耀
抑
輿
曜
葉
欲
預
楊
蓉
沃
ゆ
よ
与
揺
羊
慾
傭
様
要
浴
幼
洋
謡
翌
妖
溶
踊
翼
予
容庸
熔用
遥陽
淀
ら
456
457
458
羅
螺裸来莱頼雷洛絡落酪
乱卵嵐欄濫藍蘭覧
り
458
459
460
461
462
463
464
465
31
利吏
Appendix
履李
痢
葎掠
隆竜
両凌
糧良
厘林
梨
裏
略
龍
寮
諒
淋
理
裡
劉
侶
料
遼
燐
璃
里
流
慮
梁
量
琳
466
467
468
469
470
瑠
嶺
齢
漣
涙
玲
歴
簾
連
累
礼
列
練
錬
類令伶例冷励
苓鈴隷零霊麗
劣烈裂廉恋憐
聯
470
471
472
473
呂魯櫓炉賂路
露労婁廊弄朗楼榔浪漏
牢狼篭老聾蝋郎六麓禄
肋録論
離
溜
旅
涼
陵
臨
陸
琉
虜
猟
領
輪
律
留
了
療
力
隣
率
硫
亮
瞭
緑
鱗
立
粒
僚
稜
倫
麟
る∼れ
塁
怜
暦
煉
蓮
ろ
わ
473
474
475
倭和話歪賄脇惑
枠鷲亙亘鰐詫藁蕨椀湾
碗腕
30-21
区点
1∼3桁目
476
477
478
479
480
481
482
483
484
485
486
487
488
489
490
491
492
493
494
495
496
497
498
499
500
501
502
503
504
505
506
507
508
509
510
511
512
513
514
515
516
0
乖
亟
仂
佝
侑
俑
倅
偃
傀
僮
儡
兢
冏
冫
几
刎
剞
劒
勣
甸
匸
卮
厰
叭
吩
咒
咥
唔
售
咯
喩
嘔
嘴
1
弌
乘
亠
仗
佗
佯
俚
伜
假
傚
僉
價
儺
竸
冑
决
處
刧
剔
剱
辧
勦
匍
區
夘
厶
叺
吝
呻
咬
咫
哽
啜
喊
喇
嗷
嘶
2
丐
亂
亢
仞
佇
來
俐
俶
會
傅
僊
僵
儷
兩
冓
冱
凩
刪
剪
劈
劬
飭
匐
卆
卻
參
吁
呎
咀
哄
哂
哮
啅
喟
喨
嘖
嘲
3
区点4桁目
4 5 6
丕
亅
亰
仭
佶
侖
俤
倡
偕
傴
傳
儉
儼
兪
冕
冲
凭
刮
剴
劑
劭
勠
匏
卅
卷
簒
吽
咏
呶
哈
咤
哭
啖
啻
嗚
嗾
嘸
个
豫
亳
仟
侈
儘
俥
倩
偐
傲
僂
儁
儻
兮
冖
冰
凰
刳
剩
辨
劼
勳
匕
丗
厂
雙
呀
呵
咄
咨
咾
哺
啗
啾
嗅
嗽
噫
7
8
9
丱
亊
亶
价
侏
俔
倚
倬
偈
丶
舒
从
伉
侘
俟
倨
俾
做
丼
弍
仍
佚
佻
俎
倔
俯
偖
丿
于
仄
估
佩
俘
倪
們
偬
乂
亞
仆
佛
佰
俛
倥
倆
偸
僖
儂
儿
冀
冤
况
凵
刹
剳
僞
儖
兀
冂
冦
冽
凾
剏
剿
僥
儕
兒
囘
冢
凅
刄
剄
剽
僭
儔
兌
册
冩
凉
刋
剋
劍
僣
儚
兔
冉
冪
凛
刔
剌
劔
劵
勵
匚
卉
厖
叟
听
咎
咐
勁
勸
匣
卍
厠
曼
吭
呟
咆
勍
勹
匯
凖
厦
燮
吼
呱
哇
勗
匆
匱
卞
厥
叮
吮
呷
咢
勞
匈
匳
卩
厮
叨
吶
呰
咸
咼
哢
唸
喘
嗟
嘛
噤
哘
唹
唳
喞
嗄
嗹
嘯
哥
啀
啝
單
嗜
噎
噬
哦
啣
喙
啼
嗤
噐
噪
唏
啌
喀
喃
嗔
營
嚆
区点
1∼3桁目
517
518
519
520
521
522
523
524
525
526
527
528
529
530
531
532
533
534
535
536
537
538
539
540
541
542
543
544
545
546
547
548
549
550
551
552
553
554
555
556
557
0
1
2
3
区点4桁目
4 5 6
嚀嚊嚠嚔
嚼囁囃囀
囹圀囿圄
圈國圍
圷圸坎圻
坿垉垓垠
埔埒埓堊
堡塢塋塰
墟墫墺壞
壗壙壘壥
壻壼壽夂
夭夲夸夾
奢奠奧奬
奸妁妝
姜妍姙姚
婀婬婉娵
嫋嫂媽嫣
嬌嬋嬖嬲
孀孑孕孚
學斈孺宀
寔寐寤實
寳尅將專
尹屁屆屎
屐屏孱
岑岔妛岫
峇峙峩峽
崗嵜崟崛
嵌嵒嵎嵋
嶢嶝嶬嶮
巓巒巖巛
帑帛帶帷
幟幢幤幇
廁廂廈廐
廖廣廝
廬廱廳廰
彜弋弑弖
彎弯彑彖
徃徂彿徊
徠徨徭徼
悳忿怡恠
怕怫怦怏
嚏
囈
圉
圓
址
垳
埖
毀
墻
壜
夊
竒
奩
佞
娥
娶
嫗
嫐
孛
它
寢
對
屓
屬
岻
峺
崑
嵬
嶽
巫
幄
幵
廏
廚
廴
弩
彗
很
忖
怙
怺
7
8
9
嚥嚮嚶嚴囂
囎囑囓囗囮
團
坏
垤
埣
塒
墸
壤
夐
奕
圖
坩
垪
堋
堽
墮
壟
夛
奐
嗇
埀
垰
堙
塹
壅
壯
梦
奎
圜
垈
埃
堝
墅
壓
壺
夥
奚
圦
坡
埆
塲
墹
壑
壹
夬
奘
侫
娟
婢
嫦
嬪
孥
宦
寞
尓
妣
娑
婪
嫩
嬶
孩
宸
寥
尠
妲
娜
媚
嫖
嬾
孰
寃
寫
尢
姆
娉
媼
嫺
孃
孳
寇
寰
尨
姨
娚
媾
嫻
孅
孵
寉
寶
尸
屮
岶
峭
崔
嵳
嶐
已
幃
并
乢
岼
嶌
崢
嵶
嶷
巵
幀
幺
屶
岷
峪
崚
嶇
嶼
帋
幎
麼
屹
峅
崋
崙
嶄
巉
帚
幗
广
岌
岾
崕
崘
嶂
巍
帙
幔
庠
廛
廸
弭
彙
徑
忻
怐
恚
廢
廾
弸
彡
徇
忤
怩
恁
廡
弃
彁
彭
從
忸
怎
恪
廨
弉
彈
彳
徙
忱
怱
恷
廩
彝
彌
彷
徘
忝
怛
恟
区点
1∼3桁目
558
559
560
561
562
563
564
565
566
567
568
569
570
571
572
573
574
575
576
577
578
579
580
581
582
583
584
585
586
587
588
589
590
591
592
593
594
595
596
597
598
0
1
2
恊恆恍
悁悍惧
悄悛
惠惓悴
愆惶惷
愍愎慇
愴愽慂
慴慯慥
憇憬憔
應懷懈
懣懶懺
戉戍戌
戞戡
扞扣扛
抓抖拔
拆擔拈
挌拮拱
捍搜捏
掉掟掵
揉插揶
攝搗搨
撓撥撩
據擒
舉擠擡
擺攀擽
攵攷收
敞敝敲
斷旃旆
旡旱杲
昜晏晄
晟晢晰
曁暹曉
曄暸
曵曷朏
朶杁朸
枉杰枩
枷柯枴
柢柮枹
桀桍栲
梟梏梭
梵梠梺
3
区点4桁目
4 5 6
恣
悃
悖
忰
愀
愾
慄
慱
憚
懃
懴
戔
截
扠
抃
拜
挧
掖
捫
揄
搏
撈
擅
抬
攘
攸
數
旁
昊
晉
暃
暾
曖
朖
朷
杼
柬
柎
桎
梔
椏
恃
悚
悗
悽
惴
愨
慳
慟
憊
懆
懿
戛
戮
扨
抔
拌
挂
掎
捩
搖
摧
撼
擇
擣
攜
畋
斂
旄
昃
晁
暈
暼
曚
朞
杆
杪
枳
柆
梳
條
梍
7
8
9
恤恂恬恫恙
悒
惆
惺
愧
慷
慝
憑
憺
懽
悧
悵
愃
慊
慘
慓
憫
懋
懼
悋
惘
愡
愿
慙
慵
憮
罹
懾
惡
慍
惻
愼
慚
憙
懌
懍
戀
悸
愕
惱
愬
慫
憖
懊
懦
戈
戰
扼
拗
拊
挈
掀
掾
搴
摯
戲
抂
拑
拂
拯
掫
揩
搆
摶
戳
抉
抻
拇
拵
捶
揀
搓
摎
扁
找
拏
抛
捐
掣
揆
搦
攪
扎
抒
拿
拉
挾
掏
揣
搶
撕
撻
擯
攅
效
斃
旌
旻
晞
暎
擘
攬
攤
敖
變
旒
杳
晝
暉
擂
擶
攣
敕
斛
旛
昵
晤
暄
擱
擴
攫
敍
斟
旙
昶
晧
暘
擧
擲
攴
敘
斫
无
昴
晨
暝
曠
朦
杞
枌
柩
柧
栫
梛
桾
昿
朧
杠
枋
枸
檜
桙
梃
椁
曦
霸
杙
枦
柤
栞
档
檮
棊
曩
朮
杣
枡
柞
框
桷
梹
椈
曰
朿
杤
枅
柝
栩
桿
桴
棘
区点
1∼3桁目
1
椢椦
棔
棹棠
楷楜
楙椰
榿槁
榧樮
樛槿
樔槫
樶橸
檍檠
檗
櫑櫟
欖鬱
歉歐
殀殄
殯殲
毬毫
氣汞
汾汨
泅泝
沺
洽洸
浚浹
涵淇
淅淺
渙湲
湃渺
滉溷
溥滂
滲漱
漾
潛濳
澳澣
濔濘
瀏濾
瀲灑
炮烟
煕熈
熕熨
燠燬
区点4桁目
4 5 6
2
3
棡
棧
棯
楸
楡
槓
榑
權
樊
橇
檄
蘗
檪
欟
歙
殃
殱
毳
汕
汳
沮
泛
洙
浙
淦
淙
湟
湎
滓
溟
滯
漓
潭
澡
濱
瀛
灣
烋
煦
熬
燧
椌
棕
椨
楫
楞
榾
榠
槹
樒
橢
檢
檻
櫚
欸
歔
殍
殳
毯
汢
沒
沱
泯
洵
涎
涸
淤
渾
渤
溽
潁
漲
滷
澂
澤
濮
瀚
炙
烝
煢
燗
燵
棍
椶
椪
楔
楝
槎
榜
槲
櫁
橙
檣
櫃
櫪
欷
歛
殘
殷
麾
汪
沐
沾
泙
洳
涕
淆
淕
渣
滿
溯
漑
滌
澆
潼
澹
濛
潴
炒
烙
煌
熹
燼
椒
椚
楾
榁
寨
榕
槧
樣
橦
櫂
櫻
盜
歟
殕
殼
氈
沂
泄
椄
椣
楮
楪
槊
榴
樅
樓
橈
檸
欅
欹
歡
殞
毆
氓
沍
泱
7
棗
椡
椹
榲
槝
槞
榱
橄
樸
檳
蘖
飮
歸
殤
毋
气
沚
泓
8
棣
棆
楴
榮
榻
槨
樞
樌
樢
檬
櫺
歇
歹
殪
毓
氛
沁
沽
9
椥
楹
椽
槐
槃
樂
槭
橲
檐
櫞
欒
歃
歿
殫
毟
氤
沛
泗
泪
洒
濤
淬
淪
湫
渝
滄
灌
洟
洌
涅
淞
淮
渫
游
溲
滬
衍
浣
淹
淌
渭
湶
溂
滔
滸
洶
涓
渕
淨
湮
湍
溪
滕
滾
洫
浤
渊
淒
渮
渟
溘
溏
漿
潺
潘
濆
瀉
瀝
炯
焉
煖
熾
潸
澎
澪
瀋
瀘
烱
烽
煬
燒
澁
澑
濟
濺
瀟
炬
焜
熏
燉
澀
濂
濕
瀑
瀰
炸
焙
燻
燔
潯
潦
濬
瀁
瀾
炳
煥
熄
燎
区点
1∼3桁目
640
641
642
643
644
645
646
647
648
649
650
651
652
653
654
655
656
657
658
659
660
661
662
663
664
665
666
667
668
669
670
671
672
673
674
675
676
677
678
679
680
0
爲
犂
狆
猗
獎
獺
琅
瑁
璧
瓷
甦
畩
疊
痃
痣
瘋
瘰
癩
皖
盍
眈
眸
瞎
瞽
砌
碚
碾
礫
禊
秕
稟
穢
窖
竊
竦
笞
1
2
3
区点4桁目
4 5 6
7
8
9
燹燿爍爐爛爨爭爬爰
爻爼爿牀牆牋牘牴牾
犁犇犒犖犢犧犹犲狃
狄狎狒狢狠狡狹狷倏
猊猜猖猝猴猯猩猥猾
獏默獗獪獨獰獸獵獻
珈玳珎玻珀珥珮珞璢
瑯琥珸琲琺瑕琿瑟瑙
瑜瑩瑰瑣瑪瑶瑾璋璞
瓊瓏瓔珱
瓠瓣瓧瓩瓮瓲瓰瓱瓸
甄甃甅甌甎甍甕甓甞
甬甼畄畍畊畉畛畆畚
畤畧畫畭畸當疆疇畴
疉疂疔疚疝疥疣痂疳
疵疽疸疼疱痍痊痒痙
痞痾痿痼瘁痰痺痲痳
瘍瘉瘟瘧瘠瘡瘢瘤瘴
瘻癇癈癆癜癘癡癢癨
癪癧癬癰
癲癶癸發皀皃皈皋皎
皓皙皚皰皴皸皹皺盂
盖盒盞盡盥盧盪蘯盻
眇眄眩眤眞眥眦眛眷
睇睚睨睫睛睥睿睾睹
瞋瞑瞠瞞瞰瞶瞹瞿瞼
瞻矇矍矗矚矜矣矮矼
砒礦砠礪硅碎硴碆硼
碌碣碵碪碯磑磆磋磔
碼磅磊磬
磧磚磽磴礇礒礑礙礬
祀祠祗祟祚祕祓祺祿
禝禧齋禪禮禳禹禺秉
秧秬秡秣稈稍稘稙稠
禀稱稻稾稷穃穗穉穡
穩龝穰穹穽窈窗窕窘
窩竈窰窶竅竄窿邃竇
竍竏竕竓站竚竝竡竢
竭竰笂笏笊笆笳笘笙
笵笨笶筐
筺笄筍笋筌筅筵筥筴
区点
1∼3桁目
681
682
683
684
685
686
687
688
689
690
691
692
693
694
695
696
697
698
699
700
701
702
703
704
705
706
707
708
709
710
711
712
713
714
715
716
717
718
719
720
721
区点4桁目
4 5 6
0
1
2
3
筧
箚
箴
簇
簟
籘
粭
粽
糲
筰
箋
篆
簓
簷
籟
粢
糀
糴
紂
絆
綉
綽
緝
縒
縹
繚
繿
纛
罅
罠
羌
羶
翩
耜
聟
肄
胥
脩
隋
腴
腟
膺
臧
舐
艚
艸
苟
茆
茵
茫
筱
箒
篝
篳
簫
籤
粫
糅
糶
紜
絳
絛
綫
緤
縱
繃
繹
纈
纜
罌
罨
羔
羸
翳
耡
聢
肆
胙
脣
腆
膃
膓
臉
臺
舖
艟
艾
苒
苜
茴
茗
筬
箏
篩
篷
簽
籖
粡
糂
糺
紕
絖
綏
總
緞
縟
縷
繪
纉
缸
罍
罩
羞
譱
翹
耨
聨
肅
胝
脯
脾
膈
膩
臍
臻
舩
艤
芍
苴
茉
茖
茘
紵
經
緇
緘
縡
縵
繙
辮
纎
罟
羇
羮
翦
耙
聚
聿
胛
脛
腦
膣
臂
臠
舍
艝
艷
苣
苞
茯
筮
筝
簑
簗
籌
籥
粨
糘
紆
紊
絎
絽
綢
緻
縉
縲
繩
續
缺
罎
罧
羝
翅
飜
耿
聳
肛
胄
腋
腓
膊
膰
臑
臾
舫
艢
芒
苳
苙
茲
莅
7
8
9
箝
箙
簔
簍
籃
籬
粳
糒
箘
篋
篦
篶
籔
籵
粲
糜
箟
篁
篥
簣
籏
粃
粱
糢
箍
篌
籠
簧
籀
粐
粮
鬻
箜
篏
簀
簪
籐
粤
粹
糯
絅
絲
綛
綯
緲
縋
縺
繼
纒
絋
絨
綺
緜
緡
縢
繧
繻
纐
紮
絮
綮
綸
縅
繆
繝
纃
纓
紲
絏
綣
綟
縊
繦
繖
緕
纔
紿
絣
綵
綰
縣
縻
繞
繽
纖
罐
罸
羚
翆
耆
耻
聲
肓
胚
网
羂
羣
翊
耄
聊
聰
肚
胖
罕
羆
羯
翕
耋
聆
聶
肭
脉
罔
羃
羲
翔
耒
聒
聹
冐
胯
罘
羈
羹
翡
耘
聘
聽
肬
胱
腑
膀
膵
臙
舁
舸
艨
芫
苺
胼
膂
膾
臘
舂
舳
艪
芟
莓
腱
膠
膸
臈
舅
艀
艫
芻
范
腮
膕
膽
臚
與
艙
舮
芬
苻
腥
膤
臀
臟
舊
艘
艱
苡
苹
茱荀茹荐荅
莚莪莟莢莖
区点
1∼3桁目
722
723
724
725
726
727
728
729
730
731
732
733
734
735
736
737
738
739
740
741
742
743
744
745
746
747
748
749
750
751
752
753
754
755
756
757
758
759
760
761
762
区点4桁目
4 5 6
0
1
2
3
茣
莨
菷
菻
蒂
蒿
蒡
蓼
莎
菴
萇
葭
葩
蒟
蔡
蕀
蕁
蕭
薺
蘓
乕
蚌
蛞
蜃
蜻
蝗
蝓
蟀
蟲
蠖
衂
衽
袤
裹
襃
襌
襦
覊
覽
訖
詆
誡
諫
諛
鞫
譖
譟
讖
豕
莇
萓
菠
萪
葆
蓙
蓿
蕣
蘂
薔
藏
蘋
虔
蚶
蛩
蛻
蜥
蝨
蝣
蟐
蟠
蠕
衒
袵
袰
褂
褞
褝
襤
覓
覿
訐
詈
誑
諳
謌
謦
譛
譬
讙
豢
莊
菫
菲
萼
萬
蓍
蓴
蕘
蕋
薛
薹
藾
號
蚯
蛬
蜑
蜩
蝮
蝪
雖
蠏
蠢
衙
衲
袿
裼
褥
襠
襭
覘
觀
訌
詼
誥
諧
謇
謫
譚
譯
讚
豬
薨
藉
蘊
虍
蚋
蛔
蜀
蜷
蝴
螽
蟯
蠑
衄
衵
袍
裝
褓
褸
覈
覺
訃
詒
誨
諚
諞
謳
證
讓
豐
荼
菎
萍
蕚
葯
蒻
蔗
蕈
蕕
藪
藐
藺
虧
蛄
蛟
蜉
蜚
蝙
蠅
螫
蠍
蠡
衞
袂
袱
裴
褪
襞
襪
覡
觚
訛
詭
誦
諤
謚
謾
譫
譴
谺
豸
7
8
9
莵
菽
萢
蒄
葹
蓚
蔘
荳
萃
萠
葷
萵
蓐
蔬
荵
菘
莽
葫
蓊
蓁
蔟
莠
萋
萸
蒭
葢
蓆
蔕
莉
菁
蔆
葮
蒹
蓖
蔔
薀
薇
藕
蘆
虱
蛆
蛛
蜍
蝠
薤
薜
藝
蘢
蚓
蚰
蛯
蛹
蝟
薈
蕷
藥
蘚
蚣
蛉
蜒
蜊
蝸
薑
蕾
藜
蘰
蚩
蠣
蜆
蜴
蝌
薊
薐
藹
蘿
蚪
蚫
蜈
蜿
蝎
螢
蟄
蟾
蠱
衢
袗
裃
裨
褫
螟
螳
蟶
蠶
衫
袒
裄
裲
襁
螂
蟇
蟷
蠹
袁
袮
裔
褄
襄
螯
蟆
蠎
蠧
衾
袙
裘
褌
褻
蟋
螻
蟒
蠻
袞
袢
裙
褊
褶
襯
覩
觜
訝
詬
誚
諱
諡
謨
襴
覦
觝
訥
詢
誣
謔
謖
譁
襷
覬
觧
訶
誅
諄
諠
謐
譌
襾
覯
觴
詁
誂
諍
諢
謗
譏
覃
覲
觸
詛
誄
諂
諷
謠
譎
譽讀讌讎讒
豁谿豈豌豎
豺貂貉貅貊
30-22
31
Appendix
599
600
601
602
603
604
605
606
607
608
609
610
611
612
613
614
615
616
617
618
619
620
621
622
623
624
625
626
627
628
629
630
631
632
633
634
635
636
637
638
639
0
区点
1∼3桁目
31
Appendix
763
764
765
766
767
768
769
770
771
772
773
774
775
776
777
778
779
780
781
782
783
784
785
786
787
788
789
790
791
792
793
794
795
796
797
798
799
800
801
802
803
区点4桁目
4 5 6
0
1
2
3
貍
貳
賻
賍
趾
跟
蹂
貎
貮
贄
贔
趺
跣
踵
蹇
蹕
躓
躾
輊
輦
轎
辯
迹
逶
遏
遨
邉
鄂
酩
醵
釡
鈑
鉐
錏
錙
鍮
鏥
鐃
鑄
鑽
閖
閾
闡
陋
陝
隧
雉
霓
貔
貶
贅
贖
跏
跼
踰
蹉
蹶
躑
軅
輅
輳
轗
辷
迺
逵
遐
遯
邏
鄒
酳
醴
釛
鉞
銜
鋺
錢
鍖
鏘
鐇
鑛
鑚
閘
闊
闥
陷
陟
隱
雍
霎
豼
賈
贊
赧
跚
踈
踴
蹌
蹲
躔
軈
輕
輻
轜
迚
逑
逹
遑
遶
邨
鄙
酲
醺
釼
鉗
銖
鍄
錚
鎰
鏃
鐐
鑠
鑼
閙
濶
闢
陜
陦
隲
襍
霑
蹣
躊
躱
軾
輌
轆
辭
逅
逧
遞
邊
郛
酥
醪
釟
鈕
鉋
鋩
鍼
鏨
鐓
鑒
鑷
閔
閹
關
陏
險
雋
霈
30-23
貘
賁
贇
赭
跖
踉
蹊
蹐
蹼
躙
軋
輒
輹
轢
迥
逕
迸
遒
隨
邯
鄲
醋
釀
釵
鉅
銓
錮
錣
鎬
鏝
鐶
鑢
鑾
閠
闃
阡
陞
陲
隰
雜
霏
7
8
9
戝
賤
贏
赱
跌
跿
貭
賣
贍
赳
跛
踝
貪
賚
贐
趁
跋
踞
貽
賽
齎
趙
跪
踐
貲
賺
贓
跂
跫
踟
蹈
躁
躪
軛
輙
轅
轣
迢
逡
蹙
躇
躡
軣
輓
轂
轤
迪
逍
蹤
躅
躬
軼
輜
輾
辜
迯
逞
蹠
躄
躰
軻
輟
轌
辟
邇
逖
踪
躋
軆
軫
輛
轉
辣
迴
逋
逎
遲
邱
鄰
醉
釁
釶
鉉
銛
遉
邂
邵
酊
醂
釉
鈞
鉤
鉚
逾
遽
郢
酖
醢
釋
釿
鉈
鋏
遖
邁
郤
酘
醫
釐
鈔
銕
銹
遘
邀
扈
酣
醯
釖
鈬
鈿
銷
錺
鎭
鏐
鐫
鑞
钁
閨
闍
阨
錵
鎔
鏈
鐵
鑪
鑿
閧
闌
阮
錻
鎹
鏤
鐡
鈩
閂
閭
闕
阯
鍜
鏖
鐚
鐺
鑰
閇
閼
闔
陂
鍠
鏗
鐔
鑁
鑵
閊
閻
闖
陌
陬
隴
霍
霖
隍
隶
雕
霙
隘
隸
雹
霤
隕
隹
霄
霪
隗
雎
霆
霰
区点
1∼3桁目
804
805
806
807
808
809
810
811
812
813
814
815
816
817
818
819
820
821
822
823
824
825
826
827
828
829
830
831
832
833
834
835
836
837
838
839
840
区点4桁目
4 5 6
0
1
2
3
霹
靤
靺
鞴
韶
顏
霽
靦
鞆
韃
韵
顋
顱
飩
餤
饋
馼
駻
驂
驥
髑
髮
髻
鬩
魑
鮨
鯢
鰉
鰥
鱧
鴆
鴿
鵝
鵯
鶺
鷽
麌
靡
黥
鼇
齣
齶
堯
霾
靨
鞋
韆
頏
顫
顴
飫
餠
饑
駟
駸
驀
驤
髓
髴
鬆
鬪
魘
鮴
鯤
鰓
鰤
鱶
鴪
鴾
鵞
鵺
鷆
鸚
麒
黌
黨
鼈
齟
龕
槇
靄
勒
鞏
韈
頌
顯
顳
餃
餬
饒
駛
騁
驃
驩
體
髱
鬘
鬮
魴
鯀
鯔
鰌
鰡
鱸
鴦
鵆
鵤
鶚
鷏
鸛
麕
黎
黯
皷
齠
龜
遙
飆
餞
饐
馮
駲
驅
驢
髏
髫
鬨
魎
鮠
鯣
鰔
鰛
鱠
鴃
鵁
鶫
鶸
鷯
麋
麭
黠
黽
齔
齲
靆
靫
鞐
韋
頸
顰
颪
餉
餮
饌
駝
騏
騾
驫
髞
髷
鬚
鬯
鮓
鯊
鯡
鰆
鰰
鳧
鶯
鵈
鵑
鶤
鷂
鸞
麑
黏
黴
鼕
齡
龠
瑤
7
8
9
靈
靱
鞜
韜
頤
靂
靹
鞨
韭
頡
靉
鞅
鞦
齏
頷
靜
靼
鞣
韲
頽
靠
鞁
鞳
竟
顆
颯
餒
餽
饕
駘
騅
驕
驪
髟
颱
餔
餾
馗
駑
駢
驍
骭
髢
颶
餘
饂
馘
駭
騙
驛
骰
髣
飄
餡
饉
馥
駮
騫
驗
骼
髦
飃
餝
饅
馭
駱
騷
驟
髀
髯
鬟
鬲
鮃
鮹
鰺
鰈
鱇
鳬
鴣
鬢
魄
鮑
鯆
鯲
鰒
鰲
鳰
鴟
鬣
魃
鮖
鯏
鯱
鰊
鱆
鴉
鵄
鬥
魏
鮗
鯑
鯰
鰄
鰾
鴈
鴕
鬧
魍
鮟
鯒
鰕
鰮
鱚
鳫
鴒
鵐
鶩
鷙
鹵
麝
黐
黶
鼡
齦
鵙
鶲
鷓
鹹
麥
黔
黷
鼬
齧
鵲
鷄
鷸
鹽
麩
黜
黹
鼾
齬
鶉
鷁
鷦
麁
麸
點
黻
齊
齪
鶇
鶻
鷭
麈
麪
黝
黼
齒
齷
Symbols/Pictographs
Enter
こんま
Symbol
,
Enter
わる
Symbol
÷
■ Symbols
Converted symbols
Enter
あっと
Symbol
@
あっとまー
く
Enter
Symbol
さんかく
△▲▽▼
しゃせん
/\
□■◇◆
いこーる
=
しかく
えん
¥
たす
+
どう
ヽヾゝゞ〃々
おす
おなじ
々
ぱーせんと %
おなじく
〃
ひく
−
おんぷ
♪
ひしがた
◇◆
×
かける
ほし
☆★
()〔〕
[]{}〈〉
《》
まる
○●◎
「」
『』
【】‘ ’
“ ”()
〈〉
むげん
∞
[] {} 「」
めす
♀
から
∼
やじるし
→←↑↓
こめ
※
ゆうびん
〒
ころん
:
るーと
√
31
Appendix
かっこ
30-24
■ Pictographs
31
Appendix
30-25
• Pictographs enclosed by
are animated.
• Some pictographs may not appear on some Vodafone
handset models.
• 3D Pictographs may look different from the actual ones.
31
Appendix
30-26
Emotions
Enter
31
Emoticon
Enter
Emoticon
Enter
Appendix
ありがと
ありがとう
ひやあせ
むか
ばんざい
あせあせ
こそこそ
わーい
びくっ
じーっ
おーい
どき
きこえない
ぶい
え
こまったもんだ
ぎゃはは
めがてん
ぶたー
あは
はてな
こあら
にこ
きらーん
いっぷく
にこ
しくしく
いっぷく
ちゅ
さよなら
ほし
ちゅ
いたた
ねてる
わくわく
えーん
ねむい
ういんく
なぜ
めも
さよなら
がーん
うん
がんば
えへん
かんぱい
ね
む
ども
ぽりぽり
いかり
30-27
Emoticon
Memory Capacity
Messaging
Inbox, Mail Folders
Up to 1,000
Sent Messages
Up to 500
Outbox, Drafts
Up to 50
*
Inbox, Mail Folders, Sent Messages, Outbox and Drafts in the Mail
Box use memory together.
*
In Inbox and Mail Folders, more than 1000 messages may be
stored.
*
The number that can be stored varies depending on the data
size.
*
Up to 5 subfolders and 95 files can be stored in Pictures,
Ringtones and Videos, respectively. Each subfolder can contain up
to 100 files, which means that up to 595 files can be stored in
each root folder. Music can contain up to 100 subfolders, each of
which can contain up to 100 files, which means that up to 1,000
files can be stored in Music.
Vodafone live!
Saved Pages
Up to 100 (Up to 300K bytes per
page)
Bookmarks
Up to 100
Data Folder (Up to 450M bytes)
Up to 595
Ringtones
Up to 595
V-appli
Up to 100
Music
Up to 1,000
Videos
Up to 595
Other Folders
Up to 100
Voice Rec.
Up to 100
More Folder
Up to 100
31
Appendix
Pictures
30-28
Specifications
• Setting an animation as wallpaper may cause shorter continuous talk time and continuous standby time.
The specifications are subject to change without prior notice.
• Running V-appli may cause shorter continuous talk time
and continuous standby time.
Vodafone 804N
Item
31
Specification
Weight
Approx. 115 g
Continuous talk time
Voice call: Approx. 180 minutes (3G)
Approx. 260 minutes (GSM)
Video call: Approx. 120 minutes
Continuous standby time
Approx. 250 hours (3G)
Approx. 210 hours (GSM)
Dimensions (W x H x D)
Approx. 48 x 93 x 23 mm
(when closed)
Maximum output
0.25 W (3G)
2.0W (GSM)
• Continuous talk time is measured under the following conditions: In standby mode and with normal signal reception.
Continuous standby time is measured under the following
conditions: In standby mode, with a fully-charged new battery installed, the handset folded, no calls/operations in
progress and normal signal reception. As the handset
could be used in a mixture of talk and standby modes, the
actual talk time and standby time may be shorter than
indicated above.
Battery
Item
Specification
Appendix
• The above values are calculated with the battery installed.
Voltage
• Battery operating time is calculated with stable signal conditions. Talking in a weak signal area or leaving the handset in standby mode while out of range consumes much
battery power and may reduce battery operating time by
more than half.
Type
Lithium-ion
Capacity
1000 mAh
Dimensions (W x H x D)
Approx. 37 x 60 x 4 mm
• Frequent use with the display light on (for Vodafone live!
operation, etc.) may cause shorter continuous talk time
and continuous standby time.
30-29
3.8 V
Rapid Charger
Item
Input voltage
Specification
100 - 240 V AC, 50/60 Hz
(Using the supplied power cord)
Rated input capacity
9 VA (AC 100)
Output voltage/Current
DC 5.4 V / 600 mA
Operating temperature
5 qC to 40 qC
Dimensions (W x H x D)
Approx. 38 x 63 x 20 mm
(excluding power cord)
Desktop Holder
Item
Specification
Input voltage/Current
5.4 V DC / 600 mA
(with Rapid Charger connected)
Output voltage/Current
5.4 V DC / 600 mA
(with Rapid Charger connected)
Dimensions (W x H x D)
Approx. 107 x 54 x 40 mm
31
Appendix
30-30
edit content . . . . . . . . . . . . . . . . 25-6
with rapid charger . . . . . . . . . . . 1-18
Bookmarks . . . . . . . . . . . . . . . . . . . 25-5
charging battery . . . . . . . . . . . . . . . 1-13
accessing functions
from desktop icons . . . . . . . . . . . . 8-6
break a line . . . . . . . . . . . . . . . . . . . . 4-9
charing
in-car charger . . . . . . . . . . . . . . 1-20
adjust volume . . . . . . . . . . . . . . . . . . 2-7
C
CLI Display . . . . . . . . . . . . . . . . . . . . 5-4
A
Alarms . . . . . . . . . . . . . . . . . . . . . . .15-6
All Reset . . . . . . . . . . . . . . . . . . . . .30-7
alphanumerics entry mode . . . . . . . . 4-3
answer a call . . . . . . . . . . . . . . . . . . . 2-6
video call . . . . . . . . . . . . . . . . . . . 6-3
answer a video call . . . . . . . . . . . . . . 6-3
cache . . . . . . . . . . . . . . . . . . . . . . . . 24-2
Calculator . . . . . . . . . . . . . . . . . . .15-10
Calendar . . . . . . .
check contents
edit contents .
holidays . . . . .
.
.
.
.
.
.
.
.
.
.
.
.
.
.
.
.
.
.
.
.
.
.
.
.
.
.
.
.
.
.
.
.
.
.
.
.
.
.
.
.
.
.
.
.
.
.
.
.
.
.
.
.
. 15-2
. 15-4
. 15-4
. 15-4
Any Key Answer . . . . . . . . . . . . . . . . 2-6
Call Barring . . . . . . . . . . . . .17-2、17-4
attachments
check . . . . . . . . . . . . . . . . . . . 21-11
Call Forwarding . . . . . . . . . . . . . . . . 17-6
attahcments
save . . . . . . . . . . . . . . . . . . . . 21-12
Call Waiting . . . . . . . . . . . 17-2、17-10
attahments . . . . . . . . . . . . . . . . . . 21-11
auto receive . . . . . . . . . . . . . . . . . . .23-3
30
auto timer . . . . . . . . . . . . . . . . . . . . . 7-5
Appendix
B
bar code reader . . . . . . . . . . . . . . . . . 7-8
battery charger . . . . . . . . . . . . . . . .1-13
battery level . . . . . . . . . . . . . . . . . . .1-14
Battery pack . . . . . . . . . . . . . . . . . . . . . i
Bluetooth . . . . . . . . . . . . . . . . . . . . .13-2
Bookmark
30-31
call time . . . . . . . . . . . . . . . . . . . . . . . 2-9
Caller ID Information . . . . . . . . . . . . 17-2
Caller ID Notification . . . . . .17-2、17-5
camera . . . . . . . .
auto timer . . .
image . . . . . .
playing videos
video . . . . . . .
.
.
.
.
.
.
.
.
.
.
.
.
.
.
.
.
.
.
.
.
.
.
.
.
.
.
.
.
.
.
.
.
.
.
.
.
.
.
.
.
.
.
.
.
.
.
.
.
.
.
.
.
.
.
.
.
.
.
.
.
.
.
.
.
.
.
.
.
.
.
.
.
.
.
.
7-2
7-5
7-4
7-8
7-6
centre access code . . . . . . . . . . . . . 1-30
changing
folder names . . . . . . . . . . . . . . . 21-4
SMS centre . . . . . . . . . . . . . . . . 23-6
charging
desktop holder . . . . . . . . . . . . . . 1-19
Converter . . . . . . . . . . . . . . . . . . . 15-10
creating mails . . . . . . . . . . . . . . . . . 20-2
creation mode . . . . . . . . . . . . . . . . 23-4
cursor . . . . . . . . . . . . . . . . . . . . . . . . 4-2
customer service . . . . . . . . . . . . . 30-38
customising handset address . . . . 18-4
D
Data Folder . . . . . .
delete files . . .
move files . . . .
rename folders
use image files
use sound files
.
.
.
.
.
.
.
.
.
.
.
.
.
.
.
.
.
.
.
.
.
.
.
.
.
.
.
.
.
.
.
.
.
.
.
.
. 11-5、12-2
. . . . . . . 12-8
. . . . . . . 12-8
. . . . . . . 12-7
. . . . . . . 12-4
. . . . . . . 12-4
delete
address . . . . . . . . . . . . . . . . . . . 20-4
appointments, holidays, events . 15-5
Bookmarks . . . . . . . . . . . . . . . . 25-6
desktop icon . . . . . . . . . . . . . . . . 8-7
downloaded V-appli . . . . . . . . . . 29-3
files . . . . . . . . . . . . . . . . . . . . . . 12-8
notes . . . . . . . . . . . . . . . . . . . 15-12
Phone Book . . . . . . . . . . . . . . . 5-10
Saved Pages . . . . . . . . . . . . . . .25-5
V-appli . . . . . . . . . . . . . . . . . . . .27-6
voice memo . . . . . . . . . . . . . . . . . 2-8
deletion
message . . . . . . . . . . . . . . . . . .21-8
desktop holder . . . . . . . . . . . . . . . .1-19
Dialled Calls . . . . . . . . . . . . . . . . . . . . 2-3
options . . . . . . . . . . . . . . . . . . . . . 2-4
display . . . . . . . . . . .
desktop icons . . .
display . . . . . . . .
display setting . .
external display .
text entry window
.
.
.
.
.
.
.
.
.
.
.
.
.
.
.
.
.
.
.
.
.
.
.
.
.
.
.
.
.
.
.
.
.
.
.
.
. . . . . .1-11
. . . . . . . 8-5
.8-2、1-11
. . . . . . . 8-2
. . . . . .1-12
. . . . . . . 4-2
message list screen . . . . . . . . . . 21-2
V-appli Library . . . . . . . . . . . . . . 27-4
F
file attachment . . . . . . . . . . . . . . . . 20-5
MMS settings . . . . . . . . . . . . . . . 23-4
Ignore If No ID . . . . . . . . . . . . . . . . . 2-7
Fix Mode . . . . . . . . . . . . . . . . . . . . . 4-14
font setting . . . . . . . . . . . . . . . . . . . . 8-8
image . . . . . . . . . . . . . . . . . . . . . . . . 7-4
attachment . . . . . . . . . . . . . . . . . 7-6
font size . . . . . . . . . . . . . . . . . . . . . 23-2
Inbox list screen . . . . . . . . . . . . . . . 21-2
G
input
text . . . . . . . . . . . . . . . . . . . . . . 20-4
Group Talk . . . . . . . . . . . . . . . . . . . 17-2
Input Mode . . . . . . . . . . . . . . . . . . . 4-12
initial settings . . . . . . . . . . . . . . . . . 1-22
Groups . . . . . . . . . . . . . . . . . . . . . . . 5-5
H
international call . . . . . . . . . . . . . . . . 2-2
display setting . . . . . . . . . . . . . . . . . . 8-2
handset . . . . . . . . . . . . . . . . . . . . . . . 1-8
download
files with content key . . . . . . . . . .25-3
handset codes . . . . . .
centre access code
network password .
security code . . . . .
.
.
.
.
.
.
.
.
.
.
.
.
.
.
.
.
.
.
.
.
.
.
.
.
.
.
.
.
.
.
.
.
.
.
.
.
. 1-30
. 1-30
. 1-30
. 1-30
handsfree . . . . . . . . . . . . . . . . . . . . . 2-8
heding text . . . . . . . . . . . . . . . . . . . 23-2
emergency call . . . . . . . . . . . . . . . .2-12
History . . . . . . . . . . . . . . . . . . . . . . 25-7
emoticons . . . . . . . . . . . . . 4-9、30-27
I
external camera . . . . . . . . . . . . . . . .1-10
external display . . . . . . . . . . . . . . . .1-12
external display clock . . . . . . . . . . . . 8-3
icon
display . . . . . . . . . . . . . . . . . . . . 1-11
external display . . . . . . . . . . . . . 1-12
K
kanji/hiragana entry mode . . . . . . . . 4-3
katakana entry mode . . . . . . . . . . . . 4-3
key tones . . . . . . . . . . . . . . . . . . . . . 9-5
keys & menus . . . . . . . . . . . . . . . . . 1-24
kuten code . . . . . . . . . . . . . . . . . . 30-18
M
mail . . . . . . . . . . . . . . . . .
changing folder names
character maximum . .
creating slides . . . . . .
..
.
..
..
.
.
.
.
.
.
.
.
.
.
.
.
.
.
.
.
.
.
.
.
.
.
.
.
18-2
21-4
20-2
20-6
30-32
30
Appendix
edit characters . . . . . . . . . . . . . . . . .4-17
enter characters . . . . . . . . . . . . . . . . 4-2
Insert mode . . . . . . . . . . . . . . . . . . 4-17
internal camera . . . . . . .1-9、7-5、7-6
display light . . . . . . . . . . . . . . . . . . . . 8-4
E
illumination . . . . . . . . . . . . . . . . . . . . 8-8
customising handset address
entry field . . . . . . . . . . . . . . .
file attachment . . . . . . . . . . .
new mail . . . . . . . . . . . . . . . .
send option settings . . . . . . .
sending . . . . . . . . . . . . . . . .
text input . . . . . . . . . . . . . . .
mail box . . . . . . . .
Draft . . . . . . . .
Inbox . . . . . . .
Mail Folders . .
Outbox . . . . . .
Sent Messages
.
.
.
.
.
.
.
.
.
.
.
.
.
.
.
.
.
.
.
.
.
.
.
.
.
.
.
.
.
.
.
.
.
.
.
.
.
.
.
.
.
.
.
.
.
.
.
.
.
.
.
.
.
.
.
.
.
.
.
.
.
.
.
.
.
.
.
.
.
.
.
.
.
.
.
.
.
.
.
.
.18-4
.20-2
.20-5
.19-2
.20-7
.20-4
.20-4
.
.
.
.
.
.
.
.
.
.
.
.
.21-2
.21-2
.21-2
.21-2
.21-2
.21-2
mail server . . . . . . . . . . . . . . . . . . . .22-2
usage . . . . . . . . . . . . . . . . . . . . .22-2
mail type . . . . . . . . . . . . . . . . . . . . .20-2
main image window . . . . . . . . . . . . . . 6-2
30
main menu . . . . . . . . . . . . . . . . . . . .1-25
opening . . . . . . . . . . . . . . . . . . .1-25
opening the main menu . . . . . . . .1-25
Appendix
make a call . . . . . . . . . . . . .
international call . . . . . .
Phone Book . . . . . . . . .
show/hide your caller ID
video call . . . . . . . . . . .
.
.
.
.
.
.
.
.
.
.
.
.
.
.
.
.
.
.
.
.
.
.
.
.
.
.
.
.
.
.
.
.
.
.
.
Media Player
view pictures . . . . . . . . . . . . . . . 10-9
memory capacity . . . . . . . . . . . . .30-28
memory card . . . . . . . . . . . . . . . . . . 11-2
Memory Reset . . . . . . . . . . . . . . . . . 30-7
message
deletion . . . . . . .
font size . . . . . . .
indicators . . . . . .
Internet access .
Message to . . . .
Move . . . . . . . . .
Phone to . . . . . .
phonebook entry
protection . . . . .
reply message . .
sort message . . .
.
.
.
.
.
.
.
.
.
.
.
.
.
.
.
.
.
.
.
.
.
.
.
.
.
.
.
.
.
.
.
.
.
.
.
.
.
.
.
.
.
.
.
.
.
.
.
.
.
.
.
.
.
.
.
.
.
.
.
.
.
.
.
.
.
.
.
.
.
.
.
.
.
.
.
.
.
.
.
.
.
.
.
.
.
.
.
.
.
.
.
.
.
.
.
.
.
.
.
.
.
.
.
.
.
.
.
.
.
.
. . 21-8
. . 23-2
. . 21-2
.21-10
.21-10
.21-13
.21-10
.21-10
. . 21-8
. . 21-6
.21-12
message list screen . . . . . . . . . . .21-12
message screen . . 20-2、20-4、21-3
OPTIONS . . . . . . . . . . . . . . . . . 21-4
. 2-2
. 2-2
. 5-6
. 2-2
. 6-2
missed calls . . . . . . . . . . . . . . . . . . . 2-5
microSD memory card
check data . . . . . . . . . . . . . . . . . 11-5
transfer data . . . . . . . . . . . . . . . 11-6
Missed Call Notification . . . . . . . . . 17-2
make a video call . . . . . . . . . . . . . . . . 6-2
MMS . . . . . . . . . . . . . . . . . . . . . . . . 18-2
manage files . . . . . . . . . . . . . . . . . .12-8
multi selector . . . . . . . . . . . . 1-9、1-10
manner mode . . . . . . . . . . . . . . . . . . . 3-2
Multitasking . . . . . . . . . . . . . . . . .30-13
Manufacture Number . . . . . . . . . . . .26-3
Music Player . . . . . . . . . . . . . . . . . . 10-2
30-33
Edit Playlist . . . . . . . . . . . .
operations during playback
options . . . . . . . . . . . . . . .
playback . . . . . . . . . . . . . .
screen . . . . . . . . . . . . . . .
settings . . . . . . . . . . . . . . .
.
.
.
.
.
.
.
.
.
.
.
.
.
.
.
.
.
.
.
.
.
.
.
.
10-6
10-4
10-4
10-3
10-2
10-5
N
network password . . . . . . . . . . . . . 17-5
Network-type V-appli . . . . . . . . . . . 27-2
new mail . . . . . . . . . . . . . . . . . . . . . 19-2
Notepad . . . . . . . . . . . . . . . . . . . . 15-11
numbers entry mode . . . . . . . . . . . . 4-3
O
operations during a call . . . . . . . . . . 2-7
optional services . . . . .
Call Forwarding . . . .
Call Waiting . . . . . . .
Caller ID Notification
enter service codes .
operate from landline
Voice Mail . . . . . . . .
.
.
.
.
.
.
.
.
.
.
.
.
.
.
.
.
.
.
.
.
.
.
.
.
.
.
.
.
.
.
.
.
.
.
.
.
.
.
.
.
.
.
.
.
.
.
.
.
.
. . 17-2
. . 17-6
. 17-10
. . 17-5
. . 17-2
. . 17-3
. . 17-8
OPTIONS . . . . . . . . . . . . . . . . . . . . 1-27
other settings . . .
auto answer .
charge tone . .
coverage tone
.
.
.
.
.
.
.
.
.
.
.
.
.
.
.
.
.
.
.
.
.
.
.
.
.
.
.
.
.
.
.
.
.
.
.
.
.
.
.
.
.
.
.
.
.
.
.
.
.
.
.
.
.
.
.
.
.
.
.
.
9-5
9-5
9-5
9-5
key tones . . . . . . . . . . . . . . . . . . . 9-5
R
Overwrite mode . . . . . . . . . . . . . . . .4-17
owner information . . . . . . . . . . . . . .2-10
P
Phone Book . . . . . . . . . . . . . . . . .
adding a number from call logs
make a call . . . . . . . . . . . . . . .
setting groups . . . . . . . . . . . . .
.
.
.
.
.
.
.
.
. 5-2
. 5-4
. 5-6
. 5-5
phone book
displaying secret data . . . . . . . . .14-8
pictographs . . . . . . . . . . . . 4-8、30-25
Pictures . . . . . . . . . . . . . . . . . . . . . .10-9
options . . . . . . . . . . . . . . . . . . 10-10
Pin code . . . . . . . . . . . . . . . . . . . . . .14-2
PIN lock . . . . . . . . . . . . . . . . . . . . . .14-3
PIN1 . . . . . . . . . . . . . . . . . . . . . . . . . . 1-7
PIN2 . . . . . . . . . . . . . . . . . . . . . . . . . . 1-7
Playlists . . . . . . . . . . . . . . . . . . . . . .10-3
power . . . . . . . . . . . . . . . . . . . . . . . .1-21
Prediction . . . . . . . . . . . . . . . . . . . . . 4-9
Rapid Charger . . . . . . . . . . . . . . . . . . . . . i
rapid charger . . . . . . . . . . . . . . . . . 1-18
retrieving network information . . . . 1-23
receive
message list . . . . . . . . . . . . . . . 22-2
retry function . . . . . . . . . . . . . . . . . 18-2
Received Calls . . . . . . . . . . . . . . . . . 2-4
receiving
MMS . . . . . . . . . . . . . . . . . . . . . 22-3
new mail . . . . . . . . . . . . . . . . . . 19-2
the rest of MMS . . . . . . . . . . . . . 19-3
receiving calls
Auto Answer . . . . . . . . . . . . . . . 16-5
using a stereo microphone . . . . . 16-5
receiving message list . . . . . . . . . . 22-3
record
voice . . . . . . . . . . . . . . . . . . . .15-13
releasing
PIN lock . . . . . . . . . . . . . . . . . . . 14-3
reply message . . . . . . . . . . . . . . . . . 21-6
reset
security levels . . . . . . . . . . . . . . 28-2
total call time . . . . . . . . . . . . . . . . 2-9
reset item list . . . . . . . . . . . . . . . . . 30-7
PUK . . . . . . . . . . . . . . . . . . . .1-7、14-3
resetting
all functions and personal data .14-11
resetting functions . . . . . . . . . .14-10
push tones . . . . . . . . . . . . . . . . . . . .16-2
retrieval
priority . . . . . . . . . . . . . . . . . . . . . . .20-7
ringtone . . . . . . . . . . . . . . . . 9-3、12-4
ringtone . . . . . . . . . . . . . . . . . . . 9-3
volume . . . . . . . . . . . . . . . . . . . . 9-3
S
save in data folder . . . . . . . . . . . . 21-12
Saved Pages . . . . . . . . . . . . . . . . . . 25-4
save . . . . . . . . . . . . . . . . . . . . . 25-4
scroll . . . . . . . . . . . . . . . . . . . . . . . 23-2
secret data
saving . . . . . . . . . . . . . . . . . . . . 14-8
security code . . . . . . . . . . . 1-30、14-2
change network password . . . . . 17-5
security levels . . . . . . . . . . . . . . . . 28-2
selecting itmes
with keypad . . . . . . . . . . . . . . . . 1-26
send option . . . . . . . . . . . . . . . . . . 20-7
server message list . . . . . . . . . . . . 22-3
service codes . . . . . . . . . . . . . . . . . 17-2
setting
active PIN1 . . . . . . . . . . . . . . . . 14-3
setting date & time . . . . . . . . . . . . . 1-22
Settings Reset . . . . . . . . . . . . . . . . 30-7
30-34
30
Appendix
playback
pictures . . . . . . . . . . . . . . . . . . .10-9
voice memo . . . . . . . . . . . . . . . . . 2-8
message list . . . . . . . . . . . . . . . 22-2
retrieving
network information . . . . . . . . . . 1-23
sever mail capacity . . . . . . . . . . . . .22-2
shutter sound . . . . . . . . . . . . . . . . . . 7-5
slide . . . . . . . . . . . . . . . . . . . . . . . . .21-3
slides . . . . . . . . . . .
adding a picture
adding slides . .
adding sound . .
adding video . . .
.
.
.
.
.
.
.
.
.
.
.
.
.
.
.
.
.
.
.
.
.
.
.
.
.
.
.
.
.
.
.
.
.
.
.
.
.
.
.
.
.
.
.
.
.
.
.
.
.
.
.
.
.
.
.
.
.
.
.
.
.20-6
.20-6
.20-6
.20-6
.20-6
SMS . . . . . . . . . . . . . . . . . . . . . . . . .18-2
30
pictographs . . . . . . . . . . . . . . . . . 4-8
Prediction . . . . . . . . . . . . . . . . . . 4-9
switch between single-byte and doublebyte . . . . . . . . . . . . . . . . . . . . . 4-4
switch between upper and lower cases
4-4
symbols . . . . . . . . . . . . . . . . . . . . 4-8
T9 . . . . . . . . . . . . . . . . . . . . . . . 4-12
2-touch . . . . . . . . . . . . . . . . . . . 4-16
text entry mode . . . . . . . . . . . . . . . . . 4-3
standby screen . . . . . . . . . . . . 8-2、8-5
desktop icons . . . . . . . . . . . . . . . . 8-5
text entry window . . . . . . . . . . . . . . . 4-2
stereo microphone . . . . . . . .6-3、16-4
TLS/SSL . . . . . . . . . . . . . . . . . . . . . 24-2
sub image window . . . . . . . . . . . . . . . 6-2
total duration . . . . . . . . . . . . . . . . . . . 2-9
symbols . . . . . . . . . . . . . . . 4-8、30-24
troubleshoot . . . . . . . . . . . . . . . . .30-14
Volume . . . . . . . . . . . . . . . . . . . 29-2
vCalendar . . . . . . . . . . . . . . . . . . . . 12-5
vCard . . . . . . . . . . . . . . . . . . . . . . . 12-5
vfiles . . . . . . . . . . . . . . . . . . . . . . . . 12-5
vibrator . . . . . . . . . . . . . . . . . . . . . . . 9-5
video
attachment . . . . . . . . . . . . . . . . . 7-8
video call . . . . . . . . . . . . . . . . . . . . . 6-2
turn on/off voices and sound . . . . 6-4
video call settings . . . . . . . . . . . . . . 6-5
Videos . . . . . . . . . . . . . . . . . . . . . 10-11
vNote . . . . . . . . . . . . . . . . . . . . . . . 12-5
Vodafone live! . . . . . . . . . . . . . . . . 18-2
Voice Mail . . . . . . . . . . . . . . 17-2、17-8
Appendix
U
Voice Recorder . . . . . . . . . . . . . . . 15-13
Tasks . . . . . . . . . . . . . . . . . . . . . . . .15-8
options . . . . . . . . . . . . . . . . . . . .15-8
Unknown . . . . . . . . . . . . . . . . . . . . . . 2-7
W
text entry
alphanumerics . . . . .
changing entry modes
edit characters . . . . .
emoticons . . . . . . . .
kanji/hiragana . . . . . .
katakana . . . . . . . . .
kuten codes . . . . . . .
New Line . . . . . . . . .
numbers . . . . . . . . . .
USIM card . . . . . . . . . . . . . . . . . . . . .
adding Phone Book contacts . . . .
exchange data between handset
USIM card . . . . . . . . . . . . . . . .
30-35
.
.
.
.
.
.
.
.
.
.
.
.
.
.
.
.
.
.
.
.
.
.
.
.
.
.
.
.
.
.
.
.
.
.
.
.
.
.
.
.
.
.
.
.
.
.
.
.
.
.
.
.
.
.
.
.
.
.
.
.
.
.
.
.
.
.
.
.
.
.
.
.
. . 4-7
. . 4-3
.4-17
. . 4-9
. . 4-6
. . 4-7
.4-10
. . 4-9
. . 4-8
uploading files . . . . . . . . . . . . . . . . 24-6
1-4
5-2
and
5-8
utility software . . . . . . . . . . . . . . . . . . . . i
V
validity period . . . . . . . . . . . . . . . . . 23-6
V-appli
Vibration . . . . . . . . . . . . . . . . . . 29-2
warranty and after sales service . 30-37
web page . . . . . . . . . .
accessing the web .
authentication . . . .
copy text . . . . . . . .
crating MMS . . . . .
Encoding . . . . . . . .
Font Size . . . . . . .
making a video call
making a voice call
menu . . . . . . . . . .
.
.
.
.
.
.
.
.
.
.
.
.
.
.
.
.
.
.
.
.
.
.
.
.
.
.
.
.
.
.
.
.
.
.
.
.
.
.
.
.
.
.
.
.
.
.
.
.
.
.
.
.
.
.
.
.
.
.
.
.
.
.
.
.
.
.
.
.
.
.
.
.
.
.
.
.
.
.
.
.
.
.
.
.
.
.
.
.
.
.
.
.
.
.
.
.
.
.
.
.
24-4
24-6
24-5
25-9
24-6
25-8
25-8
24-6
24-6
24-5
Page Information . . . . .
play melodies . . . . . . . .
save files . . . . . . . . . . .
Scroll Settings . . . . . . .
search for a word . . . . .
selection button . . . . . .
send message with URL
Server Certificate . . . . .
text entry field . . . . . . . .
update . . . . . . . . . . . . .
uploading files . . . . . . .
.
.
.
.
.
.
.
.
.
.
.
.
.
.
.
.
.
.
.
.
.
.
.
.
.
.
.
.
.
.
.
.
.
.
.
.
.
.
.
.
.
.
.
.
.
.
.
.
.
.
.
.
.
.
.
.
.
.
.
.
.
.
.
.
.
.
.25-8
.25-2
.25-2
.25-8
.25-9
.24-5
.25-9
.25-8
.24-5
.25-9
.24-6
web page command button . . . . . . .24-5
website . . . . . . . . . . . . . . . . . . . . . .18-3
accessing from menu . . . . . . . . .24-3
entering URL . . . . . . . . . . . . . . .24-3
30
Appendix
30-36
Warranty and After Sales Service
Repair
See Troubleshooting before contacting us for repair.
Warranty
A warranty comes with the purchase of the handset.
• Check the name of the shop and the date of purchase.
• Read contents fully and keep in a safe place.
• The warranty period is described in the warranty.
Vodafone shall not be liable for any loss or damage, to you or
third parties, arising from missed calls due to handset malfunctions.
30
Appendix
30-37
If you still have any problems, contact Customer Service
(zp.30-38) in your subscription area or your nearest
Vodafone Shop.
Please provide a detailed description of the problem.
• During the warranty period, repairs are performed under
the terms and conditions of the warranty.
• After the warranty period expires, repairs are performed if
possible on request at your expense.
Customer Service
If you have any questions about a Vodafone handset or services, please call General Information. For repairs, please call
Customer Assistance.
Vodafone Customer Centres
Vodafone International Call Centre
From a Vodafone handset, dial toll free at
157 for General Information or
113 for Customer Assistance
From outside Japan,
dial +81-3-5351-3491
(Please take care to dial the correct number.
International charges will apply to this call.)
Toll-free numbers from a landline:
Subscription area
Hokkaido, Aomori, Akita, Iwate, Yamagata, Miyagi, Fukushima, Niigata, Tokyo,
Kanagawa, Chiba, Saitama, Ibaraki, Tochigi, Gunma, Yamanashi, Nagano,
Toyama, Ishikawa, Fukui
Aichi, Gifu, Mie, Shizuoka
Osaka, Hyogo, Kyoto, Nara, Shiga, Wakayama
Tokushima, Kagawa, Ehime, Kochi
Fukuoka, Saga, Nagasaki, Oita, Kumamoto, Miyazaki, Kagoshima, Okinawa
General Information
0088-240-157
Customer Assistance
0088-240-113
General Information
0088-241-157
Customer Assistance
0088-241-113
General Information
0088-242-157
Customer Assistance
0088-242-113
General Information
0088-259-157
Customer Assistance
0088-259-113
General Information
0088-247-157
Customer Assistance
0088-247-113
General Information
0088-250-157
Customer Assistance
0088-250-113
30-38
30
Appendix
Hiroshima, Okayama, Yamaguchi, Tottori, Shimane
Contact
Introduction
Vodafone 804N User Guide
Thank you for purchasing the Vodafone 804N handset.
Note
●Read this guide thoroughly before using the
Vodafone 804N handset to ensure proper usage.
• Unauthorised copying of any part of this guide is
●After reading this guide, keep it for later reference.
●Accessible services may be limited to contract
conditions or service area.
The Vodafone 804N handset is compatible with the
W-CDMA and GSM network systems.
February 2006 Version 1
prohibited.
Vodafone K.K.
• The guide contents are subject to change without
prior notice.
• Steps have been taken to ensure the accuracy of
descriptions in this guide. If you find inaccurate or
missing information, please contact Customer
Service (zP.30-38).
*For more information, please dial
157 from a Vodafone handset for
Customer Service or visit your
To help protect the environment and recycle valuable
nearest Vodafone Shop.
resources, mobile phone and PHS shops displaying
the above mark accept mobile phones, batteries and
chargers of all manufacturers.
※Mobile phones, batteries and chargers collected for
recycling cannot be returned.
※To protect your privacy, delete any personal information
(telephone numbers, call logs, messages, etc.) before
taking your handset to the shop.
Model name: Vodafone 804N
Manufacturer: NEC Corporation
MDY-000031-JEA0