1
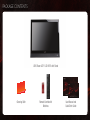
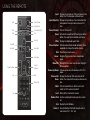
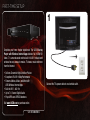
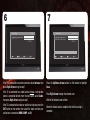
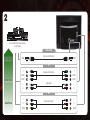
RAZOR LED™ LCD HDTV
E190VA / E220VA / E260VA – QUICK START GUIDE
PACKAGE CONTENTS
VIZIO Razor LED™ LCD HDTV with Stand
Cleaning Cloth
Remote Control with
Batteries
User Manual and
Quick Start Guide
USING THE REMOTE
Input: Change the input device. With each press of the
button, the TV will display a different input.
Input
Power/Standby
Input (Specific)
Wide
Sleep
Closed Caption (CC)
Exit
Arrow Up
Menu/OK
Arrow Left
Arrow Right
Input (Specific): Change the input device. Press the button that
corresponds to the input device you wish to
view.
Power/Standby: Turn the TV on or off.
Sleep: Activate the sleep timer. With each press of the
button, the sleep timer’s duration will change.
Wide: Change the displayed aspect ratio.
Closed Caption: Activate or deactivate closed captioning. Press
repeatedly to change the caption channel.
Exit: Close the on-screen menu.
Arrow Down
Volume Up/Down
Last
Channel
Up/Down
Mute
Number Pad
Arrow : Navigate the on-screen menu and episode
guide.
Menu/OK: Display the on-screen menu or select highlighted menu option.
Volume Up/Down: Increase or decrease the loudness of the TV’s
audio.
Channel Up/ Change the channel. With each press of the
Down: button, the channel will increase or decrease by
one.
Mute: Turn the sound off or on. When mute is activated, the TV’s audio is turned off.
Info
Last: Return to the channel last viewed.
Number Pad: Use the number pad to manually enter a channel.
Info: Display the Info Window.
Dash (-): Use with Number Pad to to manually enter a
sub-channel (18-1, 18-2, etc).
FIRST-TIME SETUP
1
Complete your home theater experience! The VIZIO Blu-ray
Player with Wireless Internet Apps delivers full 1080p HD
video, 7.1 surround sound and has built-in 802.11n dual-band
wireless for easy access to movies, TV shows, music and more
from the Internet.
• Delivers Cinematic High-Definition Picture
• Exceptional Full HD 1080p Performance
• Streams Movies, Music, and More with
VIZIO Wireless Internet Apps
• Built-In Wi-Fi - 802.11n
• Up to 7.1 Channel Digital Audio
• Plays MP3s and JPEG Slideshows
Visit www.VIZIO.com to purchase online.
VIZIO RECOMMENDS
Connect the TV’s power cable to an electrical outlet.
2
3
Initial Setup
Welcome
Allow the VIZIO setup Wizard to
help you tune your channels.
Next
Connect your antenna or cable/satellite box to the coaxial port on
the back of the TV.
EXIT
Exit
Turn the TV on by pressing the Power/Standby button on the
remote.
The Setup App is displayed.
Press the Right Arrow button on the remote to go to the next
screen.
4
5
Initial Setup
Language
Please select your language:
English
Initial Setup
Mode Setting
Please select your input location:
Español
Home
Retail
Français
Back
5
Select
Next
EXIT
Exit
Back
Select
Next
EXIT
Exit
Press the Up/Down Arrow buttons on the remote to highlight your
preferred language.
Press the Up/Down Arrow buttons on the remote to highlight
Home.
Press Right Arrow to go to the next screen.
Press Right Arrow to go to the next screen.
6
7
Initial Setup
Tuner
Please select your input source:
Antenna
Cable
Back
Select
Next
EXIT
Exit
If the TV is connected to an external antenna, select Antenna, then
press Right Arrow and go to step 7.
If the TV is connected to a cable service without a set-top box
(cable is connected directly from the wall outlet) select Cable,
then press Right Arrow and go to step 7.
If the TV is connected to a cable or satellite set-top box, press the
EXIT button on the remote, then select the input to which your
set-top box is connected (HDMI, COMP, or AV).
Initial Setup
Channel Scan
Please connect your cable or
antenna to the DTV/TV input
Scan
Back
Select
Skip Scan
Next
EXIT
Exit
Press the Up/Down Arrow buttons on the remote to highlight
Scan.
Press Right Arrow to begin the channel scan.
Wait for the channel scan to finish.
When the channel scan is complete, the first-time setup is
complete.
CONNECTING YOUR DEVICES
1
HDMI
Component
To get the best high-resolution picture and sound on your new
VIZIO TV, connect your devices with an HDMI cable.
VIZIO High Speed HDMI Cables are manufactured to produce
the best picture on VIZIO TVs and feature:
Composite AV
•1080p and for full HD video and future Ultra-HD video
•Great flexibility for thin wall mounts
•Stays securely connected at sharp angles
•Limited lifetime warranty
Visit www.VIZIO.com to purchase online.
VIZIO RECOMMENDS
Ensure your device has one of the above ports.
Turn your device and the TV off.
Connect your devices using the connection chart on the next
page. This chart shows the most common connections. If you
would like to see additional connection options, see Connecting
Your Devices in the user manual.
2
Blu-ray/DVD Player, Game Console,
or other Device
CHOOSE ONE:
Best Picture
HDMI
High Speed HDMI Cable
HDMI
OR
Y
Better Picture
Component Video Cable
CB/PB
CR/PR
L
Y
CB/PB
CR/PR
Audio Cable
R
L
R
OR
L
Good Picture
R
VIDEO
Composite AV Cable
L
R
VIDEO
HELP TOPICS
Products are often returned due to a technical problem rather than a defective product that may
result in unnecessary shipping charges billed to you. Our trained support personnel can often
resolve the problem over the phone. For more information on warranty service or repair, after the
warranty period, please contact our Support Department at the number below.
Customer support and quality service are integral parts of VIZIO’s commitment to service excellence.
For technical assistance contact our VIZIO Technical Support Department via email or phone.
Please have your VIZIO model number, serial number, and date of purchase available before your
call.
There is no power.
There is a picture,
but there is no sound.
The picture quality
seems low.
Phone:
Fax:
Email:
Web:
(877) 698-4946
(949) 585-9563
[email protected]
www.VIZIO.com
Hours of operation: Monday - Friday: 6 am to 9 pm (PST)
Saturday - Sunday: 8 am to 4pm (PST)
• Ensure the power cord is securely connected to the AC socket on the TV and a working electrical outlet.
• Press the Power/Standby button on the remote or on the right side of the TV.
• Try plugging the power cord into a different electrical outlet.
• Press the Volume Up button on the remote or on the right side of the TV.
• Press the MUTE button on the remote to ensure Mute is off.
• Press MENU, then select TV Settings > Audio. Ensure TV Speakers is set to On.
• View high-definition (HD) programs when possible.
• Ensure all cables are securely connected.
I cannot return to
the Setup App.
• The on-screen menu has guided setup. Press MENU, then select Help > System Reset >
Start Setup Wizard. Enter your PIN (default is 0000). Select Yes.
There are black/gray
bars on the top/bottom/
sides of the picture.
• Set the TV to Wide or Zoom Mode. Press MENU, then select Wide. Highlight Wide or Zoom and press OK.
• Adjust the video settings of your external device (Blu-ray™ or DVD player).
• If using the RGB (computer) input, ensure you are using a supported desktop resolution.
• Some television channels add black bars to the picture.
The TV does not respond
when I press buttons
on the remote control.
• Insert new batteries into the remote.
• Point the remote directly at the TV’s sensor.
• Ensure nothing is blocking the TV’s sensor. (The sensor is on the front of the TV, in the lower right corner.)
The TV displays “No Signal”
The TV displays
“Please Scan Channels!”
• Ensure your connected devices are turned on.
• Press the INPUT button on the remote and select the input to which your device is connected (HDMI,
Composite, etc).
• If connected to a cable/satellite service with a set-top box via coaxial cable, press the TV button on the remote,
then use the Number Pad to change the channel to 3 or 4.
• Ensure your antenna or cable/satellite box is connected to the TV.
• Select the input to which your antenna or cable/satellite box is connected.
• Perform a channel scan. Press MENU, then select TV > Channels > Scan Channels > On.
TRADEMARKS SHOWN ARE THE PROPERTY OF THEIR RESPECTIVE OWNERS. IMAGES USED ARE FOR ILLUSTRATION PURPOSES ONLY. VIZIO, THE V LOGO, WHERE VISION MEETS VALUE,
AND OTHER VIZIO TRADEMARKS ARE THE INTELLECTUAL PROPERTY OF VIZIO INC. PRODUCT FEATURES AND SPECIFICATIONS ARE SUBJECT TO CHANGE WITHOUT NOTICE.
© 2011 VIZIO INC. ALL RIGHTS RESERVED.
110103ST-NC