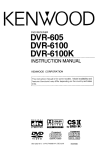
1
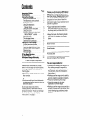
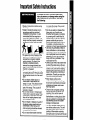
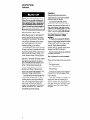
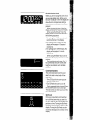
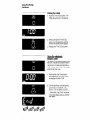
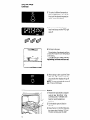
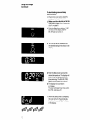
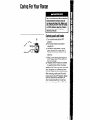
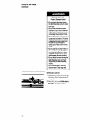
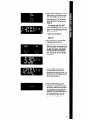
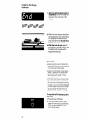
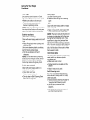
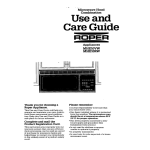
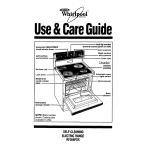
%+l
4”
Home
of
Appliances
Use& CareGuide
Electronic automatic
MEALTIMER’” oven
Model and serial
Bake element
Anti-tip bracket
Removable
storage drawer
SELF-CLEANING
ELECTRIC
RANGE
RF387PXW
Contents
Page
Important
Safety
Instructions.
Using Your Range
Using the surface units
The electronic oven controls
Setting the clock
Using the electronic
Minute Timer
Using the Oven-Off button.
Using the oven
Using the electronic automatic
MEALTIMER’” control
Theovenvent
. .._..........
The storage drawer
Optional door panel pat
Caring For Your Range
Control panel and knobs
Solid element surface units
Using the Self-Cleaning cycle
Cleaning tips
The oven light
If You Need Service
Or Assistance.
Whirlpool
Range Warranty.
8
9
9
11
15
16
16
17
17
Thank you for buying a Whirlpool
appliance.
Please complete
and
mail the Owner Registration
Card
provided with this product. Then
complete the form below. Have this
Information ready If you need service or
call with a question.
l Copy model and serial numbers
from plate (behind the oven door on
the frame) and purchase date from
sales slip.
l Keep this book, the Cooking Guide
and sales slip together in a handy
place.
Model Number
18
19
Serial
Number
23
25
Purchase
26
28
Service
Date
Company
Phone
Number
‘@21990Whirlpool Corporation
Remove the Consumer Buy Guide
label. It will be easier to remove before
the range is used. To remove any remaining glue:
l Rub briskly with thumb to make a ball,
then remove.
or
l Soak area with liquid hand dishwashing detergent before removing glue as
described above.
Do not use sharp instruments,
rubbing alcohol, flammable fluids or
abrasive cleaners. These can damage
the finish. See “Important Safety
Instructions” on page 3.
You are responsible
for:
l Installing and leveling the range on a
floor strong enough to support its
weight, and where it is protected from
the elements. (See the Installation
Instructions.)
l Making sure the range is not used by
anyone unable to operate it properly.
l Properly maintaining
the range.
l Using the range only for jobs
expected of a home range.
l Making sure the range is secured by a
properly installed anti-tip bracket, with
a rear leveling leg positioned under
bracket.
ImDortant
SafetvInstructions
To reduce the risk of fire, electrical shock,
injury to persons, or damage when using the
including
range, follow basic precautions,
l
l
Read all instructions before using
the range.
Install or locate the range only in
accordance with the provided
Installation Instructions. It is recommended that the range be installed by a qualified installer. The
range must be properly connected
to electrical supply and grounded.
$~!A,~
l
..d..d~
l
To reduce the risk of tipping of the
appliance, the appliance must be
secured by a properly installed
anti-tip bracket. To check if the
bracket is installed properly,
remove the storage drawer (see
page 16) and verify that the anti-tip
bracket is engaged.
l Do not use the range for warming
or heating the room. Persons could
be burned or injured, or a fire could
start.
l Do not leave children alone or
unattended in area where the
range is in use. They should never
be allowed to sit or stand on any
part of the range. They could be
burned or injured.
l Do not wear loose or hanging garments when using the range. They
could ignite if they touch a hot surface unit or heating element and
you could be burned.
* Do not repair or replace any part of
the range unless specifically recommended in this manual. All
other servicing should be referred
to a qualified technician.
l Do not store flammable
materials
l
l
l
l
l
in or near the range. They could
explode or burn.
Do not use water on grease fires.
Never pick up a flaming pan.
Smother flaming pan on cooktop
by covering with a well-fitted lid,
cookie sheet or flat tray. Flaming
grease outside of pan can be
extinguished with baking soda or,
if available, a multipurpose dry
chemical or foam-type extinguisher.
Use only dry potholders. Moist or
damp potholders on hot surfaces
may result in burns from steam. Do
not let potholder touch hot heating
elements. Do not use a towel or
bulky cloth for a potholder. They
could catch on fire.
Select a pan with a flat bottom that
is about the same size as the surface unit. If pan is smaller than the
surface unit, some of the heating
element will be exposed and may
result in the igniting of clothing or
potholders. Correct pan size also
improves cooking efficiency.
Never leave surface units
unattended at high heat settings.
A boil-over could result and cause
smoking and greasy spill-overs
that may ignite.
Check to be sure glass cooking
utensils are safe for use on the
cooktop. Only certain types of
glass, glass-ceramic, ceramic,
earthenware or other glazed utensils are suitable for cooktops without breaking due to the sudden
change in temperature.
Turn pan handles inward, but not
over other surface units. This will
help reduce the chance of burns,
igniting of flammable materials,
and spills due to bumping of the pan
Important
Continued
l
l
l
l
l
l
l
Safety
Instructions
Use care when opening oven door.
Let hot air or steam escape before
removing or replacing food.
Do not heat unopened containers.
They could explode. The hot contents could cause burns and container particles could cause injury.
Keep range vents unobstructed.
Always position oven racks in
desired location while oven is cool.
If rack must be moved while oven
is hot, do not let potholder contact
hot heating element in oven.
Do not clean door seal. It is essential for a good seal. Care should be
taken not to rub, damage, or move
the seal. Clean only parts recommended in this Use and Care
Guide.
Do not use oven cleaners. No commercial oven cleaner or oven liner
protective coating of any kind
should be used in or around any
part of the oven.
Before self-cleaning the oven,
remove broiler pan, broiler grid,
oven racks and other utensils. Do
not use your oven to clean miscellaneous parts.
l
l
Do not store things children might
want above the range. Children
could be burned or injured while
climbing on it.
Do not touch surface units, areas
near units, heating elements or interior surfaces of oven. Surface
units and heating elements may be
hot even though they are dark in
color. Areas near surface units and
interior surfaces of an oven become hot enough to cause burns.
During and after use, do not touch,
or let clothing or other flammable
materials contact surface units,
areas near units, heating elements
or interior surfaces of oven until
they have had sufficient time to
cool. Other surfaces of the range
may become hot enough to cause
burns; such as, the oven vent
opening, the surface near the vent
opening, the cooktop, the oven
door and window.
. FOR YOUR SAFETY.
DO NOT STORE OR USE
GASOLINE OR OTHER
FLAMMABLE
VAPORS AND
LIQUIDS IN THE VICINITY OF
THIS OR ANY OTHER
APPLIANCE.
THE FUMES
CAN CREATE A FIRE
HAZARD OR EXPLOSION.
- SAVE THESE INSTRUCTIONS
-
UsingYourRange
Usingthe surfaceunits
Control knobs must be pushed
in before turning them to a setting.
They can be set anywhere between
HI and OFF.
Surface unit markers
The solid dot in the surface unit marker
shows which surface unit is turned on
by that knob.
Surface unit indicator
lights
One of the Surface Unit Indicator
Lights on the control panel will glow
when a surface unit is on.
Burn and Fire Hazard
Be sure all control knobs are
turned to OFF and all indicator
lights are OFF when you are not
cooking. Someone could be
burned or a fire could start if a
surface unit is accidentally
left ON.
Until you get used to the settings, use the following
as a guide.
For best results, start cooking at the
hrgh settings; then turn the control knob
down to continue cooking.
Use HI to start foods cooking; 10
bring liquids to a boil.
Use MED-HI to hold a rapid boil; to
fry chicken or pancakes.
Use MED for gravy, puddings and
icing; to cook large amounts of
vegetables.
Use MED-LO to keep food cooking
after starting it on a higher setting.
Use LO to keep food warm until
ready to serve. Set the heat higher or
lower within the LO band to keep food
at the temperature you want.
5
Using Your Range
Continued
Solid elements stay hot for a long
time. Do not use the HI setting for
long periods of time or leave pans
on hot elements when cooking is
done. Burned food and damage to
the cookware could result.
Solid element surface units
Before placing a pan on solid element
surface units for the first time, heat on
HI setting for five minutes. The surface
units will give off smoke as the protective coating, applied at the factory,
finishes bonding to the surface.
Solid element surface units are made
of heavy cast-Iron to provide even cooking. Each surface unit has a built-in protective limiter as a safety feature. The
limiter senses uneven cooking temperatures and automatically reduces the
heat level. The limiter will sense uneven
heat when a pan boils dry or when a
pan is removed and the surface unit is
left on. The heat level may also be
reduced automatically if the bottom of
the pan is not flat or if the pan is too
large or too small for the element. This
will result in longer cooking times.
Solid elements hold heat longer than
conventional surface units. For best
cooking results, use a high setting for
only a very short period of time. Then
use a lower setting to complete the
cooking. You may want to turn the solid
element surface unit OFF a few minutes before you finish cooking.
Cookware
Pans should be the same size or
larger than the surface unit to prevent
boil-overs and hot handles.
Use only flat-bottomed utensils.
Flat bottoms allow maximum contact
between the pans and surface units for
fast, even cooking. Pans with uneven
bottoms or with raised patterns on the
bottoms are not suitable. Do not use
trivets, woks with skirts, or canners with concave or ridged
bottoms.
To check your cookware for flatness,
place a straight-edge across the bottom
of each piece. Move the straight-edge
around. If light shows anywhere
between the pan and the straight-edge,
the pan is not flat. Do not use it.
See the Cooking Guide for additional
cookware information.
The electronicovencontrols
There are three parts in the oven control
section.
-The digital display.
-The command buttons.
-The Set Knob.
Instructions for each oven control are
covered on the followrng pages. Read
them carefully.
When you first plug in the range, the
display will show four flashing 8’s. If,
after you set the clock (page 8) the display agatn shows four flashing 8’s; your
electricity was off for a while. Reset
the clock.
Digital
display/clock
pressed.
When showing the time of day, the
display will show the hour and minutes.
When using the Minute Timer, the
display shows minutes and seconds in
the following sequence:
. For settings from l-59 seconds, each
second will show in the display.
l For settings from l-10 minutes, the
display will increase in 10 second
increments.
. For settings from IO-99 minutes, the
display will increase in 1 mrnute
increments.
When using the Bake Hours and/or
Stop Time, the display shows hours and
Command
buttons
The light comes on when you touch the
command buttons.
Set Knob
clockwlse decreases the number on the
display.
Using Your Range
Continued
Settingthe clock
I. Push the Time Of Day button. The
TIME light will show in the display.
2. While pushing the Time Of Day
button, turn the Set Knob until the
correct time shows in the display.
3. Release the Time Of Day button.
Usingthe electronic
MinuteTimer
The Minute Timer does not star-l or stop
the oven. It works like a kitchen timer. It
can be set in minutes and seconds up
to 99 minutes. You will hear four beeps
when the set time IS up.
1. Push the Mtn/Sec Timer button
The TIMER light will come on and
the display will show “0:OO.”
2 Turn the Set Knob until the desired
time shows in the display. The
Mrnute Timer will begin counting
down 2 seconds after the time is set.
When time is up, “End” ~111 show
in the large display and you will hear
four beeps.
To cancel the Minute Timer:
Push the Mrn/Sec Timer button and
turn the Set Knob until “0:OO“ shows
In the display.
or
l Qurckly push the Mrn/Sec
Timer
button twice.
l
Usingthe Oven-Offbutton
The Oven-Off button wtll cancel any
command button except for the Min/
Set Timer button. When the Oven-Off
button is pushed, “Off” WIII show In the
large display. The display will then show
the time of day or, If Minute Timer is
also being used, the time remarnrng.
Usingthe oven
Baking
1. Postron the rack(s) properly before
turning on the oven. To change
rack position, lift rack at front and
pull out.
The rack(s) should be placed so
the top of the food will be centered In
the oven. Always leave at least 1% to
2 inches (4-5 cm) between the sides
of the pan and the oven walls and
other pans. For more information,
see the Cookrng Guide.
2. Push the Bake button. “35O’F” WIII
show in the small display to Indicate
the preset temperature and the
PRE-BAKE and ON lights WIII
come on.
9
Using Your Range
Continued
3. To cook at a dlfferent temperature,
push the Bake button. Turn the Set
Knob until the desrred temperature
shows In the small drsplay.
4. The oven IS preheated when you
hear three beeps and the PRE- light
goes off.
5. Put food In the oven.
Durtng baking, the elements will turn
on and off to keep the oven temperature
at the setting.
The top element helps heat during baking, but does not turn red.
6. When baking IS done, push the OvenOff button. “Off” will show in the display and all other displays will go off
NOTE: The oven automatically turns off
after 11 hours, 59 minutes
Broiling
1. Position the rack before turning the
oven on. See “Broil Chart” In the
Cooking Guide or a reliable cookbook for recommended rack
positions.
2. Put the broiler pan and food on
the rack.
3. Close the door to the Broil Stop positron (open about 4 inches, 10.2 cm).
The door will stay open by itself.
4. Push the Broil button. “brl” will show
tn the small display and the BROIL
and ON ltghts will come on.
5. When broiling IS done, push the
Oven Off-button. “Off” will show in
the large display and all other
displays will go off.
Custom broil
If food is cooking too fast, push the
Broil button and turn the Set Knob
counterclockwise untrl 325°F shows in
the small display. The CUST BROIL
and ON lights will come on.
9 If you want food to broil slower from
the start, push the Broil button and
turn the Set Knob so a temperature
between 15O’F and 325°F (65.5”C
and 162.7%) shows in the small display. The lower the temperature, the
slower the cooking. The CUST BROIL
and ON lights will come on.
NOTE: The door must be partly open
whenever the oven IS being used to
broil. Leaving the door open allows the
oven to maintain proper temperatures.
l
Usingthe electronicautomaticMEALTIMER’”
control
The automatic MEALTIMER’” control
will turn the oven on and off at times
you set.. .even when you are not
around.
Automatic baking is ideal for foods
which do not require a preheated oven,
such as meats and casseroles. Do not
use the automatic
cycle for cakes,
cookies, etc...undercooking
will
result.
11
Using Your Range
Continued
To start baking now and stop
automatically:
1. Position the oven rack(s) properly
and place the food in the oven.
2. Make sure the clock is set to the
right time of day. (See “Setting the
clock” on page 8.)
6. The display will count down
in minutes.
The oven will beep three times when
the PRE- light goes off.
7. When the baking time is completed,
the oven will turn off automatically,
beep four times and “End” will show
in the display.
To delay start and stop
automatically:
1. Position the oven rack(s) properly
and place the food in the oven
2. Make sure the clock is set to the
right time of day. (See “Setting the
clock” on page 8.)
3. Push the Bake Hours button. “0:OO”
WIII show In the display and the
BK/HR light will come on.
4. Turn the Set Knob clockwise until
the desired baking time shows in the
display.
5. Push the Stop Time button. The
ST/TM light will come on. Turn the
Set Knob clockwise until the desired
stop time shows in the display.
The time of day will show in the display and the ST/TM light will flash
until Bake is selected.
Using Your Range
Continued
7. Changes can be made at any time
by pressing a command button.
on. The display will count down in
minutes.
The oven will beep three times when
the PRE- light goes off.
9. When the baking time is completed,
the oven will turn off automatically,
beep four times and “End” will show
in the display.
To avoid sickness and food waste
when using the MEALTIMER’”
control:
l Do not use foods
that will spoil
while waiting for cooking to
start, such as dishes with milk
or eggs, cream soups, and
cooked meats or fish. Any food
that has to wait for cooking to
start should be very cold or
frozen before it is put in the
oven. MOST UNFROZEN FOODS
SHOULD NEVER STAND MORE
THAN TWO HOURS BEFORE
COOKING STARTS.
l Do not use foods
containing
baking powder or yeast when
using delay start. They will not
rise properly.
l Do not allow food to remain
in
oven for more than two hours
after end of cooking cycle.
Theovenvent
Hot air and moisture escape from the
oven through a vent on the backguard
below the control panel. The vent is
needed for air circulation. Do not
block the vent. Poor baking can
result.
Ok
vent
Burn Hazard
When the oven is ON, pans and
pan handles left near the oven
vent can become hot enough to
burn the user and to melt plastics.
Use pot holders to move pans.
Never store plastics, paper or
other items that could melt or
burn near the oven vent, or any
of the surface units.
Using Your Range
Continued
Thestoragedrawer
The storage drawer is for storing pots
and pans. The drawer can be removed
to make it easier to clean under the
range, and to check for installation of
the anti-tip bracket. Use care when
handling the drawer.
Removing the storage drawer:
1. Empty drawer of any pots and pans
before removing drawer. Pull drawer
straight out to the first stop. Lift front
and pull out to the second stop.
2. Lift back slightly and slide drawer all
the way out.
Replacing
the storage drawer:
1. Fit ends of drawer slide rails into
the drawer guides on both sides of
openrng.
2. Lrft drawer front and push In until
metal stops on drawer slrde rails
clear white stops on drawer guides.
Lrft drawer front again to clear
second stop and slide drawer closed.
To verify the anti-tip bracket
is engaged:
l Remove the storage drawer.
l Look to see if the anti-tip bracket is
attached to floor with screws,
l Make sure one rear leveling leg is
positioned under the anti-tip bracket.
l See Installation
Instructions for
further details.
Optionaldoorpanelpat
If you would like to change the color
of your oven door glass to white or
almond, you can order one of these
kits: White (Kit No. 814069) or Almond
(Kit No. 614070) from your Whirlpool
Dealer. The kits include easy installation instructions.
CaringForYourRange
Burn and Electrical Shock Hazard
Solid element surface units do
not glow red when hot. Make sure
all controls are OFF and the range
is COOL before cleaning. Failure
to do so can result in burns or
electrical shock.
Controlpanelandknobs
1. Turn control knobs to the OFF
position.
2. Pull control knobs and buttons
straight off.
3. Use warm soapy water or spray
glass cleaner, and a soft cloth, to
wipe the control panel. Rinse and
wipe dry.
4. Wash control knobs and buttons in
warm soapy water. Rinse well and
dry. Do not soak.
5. Replace control knobs and buttons
by pushing them firmly into place.
NOTE: When cleaning, never use steel
wool, abrasives, or commercial oven
cleaners which may damage the finish.
After cleaning, make sure all control
knobs point to the OFF position. Make
sure you have not turned oven ON
when replacing buttons. If oven has
been turned on, push Oven-Off button.
Caring For Your Range
Continued
Solidelementsurfaceunits
1. For best results, wipe off surface
units with a damp soft cloth and
soapy water after each use. Burnedon food may be removed with a
soapy scouring pad. The red spot in
the center of the surface unit will
gradually wash off. This is normal
and will not affect the operation of
the surface unit.
2. IMPORTANT: After cleaning, apply
a thin coat of salt-free oil to the
COOL surface units, then heat 3-5
minutes. It may stall smoke slightly
when heated. If surface units have
dark spots caused by grease and
food, the oil treatment will improve
their appearance but not eliminate
the spots.
NOTE: Optional Electrol’ dressing
can be applied to the surface units to
improve their appearance.
3. The stainless steel trim rings will
yellow from the heat of the surface
units and pans. This is normal. The
yellowing can be removed by using
stainless steel cleaner or Cook Top
Polishing Creme on the trim rings.
To obtain order information for
Cook Top Polishing Creme (Part
NO. 814009) or ElectroIP dressing
(Part No. 814030), write to:
Whirlpool Corporation
Attention: Customer Service Dept.
1900 Whirlpool Drive
LaPorte, IN 46305
18
Usingthe Self-Cleaningcycle
1
Before you start
1. Clean the areas shown by hand.
They do not get hot enough during
the Self-Cleaning cycle for soil to
burn away. Use hot water and
detergent or a soapy steel wool
pad on.
l The inside of the door. (The center
area of the door does not need to
be hand cleaned.)
l The frame around the oven.
Do not clean, move or bend the
fiberglass seal. Poor cleaning and
poor baking will result.
Hand clean frame
I
Hand clean door
around edge
Do not hand
The Self-Cleaning cycle uses very
high heat to burn away SOII. Before
you start, make sure you understand
exactly how to use the Self-Cleaning
cycle safely.
:lean seal
2. Remove the broiler pan and any
pots and pans you may have stored
in the oven.
NOTE: The broiler pan (without grid)
can be cleaned in the oven only if most
of the soil has been removed by handcleaning or a dishwasher. The chrome
broiler grid will discolor if cleaned in
the Self-Cleaning cycle.
3. Wipe out any loose soil or
grease. Thus will help reduce smoke
during the Self-Cleaning cycle.
4. If you want the oven racks to
remain shiny, remove from the
oven and clean by hand. Otherwrse. put oven racks on second and
fourth guides (guides are counted
from bottom to top). After racks are
cleaned In the Self-Cleaning cycle,
they become harder to slide. See
page 24
Turn on a vent hood or other krtchen
vent during the Self-Cleaning cycle.
This will help remove heat and odors
that are normal during the cycle.
19
Caring For Your Range
Continued
l
l
l
l
l
l
Setting
-
.A,
--e
20
Personal Injury and
Product Damage Hazard
Do not touch the oven during
the Self-Cleaning
cycle. It could
burn you.
Do not use commercial oven
cleaners in your oven. Cleaners
may produce hazardous fumes
or damage the porcelain finish.
Do not force the Lock Lever, you
could bend or break it. The lever
is designed to stay locked until
the oven is cool enough to
safely open. Wait until it moves
freely.
Do not use foil or other liners in
the oven. During the Self-Cleaning cycle foil can burn or melt
and damage the oven surface.
Do not block the vent during the
Self-Cleaning
cycle. Air must
move freely for best cleaning
results.
Do not leave plastic utensils
near the vent. They may melt.
the controls
1. Make sure the clock IS set to the right
time of day. (See “Setting the clock”
on page 8.)
2. Move the Lock Lever all the way to
the right-the
Clean posltlon
3. Push the Self-Clean button. A 3-hour
Self-Cleaning cycle will be set automatically. “C3:OO” will show in the
large display and “cln” will show in
the small display. The ON light will
come on.
If a cleaning cycle other than 3
hours is desired, push the Self-Clean
button. Turn the Set Knob to the new
time up to 4 hours.
l Use 2 hours for light soil.
l Use 3-4 hours for moderate to
heavy soil.
4. Skip to Step 6 if you want the SelfCleaning cycle to start now.
5. (Option) Delayed clean: Push the
Self-Clean button. Immediately push
the Stop Time button. Immediately
turn the Set Knob to the new stop
time. The DELAY and ST/TM lights
will come on.
After the stop time has been set,
the large display will go back to
showing the current time of day. “cln”
will show in the small display and the
DELAY light will stay on.
6. After the Self-Cleaning cycle is
stat-led, the Locked Indicator Light
will come on when the oven temperature exceeds normal baking temperatures. The Lock Lever must not
be moved and the door can’t be
opened when this light is on.
21
Caring For Your Range
Continued
7. After the Self-Cleaning
cycle is
completed,
the oven will beep four
times and “End” will show in the
display.
-
-
8. When the oven reaches normal baking temperatures, the Locked Indicator Light goes off. Move the Lock
Lever back to the left. Do not force
it. Wait until it will move easily.
9. After the oven is cool, wipe off
any residue or ash with a damp cloth.
If needed, touch up spots with a
soapy steel wool pad.
Special tips
Keep the kitchen well ventilated durIng the Self-Cleaning cycle to help get
rid of heat, odors and smoke.
l Clean the oven before it gets heavily
solled. Cleaning a very soiled oven
takes longer and results In more
smoke than usual.
9 If the Self-Cleaning cycle doesn’t get
the oven as clean as you expected.
the cycle may not have been set long
enough or you may not have prepared
the oven properly. Set the Self-CleanIng cycle longer the next time and
hand clean areas noted on page1 9.
l
TO stop the Self-Cleaning
cycle at
any time:
1. Push the Oven-Off button
2. When the Locked Indicator Light
goes off, move the Lock Lever back
to the left. Do not force it. Wait
until it moves easily.
22
How it works
During the Self-Cleaning cycle, the
oven gets much hotter than it does for
baking or broiling...approximately
875°F (468°C). This heat breaks up
grease and soil and burns it off.
This graph shows approximate
temperatures and times during a
Sell-Cleamng cycle for 3 hours.
Self-Cleaning
(Approximate
cycle-three
temperatures
hour setting
and times)
1000°F
538°C
800°F
42PC
SOO’F
316°C
400°F
204°C
200°F
93°C
START
~5 hr.
1 hr.
1% hrs.
2 hrs.
2% hrs.
3 hrs.
3% hrs.
STOP
Notice that the heating stops when the 3-hour setting is up, but that it takes longer
for the oven to cool down enough to unlock
Cleaningtips
Control knobs
Clean with warm soapy wafer and a
sofl cloth.
l Wash, rinse and dry well.
l Do not soak.
Control panel
Clean with warm soapy wafer or spray
glass cleaner and a soft cloth.
l Wash, rinse and dry well.
l Follow directions
provided with
the cleaner.
Surface units (Solid elements)
Clean with warm soapy water on a soft
cloth.
l Make sure the cooktop and the surface units are cool.
OR
Clean with soapy scouring pad or
scouring powder.
l Wipe off the surface units after each
use.
NOVE: After each cleaning, heat
surface units until dry.
To darken surface units or to
remove rust spots:
Use salt-free oil on a soft cloth.
l Make sure surface units are cool.
l After each cleaning,
apply thin coat 01
oil to surface units, then heat for 3-5
minutes. Slight smoking of oil will
occur.
Use Electrol’” dressing (Part No.
814030)’
l Follow the directions on the dressing.
NOTE: This will improve surface unit
appearance, but will not eliminate
dark spots.
‘See page 18 for ordering information.
23
Caring For Your Range
Continued
Trim rings
Use stainless steel cleaner or Cook
Top Polishing Creme (Part No. 814009)’
l Make sure surface units are cool.
l Follow directions provided with
cleaner or polishing creme.
NOTE: Yellowing of trim rings is normal
from heat of the surface units and pans.
*See page 18 for ordering information.
Exterior surfaces
(other than cooktop)
Clean with warm soapy water and a soft
cloth.
l Wipe off regularly when cooktop and
oven are cool.
Use a non-abrasive plastic scrubbing
pad for heavily-soiled areas,
l Do not use abrasive
or harsh
cleansers.
NOTE: Do not allow food containing
acids (such as vinegar, tomato, lemon
juice or milk) to remain on surface.
Acids may remove the glossy finish.
Broiler pan and grid
Clean with warm soapy water or a
soapy steel wool pad.
l Clean after each use.
l Wash, rinse and dry well.
l Do not clean in Self-Cleaning
Oven
(See note on page1 9 .)
24
Oven racks
Use Self-Cleaning cycle.
l Leave in oven during Self-Cleaning
cycle.
OR
Clean with warm soapy water or soapy
steel wool pads.
. Wash, rinse and dry. Use soapy steel
wool pads for heavily-soiled areas.
NOTE: The oven racks will discolor and
be harder to slide when left in the oven
during the Self-Cleaning cycle. If you
want them to stay shiny, remove from
the oven and clean by hand. If racks are
left in the oven during the Self-Cleaning
cycle, apply a small amount of vegetable oil to the sides of the racks to make
them easier to slide.
Oven door glass
Use spray glass cleaner or warm soapy
water and a non-abrasive plastic
scrubbing pad.
l Make sure oven is cool
l Follow directions
provided with the
cleaner.
l Wash, rinse and dry well.
Self-Cleaning
oven
For areas outside the Self-Cleaning
area use warm soapy water or soapy
steel wool pads.
l Follow directions starting on page 19,
“Using the Self-Cleaning cycle.”
. Do not use commercial oven
cleaners.
. Do not use foil to line the bottom of
your Self-Cleaning Oven.
Theovenlight
The oven light will come on when you
open the oven door. To turn the light on
when the oven door is closed, push the
Oven Light Switch on the control panel.
Push the switch again to turn off the
light.
Electrical
Shock and Personal
Injury Hazard
l Make sure oven and light bulb
are cool and power to the range
has been turned OFF before
replacing the light bulb. Failure
to do so could result in electrical shock or burns.
. The bulb cover must be in place
when using the oven. The cover
protects the bulb from breaking,
and from high oven temperatures. Since bulb cover is made
of glass, be careful not to drop
it. Broken glass could cause
injury.
To replace the oven light:
1. Unplug appliance or disconnect at
main power supply.
2. Remove the glass bulb cover in the
back of the oven by screwing it out
counterclockwise.
3. Remove the light bulb from its
socket. Replace the bulb with a
40-watt appliance bulb.
4. Replace the bulb cover by screwing it
in clockwise. Plug in appliance or
reconnect at the main power supply.
NOTE: The oven light will not work
during the Self-Cleaning cycle.
25
If YouNeedServiceOrAssistance...
We suggestyou follow these
steps:
1. Before
calling
for assistance...
Performance problems often result from
lrttle things you can find and frx wrthout
tools of any kind
If nothing operates:
Is the power supply cord plugged Into
a live circuit with the proper voltage7
(See Installation Instructions.)
l Have you checked your home’s main
fuses or ctrcurt breaker box7
l
If the oven will not operate:
Are the electronic controls set
correctly? See pages 9-l 5.
l Have you programmed
a delay start
trme?
l
If surface units will not operate:
l Have you checked your home’s main
fuses or circuit breaker box7
l Do the control knobs turn?
If surface unit knob(s) will
not turn:
l Did you push In before trytng to turn7
If the Self-Cleaning
cycle will
not operate:
l Does the clock show the right time
of day?
9 Is the Lock Lever all the way to
the right?
l Have you set a delay start time?
26
If cooking results aren’t what you
expected:
. Is the range level?
l If needed, have you preheated
the
oven as the recipe calls for?
l Are you following a tested recipe from
a reliable source?
l Are you using pans recommended
in
the Cooking Guide?
l If bakrng, have you allowed 1% to 2
inches (4-5 cm) on all sides of the
pans for air circulation?
l Are the pans the size called for in the
recipe?
l Do the cooking utensils have smooth,
flat bottoms and fit the surface
elements being used?
If the oven temperature
seems too
low or too high:
l Was your old oven accurate?
Your old
oven may have shifted gradually while
your new oven may be more exact.
l If, after using the oven, you are not
satisfied with the temperature settings,
they can be adjusted by an authorized
WhirlpoolSM service technician. (See
“If you need service” on page 27 )
If there has been a power interruption, the display will flash 8888.
Reset the clock (page 8).
If “call” shows on the display,
call for service. (See “If you need
service”
on page 27.)
See the Cooking Guide for more
information on cooking problems and
how to solve them.
2. If you need assistance:..
Call Whirlpool
COOL-LINE”
service assistance
telephone
number.
Dial free from anywhere
in the U.S.:
l-800-253-1301
and talk with one of our trained consultants The consultant can instruct you
in how to obtain satisfactory operation
from your appliance or, if service is necessary, recommend a qualified service
company in your area.
If you prefer, write to:
Mr. Donald Skinner
Director of Consumer Relations
Whirlpool Corporation
2000 M-63
Benton Harbor, Ml 49022
Please include a daytime phone
number in your correspondence.
4. If you need FSP”
replacement
parts’...
FSP is a registered trademark of
Whirlpool Corporatron for quality parts.
Look for this symbol of quality whenever you need a replacement part for
your Whirlpool appliance. FSP replacement parts will fit right and work right,
because they are made to the same
exacting specifications used to build
every new Whirlpool appliance.
To locate FSP replacement parts in
your area, refer to Step 3 above or call
the Whirlpool COOL-LINE service
assistance number in Step 2.
5. If you are not satisfied with
how the problem was solved:..
l
3. If you need service?..
Whirlpool has a
mi,fl
01’”
~~~n,;Yg”~~~‘l
seaVIce rized Whirlpools”
service companies Whirlpool service technicians
are trained to fulfill the product warranty
and provide after-warranty service, anywhere in the United States. To locate
the authorized Whirlpool service company in your area, call our COOL-LINE”
service assistance telephone number
(see Step 2) or look in your telephone
directory Yellow Pages under:
3
l
Contact the Major Appliance
Consumer Action Panel (MACAP).
MACAP is a group of independent
consumer experts that voices consumer vrews at the highest levels of
the major appliance industry.
Contact MACAP only when the
dealer, authorized servicer or
Whirlpool have failed to resolve
your problem.
Major Appliance Consumer
Action Panel
20 North Wacker Drive
Chicago, IL 60606
MACAP will in turn inform us of
your action.
‘When requesting assistance, please
provide: model number, serial number,
date of purchase, and a complete
description of the problem. This information is needed in order to better
respond to your request.
27
Whirlpool’RangeProduct
Warranty
1 LENGTH
OF WARRANTY
FULL ONE-YEAR
WARRANTY
From Date of Purchase
WHIRLPOOL
1 WHIRLPOOL
EROOl
WILL PAY FOR
FSP@ replacement parts and repair labor to
correct defects in materials or workmanship.
Service must be provided by an authorized
WhirlooolSM service company.
WILL NOT PAY FOR
A. Service calls to:
1. Correct the installation of the range product
2. Instruct you how to use the range product
3. Replace house fuses or correct house wiring or plumbing.
4. Replace owner accessible light bulbs.
B. Repairs when range product is used in other than normal, srngle-famrly
household use.
C. Pick up and delivery. This product is designed to be repaired in
the home.
D. Damage to range product caused by accident, misuse, fire, flood, acts of
God or use of products not approved by Whirlpool.
WHIRLPOOL CORPORATION SHALL NOT BE LIABLE FOR INCIDENTAL OR
CONSEQUENTIAL
DAMAGES. Some states do not allow the exclusion or limitation
of incidental or consequential damages so this limitation or exclusion may not apply
to you. This warranty gives you specific legal rights, and you may also have other
rights which vary lrom state to state.
Outside the United States, a different warranty may also apply. For details, please
contact your franchised Whirlpool distributor or military exchange.
If you need servrce, first see the “Service and Assistance” section of this book.
After checking “Service and Assistance,” additronal help can be found by calling
our COOL-LINE” service assistance telephone number, l-800-253-1301,
from
anywhere in the U.S.
@Registered Trademark/TM
Part No. 3150578
01990 Whirlpool Corporation
TrademarkSM
Service Mark of Whirlpool Corporation
Printed in U.S.A.