1
DHT-S514
Sound Bar and Wireless Subwoofer System
Contents
Introduction.......................................................................................................................................2
Accessories..........................................................................................................................................2
Sound Bar Controls......................................................................................................................3
Sound Bar Rear Panel.................................................................................................................3
Subwoofer Rear Panel...............................................................................................................3
Locating DHT-S514 Components.....................................................................................4
Wall-Mounting.................................................................................................................................4
Connecting DHT-S514 to your television.................................................................5
Setting the HDMI Control Function...............................................................................5
Disable Your Television’s Speakers...............................................................................5
HDMI Input (ARC) – First Choice........................................................................................6
HDMI Input (without ARC) – Second Choice...........................................................6
Digital Optical Input – Third Choice..............................................................................7
Digital Coaxial Input – Fourth Choice..........................................................................7
Analog Input – Fifth Choice..................................................................................................8
Connecting DHT-S514 to your HDMI equipment...............................................8
Power Connections......................................................................................................................8
The DHT-S514 Remote Control..........................................................................................9
About DHT-S514’s Automatic Power Modes
(without the HDMI cable).....................................................................................................10
About the DHT-S514 Control Button LEDs...........................................................10
Adjusting the subwoofer level........................................................................................10
Volume Change Indication.................................................................................................10
Listening Modes...........................................................................................................................11
Night Mode.......................................................................................................................................11
Using Bluetooth®.........................................................................................................................12
Use Any Remote to Control your DHT-S514........................................................12
Pairing the sound bar and subwoofer......................................................................12
Troubleshooting DHT-S514...............................................................................................13
Specifications.................................................................................................................................15
Trademark information.........................................................................................................15
Owner’s Manual
Introduction
Thank you for choosing Denon. Modern flat-panel televisions are wonders of digital video, but leave little room for serious sound reproduction.
Denon’s DHT-S514 home theater sound bar speaker system will envelop you in rich, room-filling sound. Simple to set up and easy to use,
the DHT-S514 transforms any TV into a home entertainment system, delivering truly wide range response including deep bass from the
wireless subwoofer and clear mids and detailed highs from the multi-driver high fidelity sound bar. Simply connect it to your television and
enjoy powerful, dynamic audio from your favorite TV shows, movies, games and music. DHT-S514’s inputs adapt to any television or system
arrangement. The DHT-S514 also accepts wireless Bluetooth® streaming for convenient audio playback from mobile devices. An ingenious
remote control learning solution lets you continue using your familiar television or cable/satellite remote.
We’ve worked hard to make DHT-S514 the best performing product of its kind—and just as diligently to ensure it is the simplest to set up and
easiest to use.
You’re about to hear just how much you’ve been missing, but first, please take a few moments to review this brief manual. You probably think it
is not really necessary, but doing so will help you get the most from the DHT-S514.
Please save your original shipping carton and packing materials.
If you need to move or ship the DHT-S514, this is by far the safest way to do so.
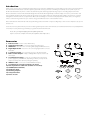
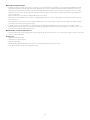
Accessories
1)Remote Control—remote control with battery.
2)Subwoofer Power Cable—connect to subwoofer power input.
3)HDMI Cable—best choice for connecting ARC equipped HDMI televisions.
4)Digital Optical Cable—best choice for connecting digital audio sources to
DHT-S514.
5)3.5 mm Stereo Cable—for connecting a source to the Analog Input.
6)RCA to 3.5 mm Adaptor—adapts a left/right RCA output to a stereo 3.5
mm output.
7)Sound Bar Power Supply—connect to sound bar power input. (Your
power supply may look different, depending on where you live.) The AC
adapter and the power cable are packaged separately.
8)IR Blaster cable—connect to sound bar IR Blaster Output.
9)Sound Bar for foot (19 mm/31 mm Two sets of two)
10)Non-slip stickers for subwoofer (4 stickers on one sheet)
11)CD-ROM (Owner’s Manual)
12)Quick Start Guide
13)Mounting Template
14)Safety Instructions
15)Notes on radio
2
1
4
2
3
5
6
7
8
9
10
11
12
13
14
15
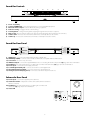
Sound Bar Controls
1
2
3
4
5
6
7
8
1) Power on/standby
2)Television/HDMI Input—select to watch television or connected HDMI equipment.
3)Bluetooth wireless input—select for Bluetooth pairing or playback.
4)Remote Learning—engages remote control learning.
5)Listening Mode—changes Listening Mode, stepping through the three modes in sequence.
6)Mute sound—Press to mute the audio, press again to unmute. (Pressing either Volume key also unmutes.)
7)Volume down—Decreases the volume. Press and hold to continually decrease the volume.
8)Volume up—Increases the volume. Press and hold to continually increase the volume.
Sound Bar Rear Panel
9
14
15
DIGITAL IN
OPTICAL
16
ANALOG IN
17
DC IN
DC IN
HDMI IN
DIGITAL IN
COAXIAL
10
11
12
DIGITAL IN
COAXIAL
HDMI IN
HDMI OUT (ARC)
TO TELEVISION
SERVICE
HDMI OUT (ARC)
TO TELEVISION
SERVICE
13
DIGITAL IN
OPTICAL
PAIR
ANALOG IN
IR BLASTER OUT
IR BLASTER OUT
9)HDMI Input—connects to the HDMI equipment with an HDMI cable.
10)HDMI Output (ARC)—connects to the TV with an HDMI cable. Compatible with the ARC function.
11)Service Port—for service only, do not use.
12)IR Blaster Output—connect the supplied IR Blaster here. See “Locating DHT-S514 Components” (vpage 4) for more information.
13)Pair Button—Pre-paired at the factory. See “Pairing the sound bar and subwoofer” (vpage 12) for more information.
14)Power Input—connect the power supply cable here.
15)Coaxial Digital In (RCA jack)—connects to television’s coaxial digital audio.
16)Optical Digital Input (S/PDIF)—connects to television’s optical digital out.
17)Analog In (3.5 mm mini plug stereo)—connects to television’s rear panel audio out.
Subwoofer Rear Panel
18)Power Input—connect the supplied power cable here.
19)Subwoofer Volume—Adjusts the volume of the subwoofer for best balance
with the sound bar.
20)Pair Button—Pre-paired at the factory. See “Pairing the sound bar and
subwoofer” (vpage 12) for more information.
21)Status LED
DHT-S514
AC IN
SUBWOOFER
VOLUME
DHT-S514
PAIR
SUBWOOFER
VOLUME
PAIR
18
3
19
20 21
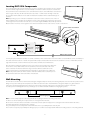
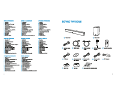
Locating DHT-S514 Components
The sound bar of the DHT-S514 should be place as close as possible to the television screen. It should
be centered left-to-right with the screen, and ideally no more than a few inches above or below. The
most common location is below the screen. Sometimes this location can be difficult, because the base
of the TV gets in the way. The DHT-S514 has two sets of feet – 19 mm and 31 mm high – that raise
the sound bar off the shelf, for a more stable and attractive installation when used with this type of
television.
Note: Depending on your TV model or installation location, the remote control receiver on the TV
may be hidden by the sound bar, preventing the remote control from being used because the remote
control signals cannot reach the TV. In this case, connect the supplied IR Blaster. Attach the tip of the IR
Blaster near the TV remote control signal receiver and check that the remote control can be used to control the TV.
Feet
Feet
Remote control sensor of the TV
HDMI IN
DC IN
HDMI IN
DIGITAL IN
COAXIAL
HDMI OUT (ARC)
TO TELEVISION
HDMI OUT (ARC)
PAIR
COAXIAL DIGITAL IN
DIGITAL IN
OPTICAL
TO TELEVISION
SERVICE
ANALOG IN
OPTICAL DIGITAL IN
IR BLASTER OUT
SERVICE
IR BLASTER OUT
IR Blaster cable (supplied)
You may also place DHT-S514 sound bar on a shelf, or furniture, above or below the screen. It should be centered with the screen, and ideally no
more than a few inches above or below. The system will usually sound best when the front of the sound bar is close to, or flush with, the front
edge of the furniture or shelf on which it rests. This reduces unwanted sound reflections.
Place the wireless subwoofer anywhere in the room. For the best sound, place the subwoofer
near a wall or corner, within 6 meters of the sound bar, and on the same side of the room
as the sound bar. The wireless subwoofer range is 8 meters. Wireless subwoofer can be
positioned vertically or horizontally. Attach the supplied non-slip stickers to the subwoofer.
Note: Don’t put the subwoofer where curtains or furniture will block the sound. The port on
the back of the subwoofer cabinet should be unobstructed.
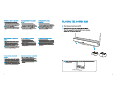
Wall-Mounting
The DHT-S514 sound bar can be wall-mounted using the integrated keyhole mounts. A mounting template can be found in the product carton.
Using a level, position and tape the template to the wall in the desired location. Install hardware* using the template as a guide and then
remove the mounting template from the wall. Connect the audio and power cables prior to mounting the sound bar on the wall.
*Consult a person knowledgeable about your wall type to recommend suitable hardware for hanging the speaker.
WallMounting
Mounting Keyholes
Wall
Keyholes
Note: To ensure safety, request a contractor perform the mounting work when mounting onto a wall.
In order to use the unit safely, do not place items on or hang items from the unit.
Be sure to fix connection cables to the wall to ensure that cannot be pulled or tripped over causing the unit to fall. Check that the unit is
mounted safely after the mounting work is complete.
Also, periodically check the safety of the unit and whether there is a possibility that the unit may fall.
Denon cannot accept any responsibility for damage, injury or accidents caused by problems with the mounting location or mounting method.
4
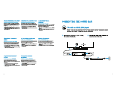
Connecting DHT-S514 to your television
DHT-S514 can be connected to your system one of five ways. In order of preference they:
qFirst Choice – HDMI Input (ARC)—If your television has an ARC (audio return channel) HDMI connector, connect it to one of the HDMI
Input of the DHT-S514. This will provide the best sound and several other benefits.
wSecond Choice – HDMI Input (without ARC)—Connect to a TV that is not compatible with the ARC (audio return channel) function using
the HDMI cable and audio input cable (e – t).
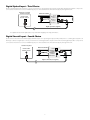
eThird Choice – Digital Optical Input (S/PDIF)—A digital optical cable connection from the television also provides excellent sound.
rFourth Choice – Digital Coaxial Input (RCA jack)—Another way to supply a digital audio signal to the DHT-S514.
tFifth Choice – Analog Input (3.5 mm stereo mini plug)—You can enjoy the sound of the DHT-S514 with equipment that doesn’t have
digital signal outputs by connecting them to the analog input.
All five inputs are all selected by the television button on DHT-S514’s front panel or remote, but which is active is determined by auto-priority. If
only one input is receiving a signal, that input will play. If more than one input is receiving a signal, the order of priority is HDMI, Digital Optical,
Digital Coaxial and Analog.
HDMI Connection
You can enjoy high quality audio and video playback by connecting this unit and a TV or this unit and a device such as a Blu-ray disc recorder or
game console using a HDMI cable to transmit high resolution digital video signals and Blu-ray disc audio signals.
• ARC (Audio return channel) function
The TV audio can be played back through this unit using the HDMI cable used to connect this unit to the TV (z1).
z1: The TV also needs to be compatible with the ARC function.
• HDMI control function
You can switch off the power, switch input source and adjust the volume of this unit using the TV (z2) remote control.
z2: The TV also needs to be compatible with the HDMI control function. This function may not operate due to connected devices or settings.
Setting the HDMI Control Function
When the connection to the TV is the same as q or w, enable the HDMI control function on the TV.
If the TV is compatible with the ARC function, enable the ARC function on the TV.
(See the TV Owner’s Manual for details.)
Disable Your Television’s Speakers
When the connection to the TV is the same as e – t, disable your television’s built-in speakers when using DHT-S514. Usually, this is done
with an on-screen setup menu on your television. Look for an “Audio” or “Sound” sub-menu, and a “Speakers Off”, “Disable Speakers”, “External
Speakers” or similar menu item. Some televisions have a switch on the rear panel to disable the built-in speakers.
Don’t leave the television speakers on so that both systems play simultaneously;
this will not yield sound that is louder or “better.”
5
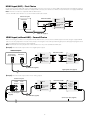
HDMI Input (ARC) – First Choice
If your television has an ARC (audio return channel) HDMI connector, connect it to one of the HDMI output of the DHT-S514 with the supplied
HDMI cable. Often, with televisions that have multiple HDMI connectors, the number one HDMI connector will be the one equipped with ARC.
Note: The TV also needs to be compatible with the ARC function.
Turn the TV HDMI control function on. See the TV Owner’s Manual for details.
Television rear
rear panel
Television
panel
DHT-S514
Sound
DHT-S514
Sound
BarBar
HDMI INPUT
(ARC)
HDMI IN
HDMI IN
HDMI OUT (ARC)
TO TELEVISION
HDMI OUT (ARC)
TO TELEVISION
SERVICE
IR BLASTER OUT
SERVICE
IR BLASTER OUT
HDMI cable (supplied)
HDMI Input (without ARC) – Second Choice
When connecting to a TV that is not compatible with the ARC function, connect the TV to HDMI output on this unit using the supplied HDMI
cable. You can also playback the TV audio on this unit by connecting the TV to audio input either digital optical cable (supplied), digital coaxial
cable (not supplied) or 3.5 mm stereo cable (supplied).
Note: The TV audio cannot be played back on this unit when it is only connected with the HDMI cable.
GExampleH When the audio output on the TV is a digital optical output:
Television
rearpanel
panel
Television rear
DHT-S514
Sound
BarBar
DHT-S514
Sound
DIGITAL AUDIO
OPTICAL OUTPUT
DC IN
HDMI IN
HDMI INPUT
HDMI OUT (ARC)
PAIR
TO TELEVISION
SERVICE
HDMI OUT (ARC)
TO TELEVISION
SERVICE
IR BLASTER OUT
DIGITAL IN
COAXIAL
DC IN
HDMI IN
HDMI IN
DIGITAL IN
COAXIAL
HDMI OUT (ARC)
PAIR
DIGITAL IN
OPTICAL
DIGITAL IN
OPTICAL
TO TELEVISION
SERVICE
ANALOG IN
IR BLASTER OUT
DIGITAL IN
COAXIAL
DIGITAL IN
OPTICAL
ANALOG IN
ANALOG IN
IR BLASTER OUT
HDMI cable (supplied)
Digital optical cable (supplied)
GExampleH When the audio output on the TV is an analog output:
Television
rearpanel
panel
Television rear
DHT-S514
Sound
BarBar
DHT-S514
Sound
AUDIO
OUTPUT
HDMI
INPUT
DC IN
HDMI IN
HDMI IN
DIGITAL IN
COAXIAL
HDMI OUT (ARC)
TO TELEVISION
SERVICE
IR BLASTER OUT
PAIR
HDMI OUT (ARC)
TO TELEVISION
SERVICE
IR BLASTER OUT
RCA to 3.5 mm Adaptor
(supplied)
DC IN
HDMI IN
HDMI OUT (ARC)
PAIR
DIGITAL IN
OPTICAL
TO TELEVISION
SERVICE
ANALOG IN
IR BLASTER OUT
DIGITAL IN
COAXIAL
DIGITAL IN
OPTICAL
ANALOG IN
HDMI cable (supplied)
3.5 mm Stereo Cable (supplied)
6
DIGITAL IN
COAXIAL
DIGITAL IN
OPTICAL
ANALOG IN
Digital Optical Input – Third Choice
Use the supplied digital optical cable to connect your television’s optical digital output to DHT-S514’s Optical Digital Input. Other components
connected to the television, such as a DVD/Blu-ray player or cable/satellite tuner, will automatically play through DHT-S514.
Television
Televisionrear
rear panel
panel
DHT-S514Sound
Sound Bar
Bar
DHT-S514
DIGITAL AUDIO
OPTICAL OUTPUT
DC IN
DIGITAL IN
COAXIAL
DC IN
DIGITAL IN
COAXIAL
DIGITAL IN
OPTICAL
DIGITAL IN
OPTICAL
ANALOG IN
ANALOG IN
Digital optical cable (supplied)
The optical connector looks square, but it is “keyed” and will only plug in one way; don’t force it.
Digital Coaxial Input – Fourth Choice
If your television doesn’t have and ARC equipped HDMI output or an optical digital output, it will probably have a coaxial digital output. Use an
“RCA”-type cable (not supplied) to connect your television’s coaxial digital audio output to DHT-S514’s Coaxial Digital Input. Other components
connected to the television, such as a DVD/Blu-ray player or cable/satellite tuner, will automatically play through DHT-S514.
Television
Televisionrear
rearpanel
panel
DIGITAL AUDIO
COAXIAL OUTPUT
DHT-S514
DHT-S514Sound
SoundBar
Bar
DC IN
DIGITAL IN
COAXIAL
DC IN
DIGITAL IN
COAXIAL
DIGITAL IN
OPTICAL
DIGITAL IN
OPTICAL
ANALOG IN
ANALOG IN
Digital coaxial cable (not supplied)
7
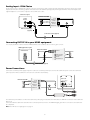
Analog Input – Fifth Choice
If your television has no digital audio outputs, connect its analog stereo audio output using the supplied 3.5 mm stereo cable to the analog
input of the DHT-S514. The analog outputs of most televisions are dual RCA jacks (typically red for right and white or black for left). Use the
supplied adaptor to connect those outputs to the 3.5 mm stereo cable.
Televisionrear
rear panel
Television
panel
DHT-S514Sound
SoundBar
Bar
DHT-S514
AUDIO
OUTPUT
DC IN
DIGITAL IN
COAXIAL
DC IN
DIGITAL IN
COAXIAL
DIGITAL IN
OPTICAL
DIGITAL IN
OPTICAL
ANALOG IN
ANALOG IN
RCA to 3.5 mm Adaptor
(supplied)
3.5 mm Stereo Cable (supplied)
Connecting DHT-S514 to your HDMI equipment
You can play back from a device that has a HDMI terminal, such as a Blu-ray disc recorder or game console.
HDMI
equipment
rear
panel
Television
rear
panel
HDMI OUTPUT
DHT-S514
Sound
Bar
DHT-S514
Sound
Bar
HDMI IN
HDMI IN
HDMI OUT (ARC)
TO TELEVISION
HDMI OUT (ARC)
TO TELEVISION
SERVICE
IR BLASTER OUT
SERVICE
IR BLASTER OUT
HDMI cable (not supplied)
Power Connections
Connect the sound bar power supply and power cord to the sound bar power input. Connect the subwoofer power cord to the subwoofer
power input. The wireless subwoofer connects to the sound bar automatically.
Sound
DHT-S514
SoundBar
Bar
DC IN
DIGITAL IN
COAXIAL
DIGITAL IN
OPTICAL
ANALOG IN
Subwoofer
DC IN
DHT-S514
DIGITAL IN
COAXIAL
AC IN
SUBWOOFER
VOLUME
PAIR
DIGITAL IN
OPTICAL
ANALOG IN
The subwoofer power switches on when the subwoofer power plug is inserted into the wall outlet. The PAIR LED on the back of the subwoofer
flashes red.
Connection with the subwoofer starts when the sound bar power is turned on. The PAIR LED lights green when connection to the subwoofer
has completed.
Note: If the LED does not light green, see page 12.
8
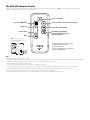
The DHT-S514 Remote Control
A remote control is supplied with DHT-S514. Its keys duplicate DHT-S514’s front-panel buttons (“vpage 3 “Sound Bar Controls”), with one
addition (Day/Night), and one deletion (the “Learn” key).
Power on/standby
Selects the Bluetooth® wireless audio input
Select TV / HDMI input
Volume up
Selects the Listening Mode
Volume down
Day/Night; toggles Night
Mode on and off (vpage 11
“Listening Modes”).
Mute
Note: Don’t forget to insert
the supplied battery into your
remote control.
Remember, you can use your television
or cable/satellite-box remote
to operate DHT-S514;
see the “Use Any Remote to Control your
DHT-S514” (vpage 12).
10º
CR2025
Note:
• Use lithium batteries in the remote control.
• Replace the batteries with new ones if the set does not operate even when the remote control unit is operated close to the unit. (The supplied
batteries are only for verifying operation. Replace them with new batteries at an early date.)
• To prevent damage or leakage of battery fluid:
• Do not short-circuit, disassemble, heat or dispose of batteries in flames.
• Do not keep the battery in a place exposed to direct sunlight or in places with extremely high temperatures, such as near a heater.
• If the battery fluid should leak, carefully wipe the fluid off the inside of the battery compartment and insert new batteries.
• Remove the batteries from the remote control unit if it will not be in use for long periods.
• Used batteries should be disposed of in accordance with the local regulations regarding battery disposal.
9
About DHT-S514’s Automatic Power Modes (without the HDMI cable)
DHT-S514 will automatically “wake-up” whenever any of its wired inputs receives an audio signal. Simply turning on your television will also
turn on DHT-S514. (For Bluetooth playback you will need to turn on DHT-S514 manually using the remote control or top panel power button).
Because of DHT-S514’s power saving design, the system takes five to seven seconds to turn on from standby. Pressing either the front-panel
Television Input
or Bluetooth keys will also power up the DHT-S514. Press the Power key X again to return DHT-S514 to its low-power
“standby” mode. DHT-S514 will automatically return to standby after five minutes of not receiving an audio signal.
Note: Except the HDMI connection (For the HDMI connection, the HDMI control is activated (vpage 5 “Setting the HDMI Control Function”)).
If you wish to change this auto-on behavior you may switch between the standard automatic wake-up/standby mode, and a manual power
on/standby mode. To change from one to the other, press-and-hold the front panel Power key X for three seconds. The power key LED will flash
bright for three seconds, then illuminate steadily for three seconds, and then turn off, indicating you have changed to manual power mode.
Each time you repeat the Power-key X press-and-hold, it will change to the other mode. In manual power mode the DHT-S514 is turned on, or
standby, with a momentary press of the Power key X.
About the DHT-S514 Control Button LEDs
The eight LEDs illuminating the top panel control buttons flash or light in various patterns to indicate different functions.
Power Momentarily bright when the DHT-S514 is turning on/waking from sleep;
dimly lit while on/awake (operating mode);
off when the DHT-S514 is “asleep” in standby mode;
flashes when toggling between manual- and auto-on/standby modes.
TV/HDMI Input Switches the audio input of the DHT-S514.
The input switches between TV Input and HDMI Input each time the button is pressed.
The button LED flashes twice when the input is switched to TV input. The button LED flashes 4 times when the input is
switched to HDMI input.
Bluetooth® Input Flashes bright, rapidly, while Bluetooth is “pairing” a wireless device;
brightly lit when selected.
The Bluetooth LED will flash bright, slowly, while attempting to re-pair a device that has passed out of range or otherwise lost wireless
contact, and blink rapidly to indicate a Bluetooth error (unable to pair). This will stop after 60 seconds or if any DHT-S514 key is
pressed.
Learning Flashes when learning functions from your remote (vpage 12 “Use Any Remote to Control your DHT-S514”).
Listening Mode Flashes once when pressed at the front panel, and selects the next Listening Mode (vpage 11 “Listening
Modes”).
Mute Flashes bright continuously as long as Mute function is invoked.
Adjusting the subwoofer level
SUBWOOFER
VOLUME
Use the Subwoofer Volume control on the rear of the subwoofer to adjust its sound output level. In many rooms,
setting between 10 and 2 o’clock will sound good. Once set, you typically won’t need to adjust this control.
Volume Change Indication
When you adjust DHT-S514’s volume from the remote control, the 8 front-panel LEDs momentarily function as a horizontal “bar-graph” of the
volume setting reached, illuminating from 1 to all 8 buttons, the latter indicating maximum volume.
10
Listening Modes
DHT-S514 includes three Listening Modes for different kinds of audio programs, room acoustics, or personal preferences. It also has a special
“Night Mode,” which enhances low-volume listening, which is described in the following section.
Select a Listening Mode using either Listening Mode key
(front panel or remote). Each keypress advances in sequence through the three
modes – Dialog, Music and Movie. DHT-S514’s front panel key LEDs momentarily display a pattern representing each newly selected mode.
The following information describes the various listening modes, and shows an illustration of the LED pattern displayed when that mode is
selected.
Note: The LED displays used to indicate the various Listening Modes are simple horizontal display patterns—there is no correspondence
between the lit LEDs and their underlying key functions.
Dialog mode highlights center-recorded sounds
such as movie dialog, television announcers,
or musical soloists; it is valuable for everyday
television viewing.
Music mode widens the “soundstage” somewhat
for a more enveloping, involving sound.
Movie mode deploys DHT-S514’s maximum
processing for the “biggest” possible sound on
action films or other large-scale content.
Night Mode
Night Mode improves low-volume listening by subtly lifting softer sounds, and lowering very loud ones. While you may use Night Mode
whenever you like, for maximum dynamic realism from television programming, movies or music, leave night mode turned off.
To engage Night Mode, press the Day/Night button
on the remote control press, or press and hold the front panel Listening Mode button
for three seconds. When Night Mode is engaged, the LED pattern for the current Listening Mode dimly lights. To exit Night Mode, use
the same buttons in the same way. When DHT-S514 exits Night Mode, the LED pattern for the current listening mode brightly lights.
11
Using Bluetooth®
DHT-S514 can stream music wirelessly, via Bluetooth, from any compatible Bluetooth device such as a mobile phone, tablet, or laptop computer.
Pairing Your Bluetooth Device
Before you can stream Bluetooth audio to DHT-S514, you must pair your device to DHT-S514.
To pair the device to the DHT-S514 for the first time:
1 Press-and-hold the Bluetooth key (front panel or remote) for at least 3 seconds; the Bluetooth LED will begin to flash rapidly.
2 Go to Bluetooth settings on your device. Make sure the device’s Bluetooth feature is set to “on”.
3 From the Bluetooth list on your device, select “DHT-S514”.
4 Playback audio on the Bluetooth source; you should now hear audio from the DHT-S514. DHT-S514’s Bluetooth key LED will remain on as
long as DHT-S514’s Bluetooth input is selected and active.
DHT-S514 can pair multiple Bluetooth devices; however, only one can play at a time. First come, first served. One Bluetooth Source will need to be
disconnected before another paired device can play.
Use Any Remote to Control your DHT-S514
It’s easy to “teach” DHT-S514 to respond to nearly any conventional IR (infrared) remote, so that you may continue to use your favorite television
or cable/satellite. You may prefer to teach DHT-S514 only selected commands, to avoid unintentional operations and subsequent confusion
among some household members. Some DHT-S514 owners teach only Volume Up/Down and Mute, relying on the DHT-S514’s front panel, or
DHT-S514’s own remote, for other functions.
Learning commands (using Volume up as an example):
1 Press-and-hold the front panel’s Learn button for 3 seconds; its key LED will flash slowly.
2 Now press the front-panel Volume up key; the Volume up key LED will also commence flashing slowly, in sync with the Learn LED.
3 Within 60 seconds, aim the “source” remote (for example, the television handset) from approximately 0.5m directly toward DHT-S514’s
front panel, and press its Volume up key 4 times in slow succession; both flashing DHT-S514 LEDs will now light steadily for 3 seconds,
indicating a successful “learn.”
Unlearning commands
1 Press-and-hold the front panel’s Learn button for 3 seconds; its LED will flash slowly.
2 Press the button you want to clear; the button’s LED will also flash slowly, in sync with the Learn LED.
3 Press the learn button within 60 seconds; both LEDs will flash rapidly for 3 seconds. The command has been unlearned.
Seven of the eight DHT-S514 front-panel buttons can be taught to respond to an external remote. Simply repeat this three-step process for as
many of the other DHT-S514 commands (each associated with a front-panel button) as you wish.
Note: Rapid blinking of the two LEDs indicates a failed “learn”. Press any other front-panel or DHT-S514 remote key to reset learning, and start
again. See the Troubleshooting section (vpage 13) for tips to help you successfully teach DHT-S514 to recognize the signals from your remote
control.
Once you have programmed DHT-S514 to respond to your “everyday” remote controller, you may wish to put away the DHT-S514 remote for
safekeeping. If you do, we recommend that you remove the battery, and wrap it in a slip of paper, masking-tape, or similar to prevent accidental
discharge and put it and the DHT-S514 remote someplace safe.
Some remotes can learn by pressing the remote key several times (up to four times).
Pairing the sound bar and subwoofer
The subwoofer and sound bar are paired at the factory. However if the communication is interrupted, follow this procedure.
1 Press the Pair Button on the subwoofer until the Status LED flashes red rapidly.
2 The sound bar power is turned on.
Press the Pair Button on the back of the sound bar. The Status LED on the subwoofer will be solid green.
Status LED
Red LED: Subwoofer not paired to, or searching for sound bar.
Green LED: Subwoofer is paired to sound bar. Your system is ready.
12
Troubleshooting DHT-S514
DHT-S514 Does not power on
• Is the DHT-S514 plugged into a proven-live wall outlet? Try a lamp or other known-good appliance. Avoid using outlets that are connected
to switches or dimmers.
No sound
• Is DHT-S514’s volume turned up? (Don’t laugh; we do this one ourselves all the time.)
• Is DHT-S514 muted (if so, the front panel Mute key
LED will be flashing).
• Is the DHT-S514 set to the correct source? A flashing Bluetooth® key LED on the front panel indicates DHT-S514 is trying to “pair” to
Bluetooth; press the Television Input key
to interrupt this and switch to television sound.
• Is the audio source a volume-controlled television or cable/satellite box output? If so, you must turn up the volume of the television or
cable/satellite box to send adequate signal-level to DHT-S514. (For this reason it is best to choose fixed-level outputs where possible; some
televisions have separate physical outputs, other employ on-screen menu settings to manage this.)
• Check connections: remember that DHT-S514 auto-prioritizes multiple incoming signals, selecting HDMI, optical-digital, coaxial-digital, and
analog-mini plug, in that order. Confirm that the television is routing audio to the appropriate output; there may be TV-menu settings to
manage this.
No subwoofer sound, sound interrupted, or noise occurring
• Check that the Status LED is lit in green on the subwoofer. When the Status LED is flashing in red, disconnect from the wall outlet and then
reconnect to it, or try to pair again (vpage 12 “Pairing the sound bar and subwoofer”).
• When there is an obstacle between the sound bar and the subwoofer, remove it or place the subwoofer closer to the sound bar.
Distorted sound from the DHT-S514
• If the signal source is a volume-controlled output, turn it down a couple of steps from maximum.
• Check the signal source to be sure the distortion is not originating there.
• If DHT-S514’s volume is set to its maximum, turn it down a few steps.
Trouble teaching DHT-S514 remote control commands
• Make sure the source remote is working properly in the first place; check batteries; confirm direct operation.
• Move the DHT-S514 and source remote out of bright sunlight or powerful room lighting (too-bright light will impede infrared-signal
transmission).
• Be sure to hold the “source” remote steady, 0.3 – 0.5 m in front of the DHT-S514, on its level, with the remote’s IR emitter (usually a smooth
black-plastic area across the end you point toward the television) aimed straight and level at the center of DHT-S514’s front panel.
• Press and release source-remote keys deliberately; hold each keypress down for a half-second or so, and pause a second between
repetitions.
• Remember that while DHT-S514 can learn almost all IR (infrared) remote commands, there remain a few rare code formats that cannot be
taught (much like some engineers we know).
Television speakers keep getting turned back up
• Disable the television’s speakers (usually a setup-menu option, but a rear-panel switch on some televisions). If this is not possible, the
problem is likely that the television responds to press-and-hold (ramping) volume commands more quickly than the DHT-S514; in this rare
case use DHT-S514’s front-panel or supplied remote to turn the DHT-S514’s volume up.
Trouble Pairing Bluetooth®
• Make sure DHT-S514 is in Bluetooth pairing mode (Bluetooth key LED should be flashing).
• Make sure your Bluetooth source is in Bluetooth pairing mode (see the source’s instructions).
• Bluetooth source device must support A2DP (Advanced Audio Distribution Profile); some Bluetooth products (some tablets, some GPS
units, for example) will thus work with Bluetooth keyboards or headsets but are not capable of high-fidelity audio playback.
• Keep your Bluetooth source within 3m of DHT-S514 while pairing.
• Power cycle the Bluetooth device (complete power off and “hard-reboot”), and try to pair again.
13
Bluetooth connection problems
• If a Bluetooth fault occurs (the device moves out of range, or stops playing due to low battery or user input), DHT-S514’s Bluetooth LED
again blinks rapidly; the DHT-S514 will automatically attempt to re-connect, and will resume playback when the Bluetooth source is in
range. Note: On some devices you will need to press play again. Bluetooth’s effective wireless range varies with the source; (9 – 12 m) is
typical. If the source moves out of range, DHT-S514 will continue trying to re-connect it for 4 minutes; after that interval you will have to
re-connect, as above.
• Make sure DHT-S514 is not paired to a different Bluetooth source device.
• Make sure your desired Bluetooth source device is actually playing music or another audio program and is paired to DHT-S514 and not
some other device.
• On a multifunction source device such as a tablet or mobile phone, not every program or “app” may support Bluetooth audio broadcast
(consult the instructions for the program or app).
• Consider possible sources of interference, particularly those operating at 2.4 GHz (Wi-Fi routers, microwave ovens, landline cordless
telephones); power down suspects one at a time to identify a culprit. Often, repositioning an interfering device to another room, or even
across the room, will restore Bluetooth function.
DHT-S514 takes several seconds to turn on
• The DHT-S514’s power saving design puts the unit into standby mode after five minutes of no sound. DHT-S514 takes a few seconds to start
up the next time audio plays.
Factory reset
• Unplug sound bar from wall.
• Hold down Vol – (minus) button.
• Plug into power again.
• Standby button light will blink fast for several seconds indicating that the system has been reset.
• Clears Bluetooth pairing, remote learning, audio mode.
14
Specifications
Rated output:
Sound bar
Subwoofer
10 W + 10 W (4 Ω/ohms, 200 Hz, 0.7 % T.H.D)
49 W (4 Ω/ohms, 60 Hz, 0.7% T.H.D)
Frequency Range:
40 Hz to 20 kHz
High Frequency Drivers:
35/64” (14 mm) tweeter x 2
Mid Frequency Drivers:
2 1/64 x 5” (51 x 127 mm) HHRT drivers x 2
Low Frequency Drivers:
5 15/64” (133 mm) woofers x 2
Dimensions: (H x W x D)
Sound bar Subwoofer
3 9/64 x 39 17/32 x 3 5/64” (79.8 x 1004 x 78.3 mm)
12 21/64 x 6 3/4 x 13 5/8” (313 x 171.5 x 346 mm)
Wireless Technologies: Bluetooth 2.1 + EDR, A2DP, APT-X
2.4/5.2/5.8 GHz triband frequency hopping (subwoofer)
Rating Voltage:
AC 120 V, 60 Hz
Power consumption:
Sound bar
Subwoofer
DC 24 V, 2.5 A
0.5 W or less (Standby)
60 W
Weight:
Sound bar Subwoofer
5 lbs 1 oz (2.3 kg)
13 lbs (5.9 kg)
Specifications are subject to change without notice.
Trademark information
Manufactured under license from Dolby Laboratories. Dolby, Pro Logic, and
the double-D symbol are trademarks of Dolby Laboratories.
©2013 CSR plc and its group companies.
The aptX® mark and the aptX logo are trade marks of CSR plc or one of its
group companies and may be registered in one or more jurisdictions.
The Bluetooth® word mark and logos are registered trademarks owned by
Bluetooth SIG, Inc. and any use of such marks by D&M Holdings Inc. is under
license. Other trademarks and trade names are those of their respective
owners.
The terms HDMI and HDMI High-Definition Multimedia Interface, and the
HDMI Logo are trademarks or registered trademarks of HDMI Licensing LLC in
the United States and other countries.
Manufactured under license under U.S. Patent Nos: 5,956,674; 5,974,380;
6,487,535 & other U.S. and worldwide patents issued & pending. DTS, the
Symbol, & DTS and the Symbol together are registered trademarks & DTS
Digital Surround and the DTS logos are trademarks of DTS, Inc. Product
includes software. © DTS, Inc. All Rights Reserved.
Adobe, the Adobe logo and Reader are either registered trademarks or
trademarks of Adobe Systems Incorporated in the United States and/or other
countries.
15
www.denon.com
D&M Holdings Inc.
3520 10274 00AD
DE NON
Sound bar and wireless subwoofer system
DHT-5514
Errata Sheet
au1cKSTARTGUIDE
Correct
Wrong
41> (1 .0 m)
~page
3
~ Power cable
(0.5 m)
~page
7
~page
9
e
(0.5 m)
e
~ Power cable
(1.0 m)
~1
8
(1.0 m)
~1
0
(1.0 m)
""'
8
(2.0 m)
[I]
[ffi
(0.5 m)
4D (2.0 m)
0
~page
11
[;...
I
(1.0 m)
D&M Holdings Inc.
Printed in China 5431 10343 OOAD
DE NON
Sound Bar and Wireless Subwoofer System
DHT-5514
Owner's Manual
illJO~trJ
Manuel de I'Utilisateur
CD-ROM
Manual del usuario
For PC/MAC use only!
Copy .
. gs \0C·
rtght ©2013 D&M Ho\d'"
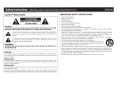
Safety Instructions
(Read these safety instructions before operating the unit.)
0 SAFETY PRECAUTIONS
0 IMPORTANT SAFETY INSTRUCTIONS
1.
2.
3.
4.
5.
6.
7.
CAUTION:
TO REDUCE THE RISK OF ELECTRIC SHOCK, DO NOT REMOVE COVER (OR BACK). NO USERSERVICEABLE PARTS INSIDE. REFER SERVICING TO QUALIFIED SERVICE PERSONNEL.
The lightning flash with arrowhead symbol, within an equilateral triangle, is intended to
alert the user to the presence of uninsulated "dangerous voltage " within the product's
enclosure that may be of sufficient magnitude to constitute a risk of electric shock to
persons .
The exclamation point within an equilateral triangle is intended to alert the user to
the presence of important operating and maintenance (servicing) instructions in the
literature accompanying the appliance.
8.
9.
10.
11.
12.
WARNING:
TO REDUCE THE RISK OF FIRE OR ELECTRIC SHOCK, DO NOT EXPOSE THIS APPLIANCE TO
RAIN OR MOISTURE.
CAUTION:
To completely disconnect this product from the mains. disconnect the plug from the wall socket outlet.
The mains plug is used to completely interrupt the power supply to the unit and must be within easy
access by the user.
PRECAUTION:
Pour deconnecter completement ce produit du courant secteur, debranchez Ia prise de Ia prise murale.
La prise secteur est util isee pour couper completement I' alimentation de l'appareil et l'utilisateur doit
pouvoir y acceder facilement.
PRECAUCION:
Para desconectar completamente este producto de Ia alimentaci6n electrica, desconecte el enchufe
del enchufe de Ia pared.
El enchufe de Ia alimentaci6n electrica se utiliza para interrumpir par complete el suministro de
alimentaci6n electrica a Ia unidad y debe de encontrarse en un Iugar al que el usuario tenga facil acceso .
DENON
13.
Read these instructions.
Keep these instructions.
Heed all warnings.
Follow all instructions.
Do not use th is apparatus near water .
Clean only with dry cloth.
Do not block any ventilation openings.
Install in accordance with the manufacturer's instructions.
Do not install near any heat sources such as radiators, heat registers, stoves. or other apparatus
(including amplifiers) that produce heat.
Do not defeat the safety purpose of the polarized or grounding-type plug. A polarized plug has two
blades with one wider than the other. A grounding type plug has two blades and a third grounding
prong. The wide blade or the third prong are provided for your safety. If the provided plug does not
fit into your outlet, consult an electrician for replacement of the obsolete outlet.
Protect the power cord from being walked on or pinched particularly at plugs, convenience
receptacles, and the point w here they exit from the apparatus
Only use attachments/accessones spec1f1ed by the manufacturer
~
Use only w1th the cart, stand, tnpod, bracket, or table spec1f1ed by the manufacturer,
• 1
or sold w1th the apparatus When a cart IS used, use caut1on when mov1ng the cart/
~ ~
apparatus comb1nat1on to avo1d InJUry from t1p-over
~Unplug th1s apparatus dunng lightnmg storms or when unused for long penods of t1me.
®
t5)
14. Refer all servicing to qualified service personnel. Servicing is required when the apparatus has
been damaged in any way, such as power-supply cord or plug is damaged, liquid has been spilled
or objects have fallen into the apparatus, the apparatus has been exposed to rain or moisture, does
'
not operate normally, or has been dropped.
15. Batteries shall not be exposed to excessive heat such as sunshine, fire or the like.
0 NOTES ON USE I OBSERVATIONS RELATIVES
AL'UTILISATION I
NOTAS SOBRE EL USO
WARNINGS
AVERTISSEMENTS
ADVERTENCIAS
• Avoid high temperatures.
Allow for sufficient heat dispersion when installed in a rack.
• Handle the power cord carefully.
Hold the plug when unplugging the cord.
• Keep the unit free from moisture, water, and dust.
• Unplug the power cord when not using the unit for long periods
of time.
• Do not obstruct the ventilation holes.
• Do not let foreign objects into the unit.
• Do not let insecticides, benzene, and thinner come in contact
with the unit.
• Never disassemble or modify the unit in any way.
• Ventilation should not be impeded by covering the ventilation
openings with items, such as newspapers, tablecloths or
curtains.
• Naked flame sources such as lighted candles should not be
placed on the unit.
• Observe and follow local regulations regarding battery disposal.
• Do not expose the unit to dripping or splashing fluids.
• Do not place objects filled with liquids, such as vases, on the
unit.
• Do not handle the mains cord with wet hands.
• When the switch is in the OFF (STANDBY) position, the
equipment is not completely switched off from MAINS.
• The equipment shall be installed near the power supply so that
the power supply is easily accessible.
• Do not keep the battery in a place exposed to direct sunlight or in
places with extremely high temperatures, such as near a heater.
• Danger of explosion if battery is incorrectly replaced.
• Replace with only same or equivalent type.
• Eviter des temperatures elevees.
Tenir compte d'une dispersion de chaleur suffisante lors de !'installation
sur une etagere.
• Manipuler le cordon d'alimentation avec precaution.
Tenir Ia prise lors du debranchement du cordon.
• Proteger l'appareil contre l'humidite, l'eau et Ia poussiere.
• Debrancher le cordon d'alimentation lorsque l'appareil n'est pas utilise
pendant de longues periodes.
• Ne pas obstruer les t rous d'aeration.
• Ne pas laisser des objets etrangers dans l'appareil.
• Ne pas mettre en contact des insecticides, du benzene et un diluant avec
l'appareil.
• Ne jamais demonter ou modifier l'appareil d'une maniere ou d'une autre .
• Ne pas recouvrir les orifi ces de ventilation avec des objets tels que des
journaux, nappes ou rideaux. Cela entraverait Ia ventilation.
• Ne jamais placer de flamme nue sur l'appareil, notamment des bougies
allumees.
• Veillez a respecter les lois en vigueur lorsque vous jetez les piles
usagees.
• L'appareil ne doit pas etre expose l'eau ou l'humidite.
• Ne pas poser d'objet contenant du liquide, par exemple un vase, sur
l'appareil.
• Ne pas manipuler le cordon d'alimentation avec les mains mouillees.
• Lorsque l'interrupteur est sur Ia position OFF (STANDBY), l'appareil n'est
pas completement deconnecte du SECTEUR (MAINS).
• L'appareil sera installe pres de Ia source d'alimentation, de sorte que
cette derniere soit facilement accessible.
• Ne placez pas Ia pile dans un endroit expose Ia lumiere directe du
soleil ou dans des endroits presentant des temperatu res extremement
elevees, par exemple pres d'un radiateur.
• Evite altas temperat uras.
Permite Ia suficiente dispersion del calor cuando esta instalado en
Ia consola.
• Maneje el cordon de energfa con cuidado.
Sostenga el enchufe cuando desconecte el cordon de energfa.
• Mantenga el equipo libre de humedad, agua y polvo.
• Desconecte el cordon de energfa cuando no utilice el equipo por
mucho t iempo.
• No obstruya los orif icios de ventilacion.
• No deje objetos extranos dentro del equipo.
• No permita el contacto de insecticidas, gasolina y diluyentes con
el equipo.
• Nunca desarme o modif ique el equipo de ninguna manera .
• La vent ilacion no debe quedar obstruida por haberse cubierto las
aperturas con objetos como periodicos, manteles o cortinas .
• No deberan coloca rse sobre el aparato fuentes inflamables sin
proteccion, como velas encendidas.
• A Ia hora de deshacerse de las pilas, respete Ia normativa para el
cuidado del media ambiente.
• No exponer el aparato al goteo o salpicaduras cuando se uti lice.
• No colocar sobre el aparato objetos llenos de lfquido, como jarros.
• No maneje el cable de alimentacion con las manos mojadas.
• Cuando el interrupter esta en Ia posicion OFF (STANDBY), el
equipo no esta completamente desconectado de Ia alimentacion
MAINS.
• El equipo se instalara cerca de Ia f uente de alimentacion de
manera que res ulte facil acceder a ella.
• No coloque las pi las en un Iugar expuesto a Ia luz directa del sol
o donde Ia temperatura sea extremadamente alta, como cerca de
una ca lefaccion.
• DO NOT INGEST BATIERY, CHEMICAL BURN HAZARD
• The remote control supplied with this product
contains a coin/ button cell battery. If the coin/button
cell battery is swallowed, it can cause internal burns
~
in just 2 hours and can lead to death.
• Keep new and used batteries away from children. If the battery
compartment does not close securely, stop using the product
and keep it away from children. If you think batteries might
have been swallowed or placed inside any part of the body,
seek immediate Medical attention.
• NO INGER IR LA PILA. PELIGRO DE OUEMADURAS OUiM ICAS
• N'INGEREZ PAS LES PILES. BRULURE CHIMIQUE
• El mando a dista ncia suministrado con este producto
• La telecommande fourn ie avec ce produit contient une pile
contiene una pila de tipo boton. Si Ia pila boton se
bouton. Si Ia pile bouton est avalee, elle peut entrainer de tres
ingiere, puede causar graves quemaduras internas en
graves brQiures internes en a peine 2 heures et Ia mort.
~
apenas 2 horas y podrfa ocasionar Ia muerte.
• Conservez les piles, nouvelles ou usagees, hors de portee des enfants.
• Mantenga las pi las nuevas y usadas fuera del alcance de los
Si le compartiment des piles ne se ferme pas correctement, n'uti lisez
ninos. Si el compartimento de Ia pila no cierra correctamente,
plus le produit et conservez-le hors de portee des enfants. Si vous
deje de utilizar el producto y mantengalo alejado de los ninos.
pensez que des piles ont ete ingerees ou placees dans n'importe quelle
Si cree que las pi las podrfan haberse ingerido o introducido en
partie du corps, consultez immediatement un medecin.
alguna parte del cuerpo, solicite atencion medica de inmediato.
!.\!
a
a
a
1.\
ill
M
!
DE NON
www.denon.com
D&M Holdings Inc. Printed in China 5431 10337 OOAD
Notes on radio
USA CANADA
0 FCC Information (For US customers)
0 IC Information (For Canadian customers)
1. IMPORTANT NOTICE :
DO NOT MODIFY THIS PRODUCT
This product. when installed as indicated in the instructions contained in this manual, meets FCC requirements. Any changes
or modifications not expressly approved by the party responsible for compliance could void the user's authority to operate
the equipment.
1. PRODUCT
This product IC: 11154A-DHTS514 (soundbar)
11154A-DHTS514A (subwoofer)
This device complies w ith Industry Canada licence-exempt RSS standard(s). Operation is subject to the following two
conditions: (1) this device may not cause interference, and (2) th is device must accept any interference, including interference
that may cause undesired operation of the device.
CAN ICES-3(8)/NM8-3(8)
2. CAUTION
• To comply with FCC RF exposure compliance requirement, separation distance of at least 20 em must be maintained
between this product and all persons.
• Th is product and its antenna must not be co-located or operating in conjunction with any other antenna or transmitter.
3. COMPLIANCE INFORMATION
This device complies with Part 15 of the FCC Rules. Operation is subject to the following two conditions: (1) this device may
not cause harmfu l interference, and (2) this device must accept any interference received, including interference that may
cause undes ired operation .
• Product Name : HOME THEATER SYSTEM
• Model: DHT-S514
• This product FCC ID: 2AAGJDHTS514 (soundbar)
2AAGJDHTS514A (subwoofer)
Denon Electronics (USA). LLC
(a D&M Holdings Company)
100 Corporate Drive Mahwah, NJ 07430-2041
Tel. (201) 762-6665
4. NOTE
This product has been tested and found to comply with the limits for a Class 8 digital device. pursuant to Part 15 of the FCC
Rules . These limits are designed to provide reasonable protection against harmful interference in a residential installation.
Thi s product generates, uses and can radiate radio frequency energy and, if not installed and used in accordance with the
instructions, may cause harmful interfere nce to radio communications . However, there is no guarantee that interference will
not occur in a particular insta llation. If this product does cause harmful interference to rad io or television reception. which
can be determined by turning the product OFF and ON, the user is encouraged to try to correct the interference by one or
more of the fol lowing measures:
• Reorient or relocate the receiving antenna.
• Increase the separation between the equipment and receiver.
• Connect the product into an outlet on a circuit different from that to which the receiver is connected.
• Consult the local retailer authorized to distribute this type of product or an experienced radio/TV technician for help.
2. CAUTION
To reduce potential rad io interference to other users, the antenna type and its gain should be so chosen that the equivalent
isotropically radiated power (e.i.r.p.) is not more than that permitted for successfu l communication.
0 Informations sur IC (pour les clients canadiens)
1. APPAREIL
Cet appareiiiC: 11154A-DHTS514 (soundbar)
11154A-DHTS514A (subwoofer)
Le present appareil est conforme aux CNR d'lndustrie Canada applicables aux appareils radio exempts de licence.
L'exploitation est autorisee aux deux conditions suivantes: (111'appareil ne doit pas produire de brouil lage, et (2) l'utilisateur
de l'appareil doit accepter tout brouillage radioelectrique subi, meme si le brouillage est susceptible d'en compromettre le
fonctionnement.
CAN ICES-3(8)/NMB-3(8)
2. ATTENTION
Afin de redu ire le risque d'interference aux autres utilisateurs, il faut choisir le type d'antenne et son gain de fa c;;on ce
que Ia puissance isotrope rayonnee equivalente (p.i.r.e.) ne soit pas superieure au niveau requ is pour l'obtention d'une
communication satisfaisante.
a
For Canadian customers: CAN ICES-3(8)/NM8-3(8)
0 RF Exposure Information
Th is equipment complies with FCC/IC radiation exposure limits set forth for an uncontrolled environment and meets the FCC
radio frequency (RF) Exposure Guidelines in Supplement C to OET65 and RSS-1 02 of the IC radio frequency (RF) Exposure
rules. This equ ipment has very low levels of RF energy that are deemed to comply without testing of specific absorption
ratio (SARI.
Cet equipement est con forme aux normes d' exposition aux radiations FCC/IC definies pour un environnement non contr61e
et satisfait les directives d'exposition Ia radiofrequence (RFI dans le supplement C des OET65 et RSS-1 02 des regles
d'exposition Ia frequence radio (RF) IC. Cet equipement a de tres faibles niveaux d'energie RF qui sont juges conformes
sans test de taux d'absorption specifique (SARI .
a
a
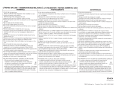
[ENGLISH]
1. DECLARATION OF CONFORMITY
Hereby, Denon, declares that this Radio LAN device is in compliance w ith t he
essential requirements and other relevant provisions of Directive 1999/5/EC.
2. IMPORTANT NOTICE: DO NOT MODIFY THIS PRODUCT
This product, when installed as indicated in the instructions contained in this
manual, meets R&TIE directive requirements. Modification of the product could
result in hazardous Radio and EMC radiation .
3. CAUTION
Separation distance of at least 20 em must be maintained between this product
and all persons.
This product and its antenna must not be co-located or operating in conjunction
w ith any other antenna or transmitter.
[DEUTSCH]
1. UBEREINSTIMMUNGSERKLARUNG
Hiermit erkliirt Denon, dass sich dieser/diese/dieses Radio LAN device in
Ubereinstimmung mit den grundlegenden Anforderungen und den anderen
relevanten Vorschriften der Richtlinie 1999/5/EG befmdet" . (BMWi)
Hiermit erkliirt Denon die Ubereinstimmung des Geriites Radio LAN device m it
den grundlegenden Anforderungen und den anderen relevanten Festlegungen der
Richtlinie 1999/5/EG. (Wien)
2. WICHTIGER HINWEIS: NEHMEN SIE KEINE VERANDERUNGEN AN DIESEM
PRODUKTVOR
Wenn dieses Produkt entsprechend dieser Bedienungsanleitung aufgebaut w ird,
entspricht es den Anforderungen der R&TIE-Richtlinie. Veriinderungen am Produkt
k6nnen zu gefiihrlicher Funk- und EMV-Strahlung fuhren .
3. VORSICHT
Zwischen dieses Produkts und Personen muss ein Schutzabstand von 20 em
eingehalten werden .
Dieses Produkt und seine Antenne durfen nicht neben anderen Antennen oder
Sendern aufgestellt oder zusammen mit ihnen verwendet werden .
[FRAN<;AIS]
1. DECLARATION DE CONFORMITE
Par Ia presente Denon declare que l'appareil Radio LAN device est conforms aux
exigences essentielles et aux autres dispositions pertinentes de Ia directive 1999/5/CE.
2. MISE EN GARDE IMPORTANTE : NE JAMAIS MODIFIER CE PRODUIT
Si toutes les consignes indiquees dans ce mode ont ete respectees pendant son
installation, ce produit est conforme aux directives R&TIE. Toute modification du
produit risquerait alors de generer des radiations radio et EMC dangereuses.
3. ATTENTION
L'appareil devra etre situe une distance de 20 em au mains des personnes.
Ce produit ainsi que son antenne ne devront en aucun cas etre utilises a proximite
d'une autre antenne ou transmetteur.
[ITALIANO]
1. DICHIARAZIONE Dl CONFORMITA
Con Ia presente Denon dichiara che questa Radio LAN device conforms ai requisiti
essenziali ed aile altre disposizioni pertinenti stabilite dalla direttiva 1999/5/CE.
2. AWERTENZA IMPORTANTE: NON MODIFICARE OUESTO PRODOTTO
Se installato come indicate nelle istruzioni del presente manuale, questa prodotto
soddisfa i requisiti della direttiva R&TIE. Eventuali modifiche apportate al prodotto
potrebbero causare pericolose radiazioni radio ed EMC.
3. ATTENZIONE
Enecessaria mantenere una distanza minima di 20 em tra questa prodotto e le persone.
Questa prodotto e Ia relativa antenna non devono essere posizionati in prossimita di altre
antenne o trasmettitori e non devono essere utilizzati congiuntamente a questi ultimi.
[ESPANOL]
1. DECLARACION DE CONFORMIDAD
Por media de Ia presente Denon declara que el Radio LAN device cumple con los
reqUisites esenciales y cualesquiera otras disposic1ones aplicables o exig1bles de
Ia Directiva 1999/5/CE.
2. NOTA IMPORTANTE: NO MODIFIOUE ESTE PRODUCTO
Este producto, si es instalado de acuerdo con las instrucciones contenidas en este
manual, cum pie los requisites de Ia directiva R&TIE. La modificaci6n del producto
puede producir radiaci6n de Radio y EMC peligrosa.
3. PRECAUCION
Se debe mantener una separaci6n de al menos 20 em del producto y las personas.
Este producto y su antena no debe instalarse ni utilizarse conjuntamente con otra
antena o transmisor.
a
e
[NEDERLANDS]
1. EENVORMIGHEIDSVERKLARING
Hierbij verklaart Denon dat het toestel Radio LAN device in overeenstemming is
met de essentiele eisen en de andere relevante bepalingen van richtlijn 1999/5/EG.
Bij deze Denon dat deze Radio LAN device voldoet aan de essentiele eisen en aan
de overige relevante bepalingen van Richt lijn 1999/5/EC.
2. BELANGRIJKE MEDEDELING: BRENG AAN DIT PRODUCT GEEN
AANPASSINGEN AAN
Dit product, indien ge"installeerd volgens de aanwijzingen in deze gebruiksaanwijzing,
voldoet aan de vereisten van de R&TIE-richtlijn . Aanpassing van dit product kan
gevaarlijke radio- en EMC-straling tot gevolg hebben.
3. LETOP
Houd tussen en personen altijd een afstand van tenminste 20 em aan .
Dit product en zijn antenne mogen niet in de buurt van een andere antenne of
zender worden geplaatst of in combinatie daarmee worden gebruikt.
[SVENSKA]
1. OVERENSSTAMMELSESINTYG
Harmed intygar De non att denna Radio LAN device star I 6verensstiimmelse med
de viisentliga egenskapskrav och 6vriga relevanta bestiimmelser som framgar av
direktiv 1999/5/ EG.
2. VIKTIGT: APPARATEN FAR INTE MODIFIERAS
Under f6rutsiittning att apparaten installeras enligt anvisningarna i denna
bruksanvisning, uppfyller denna kraven i R& TIE-direktivet. Ev. modifiering av
ai)paraten kan result era i farlig radio- och elektromagnetisk straining.
3. FORSIKTIGT
Se till att det f inns ett avstand pa minst 20 em mellan apparatens och personer i
omgivningen.
Apparaten och dess antenn far inte placeras eller anviindas i niirheten av andra
antenner eller siindare.
[PYCCKII1Iil]
1. CEPTII1CI>IIIKAT COOTBETCTBIIIR
Haw~o~ npOAYKTbl cooTBSTCTBYIOT cneAYIDLL\IoiM nonmKeHio1AMio1 Alo1P9KTio1Bbl E3C/ EC:
R&TIE Directive 1999/5/EC.
2. BA>KHO! HE 1113MEHRiiiTE AAHHbllil nPO.QYKT
npOAYKT, yCTa HOBfl9 H Hbl~ cornaCHO lo1HCTPYKL11o1AM B HaCTOALL\9M pyKOBOACTB9,
OTBeYaeT Tpe6osaHio1AM AlolpeKTioiBbl R&TIE. liiJMeHeH ~o~e npDAYKTa MO>KeT
np~o~seCTiol K nOABneHio\10 onaCHOrD 3fl9KTpOMarHio1THOrO lo13flYY9Hio1A.
3 . nPE.QYnPE~EHII1E
He np~o~6n~o~>Ka~Tecb K A8HHoro lo13Aen~o~A 6n~o~>Ke, YeM Ha 20 CM .
3anpell\a9TCA ~o~cnonb30BaTb AaHHblf;i npDAYKT 1o1 aHTeHHY c Apyrof;i aHTeH HO~ ~o~n ~o~
nepeAaTYioiKOM.
[POLSKI]
1. DEKLARACJA ZGODNOSCI
Niniejszym Denon oswiadcza, ie Radio LAN device jest zgodny z zasadniczymi
wymogami oraz pozostalymi stosownymi postanowieniami Dyrektywy 1999/5/EC.
2. UWAGA: MODYFIKACJA TEGO UR~DZENIA JEST ZABRONIONA
Po zainstalowaniu zgodnie z instrukcjam i zawartym i w niniejszej instrukcji
obstugi urz~dzen i e to b~dzie spetniac wymogi dyrektywy R&TIE. Wprowadzanie
modyfikacji do tego urz~dzenia moie skutkowac powstaniem niebezpiecznego
promieniowania elektromagnetycznego oraz radiowego.
3. OSTRZEZENIE
Mi~dzy tego produktu i wszelkimi osobami musi bye zachowana odleglosc
przynajmniej 20 em.
Urz~dzenia wraz z anten~ nie mozna instalow ac w pol~czeniu z inn~ a nten~ lub
nadajnikiem .
CHaCTOALL\eTo, De non ASKnap~o~pa, Ye Tosa 6e3>Kio1YHD
YCTpOf;iCTBO e B CbOTBeTCTBiole CbC Cbll\eCT Be H ~o~Te
~o~J~o~cKBaH ~o~A 1o1 Apyr ~o~Te np~o~no>K~o~M~o~ paJnopeA6~o~ Ha
li~o~oeKTioi Ba 1999/5/ EC.
Denon t imto prohlasuje, ze tento Radio LAN device
Czech
Cesky
je ve shade se zakladnimi pozadavky a dalsimi
I orislusnvmi ustanove nim i smernice 1999/5/ ES .
Danish
Undertegnede Denon e rkl<erer herved, at f0lgende j
Dansk
udstyr Radio LAN dev1ce overholder de v<esentlige
krav oa 0vriae relevante krav i direktiv 1999/5/ EF. . _
Estonian
Kiiesolevaga kinnitab Denon seadme Radio LAN
Eesti
device vastavust direkt iivi 1999/5/EU p6hin6uetele
ja
nimetatud
direktiivist tulenevatele teistele
asiakohastele siitetele.
·-·-··1Valmistaja De non vakuuttaa tiiten etta Radio LAN
Finnish
Suomi
! device tyyppinen laite on direktiivin 1999/5/EY
oleellisten vaat imusten ja sitii koskevien direkt iivin
muiden ehtoien mukainen.
Greek
11e tllV 1tapoucra Denon OfJAWvet on radio LAN device
EAI.f[VtKft
I O'UJ.l)J.Opcprovetm rrpo~E.lncr oumwOem anattT}O£l~ Kat ttcr
A.omecr GYETLKE<J otam em mcr OOOV\ClG 1999/5/EK, ~
Hungarian
Alulirott, Denon nyilat kozom, hogy a Radio LAN device
Magyar
megfelel a vonatkoz6 alapvet6 k6vetelmenyekne k es
az 1999/5/EC iranvelv eqveb el6irasainak. . . __
Latvian
Ar so Denon deklare, ka Radio LAN device atbilst
Latviski
Direktivas 1999/5/ EK bOtiskajam prasibam un citiem ar
to saistitaiiem noteikumiem.
Lithuanian
Siuo Denon deklaruoja, kad sis Radio LAN device
Lietuvi4
atitinka esminius reikalavimus ir kitas 1999/ 5/EB
Direktvvos nuostatas.
Hawnhekk, Denon, jiddikjara li dan Radio LAN device
Maltese
Matti
jikkonforma mal-htigijiet essenzjali u ma provvedimenti
ohrain relevant i li hemm fid-Dirrettiva 1999/5/EC.
Port uguese Den on declara que este Radio LAN device esta
Port ugues
conforms com os requisites essenciais e outras
disoosic6es da Direct iva 1999/5/CE.
Romanian
Denon declara ca acest dispozit iv lara fir respecta
Romana
cerintele esentiale precum ~i alte dispozitii relevante
ale Directivei 1999/5/ EC.
Slovak
Denon tymto vyhlasuje. ze Radio LAN device spfna
Sloven sky
zakladne poziadavky a vsetky prislusne ustanovenia
Smernice 1999/ 5/ ES.
·- Slovenian
Denon izjavlja, da je ta radio LAN device v skladu z
Slovensko
bistvenimi zahtevami in ostalimi relevantnimi dolocili
direktive 1999/5/ ES.
Denon bu kablosuz cihazm temel gereksinim le ri ve
Turkish
Turk
1999/5/ EC yonergesindeki ilgili ko~ul lan ka r~ 1ladlljtn1
bevan eder.
Bulgarian
5bn rapcK~o~
C€0560<0
R&TTE Directive 1999/5/EC
This product may be operated in the following countries·
AT
BE
Fl
OK
FR
DE
GR
HU
IE
IT
NL
PL
PT
SK
ES
SE
GB
NO
CH
cz
DEN ON
www.der'lon.com
D&M Hold ings
Inc.
Printed in China 5431 10338 OOAD
To start your Extended Protection Plan coverage:
1.
Call us toll-free at (855) 720-0823 (US Residents Only)
Have your model number, serial number,
and purchase receipt available when calling.
2.
Log on to http://servicecontracts.d enon.com
Copyright © 2011 D&M Holdings Inc. All Rights Reserved.
The Denon Extended Protection Plan
Today's highly technical products are mechanically and electronically
complex, and even the best equipment may need periodic attention that
can result in costly repair bills. With the Denon Extended Protection Plan,
there are no deductibles or hidden charges. Best of all, if your Denon
product is unrepairable, we will replace it, absolutely free with a unit that
has similar features and functionality.
Don't delay! You must extend your coverage before your factory
warranty expires. To extend your warranty, simply log on to our website:
http://servicecontracts.denon.com, or call us toll-free at {855) 720-0823.
(US Residents Only)
Features & Benefits
• 1 00°/o coverage on parts & labor
• If unrepairable, we'll replace it!
• No deductibles or hidden charges
• Power surge protection
• Unlimited service calls
• Nationwide authorized service
center network
• Service representatives
available to assist you
24 hours a day
• No Lemon guarantee
• Fully insured
• Fully transferable
DE NON
Congratulations on purchasing this Denon product!
We invite you to join the Denon Owner's Club.
Thank you for choosing Denon.
Be the first to know about upcoming Denon products and get exclusive
previews of new technologies. You will also receive members only offers from
our online store and be the first in line for all promotions and contests.
http://usa.denon.com/us/MyAccount/Pages/Login.aspx
Join today!
Please register your product at,
USA Customers : http://usa.denon.com/us/Support/Pages/ProductRegistration.aspx
Canada Customers : http://ca.denon.com/CA/Support/Pages/ProductRegistration.aspx
Denon Factory Service Information
USA
DENON FACTORY SERVICE by PANURGV OEM
701 Ford Road (South Dock)
Rockaway, NJ 07866-2053
(973) 625-4056
(973) 625-9489 Fax
http://www.panurgyoem .com/Denon/Denonrepair.html
To locate an authorized warranty service center within your area please visit our web site at
http://usa.denon.com/us/Support/Pages/ServiceCenterSearch.aspx
CANADA
DENON FACTORY SERVICE by MICROLANDTECHNICAL SERVICES
170 Alden Road, Unit 2
Markham, ON L3R4C1
(905) 940-1982
http://clientportal.microland.ca/rmastart.aspx
To locate an authorized warranty service center within your area please visit our web site at
http://ca.denon.com/CA/Support!Pages/ServiceCenterSearch.aspx
WARRANTY DE COMMON
5431 10003 60AD
1
i
DEN0 N
l
~·•tlll•-~·•tlt••·. . .·•lll''·. . . ·••tll:·.... ·••ll'•·. . . ·••tl''·. . .·•tlll•·. . . ·••~"''..,_.,,lll•·.,_.,,llt•·. . .·•llll•· . . . ·•tlll•·. . . ··•llt•·. . . ·•tlll•·_.,.·,tllt•..... ·•tlll•·.... ·•tllt•·. . . ·•tll"·. . . ·•tllt•-....·••llh·. . .·••H••·. . .·•tllt•-.-.-•tllt•...-.·•tlll•·. . . ·•tllt•-.-.·•tlll•·.-.·•tlll•·. . .·•tllh·. . .·•tllt~....,,tlt•·...·•tllt•·. . .·•tllt'
nu. w~Mry Mil bohoo=doruy milio U.S.A.
t
;
®
.
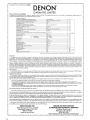
LIMITED WARRANTY
~
Length of Non-Transferable Warranty
•
This warranty on your DENON product which is distributed and warranted by DENON ELECTRONICS (USA), LLC remains in effect for the following periods from
the date of the original consumer purchase from an AUTHORIZED DENON ELECTRONICS (USA), LLC DEALER.
~
~
Product Category
NV Controller, NV Receiver,
f
IN-Command series
rM
AM/FM Receiver
AV Receivers, Sound bar
DVD Receiver, DVD Home Theater System
D/A Converter
t
Pre-Amplifier, Digita l Pre-Ampl if ier. Power-Amplif ier, Head Amplifier
'
Tuner, Integrated Amplifier
Option Board
CD Player, DVD Player, Blu-ray Disc Player
CD Recorder
~
CD Receiver, Network CD Receiver, Network Receiver
Network Aud io Player
System Audio
Turntable
I
I
1
2
I Autolift I Manual
I Full Automatic
Speaker
Sub-woofer
Microphone
~~oth Speaker
iPh or. e•.J I iPod® Docks
Headphone
Front Surround Home Theater System
Video Processor
Cartridge
Remote Controller
Cables
Speaker stands
AVC, AVR, ORA
AVR-••••c1. AVR-X .. **, DKT-S ....
ADV, S
DA
PRA,AVP, DAP,POA, HA
TU, PMA
ACD
DCD, DCM, DVD, DVM, DBP. DBT
CDRW
RCD, DRA-N
DNP
D-F, D-M, S
DP-L, DP-M
DP-F, DP-USB
sc
DSW
OM-S, DM-A
DSB
ASD, DSD
AH
DKT-FS
DVP
DL
RC
AK
ASF
'
'
2
3
1
2
3
3
3
1
1
1
2
1
YEAR ISI
4
2
5
1
2
1
1
1
1
3
90
90
90
90
DAYS
iPod is a trademark of Apple Inc., registered in the U.S. and other countries .
What is Covered
Except as specified below, this Warranty covers all defects in material and workmanship in this product occurring during the above warranty periods. The following are
not covered by the Warranty: (I) Any product which is not distributed in the U.S.A. by DEN ON ELECTRONICS (USA), LLC. (2) Any product which is not purchased in
the U.S.A. from an authorized DENON dealer. (Note: AUTHORIZED DENON DEALERS can be identified by DENON AUTHORIZED DEALER sticker displayed in
the stores. If you are uncertain as to whether a dealer is a DEN ON AUTHORIZED DEALER, please contact DEN ON as listed below). (3) Any product on which the serial
number has been defaced, modified or removed. (4) Damaged deterioration or malfunction resulting from: a) Accident, act of nature, abuse, misuse, neglect, unauthorized
product repair, opening of or modiftcation or failure to follow instructions supplied with the product. b) Repair or attempted repair by anyone not authorized by DENON.
c) Any shipment of the product (claim must be presented to carrier). (5) Items subject to wear from normal usage (tape heads, cartridges, stylus, battery, etc.). (6)
Periodic check-ups which do not disclose any defect. (7) Use of the product outside the U.S.A. (8) Damaged magnetic tape or CD/DVD/BD discs. (9) Use in industrial,
commercial , and/or professional applications. (I 0) Any installation or removal charges resulting from product failure.
What We Will Pay For
If during the applicable warranty period from the date of original consumer purchase your DENON product is found to be defective by DENON, DENON will
repair, or at its option, replace with new, reconditioned or equivalent model, such defective product without charge for parts or labor.
How to Obtain Warranty Performance
If your unit ever needs service, it may be taken or shipped to any authorized DENON service station or DENON ELECTRONICS (if you are uncertain as to whether
a service station is DENON authorized, please visit our website at http://usa.denon.com/us/Support!Pages/ServiceCenterSearch.aspx or contact DENON as listed
below.) In all other cases, the following procedures apply whenever your unit must be transported for warranty service;
.
t
'
a. You are responsible for transporting your unit or arranging for its transportation.
b. If shipment of your unit is required;
You must pay the initial shipping charges, but we will pay the return shipping charges if the repairs are covered by the Warranty.
c. WHEN RETURNING YOUR UNIT FOR WARRANTY SERVICE. A COPY OF THE ORIGINAL SALES SLIP MUST BE ATTACHED.
d. You should include the following: your name, address, daytime telephone number, model and serial number of the product and a description of the problem.
In the case of a CD/DVD/BD Player, please enclose ONE (I) disc that the unit has failed with for test reasons. It will be returned with the unit.
THIS WARRANTY IS VALID IN THE U.S.A. ONLY.
If your product does not require service, but you have questions regarding its operation, please contact our Customer Support Department as listed below.
THIS WARRANTY IS EXPRESSLY MADE IN LIEU OF ALL OTHER WARRANTIES, EXPRESSED OR IMPLIED, INCLUDING WITHOUT LIMITATION,
WARRANTIES OF MERCHANTABILITY AND FITNESS FOR A PARTICULAR PURPOSE.
OUR LIABILITY IS LIMITED TO THE REPAIR OR REPLACEMENT, AT OUR OPTION, OF ANY DEFECTIVE PRODUCT AND SHALL IN NO EVENT
INCLUDE INCIDENTAL OR CONSEQUENTIAL COMMERdAL OR PROPERTY DAMAGES OF ANY KIND. WE ARE NOT RESPONSIBLE FOR
PRODUCTS LOST, STOLEN AND/OR DAMAGED DURING SHIPPING.
SOME STATES DO NOT ALLOW LIMITATIONS ON HOW LONG AN IMPLIED WARRANTY LASTS AND/OR DO NOT ALLOW THE EXCLUSION OF
INCIDENTAL OR CONSEQUENTIAL DAMAGES, SO THE ABOVE LIMITATIONS AND EXCLUSIONS MAY NOT APPLY TO YOU.
This warranty gives you specific legal rights, but you may also have other rights which vary from state to state. This Warranty may not be altered other than in a
writing signed by an officer of Denon Electronics USA, LLC.
DENON ELECTRONICS (USA), LLC
(a D&M Holdings Company)
100 Corporate Drive
Mahwah, NJ 07430-2041
(201) 762-6665
www.usa.denon.com
2
t,, _
__,,,,___, , ,.__,., ,,__ ,,,,,.-.,oiiO•·-·••ol'•·-·•oiiO•-"oiU•·-
DENON FACTORY SERVICE by PANURGY OEM
701 Ford Road (South Dock)
Rockaway, NJ 07866-2053
(973) 625-4056
(973) 625-9489 Fax
http://www.panurgyoem.com/Denon/Denonrepair.html
•
·•ol'•·-·•oll'•·-·••ol'•·-"'"''--"'"''--"''''·-"oll'•·-"'""·-·•oll''·-"'"''·-"'"'·-·••ll''·-·•oll''·-·••0''·- ·•oll' ·-·••ol'•·-·•oll'•·-·••ll'•·-·••li''·-·•OI''·-·•oiU•·- ·•III''·-·•IIIO•·..J
!
DE N0 N®
~·•tlll•-..-·•tlll•·~· •tlll•·.... ·otllt•.... ·ollll•·.....·•tlll•·...,.·•tlll•·. . . ·ulllo·. . . ·otlll•·. . .·lllll•·. .·otlll•·. . .·•tlll•. . .·•tlll!.....,,lllo.,.P·olltl•·. . .·•tlll• ....·•tlll•·....·•tlll•·. . . ·•tl~'·. . .·•llll••. .·•tlll•·. . .·•tlll•·.... ·•tlll•·....·ulll•..,._·otlll'·....·•tlll•·. .·•tlll•·....·lllll•·.... ·•tlll•·.... ·lllll•·.... ·•tlll•·. . .
''"~cyMUrehoomrooruy;o~
~- ·
'
~
•
i
i
~
t
t
t
t
t
t
t
t
t
t
t
t
t
t
t
t
't
~
t
t
t
t
t
t
t
t
LIMITED WARRANTY
Length of Non-Transferable Warranty
This warranty on your DENON product which is distributed and warranted by D&M CANADA INC. remains in effect for the following periods from the date of the
original consumer purchase from an AUTHORIZED D&M CANADA INC. DEALER.
AN Controller, AN Receiver, AM/FM Receiver
IN-Command series TM AV Receivers, Sound bar
DVD Receiver, DVD Home Theater System
D/A Converter
Pre-Amplifier, Digital Pre-Amplifier, Power-Amplifier, Head Amplifier
Tuner, Integrated Amplifier
Option Board
CD Player, DVD Player, Blu-ray Disc Player
CD Recorder
CD Receiver, Network CD Receiver, Network Receiver
Network Audi o Player
System Aud io
I 1 I Autolift I Manual
Turntable
I 2 I Full Automatic
Speaker
Sub-woofer
Microphone
Bluetooth Speaker
iPhone<!ll / iPod® Docks
Headphone
Front Surround Home Theater System
Video Processor
Cartridge
Remote Controller
Cables
Speaker stands
AVC, AVR, ORA
AVR-** .. CI, AVR-X .... , DHT-S** ..
ADV, S
DA
PRA,AVP,DAP, POA, HA
TU, PMA
ACD
DCD, DCM, DVD, DVM, DBP, DBT
CDRW
RCD, DRA-N
DNP
D-F, D-M, S
DP-L, DP-M
DP-F, DP-USB
sc
DSW
DM-S, OM-A
DSB
ASD, DSD
AH
DHT-FS
DVP
DL
RC
AK
ASF
2
1
2
3
3
3
1
1
1
2
1
YEARlSI
4
2
5
'
;
1
2
1
1
1
1
3
90
90
90
90
•
DAYS
iPod is a tradema rk. of Apple Inc., regi stered in the U.S. and other countries
What is Covered
Except as specified below, this Warranty covers all defects in material and workmanship in this product occurring during the above warranty periods. The following
are not covered by the Warranty : (I) Any product which is not distributed in Canada by D&M CANADA INC. (2) Any product which is not purchased in Canada
from an authorized DENON dealer. (Note: AUTHORIZED DENON DEALERS can be identified by DENON AUTHORIZED DEALER sticker displayed in the
stores. If you are uncertain as to whether a dealer is a DEN ON AUTHORIZED DEALER, please contact D&M CANADA INC. as listed below) . (3) Any product on
which the serial number has been defaced, modified or removed. (4) Damaged deterioration or malfunction resulting from: a) Accident, act of nature, abuse, misuse,
neglect, unauthorized product repair, opening of or modification or failure to follow instructions supplied with the product. b) Repair or attempted repair by anyone
not authorized by DENON. c) Any shipment of the product (claim must be presented to carrier). (5) Items subject to wear from normal usage (tape heads, cartridges,
stylus, battery, etc.). (6) Periodic check-ups which do not disclose any defect. (7) Use of the product outside Canada. (8) Damaged magnetic tape or CD/DVD/BD
discs. (9) Use in industrial, commercial, and/or professional applications. ( 10) Any installation or removal charges resulting from product failure.
What We Will Pay For
If during the applicable warranty period from the date of original consumer purchase your DEN ON product is found to be defective by DEN ON, DENON will
repair, or at its option, replace with new, reconditioned or equivalent model, such defective product without charge for parts or labor.
''
;'
•
'
How to Obtain Warranty Performance
If your unit ever needs service, it may be taken or shipped to any authorized DENON service station or D&M CANADA INC. (For an authorized DENON service
station near you, please check our website http://ca.denon.com/CNSupport/Pages/ServiceCenterSearch.aspx or contact D&M CANADA INC. as listed below.) In all
other cases, the following procedures apply whenever your unit must be transported for warranty service;
a. You are responsible for transporting your unit or arranging for its transportation.
b. If shipment of your unit is required;
You must pay the initial shipping charges, but we will pay the return shipping charges if the repairs are covered by the Warranty.
c. WHEN RETURNING YOUR UNIT FOR WARRANTY SERVICE. A COPY OF THE ORIGINAL SALES SLIP MUST BE ATTACHED.
d. You should include the following: your name, address, daytime telephone number, model and serial number of the product and a description of the problem.
In the case of a CD/DVD/BD Player, please enclose ONE (I) disc that the unit has failed with for test reasons. It will be returned with the unit.
THIS WARRANTY IS VALID IN CANADA ONLY.
If your product does not require service, but you have questions regarding its operation, please contact our Customer Support Department as listed below.
t
SOME PROVINCES DO NOT ALLOW LIMITATIONS ON HOW LONG AN IMPLIED WARRANTY LASTS AND/OR DO NOT ALLOW THE EXCLUSION OF
INCIDENTAL OR CONSEQUENTIAL DAMAGES , SO THE ABOVE LIMITATIONS AND EXCLUSIONS MAY NOT APPLY TO YOU .
OUR LIABILITY IS LIMITED TO THE REPAIR OR REPLACEMENT, AT OUR OPTION, OF ANY DEFECTIVE PRODUCT AND SHALL IN NO EVENT
INCLUDE INCIDENTAL OR CONSEQUENTIAL COMMERCIAL OR PROPERTY DAMAGES OF ANY KIND. WE ARE NOT RESPONSIBLE FOR
PRODUCTS LOST, STOLEN AND/OR DAMAGED DURING SHIPPING.
This warranty gives you specific legal rights, but yon may also have other rights which vary from province to province. This Warranry may not be altered other than
in a writing signed by an officer of D&M Canada Inc.
;
+
3
'i
t
;,.
Product Category
THIS WARRANTY IS EXPRESSLY MADE IN LIEU OF ALL OTHER WARRANTIES , EXPRESSED OR IMPLIED, INCLUDING WITHOUT LIMITATION,
WARRANTIES OF MERCHANTABILITY AND FITNESS FOR A PARTICULAR PURPOSE.
t
:
·•tlll'
D&M CANADA INC.
104621slington Avenue, Unit 88
Klein burg, Ontario LOJ 1CO
(905) 475-4085
www.ca.denon.com
DENON FACTORY SERVICE
by MICROLANDTECHNICAL SERVICES
170 Alden Road, Unit 2
Markham, ON L3R 4C1
(905) 940-1982
http://clientportal.microland.ca/rmastart.aspx
!
•
!'
't
·•1111•·. . . ·•1111•·. .·•1111 1•. .·•1111 1•. .·•1/11•·...-•1111•·.,._•1111•·. .·•1111•·. .·•1111•·.,._,,111•·. .·•1111•·. .·•1111•·. .·•1111t·. .·•llll•·...-ollll•·...-•llll•·. . .·•llll•·. . .·•tiP•·. .·•IIII•·. .·•IIII•·...-•III1•·. .·•1111•·. .·•11t"·. .·•ll/h·. .·•lll1•·...-•ltll•· . . .·•ltll•·. . .·•lltl• . . .·•llll•· . .·•lll1•·. . .·•1• ''·....•11:11•·....
3
I c-&Mm"~=•OO•~q,·m~
DEN 0 N®
l
I
:
Duree du garantie non-transferable
GARANTIE LIMITEE
Ii
,.
La garantie de votre produit DENON, distribue et garanti par D&M CANADA INC. prend effet il partir de Ia date d'achat du consommateur original aupres d ' un
revendeur official D&M CANADA INC. pendant Ies periodes suivantes.
~· ······· . . .·••••••·. . . · ·•llh~ ········. . . ·•tll"· . . . ········~·•tlll•·. . . ·••lll• .... ···••"·. . . ·•tllll·. . . ··•ll••·. . .··••"· . . . ··•ll••·. . . ·••••••·. . .·•tllh·. . . ·•tlll• ....·•tlll•·. . . ·•tlll•·. . . ·•tlll•·. . . ·•••••••. . . ·•tlll•·. . . ·••••••· . . . ·•tlll• .... ··•ll"·. . ........................ ,.lll•·. . .·•tlll! .....,,ll''· . . . ·•tlll•· . . . ··••ll•· . . . ·•tlll.
~
Contr61eur AN. Recepteu AN. Recepteur AMIFM
IN-Command series TM Recepteurs AV, Barre de son
Recepteur DVD, Systeme DVD Home Theater
Convertisseur NIA
Preamplificateur, preamplificateur numerique,
Ampl ificateur de puissance, Preamplificateur phone
Syntoniseur, amplificateur integra
Carte optionnelle
Lecteur CD. Lecteur DVD, Lecteur Disque Blu-ray
Enregistreur CD
Ampri-tuner avec Lecteur de CD,
Recepteur audio I CD avec reseau integra I Chaine audio avec reseau integra
Lecteur Audio Reseau
Systeme Audio
Table tournante
I
I
1
2
I
I
Levee auto
Auto complet
AVC. AVR. ORA
AVR-** .. CI, AVR-X**** , DHl-S****
ADV, S
DA
1
2
PRA, AVP.DAP, POA, HA
3
3
3
1
1
RCD, DRA-N
1
DNP
0-F, D-M. S
DP-L, DP-M
DP-F, DP-USB
2
ANNEES
1
4
2
5
1
2
sc
Haut-parleurs
Sub-woofer
Micro
Enceinte Bluetooth
iPhone® I iPod® Docks
Casque d'ecoute
Avant Surround Systeme Home Theater
Processeur video
Cellule phonolectrice
Telecommande
Cable
Support pour enceinte acoustique
2
3
TU, PMA
ACD
DCD, DCM, DVD, DVM. DBP. DBT
CDRW
'
'
Categoric de produit
DSW
OM-S, OM-A
DSB
ASD. DSD
AH
DHT-FS
DVP
DL
RC
AK
ASF
1
1
1
1
3
90
90
90
90
JOURS
Apple et tPod sont des marques commerc•ales d:A.pple Inc .. deposees aux Etats-Un•s et dans d'autres pays.
Couverture
Cette garantie couvre tous Ies defauts de materiel ou de fabrication du produit, ill' exception de ceux indiques ci-apres qui conforrment selon les termes durant Ia peri ode
de Ia garantie. Ne soot pas couverts par Ia garantie: (I) Tout produit qui n' est pas distribue au Canada par D&M CANADA INC. (2) Tout produit qui n 'a pas ete achete au
Canada aupres d'un revendeur officiel DENON (Note: On peut identifier les revendeurs officiels DENON par leur auto-collant "REVENDEUR OFFICIEL DENON" affiche
dans leur magasin. Si vous doutez qu'un revendeur soit officiellement reconnu, contactez D&M CANADA INC. ill'adresse ci-dessous.) (3) Tout produit dont le numero
de serie a ete efface, modifie ou enleve. (4) Dommages dus Ia deterioration ou un fonctionnement defectueux Ia suite de: a) accident, acte de Ia nature, abus, utilisation
impropre, negligence, reparation au moyen d'un produit non autorise, debale, modification, emploi contraire aux instructions fournies avec le produit, b) reparation ou
tentative de reparation par quelqu' un non reconnu par DENON. c) tout envoi du produit (Ia reclamation doit etre pn!sentee au transporteur), (5) Articles sujets a deterioration
par !'usage (tetes de magnetophone, cellules phono, pointes de lecture phono, piles, etc.). (6) verification periodique qui ne revele aucun defaut. (7) Utilisation du produit hors
du Canada. (8) Bandes magnetiques, disques CD/DVD/BD endommages. (9) Utilisation commerciale, industrielle ou professionnelle. (I 0) Toutes charges d' installation ou de
deplacement resultant d'un defaut du produit.
a
a
a
Notre paiement
Si votre produit DENON est reconnu defectueux par DEN ON durant Ia periode d'application de Ia garantie apres Ia date d ' achat du consommateur, DENON reparera
ou, son choix, remplacera avec un modele neuf, usage ou equivalent ce produit defectueux sans frais de pieces ni de main d'ceuvre.
a
Application de Ia garantie
a
Si votre appareil necessite une verification ou une reparation, il peut etre apporte ou envoye tout atelier de service autorise DENON ou directement chez D&M CANADA
INC. (Pour trouver I' atelier autorise le plus pres, priere de verifier sur le site lntemet de DENON au http:llca.denon.com/CNSupport/PagesiServiceCenterSearch.aspx ou bien
contactez D&M Canada Inc aux coordonnes indiquees ci bas).
Dans tous Ies autres cas, Ies procedures suivantes s' appliquent si votre appareil doit etre envoye pour une verification ou une reparation sous garantie.
;•
;
;
~
•
t
t
~
t
~--,
t
_
;
a. Vous etes responsable du transport de votre article ou vous devez vous arranger vous-meme pour son transport.
b. Si votre article doit etre envoye, vous devez payer les frais d'envoi initiaux, mais nous payerons les frais de retour si Ia garantie couvre les reparations.
c. LORSOUE VOUS RENVOYEZ VOTRE ARTICLE POUR UN SERVICE SOUS GARANTIE. VOUS DEVEZ JOINDRE UNE COPIE DE LA FACTURE
D ' ACHAT D'ORIGINE.
d. Vous devez inclure egalement vos nom, adresse, numero de telephone de jour, numeros de modele et de serie du produit et une description du probleme.
Dans le cas d'un lecteur CD/DVD/BD, joindre un disque que l'appareil n'a pu lire pour test. U vous sera rctourne avec !'article.
CETTE GARANTIE EST VALABLE SEULMENT AU CANADA.
Si votre produit ne requiert aucun service mais que vous avez des questions quanta son fonctionnement, contactez notre departement service clientele dont I' adresse figure ci-dessous.
CETTE GARANTIE EST EXPRESSEMENT FAITE EN LIEU ET PLACE DE TOUTES LES AUTRES GARANTIES EXPRIMEES OU SOUS-ENTENDUES' Y COMPRIS,
SANS SE LIMITER A CELLES-CI, LES GARANTIES MARCHANDES ET SPECIFIQUES POUR UN USAGE PARTICULIER.
NOTRE RESPONSABILI'rE SE LIMITE A LA REPARATION OU AU REMPLACEMENT, A NOTRE CHOIX, DE TOUT PRODUIT DEFECTUEUX ET N' INCLUT EN
AUCUN CAS DES DOMMAGES FORTUITS, COMMERCIAUX INDIRECTS NI MATERIELS D' AUCUNE SORTE. NOUS NOUS SOMMES PAS RESPONSABLES
POUR LA PERTE DE LES PRODUITS ETIOU LES MARCHANDISES ENDOMMAGEES PENDANT LE TRNASPORT DES BIENS.
CERTAINES PROVINCES NE PERMETTENT PAS DE LIMITES QUANT A LA DUREE D'UNE GARANTIE SOUS-ENTENDUE ETIOU NE PERMETTENT PAS
L' EXCLUSION DE DOMMAGES FORTUITS. LES LIMITATIONS ET EXCLUSIONS MENTIONNEES PLUS HAUT PEUVENT NE PASS' APPLIQUERA VOTRE CAS.
Cette garantie vous donne des droits tegaux specifiques, mais il se pourrait que vous ayez d ' autres droits qui varient d'une province
etre modifiee que par un document signe par un gestionnaire autorise de D&M Canada.
D&M CANADA INC.
10462 Islington Avenue, Unit 88
Klein burg, Ontario LOJ 1CO
(905) 475-4085
www.ca.denon.com
a I' autre. La garantie ne peut
DENON FACTORY SERVICE
by MICROLANDTECHNICAL SERVICES
170 Alden Road, Unit 2
Markham, ON L3R 4C1
(905) 940-1982
http://clientportal.microland.ca/rmastart.aspx
;
~
........... ,llll•·......tltt•·....otll"·....•lll'•·. . .·•lll"·. . .••llllt·....•llll·. . .••dti•·.... •IHI•· .... oldll .....,tlft•·.... •IMI•·................IIIt•·....•llt• ......•tllt•·. . .••..lt•.....•lll"·. . ..,dll•·......lll•· . . .••lllf•·. . .·•IUI•·~Itl'·. . .·oiJII•· .... •IIII· ......IIII•·....•IIIh· .... •lllh·.... •tlll+...... ,tiii•• . . .·•MII+·~
4