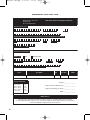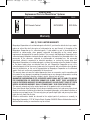
1
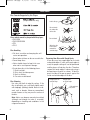
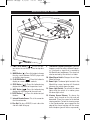
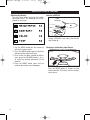
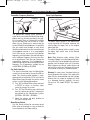
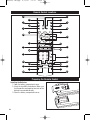
MV6000-UM.qxp
4/5/05
16:13
Page 1
Owner's Manual
Mobile DVD/CD Player
90.1M
90.5M
HZ Hz
Models: MV6000
MV6000C
For operational or technical assistance, after reading this manual,
please call us toll free at (800) 638-3600 or visit www.magnadyne.com
MV6000-UM.qxp
4/5/05
16:13
Page 2
Features
• Compatible with PAL and NTSC Systems. This
player can play discs recorded in either PAL or
NTSC format.
• Supplied Remote Features: multi-language
audio-track/subtitle, multi-angle (where available), plus all basic functions.
• CD, DVD, CD-R, CD-RW, MP3 Compatible.
• L/R stereo analog audio outputs for
connection to existing head unit aux. inputs.
Video output is composite video.
Use this Product Safely
Driving
Be aware of road and traffic conditions. Keep
the volume at a low level.
Moisture
Do not expose the product to water or excessive moisture. This could cause electrical
shorts, fire or other damage.
Parking
Parking in direct sunlight can produce very high
temperatures inside your vehicle. Give the car
interior a chance to cool down before starting
playback.
Proper Power Supply
This product is designed to operate with a 12 Volt
DC, negative ground battery system.
2
Protecting the Disc Mechanism
Avoid inserting any foreign objects into the slot of
this player. Failure to observe this precaution may
cause malfunction of this unit.
Repairs
Contact our customer service representatives.
Do not attempt to disassemble or adjust this
product yourself.
Installation
The unit should be installed in a horizontal position.
MV6000-UM.qxp
4/5/05
16:13
Page 3
Contents
Safety Information. . . . . . . . . . . . . . . . . . . . . . 3
Disc Notes. . . . . . . . . . . . . . . . . . . . . . . . . . . . 4
Screen and DVD/CD Functions . . . . . . . . . . 5-7
Location of Functions. . . . . . . . . . . . . . . . . . 5
Adjusting the Monitor . . . . . . . . . . . . . . . . . 6
Inserting a DVD/CD . . . . . . . . . . . . . . . . . . . 6
Changing to an Auxiliary Input Source. . . . . 6
Transmitter Frequency Selection . . . . . . . . . 7
Car Radio Interface . . . . . . . . . . . . . . . . . . . 7
Mono/Stereo Switch. . . . . . . . . . . . . . . . . . . 7
Dome Light Operation . . . . . . . . . . . . . . . . . 7
Wiring Diagram . . . . . . . . . . . . . . . . . . . . . . . 8
Wiring Instructions . . . . . . . . . . . . . . . . . . . 9
Remote Control . . . . . . . . . . . . . . . . . . . . 10-11
Remote Control Functions . . . . . . . . . . 10-11
Headphones . . . . . . . . . . . . . . . . . . . . . . 12-13
Headphone Operation. . . . . . . . . . . . . . . . . 13
Basic Operation. . . . . . . . . . . . . . . . . . . . 14-15
Turn the Unit On. . . . . . . . . . . . . . . . . . . . . 14
Loading a DVD/CD Disc . . . . . . . . . . . . . . 14
Ejecting a Disc . . . . . . . . . . . . . . . . . . . . . 14
Standby State . . . . . . . . . . . . . . . . . . . . . . . 14
Basic Play. . . . . . . . . . . . . . . . . . . . . . . 14-15
Advanced Operation . . . . . . . . . . . . . . . . 16-17
Initial DVD Setup . . . . . . . . . . . . . . . . . . 18-19
Specifications. . . . . . . . . . . . . . . . . . . . . . . . 20
Troubleshooting . . . . . . . . . . . . . . . . . . . . . . 21
Replacement Parts . . . . . . . . . . . . . . . . . 22-23
Warranty . . . . . . . . . . . . . . . . . . . . . . . . . . . . 23
Safety Information
CAUTION:
THIS MOBILE DVD PLAYER IS A CLASS I LASER
PRODUCT. HOWEVER, THIS MOBILE DVD PLAYER
USES A VISIBLE/INVISIBLE LASER BEAM WHICH
COULD CAUSE HAZARDOUS RADIATION EXPOSURE IF DIRECTED. BE SURE TO OPERATE THE
MOBILE DVD PLAYER CORRECTLY AS INSTRUCTED. USE OF CONTROLS OR ADJUSTMENTS OR
PERFORMANCE OF PROCEDURES OTHER THAN
THOSE SPECIFIED HEREIN MAY RESULT IN HAZARDOUS RADIATION EXPOSURE. DO NOT OPEN
COVERS AND DO NOT REPAIR YOURSELF. REFER
SERVICING TO QUALIFIED PERSONNEL.
CAUTION:
FCC REGULATIONS STATE THAT ANY UNAUTHORIZED CHANGES OR MODIFICATIONS TO THIS
EQUIPMENT MAY VOID THE USER’S AUTHORITY TO OPERATE IT.
WARNING:
• TO REDUCE THE RISK OF FIRE OR ELECTRIC
SHOCK, DO NOT EXPOSE THIS EQUIPMENT
TO RAIN OR MOISTURE.
• THIS DEVICE IS INTENDED FOR CONTINUOUS
OPERATION.
• TO REDUCE THE RISK OF FIRE OR ELECTRIC
SHOCK AND ANNOYING INTERFERENCE, USE
ONLY THE RECOMMENDED ACCESSORIES.
This product incorporates copyright protection
technology that is protected by method claims of
certain U.S. patents and other intellectual property
rights owned by Magnadyne Corporation and other
rights owners. Use of this copyright protection
technology must be authorized by Magnadyne
Corporation and is intended for home and other
limited viewing uses only unless otherwise authorized by Magnadyne Corporation. Reverse engineering or disassembly is prohibited.
Region Management Information:
This Mobile DVD Player is designed and manufactured to respond to the Region Management
Information that is recorded on a DVD disc. If the
Region number described on the DVD disc does
not correspond to the Region number of this
Mobile DVD Player, this Mobile DVD Player cannot play this disc.
3
MV6000-UM.qxp
4/5/05
16:13
Page 4
Disc Notes
Disc Formats Supported by this Player:
V I D E O
(Single-sided disc only)
Label side up
Do not touch
the underside
of the disc
Discs which cannot be played with this player:
• DVD-ROM
• DVD-R/DVD-RAM
• CDV
• CD-G
Disc Handling
• Dirt, dust, scratches and warping disc will
cause non operation.
• Do not place stickers on disc or scratch disc.
• Do not warp discs.
• A disc should always be kept in its case
when not in use to prevent damage.
• Do not place discs in the following places:
1. Direct sunlight.
2. Dirty, dusty and damp areas.
3. Near car heaters.
4. Car seats or dashboard.
Disc Cleaning
Use a dry soft cloth to wipe the surface. If the
disc is quite dirty, use a soft cloth slightly moist
with isopropyl (rubbing) alcohol. Never use solvents such as benzine, thinner or conventional
record cleaners as they may mar the surface of
the disc.
Note: A disc may become somewhat scratched
(although not enough to make it unusable)
depending on handling and conditions in the
usage environment.
4
Do not bend
Wipe the disc
from center
toward the
outside edge.
Preparing New Discs with Rough Spots
A new disc may have rough edges on its inside
and outside edges. If a disc with rough edges is
used, the proper setting will not be performed
and the player will not play the disc. Therefore,
remove the rough edges in advance by using a
ball point pen or pencil as shown. To do this,
press the side of the pen or pencil against the
inside and outside edges of the disc.
Rough spots on
outside edge
Rough spots
on inside edge
Ball point pen
or pencil
MV6000-UM.qxp
4/5/05
16:13
Page 5
Screen and DVD/CD Functions
10
9
11
8
12
7
90.1M
90.5M
HZ Hz
1
2
3
4
5
6
13
1. PWR / STOP Button (
): Press this button to turn the unit On/Off. Press to stop disc
play.
2. MODE Button ( ): Press this button to change
the play source between DVD/CD player and
an auxiliary input source.
3. PLAY/PAU Button (
): Press this button to
display on screen monitor controls.
4. PREV Button (
): Press this button during
playback to skip back to the previous track.
5. NEXT Button (
): Press this button during
playback to skip forward to the next track.
6. EJECT Button (
the disc.
): Press this button to eject
7. Infrared Remote Sensor: This is the sensor for
the infrared remote.
8. Disc Slot: To play a DVD/CD, insert a disc into
slot with label facing up.
9. Transmitter Frequency Selection: 3 position
frequency switch to select a different frequency. It transmits a signal that is received by
the MovieVision headphones. The signal can
also be received by the vehicle’s car radio.
10. Mono/Stereo Switch: Changes the unit from
Mono to Stereo
11. Dome Light: The dome lights located in the
MovieVision screen housing will illuminate
whenever the vehicle doors are open.
12. Dome Light Switch: To activate the dome
lights while the vehicle is in motion, press
the dome light switch.
13. Viewing Screen Release: To release the
screen, push inward on the tab and pull
downward. Place the screen to the desired
viewing position. To lock the viewing screen
in the closed position, press upward on the
edge of the screen housing until the screen
locks into place (you will hear a snap sound).
5
MV6000-UM.qxp
4/5/05
16:13
Page 6
Screen and DVD/CD Functions
Adjusting the Monitor:
Press the Menu button to activate the monitor
adjustment menu. The following will be displayed on the screen:
Inserting a DVD/CD
Label
Facing Up
To play a DVD/CD, insert a disc into slot with
label facing up.
1. Use the MENU button on the remote to
activate the menu screen.
2. Press the MENU button again to select the
desired monitor adjustment item.
3. Once an item has been selected for adjustment, press the VOLUME buttons (- or +)
to make the desired adjustment to the
monitor.
4. Press the MENU button again until the
monitor adjustment menu disappears.
Changing to an Auxiliary Input Source
Press the MODE button to change the play
source between DVD player and an auxiliary
input source.
6
MV6000-UM.qxp
4/5/05
16:13
Page 7
Screen and DVD/CD Functions
Transmitter Frequency Selection:
Frequency
Switch
Mono/ Stereo
Switch
90.5MHz
Dome Light Operation:
Dome Light Switch
90.1M
90.5M
HZ Hz
90.1MHz
89.7MHz
MONO ST
The MovieVision viewing screen transmits a
signal that is received by the MovieVision headphones and can also be received by the vehicle’s car radio. There are 3 frequencies available
for use but only one can be used at a time.
When you are listening to a movie using the
wireless MovieVision headphones, it is possible
that you could travel through an area where
interference between the screen transmitter and
the headphone receiver is at an unacceptable
level. If this occurs, you can use the 3 position
frequency switch located in the roof housing to
select a different frequency that may have less
or no interference. Each time you change the
transmitting frequency, the headphone/car
radio receiver will have to be retuned to the new
frequency. The 3 frequencies available for use
are 89.7MHz, 90.1MHz or 90.5MHz.
Car Radio Interface:
The signal transmitted from the MovieVision
screen can be received by the existing FM car
radio. This listening mode provides a much
higher quality of sound for all. To listen to the
MovieVision signal through the vehicle stereo
system, use the following procedure:
A. Turn “ON” the MovieVision system and insert
a DVD/CD or attach an auxiliary signal
source to view on the screen.
B. Turn “ON” the FM radio in your vehicle and
tune the radio to one of the 3 frequencies
transmitted by the MovieVision system.
(89.7MHz - 90.1MHz - 90.5MHz)
C. Adjust the volume and tonal qualities to
suit your listening taste.
Mono/Stereo Switch:
Use the Stereo setting for enhanced sound
effect when environment is noisy or tends to
have interference use Mono setting.
The dome lights located in the MovieVision
screen housing will illuminate whenever the
vehicle doors are open just as the original
dome light did.
To activate the dome lights manually, press
the dome light switch next to the desired
dome light.
Note: Most American made vehicles (Ford,
Chevrolet, Dodge) have a dashboard light dimmer switch that can be rotated to the maximum
position and the dome lights will illuminate.
Most Japanese or Korean made vehicles do
not have this switch and the lights will have to
be turned on manually as mentioned above.
Warning! In some cases, the dome light may
be hot, proceed with caution. Only replace the
bulb with the recommended size and wattage.
Altering the size, shape or wattage will result
in a damaged housing (melting). Use only
Sylvania or GE model DE3021 for replacements.
7
MV6000-UM.qxp
4/5/05
16:13
Page 8
Wiring Diagram
Video Output
Yellow RCA Connector
with Gray Wire
Video Input
Yellow RCA Connector
with Black Wire
Audio Input (Right)
Red RCA Connector
with Black Wire
Audio Input (Left)
White RCA Connector
with Black Wire
Black Wire Ground
Yellow Wire 12 V Memory
3A
Red Wire Ignition
3A
Green Wire See Dome Light Section for Connection
White Wire See Dome Light Section for Connection
Orange Wire See Dome Light Section for Connection
8
MV6000-UM.qxp
4/5/05
16:13
Page 9
Wiring Instructions
Power Harness Wiring:
The 3 wire harness provides battery and ignition 12 volts as well as a chassis ground.
Route the power harness to the point in the
vehicle that you will make the connections.
Auxiliary Input:
You may use video games, camcorders and
other portable video unit by connecting the
unit to the color-coded auxiliary input connectors.
Red Wire: The red wire in the harness should
be connected to a +12 volt power wire that
is turned on and of by the position of the
ignition key.
Note: These connectors are attached to black
wires.
Yellow Wire: The yellow wire in the harness
should be connected to a constant +12 volt
wire that is NOT turned on and off by the
position of the ignition key.
Black Wire: The black wire in the harness
should be connected to the chassis of the
vehicle using a ring terminal and self tapping screw or existing bolt and nut.
Yellow RCA Connector: Video input.
Red RCA Connector: Audio input right.
White RCA Connector: Audio input left.
Video Output:
You may output video to an optional monitor.
Note: This connector is attached to a gray wire.
Yellow RCA Connector: Video output.
Dome Light Harness Wiring:
Follow the enclosed wiring to connect the
MovieVision dome light system to the factory
installed dome light wiring
For Negative Trigger Dome Light Systems
(typical to most vehicles):
Orange Wire: Connect to constant +12 volts.
Green Wire: Connect to the common trigger
wire coming from all door pin switches (-).
White Wire: Connect to chassis ground.
For Positive Trigger Dome Light Systems
(typical to many Ford vehicles):
Orange Wire: Connect to chassis ground.
Green Wire: Connect to the common trigger
wire coming from all door pin switches (+).
White Wire: Connect to constant +12 volts.
9
MV6000-UM.qxp
4/5/05
16:13
Page 10
Remote Control Locations
8
9
4
5
3
6
1
2
7
10
12
11
14
13
15
16
17
19
20
18
21
24
23
22
25
28
26
27
32
29
31
30
Preparing the Remote Control
Installing the Batteries:
1. Open the battery compartment cover.
2. Insert the two AAA size batteries. Make sure
that the positive and negative terminals of the
batteries are oriented correctly.
3. Close the battery compartment cover.
+
+
10
MV6000-UM.qxp
4/5/05
16:13
Page 11
Remote Control Functions
1. POWER:
Turns the unit On/Off.
2. EJECT:
Ejects the disc.
3. MUTE:
Mutes the sound.
4. SUBTITLE:
Changes the SUBTITLE language on multi-subtitle language DVD disc.
5. ANGLE:
Changes the view angle on multi-angle DVD disc.
6. DISPLAY:
Displays statistical disc information during playback.
7. MODE:
Changes between DVD/CD and AV input mode.
8. SETUP:
Displays the SETUP menu.
9. PAL/NTSC:
Switches between PAL and NTSC mode.
10. AUDIO:
Changes the AUDIO soundtrack on multi-audio soundtrack DVD disc.
11. TITLE:
Displays the TITLE menu that is stored on the DVD disc.
12. MENU:
Activates the screen adjustment menu.
13. NAVIGATION:
In MENU mode,
,
left/right, forward/back.
14. ENTER:
Confirms the Track/Chapter selected with the numeric buttons or selected with
the cursor buttons on monitor screen.
15. SLOW FW/RV:
buttons serve as cursor buttons to select item
Slow FORWARD/REVERSE playback motion.
16. PLAY:
Plays the disc.
17. RAPID FW/RV:
Searches FORWARD rapidly.
18. SKIP:
19. STOP:
20. PAUSE:
21. 0-9:
n
Skips forward one track.
REWINDS rapidly.
Skips back one track.
STOPS Play.
PAUSES Play.
Numeric buttons.
22. 10+:
Digital selection button, used in combination with numeric buttons.
23. CLEAR:
Clears number when input in error.
24. VOLUME:
VOLUME + / - Increases or decreases the volume level.
25. ZOOM:
Enlarges or reduces size of picture.
26. RESUME:
Resumes playback from any set-up screen mode.
27. GO TO:
Goes to the chapter or time that you selected.
28. PBC:
Change between PBC On and PBC Off on the disc.
29. RANDOM:
Plays CD tracks in RANDOM order.
30. PROGRAM:
Plays CD tracks in the order programmed.
31. REPEAT:
Switches the REPEAT mode of discs.
32. A-B:
Allows a passage to be repeated continuously.
11
MV6000-UM.qxp
4/5/05
16:13
Page 12
Headphones
4
3
1
6
2
1
3
TUNE
2
DN
PWR
UP
5
MHz
7
1. VOL Knob: Rotate to increase and decrease
the volume level.
2. Headphone Receptacle: A second set of personal-type headphones (must have 3.5 mini
male type plug) can be connected in this receptacle.
3. Preprogrammed Buttons: 3 pre-programmed
buttons to tune the headphone radio to the
exact MovieVision signal.
4. Radio Tuning Down Button (DN): Press to
manually search down to tune in a FM radio
station.
5. Radio Tuning Down Button (UP): Press to
manually search up to tune in a FM radio station.
6. PWR Button: Press this button to turn the unit
On/Off.
7. Digital Display: The digital display will show
radio station frequency when the headphone
is on.
12
Installing the Batteries:
To install the “AAA” batteries supplied, use the
following procedure:
A. Hold the headphones in one hand and place
your thumb onto the gripping arrow on the
battery holder cover.
B. Press down on the gripping arrows while
pulling downward on the battery door. Slide
the door away from the headphones to
expose the battery holder cavity.
C. Place the batteries into the holder following
the directions engraved inside the holder.
Observe battery polarity.
MV6000-UM.qxp
4/5/05
16:14
Page 13
Headphones
The correct operation, care and maintenance of
the headphones is critical to their ability to provide
the user with a lifetime of operation. Misuse,
abuse and neglect of the headphones will result in
poor performance and premature failure.
Adjust the Headphones to Fit Your Head
A. Spread the ear pads apart and place the
headphones on your head. Observe the “L”
and “R” indicators.
B. Slide the adjuster up or down until a comfortable fit is achieved.
WARNING!
• Do not throw the headphones.
• Do not get the headphones wet or submerse
them in any liquid.
• Do not lay heavy objects on the headphones.
• Refrain from turning the volume of the headphones to the maximum position, this may
result in ear damage.
Headphone Operation
1. Turn On the Headphones:
To turn on the headphones, press the “PWR”
button on the right side. The digital display will
show radio station frequency when the headphone is on.
2. Tuning an FM Radio Station:
A. Press the “UP” or “DOWN” button to manually tune in an FM radio station.
B. Press and hold the “UP” or “DOWN” button
for one second then release. The radio tuner
will search up or down the radio band for the
next strongest FM radio station.
Note: FM radio stations are always received in
Stereo Mode.
C. Adjust the volume knob to the desired volume
level.
Volume
Knob
3. Listening to What is Displayed on the Screen:
On the right ear pad are 3 preprogrammed buttons marked 1, 2 and 3. These buttons will tune
the headphone radio to the exact MovieVision
signals. Press the buttons one at a time until
what you hear in the headphones is what is displayed on the viewing screen.
4. Turn Off the Headphones When Not in Use:
A. Press the “PWR” button to turn off the
headphones. The display will be blank
when the headphones are off.
B. The batteries will last for approximately 10
hours of continuous use. Forgetting to turn
off the headphones when they are not in
use will decrease the battery life.
5. Connecting a Second Set of Headphones
The MovieVision headphones have a receptacle
located at the side of the “L” ear pad. A second set
of personal-type headphones (must be a 3.5 mini
male type plug) can be connected at this point.
Note: When a second pair of headphones are
attached, the tuning and audio level is controlled by the MovieVision headphone.
13
MV6000-UM.qxp
4/5/05
16:14
Page 14
Basic Operation
Turn the Unit On
1. Turn the car ignition on to the accessory position.
2. Press the POWER
button.
Loading a DVD/CD Disc
1. Insert the disc with printed side facing up
into the disc slot. The player will automatically search the disc.
2. The player starts playback automatically.
Ejecting a Disc
Press the
EJECT button to eject disc.
Standby State
1. With the unit on, press POWER
on the
remote.
on the
2. In Standby State, press POWER
remote, again to recall playback.
3. To cancel Standby State, press POWER on
the unit's front panel.
BASIC PLAY
Stopping Play
Press the n STOP button to stop the disc
playback. Press the
PLAY button on the
remote will continue with normal playback.
Press the n STOP button twice, to stop the
playback and go back to initial Track/Chapter.
Pause (still picture)
Press PAUSE during playback on the remote
to stop play temporarily. Press PLAY
on
remote to return to normal playback.
Rapid Forward/Rapid Reverse
Press FF
and REW
during play. Each
time the button is pressed, the speed of rapid
forward/reverse changes according to the disc
as follows:
DVD:
Normal Playback
Note: For Screen Saver mode select “On” in
Screen Saver setup. The screen saver will
automatically activate when playback is
stopped or paused and there is no button operation for 5 minutes. Screen saver mode will
release automatically when a disc is played.
After 5 minutes, if the unit is not operated
while in screen saver mode, it will enter standby state.
Power
Button
Disc Slot
Eject
Button
2X
4X
6X
8X
2X
4X
16X
100X
CD/MP3:
Normal Playback
Slow Motion Play (DVD Only)
Press SLOW
on the remote control during playback. Each time the button is pressed,
the slow mode is changed according to the
disc as follows:
DVD:
Normal Playback
14
2X
4X
8X
MV6000-UM.qxp
4/5/05
16:14
Page 15
Basic Operation
Skipping Track
Press SKIP
on the remote control during playback. Press
to skip to next track
and
to skip back one track.
Mute
Mutes the sound, while the disc continues playing. When MUTE is pressed again, sound will
resume to previous level.
Mode Selection
Press MODE on the front panel of the unit or
MODE on the remote to select among DVD/CD
and AV input modes. The indicator on the front
panel of the unit will illuminate with the corresponding selection.
Mode Button
Volume Level Adjustment
Press VOLUME +/- on the remote to increase
or decrease volume level.
DVD Video Menu
When playing a DVD disc:
1. Disc will play automatically and stop at menu
display.
,
buttons on the
2. Use NAVIGATION
remote to move the highlight bar in the
menu.
3. Press ENTER to confirm selection.
Last Play Memory
Press POWER
during play to turn “Off” the
unit. Press again to turn “On” the unit. The DVD
player will resume playing from the point at
which it stopped.
• While the disc is playing press MODE to
switch to AV input mode. The player will
resume playing from the point at which it
stopped.
15
MV6000-UM.qxp
4/5/05
16:14
Page 16
Advanced Operation
Repeat Play/Repeat Paragraph Play:
Repeat Play (REPEAT, 31)
Press the REPEAT button to repeat a disc,
track or chapter.
1. Press REPEAT button repeatedly to scan
selection of repeat modes.
2. Pressing REPEAT will have different effects
on various kinds of discs.
CHAPTER REPEAT ON
REP-ONE
TITLE REPEAT ON
REP-ALL
REPEAT OFF
REPEAT OFF
Press the DISPLAY button during playback to
display the console information of the current
disc onscreen.
TITLE / CHAPTER
SINGLE ELAPSE
TITLE REMAIN
SINGLE REMAIN
CHAPTER ELAPSE
TOTAL ELAPSE
CHAPTER REMAIN
TOTAL REMAIN
OFF
DVD
CD/MP3/WMA
DVD
CD/MP3/WMA
PAL/NTSC System Selection (PAL/NTSC, 9)
Repeat Paragraph (A-B, 32)
A-B (REPEAT) allows a passage to be repeated
continuously.
1. Press A-B button at the start of the required
passage.
2. Press A-B button again at the end of the
passage.
3. The unit will repeat playing the passage set
from A to B.
4. To revert to normal playing press A-B button
again.
Console Information (CONSOLE, 6)
A TO B SET A
A TO B SET B
A TO B CANCELLED
16
Press the PAL/NTSC button to switch between
PAL, NTSC and AUTO modes.
NOTE: This function is only effective when
LOGO is displayed. For instance, when there is
no disc in the unit, ejecting a disc and in the
STOP mode or pre-STOP mode when playing a
DVD.
MV6000-UM.qxp
4/5/05
16:14
Page 17
Advanced Operation
Random Playing (RANDOM, 30)
SPECIAL FUNCTIONS FOR DVD
Press the RANDOM button during playback to
play tracks in random order. Press RANDOM
again to revert to normal playback.
Note: This function is effective only on a CD.
Multi-Subtitle Language Function (SUBTITLE, 4)
Press SUBTITLE during playback. Each time
the button is pressed the subtitle language on
the screen changes.
Zoom
Multi-Audio Language Function (AUDIO, 10)
Press the ZOOM button during playback of
DVD to enlarge an area on the screen.
,
Note: In ZOOM mode press
buttons
to move images up, down, left or right to find
the desired image to zoom in on.
Press AUDIO during playback. Each time the
button is pressed, the audio soundtrack language on the screen changes in sequential
order.
Multi-Angle Function (ANGLE, 5)
ZOOM X1.5
,
ZOOM X2
Press ANGLE during playback. Each time the
button is pressed, the angle soundtrack language changes in sequential order.
ZOOM X3
ZOOM OFF
17
MV6000-UM.qxp
4/5/05
16:14
Page 18
Initial DVD Setup
INITIAL SETUP:
SPEAKER SETUP Submenu:
1. Turn the unit on without any disc inside the unit.
2. Press the SETUP button on the remote to
view the Setup Menu - Main Page.
-- SPEAKER SETUP PAGE -DOWNMIX
LT / RT
STEREO
MAIN PAGE
LOUD SPEAKERS SETUP
3. The Setup Menu - Main Page categories are:
General Setup
Speaker Setup
Audio Setup
Preferences
4. Select one of the four main menu categories by using the NAVIGATIONAL
buttons
5. Press the ENTER button to confirm selection.
,
1. Use the NAVIGATIONAL
buttons
to scroll between the menu item.
2. Make a selection by pressing the ENTER
button.
3. Press the SETUP button to exit the menu.
Speaker Setup Submenu Options:
Downmix: LT/RT, Stereo
AUDIO SETUP Submenu:
-- AUDIO SETUP -SPDF
OFF
OP MODE
ON
LPCM OUTPUT
DYNAMIC
GENERAL SETUP Submenu:
MAIN PAGE
-- GENERAL PAGE -TV DISPLAY
NORMAL / PS
PIC MODE
NORMAL / LB
ANGLE MARK
WIDE
OSD LANG
CAPTIONS
SCR SAVER
MAIN PAGE
GENERAL SETUP
18
,
1. Use the NAVIGATIONAL
buttons
to scroll between the menu items.
2. Make a selection by pressing the ENTER
button.
3. Press the SETUP button to exit the menu.
General Setup Submenu Options:
TV Display: Normal/PS, Normal/LB, Wide
PIC Mode: Auto, Hi-Res, N-Flicker
Angle Mark: On, Off
OSD Lang: English, French, German, Italian,
Spanish
Captions: On, Off
SCR Saver: On, Off
AUDIO RELATED
,
1. Use the NAVIGATIONAL
buttons
to scroll between the menu item.
2. Make a selection by pressing the ENTER
button.
3. Press the SETUP button to exit the menu.
Audio Setup Submenu Options:
SPDF: On, Off
OP Mode: Line Out, RF REMOD
LPGM Output: LPCM 48K, LPCM 96K
Dynamic: Full, 6/8, 4/8, 2/8, Off
MV6000-UM.qxp
4/5/05
16:14
Page 19
Initial DVD Setup
PREFERENCES SETUP Submenu:
-- PREFERENCES PAGE -SUBTITLE
DISC MENU
PARENTAL
PASSWORD
DEFAULTS
SMARTNAVI
MAIN PAGE
BACK TO MAIN PAGE
,
1. Use the NAVIGATIONAL
buttons
to scroll between the menu items.
2. Make a selection by pressing the ENTER
button.
3. Press the SETUP button to exit the menu.
Preferences Setup Submenu Options:
TV Type: Auto, NTSC, PAL
Audio: English, French, Spanish, Chinese,
Japanese, German, Italian
Subtitle: English, French, Spanish, Chinese,
Japanese, German, Italian, Off
Disc Menu: English, French, Spanish,
Chinese, Japanese, German, Italian, Off
Parental: 1 - G
23 - PG
4 - PG 13
56 - PG R
7 - NC 17
8 - Adult
No Parental
Password: Change (Enter 3308 if any change
is preferred)
Defaults: Reset
SmartNav: No Menu, With Menu
Logo: Orig Logo, Cust Logo
19
MV6000-UM.qxp
4/5/05
16:14
Page 20
Specifications
Supply Voltage . . . . . . . 12V DC, Negative Ground
Current Consumption . Less than 3A
Signal System . . . . . . . Composite Video 1.0Vp-p 75Ω
Compatible Discs . . . . . DVD-Video Disc:
DVD 12 cm disc (single sided disc only)
Compact Disc:
Video CD 12 cm disc
CD 12 cm disc
MP3:
MP3 12 cm disc
Specifications. . . . . . . . Frequency Response: 20 Hz - 20 KHz,
Signal to Noise Ratio: 80dB (JIS)
Wow and Flutter: Below Measurable Limits
20
MV6000-UM.qxp
4/5/05
16:14
Page 21
Troubleshooting
Only qualified service personnel can remove
the cover or service this player. Otherwise the
warranty will become invalid.
No Power:
• Check to see if the player is set to “On”.
• Check to see that the power plug of the main
unit is properly connected.
• Check to see if that power to the outlet is
properly working.
No Picture:
• Check to see that the monitor is switched to
“On”.
• Check that the correct Mode is selected (DVD
or AV) by pushing the MODE button.
• Check the video connection.
Distorted Picture:
• Check the disc for fingerprints and clean with
soft dry cloth, wiping from center to edge.
• A small amount of picture distortion may
appear. This may not be a malfunction.
Completely Distorted Picture:
The disc format is not according to the monitor
used (PAL/NTSC).
No Color in Picture:
The disc format is not according to the monitor
used (PAL/NTSC).
Disc Does Not Play:
• Ensure the disc label is facing upwards.
• Clean the disc.
• Check to see if the disc is defective by trying
another disc.
No Return to Start-Up Screen when Disc is
Removed:
• Press POWER to turn “Off” the unit, then
press it again to turn “On” the unit.
• Press RESET button “On” the front of the
DVD unit.
The Player Does Not Respond to the Remote
Control:
• Aim the remote control directly at the sensor
on the front of the housing.
• Avoid all obstacles which may interfere with
the signal path.
• Inspect or replace the remote control batteries.
Buttons Do Not Work:
• Press POWER to turn “Off” the unit, then
press it again to turn “On” the unit.
DVD player showing “REGION ERROR”:
• The DVD player and the discs all have a
“REGION CODE”. If the region number on the
disc does not correspond to the region number of the DVD player the unit cannot play the
disc.
No Sound:
• Check audio connections.
• If using a Hi-Fi amplifier, try another sound
source.
21
MV6000-UM.qxp
4/5/05
16:14
Page 22
Replacement Parts Order Form
Send Orders To: Magnadyne Corporation
ATTN: Consumer Parts Sales
P. O. Box 5365
Carson, CA 90749-5365
We Accept Checks, Money Orders, Visa and Master Card
Make Checks Payable to: Magnadyne Corporation
SHIP TO: (No P.O. Boxes)
LAST NAME
FIRST NAME
INITIAL
STREET ADDRESS (IF PAYING WITH A CREDIT CARD, YOUR BILLING ADDRESS IS REQUIRED)
CITY
STATE
ZIP CODE
DAYTIME PHONE NUMBER
CREDIT CARD INFORMATION:
CARD TYPE:
VISA
MASTER CARD
CARD NUMBER
EXP. MONTH
YEAR
NAME - EXACTLY AS IT APPEARS ON YOUR CREDIT CARD
Part #
Description
Qty.
Remote Control
MV1500RM
Price Each
TOTAL
$39.95
Shipping and Handling
Subtotal + Tax
Up to $20.00
20.01 to 30.00
30.01 to 45.00
45.01 to 70.00
Over 70.01
Add
$5.00
5.95
6.50
6.95
7.95
Subtotal = ________ . ______
California Residents Add Sales Tax = ________ . ______
Shipping and Handling (See Chart) = ________ . ______
TOTAL = ________ . ______
No C.O.D.’s
On regular orders please allow 4-5 weeks for delivery. Please give a shipping address where this order
may be delivered between the hours of 9 a.m. and 5 p.m. weekdays. If UPS is unable to deliver, your order will be
returned and additional shipping charges will be required.
22
MV6000-UM.qxp
4/5/05
16:14
Page 23
Order By Mail
®
Replacement Parts for MovieVision Systems
DESCRIPTION
DVD Remote Control
MODEL #
PRICE
MV1500RM
$39.95 Ea.
Warranty
ONE (1) YEAR LIMITED WARRANTY
Magnadyne Corporation or its authorized agents will within 1 year from the date of sale to you, repair,
replace or refund the retail sales price of said product or any part thereof, at the option of the
Magnadyne Corporation or its authorized agents, if said product or part is found defective in
materials or workmanship, when properly connected and operating on the correct power
requirements designated for the specific product. This warranty and Magnadyne Corporation or its
authorized agents obligations hereunder do not apply where the product was; damaged while in the
possession of the consumer, subjected to unreasonable or unintended use, not reasonably
maintained, utilized in commercial or industrial operations, or serviced by anyone other than
Magnadyne Corporation or its authorized agents, or where the warning seal on the product is broken
or the power and/or plugs are detached from the unit. Magnadyne Corporation or any of its
authorized agents will not assume any labor costs for the removal and re-installation of any product
found to be defective, or the cost of transportation to Magnadyne Corporation or its authorized
agents. Such cost are the sole responsibility of the purchaser.
This warranty does not cover the cabinet appearance items or accessories used in connection with
this product, or any damage to recording or recording tape, or any damage to the products resulting
from improper installation, alteration, accident, misuse, abuse or acts of nature.
MAGNADYNE CORPORATION OR ITS AUTHORIZED AGENTS SHALL NOT BE LIABLE TO ANYONE
FOR CONSEQUENTIAL OR INCIDENTAL DAMAGES OR CLAIMS EXCEPT THOSE ACCORDED BY
LAW. NO EXPRESSED WARRANTY OR IMPLIED WARRANTY IS GIVEN EXCEPT THOSE SET FORTH
HEREIN. NO IMPLIED WARRANTY SHALL EXTEND BEYOND 1 YEAR FROM THE DATE OF SALE.
This warranty extends only to the original purchaser of the product and is not transferable.
Some states do not allow limitations on how long an implied warranty lasts and some states do not
allow the exclusion or limitation of incidental or consequential damages, so the above limitations or
exclusion may not apply to you. This warranty gives you specific legal rights and you may have other
rights that vary from state to state.
Defective merchandise should be returned to the original point of purchase or secondly, to
Magnadyne Corporation, 1111 W. Victoria Street, Compton CA 90220. Return Authorization must be
obtained before sending, or merchandise may be refused.
23
MV6000-UM.qxp
4/5/05
© Copyright 2005
Magnadyne Corporation
16:14
Page 24
MV6000-UM
Rev. B 4-5-05