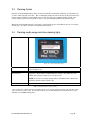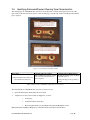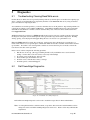
1
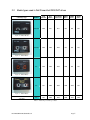
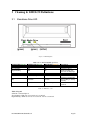
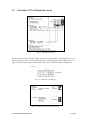
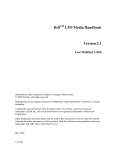
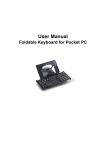
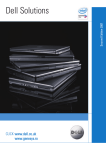
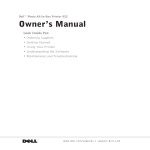
DellTM Digital Data Storage/Digital Audio Tape
Media Handbook (DDS/DAT)
Version 1.0
Last Modified 08/17/05
Information in this document is subject to change without notice.
© 2005 Dell Inc. All rights reserved.
Reproduction in any manner whatsoever without the written permission of Dell Inc. is strictly
forbidden.
Trademarks used in this text: Dell, the DELL logo, PowerEdge, and PowerVault are
trademarks of Dell Inc.; Microsoft and Windows are registered trademarks of Microsoft
Corporation.
Other trademarks and trade names may be used in this document to refer to either the entities
claiming the marks and names or their products. Dell Inc. disclaims any proprietary interest in
trademarks and trade names other than its own.
1
Introduction............................................................................................... 5
2
Dell PowerVault DDS/DAT Drives and Media ......................................... 6
2.1
2.2
2.3
2.4
2.5
3
Drive Types and Basic Characteristics – DDS/DAT Drives...................................................... 6
Media types used in Dell PowerVault DDS/DAT drives........................................................... 7
Media Color Schemes and description ....................................................................................... 8
Invalid Media Symptoms............................................................................................................ 8
Migrating DDS/DAT media ....................................................................................................... 8
Cleaning & LED/LCD Definitions............................................................. 9
3.1
3.2
3.3
3.4
3.5
Standalone Drive LED................................................................................................................ 9
Autoloader LCD and Magazine Layout ................................................................................... 10
Cleaning Cycles ........................................................................................................................ 11
Cleaning media usage and drive cleaning lights ...................................................................... 11
Identifying Exhausted/Expired Cleaning Tape Characteristics................................................ 12
4
Stuck Tapes ............................................................................................ 13
5
Diagnostics ............................................................................................. 14
5.1
5.2
Troubleshooting Cleaning/Read/Write errors .......................................................................... 14
Dell PowerEdge Diagnostics .................................................................................................... 14
6
Erasing a prewritten DDS/DAT Tape..................................................... 16
7
Media Handling ...................................................................................... 17
7.1
7.2
7.3
7.4
7.5
7.6
Perform a Thorough Inspection................................................................................................ 17
Handle the Cartridge Carefully................................................................................................. 17
Ensure Proper Packaging if shipping tapes .............................................................................. 17
Cartridge Storage Conditions ................................................................................................... 18
Cartridge life............................................................................................................................. 18
Media Do’s and Don’ts............................................................................................................. 19
Dell DDS/DAT Media Handbook
Page 2
List of Tables
Table 1 DDS/DAT Drive Types and Basic Characteristics ............................................................................ 6
Table 2 - Media Types and Interoperability..................................................................................................... 7
Table 3 - LED drive codes ............................................................................................................................... 9
Table 4 -Cleaning Characteristics per Drive.................................................................................................. 11
Table 5 Characteristics of DDS/DAT cleaning tape in various drives .......................................................... 12
Table 6 Tape Environmental Specifications .................................................................................................. 18
Table 7 - Media Do's and Don't...................................................................................................................... 19
List of Figures
Figure 1- Dell PowerVault 100T DAT72 External.......................................................................................... 6
Figure 2- Dell PowerVault 100T DDS4 External ............................................................................................ 6
Figure 3 - Dell PowerVault 120T DDS4 Autoloader ...................................................................................... 6
Figure 4 - DAT72 Media.................................................................................................................................. 7
Figure 5 - DDS4 Media.................................................................................................................................... 7
Figure 6 - DDS3 Media.................................................................................................................................... 7
Figure 7 - DDS2 Media.................................................................................................................................... 7
Figure 8 - LED Diagram .................................................................................................................................. 9
Figure 9 - DDS4 Autoloader LCD ................................................................................................................. 10
Figure 10 - DDS4 Autoloader Magazine ....................................................................................................... 10
Figure 11 - DDS4 Autoloader LCD with Cleaning ....................................................................................... 10
Figure 12 - Universal Cleaning Tapes ........................................................................................................... 11
Figure 13- New and Expired Cleaning Media ............................................................................................... 12
Figure 14 – Dell Online PowerEdge Diagnostic............................................................................................ 14
Figure 15 - Media Write Protect Tab ............................................................................................................. 16
Figure 16 -Media Recognition Holes ............................................................................................................. 17
Dell DDS/DAT Media Handbook
Page 3
This page is left blank intentionally
Dell DDS/DAT Media Handbook
Page 4
1 Introduction
This document describes media compatibility, handling for all DellTM PowerVaultTM DDS/DAT Drives.
For information regarding use and operation of the PowerVault Tape Drive, please consult the User’s Guide
located on http://support.dell.com.
Dell DDS/DAT Media Handbook
Page 5
2 Dell PowerVault DDS/DAT Drives and Media
2.1
Drive Types and Basic Characteristics – DDS/DAT Drives
Capacity
(native/compressed)
Native Speed
Primary Media
Figure 1- Dell PowerVault
100T DAT72 External
Figure 2- Dell PowerVault 100T
DDS4 External
Figure 3 - Dell PowerVault 120T
DDS4 Autoloader
36 GB/72 GB
20 GB/40 GB
20 GB/40GB
3.5 MB/s
Digital Audio Tape 4mm
• Label: DAT72
2.75 MB/s
Digital Audio Tape 4mm
No specific label.
•
•
•
Physical Differences
Used in:
•
•
PV100
Internal/External
Dell PV112T
Dell PV114T
PV100 Internal/External
Dell PV112T Drive Enclosure
2.36 MB/s
Digital Audio Tape 4mm
• Supports up to 8 media
cartridges
• LCD front panel
• PV120T DDS4
Autoloader
Table 1 DDS/DAT Drive Types and Basic Characteristics
Dell DDS/DAT Media Handbook
Page 6
2.2
Media types used in Dell PowerVault DDS/DAT drives
Cartridge Type
Part #
Dell
DAT72
Dell
DDS4
Dell DDS4
Autoloader
DDS3
Drive
DDS2
Drive
DDS1
Drive
340-7240
YES
NO
NO
NO
NO
NO
340-8701
YES
YES
YES
NO
NO
NO
n/a
YES
YES
YES
YES
NO
NO
n/a
NO
YES
YES
YES
YES
NO
n/a
NO
YES
YES
YES
YES
YES
Figure 4 - DAT72 Media
Figure 5 - DDS4 Media
Figure 6 - DDS3 Media
Figure 7 - DDS2 Media
(DDS1 Media Picture Not
available)
Table 2 - Media Types and Interoperability
Dell DDS/DAT Media Handbook
Page 7
2.3
•
•
Media Color Schemes and description
Dell DDS/DAT media and most other manufacturer’s media are black and marked with the DDS/DAT
label. (See Table 2 for figures.)
Dell recommends the use of Dell branded media in all Dell PowerVault DDS/DAT drives.
Note: DDS/DAT tapes are normally black, but Non-Dell branded media may come in other colors.
Please pay attention to the DDS/DAT label on the tape to determine correct media for your drive.
2.4
Invalid Media Symptoms
Standalone drive reaction to inserting invalid media into drive. (i.e. DAT72 media into DDS4 Drive)
1.
2.
3.
All LED’s will flash
Drive will eject and reload tape and the LED’s will flash again trying to load cartridge.
Drive will eject tape
Drive autoloader reaction to inserting invalid media into drive. (i.e. DAT72 media into DDS4 Drive)
1.
2.
3.
2.5
Magazine will load normally.
The drive will unload the invalid media back into the magazine.
The magazine will then eject from the autoloader and the message “Remove Invalid Cartridge” will be
displayed on the LCD panel. This message will not go away until a valid media cartridge is inserted into
the drive.
Migrating DDS/DAT media
DDS/DAT drives are backwards capable with media that was written by previous DDS/DAT generations.
See table 2 for details and limitations.
Regardless of what vendor or OEM product is being used to create media, always use the latest available
firmware for the drive. This will ensure optimal performance for using tape from different drive vendors.
3 Cleaning & LED/LCD Definitions
3.1
Standalone Drive LED
Figure 8 - LED Diagram
CLEAN LED (Green)
Solid On
Slow Flashing
Rapid Flashing
LED codes on Dell DAT/DDS tape drives
MEDIA LED (Green)
DRIVE LED (Amber)
Off
Off
Off
Off
Off
Off
Off
Off
Solid On
Rapid Flashing
Off
Off
Off
Solid On
Solid On
Off
Solid On
Rapid Flashing
Description
Cleaning recommended
Cleaning required
Expired cleaning tape
(Use new cleaning tape)
No problems
Possible write error.
Cleaning recommended.
Drive reading or writing
normally.
Hardware Fault has
occurred.
Table 3 - LED drive codes
Table 3 Legend
Solid On = Constant light on.
Slow flashing = blink rate of 2 seconds on, 1 second off.
Rapid flashing = blink rate of 1/8th of a second on, 1/8th of a second off.
Dell DDS/DAT Media Handbook
Page 9
3.2
Autoloader LCD and Magazine Layout
Figure 9 - DDS4 Autoloader LCD
The autoloader will accept a cleaning cartridge only in Slot 8 of the magazine. See the figure below for the
magazine slot layout. You can use the cleaning tape in slot 8 with the magazine fully loaded in slots 1-7, or
empty, or partially loaded. Please consult the Autoloader’s User’s Guide for magazine configurations.
Figure 10 - DDS4 Autoloader Magazine
Figure 11 - DDS4 Autoloader LCD with Cleaning
Dell DDS/DAT Media Handbook
Page 10
3.3
Cleaning Cycles
Regularly cleaning DDS/DAT drives helps in long-term reliability and should be conducted on a scheduled cycle
as well as when requested by the drive. The recommended cleaning interval for the drive is 50 tape motion hours
which is indicated when the cleaning LED comes on solid. Dell does not recommend cleaning outside of the
normal cleaning requests from the tape drive unless you are performing Read/Write troubleshooting steps.
Note: If the Cleaning LED remains on after using a valid cleaning tape, this would indicate the use of an expired
cleaning tape. See table 3 and table 5 for additional characteristics.
3.4
Cleaning media usage and drive cleaning lights
Figure 12 - Universal Cleaning Tapes
Physical Description
Part Number
Characteristics
Black tape labeled with “DG-12CL or DG-15CL are the current recommended
clean cartridge to use.”
310-5053
Appearance almost identical to DDS/DAT Data cartridge. Only difference is the
labeling and cleaning cartridge has no write protect tab.
NOTE: Do not use any cleaning cartridge that has cloth like material. Material for
valid drive should resemble magnetic tape.
Life Expectancy
40 cleanings
Table 4 -Cleaning Characteristics per Drive
* If excessive dust or debris from the tape media collects at one or more of the tape heads, your drive may not be
able to read from or write to tape. To avoid this situation, it is recommended that you maintain the above clean
schedule on your DDS/DAT tape drive.
Dell DDS/DAT Media Handbook
Page 11
3.5
Identifying Exhausted/Expired Cleaning Tape Characteristics
The cleaning tape for a DDS/DAT drive only moves in one direction. Looking at the figure below if all of the
tape resides on the left roller, then you have a new cleaning tape. If all the tape resides on the Right roller then the
tape is expired.
Figure 13- New and Expired Cleaning Media
Drive Type
Dell PowerVault DAT72, DDS4, and
other manufacturer DDS drives
Cleaning with a Good Tape
Cleaning with an Expired Tape
Tape and Drive LED will turn on while
drive is cleaned and media will eject
when completed.
Clean light will flash rapidly and Media
Light will remain on.
Nothing will happen and tape will stay
in drive.
Table 5 Characteristics of DDS/DAT cleaning tape in various drives
The cleaning light on a DDS/DAT drive can come on for two reasons.
1.
A periodic maintenance threshold has been exceeded.
2.
A high error rate has occurred. This can happen for 3 reasons.
•
A head clog
•
A hardware failure on the drive
•
Bad or marginal media. (see Troubleshooting Cleaning/Read/Write errors)
Note: Run Dell PowerEdgeTM Diagnostics to determine media or hardware related failures.
Dell DDS/DAT Media Handbook
Page 12
4
Stuck Tapes
Dell standalone tape drives have the capability to reset the drive in the event of a stuck tape or other nonresponsive drive issues. Attempting this drive reset may or may not help in removing a stuck tape.
Note: Dell PowerEdge Diagnostics also includes a Media Eject test that can be run to eject the media in the
drive.
How to perform a device reset on Dell PowerVault DDS/DAT
drives
Dell PowerVault DAT72,
DDS4, and all other DDS drives
Press the eject button for about 5 seconds, the tape will rewind and may eject after about
30 seconds to 1 minute.
Dell DDS/DAT Media Handbook
Page 13
5
Diagnostics
5.1
Troubleshooting Cleaning/Read/Write errors
If Clean, Read, or Write errors are reported by backup software try alternate pieces of media before replacing tape
drives. If there are invalid media errors reported by the drive via the LED/LCD then also try using an alternate
piece of media before replacing the drive.
To troubleshoot errors with tape drives, you need to determine the root of the problem. Tape related problems can
come from two primary sources; Media and Hardware. Dell Online PowerEdge Diagnostics can be used under
either Microsoft® Windows® or Linux to narrow down the likely cause. This tool can be downloaded for free
from support.dell.com.
Within the Diagnostic tools there is a Media test which can be run in a long test or quick test mode to help with
the diagnosis. The quick test will fill 20 percent of the tape and the long test will write to 80 percent. Reading,
writing, spacing, and verifying will all happen during this test so do not use it as a performance tool.
Note: The Media test will overwrite data on the tape. Dell suggests using a blank (new) or scratch piece of
media. If the intent is to test a specific piece of media then make sure the data contained on that media is backedup elsewhere. If a failure is seen it is important to run the test on more than one piece of media to narrow the
issue down to the drive or the tape media.
In the event of a failure complete the following procedure.
1. Run the test on one tape. (We suggest running the full test if you think the errors occur later in the
backup – run the short test if errors tend to occur early in the backup)
2. If a failure occurs, mark the tape and set it aside.
3. Insert another tape and rerun the same test.
4. If failure occurs, clean the drive and try a 3rd tape.
5. If failures persist, contact Dell Support.
5.2
Dell PowerEdge Diagnostics
Figure 14 – Dell Online PowerEdge Diagnostic
Dell Online PowerEdge Diagnostics can be used to troubleshoot tape drives in Linux and Windows.
Note: As of the publication date of this document, a tape device driver must be loaded in Windows device
manager in order to run Dell PowerEdge Diagnostics Version 2.3. Future version may eliminate this
requirement.
Dell DDS/DAT Media Handbook
Page 14
Tests included in Dell PowerEdge Diagnostics are the following:
1.
The media can be used to determine if errors are related to tape hardware or certain pieces of media.
• The media test can be run in full mode which will fill 80 percent of the tape.
• The media test can also be run in quick mode that will fill 20 percent of the tape.
Note: These tests could take between 2 to 6 hours. Read, Write, Space, Rewind, and
Verify tests will be run to exercise the drive and media.
2. The Drive Insert test will test the capabilities of the drive to mount, thread, and do a short write
operation to the tape. A tape must be present in the drive to run this test, note that the tape will be
overwritten.
3. The Tape Drive Eject test can be used to try to eject a stuck tape. This test will not work under true
hardware failures. If the stuck tape is due to software this test could work when trying to eject a stuck
tape.
4. The Tape Device Self test can be used to do a quick verify of drive operations without spending
hours writing to tape in search of bad media as seen in the Media test. This test will usually finish within
4 minutes.
6.
Use the Tape Device Firmware Check test to verify that the drive firmware is up-to-date. New
firmware can fix many types of known issues.
Note: If a tape is stuck in a DDS/DAT drive, the firmware can still be updated.
Dell DDS/DAT Media Handbook
Page 15
6 Erasing a prewritten DDS/DAT Tape
Write-protection will not prevent a cartridge from being erased by bulk-erasure or degaussing. You may bulk
erase DDS/DAT format cartridges. The cartridge will be usable; however the previous data will be lost.
NOTE: The erase feature in backup software is the preferred method for erasing a DDS/DAT tape. DAT 72
drives do not support long erase. They only support quick erase. To prevent erasing a tape set the write protect
switch.
Figure 15 - Media Write Protect Tab
Dell DDS/DAT Media Handbook
Page 16
7 Media Handling
7.1
Perform a Thorough Inspection
•
Inspect the cartridge's packaging to determine potential rough handling.
•
When inspecting a cartridge, make sure there is no blockage over the open holes. These are cartridge
sensors to identify the type of tape, the magnetic thickness and whether the tape is pre-recorded,
unrecorded, or is a cleaning cartridge. Other cartridge features allow the drive to determine the cartridge
in the BOT (beginning of tape), or EOT (end of tape) points.
•
Inspect the cartridge for damage before using or storing it.
•
If you suspect that the cartridge has been mishandled but it appears useable, copy any data onto a good
cartridge immediately for possible data recovery. Discard the mishandled cartridge.
Figure 16 -Media Recognition Holes
7.2
Handle the Cartridge Carefully
•
Do not handle tape that is outside the cartridge. Handling the tape can damage the tape's surface or edges,
which may interfere with read or write reliability. Pulling on tape that is outside the cartridge can damage
the tape and the brake mechanism in the cartridge.
•
Degaussing will lose all data on a pre-recorded cartridge. It is usable for a new data backup.
7.3
Ensure Proper Packaging if shipping tapes
•
When you ship a cartridge, ship it in its original or better packaging.
•
Always ship or store a cartridge in a jewel case.
•
Use only a recommended shipping container that securely holds the cartridge in its jewel case during
transportation.
Dell DDS/DAT Media Handbook
Page 17
•
Never ship a cartridge in a commercial shipping envelope. Always place it in a box or package.
•
If you ship the cartridge in a cardboard box or a box of a sturdy material, ensure the following:
7.4
o
Place the cartridge in polyethylene plastic wrap or bags to protect it from dust, moisture, and
other contaminants.
o
Pack the cartridge snugly. Do not allow it to move around.
o
Double-box the cartridge (place it inside a box, then place that box inside the shipping box) and
add padding between the two boxes
Cartridge Storage Conditions
Provide Proper Acclimation and Environmental Conditions
•
Before you use a cartridge, let it acclimate to the normal operating environment for 24 hours.
•
Ensure that all surfaces of a cartridge are dry before inserting it.
•
Do not expose the cartridge to moisture or direct sunlight.
•
Do not expose recorded cartridges to stray magnetic fields (for example, terminals, motors, video
equipment, X-ray equipment, or fields that exist near high-current cables or power supplies). Such
exposure can cause the loss of recorded data.
•
Maintain the following environmental conditions outlined in the table below.
Environmental Factor
Operating
Non
Operational
Storage
Temperature
5 to 45
degrees
Celsius
(41 to 113
degrees
Fahrenheit)
-40 to 65
degrees
Celsius
(-40 to 149
degrees
Fahrenheit)
Relative humidity (non-condensing)
20 to 80%
0 to 90%
Wet bulb temperature
28 degrees
Celsius
(82.4
degrees
Fahrenheit)
No
condensation
Table 6 Tape Environmental Specifications
7.5
•
Cartridge life
Durability - 2,000 passes on any area of full tape backups.
o Each time media gets loaded, unloaded, written to, read from, the media must pass through
contact patches on the cylinder head, which can eventually wear down the media.
Dell DDS/DAT Media Handbook
Page 18
A single media under optimum conditions can run around 250 backup, restore or verify
operations.
Media Coating - Patented Ceramic Coated Metal Particle
Archival life – 30 years.
o
•
•
7.6
Media Do’s and Don’ts
DO
Store cartridges in their protective cases
Store Cartridges vertically
Inspect Cartridge for damage before each use
Unload cartridge prior to powering down the drive.
Allow 24-hour conditioning period before using media
when moving between environment change i.e.
temperature and humidity changes
DON’T
Touch media with bare fingers
Stack cartridges horizontally
Use pens or pencils during cartridge inspection
Drop cartridge
Disassemble cartridge
Ship cartridges loaded into a tape drive.
Store near magnetic devices i.e. speakers, monitors,
electrical motors, power supplies.
Table 7 - Media Do's and Don't
Dell DDS/DAT Media Handbook
Page 19