1
RPS
D5500CU
en
Installation Guide
RPS
Table of Contents | en
3
Table of Contents
1
Legal
5
1.1
Trademarks
5
1.2
Software License Agreement
5
2
Introduction
8
2.1
Release Notes
8
2.2
Minimum System Requirements
8
2.2.1
RPS Minimum System Requirements
8
2.2.2
Minimum System Requirements for SQL Express Only
9
2.2.3
RPS and SQL Express on the Same PC Minimum Requirements
10
2.2.4
Minimum System Requirements for RPS and SQL Express on a PC with Vista
10
3
Installing RPS
11
3.1
Hardware Installation
11
3.1.1
Installing a Modem
11
3.1.2
Protecting AC Power and Phone Lines
11
3.2
Installing RPS
11
3.3
Installing RPS Together with SQL Express
12
3.3.1
Prerequisites for a New Installation
12
3.3.2
Windows Installer 3.1
13
3.3.3
Installing .NET Framework 2.0
15
3.3.4
Installing MDAC
17
3.3.5
Installing SQL Express
18
3.3.6
Installing SQL Server Management Studio Express
25
3.4
Installing RPS with SQL Server or SQL Express
28
3.4.1
New Installations for Standalone PCs
28
3.4.2
Installation Using SQL Server
35
3.4.3
Installation Using SQL Express on a Network
41
3.4.4
Using a Networked Drive to Store Database Files
47
4
Upgrading Existing RPS Installations
48
4.1
Upgrading RPS Client and Access Database to SQL
48
4.2
Upgrading the SQL Server Database From the Server
54
4.3
Upgrading the SQL Express Database From the Server
56
4.4
Upgrading SQL Server Database from the RPS Client
58
4.5
Upgrading the RPS Client Only (if using a network database)
63
4.6
Upgrading RPS .dat Files on the Server
66
5
Post-Installation/Upgrade Tasks
67
5.1
Switching From a Client to Network Installation
67
5.2
Reverting to Previous RPS Installation After SQL Upgrade
71
5.2.1
Reverting to a Microsoft Access Database
71
5.2.2
Reverting to a Previous SQL Database
72
5.3
Setting Security Levels by Panel Type for Networked Users
76
5.4
Backing Up the SQL or SQL Express Database
77
Bosch Security Systems, Inc.
Installation Guide
4998141259 | 09 | 2008.10
4
en | Table of Contents
6
RPS
RPS Setup and Maintenance
79
6.1
Modifying RPS
79
6.2
Repairing RPS
80
6.3
Removing RPS
80
7
Logging Into RPS
81
7.1
First Time Log-In
81
7.2
Changing the Password
82
8
Recovering Old Database Files
83
9
RPS Operation and Control Panel Account Notes
84
9.1
RPS Notes
84
9.1.1
Installation and Administration
84
9.1.2
General Operation
84
9.1.3
Modems
84
9.2
Control Panel Account Notes
85
9.2.1
2000 Series
85
9.2.2
D6412/D4412 and DS7240/DS7220
85
9.2.3
D7024 and DS9400
86
9.2.4
D8112
86
9.2.5
D9112B1, D7212B1
86
9.2.6
DS7400XiV4-EXP
87
9.2.7
Control Panel Help Files
87
4998141259 | 09 | 2008.10
Installation Guide
Bosch Security Systems, Inc.
RPS
Legal | en
1
Legal
1.1
Trademarks
–
5
Microsoft®, Windows® 2000, XP, VistaTM UltimateTM and SQL ServerTM are either
registered trademarks or trademarks of Microsoft Corporation in the United States and/
or other countries.
–
InstallShield® is a registered trademark and service mark of Acresso Software in the
–
Intel® is a registered trademark of Intel Corporation in the United States and other
United States and other countries.
countries.
–
Pentium® is a registered trademark of Intel Corporation in the United States and other
countries.
1.2
Software License Agreement
Bosch Security Systems, Inc. ("Bosch") licenses this software and all associated
documentation (the "Software") for your (also referred to herein as "Licensee") non-exclusive
use. Licensee has read this End User Software License Agreement ("License") and agrees to
abide by the terms and conditions of this License. By using the Software you the Licensee
accept and agree that you will abide by and are legally bound by the terms of this License. If
you do not agree to abide by the terms of this License you shall immediately return the
Software to Bosch. Licensee's use of the Software is subject to the following terms and
conditions:
1.
LICENSE: Under the terms of this nonexclusive, non-transferable (except as specifically
permitted herein) license:
a.
You may use a machine-readable form of the Software on a single computer or a
single server at a time, or as otherwise defined in the installation/operation manual
of the Bosch product and only for the operation of Bosch products.
b.
You may not modify, translate, create derivative works, decompile, disassemble or
c.
You may not sublicense, lease or otherwise rent the Software without Bosch's prior
reverse engineer the Software.
written consent.
d.
You may make one copy of the Software solely for backup or archival purposes,
provided such copy must contain the original Software proprietary notice. No other
copying of the Software or the accompanying documentation is permitted.
e.
This License will terminate automatically if you fail at any time to comply with any of
its terms or conditions. Upon termination, you shall immediately destroy the
Software or return it to Bosch along with any copies you have made, and to delete
any installed copy from your hardware.
2.
TRANSFER OF OWNERSHIP: You may transfer this License to another party only if you:
a.
Also transfer the License, Software, and all accompanying documentation and (by
sale or lease) ownership of the associated Bosch hardware, if applicable,
b.
Require the other party to abide by the terms of this License, and
c.
Destroy all copies of the Software and any updates that you do not transfer to the
other party.
Bosch Security Systems, Inc.
Installation Guide
4998141259 | 09 | 2008.10
6
en | Legal
RPS
3.
OWNERSHIP AND PROPRIETY RIGHTS: Although the diskette/media containing the
Software is yours, the Software is owned and copyrighted by Bosch and/or its suppliers.
Except for the rights expressly granted herein, Bosch and its suppliers retain all rights to
the Software, including, without limitation, the title to all copyright, patent, trade secret
and other intellectual and proprietary rights therein and any copies thereof, in whole or in
part, all of which are the valuable property of Bosch and/or its suppliers. You may not
remove, change or delete the copyright notice from the Software. If you make any copies
of the Software in whole or in part, all such copies shall contain the same copyright and
proprietary markings as appear on or in the original Software copy, including diskette
markings. You will instruct your employees and others having access to the Software in
and ensure their compliance with the terms of this License. You will use your best efforts
to prevent any unauthorized copying of the Software. You will be responsible for any
breach of any provision of this License by your employees. You shall not sell, transfer,
publish, disclose or otherwise make available the whole or any part of the Software or
any copies thereof to any third party or persons not permitted by the terms of, and
pursuant to the terms contained in this License. You are not in violation of this
Agreement, including this section, when a third party views the functional output
resulting from your use of the Software.
4.
TAXES: You must pay all taxes that may now or hereafter be imposed, levied, or assessed
with respect to the possession or use of the Software or this License. You shall file all
reports required in connection with such taxes.
5.
WARRANTY, LIMITATION OF LIABILITY, REMEDIES: THE SOFTWARE IS PROVIDED "AS
IS" WITHOUT WARRANTY OF ANY KIND INCLUDING WARRANTIES THAT THE SOFTWARE
IS ERROR FREE OR WILL RUN UNINTERRUPTED, OR WARRANTIES OF
MERCHANTABILITY, FITNESS FOR A PARTICULAR PURPOSE OR AGAINST
INFRINGEMENT. NEITHER BOSCH NOR ITS SUPPLIERS SHALL BE LIABLE FOR ANY LOSS
OF PROFITS, LOSS OF USE, INTERRUPTION OF BUSINESS, LOSS OF DATA, NOR FOR
INDIRECT, SPECIAL, INCIDENTAL, OR CONSEQUENTIAL DAMAGES OF ANY KIND
WHETHER UNDER THIS LICENSE OR OTHERWISE, OR FOR ANY CLAIM BY ANY OTHER
PARTY. Bosch does not warrant the functions provided by the Software. However, Bosch
warrants the diskette or other media on which the Software is furnished to be free from
material defects in materials and workmanship under normal use for a period of 90 days
from the date of original purchase. Bosch's entire liability to you, and your exclusive
remedy, shall be the replacement of the diskette or other media not meeting Bosch's
warranty, provided you return the same to Bosch. The replacement will be warranted for
the remainder of the term of the original warranty or 30 days, whichever is longer. You
assume responsibility for the selection of the Software to achieve your intended results,
and for the installation, use and results obtained from the Software. Without limiting the
generality of the foregoing, in no event shall Bosch be liable for any consequential,
special or general damages in any action, whether based on tort, contract or otherwise,
in connection with this License, or the Software furnished hereunder. The damages
excluded under this paragraph include, but are not limited to, damages for loss of actual
and anticipated profits, loss of programming and/or production materials, and damage to
the business reputation of user.
6.
U.S. GOVERNMENT RESTRICTED RIGHTS: The Software is provided with restricted
rights. Use, duplication, or disclosure by the U.S. Government is subject to restrictions as
set forth in subparagraph (c)(1)(ii) of the Rights in Technical Data and Computer
Software clause at DFAR 252.227-7013, Federal Acquisition Regulation clause 52.227-19
(c) (2) Commercial Computer Software Restricted Rights, NASA clause 52.227.86 (d)
Commercial Computer Software Licensing or their successor.
4998141259 | 09 | 2008.10
Installation Guide
Bosch Security Systems, Inc.
RPS
Legal | en
7.
7
EXPORT LAWS, APPLICABLE LAW: If you, the licensee under this License, are not a U.S.
citizen or you will take delivery of the Software outside the United States, Bosch will
secure the necessary U.S. Government authorizations for exportation of the Software to
your country of destination. You agree to not reexport the Software from that destination
to another foreign country without complying with all applicable U.S. Government
restrictions and requirements. If you, the licensee, are a U.S. citizen or you will take
delivery of the Software inside the United States, then you agree to not export the
Software from the United States without complying with all applicable U.S. Government
restrictions and requirements, including obtaining any necessary U.S. Government
authorization for the export. You will not permit the Software to be reexported from an
authorized foreign destination country to any other foreign country except in compliance
with all U.S. laws and regulations. This License will be governed by the laws of the State
of New York and the United States of America, including U.S. copyright laws.
8.
TERM AND TRANSFER: You may terminate this Agreement at any time by returning the
Software to Bosch or destroying the Software together with all copies in any form. Bosch
may terminate this Agreement if you fail to comply with its terms and conditions in any
material respect. Upon termination, you may not use the Software and must return or
destroy all copies thereof in whole or in part, and we will not further support the
Software.
9.
ENTIRE CONTRACT: This License, including all schedules, constitutes the entire and only
agreement between the parties and supersedes all prior agreements, understandings and
communications, whether oral or written, between the parties respecting the subject
matter hereof. There are no understandings, agreements, warranties or representations,
express or implied, except as set forth herein. This License prevails over any additional,
conflicting or inconsistent terms and conditions appearing on any purchase order
submitted by Licensee. This License shall be governed by and interpreted under the laws
of New York, excepting any conflicts of laws provision. Jurisdiction for any suit brought
hereunder shall be the federal or state courts residing in New York City.
Bosch Security Systems, Inc.
Installation Guide
4998141259 | 09 | 2008.10
8
en | Introduction
2
RPS
Introduction
RPS (Remote Programming Software) is a Windows®-based account management and control
panel programming utility designed to remotely set up and program specific control panels.
2.1
Release Notes
The Release Notes provide additional information about RPS that became available after the
printing of this manual. Review these notes before using RPS. The Release Notes also list
control panels that are compatible with RPS.
2.2
Minimum System Requirements
i
2.2.1
NOTICE!
Unattended Mode does not run on Windows® XP Home, Windows® Vista HomeBasic, or
Windows® Vista Home Premium editions.
RPS Minimum System Requirements
Processor:
Pentium III, 800 MHz or faster
Operating System:
–
Microsoft® Windows® 2000 Professional with Service Pack 4
–
Microsoft Windows 2000 Server with Service Pack 4
–
Microsoft Windows 2003 Server
–
Microsoft Windows XP Professional with Service Pack 2
–
Microsoft Windows XP Home Edition
RAM:
Hard Drive Space:
–
Minimum: 128 MB (limited overall performance of RPS)
–
Recommended: 256 MB or higher
Approximately 250 MB for RPS installation. Accounts and history
require additional hard drive space.
Video:
VGA monitor capable of supporting 1024 x 768 resolution. RPS
supports 24-bit color palettes and lower. For Windows XP, change the
font settings to Normal Fonts.
Database Support:
Microsoft SQL Server™ 2000
Modems:
The online help file for each control panel lists compatible modems
that were tested with RPS. The administrator can also configure and
use most major brands and types of modems with RPS. Refer to
Modem Specifications in the RPS Help file for more information.
Ports:
One serial port for modem communication and one parallel port for
printer connection or security block (dongle). One USB port for
security block (dongle). If you have an available USB port and your
installation requires a security block, you can use either the USB or
parallel port security block.
4998141259 | 09 | 2008.10
Installation Guide
Bosch Security Systems, Inc.
RPS
2.2.2
Introduction | en
9
Minimum System Requirements for SQL Express Only
Processor:
Operating System:
Pentium III Compatible or higher
–
Minimum: 500 MHz
–
Recommended: 1 GHz or higher
–
Microsoft® Windows® VistaTM UltimateTM
–
Microsoft Windows Vista Home Premium
–
Microsoft Windows Vista Home Basic
–
Microsoft Windows Vista Business
–
Microsoft Windows Vista Enterprise
–
Microsoft Windows 2003 Server with Service Pack 1
–
Microsoft Windows 2003 Server Enterprise Edition with Service
Pack 1
–
Microsoft Windows 2003 Server Premium Edition with Service
Pack 1
–
Microsoft Windows XP Professional with Service Pack 2
–
Microsoft Windows XP Home Edition with Service Pack 2
–
Microsoft Windows XP Tablet Edition with Service Pack 2
–
Microsoft Windows XP Media Edition with Service Pack 2
–
Microsoft Windows 2000 Professional Edition with Service Pack 4
–
Microsoft Windows 2000 Server Edition with Service Pack 4
–
Microsoft Windows 2000 Advanced Edition with Service Pack 4
–
Microsoft Windows 2000 Datacenter Server Edition with Service
Pack 4
RAM:
–
Minimum: 192 MB (limited overall performance of RPS)
–
Recommended: 512MB or higher
Hard Drive Space:
600 MB free space.
Browser:
Microsoft Internet Explorer version 6 or later
Software:
–
Microsoft .NET Framework 2.0
–
Windows Installer 3.1
–
Microsoft Data Access Components (MDAC)
Bosch Security Systems, Inc.
Installation Guide
4998141259 | 09 | 2008.10
10
en | Introduction
2.2.3
RPS
RPS and SQL Express on the Same PC Minimum Requirements
Processor:
Intel Pentium IV
Operating System:
–
Microsoft Windows 2003 Server with Service Pack 1
–
Microsoft Windows XP Professional with Service Pack 2
–
Microsoft Windows XP Home Edition with Service Pack 2
–
Microsoft Windows 2000 Professional Edition with Service Pack 4
–
Microsoft Windows 2000 Server Edition with Service Pack 4
–
Minimum: 512 MB
–
Recommended: 1 GB or higher
RAM:
Hard Drive Space:
Approximately 512 MB for RPS installation. Accounts and history
require additional hard drive space.
Video:
VGA monitor capable of supporting 1024 x 768 resolution. RPS
supports 24-bit color palettes and lower. For Windows XP, change the
font settings to Normal Fonts.
Modems:
The online help file for each control panel lists compatible modems
that were tested with RPS. The administrator can also configure and
use most major brands and types of modems with RPS. Refer to
Modem Specifications in the RPS Help file for more information.
Ports:
One serial port for modem communication and one parallel port for
printer connections.
2.2.4
Browser:
Microsoft Internet Explorer version 6 or later
Software:
–
Microsoft .NET Framework 2.0
–
Windows Installer 3.1
–
Microsoft Data Access Components (MDAC)
Minimum System Requirements for RPS and SQL Express on a PC with
Vista
Processor:
1 GHz 32-bit (x86) processor
Operating System:
–
Microsoft Windows Vista (all versions)
RAM:
–
Minimum: 512 MB
–
Recommended: 1 GB or higher
Hard Drive Space:
20 GB hard drive with at least 14 GB of available space.
Video:
VGA monitor capable of supporting 1024 x 768 resolution. RPS
supports 24-bit color palettes and lower. Set the font settings to
Normal Fonts.
Modems:
The online help file for each control panel lists compatible modems
that were tested with RPS. The administrator can also configure and
use most major brands and types of modems with RPS. Refer to
Modem Specifications in the RPS Help file for more information.
Ports:
One serial port for modem communication and one parallel port for
printer connections.
Browser:
Microsoft Internet Explorer version 6 or later
Software:
–
Microsoft .NET Framework 2.0
–
Windows Installer 3.1
4998141259 | 09 | 2008.10
Installation Guide
Bosch Security Systems, Inc.
RPS
Installing RPS | en
3
Installing RPS
3.1
Hardware Installation
3.1.1
11
Installing a Modem
When using an internal modem, consult the documentation accompanying your modem for
physical installation.
3.1.2
Protecting AC Power and Phone Lines
Protect your hardware and data from costly damage by protecting the AC power source and
the phone line for the modem. Several manufacturers offer devices that provide combined AC
and telephone line protection. Contact your computer dealer for more information on these
devices.
3.2
Installing RPS
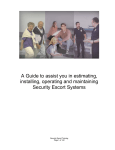
1.
Insert the RPS CD-ROM into your CD-ROM drive.
The RPS startup program should automatically start.
Figure 3.1 RPS Startup
2.
If the startup program does not automatically start:
a.
b.
Select Start > Run…
At the prompt, type: X:\Winopen rps_menu.hta
("X" = the drive letter assigned to your CD-ROM drive.)
Bosch Security Systems, Inc.
Installation Guide
4998141259 | 09 | 2008.10
12
en | Installing RPS
RPS
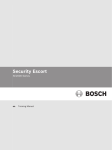
3.
When the startup window opens, select a language from the list provided. Refer to
Figure 3.1 on page 11. An instruction window opens in the selected language.
Figure 3.2 English Instruction Page
From the instruction window, you can open the RPS documentation and install RPS.
4.
Follow the steps listed on the instruction window for installing each component required
for RPS.
i
3.3
For new installations of RPS 5.x, you must install Microsoft .NETTM Framework 2.0. If you are
upgrading or re-installing RPS 5.x, install only RPS.
Installing RPS Together with SQL Express
i
3.3.1
NOTICE!
NOTICE!
If SQL Express is already installed, you do not need to install SQL Server 2005.
If SQL Server 2005 is already installed, you do not need to install SQL Express.
Prerequisites for a New Installation
Use the following steps to install RPS for the first time, or to replace a previous version that
was removed using Add/Remove Programs.
4998141259 | 09 | 2008.10
Installation Guide
Bosch Security Systems, Inc.
RPS
Installing RPS | en
3.3.2
13
Windows Installer 3.1
i
NOTICE!
Windows Installer 3.1 is only needed on Windows® 2000 and Windows® XP SP2 operating
systems.
1.
Select the Windows Installer 3.1 from the RPS installation CD-ROM, or select Install
Windows Installer 3.1 from the RPS instruction dialog.
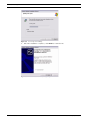
2.
The Windows Installer 3.1 welcome dialog opens.
Click Next.
Figure 3.3 Windows Installer 3.1 Welcome Dialog
3.
The License Agreement dialog opens.
Click I Agree, then click Next.
Figure 3.4 License Agreement Dialog
4.
Bosch Security Systems, Inc.
The Updating Your System dialog shows the status of the installation.
Installation Guide
4998141259 | 09 | 2008.10
14
en | Installing RPS
RPS
Figure 3.5 License Agreement Dialog
5.
When the installation completes, click Finish to restart the PC.
Figure 3.6 Windows Installer 3.1 Completing Dialog
4998141259 | 09 | 2008.10
Installation Guide
Bosch Security Systems, Inc.
RPS
Installing RPS | en
3.3.3
15
Installing .NET Framework 2.0
i
NOTICE!
.NET Framework 2.0 is not required for Windows® Vista operating systems.
1.
Select Install .NET Framework 2.0 from the RPS installation CD-ROM, or select Install
.NET Framework 2.0 from the RPS instruction dialog.
2.
The Microsoft .NET Framework 2.0 Setup welcome dialog opens.
Click Next.
Figure 3.7 .NET Setup Welcome Dialog
3.
The End-User License Agreement dialog opens.
Select I accept the terms of the License Agreement, then click Install.
Figure 3.8 .NET End-User License Dialog
Bosch Security Systems, Inc.
Installation Guide
4998141259 | 09 | 2008.10
16
en | Installing RPS
RPS
4.
The Installing Components dialog show the installation progress.
Figure 3.9 .NET Installing components Dialog
5.
When the Setup Complete dialog opens, click Finish.
Figure 3.10 .NET Setup Complete Dialog
4998141259 | 09 | 2008.10
Installation Guide
Bosch Security Systems, Inc.
RPS
Installing RPS | en
3.3.4
17
Installing MDAC
i
NOTICE!
MDAC is required only for Windows 2000 installations.
1.
Select the MDAC installer from the RPS CD-ROM, or select Install Microsoft Data Access
Components from the RPS instruction dialog.
2.
The End User License Agreement dialog opens.
Select I accept all of the terms of the preceding license agreement, then click Next.
Figure 3.11 MDAC End User License Agreement Dialog
3.
The Installing the Software dialog opens.
Click Finish.
Figure 3.12 MDAC Installing the Software Dialog
4.
Bosch Security Systems, Inc.
When the Setup is Complete dialog opens, click Close.
Installation Guide
4998141259 | 09 | 2008.10
18
en | Installing RPS
RPS
Figure 3.13
3.3.5
MDAC Setup is Complete Dialog
Installing SQL Express
1.
Select the SQL Express installer from the RPS installation CD-ROM, or select Install
Microsoft SQL Server 2005 Express SP2 from the RPS instruction dialog. The Extracting
Files dialog shows briefly.
Figure 3.14
2.
SQL Express Extracting Files Dialog
The End User License Agreement dialog opens.
Select I accept the licensing terms and conditions, then click Next.
Figure 3.15
4998141259 | 09 | 2008.10
SQL Express End User License Agreement Dialog
Installation Guide
Bosch Security Systems, Inc.
RPS
Installing RPS | en
3.
19
The Installing Prerequisites dialog opens,
Click Install.
The dialog shows the progress of the installation.
Figure 3.16 SQL Express Installing Prerequisites Dialog
4.
The Microsoft SQL Server Installation Wizard welcome screen opens.
Click Next.
Figure 3.17 Microsoft SQL Server Installation Wizard Welcome Dialog
5.
Bosch Security Systems, Inc.
When the System Configuration Check dialog finishes, click Next.
Installation Guide
4998141259 | 09 | 2008.10
20
en | Installing RPS
RPS
Figure 3.18
6.
SQL System Configuration Check Dialog
The Microsoft SQL Server Installation dialog shows the status of the installation.
When the installation finishes, click Next.
Figure 3.19
4998141259 | 09 | 2008.10
Microsoft SQL Server Installation Dialog
Installation Guide
Bosch Security Systems, Inc.
RPS
Installing RPS | en
7.
21
The Registration Information dialog opens.
Click Next.
Figure 3.20 SQL Registration Information Dialog
8.
The Feature Selection dialog opens:
a.
Click the X next to Connectivity Components.
b.
Select Entire feature will be installed on local hard drive.
c.
Click Next.
Figure 3.21 SQL Feature Selection Dialog
Bosch Security Systems, Inc.
Installation Guide
4998141259 | 09 | 2008.10
22
en | Installing RPS
RPS
9.
The Authentication Mode dialog opens:
a.
Select Mixed Mode.
b.
Type a SQL Server password in both password fields.
c.
Click Next.
Figure 3.22
i
SQL Authentication Mode Dialog
NOTICE!
You will need the SQL Server password later when logging into RPS. The password is case
sensitive.
10. The Configuration Options dialog opens.
Select Enable User Instances, then click Next.
Figure 3.23
4998141259 | 09 | 2008.10
SQL Configurations Dialog
Installation Guide
Bosch Security Systems, Inc.
RPS
Installing RPS | en
23
11. The Error and Usage Report Settings dialog opens.
Click Next.
Figure 3.24 SQL Error and Usage Report Settings Dialog
12. The Ready to Install dialog opens.
Click Install.
Figure 3.25 SQL Ready to Install Dialog
Bosch Security Systems, Inc.
Installation Guide
4998141259 | 09 | 2008.10
24
en | Installing RPS
RPS
13. The Setup Progress dialog opens.
When the installation is finished, click Next.
Figure 3.26
SQL Setup Progress Dialog
14. The Completing Microsoft SQL Server 2005 Setup dialog opens.
Click Finish.
Figure 3.27
4998141259 | 09 | 2008.10
Completing Microsoft SQL Server 2005 Setup Dialog
Installation Guide
Bosch Security Systems, Inc.
RPS
3.3.6
Installing RPS | en
25
Installing SQL Server Management Studio Express
1.
Select the SQL Server Management Studio Express installer from the RPS installation
CD-ROM, or select Install SQL Server Management Studio Express from the RPS
instruction dialog.
2.
The SQL Server Management Studio Express Setup dialog opens.
Click Next.
Figure 3.28 SQL Server Management Studio Express Setup Dialog
3.
The License Agreement dialog opens.
Select I accept the terms in the license agreement, then click Next.
Figure 3.29 SQL Studio License Agreement Dialog
Bosch Security Systems, Inc.
Installation Guide
4998141259 | 09 | 2008.10
26
en | Installing RPS
RPS
4.
The Registration Information dialog opens.
Click Next.
Figure 3.30
5.
SQL Studio Registration Information Dialog
The Feature Selection dialog opens.
Click Next.
Figure 3.31
4998141259 | 09 | 2008.10
SQL Studio Feature Selection Dialog
Installation Guide
Bosch Security Systems, Inc.
RPS
Installing RPS | en
6.
27
The Ready to Install the Program dialog opens.
Click Install.
Figure 3.32 SQL Studio Ready to Install Dialog
7.
When the installation finishes, click Finish.
Figure 3.33 SQL Studio Installation Complete Dialog
Bosch Security Systems, Inc.
Installation Guide
4998141259 | 09 | 2008.10
28
en | Installing RPS
RPS
NOTICE!
Networking protocols are disabled by default in SQL Server Express. If someone simply
installs SQL Server Express and chooses all the defaults, SQL Server Express can only have
connections originating on the local machine where SQL Server is installed.
To enable SQL Server Express to accept remote connections, configure SQL Server Express to
listen on TCP/IP:
i
3.4
Launch the SQL Server Configuration Manager from the Microsoft SQL Server 2005
–
Click the Protocols for SQLEXPRESS node.
–
Right-click on TCP/IP in the list of protocols, then select Enable.
–
In the SQL Server Configuration Manager, click the SQL Server 2005 Services node.
program menu.
–
Right-click on SQL Server Browser and select Properties.
–
Click the Start button to start the SQL Server Browser.
–
Select the Service tab, and set Sart Mode to Automatic.
Installing RPS with SQL Server or SQL Express
i
3.4.1
–
NOTICE!
If SQL Express is already installed, you do not need to install SQL Server 2005.
If SQL Server 2005 is already installed, you do not need to install SQL Express.
New Installations for Standalone PCs
Use the following steps on a standalone PC to install RPS for the first time, or to replace a
previous version that was removed using Add/Remove Programs.
1.
Unless the PC already has SQL Express installed, install SQL Express from the RPS CDROM. Refer to Section 3.3 Installing RPS Together with SQL Express on page 12.
2.
Select the RPS installer from the RPS installation CD-ROM, or select Install RPS from the
RPS instruction dialog.
3.
Select your setup language preference, then click OK.
The RPS InstallShield® Wizard opens.
Figure 3.34
4998141259 | 09 | 2008.10
RPS Choose Setup Language
Installation Guide
Bosch Security Systems, Inc.
RPS
Installing RPS | en
29
Figure 3.35 RPS Preparing to Install
4.
When the Welcome dialog opens, click Next.
Figure 3.36 RPS InstallShield Welcome
Bosch Security Systems, Inc.
Installation Guide
4998141259 | 09 | 2008.10
30
en | Installing RPS
RPS
5.
The Choose Destination Location dialog opens.
If the default directory is acceptable, click Next.
Otherwise, click Browse to select a different directory, then click Next.
Figure 3.37
6.
RPS Choose Destination Dialog
The New Database Creation dialog opens.
If the default directory for the database files is acceptable, click Next.
Otherwise, click Browse to select a different directory, then click Next.
Figure 3.38
4998141259 | 09 | 2008.10
RPS New Database Creation Dialog
Installation Guide
Bosch Security Systems, Inc.
RPS
Installing RPS | en
7.
31
The Select Features dialog opens. Select the desired features and control panel types for
this RPS installation, then click Next.
Figure 3.39
8.
RPS Select Features
The Select Program Folder dialog opens.
Click Next.
Figure 3.40
Bosch Security Systems, Inc.
RPS Select Program Folder
Installation Guide
4998141259 | 09 | 2008.10
32
en | Installing RPS
RPS
9.
The Start Copying Files dialog opens, listing your selections from the previous steps and
confirming that the PC's hard drive has enough unused space for the RPS installation.
Click Next.
Figure 3.41
RPS Start Copying Files
The Setup Status dialog indicates the installer's progress.
10. When the InstallShield Wizard Complete dialog opens, click Finish.
The PC restarts.
Figure 3.42
RPS InstallShield Wizard Complete
11. After logging onto the PC, start RPS either by selecting Start>Bosch>RPS 5.x, or by
double-clicking the RPS 5.x shortcut on the PC's desktop.
12. Select Start>Microsoft SQL Server 2005>SQL Server Management Studio Express.
4998141259 | 09 | 2008.10
Installation Guide
Bosch Security Systems, Inc.
RPS
Installing RPS | en
33
13. From the Connect to Server dialog, copy the text from the Server name field into the
PC's clipboard.
Figure 3.43 SQL Server Connect to Server
14. In the RPS System Configuration dialog:
a.
Paste the text copied in the previous step into the Select or Enter SQL Server name
field.
b.
Type a database name into the Enter SQL Database Name field.
c.
In the Enter User Name and Enter Password fields, type sa for the User Name and
the password used when SQL Exporess was installed.
d.
Click Create Database, which creates a database in SQL Express with the name you
provided.
Figure 3.44 RPS System Configuration
Bosch Security Systems, Inc.
Installation Guide
4998141259 | 09 | 2008.10
34
en | Installing RPS
RPS
15. The Create Database dialog opens.
Click OK.
Figure 3.45
RPS Create Database
16. Close the SQL Server Management Studio dialog.
17. Click OK to close the RPS System Configuration dialog.
18. In the RPS Logon Information dialog, enter your RPS user name and password, then click
OK.
Figure 3.46
RPS Logon Information
19. The Panel Filter dialog opens.
If you want to see a subset of all accounts, enter the filter criteria into the Panel
Information fields, then click OK.
If you want to see all accounts, click OK.
Refer to the RPS General Help in RPS for more information on the panel filter.
Figure 3.47
RPS Panel Filter
20. Create and configure the control panel account.
4998141259 | 09 | 2008.10
Installation Guide
Bosch Security Systems, Inc.
RPS
3.4.2
Installing RPS | en
35
Installation Using SQL Server
1.
Open the RPS installer from the RPS CD-ROM.
2.
Select your setup language preference, then click OK.
Figure 3.48 RPS Choose Setup Language
3.
At the RPS InstallShield Welcome dialog, click Next.
Figure 3.49 RPS InstallShield Wizard Welcome
4.
The Choose Destination Location dialog opens.
If the default directory is acceptable, click Next.
Otherwise, click Browse to select a different directory, then click Next.
Figure 3.50 RPS Choose Destination Location
Bosch Security Systems, Inc.
Installation Guide
4998141259 | 09 | 2008.10
36
en | Installing RPS
RPS
5.
The New Database Creation dialog opens.
Click Browse to select a different directory on the network.
Figure 3.51
6.
RPS New Database Creation
In the Choose Folder dialog, browse to the desired network directory, then click OK.
NOTICE!
i
To determine which network directory should contain the RPS database, consult your network
or database administrator.
RPS does not support Universal Naming Convention (UNC). Select a mapped network drive.
4998141259 | 09 | 2008.10
Installation Guide
Bosch Security Systems, Inc.
RPS
Installing RPS | en
7.
37
The New Database Creation dialog returns and shows the new directory path.
Click Next.
Figure 3.52 RPS New Database Creation
8.
The Select Features dialog opens.
Select the desired features and control panel types for this RPS installation, then click
Next.
Figure 3.53 RPS Select Features
Bosch Security Systems, Inc.
Installation Guide
4998141259 | 09 | 2008.10
38
en | Installing RPS
RPS
9.
The Select Program Folder dialog opens.
Click Next.
Figure 3.54
RPS Select Program Folder
10. The Start Copying Files dialog opens, listing your selections from the previous steps and
confirming that the PC's hard drive has enough unused space for the RPS installation.
Click Next.
Figure 3.55
4998141259 | 09 | 2008.10
RPS Start Copying Files Dialog
Installation Guide
Bosch Security Systems, Inc.
RPS
Installing RPS | en
39
11. When the InstallShield Wizard Complete dialog opens, click Finish.
The PC restarts.
Figure 3.56 RPS InstallShield Wizard Complete
12. After logging onto the PC, start RPS either by selecting Start>Bosch>RPS 5.x, or by
double-clicking the RPS 5.x shortcut on the PC's desktop.
13. In the RPS System Configuration dialog:
a.
Select or enter the SQL server name into the Select or Enter SQL Server name field.
b.
Type a database name into the Enter SQL Database Name field.
c.
In the Enter User Name and Enter Password fields, type the same name and
password used when the SQL server was installed.
d.
Click Create Database, which creates a database in SQL with the name you
provided.
Figure 3.57 RPS System Configuration Dialog
Bosch Security Systems, Inc.
Installation Guide
4998141259 | 09 | 2008.10
40
en | Installing RPS
RPS
14. When the Create Database dialog opens, click OK.
Figure 3.58
RPS Create Database
15. Click OK to close the RPS System Configuration dialog.
16. In the RPS Logon Information dialog, enter your RPS user name and password, then click
OK.
Figure 3.59
RPS Logon Information
The Panel Filter dialog opens. If you want to see a subset of all accounts, enter the filter
criteria into the Panel Information fields, then click OK. If you want to see all accounts, click
OK.
Refer to the RPS General Help in RPS for more information on the panel filter.
Figure 3.60
RPS Panel Filter
17. Create and configure the control panel account.
4998141259 | 09 | 2008.10
Installation Guide
Bosch Security Systems, Inc.
RPS
3.4.3
Installing RPS | en
41
Installation Using SQL Express on a Network
1.
If necessary, install SQL Express from the RPS CD-ROM onto a network server.
2.
Open the RPS installer from the RPS CD-ROM.
3.
Select your setup language preference, then click OK.
Figure 3.61 RPS Choose Setup Language
4.
At the RPS InstallShield® Welcome dialog, click Next.
Figure 3.62 RPS InstallShield Wizard Welcome
5.
The Choose Destination Location dialog opens.
If the default directory is acceptable, click Next.
Otherwise, click Browse to select a different directory, then click Next.
Figure 3.63 RPS Choose Destination Location
Bosch Security Systems, Inc.
Installation Guide
4998141259 | 09 | 2008.10
42
en | Installing RPS
RPS
6.
The New Database Creation dialog opens.
Click Browse to select a different directory on the network.
Figure 3.64
RPS New Database Creation
NOTICE!
i
To determine which network directory should contain the RPS database, consult your network
or database administrator.
RPS does not support Universal Naming Convention (UNC). Select a mapped network drive.
7.
In the Choose Folder dialog, browse to the desired network directory, then click OK.
Figure 3.65
4998141259 | 09 | 2008.10
RPS Choose folder
Installation Guide
Bosch Security Systems, Inc.
RPS
Installing RPS | en
8.
43
The New Database Creation dialog returns and shows the new directory path.
Click Next.
Figure 3.66 RPS New Database Creation
9.
The Select Features dialog opens.
Select the desired features and control panel types for this RPS installation, then click
Next.
i
NOTICE!
All networked workstations should have the same control panel types selected.
Figure 3.67 RPS Select Features
Bosch Security Systems, Inc.
Installation Guide
4998141259 | 09 | 2008.10
44
en | Installing RPS
RPS
10. When the Select Program Folder dialog opens, click Next.
Figure 3.68
RPS Select Program Folder
11. The Start Copying Files dialog opens, listing your selections from the previous steps and
confirming that the PC's hard drive has enough unused space for the RPS installation.
Click Next.
Figure 3.69
4998141259 | 09 | 2008.10
RPS Start Copying Files
Installation Guide
Bosch Security Systems, Inc.
RPS
Installing RPS | en
45
12. When the InstallShield Wizard Complete dialog opens, click Finish.
The PC restarts.
Figure 3.70 RPS InstallShield Wizard Complete
13. After logging onto the PC, start RPS either by selecting Start>Bosch>RPS 5.x, or by
double-clicking the RPS 5.x shortcut on the PC's desktop.
14. In the RPS System Configuration dialog:
a.
Select or enter the SQL server name into the Select or Enter SQL Server name field.
b.
Type a database name into the Enter SQL Database Name field.
c.
In the Enter User Name and Enter Password fields, type sa for the User Name and
the password used when SQL Express was installed.
d.
Click Create Database, which creates a database in SQL with the name you
provided.
Figure 3.71 RPS System Configuration Dialog
Bosch Security Systems, Inc.
Installation Guide
4998141259 | 09 | 2008.10
46
en | Installing RPS
RPS
15. The Create Database dialog opens.
Click OK.
Figure 3.72
RPS Create Database
16. Click OK to close the RPS System Configuration dialog.
17. In the RPS Logon Information dialog, enter your RPS user name and password, then click
OK.
Figure 3.73
RPS Logon Information
The Panel Filter dialog opens. If you want to see a subset of all accounts, enter the filter
criteria into the Panel Information fields, then click OK. If you want to see all accounts, click
OK.
Refer to the RPS General Help in RPS for more information on the panel filter.
Figure 3.74
RPS Panel Filter Dialog
18. Create and configure the control panel account.
4998141259 | 09 | 2008.10
Installation Guide
Bosch Security Systems, Inc.
RPS
Installing RPS | en
47
NOTICE!
Networking protocols are disabled by default in SQL Server Express. If someone simply
installs SQL Server Express and chooses all the defaults, SQL Server Express can only have
connections originating on the local machine where SQL Server is installed.
To enable SQL Server Express to accept remote connections, configure SQL Server Express to
listen on TCP/IP:
i
3.4.4
–
Launch the SQL Server Configuration Manager from the Microsoft SQL Server 2005
program menu.
–
Click the Protocols for SQLEXPRESS node.
–
Right-click on TCP/IP in the list of protocols, then select Enable.
–
In the SQL Server Configuration Manager, click the SQL Server 2005 Services node.
–
Right-click on SQL Server Browser and select Properties.
–
Click the Start button to start the SQL Server Browser.
–
Select the Service tab, and set Sart Mode to Automatic.
Using a Networked Drive to Store Database Files
Use the following to ensure that all your workstations operate correctly with RPS if you are
using a networked drive to store your database files:
–
Refresh any List view they are using to see changes that are being made by other
workstations in the network.
–
Back up the network drive's database files frequently so that possible errors made by
other users, or hardware problems on the network can be easily corrected.
–
Two users cannot create accounts with the same name. If a user creates an account
named "Big Mall Store," for example, and saves it to the Panel List, a second user trying
to create an account with this same name will get an error message. The user must
choose a different account name to correct this problem.
–
Only one user at a time may make changes to an account once it is created. However, a
user with an authority level of 15 can overwrite changes being made by a user with a
lower authority level. Ensure that no other operators are using the account at the same
time. An account that is already in use by another operator generates a "Panel Already
Open" message.
–
The Panel Already Open window has three option buttons:
–
Yes: Click Yes to try to override the lock and save changes made by the operator
who currently has the account open.
–
No: Click No to try to override the lock and ignore changes made by the operator
who currently has the account open.
–
Cancel: Click Cancel to close the Panel Already Open dialog without attempting to
override a locked account. The account opens in View Only mode.
–
If you wish to override the locked account by clicking Yes or No, a progress indicator
appears while RPS attempts to override the locked account.
–
If the lock override succeeds, a message appears telling the operator with the
account currently open that the account was taken over. The account is then put into
View Only mode. Only the operator who initiated the lock override can modify the
account from this point on.
–
Bosch Security Systems, Inc.
If the lock override fails, a different dialog appears indicating the failure.
Installation Guide
4998141259 | 09 | 2008.10
48
en | Upgrading Existing RPS Installations
RPS
4
Upgrading Existing RPS Installations
4.1
Upgrading RPS Client and Access Database to SQL
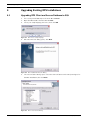
1.
If necessary, install SQL Express from the RPS CD-ROM.
2.
Open the RPS installer from the RPS CD-ROM.
3.
Select your setup language preference, then click OK.
Figure 4.1 RPS Choose Setup Language
4.
When the Welcome dialog opens, click Next.
Figure 4.2 RPS InstallShield Welcome Dialog
5.
The Select Features dialog opens. Select the desired features and control panel types for
this RPS installation, then click Next.
Figure 4.3 RPS Select Features Dialog
4998141259 | 09 | 2008.10
Installation Guide
Bosch Security Systems, Inc.
RPS
Upgrading Existing RPS Installations | en
6.
49
When the Select Program Folder dialog opens, click Next.
Figure 4.4 RPS Select Program Folder Dialog
7.
The Start Copying Files dialog opens, listing your selections from the previous steps and
confirming that the PC's hard drive has enough unused space for the RPS installation.
Click Next.
The Setup Status dialog indicates the installer's progress.
Figure 4.5 RPS Start Copying Files
Bosch Security Systems, Inc.
Installation Guide
4998141259 | 09 | 2008.10
50
en | Upgrading Existing RPS Installations
8.
RPS
When the InstallShield® Wizard Complete dialog opens, click Finish.
The PC restarts.
Figure 4.6 RPS InstallShield Wizard Complete Dialog
9.
After logging onto the PC, start RPS either by selecting Start>Bosch>RPS 5.x, or by
double-clicking the RPS 5.x shortcut on the PC's desktop.
10. If necessary and if you do not know the SQL Server name, select Start>Microsoft SQL
Server 2005>SQL Server Management Studio Express.
The SQL Server 2005 Connect to Server dialog opens.
Figure 4.7 SQL Server 2005 Connect to Server Dialog
11. From the Connect to Server dialog, copy the text from the Server name field into the
PC's clipboard.
4998141259 | 09 | 2008.10
Installation Guide
Bosch Security Systems, Inc.
RPS
Upgrading Existing RPS Installations | en
51
12. In the RPS System Configuration dialog:
a.
Paste the text copied in the previous step into the Select or Enter SQL Server name
field.
b.
Type a database name into the Enter SQL Database Name field.
c.
In the Enter User Name and Enter Password fields, type the same name (sa for SQL
Express) and password used when the SQL database was installed.
d.
Click Create Database, which creates a database in SQL Express with the name you
provided.
Figure 4.8 RPS System Configuration Dialog
The database Merge Utility opens.
13. In the Database Merge Utility dialog, select the Source Database Details tab, then
confirm that the path to the Access Database is correct.
Figure 4.9 RPS Database Merge Utility Dialog
Bosch Security Systems, Inc.
Installation Guide
4998141259 | 09 | 2008.10
52
en | Upgrading Existing RPS Installations
RPS
14. In the Database Merge Utility dialog, select the Destination Database Details tab, then
confirm that the SQL Database fields are configured correctly.
If the Dat File Location field is not pointing to the correct directory, click ... and navigate
to the correct directory, then click Merge Database.
Figure 4.10
RPS Destination Database Details Dialog
15. In the confirmation dialog, click OK.
Figure 4.11
Database Merge Success
16. Close the MS SQL Server Management Studio dialog.
17. In the RPS System Configuration dialog, click OK.
18. In the RPS Logon Information dialog, type the RPS user name and password, then click
OK.
Figure 4.12
4998141259 | 09 | 2008.10
RPS Logon Information Dialog
Installation Guide
Bosch Security Systems, Inc.
RPS
Upgrading Existing RPS Installations | en
53
The Panel Filter dialog opens. If you want to see a subset of all accounts, enter the filter
criteria into the Panel Information fields, then click OK. If you want to see all accounts, click
OK.
Refer to the RPS General Help in RPS for more information about the panel filter.
Figure 4.13 RPS Panel Filter Dialog
19. Create and configure the control panel account.
Bosch Security Systems, Inc.
Installation Guide
4998141259 | 09 | 2008.10
54
4.2
en | Upgrading Existing RPS Installations
RPS
Upgrading the SQL Server Database From the Server
1.
Open the SQL Server Management Studio.
Figure 4.14
2.
Log into the database.
Figure 4.15
3.
4998141259 | 09 | 2008.10
SQL Server 2005 Connect to Server
In SQL Server, select File>Open>File.
Figure 4.16
4.
Path to SQL Server Management Studio
SQL Server File > Open > File Path
Locate the SQL upgrade script file on the RPS CD-ROM, then click Open.
Installation Guide
Bosch Security Systems, Inc.
RPS
Upgrading Existing RPS Installations | en
5.
55
Log in again, then click Connect.
Figure 4.17 SQL Server 2005 Connect to Database Engine
6.
In the drop-down menu, select the RPS database that you are upgrading.
Figure 4.18 SQL Server 2005 Upgrade RPS Database
7.
Select Query>Execute. When you see Query executed successfully on the bottom of the
window, the database is upgraded.
Figure 4.19 SQL Server 2005 Query > Execute
8.
9.
Close Microsoft SQL Server Studio.
If you have not already done so, upgrade the RPS .dat files.
Refer to Section 4.6 Upgrading RPS .dat Files on the Server on page 66.
i
NOTICE!
You must now upgrade all clients to the same RPS version to match the SQL database.
Bosch Security Systems, Inc.
Installation Guide
4998141259 | 09 | 2008.10
56
4.3
en | Upgrading Existing RPS Installations
RPS
Upgrading the SQL Express Database From the Server
1.
Open the SQL Server Management Studio.
2.
Log into the database.
Figure 4.20
3.
Path to SQL Server Management Studio
In SQL Server, select File>Open>File.
Figure 4.21
SQL Server File > Open > File
4.
Locate the SQL upgrade script file on the RPS CD-ROM, then click Open.
5.
Log into the database again, then click Connect.
Figure 4.22
4998141259 | 09 | 2008.10
SQL Server 2005 Connect to Database Engine
Installation Guide
Bosch Security Systems, Inc.
RPS
Upgrading Existing RPS Installations | en
6.
57
In the drop-down menu, select the RPS database that you are upgrading.
Figure 4.23 SQL Server 2005 Upgrade RPS Database
7.
Select Query>Execute.
When you see Query executed successfully on the bottom of the dialog, the database is
upgraded.
Figure 4.24 SQL Server 2005 Query > Execute
8.
Close Microsoft SQL Server Studio.
9.
If you have not already done so, upgrade the RPS .dat files.
Refer to Section 4.6 Upgrading RPS .dat Files on the Server, page 66, for more information.
i
NOTICE!
You must now upgrade all clients to the same RPS version to match the SQL database.
Bosch Security Systems, Inc.
Installation Guide
4998141259 | 09 | 2008.10
58
en | Upgrading Existing RPS Installations
4.4
RPS
Upgrading SQL Server Database from the RPS Client
NOTICE!
i
If you have already upgraded the database for SQL Server or SQL Express from the server, you
can skip this section and proceed to Section 4.5 Upgrading the RPS Client Only (if using a
network database), page 63.
1.
Instruct all users to log out of RPS.
2.
Open the RPS installer from the RPS CD-ROM.
3.
Select your setup language preference, then click OK.
Figure 4.25
4.
When the Welcome dialog opens, click Next.
Figure 4.26
4998141259 | 09 | 2008.10
RPS Choose Setup Language
RPS InstallShield Wizard Welcome Dialog
Installation Guide
Bosch Security Systems, Inc.
RPS
Upgrading Existing RPS Installations | en
5.
59
The Select Features dialog opens.
Select the desired features and control panel types for this RPS installation, then click
Next.
Figure 4.27 RPS Select Features Dialog
6.
When the Select Program Folder dialog opens, click Next.
Figure 4.28 RPS Select Program Folder Dialog
Bosch Security Systems, Inc.
Installation Guide
4998141259 | 09 | 2008.10
60
en | Upgrading Existing RPS Installations
7.
RPS
The Start Copying Files dialog opens, listing your selections from the previous steps and
confirming that the PC's hard drive has enough unused space for the RPS installation.
Click Next.
The Setup Status dialog indicates the installer's progress.
Figure 4.29
8.
RPS Start Copying Files
When the InstallShield Wizard Complete dialog opens, click Finish.
The PC restarts.
Figure 4.30
9.
RPS InstallShield Wizard Complete Dialog
After logging onto the PC, start RPS either by selecting Start>Bosch>RPS 5.x, or by
double-clicking the RPS 5.x shortcut on the PC's desktop.
4998141259 | 09 | 2008.10
Installation Guide
Bosch Security Systems, Inc.
RPS
Upgrading Existing RPS Installations | en
61
10. An error dialog opens. Click OK.
Figure 4.31 RPS Incompatible Database Message Dialog
11. In the RPS System Configuration dialog, click Upgrade Database.
Figure 4.32 RPS System Configuration Dialog
12. A confirmation dialog opens.
Click OK.
Figure 4.33 RPS Upgrade Database Dialog
Bosch Security Systems, Inc.
Installation Guide
4998141259 | 09 | 2008.10
62
en | Upgrading Existing RPS Installations
RPS
13. In the RPS Logon Information dialog, type the RPS user name and password, then click
OK.
Figure 4.34
RPS Logon Information Dialog
The Panel Filter dialog opens. If you want to see a subset of all accounts, enter the filter
criteria into the Panel Information fields, then click OK. If you want to see all accounts, click
OK.
Refer to the RPS General Help in RPS for more information on the panel filter.
Figure 4.35
RPS Panel Filter Dialog
14. Create and configure the control panel account.
4998141259 | 09 | 2008.10
Installation Guide
Bosch Security Systems, Inc.
RPS
4.5
Upgrading Existing RPS Installations | en
63
Upgrading the RPS Client Only (if using a network database)
1.
Open the RPS installer from the RPS CD-ROM.
2.
Select your setup language preference, then click OK.
Figure 4.36 RPS Choose Setup Language Dialog
3.
When the Welcome dialog opens, click Next.
Figure 4.37 RPS InstallShield Wizard Welcome Dialog
4.
The Select Features dialog opens.
Select the desired features and control panel types for this RPS installation, then click
Next.
Figure 4.38 RPS Select Features Dialog
Bosch Security Systems, Inc.
Installation Guide
4998141259 | 09 | 2008.10
64
en | Upgrading Existing RPS Installations
5.
When the Select Program Folder dialog opens, click Next.
Figure 4.39
6.
RPS
RPS Select Program Folder Dialog
The Start Copying Files dialog opens, listing your selections from the previous steps and
confirming that the PC's hard drive has enough unused space for the RPS installation.
Click Next.
The Setup Status dialog indicates the installer's progress.
Figure 4.40
4998141259 | 09 | 2008.10
RPS Start Copying Files Dialog
Installation Guide
Bosch Security Systems, Inc.
RPS
Upgrading Existing RPS Installations | en
7.
65
When the InstallShield Wizard Complete dialog opens, click Finish.
The PC restarts.
Figure 4.41 RPS InstallShield Wizard Complete
8.
After logging onto the PC, start RPS either by selecting Start>Bosch>RPS 5.x, or by
9.
Log into RPS.
double-clicking the RPS 5.x shortcut on the PC's desktop.
10. In the RPS System Configuration dialog, click Modify and change the location so that it
points to the network database again. Also, confirm that the SQL database information is
correct.
Figure 4.42 RPS System InstallShield Configuration Dialog
11. In the RPS System Configuration dialog, click OK.
Bosch Security Systems, Inc.
Installation Guide
4998141259 | 09 | 2008.10
66
en | Upgrading Existing RPS Installations
RPS
12. In the RPS Logon Information dialog, type the RPS user name and password, then click
OK.
Figure 4.43
RPS Logon Information Dialog
13. Create and configure the control panel account.
4.6
Upgrading RPS .dat Files on the Server
1.
2.
Use Windows Explorer to open the SQL Dat File Upgrade.zip file from the RPS CD-ROM.
Extract the contents of the .zip file into the existing RPS Database directory, and replace
all existing files.
Figure 4.44
3.
4998141259 | 09 | 2008.10
RPS Logon Information
Upgrade all RPS clients connected to the server.
Installation Guide
Bosch Security Systems, Inc.
RPS
Post-Installation/Upgrade Tasks | en
5
Post-Installation/Upgrade Tasks
5.1
Switching From a Client to Network Installation
67
It can be advantageous to place your RPS database files on a network drive so that many
workstations can access a single database.
1.
Locate the RPS\Database directory on the local drive.
2.
Using Windows Explorer, right-click on the Database directory, then select Sharing and
Security....
Figure 5.1 Windows Explorer > Sharing and Security
3.
In the Properties dialog, select Share this folder, then click Permissions.
Figure 5.2 Windows Explorer > Database Properties
Bosch Security Systems, Inc.
Installation Guide
4998141259 | 09 | 2008.10
68
en | Post-Installation/Upgrade Tasks
4.
RPS
In the Permissions dialog, select Allow for the Change and Read permissions, then click
OK to close the Permissions and Properties dialogs.
Figure 5.3 Windows Explorer > Permissions for Database
5.
Copy the Database directory to the new location on the network drive.
6.
Start RPS, and log on when the RPS Logon Information dialog opens.
Figure 5.4 RPS Logon Information
7.
Select Config > System.
The System Configuration dialog opens.
4998141259 | 09 | 2008.10
Installation Guide
Bosch Security Systems, Inc.
RPS
Post-Installation/Upgrade Tasks | en
8.
69
Select the File Locations tab, then click Modify and navigate to the directory location you
created on the network drive in Step 5.
Figure 5.5 RPS File Locations Tab
–
If the SQL Server database already exists, enter the SQL Server Name, SQL Database
Name, User Name, and Password, then click OK
–
If the SQL Server database does not already exist, enter the SQL Server Name and the
desired SQL Database Name, User Name and Password for the database, then click
Create Database. When the Database Created Successfully dialog opens, click OK.
Figure 5.6 RPS Create Database
9.
The Please re-login dialog opens. Click OK to restart RPS.
Figure 5.7 RPS Please Re-Login
Bosch Security Systems, Inc.
Installation Guide
4998141259 | 09 | 2008.10
70
en | Post-Installation/Upgrade Tasks
RPS
When the database files are stored on a network drive, two or more operators can access a
single account. When an operator attempts to access an account that is already open by
another operator (for example, one that has a different user name), a Panel Already Open
dialog appears, indicating that the account is already opened for editing by another operator
(the operator's log-in name displays in the message box). The operator opening a second
instance of the database can view the contents of the account, but cannot edit any of the
information in the account.
NOTICE!
i
If an operator logs on to two different terminals with the same user name and accesses the
same account from both terminals, RPS prompts the operator at the second terminal to either
override the lock and allow edits, or open the account in View Only mode.
Do not log on to RPS using the same user name on multiple PCs.
4998141259 | 09 | 2008.10
Installation Guide
Bosch Security Systems, Inc.
RPS
Post-Installation/Upgrade Tasks | en
5.2
Reverting to Previous RPS Installation After SQL Upgrade
5.2.1
Reverting to a Microsoft Access Database
71
NOTICE!
i
The following procedure assumes that the Microsoft Access database from the previous
installation was backed up, and that this Access database is already copied to the desired
directory.
1.
Select Control Panel > Add or Remove Programs, then uninstall the existing RPS
2.
Restart the PC.
3.
Ensure that the backed-up database is not inside the RPS directory, then delete the RPS
installation.
directory
4.
Install the earlier version of RPS. During the installation process, when you reach the
Select Database Configuration dialog, click Use Existing Database, then click Next.
Figure 5.8 RPS Select Database Configuration
5.
When the Use Existing Database dialog opens, click Browse and specify the location of
the Access database.
Figure 5.9 RPS Use Existing Database
6.
Bosch Security Systems, Inc.
Finish the installation by following the instructions on the screen.
Installation Guide
4998141259 | 09 | 2008.10
72
en | Post-Installation/Upgrade Tasks
5.2.2
RPS
Reverting to a Previous SQL Database
NOTICE!
i
The following procedure assumes that you used SQL Management Studio to back up the
previous SQL database (creating a .bak file), and that the Database directory containing the
.dat files was also backed up.
1.
Select Control Panel > Add or Remove Programs, then uninstall the existing RPS
installation.
2.
Restart the PC.
3.
Ensure that the backed up database is not inside the RPS directory, then delete the RPS
directory.
4.
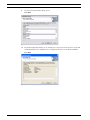
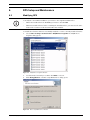
Open SQL Server Management Studio or SQL Server Management Studio Express.
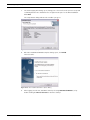
5.
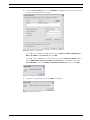
Right-click on the RPS database, then select Tasks > Restore > Database.....
Figure 5.10
6.
SQL Server 2005
The Restore Database dialog opens. Under Source for restore, select From device, then
click ....
Figure 5.11
4998141259 | 09 | 2008.10
SQL Server 2005 Restore Database
Installation Guide
Bosch Security Systems, Inc.
RPS
Post-Installation/Upgrade Tasks | en
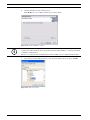
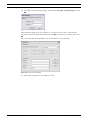
7.
73
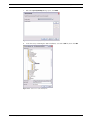
When the Specify Backup dialog opens, click Add.
Figure 5.12 SQL Server Specify Backup
8.
In the directory containing the SQL installation, select the .bak file, then click OK.
Figure 5.13 SQL Server Locate Backup File
Bosch Security Systems, Inc.
Installation Guide
4998141259 | 09 | 2008.10
74
en | Post-Installation/Upgrade Tasks
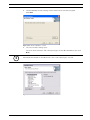
9.
RPS
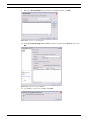
When the Specify Backup dialog identifies the Backup location, click OK.
Figure 5.14
SQL Server Specify Backup
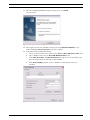
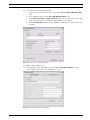
10. Under Select the backup sets to restore, click the checkbox under Restore, then click
OK.
Figure 5.15
SQL Server Restore Database
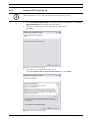
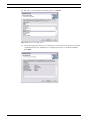
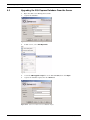
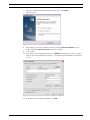
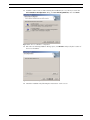
11. The database restores successfully. Click OK.
Figure 5.16
4998141259 | 09 | 2008.10
SQL Server Successful Database Restore
Installation Guide
Bosch Security Systems, Inc.
RPS
Post-Installation/Upgrade Tasks | en
75
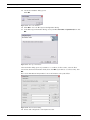
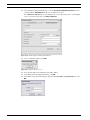
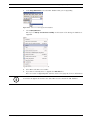
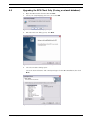
12. Install the earlier version of RPS. During the installation process, when you reach the
Select Database Configuration dialog, click Use Existing Database, then click Next.
Figure 5.17 RPS Select Database Configuration
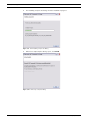
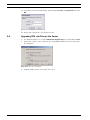
13. When the Use Existing Database dialog opens, click Browse and specify the location of
the Access database.
Figure 5.18 RPS Use Existing Database
14. Finish the installation by following the instructions on the screen.
Bosch Security Systems, Inc.
Installation Guide
4998141259 | 09 | 2008.10
76
en | Post-Installation/Upgrade Tasks
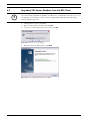
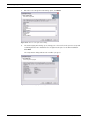
5.3
RPS
Setting Security Levels by Panel Type for Networked Users
If your company is using a database on a networked drive and you want to allow users to be
able to set security levels for control panels, you must copy the control panel definition files
to each workstation on the network. This preserves the security settings you have set for each
control panel type on the individual workstations on the network.
i
NOTICE!
If these files are not copied to each workstation, users on other workstations can change data
for control panel types that you restricted.
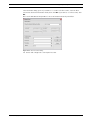
Use the following steps to transfer your security settings to other PCs on the network:
1.
From RPS, set the security levels for each control panel type on any one PC on the
network. Only users with an authority level of 15 can perform this operation.
Refer to the RPS General Help in RPS for more information on setting security levels in
RPS.
i
NOTICE!
Setting the security levels for a control panel type sets the levels for all accounts for that
control panel type (new and existing).
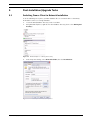
2.
Use Windows Explorer to copy the appropriate control panel definition files (peg defs) to
each PC on the network after you set the security level for each field in each panel type.
To do this, open the RPS directory on the PC where you are currently working. Find the
folder labeled PegDefs.
3.
Use Windows Explorer to copy the PegDefs folder to each of the RPS directories on all
workstations running RPS. Use the drag-and-drop feature in Windows to move the
PegDefs folder to each PC on the network. Click and hold the PegDefs folder with the
right mouse button and drag the folder to the RPS directory on the target workstation
PC. Release the right mouse button. A small dialog opens and asks if you want to Move,
Copy, Create a Shortcut to the folder or Cancel
NOTICE!
i
Ensure that you select Copy. Selecting Move moves the entire PegDefs folder from the
current PC to the workstation PC. Click Yes if the File Already Exists - Do you want to
overwrite? message appears.
NOTICE!
i
Moving the PegDefs folder prevents RPS from working on the current PC. If you accidentally
move the PegDefs folder, return it to the RPS directory on the PC, and then recopy it to the
workstation.
4.
After Windows finishes the copy process, the workstation has the same security settings
as the original PC. Repeat Step 3 for each workstation on the network.
i
NOTICE!
If you change the control panel security setting in the future, you must copy the new PegDefs
files to each workstation again.
4998141259 | 09 | 2008.10
Installation Guide
Bosch Security Systems, Inc.
RPS
5.4
Post-Installation/Upgrade Tasks | en
77
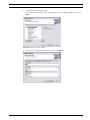
Backing Up the SQL or SQL Express Database
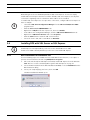
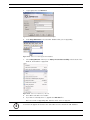
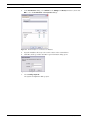
1.
From the PC's Start > Programs menu, select Microsoft SQL Management Studio or
Microsoft SQL Management Studio Express.
2.
When the Connect to Server dialog opens, click Connect.
Figure 5.19 SQL Server 2005 Connect to Server
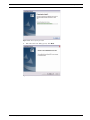
3.
Right-click the RPS database, then select Tasks > Back Up....
Figure 5.20 SQL Server 2005 Tasks > Back Up
Bosch Security Systems, Inc.
Installation Guide
4998141259 | 09 | 2008.10
78
en | Post-Installation/Upgrade Tasks
4.
When the Back Up Database dialog opens, click OK.
Figure 5.21
5.
SQL Server 2005 Back Up Database
When the Backup Completed Successfully dialog opens, click OK.
Figure 5.22
4998141259 | 09 | 2008.10
RPS
Backup Completed Successfully
Installation Guide
Bosch Security Systems, Inc.
RPS
RPS Setup and Maintenance | en
6
RPS Setup and Maintenance
6.1
Modifying RPS
79
NOTICE!
i
To modify the current RPS installation, you must use the original installation files.
–
If RPS was installed from the CD-ROM, you must use the CD-ROM.
–
If RPS was installed from a folder containing the installation files, you must use the same
folder in the location it resided at when RPS was installed.
To install other features that were not initially installed or remove currently installed features:
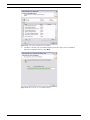
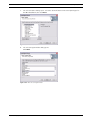
1.
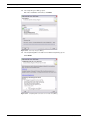
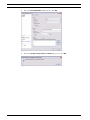
Select Start > Settings > Control Panel > Add/Remove Programs. The Add/Remove
Programs dialog opens.
Figure 6.1 Add/Remove Programs Window
2.
Scroll down the list until you see RPS. Click RPS to select it.
3.
Click Change/Remove. The RPS Setup Maintenance dialog opens.
Figure 6.2 RPS Setup Maintenance Window
Bosch Security Systems, Inc.
Installation Guide
4998141259 | 09 | 2008.10
80
en | RPS Setup and Maintenance
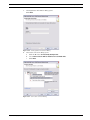
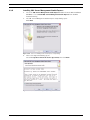
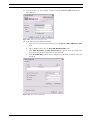
4.
RPS
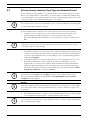
Click Modify, and then click Next. The Select Features dialog opens.
Figure 6.3 Select Features Window
5.
Select the checkboxes for the features you want to install, or clear the checkboxes for
the features you want to remove.
6.
Click Next. The selected features are either installed or uninstalled as selected.
7.
When the Install Complete dialog opens, click Finish to end the RPS Setup Maintenance
process.
6.2
Repairing RPS
NOTICE!
i
To repair the current RPS installation, you must use the original installation files.
–
–
If RPS was installed from the CD-ROM, you must use the CD-ROM.
If RPS was installed from a folder containing the installation files, you must use the same
folder in the location it resided at when RPS was installed.
To reinstall all of the program features installed during the previous setup:
1.
Select Start > Settings > Control Panel > Add/Remove Programs. The Add/Remove
Programs dialog opens. Refer to Figure 6.1.
2.
Scroll down the list until you see RPS. Click RPS to select it.
3.
Click Change/Remove. The RPS Setup Maintenance dialog opens. Refer to Figure 6.2.
4.
Click Repair, and then click Next. A progress indicator dialog opens. When the repair is
complete, the Install Complete dialog opens.
5.
6.3
Click Finish to end the RPS Setup Maintenance process.
Removing RPS
To remove RPS and all of its features:
1.
Select Start > Settings > Control Panel > Add/Remove Programs. The Add/Remove
Programs dialog opens. Refer to Figure 6.1.
2.
Scroll down the list until you see RPS. Click RPS to select it.
3.
Click Change/Remove. The RPS Setup Maintenance dialog opens. Refer to Figure 6.2.
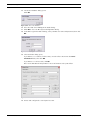
4.
Click Remove, and then click Next.
5.
When the Confirm Uninstall dialog opens, click Yes. A progress dialog opens.
6.
When the removal process is complete, restart the PC.
4998141259 | 09 | 2008.10
Installation Guide
Bosch Security Systems, Inc.
RPS
Logging Into RPS | en
7
81
Logging Into RPS
NOTICE!
i
7.1
Limit access to RPS to authorized individuals as it contains provisions for setting security
passwords. Establish appropriate security levels and set passwords before allowing operating
personnel access to RPS.
First Time Log-In
i
NOTICE!
Do not log into RPS as the same operator from two different PCs when using a networked
database.
To log into RPS:
1.
Double-click the RPS shortcut icon that was placed on your desktop during installation.
You can also select Start > Programs > Bosch > RPS (or the path you specified during
installation).
2.
When the Logon Information dialog opens:
–
–
For the user name, enter "admin".
For the password, enter "1111" or "default". The password is not case-sensitive. For
example, "password" and "PASSWORD" are identical entries.
Figure 7.1 Logon Information Window
3.
Bosch Security Systems, Inc.
Click OK to continue.
Installation Guide
4998141259 | 09 | 2008.10
82
7.2
en | Logging Into RPS
RPS
Changing the Password
To change the default password:
1.
From RPS, select Config Password.
Figure 7.2 Accessing the Change Password Window
2.
When the Change Password dialog opens:
a.
Enter the old password.
b.
Enter the new password.
c.
Enter the new password again.
d.
Click OK.
The new password takes effect the next time you log in.
Figure 7.3 Logon Information Window
4998141259 | 09 | 2008.10
Installation Guide
Bosch Security Systems, Inc.
RPS
Recovering Old Database Files | en
8
83
Recovering Old Database Files
i
NOTICE!
You cannot point RPS to a database created in an older version of RPS. Doing so either
produces errors, or it corrupts the database.
To recover control panel accounts that were not exported before installing the new version of
RPS:
1.
Uninstall the new version of RPS. Refer to Section 6.3 Removing RPS on page80.
2.
Reinstall the old version of RPS
3.
When the installation asks if you want to install a new database, click Yes.
4.
When the installation is complete, restart your PC and then start RPS.
5.
Select Config > System > File Locations.
6.
Select the database file, and click Modify.
7.
When the Modify Location dialog opens, browse to the folder named "database.000" in
the RPS directory. This is the folder where your old accounts were placed when you first
upgraded RPS.
8.
Click OK and exit RPS.
9.
Restart RPS.
10. Verify that your accounts appear in the Panel List.
11. Export your accounts. Refer to Export in the RPS General Help File for more information.
12. Remove the old version of RPS, and then reinstall the new version.
13. Import your old accounts into the new version of RPS. Refer to Import in the RPS General
Help File for more information.
14. Verify that your old accounts now appear in the Panel List.
Bosch Security Systems, Inc.
Installation Guide
4998141259 | 09 | 2008.10
84
en | RPS Operation and Control Panel Account Notes
RPS
9
RPS Operation and Control Panel Account Notes
9.1
RPS Notes
9.1.1
Installation and Administration
When using the RAM II Exporter, use the Exporter R2X_V004.exe file. Do not use any other
Ram2expt files
9.1.2
General Operation
If your PC runs Windows XP Service Pack 2 or higher and you use Windows Firewall, you must
grant permission to RPS so it can conduct network communication with control panels:
1.
Select Start > Control Panel.
–
If the PC's Control Panel is set to Category View, select Control Panel Security >
Center. Under "Manage security settings for:", click Windows Firewall. Go to Step 2.
–
If the PC's Control Panel is set to Classic View, select Control Panel Windows >
Firewall. Go to Step 2.
2.
Select the Exceptions tab.
3.
Click Add Port....
4.
In the Name field, enter the name of the port. For example, "RPS_Port."
5.
In the Port Number field, enter the port number assigned to your network interface
module. For example, if your network interface module uses Port 7700, enter "7700."
9.1.3
6.
Click UDP.
7.
Click OK.
8.
Click OK again.
9.
Test the connection from within RPS once RPS is installed.
Modems
–
Some versions of the 3COM PCMCIA Etherlink III LAN +33.6 Notebook Modem do not
work properly with RPS. Refer to Modem Compatibility List in the control panel's help file
for compatible modems.
–
Newer versions of the BestData V.90 model SPX-2 Modem are not compatible with RPS.
–
There are compatibility issues between RPS and the Hayes 1200 Smartmodem version
Refer to Modem Compatibility List in the control panel's help file for compatible modems.
1.6. Do not use this modem with RPS. Refer to Modem Compatibility List in the control
panel's help file for compatible modems.
4998141259 | 09 | 2008.10
Installation Guide
Bosch Security Systems, Inc.
RPS
RPS Operation and Control Panel Account Notes | en
9.2
Control Panel Account Notes
9.2.1
2000 Series
85
RAM II Exporter version 004 does not import account notes and zone notes. The cells for
these notes are empty in RPS.
9.2.2
D6412/D4412 and DS7240/DS7220
–
Changing an RF ID: RPS allows you to change the RF ID for a location without resetting
the learned characteristics for the transmitter. For example, the control panel supervises
an RF3401 (RF3401E) Point Transmitter. The control panel learned that both the reed
switch or magnet, and the sensor loop, are in use. The magnet must be in place and the
sensor loop must be normal for the transmitter to be normal (not faulted). If you enter an
ID for a new transmitter at this location, the control panel expects to see both the reed
switch and the sensor loop normal before the zone state is declared normal. To only use
the reed switch (or only the sensor loop), remove the ID for the location at a keypad by
using the Installer RF Menu. Refer to the control panel's documentation for instructions.
–
Parameters Changed Report: If changes are made to the control panel's programming
using RPS and the remote programming session ends with the Reset Panel box checked,
the control panel does not send a Parameters Changed report. If the session ends and
the Reset Panel box is not checked, the control panel sends the Parameters Changed
report.
–
Miscellaneous System Trouble Options: The Enable AC Fail Trouble Tone and Enable
Ground Fault Display and Trouble Tone options, located in the Miscellaneous category in
RPS, are only available on control panels with firmware version 1.04 or greater.
–
Output Function Types: If Output Function Types 1,8 to 1,13 and 2,11 are assigned to an
output, you should not be able to turn the output on or off or toggle it in RPS; however,
the control panel does not force some of these restrictions when using RPS.
–
Bypassing Unbypassable Zones in RPS: Some zones that are not bypassable at the
control panel might be bypassable in RPS.
–
Unbypassing a zone from RPS does not reactivate Zone: Unbypassing a zone from RPS
does not return the zone to active status, allowing it to generate an alarm response if
violated. To return the zone to active status from RPS:
–
–
Disarm the area in which the zone is assigned.
–
Unbypass the zone.
–
Rearm the area.
Arming States in Diagnostics: The control panel does not allow RPS to change arming
states to a lower state without first disarming the control panel. For example, if the
control panel is All On, you cannot switch to Perimeter Only until you disarm the control
panel and rearm Perimeter Only. You can switch to a higher arming state (Perimeter Only
to All On) without first disarming the control panel.
–
Callback: Initiate callback immediately to ensure proper callback operation. Click Yes at
the prompt to make RPS automatically detect the phone ring. This feature might not work
with certain modems.
–
RF Jam Detect not shown in Diagnostics: RPS does not indicate if the RF receivers are
jammed in Diagnostics. RF Receiver status is shown as either "Off Normal" or "Missing."
No other trouble conditions appear.
–
Non-traditional Alphabetical Characters Not Supported by RPS (DS7240-SWE, DS7240NOR only): Characters that are not part of the Swedish or Norwegian alphabet, but are
supported by the control panel, cannot be entered into RPS. These characters do not
appear if they are sent to RPS from the control panel.
Bosch Security Systems, Inc.
Installation Guide
4998141259 | 09 | 2008.10
86
en | RPS Operation and Control Panel Account Notes
–
RPS
Tamper conditions not bypassable (DS7240-UK only): Bypassing a zone from RPS only
bypasses the alarm condition. Tamper conditions cannot be bypassed.
–
Remote Programming Lockout (DS7240-UK and DS7200V2-UK only): After three invalid
attempts to connect to the control panel from RPS, the control panel locks out any
remote programming sessions for 4 h. Remote programming through the direct connect
method is still available.
–
SRT Modems (DS7240-NOR only): The SRT MiniBox and SRT ProBox 33.6 modems do
not work with the DS7240-NOR control panel even though they appear in the System
Config Modem tab.
9.2.3
D7024 and DS9400
–
Firmware Revision: To program the FACP using RPS, the FACP must have firmware
version 2.02 or higher installed.
–
Firmware 2.04 Defaults: The default account values are intended for firmware 2.04. A
"Panel out of Sync" message appears if you connect to a control panel with firmware
version 2.03 or lower.
–
False Values/Blank Results Appear in Compare Window: If a four-zone expander is not
installed and "Receive Panel Data" is selected from the Panel Sync dialog, some of the
values for Zones 5 to 8 might not be retrieved correctly. If a four-zone expander is
installed, the values for Input Points 5 to 8 are retrieved correctly.
–
Gentex RNAC Option: The Gentex NAC output configuration is a valid NAC option on
control panels with firmware version 2.04 or higher. If Gentex is selected and sent to a
control panel with firmware version 2.03 or lower, the NAC response is set to Steady.
–
Remote Program Enabled: If "Remote Program Enabled" is set to No, RPS still allows you
to receive data from the control panel; however, for security reasons, you cannot view
any of the PINs or change any program information.
–
"Panel out of Sync" Message with Defaulted DS9400M and RPS: The RPS default for
MUX Bus Type is "Not Installed," whereas the DS9400M's default is "Installed."
9.2.4
D8112
–
Panel Sync Window: D8112 Series Control Panels always show a Panel Sync dialog even
if the data in RPS matches the data in the control panel.
–
Importing Zone Notes from a RAM II Account (D8112G, G1, G2): Zone notes entered for
Zones 100+ do not appear with their appropriate zone when imported into RPS. Zone
notes must be manually entered into RPS. This is because RAM II does not account for
Master Zones in the Zones table.
9.2.5
D9112B1, D7212B1
–
Panel Sync Window Appears with Defaulted Panel and Account (D7212B1 only): The
Panel Sync dialog should only appear when there are programming differences between
the control panel and the RPS account; however, it might appear if you connect to a
defaulted control panel with a defaulted RPS account. Comparing the defaulted control
panel and RPS account yields no default differences.
–
ZOOM 2949 56Kx Zoom Fax Modem Answer Ring Setting: Set the control panel's
answer ring count to answer on less than eight rings when using the ZOOM 2949 56Kx
Zoom Fax Modem (version 34X).
–
Message Limitation (Keypad Tab): Even though you can send messages to each keypad's
(command center) address, only one message can be performed at a time.
4998141259 | 09 | 2008.10
Installation Guide
Bosch Security Systems, Inc.
RPS
9.2.6
RPS Operation and Control Panel Account Notes | en
87
DS7400XiV4-EXP
–
Phone Number Fields Also Apply to IP Addresses: The phone number fields in Phone
Control and Partitions > Account Code also support IP addresses if you are
communicating over an Ethernet network.
–
Resetting the Control Panel from RPS Clears Date and Time Settings: If you click the
Reset Panel checkbox on the End Session dialog, RPS clears the control panel's date and
time settings. You cannot retrieve current history events if these settings are cleared. You
must retrieve all of the control panel's history log entries.
–
If you cannot connect to a DS7400XiV4-EXP using a Hayes 2400 Modem, use the
following initialization (init) string: AT&C1&D2X0&Q0S9=1S7=255S10=254.
9.2.7
Control Panel Help Files
Some of the control panel help file topics might show "Blank" as a valid selection. RPS might
show "0" for these same selections. Some programming defaults shown in the control panel
help file topics might not be accurate. Refer to the defaults in RPS in these cases.
Bosch Security Systems, Inc.
Installation Guide
4998141259 | 09 | 2008.10
88
en | RPS Operation and Control Panel Account Notes
4998141259 | 09 | 2008.10
RPS
Installation Guide
Bosch Security Systems, Inc.
Bosch Security Systems, Inc.
130 Perinton Parkway
Fairport, NY 14450
USA
(800) 289-0096
www.boschsecurity.com
© Bosch Security Systems, Inc., 2008