1
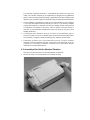
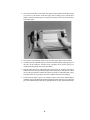
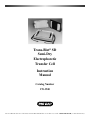
Trans-Blot® SD
Semi-Dry
Electrophoretic
Transfer Cell
Instruction
Manual
Catalog Number
170-3940
For Technical Service Call Your Local Bio-Rad Office or in the U.S. Call 1-800-4BIORAD (1-800-424-6723)
Note
To insure the best performance from the Trans-Blot SD semi-dry electrophoretic transfer
cell, become fully acquainted with these operating instructions before using the cell to
transfer samples. Bio-Rad recommends that you first read these instructions carefully. Then
assemble and disassemble the cell completely without transferring sample. After these
preliminary steps, you should be ready to transfer a sample.
Bio-Rad also recommends that all Trans-Blot SD cell components and accessories be
cleaned with a suitable laboratory cleaner (such as Bio-Rad Cleaning Concentrate, catalog
number 161-0722) and rinsed thoroughly with distilled water, before use.
Model___________________________________
Catalog Number__________________________
Date of Delivery___________________________
Warranty Period__________________________
Serial Number____________________________
Invoice Number___________________________
Purchase Order Number____________________
Warranty
Bio-Rad Laboratories warrants the Trans-Blot SD semi-dry electrophoretic transfer cell
against defects in materials and workmanship for 1 year. If any defects occur in the instrument
during this warranty period, Bio-Rad Laboratories will repair or replace the defective parts free.
The following defects, however, are specifically excluded:
1. Defects caused by improper operation.
2. Repair or modification done by anyone other than Bio-Rad Laboratories or an authorized
agent.
3. Use of fittings or other spare parts supplied by anyone other than Bio-Rad Laboratories.
4. Damage caused by accident or misuse.
5. Damage caused by disaster.
6. Corrosion due to use of improper solvent or sample.
This warranty does not apply to parts listed below:
1. Platinum plate electrode.
For any inquiry or request for repair service, contact Bio-Rad Laboratories after confirming the model and serial number of your instrument.
Table of Contents
Page
Section 1
Introduction .................................................................................................. 1
1.1
Specifications ............................................................................................................. 1
Section 2
Equipment and Reagents ............................................................................ 2
2.1
2.2
2.3
Equipment and Accessories ....................................................................................... 2
Related Instruments.................................................................................................... 4
Chemical Reagents..................................................................................................... 4
Section 3
Safety Instructions ....................................................................................... 5
Section 4
Trans-Blot SD Assembly ............................................................................. 6
4.1
4.2
4.3
Preparation for Blotting ............................................................................................. 6
Assembly of the Unit for Standard Transfers............................................................ 7
Assembly of the Unit for Acidic Transfers ............................................................... 10
Section 5
Buffer Formulation ...................................................................................... 10
Section 6
Examples of Specific Protocols ................................................................... 11
6.1
6.2
6.3
SDS-Protein Blotting ................................................................................................. 11
DNA Blotting (For acrylamide gels with DNA 250 bp to ~1 kb) ............................ 12
DNA & RNA Blotting (For agarose gels with DNA up to 23 kb,
RNA up to 3.5 kb)...................................................................................................... 12
Section 7
Properties of Protein Blotting Media......................................................... 12
Section 8
Troubleshooting Guide ................................................................................ 13
8.1
8.2
8.3
8.4
Poor Transfer.............................................................................................................. 13
Poor Binding to Nitrocellulose Membrane................................................................ 14
High Background After Incubation with Antibody Probes; Nonspecific
or Nonquantitative Detection..................................................................................... 14
Poor Detection Sensitivity or No Reactivity ............................................................. 15
Section 9
References ..................................................................................................... 15
Section 1
Introduction
Blotting was first performed by Southern1 in 1975 with the transfer of DNA from agarose
gels to nitrocellulose membranes. Blotting has subsequently been applied to RNA2-4 and
protein5,6 from both agarose and polyacrylamide gels. Membrane materials have been expanded
to include PVDF for improved protein binding capacity. To overcome the inefficiency of
capillary transfers, electric current has been adopted for eluting proteins from polyacrylamide
gels, as first described by Towbin et al.7 in 1979. Since that time, electrophoretic transfer has
also been used for DNA and RNA blotting.8-14
For blotting PCR fragments, plasmid and vector DNA, and RNA with the SD cell, use the
Trans-Blot SD DNA blotting kit. DNA or RNA can be blotted from agarose gel to
Zeta-Probe® GT membrane in only 10 minutes, without any gel pretreatments. The kit comes
complete with DNA/RNA blotting accessories and a detailed instruction manual.
Semi-dry blotting was first reported by Kyhse-Andersen in 1984.15 Blotting was
performed with plate electrodes in a horizontal configuration. The gel and nitrocellulose
membrane were sandwiched between sheets of buffer-soaked filter paper, which served as
the ion reservoir and replaced the buffer tank. The plate electrodes, separated only by the filter
paper stack, provided high field strength (V/cm) across the gel, and very efficient, rapid
transfers.
The Trans-Blot semi-dry transfer cell incorporates the original concepts of semi-dry
blotting along with innovative features for quick set-up and ease of use. The platinum-coated
titanium and stainless steel electrode pair provides efficient, background-free blotting with
trouble-free service.
1.1 Specifications
Construction
Trans-Blot SD body
Anode
Cathode
Anode platform
Overall size
Maximum gel size
Cleaning
Chemical compatibility
Molded polycarbonate
Platinum-coated titanium
Stainless steel
Precision machined acrylic
37 cm x 24 cm x 11 cm
25 cm x 18.5 cm
Do not immerse the unit in liquid. Use special care
when cleaning the anode plate to avoid scratching
or marring the platinum. Do not use abrasives or
strong detergents. The cathode plate (stainless
steel) can be cleaned with a mild abrasive to
remove salt that may deposit during normal operation. The entire unit can also be periodically disassembled and cleaned with water to remove salt
deposits.
The semi-dry blotter components are not compatible with chlorinated hydrocarbons (e.g., chloroform), aromatic hydrocarbons (e.g., toluene,
benzene), or acetone. Use of organic solvents
voids all warranties.
1
Section 2
Equipment and Reagents
2.1 Equipment and Accessories
Catalog
Number
Product Description
170-3940
Trans-Blot SD Electrophoretic Transfer Cell
Replacement Parts
170-3942
170-3947
Trans-Blot SD Anode, platinum
Trans-Blot SD Cathode, stainless steel
DNA Blotting Kit
170-3957
Trans-Blot SD DNA/RNA Blotting Kit
Power Supply
165-4761
165-4762
Model 200/2.0 Constant Voltage Power Supply, 100/120 V,
50/60 Hz
Model 200/2.0 Constant Voltage Power Supply, 220/240 V,
50/60 Hz
Protein Blotting Accesories
Blot Absorbent Filter Paper (extra thick)
170-3966
Sheets, 7 x 8.4 cm pre-cut to fit
mini PROTEAN 3 Gels, 60
170-3967
Sheets, 8.3 x 13.6 cm pre-cut to fit
Criterion Gels, 60
170-3968
Sheets, 14 x 16 cm pre-cut to fit
PROTEAN xi Gels, 30
170-3969
Sheets, 19 x 19.5 cm pre-cut to fit
PROTEAN xL Gels, 30
Immuno Blot PVDF Membrane
162-0174
Sheets, 7 x 8.4 cm, 10 (mini blot size)
162-0175
Sheets, 10 x 15 cm, 10
162-0176
Sheets, 20 x 20 cm, 10
162-0177
Roll, 26 cm x 3.3 m, 1
Sequi-Blot PVDF Membrane
162-0180
Sheets, 10 x 15 cm, 10
162-0181
Sheets, 15 x 15 cm, 10
162-0182
Sheets, 20 x 20 cm, 10
162-0184
Roll, 24 cm x 3.3 m, 1
162-0185
Sheets, 20 x 20 cm, 3
162-0186
Sheets, 7 x 8. 4 cm, 10
Recommended uses
Protein blotting
Immunoblotting of
protein.
High capacity for all
molecular weight
ranges.
Low background for
immunodensity.
Protein sequencing
and amino acid
analysis.
Nitrocellulose Membrane (0.45 micron)
162-0115
Roll, 33 cm x 3 m, 1
162-0113
Sheets, 20 x 20 cm, 5
162-0114
Sheets, 15 x 9.2 cm, 10
162-0116
Sheets, 15 x 15 cm, 10
162-0117
Sheets, 9 x 12 cm, 10
162-0145
Sheets, 7 x 8.4 cm, 10
2
Transfer of proteins
(high molecular
weight or abundant,
low molecular weight
tend to penetrate this
membrane)
Catalog
Number
Product Description
Nitrocellulose Membrane (0.2 micron)
162-0112
Roll, 33 cm x 3 m, 1
162-0146
Sheets, 7 x 8.4, 10
162-0147
Sheets, 13.5 x 16.5 cm, 10
DNA/RNA Blotting Accessories
(Blot paper)
170-3958
Extra Thick Blot Paper, 10 x 15 cm, 30
170-3959
Extra Thick Blot Paper, 15 x 15 cm, 30
170-3960
Extra Thick Blot Paper, 15 x 20 cm, 30
Zeta-Probe Membrane
162-0159
Roll, 30 cm x 3.3 m, 1
162-0153
Sheets, 9 x 12 cm, 15
162-0154
Sheets, 10 x 15 cm, 15
162-0155
Sheets, 15 x 15 cm, 15
162-0156
Sheets, 15 x 20 cm, 15
162-0157
Sheets, 20 x 20 cm, 15
162-0158
Sheets, 20 x 25 cm, 3
162-0165
Roll, 20 cm x 3.3 m, 1
162-0166
Roll, 30 cm x 30 m, 1
Recommended uses
Transfer of proteins
(smaller pore size
retaining more low
molecular weight proteins - PVDF is even
more efficient.
Nucleic Acid Blotting
Transfer of singlestranded or double
stranded DNA or RNA
of all sizes.
Zeta-Probe GT Membrane
162-0190
Sheets, 9 x 12 cm, 15
162-0191
Sheets, 10 x 15 cm, 15
162-0192
Sheets, 15 x 15 cm, 15
162-0193
Sheets, 15 x 20 cm, 15
162-0194
Sheets, 20 x 20 cm, 15
162-0195
Sheets, 20 x 25 cm, 15
162-0196
Roll, 30 cm x 3.3 m, 1
162-0197
Roll, 20 cm x 3.3 m, 1
162-0198
Roll, 30 cm x 30 m, 1
Transfer of singlestranded and double
stranded DNA or RNA
of all sizes.
Supported Nitrocellulose Membrane (0.45 micron)
162-0090
Sheets, 7 x 8.4 cm, 10
162-0091
Sheets, 10 x 15 cm, 10
162-0092
Sheets, 15 x 15 cm, 10
162-0093
Sheets, 20 x 20 cm, 10
162-0094
Roll, 30 cm x 3 m, 1
Supported Nitrocellulose Membrane (0.2 micron)
162-0095
Sheets, 7 x 8.4 cm, 10
162-0096
Sheets, 15 x 15 cm, 10
162-0097
Roll, 30 cm x 3 m, 1
3
2.2 Related Instruments
Catalog
Number
Product Description
Blotting Equipment
170-3910
Trans-Blot Electrophoretic Transfer Cell
170-3946
Trans-Blot Electrophoretic Transfer Cell, with plate electrodes
170-3945
Trans-Blot Plate Electrode Pair
170-3930
Mini Trans-Blot® Electrophoretic Transfer Cell
170-3970
Western Processor
170-6545
Bio-Dot® Microfiltration Apparatus
170-6542
Bio-Dot SF Microfiltration Apparatus
170-4017
Mini-PROTEAN® II Multiscreen Apparatus
170-4037
Large Incubation Tray
170-4039
Large Incubation Tray Lid
170-4041
Small Incubation Tray
170-4045
Small Incubation Tray Lid
2.3 Chemical Reagents
Immun-Blot® Assay Kits
Immun-Blot assay kits contain the necessary components and instructions for performing
immune detection assays on blotted membranes.
Catalog
Number
Product Description
Immun-Blot Assay Kits
170-6460
Immun-Blot Assay Kit - Goat Anti-Rabbit AP
170-6461
Immun-Blot Assay Kit - Goat Anti-Mouse AP
170-6462
Immun-Blot Assay Kit - Goat Anti-Human AP
170-6463
Immun-Blot Assay Kit - Goat Anti-Rabbit HRP
170-6464
Immun-Blot Assay Kit - Goat Anti-Mouse HRP
170-6465
Immun-Blot Assay Kit - Goat Anti-Human HRP
170-6466
Immun-Blot Assay Kit - Protein A-HRP
170-6467
Immun-Blot Assay Kit - Protein G-HRP
Immun-Lite™ Chemiluminescent Assay Kits, include Immun-Lite Membrane,
10 x 15 cm, 15 sheets
170-6470
Immun-Lite Assay Kit, Goat Anti-Rabbit AP
170-6471
Immun-Lite Assay Kit, Goat Anti-Mouse AP
170-6472
Immun-Lite Assay Kit, Goat Anti-Human AP
Immun-Lite II Assay Kits, for use with nitrocellulose and PVDF membranes
170-6477
Immun-Lite II Assay Kit, Goat Anti-Rabbit AP
170-6478
Immun-Lite II Assay Kit, Goat Anti-Mouse AP
170-6479
Immun-Lite II Assay Kit, Goat Anti-Human AP
4
Catalog
Number
Product Description
Total Protein Detection Kits
170-6512
Biotin-Blot Protein Detection Kit
170-6517
Enhanced Colloidal Gold Total Protein Detection Kit
Blotting Standards
161-0372
Precision Prestained Standards, 10–250 kD, 500 µl
161-0380
Precision Streptactin-HRP conjugate
161-0381
Precision Streptactin-AP conjugate
161-0305
Prestained SDS-PAGE Standards, Low range
161-0309
Prestained SDS-PAGE Standards, High range
161-0307
Biotinylated SDS-PAGE Standards Kit, Low range, HRP
161-0308
Biotinylated SDS-PAGE Standards Kit, Low range, AP
161-0312
Biotinylated SDS-PAGE Standards Kit, High range, HRP
161-0313
Biotinylated SDS-PAGE Standards Kit, High range, AP
161-0306
Biotinylated SDS-PAGE Standards, Low range, 250 µl
161-0311
Biotinylated SDS-PAGE Standards, High range, 250 µl
Premixed Electrophoresis and Blotting Buffers
161-0732
10X Tris/Glycine/SDS, 1 L
161-0755
10X Tris/Glycine/SDS, 6 x 1 L
161-0734
10X Tris/Glycine, 1 L
161-0757
10X Tris/Glycine, 6 x 1 L
161-0733
10X Tris/Boric Acid/EDTA, 1 L
161-0756
10X Tris/Boric Acid/EDTA, 6 x 1 L
161-0741
10X TBE Extended Range, 1 L
161-0758
10X TBE Extended Range, 6 x 1 L
Section 3
Safety Instructions
Read the entire manual before beginning electrophoretic transfers.
Electrophoretic transfer of proteins and nucleic acids is dependent on many factors.
Observe the following guidelines to avoid mishaps that may result in serious damage to the
instrument or injury to the operator.
1. Do not reverse polarity on this instrument. This will result in corrosion and rusting of
the stainless steel cathode. If this should occur, the stainless steel should be cleaned with
a mild abrasive cleaner to remove the rust.
2. Do not exceed 25 V with this instrument. This could damage the electrodes.
3. Do not adjust the pH of transfer buffers unless specifically indicated. Follow instructions carefully. Adjustment of pH of transfer buffers, when not indicated, will result in
increased buffer conductivity. This is manifested by a higher than expected initial current
output as shown by the power supply's current meter. Monitor buffer resistance with the
Model 200/2.0 power supply prior to each run to insure proper buffer conductivity.
5
4. Lengthy transfer times are not recommended. Do not leave this instrument unattended.
Joule heat can be generated rapidly during semi-dry blotting. Transferring longer than
2 hours can damage the unit.
5. Power supply requirements. The Trans-Blot SD cell should only be used with the
microprocessor-controlled Model 200/2.0 power supply (catalog numbers 165-4761 and
165-4762), or the Model 1000/500 power supply (catalog numbers 165-4710 and
165-4711). Do not use the Model 250/2.5 power supply with this apparatus. The low
voltage, high current operating conditions of the Trans-Blot SD cell are not compatible
with the Model 250/2.5 power supply, and will cause the power supply to blow a fuse.
6. Do not operate this instrument in ambient temperatures exceeding 50 °C.
Important
This Bio-Rad instrument is designed and certified to meet IEC 1010-1* safety standards.
Certified products are safe to use when operated in accordance with the instructtion
manual. This instrument should not be modified in any way. Alteration of this instrument
will:
• Void the manufacturer's warranty
• Void the IEC1010-1 safety certification
• Create a potential safety hazard
Bio-Rad is not responsible for any injury or damage caused by the use of this instrument
for purposes other than for which it is intended or by modifications of the instrument not
performed by Bio-Rad or an authorized agent.
*IEC 1010-1 is an internationally accepted electical safety standard for laboratory instruments.
Section 4
Trans-Blot SD Assembly
To determine the optimum conditions for a particular sample, a time course of transfer
should be performed. Since many factors affect transfer e.g. molecular weight, pI, and
porosity of the gel, transferring for the full suggested time may not be necessary.
4.1 Preparation for Blotting
1. Prepare the transfer buffer. See Section 5 for buffer formulation.
Note: Buffer preparation is extremely important. Do not adjust transfer buffer pH by
addition of acid or base unless specifically indicated in the instructions. Improperly
prepared buffer will cause excess heat generation and safety hazards. Use only high
quality, reagent grade methanol. Contaminated methanol can result in increased transfer
buffer conductivity, as well as poor transfer of macromolecules.
2. Following electrophoresis, equilibrate the gels in transfer buffer. Equilibration facilitates
the removal of electrophoresis buffer salts and detergents. If the salts are not removed, they
will increase the conductivity of the transfer buffer and the amount of heat generated
during the transfer. Also, low percentage gels (<12% acrylamide) will shrink in methanolcontaining buffers. Equilibration allows the gel to adjust to its final size prior to
electrophoretic transfer. The length of time required for equilibration is dependent on the
gel thickness. For example, 15 minutes for a 0.75 mm SDS-PAGE gel.
6
Low molecular weight macromolecules ( 10,000 daltons) may diffuse out of gels more
readily. One can allow adequate gel pre-equilibration by changing the pre-equilibration
buffer several times during a relatively short pre-equilibration period. This will help to limit
diffusion of low molecular weight macromolecules while providing efficient salt reduction.
3. Cut the membrane to the dimensions of the gel. Wet the membrane by slowly sliding it
at a 45° angle into transfer buffer and allowing it to soak for 15–30 minutes. Complete
wetting of the membrane is important to insure proper binding. Abrupt wetting can lead
to entrapment of air bubbles in the matrix. These air bubbles can block transfer of
molecules. To avoid membrane contamination, always use forceps or wear gloves when
handling membranes.
4. Cut filter paper to the dimensions of the gel. Two pieces of extra thick filter paper (or
four pieces of thick or six pieces of thin filter paper) per gel are needed for each gel/membrane sandwich. Completely saturate the filter paper by soaking in transfer buffer.
5. If more than one full-size gel is to be transferred at one time, cut a piece of dialysis
membrane with the appropriate molecular weight cutoff to the dimensions of the gel.
Completely wet the dialysis membrane in transfer buffer. Spectr/Por™ dialysis
membrane is recommended for this use.
4.2 Assembly of the Unit for Standard Transfers
Wear gloves for this procedure to avoid contamination of membranes.
1. Remove the safety cover and the stainless steel cathode assembly.
7
2. Place a pre-soaked sheet of extra thick filter paper onto the platinum anode. Roll a pipet
or test tube over the surface of the filter paper (like a rolling pin) to exclude all air
bubbles. If thick or thin filter paper is used, repeat with one or two more sheets of buffersoaked filter paper.
3. Place the pre-wetted blotting media on top of the filter paper. Roll out all air bubbles.
4. Carefully place the equilibrated gel on top of the transfer membrane, aligning the gel on
the center of the membrane. Transfer will be incomplete if any portion of the gel is
outside the blotting media. Roll out all air bubbles.
5. Place the other sheet of pre-soaked filter paper on top of the gel, carefully removing air
bubbles from between the gel and filter paper. If thick filter paper is used, place two sheets
on top of the gel, and remove bubbles from between each layer. If thin filter paper is used,
place three sheets on top of the gel, and remove bubbles from between each layer.
6. If more than one full-size gel is to be transferred, place a sheet of pre-soaked dialysis
membrane on top of the filter paper stack. Repeat the procedure from step 2. Up to four mini
gels can be transferred at the same time by placing them side-by-side on the anode platform.
8
7. Carefully place the cathode onto the stack. Press to engage the latches with the guide
posts without disturbing the filter paper stack.
8. Place the safety cover on the unit. Plug the unit into the power supply. Normal transfer
polarity is cathode to anode, i.e., red wire to red outlet and black wire to black outlet on
the power supply.
Caution: Do not reverse polarity. This will result in damage to the stainless steel cathode.
9. Turn on the power supply. Transfer mini gels for 15–30 minutes at 10–15 V. Large gels
can be transferred for 30 minutes to 1 hour at 15–25 V. Do not exceed 25 V with this
instrument. A current limit (3 mA/cm2 for large gels; 5.5 mA/cm2 for mini gels) is
recommended to prevent excessive heating during the run. Under the strong fields
developed by this apparatus, transfers may not always be quantitative. A certain quantity
of protein may be transferred through the membrane and onto the filter paper below.
The Model 200/2.0 power supply is capable of a 200 watt output. This means that unless
a current limit is set, uncontrolled conductivity changes may result in full power being
delivered to the Trans-Blot SD cell. In this situation, the gel sandwich and electrodes will
be exposed to excessive heat. This may result in a safety hazard. It is advisable to monitor
resistance, power, and current during the run. Refer to the Model 200/2.0 Instruction
Manual for setting current limits and run times, and monitoring these parameters.
10. Following transfer, turn the power supply off, and disconnect the unit from the power
supply. Remove the safety cover and the cathode assembly. Discard the filter paper (and
dialysis membrane, if used). The transfer efficiency can be monitored by staining the gel
with Coomassie blue R-250 protein stain or with Bio-Rad's Silver Stain Kit. Alternatively,
prestained molecular weight standards can be used, or a portion of the membrane can be
stained for total protein with colloidal gold, Biotin Blot Total Protein Stain, or an anionic
dye such as Amido Black. Zeta-Probe membrane can be stained with the Biotin-Blot
Total Protein Stain.
9
4.3 Assembly of the Unit for Acidic Transfers
If an acidic transfer buffer is used, the transfer direction will be from the anode to the
cathode.
1. Remove the safety cover and the stainless steel cathode assembly.
2. Place a pre-soaked sheet of extra thick filter paper onto the platinum anode. Roll out all
air bubbles. If thin filter paper is used, repeat with two more sheets of buffer-soaked
filter paper. If thick filter paper is used, repeat with one more sheet of buffer soaked
filter paper.
3. Carefully place equilibrated gel on top of the filter paper, aligning the gel on the center of
the membrane. Roll out all air bubbles.
4. Place the pre-wetted blotting media on top of the gel. Roll out all air bubbles.
5. Place another sheet of pre-soaked extra thick filter paper on top of the blotting membrane,
carefully removing all air bubbles. If thin filter paper is used, place three sheets on top of the
membrane, or if thick filter paper is used, place two sheets on top of the membrane.
6. If more than one gel is to be transferred, place a sheet of pre-soaked dialysis membrane
on top of the filter paper stack. Repeat the procedure from step 2.
7. Carefully place the cathode assembly onto the stack. Press to engage the latches with the
guide posts, without disturbing the filter paper stack.
8. Place the safety cover on the unit. Plug the unit into the power supply, red wire to red
outlet and black wire to black outlet.
Caution: Do not reverse polarity. This will damage the stainless steel cathode.
9. Turn on the power supply. Transfer mini gels for 15–30 minutes at 10–15 V. Large gels
can be transferred for 30 minutes to 1 hour at 15–25 V. Do not exceed 25 V with this
instrument. A current limit (3 mA/cm2 for large gels; 5.5 mA/cm2 for mini gels) is
recommended to prevent excessive heating during the run.
Section 5
Buffer Formulation
The following buffers are recommended for use with the Trans-Blot SD cell. For protein
transfers, the single buffer system of Bjerrum and Schafer-Nielsen16 provides more efficient
elution than the original isotachophoretic system of Khyse-Andersen, which requires the use
of three different buffers.15 A carbonate buffer has also been shown to produce high
efficiency transfers with improved antibody recognition.
1. Bjerrum and Schafer-Nielsen transfer buffer for SDS-proteins using nitrocellulose (with
methanol) or Zeta-Probe membrane (without methanol):16
48 mM Tris, 39 mM glycine, (20% methanol) pH 9.2
Dissolve 5.82 g Tris and 2.93 g glycine [and 0.375 g SDS or 3.75 ml of 10% SDS] in dd
H2O (add 200 ml of methanol); adjust volume to 1 liter with dd H2O.
DO NOT ADD ACID OR BASE TO ADJUST pH. The buffer will range from pH 9.0
to 9.4, depending on the quality of the Tris, glycine, dd H2O, and methanol. Methanol
should be analytical reagent grade, because metallic contaminants in low grade methanol
will plate on the electrodes.
10
Note: Some pH electrodes will not perform a proper measurement for the pH of Tris
buffers. If the pH of the buffer is not correct, check the electrode to be sure it is designed
to function with Tris buffers. If the pH electrode works properly with Tris buffers, and the
pH is below 9.0, remake the buffer.
2. SDS may be added to Buffer 1 to increase protein elution from the gel:
48 mM Tris, 39 mM glycine, (20% methanol), 1.3 mM SDS (0.0375%), pH 9.2
Dissolve 5.82 g Tris and 2.93 g glycine, and 0.0375 g SDS or 3.75 ml of 10% SDS in dd
H2O (add 200 ml of methanol); adjust the volume to 1 liter with dd H2O.
DO NOT ADD ACID OR BASE TO ADJUST pH.
3. Towbin transfer buffer for SDS-proteins using nitrocellulose (with methanol) or ZetaProbe membrane (without methanol):7
25 mM Tris, 192 mM glycine (20% methanol), pH 8.3
Dissolve 3.03 g Tris and 14.4 g glycine in dd H2O (add 200 ml of methanol); adjust
volume to 1 liter with dd H2O.
DO NOT ADD ACID OR BASE TO ADJUST pH.
4. Dunn carbonate transfer buffer for SDS-proteins using nitrocellulose (with methanol) or
Zeta-Probe membrane (without methanol):17
10 mM NaCHO3, 3 mM Na2CO3 (20% methanol), pH 9.9
Dissolve 0.84 g NaHCO3 and 0.318 g Na2CO3 (anhydrous) in dd H2O (add 200 ml of
methanol); adjust volume to 1 liter with dd H2O.
DO NOT ADD ACID OR BASE TO ADJUST pH.
5. DNA transfer buffer for use with Zeta-Probe membrane:18
5x TBE stock solution (0.5 M Tris, 0.5 M boric acid, 10 mM EDTA in dd H2O; adjust
volume to 1 liter with dd H2O. Dilute to 0.5x TBE with dd H2O for the working solution.
DO NOT ADD ACID OR BASE TO ADJUST pH.
6. 5x dye buffer (20% Ficoll, 20 mM EDTA, 1% SDS, 0.2% bromophenol blue)
Section 6
Examples of Specific Protocols
Note: In order to determine the optimum conditions for a particular sample, a time course
of transfer should be performed. Since many factors affect transfer, e.g., molecular weight,
pI, porosity of the gel, it may not be necessary to transfer for the full time or to use high
field intensity transfer conditions. Final transfer conditions for any protein should be
determined empirically.
6.1 SDS-Protein Blotting
Standard Blot to Nitrocellulose
1. Equilibrate the gel in 500 ml of Towbin buffer (Section 5) for 15 minutes.
2. Pre-chill buffer prior to transfer.
3. Assemble the sandwich as described in Section 4.2.
4. Refer to Section 4.2, step 9 for transfer conditions with either large or small gels.
11
6.2 DNA Blotting
(For acrylamide gels with DNA 250 bp to ~1 kb)
Electrophoresis Run on a Polyacrylamide Gel
1. Prepare the stock electrophoresis 5x TBE buffer (Section 5). Dilute the stock to 1x.
2. Mix 10–15 µl of the sample with 5 µl of 5x dye buffer, heat to 65 °C for 5 min and load
on a gel.
3. A 5% PAGE gel can separate DNAs from about 250 to 1,000 bp.
4. Run the gel in 1x TBE buffer at 100 V for 1–2 hours.
Standard Blot to Zeta-Probe
1. From the 5x TBE electrophoretic buffer, dilute the stock to 0.5x (Section 5) and pre-chill
1 L of the buffer.
2. Equilibrate the gel, extra thick blot paper, and Zeta-Probe membrane in 0.5x TBE buffer
for at least 15 minutes.
Note: Zeta-Probe membrane will bind non-denatured nucleic acids. Therefore, denaturing
is not mandatory before transferring. If non-denatured nucleic acids are transferred, the
blotted Zeta-Probe membrane must be treated with NaOH prior to hybridization. Refer to
the Zeta-Probe membrane instruction manual.
3. Assemble the sandwich as described in Section 4.2.
4. Run the transfer at 400 mA for 1 hour (voltage should not exceed 25 volts).
5. After transfer, separate the membrane from the gel, and rinse the membrane briefly in
0.5x TBE buffer.
6. Fix the DNA to the membrane by placing the membrane on several pieces of blot paper
saturated with 0.4 N NaOH for 10 minutes.
7. Rinse the membrane in 2 x SSC for 10 minutes and bake at 80 °C for 1 hour (this is
optional if probing immediately). The membrane is now ready for hybridization. Refer to
the hybridization procedure in the Zeta-Probe blotting membrane instruction manual.
6.3 DNA & RNA Blotting
(For agarose gels with DNA up to 23 kb, RNA up to 3.5 kb)
Refer to the Trans-Blot SD DNA blotting kit instruction manual for transfer protocol and
conditions. DNA or RNA cannot be blotted from agarose gels without the use of the TransBlot SD DNA blotting kit.
Section 7
Properties of Protein Blotting Media
PVDF membrane is suitable for presenting transferred proteins for immuno detection
(Immun-Blot PVDF) or analysis by Edman. It is resistant to tearing and chemicals. ImmunBlot PVDF is optimized for immunodevelopment with high protein binding capacity (160
µg/cm2), but low nonspecific protein binding. This membrane material will resist tearing even
when used in repeated stripping and reprobing applications. Sequi-blot PVDF has the
highest protein binding capacity (170–200 µg/cm2) and gives outstanding performance in
protein sequencing applications.
12
Nitrocellulose membranes have been used extensively for protein binding and detection.7,19-22 They can easily be stained for total protein by a dye stain (Amido Black, Coomassie®
blue, Ponceau S, Fast Green FCF, etc.22), or the more sensitive Colloidal Gold Total Protein
Stain, and also allow either RIA, FIA, or EIA.7 Nitrocellulose has a high binding capacity of
80–100 µg/cm2. Nonspecific protein binding sites are easily and rapidly blocked, avoiding
subsequent background problems. Low molecular weight proteins (esp. < 20,000 daltons)
may be lost during post transfer washes, thus limiting detection sensitivity.21 However, use of
glutaraldehyde fixation and a smaller pore size nitrocellulose membrane (0.2 µm) have been
shown to be effective in eliminating this loss.22 Large proteins (>100,000 daltons) denatured
by SDS may transfer poorly with the addition of alcohol to the transfer buffer. Alcohol increases
binding of SDS-proteins to nitrocellulose, but decreases pore sizes in the gel. Elimination of
alcohol from SDS-protein transfers also results in considerably diminished binding to
nitrocellulose. Under high field strengths of the Trans-Blot cell, proteins may be transferred
through nitrocellulose without binding.The efficiency of binding can be increased by
employing a smaller pore size nitrocellulose.23
Zeta-Probe positively charged nylon membrane allows binding of SDS-protein
complexes in the absence of alcohol.24,25 This membrane binds proteins very tightly and is
stable to post transfer washes. The binding capacity of Zeta-Probe membrane is ~480 µg/cm2.
Reprobing, after stripping of prior probes, may be performed without significant loss of
primary bound protein. Even small proteins appear to bind stably. Zeta-Probe membrane
cannot be dye-stained, as destaining is impossible. Instead, the Biotin-Blot Total Protein Stain
should be used on Zeta-Probe membrane. This assay uses NHS-Biotin (N-hydroxysuccinimide-biotinate) to biotinylate all the proteins on the membrane surface, and a combination of
an avidin-horseradish peroxidase or avidin-alkaline phosphatase and a color development
reagent to detect these biotinylated proteins.26,27 The large capacity for molecules (480 µg/cm2)
allows sensitive detection of small amounts of proteins in a complex mixture. This high
capacity requires more stringent blocking conditions than nitrocellulose.25 Zeta-Probe
membranes can be effectively and economically blocked using a 5% solution of BLOTTO
(non-fat dry milk)3,18,28
Section 8
Troubleshooting Guide
8.1 Poor Transfer
A. Molecules remain in the gel matrix (as detected by Coomassie blue or
silver staining the gel)
1. Transfer time is too short. Increase time of transfer.
2. Charge to mass ratio is incorrect. Proteins near their isoelectric point at the pH of the
buffer will transfer poorly. Try a more basic or acidic transfer buffer to increase protein
mobility.
3. Filter paper is too dry; insufficient buffer soaking the filter paper. Buffer is depleted early
in the transfer. The filter paper should be fully saturated with buffer prior to transfer.
Increase the number of sheets of filter paper, or use thicker filter paper.
4. Power supply circuit tripped. Check the fuse.
5. Gel percentage is too high. Reduce %T (total monomer) or %C (crosslinker). A 5% C
(with bis as the crosslinker) will produce the smallest pore size gel. Decreasing from this
concentration will increase pore size and increase transfer efficiency.
13
6. Methanol in the transfer buffer is restricting elution of proteins from the gel. Elimination
of methanol results in increased transfer efficiency, but it also diminishes binding to
nitrocellulose. Use PVDF.
7. Protein is precipitating in the gel. Try using SDS in the transfer buffer. SDS can increase
transfer efficiency, but can also reduce binding efficiency to nitrocellulose and affect
reactivity of some proteins with antibodies.
B. Swirls or missing patterns on blot; diffuse transfers
1. Contact between blot membrane and gel is poor. Air bubbles or excess moisture remain
between the blot and gel. Use a test tube or pipet to roll over the membrane carefully in both
directions until excess moisture and air bubbles are removed from between gel and membrane
and complete contact is established. Use thicker filter paper in the gel/membrane sandwich.
Make sure that there are no air bubbles trapped between the filter paper and the gel.
2. The gel is not completely equilibrated in transfer buffer. Gel must be properly washed in
transfer buffer to avoid shrinking or swelling during transfer. Increase time or number of
washes.
3. If multiple gels are being transferred simultaneously, cross-contamination may be
occurring. Use a smaller size pore dialysis membrane to separate gel/membrane
sandwiches. Use PVDF to more completely bind small pieces.
4. Power conditions are too high. Reduce the voltage. Check the buffer conductivity; improperly prepared buffer will result in excessive power delivered to the cell.
8.2 Poor Binding to Nitrocellulose Membrane
1. Proteins separated by SDS-PAGE require 20% methanol in the transfer buffer for
optimal protein binding. Make sure the buffer contains the proper amount of methanol.
2. Proteins may be transferring through the nitrocellulose, driven by the high field strength
of the plate electrodes. Use Zeta-Probe membrane (higher binding capacity) or 0.2 micron
nitrocellulose (smaller pore size). Transfer using the Trans-Blot cell or the Mini Trans-Blot
cell with standard platinum wire electrodes.
3. Protein >15,000 daltons may show diminished binding to 0.45 micron nitrocellulose, or
may be washed from the membrane during assays. Use Zeta-Probe membrane or
0.2 micron nitrocellulose. To increase stability of binding, proteins can be cross-linked to
nitrocellulose with glutaraldehyde.22
4. Proteins can be removed from nitrocellulose by SDS, NP-40, and several other
detergents. Use Tween-20 detergent in wash and antibody incubation steps. Reduce or
eliminate detergents from buffers. Try glutaraldehyde fixation.
5. SDS in the transfer buffer will reduce binding efficiency of proteins. Use 20% methanol
in the transfer buffer and equilibrate the gel in methanol buffer prior to transfer.
8.3 High Background After Incubation with Antibody Probes;
Nonspecific or Nonquantitative Detection
For a complete troubleshooting guide to Immun-Blot assays, consult the Immun-Blot
assay kit manual or the Zeta-Probe instruction manual. If using other detection kit, consult
manual or contact manufacturer.
14
8.4 Poor Detection Sensitivity or No Reactivity
1.
2.
3.
4.
5.
Consult detection kit manual.
Antigen binding is incomplete. See Troubleshooting Sections 8.1–8.3.
Antibody reaction times are insufficient. Increase reaction times.
Sample load is insufficient. Increase the protein concentration applied to the gel.
Antigen may require specific temperature regulation during transfer to prevent
denaturation. Use the Trans-Blot cell with the super cooling coil to transfer heat-sensitive
proteins.
6. Monoclonal antibodies might not recognize a denatured antigen. Assess binding of other
monoclonals or polyclonal antibodies. Blot native proteins.
Section 9
References
1.
2.
3.
4.
5.
6.
7.
8.
9.
10.
11.
12.
13.
14.
15.
16.
17.
18.
19.
20.
21.
22.
23.
24.
25.
26.
27.
28.
Southern, E. M., J. Mol. Biol., 98, 503 (1975).
Alwine, J. C., Kemp, D. J., Parker, B. A., Reiser, J., Stark, G. R. and Wahl, G. W., Methods
Enzymol., 68, 220 (1979).
Thomas, P. S., PNAS, 77, 5201 (1980).
Seed, B., Nuc. Acids Res., 10, 1799 (1982).
Renart, J., Peiser, J. and Stark, G. R., PNAS, 76, 3116 (1979).
Bowen, P., Steinberg, J., Laemmli, U. K. and Weintraub, H., Nuc. Acids Res., 8 (1980).
Towbin, H., Staehelin, T. and Gordon, J., PNAS, 76, 4350 (1979).
Bittner, M., Kupferer, P. and Morris, C. F., Anal. Biochem., 102, 459 (1980).
Stellwag, E. J. and Dahlberg, A. E., Nuc. Acids Res., 8, 299 (1980).
Kutateladze, T. V., Axelrod, V. D., Gorbulev, V. G., Belzhelarskya, S. N. and Vartikyan, R. M.,
Anal. Biochem., 100, 129 (1979).
Peudelhuber, T. L., Ball, D. J., Davis, A. H. and Garrad, W. J., Nuc. Acids Res., 10, 1311 (1982).
Danner, D. B., Anal. Biochem., 125, 139 (1982).
Bio-Rad Technical Bulletin 1110 “Zeta-Probe Blotting Membranes” (1987).
Holland, L. J. and Wangh, L. J., Nuc. Acids Res., 10, 3282, (1983).
Khyse-Andersen, J., Biochem. Biophys. Meth., 10, 203, (1984).
Bjerrum, O. J. and Schafer-Nielsen, C., Analytical Electrophoresis, M. J. Dunn, ed., p. 315; Verlag
Chemie, Weinheim, (1986).
Dunn, S. D., Anal. Biochem., 157, 144 (1986).
Bio-Rad Laboratories, Zeta-Probe Instruction Manual (1986).
Anderson, N. L., Nance, S. L., Pearson, T. W. and Anderson, N. G., Electrophoresis, 3, 135 (1982).
Howe, J. G. and Hershey, J. W. B., J. Biol. Chem., 256, 12836 (1981).
Erickson, P. F., Minier, L. N. and Lasher, P. S., J. Immun. Meth., 51, 241 (1982).
Polvino, W. J., Saravis, C. A., Sampson, C. E. and Cook, R. B., Electrophoresis, 4, 368 (1983).
Tovey, E. and Baldo, B. A., Electrophoresis, 8, 384 (1987).
Gershoni, J. M. and Palade, G. E., Anal, Biochem., 131, 1 (1983).
Gershoni, J. M. and Palade, G. E., Anal. Biochem., 124, 396 (1982).
Bio-Rad Laboratories, Biotin-Blot Total Protein Stain Instruction Manual (1985).
LaRochelle, W. J. and Froehner, S. C., J. Immun. Meth., 92, 65 (1986).
Johnson, D. A., Gautsch, J. W., Sportsman, J. R. and Elder, J. H., Gene Anal. Tech., 1, 3 (1984).
*Spectr/Por is a trademark of Spectrum Medical Industries.
*Coomassie is a trademark of I C I Organics, Inc.
15
Bio-Rad
Laboratories
Life Science
Group
Bulletin 0000
US/EG
Website www.bio-rad.com Bio-Rad Laboratories Main Office 2000 Alfred Nobel Drive, Hercules, CA 94547, Ph. (510) 741-1000, Fx. (510)741-5800
Also in: Australia Ph. 02 9914 2800, Fx. 02 9914 2889 Austria Ph. (01) 877 89 01, Fx. (01) 876 56 29 Belgium Ph. 09-385 55 11, Fx. 09-385 65 54
Canada Ph. (905) 712-2771, Fx. (905) 712-2990 China Ph. 86-10-62051850/51, Fx. 86-10-62051876 Denmark Ph. 45 39 17 99 47, Fx. 45 39 27 16 98
Finland Ph. 358 (0)9 804 2200, Fx. 358 (0)9 804 1100 France Ph. 01 43 90 46 90, Fx. 01 46 71 24 67 Germany Ph. 089 318 84-0, Fx. 089 318 84-100
Hong Kong Ph. 852-2789-3300, Fx. 852-2789-1257 India Ph. (91-11) 461-0103, Fx. (91-11) 461-0765 Israel Ph. 03 951 4127, Fx. 03 951 4129
Italy Ph. 39-02-216091, Fx.39-02-21609-399 Japan Ph. 03-5811-6270, Fx. 03-5811-6272 Korea Ph. 82-2-3473-4460, Fx. 82-2-3472-7003
Latin America Ph. 305-894-5950, Fx. 305-894-5960 Mexico Ph. 514-2210, Fx. 514-2209 The Netherlands Ph. 0318-540666, Fx. 0318-542216
New Zealand Ph. 64-9-4152280, Fx. 64-9-4152284 Norway Ph. 22-74-18-70, Fx. 22-74-18-71 Russia Ph. 7 095 979 98 00, Fx. 7 095 979 98 56
Singapore Ph. 65-2729877, Fx. 65-2734835 Spain Ph. 34-91-661-7085, Fx. 34-91-661-9698 Sweden Ph. 46 (0)8-55 51 27 00, Fx. 46 (0)8-55 51 27 80
Switzerland Ph. 01-809 55 55, Fx. 01-809 55 00 United Kingdom Ph. 0800-181134, Fx. 01442-259118
Rev A
00-000
0099
Sig 031799
M1703940 Rev C