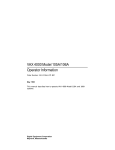
1
VAX 4000 Model 105A/106A
Troubleshooting and Diagnostics
Information
Order Number: EK–515AA–TS. B01
MAY 1995
This manual describes the troubleshooting and diagnostic procedures that
you can use to solve basic problems with VAX 4000 Model 105A and Model
106A systems.
Digital Equipment Corporation
Maynard, Massachusetts
May 1995
Digital Equipment Corporation makes no representations that the use of its products in the
manner described in this publication will not infringe on existing or future patent rights, nor do
the descriptions contained in this publication imply the granting of licenses to make, use, or sell
equipment or software in accordance with the description.
Possession, use, or copying of the software described in this publication is authorized only
pursuant to a valid written license from Digital or an authorized sublicensor.
© Digital Equipment Corporation 1995. All Rights Reserved.
The postpaid Reader’s Comments forms at the end of this document request your critical
evaluation to assist in preparing future documentation.
The following are trademarks of Digital Equipment Corporation: DECnet, Digital, OpenVMS,
RRD42, RRD43, RX, ThinWire, TK, VAX, VAXcluster, VAX DOCUMENT, VT, and the
DIGITAL logo.
All other trademarks and registered trademarks are the property of their respective holders.
S2852
This document was prepared using VAX DOCUMENT Version 2.1.
Contents
Preface . . . . . . . . . . . . . . . . . . . . . . . . . . . . . . . . . . . . . . . . . . . . . . . . . . . . .
v
1 Troubleshooting and Diagnosing Problems
1.1
1.2
Troubleshooting Procedure . . . . . . . . . . . . . . . . . . . . . . . . . . . . . .
Using the Troubleshooting Table . . . . . . . . . . . . . . . . . . . . . . . . .
1–1
1–2
2 Diagnostic Tests and Commands
2.1
2.1.1
2.1.2
2.2
Diagnostic Tests and Commands
Power-Up Tests . . . . . . . . . .
Self-Tests . . . . . . . . . . . . . . .
Contacting Digital™ Services . . .
.
.
.
.
.
.
.
.
.
.
.
.
.
.
.
.
.
.
.
.
.
.
.
.
.
.
.
.
.
.
.
.
.
.
.
.
.
.
.
.
.
.
.
.
.
.
.
.
.
.
.
.
.
.
.
.
.
.
.
.
.
.
.
.
.
.
.
.
.
.
.
.
.
.
.
.
.
.
.
.
.
.
.
.
.
.
.
.
.
.
.
.
.
.
.
.
.
.
.
.
2–1
2–1
2–4
2–8
Show Configuration Command . . . . . . . . . . . . . . . . . . . . . . . .
Listing Diagnostics . . . . . . . . . . . . . . . . . . . . . . . . . . . . . . . .
2–4
2–5
Status LED Display . . . . . . . . . . . . . . . . . . . . . . . . . . . . . . . .
2–9
Index
Examples
2–1
2–2
Figures
2–1
iii
Tables
1–1
2–1
iv
Basic Troubleshooting . . . . . . . . . . . . . . . . . . . . . . . . . . . . . .
Status LED Display and Break Enable Meanings . . . . . . . . .
1–3
2–10
Preface
This manual describes the troubleshooting and diagnostic procedures that you
can use to solve basic problems with VAX 4000 Model 105A/106A systems.
This manual is intended for people who have had some experience using
computers.
This manual has two chapters and an index.
See VAX 4000 Model 105A/106A Operator Information, EK–513AA–OP, for the
list of associated and related documents.
Conventions
The following conventions are used in this manual:
Convention
Description
MONOSPACE
Text displayed on the screen is shown in monospace type.
italic type
Italic type emphasizes important information and indicates the
complete titles of manuals.
boldface type
Boldface type in examples indicates user input. Boldface type in text
indicates the first instance of terms defined either in the text, in the
glossary, or both.
Note
A note contains information that is of special importance to the user.
v
1
Troubleshooting and Diagnosing Problems
This chapter describes the troubleshooting procedure that you can use to solve
basic problems with VAX 4000 Model 105A and Model 106A systems.
1.1 Troubleshooting Procedure
If a problem occurs, you must first make sure that all the cables, loopback
connectors, and terminators are correctly connected and that the connectors
are not damaged, for example, the pins may be broken or short-circuited.
Follow these steps:
1. Shut down the operating system following the procedures described in the
operating system documentation.
2. Turn off the console terminal and all the peripheral devices such as
printers and modems.
3. Turn off all the expansion boxes.
4. Turn off the system unit.
5. Check that the following cables, if installed, are correctly connected at both
ends and that the connectors are not damaged:
•
Console terminal cable (linking the console terminal to the system unit)
•
Console terminal power cord
•
System unit power cord
•
Expansion box SCSI cables
•
Expansion box Q–bus cables
•
Expansion box DSSI cable(s)
•
Expansion box power cords
•
ThinWire™ Ethernet cable or standard Ethernet cable
Troubleshooting and Diagnosing Problems 1–1
6. Check that the following terminators, if installed, are correctly connected
and are not damaged:
•
DSSI terminator(s)
•
SCSI terminator
•
ThinWire Ethernet terminator (T-connector and two terminators)
If you have correctly followed steps 1 to 5, the on/off switches on all
the components are set to the off (O) position, and you have solved any
problems caused by incorrectly connected cables or terminators.
7. Set the on/off switches on the following equipment to the on ( | ) position in
the following order:
a. Expansion boxes
b. Peripherals
c.
Console terminal
d. System unit
The system responds with the power-up test display. If it does not, see
Section 1.2.
1.2 Using the Troubleshooting Table
Table 1–1 suggests the corrective actions for certain system problems. If you
have a problem with the system, follow these steps:
1. Write down the symptoms of the problem.
2. Check the Symptom column in Table 1–1 for a match.
3. Check the causes of the symptom in the Possible Cause column. If the
column lists more than one possible cause, check the possible causes and
their suggested solutions in the order listed.
4. Follow the advice in the Suggested Solution column.
5. See Section 2.2 if the problem persists.
1–2 Troubleshooting and Diagnosing Problems
Table 1–1 Basic Troubleshooting
Symptom
Possible Cause
Suggested Solution
The power cord is not
connected. The power cord
may be faulty. The power
socket may not be working.
Make sure that all the power cords
are connected correctly at both
ends. Try a power cord that works
or test the power socket with an
appliance that works.
The overload protection
circuitry of the power
supply may have shut down
because of an abnormal
condition on the power line.
Turn the system off and then turn
it back on.
The power supply unit
(PSU) is faulty.
Contact your Digital services
representative.
The console terminal is
plugged into port 0.
The console only functions via port
3. Move connection to port 3.
The power cord is not
connected. The power cord
may be faulty. The power
socket may not be working.
Make sure that all the power cords
are connected correctly at both
ends. Try a power cord that works
or test the power socket with an
appliance that works.
The terminal fuse may have
blown.
Replace the blown terminal fuse.
See the terminal documentation.
The terminal settings may
be incorrect.
See the VAX 4000 Model 105A
/106A Operator Information
manual for the list of correct
terminal settings. See the terminal
documentation for information on
setting up the terminal.
The port to which the
terminal connects may be
faulty.
Try connecting the terminal to
another system. If this solution
works, the port to which the
terminal was connected is faulty. If
the terminal still does not operate,
it is faulty. In either case, contact
your Digital services representative.
System Problems
The system unit fan is off
or the power light is off.
The power-up display does
not show after 20 seconds.
(continued on next page)
Troubleshooting and Diagnosing Problems 1–3
Table 1–1 (Cont.) Basic Troubleshooting
Symptom
Possible Cause
Suggested Solution
The terminal cable may be
faulty.
Connect the terminal cable and
the terminal to another system. If
the connected terminal works, the
console circuitry or MMJ connector
is faulty. Otherwise, the cable
is faulty. Contact your Digital
services representative.
The break/enable switch is
in the wrong position.
Turn off the system unit. Set the
break/enable switch to the down
position, then turn on the system
unit.
The power-up test display
contains unexpected
characters.
The terminal settings are
incorrect or the console
circuitry is faulty.
Make sure the terminal settings
are correct, then run the powerup test again. If the terminal is
set correctly, contact your Digital
services representative.
The system fails to boot the
operating system.
The system defaults are
incorrectly set.
Set the system defaults as
described in the OpenVMS Factory
Installed Software User Guide, then
try booting the system again. If
the system still fails to boot, contact
your Digital services representative.
System Problems
EF/RF-Series Integrated Storage Element (ISE) Problems1
A write error message is
displayed; the Write-Protect
button glows orange. For
EF/RF ISEs, Mounted
wrtlck displays when DCL
command SHOW
DEVICE DI is issued.
The ISE is write-protected.
Press and release the Write-Protect
button. For EF/RF, remove WriteProtect.
The fault indicator is lit or
blinking.
The bus node ID plug is not
installed.
Install the appropriate plug.
Two or more devices have
the same node ID on the
same bus.
Make sure all devices and
controllers or adapters on the
same bus have unique IDs.
1 Only
RF3X drives are internal; all other RF-series drives are external.
(continued on next page)
1–4 Troubleshooting and Diagnosing Problems
Table 1–1 (Cont.) Basic Troubleshooting
Symptom
Possible Cause
Suggested Solution
EF/RF-Series Integrated Storage Element (ISE) Problems
A read error message
displayed; the Run/Ready
button is out.
1
Problem in the controller or
ISE.
If the Fault indicator stops
blinking, the system may have
corrected itself. Run MDM. If the
Fault indicator remains lit, call
your Digital service representative.
ISE is not spun up.
Press the Run/Ready button to
the in position. When the green
indicator lights, the ISE is available
for use.
RRD42 Compact Disc Drive Problems
The drive does not accept
the caddy.
The disc is upside-down in
the caddy or it is not placed
correctly in the caddy.
Remove the disc from the caddy
and reinsert it properly.
The system does not have
power.
Set the system unit on/off switch to
the on ( | ) position and press the
eject button again.
RRD43 Compact Disc Drive Problems
The drive does not accept
the disc.
1 Only
The disc is upside-down or
not placed correctly in the
drive.
Remove the disc from the drive and
reinsert it properly.
The system does not have
power.
Set the system unit on/off switch to
the on ( | ) position and press the
eject button again.
RF3X drives are internal; all other RF-series drives are external.
(continued on next page)
Troubleshooting and Diagnosing Problems 1–5
Table 1–1 (Cont.) Basic Troubleshooting
Symptom
Possible Cause
Suggested Solution
The TZ30 green LED
flashes rapidly.
The drive mechanism is
faulty or the tape cartridge
is damaged.
Press and release the unload button
to clear the fault. If the LED
continues to flash, do not try to
remove the tape cartridge or use
the tape drive. Contact your Digital
services representative.
The TZ30 does not operate.
The drive does not contain
a tape cartridge.
Insert the tape cartridge and press
the unload button.
The operate lever does not
slide.
The tape cartridge is in use.
Wait for the green LED to turn
on and try again. If the problem
persists, do not use the drive.
Contact your Digital services
representative.
The operate lever does not
lock.
The tape cartridge is not
inserted correctly.
Reinsert the tape cartridge. If
the problem persists, contact your
Digital services representative.
TZ30 Tape Drive Problems
The tape does not load.
Press and release the unload
button. Wait for the green LED
to turn on before sliding the lever
and removing the tape. If the
LED flashes, contact your Digital
services representative.
The system cannot write to
the tape.
The write-protect switch
is in the write-protect
position.
If the write-protect LED is on,
remove the tape, reset the switch
and try writing to the tape again. If
the problem persists, contact your
Digital services representative.
The data read from the tape
cartridge is corrupted.
The tape drive head may be
dirty.
See the VAX 4000 Model 105A
/106A Operator Information
manual for information on cleaning
the drive head.
The tape does not eject.
The tape is not rewound.
The operate lever is in the
lock position.
Follow the procedure for removing
a tape from the TZ30 described in
the VAX 4000 Model 105A/106A
Operator Information manual.
(continued on next page)
1–6 Troubleshooting and Diagnosing Problems
Table 1–1 (Cont.) Basic Troubleshooting
Symptom
Possible Cause
Suggested Solution
TLZ06/TLZ07 Cassette Tape Drive Problems
The system cannot write to
the cassette tape.
The write-protect switch
is in the write-protect
position.
If the write-protect LED is on,
remove the tape, reset the switch
and try writing to the tape again. If
the problem persists, contact your
Digital services representative.
The cassette tape is not
loaded.
Load the cassette tape.
The write-protect LED
flashes.
The tape drive heads are
dirty or the tape is worn.
Clean the drive heads (see the
VAX 4000 Model 105A/106A
Operator Information manual).
If that doesn’t work, use a new
tape.
The data read from the
cassette tape is corrupted.
The tape drive heads may
be dirty.
See the VAX 4000 Model 105A
/106A Operator Information
manual for information on cleaning
the drive head.
TZK10/TZK11 Quarter Inch Cartridge (QIC) Tape Drive Problems
The data read from the QIC
tape is corrupted.
The drive head is dirty.
Clean the drive head. See the VAX
4000 Model 105A/106A Operator
Information manual.
The system cannot write to
the QIC tape.
The write-protect switch
is in the write-protect
position.
Remove the QIC tape, reset the
switch and try writing to the
QIC tape again. If the problem
persists, contact your Digital
services representative.
The system cannot read
from or write to the QIC
tape.
The QIC tape may be faulty.
Remove the QIC tape. If the amber
LED turns off when you remove
the QIC tape, the tape is probably
faulty. Try a different QIC tape.
If the amber LED stays on or if
the problem persists, contact your
Digital services representative.
Troubleshooting and Diagnosing Problems 1–7
2
Diagnostic Tests and Commands
This chapter describes the diagnostic commands that you can use to solve
basic problems with VAX 4000 Model 105A and Model 106A systems. If you
need to contact Digital services for further assistance, this chapter also lists
the information that you must give to your Digital services representative, and
tells you where to find this information.
2.1 Diagnostic Tests and Commands
There are a number of diagnostic tests and commands that can help you to
isolate a problem with the system unit. These tests and commands are as
follows:
•
Power-up tests
•
Self-tests1
•
Configuration display1
•
Error display1
The following sections describe these tests and commands.
2.1.1 Power-Up Tests
The system runs the power-up tests each time you turn on the system. If the
system passes the tests, it responds with a display similar to the following
example:
1
You can use these tests and commands in privileged console mode only if the console
security feature is enabled and the password is set. See the VAX 4000 Model
105A/106A Customer Technical Information manual for information on the console
security feature.
Diagnostic Tests and Commands 2–1
!
"
KA53-A Vn.n, VMB 2.14
Performing normal system tests.
74..73..72..71..70..69..68..67..66..65..64..63..62..61..60..59..
58..57..56..55..54..53..52..51..50..49..48..47..46..45..44..43..
42..41..40..39..38..37..36..35..34..33..32..31..30..29..28..27..
26..25..24..23..22..21..20..19..18..17..16..15..14..13..12..11..
10..09..08..07..06..05..04..03..
Tests completed.
$
#
>>>
!
"
#
$
Central Processing Unit (CPU) Name, Firmware Version Number, and
Virtual Memory Boot (VMB) Version Number
Read-Only Memory (ROM) based diagnostics countdown
Status Message
Console Prompt
2–2 Diagnostic Tests and Commands
If SIMM_OD is not present or not plugged in correctly, the system responds
with a display similar to the following example:
KA53-A Vn.n, VMB 2.14
Performing normal system tests.
74..73..72..71..70..69..68..67..66..65..64..63..62..
!
? Test_Subtest_DC_88 Loop_Subtest=05 Err_Type=FF DE_NO_Memory_present.lis
Vec=0000 Prev_Errs=0000 P1=E04EE04E P2=00000000 P3=00000000 P4=00001006
P5=00000000 P6=7F337F7F P7=00000000 P8=00000000 P9=FFFF0000 P10=2006270C
r0=00000008 r1=21018000 r2=E04EE04E r3=80000000 r4=01000000 r5=04000000
r6=00000002 r7=00000000 r8=00000000 r9=20140758 r10=FFFFFFFE r11=FFFFFFFF
dser=0000 cesr=00000000 icsr=01 pcsts=F800 pcctl=FC00 cctl=00000006
bcetsts=03E0 bcedsts=0400 cefsts=00007E80 nests=00 mmcdsr=01FFFE40
mesr=00000000
Error: SIMM Set 0 (0A,0B,0C,0D), SSR = E04E
SIMM_0A = 16MB
SIMM_0B = 16MB
SIMM_0C = 16MB
"
SIMM_0D = 00MB ??
#
Total of 0MB, 0 good pages, 0 bad pages, 0 reserved pages
Normal operation not possible.
>>>
!
"
#
Error Message
Error Summary
Status Message
Diagnostic Tests and Commands 2–3
2.1.2 Self-Tests
Self-tests perform the same tests as the power-up tests except for one
difference; the power-up tests test all the devices in the system, whereas
the self-tests allow you to test a single device.
Execution of the SHOW CONFIG command produces the display showing the
failure of the device DZ, as shown in Example 2–1.
Example 2–1 Show Configuration Command
>>>SHOW CONF
KA53-A Vn.n, VMB 2.14
08-00-2B-2B-16-91
80MB
TstNbr DevNam
------ -------0
CPU_BD
A8
MEMORY
E4
DZ
E0
SCSI
5F
5C
0
E8
NI
DSSI
QBUS
COMM
EC
ASYNC
Info
-------------------------OK
OK
?? 001 0048
OK
3-RZ24L 6-Adapter 7-RRD42
OK
OK
OK
OK
DSW41/42 2 CHANNEL V3.11-47
OK
DHW41/2 V1.6
!
>>>
!
Listing showing failure of DZ
If you encounter an error in the power-up test display or the show configuration
display, follow these specific steps:
1. Make sure that all the required cables and terminators are securely
connected to the proper ports by following the procedure described in
Section 1.1.
2. Run the self-test on each device that failed.
2–4 Diagnostic Tests and Commands
In the example in this section, the show configuration display shows the
the DZ device has failed. The self-test number for this device is E4. See
Example 2–2. Test E4 should be run by entering T E4 at the console
prompt. If the error remains, show the test results to your Digital Services
representative.
To obtain a listing of the specific tests for the desired device, enter the
command shown in the display.
Example 2–2 Listing Diagnostics
>>>T 9E
Test
# Address Name
Parameters
___________________________________________________________________________
20053800 SCB
20054590 De_executive
30 200637BC Memory_Init_Bitmap *** mark_Hard_SBEs ******
31 20064094 Memory_Setup_CSRs **********
32 20064464 NMC_registers
**********
33 20064600 NMC_powerup
**
34 2005D0A4 SSC_ROM
***
35 20067394 B_Cache_diag_mode bypass_test_mask *********
37 200681C4 Cache_w_Memory
bypass_test_mask *********
40 2006242C Memory_count_pages SIMM_set0 SIMM_set1 Soft_errs_allowed *****
41 200579C0 Board_Reset
*
42 2005B56C Chk_for_Interrupts **********
46 200670D4 P_Cache_diag_mode bypass_test_mask *********
47 20063D7C Memory_Refresh
start_a end incr cont_on_err time_seconds ***
48 20061558 Memory_Addr_shorts start_add end_add * cont_on_err pat2 pat3 ***
4A 200634E0 Memory_ECC_SBEs
start_add end_add add_incr cont_on_err ******
4B 20061D78 Memory_Byte_Errors start_add end_add add_incr cont_on_err ******
4C 20062E90 Memory_ECC_Logic start_add end_add add_incr cont_on_err ******
4D 200613BC Memory_Address
start_add end_add add_incr cont_on_err ******
4E 20061AF8 Memory_Byte
start_add end_add add_incr cont_on_err ******
4F 20062628 Memory_Data
start_add end_add add_incr cont_on_err ******
51 2005BA5C FPA
**********
52 2005BED8 SSC_Prog_timers
which_timer wait_time_us ***
53 2005C1A8 SSC_TOY_Clock
repeat_test_250ms_ea Tolerance ***
54 2005B670 Virtual_Mode
********
55 2005C360 Interval_Timer
*****
58 200602F0 SHAC_RESET
port_number time_secs not_pres
59 2005F584 SGEC_LPBCK_ASSIST time_secs **
5C 2005FAEC SHAC
bypass_test_mask *******
5F 2005E870 SGEC
loopback_type no_ram_tests ******
(continued on next page)
Diagnostic Tests and Commands 2–5
Example 2–2
63 2005CF48
80 200649FC
81 2005CBA8
82 2005CD70
83 20058C70
84 2005A328
85 20057EE4
86 200583A0
90 2005BE54
91 2005BDE8
99 200647D0
9A 2005D1DC
9B 20064680
9C 2005D1A8
9D 2005DEC4
9E 2005C518
9F 20060888
C1 20057B90
C2 20057D68
C5 2005E770
C6 20057AD4
D0 20066C98
D2 20065220
DA 20067FE8
DB 20065A18
DC 200642BC
DD 200661FC
DE 20065DB4
DF 20065614
E0 20068498
E1 20068578
E2 20068630
E4 200689D4
E8 20068B4C
E9 20068BF4
EC 20068CAC
(Cont.) Listing Diagnostics
QDSS_any
input_csr selftest_r0 selftest_r1 ******
CQBIC_memory
bypass_test_mask *********
Qbus_MSCP
IP_csr ******
Qbus_DELQA
device_num_addr ****
QZA_Intlpbck1
controller_number ********
QZA_Intlpbck2
controller_number *********
QZA_memory
incr test_pattern controller_number *******
QZA_DMA
Controller_number main_mem_buf ********
CQBIC_registers
*
CQBIC_powerup
**
Flush_Ena_Caches dis_flush_VIC dis_flush_BC dis_flush_PC
INTERACTION
pass_count disable_device ****
Init_memory
***
List_CPU_registers *
Utility
Modify_CPU_type *********
List_diagnostics script_number *
Create_A0_Script **********
SSC_RAM_Data
*
SSC_RAM_Data_Addr *
SSC_registers
*
SSC_powerup
*********
V_Cache_diag_mode bypass_test_mask *********
O_Bit_diag_mode
bypass_test_mask *********
PB_Flush_Cache
**********
Speed
print_speed *********
NO_Memory_present *
B_Cache_Data_debug start_add end_add add_incr *******
B_Cache_Tag_Debug start_add end_add add_incr *******
O_BIT_DEBUG
start_add end_add add_incr seg_incr ******
SCSI
environment reset_bus time_s *******
SCSI_Utility
environment util_nbr target_ID lun ******
SCSI_MAP
bypass_test addr_incr_data_tst ********
DZ
environment *********
SYNC
environment *********
SYNC_Utility
environment *********
ASYNC
environment *********
!
Scripts
# Description
(continued on next page)
2–6 Diagnostic Tests and Commands
Example 2–2 (Cont.) Listing Diagnostics
A0
A1
A3
A4
A6
A7
A8
A9
B2
B5
BF
>>>
User defined scripts
Powerup tests, Functional Verify, continue on error, numeric countdown
Functional Verify, stop on error, test # announcements
Loop on A3 Functional Verify
Memory tests, mark only multiple bit errors
Memory tests
Memory acceptance tests, mark single and multi-bit errors, call A7
Memory tests, stop on error
Extended tests plus BF
Extended tests, then loop
DZ, SYNC, ASYNC with loopbacks
!
Specific test for the DZ device
Diagnostic Tests and Commands 2–7
2.2 Contacting Digital™ Services
WARNING
Only authorized service personnel should service this
equipment.
If you have followed the procedure in this chapter but the problem remains
unsolved, your Digital services representative can help you. Before you place
your call, follow these steps:
1. Write down a description of the problem, including the error messages and
the number of the self-tests that failed.
2. Look at the status LED display on the back of the system unit and write
down the numbers of the LEDs that are on (see Figure 2–1 and Table 2–1).
3. List the steps you have taken to correct the problem and the results you
got.
4. Write down the serial and model numbers of the system unit and any
connected peripheral devices. These numbers are usually printed on a
label on the back of the device.
2–8 Diagnostic Tests and Commands
Figure 2–1 Status LED Display
1
3
2
2
1
MLO-011847
!
"
Status LED Display
Break Enable LED
Diagnostic Tests and Commands 2–9
Table 2–1 Status LED Display and Break Enable Meanings
LED Number
Color
Meaning
LED 0, 1, 2, 3
Green
Binary readout indicating certain system
tests and functions.
LED 4
Green
Reset indicator; when extinguished,
indicates that the reset is active.
LED 5, 6
—
Not used
LED 7
Amber
Clock protection indicator
Break Enable
LED
Green
When the break/enable switch is in the up
position, the LED is on and you can halt
the system by pressing the break key on
the console terminal keyboard. When the
break/enable switch is in the down position
the LED is off and the system cannot be
halted from the console terminal keyboard.
2–10 Diagnostic Tests and Commands
Index
DSSI terminator, 1–2
C
Cables
checking connections, 2–4
checking the console terminal cable, 1–1
checking the Ethernet cables, 1–1
checking the expansion box power cords,
1–1
checking the expansion box SCSI cables,
1–1
checking the system unit power cord, 1–1
checking the terminal power cord, 1–1
troubleshooting, 1–1
Connections
checking SCSI terminator, 1–2
checking standard Ethernet loopback
connector, 1–2
checking ThinWire Ethernet terminator,
1–2
Console security feature, 2–1
Console terminal
checking cable, 1–1
checking power cord, 1–1
turning off, 1–1
turning on, 1–2
D
Diagnostic commands, 2–1 to 2–7
Diagnostic tests, 2–1 to 2–7
Digital Services
contacting, 2–8
E
EF/RF-Series
controller error, 1–5
duplicate node id, 1–4
fault indicator, 1–4
integrated storage element, 1–4
read error, 1–5
troubleshooting, 1–4
write error, 1–4
Ethernet
checking cable, 1–1
Expansion boxes
checking power cord, 1–1
checking SCSI cables, 1–1
turning off, 1–1
turning on, 1–2
F
Fan
troubleshooting, 1–3
Field services
See Digital services
K
KA53-A, 2–1
KA54-A, 2–1
Index–1
L
S
Loopbacks
checking, 1–1
standard Ethernet, 1–1
SCSI terminator, 1–2
Security password, 2–1
Self-tests, 2–4
running, 2–5
Standard Ethernet, 1–2
Status LED display, 2–9
location, 2–9
System unit
checking power cord, 1–1
troubleshooting, 1–3
turning off, 1–1
turning on, 1–2
O
Operating system software
troubleshooting, 1–3
P
Peripherals
turning off, 1–1
turning on, 1–2
Power cord
troubleshooting, 1–3
Power-up display
troubleshooting, 1–3
Power-up tests
successful display, 2–1
unsuccessful display, 2–3
use of, 2–1
Privileged console mode, 2–1
Q
Question marks
two (??), 2–4
R
RRD42
caddy fault, 1–5
troubleshooting, 1–5
RRD42/compact disc drives
troubleshooting, 1–5
RRD43
disc fault, 1–5
troubleshooting, 1–5
RRD43 compact disc drive
troubleshooting, 1–5
Index–2
T
Terminal
troubleshooting, 1–3
Terminators
checking, 1–1
checking connections, 1–2, 2–4
SCSI, 1–2
ThinWire Ethernet, 1–1
ThinWire Ethernet, 1–2
TLZ06
QIC tape drive, 1–6
troubleshooting, 1–6
TLZ07
QIC tape drive, 1–6
troubleshooting, 1–6
Troubleshooting, 1–1 to 1–7
EF/RF-Series, 1–4
RRD42, 1–5
RRD43, 1–5
system unit, 1–3
table, 1–2
terminal, 1–3
TLZ06, 1–6
TLZ07, 1–6
TZ30, 1–5
TZK10/TZK11, 1–7
TZ30
green LED, 1–6
head cleaning, 1–6
operate lever faults, 1–6
tape drive, 1–5
troubleshooting, 1–5
unload button, 1–6
write-protect error, 1–6
TZK10/TZK11
amber LED, 1–7
head cleaning, 1–7
QIC tape drive, 1–7
troubleshooting, 1–7
write-protect error, 1–7
W
Write-protect switch
TZ30, 1–6
TZK10/TZK11, 1–7
Index–3
Reader’s Comments
VAX 4000 Model 105A/106A
Troubleshooting and Diagnostics Information
EK–515AA–TS. B01
Your comments and suggestions help us improve the quality of our publications.
Thank you for your assistance.
I rate this manual’s:
Excellent
Good
Fair
Accuracy (product works as manual says)
Completeness (enough information)
Clarity (easy to understand)
Organization (structure of subject matter)
Figures (useful)
Examples (useful)
Index (ability to find topic)
Page layout (easy to find information)
I would like to see more/less
What I like best about this manual is
What I like least about this manual is
I found the following errors in this manual:
Page
Description
Additional comments or suggestions to improve this manual:
For software manuals, please indicate which version of the software you are using:
Name/Title
Dept.
Company
Date
Mailing Address
Phone
Poor
d
Do Not Tear – Fold Here and Tape
TM
BUSINESS REPLY MAIL
FIRST CLASS PERMIT NO. 33 MAYNARD MASS.
POSTAGE WILL BE PAID BY ADDRESSEE
DIGITAL EQUIPMENT CORPORATION
Shared Engineering Services
MLO5–5/E76
2 THOMPSON STREET
MAYNARD, MA 01754-1716
Do Not Tear – Fold Here
No Postage
Necessary
If Mailed
in the
United States