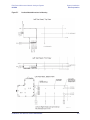
1
Installation and Service Guide Agilent Technologies N5250C PNA Series Microwave Network Analyzer System Use this manual in conjunction with the following documents: PNA Series Network Analyzer Embedded Help System PNA Series Network Analyzer Installation and Quick Start Guide Part Number E8356-90001 E8361C PNA Series Microwave Network Analyzer Service Guide Part Number E8361-90001 N5260A Millimeter Head Controller Operation and Service Guide Part Number: N5260-90001 Part Number: N5250-90001 Printed in USA November 2010 Supersedes Print Date: November 2010 Agilent Technologies, Inc. 2003, 2008, 2010, 2011 WARRANTY STATEMENT THE MATERIAL CONTAINED IN THIS DOCUMENT IS PROVIDED “AS IS,” AND IS SUBJECT TO BEING CHANGED, WITHOUT NOTICE, IN FUTURE EDITIONS. FURTHER, TO THE MAXIMUM EXTENT PERMITTED BY APPLICABLE LAW, AGILENT DISCLAIMS ALL WARRANTIES, EITHER EXPRESS OR IMPLIED WITH REGARD TO THIS MANUAL AND ANY INFORMATION CONTAINED HEREIN, INCLUDING BUT NOT LIMITED TO THE IMPLIED WARRANTIES OF MERCHANTABILITY AND FITNESS FOR A PARTICULAR PURPOSE. AGILENT SHALL NOT BE LIABLE FOR ERRORS OR FOR INCIDENTAL OR CONSEQUENTIAL DAMAGES IN CONNECTION WITH THE FURNISHING, USE, OR PERFORMANCE OF THIS DOCUMENT OR ANY INFORMATION CONTAINED HEREIN. SHOULD AGILENT AND THE USER HAVE A SEPARATE WRITTEN AGREEMENT WITH WARRANTY TERMS COVERING THE MATERIAL IN THIS DOCUMENT THAT CONFLICT WITH THESE TERMS, THE WARRANTY TERMS IN THE SEPARATE AGREEMENT WILL CONTROL. DFARS/Restricted Rights Notice If software is for use in the performance of a U.S. Government prime contract or subcontract, Software is delivered and licensed as “Commercial computer software” as defined in DFAR 252.227-7014 (June 1995), or as a “commercial item” as defined in FAR 2.101(a) or as “Restricted computer software” as defined in FAR 52.227-19 (June 1987) or any equivalent agency regulation or contract clause. Use, duplication or disclosure of Software is subject to Agilent Technologies’ standard commercial license terms, and non-DOD Departments and Agencies of the U.S. Government will receive no greater than Restricted Rights as defined in FAR 52.227-19(c)(1-2) (June 1987). U.S. Government users will receive no greater than Limited Rights as defined in FAR 52.227-14 (June 1987) or DFAR 252.227-7015 (b)(2) (November 1995), as applicable in any technical data. Certification Agilent Technologies, Inc. certifies that this product met its published specifications at the time of shipment from the factory. Agilent Technologies, Inc. further certifies that its calibration measurements are traceable to the United States National Institute of Standards and Technology, to the extent allowed by the Institute's calibration facility, and to the calibration facilities of other International Standards Organization members. ii Installation and Service Guide N5250-90001 Assistance Product maintenance agreements and other customer assistance agreements are available for Agilent Technologies, Inc. products. For information about these agreements and for other assistance, contact Agilent. Refer to “Contacting Agilent” on page 5-4. Safety and Regulatory Information The safety and regulatory information pertaining to this product is located in Chapter 1, “Safety and Regulatory Information”. Safety Notes The following safety notes are used throughout this manual. Familiarize yourself with each of the notes and its meaning before operating this instrument. All pertinent safety notes for using this product are located in Chapter 1, “Safety and Regulatory Information”. WARNING Warning denotes a hazard. It calls attention to a procedure which, if not correctly performed or adhered to, could result in injury or loss of life. Do not proceed beyond a warning note until the indicated conditions are fully understood and met. CAUTION Caution denotes a hazard. It calls attention to a procedure that, if not correctly performed or adhered to, could result in damage to or destruction of the instrument. Do not proceed beyond a caution sign until the indicated conditions are fully understood and met. Printing Copies of Documentation from the Web To print copies of documentation from the Web, download the PDF file from the Agilent web site: • Go to http://www.agilent.com. • Enter the document’s part number (located on the title page) in the Search box. • Click Search. Installation and Service Guide N5250-90001 iii iv Installation and Service Guide N5250-90001 Contents 1 Safety and Regulatory Information Safety Symbols. . . . . . . . . . . . . . . . . . . . . . . . . . . . . . . . . . . . . . . . . . . . . . . . . . . . . . . . . . . . . . . . . . . . . . . . . . . . . . . . . . 1-2 General Safety Considerations . . . . . . . . . . . . . . . . . . . . . . . . . . . . . . . . . . . . . . . . . . . . . . . . . . . . . . . . . . . . . . . . . . . . 1-2 Safety Earth Ground . . . . . . . . . . . . . . . . . . . . . . . . . . . . . . . . . . . . . . . . . . . . . . . . . . . . . . . . . . . . . . . . . . . . . . . . . . . 1-2 Before Applying Power. . . . . . . . . . . . . . . . . . . . . . . . . . . . . . . . . . . . . . . . . . . . . . . . . . . . . . . . . . . . . . . . . . . . . . . . . 1-2 Servicing . . . . . . . . . . . . . . . . . . . . . . . . . . . . . . . . . . . . . . . . . . . . . . . . . . . . . . . . . . . . . . . . . . . . . . . . . . . . . . . . . . . . . 1-3 Electrostatic Discharge Protection . . . . . . . . . . . . . . . . . . . . . . . . . . . . . . . . . . . . . . . . . . . . . . . . . . . . . . . . . . . . . . . . . 1-4 Regulatory Information . . . . . . . . . . . . . . . . . . . . . . . . . . . . . . . . . . . . . . . . . . . . . . . . . . . . . . . . . . . . . . . . . . . . . . . . . . . 1-5 Instrument Markings. . . . . . . . . . . . . . . . . . . . . . . . . . . . . . . . . . . . . . . . . . . . . . . . . . . . . . . . . . . . . . . . . . . . . . . . . . . 1-6 Lithium Battery Disposal . . . . . . . . . . . . . . . . . . . . . . . . . . . . . . . . . . . . . . . . . . . . . . . . . . . . . . . . . . . . . . . . . . . . . . . 1-7 2 System Description N5250C Network Analyzer System. . . . . . . . . . . . . . . . . . . . . . . . . . . . . . . . . . . . . . . . . . . . . . . . . . . . . . . . . . . . . . . . . 2-2 What’s Included in the N5250C System?. . . . . . . . . . . . . . . . . . . . . . . . . . . . . . . . . . . . . . . . . . . . . . . . . . . . . . . . . . 2-3 Partial Systems . . . . . . . . . . . . . . . . . . . . . . . . . . . . . . . . . . . . . . . . . . . . . . . . . . . . . . . . . . . . . . . . . . . . . . . . . . . . . . . 2-3 Basic System Configurations. . . . . . . . . . . . . . . . . . . . . . . . . . . . . . . . . . . . . . . . . . . . . . . . . . . . . . . . . . . . . . . . . . . . . . 2-4 Coaxial Measurement . . . . . . . . . . . . . . . . . . . . . . . . . . . . . . . . . . . . . . . . . . . . . . . . . . . . . . . . . . . . . . . . . . . . . . . . . . 2-4 Wafer Probe Measurement . . . . . . . . . . . . . . . . . . . . . . . . . . . . . . . . . . . . . . . . . . . . . . . . . . . . . . . . . . . . . . . . . . . . . 2-5 N5260A Millimeter Head Controller . . . . . . . . . . . . . . . . . . . . . . . . . . . . . . . . . . . . . . . . . . . . . . . . . . . . . . . . . . . . . . . . 2-6 Millimeter-Wave Test Head Modules . . . . . . . . . . . . . . . . . . . . . . . . . . . . . . . . . . . . . . . . . . . . . . . . . . . . . . . . . . . . . . . 2-7 Theory of Operation. . . . . . . . . . . . . . . . . . . . . . . . . . . . . . . . . . . . . . . . . . . . . . . . . . . . . . . . . . . . . . . . . . . . . . . . . . . . 2-8 Specifications. . . . . . . . . . . . . . . . . . . . . . . . . . . . . . . . . . . . . . . . . . . . . . . . . . . . . . . . . . . . . . . . . . . . . . . . . . . . . . . . 2-10 Warranty . . . . . . . . . . . . . . . . . . . . . . . . . . . . . . . . . . . . . . . . . . . . . . . . . . . . . . . . . . . . . . . . . . . . . . . . . . . . . . . . . . . . 2-10 Band Solutions from OML, Inc.© . . . . . . . . . . . . . . . . . . . . . . . . . . . . . . . . . . . . . . . . . . . . . . . . . . . . . . . . . . . . . . . 2-11 3 System Installation Receiving the System . . . . . . . . . . . . . . . . . . . . . . . . . . . . . . . . . . . . . . . . . . . . . . . . . . . . . . . . . . . . . . . . . . . . . . . . . . . . 3-2 The System as Shipped. . . . . . . . . . . . . . . . . . . . . . . . . . . . . . . . . . . . . . . . . . . . . . . . . . . . . . . . . . . . . . . . . . . . . . . . . 3-2 Agilent Technologies Customer Engineering . . . . . . . . . . . . . . . . . . . . . . . . . . . . . . . . . . . . . . . . . . . . . . . . . . . . . . 3-2 System Contents . . . . . . . . . . . . . . . . . . . . . . . . . . . . . . . . . . . . . . . . . . . . . . . . . . . . . . . . . . . . . . . . . . . . . . . . . . . . . . 3-3 Site Preparation . . . . . . . . . . . . . . . . . . . . . . . . . . . . . . . . . . . . . . . . . . . . . . . . . . . . . . . . . . . . . . . . . . . . . . . . . . . . . . . . . 3-6 Power Requirements. . . . . . . . . . . . . . . . . . . . . . . . . . . . . . . . . . . . . . . . . . . . . . . . . . . . . . . . . . . . . . . . . . . . . . . . . . . 3-6 Environmental Requirements . . . . . . . . . . . . . . . . . . . . . . . . . . . . . . . . . . . . . . . . . . . . . . . . . . . . . . . . . . . . . . . . . . . 3-7 Protect Against Electrostatic Discharge (ESD). . . . . . . . . . . . . . . . . . . . . . . . . . . . . . . . . . . . . . . . . . . . . . . . . . . . . 3-8 Review the Principles of Connector Care . . . . . . . . . . . . . . . . . . . . . . . . . . . . . . . . . . . . . . . . . . . . . . . . . . . . . . . . . 3-8 Space Requirements . . . . . . . . . . . . . . . . . . . . . . . . . . . . . . . . . . . . . . . . . . . . . . . . . . . . . . . . . . . . . . . . . . . . . . . . . . . 3-8 PNA, Controller, and Test Head Module Interconnections . . . . . . . . . . . . . . . . . . . . . . . . . . . . . . . . . . . . . . . . . . . . 3-10 Rear Panel Cabling . . . . . . . . . . . . . . . . . . . . . . . . . . . . . . . . . . . . . . . . . . . . . . . . . . . . . . . . . . . . . . . . . . . . . . . . . . . 3-10 Front Panel Cabling . . . . . . . . . . . . . . . . . . . . . . . . . . . . . . . . . . . . . . . . . . . . . . . . . . . . . . . . . . . . . . . . . . . . . . . . . . 3-11 Sequence of Test Head Module Connections . . . . . . . . . . . . . . . . . . . . . . . . . . . . . . . . . . . . . . . . . . . . . . . . . . . . . 3-13 System Cable Connections. . . . . . . . . . . . . . . . . . . . . . . . . . . . . . . . . . . . . . . . . . . . . . . . . . . . . . . . . . . . . . . . . . . . . . . 3-14 Configuring the PNA Software for the N5250C. . . . . . . . . . . . . . . . . . . . . . . . . . . . . . . . . . . . . . . . . . . . . . . . . . . . . . 3-17 Disconnecting the Combiner Assembly From the mm-Wave Module. . . . . . . . . . . . . . . . . . . . . . . . . . . . . . . . . . . 3-18 Old Design. . . . . . . . . . . . . . . . . . . . . . . . . . . . . . . . . . . . . . . . . . . . . . . . . . . . . . . . . . . . . . . . . . . . . . . . . . . . . . . . . . . 3-18 New Design . . . . . . . . . . . . . . . . . . . . . . . . . . . . . . . . . . . . . . . . . . . . . . . . . . . . . . . . . . . . . . . . . . . . . . . . . . . . . . . . . 3-19 4 System Specifications Specifications. . . . . . . . . . . . . . . . . . . . . . . . . . . . . . . . . . . . . . . . . . . . . . . . . . . . . . . . . . . . . . . . . . . . . . . . . . . . . . . . . . . 4-2 Installation and Service Guide N5250-90001 Contents-1 Contents System Specifications (typical) . . . . . . . . . . . . . . . . . . . . . . . . . . . . . . . . . . . . . . . . . . . . . . . . . . . . . . . . . . . . . . . . . . 4-2 General E8361C/C Option H11 Specifications . . . . . . . . . . . . . . . . . . . . . . . . . . . . . . . . . . . . . . . . . . . . . . . . . . . . . 4-4 E8361C Option H11 Rear Panel Specifications . . . . . . . . . . . . . . . . . . . . . . . . . . . . . . . . . . . . . . . . . . . . . . . . . . . . . 4-4 N5250C Option 017 and 018 Test Head Bias-Tees Specifications . . . . . . . . . . . . . . . . . . . . . . . . . . . . . . . . . . . . . 4-5 5 Maintenance and Support Maintenance. . . . . . . . . . . . . . . . . . . . . . . . . . . . . . . . . . . . . . . . . . . . . . . . . . . . . . . . . . . . . . . . . . . . . . . . . . . . . . . . . . . . 5-2 Physical Maintenance. . . . . . . . . . . . . . . . . . . . . . . . . . . . . . . . . . . . . . . . . . . . . . . . . . . . . . . . . . . . . . . . . . . . . . . . . . 5-2 Electrical Maintenance . . . . . . . . . . . . . . . . . . . . . . . . . . . . . . . . . . . . . . . . . . . . . . . . . . . . . . . . . . . . . . . . . . . . . . . . . 5-2 Caring for Waveguide (WG) Interfaces. . . . . . . . . . . . . . . . . . . . . . . . . . . . . . . . . . . . . . . . . . . . . . . . . . . . . . . . . . . . . . 5-2 Principles of Connector Care . . . . . . . . . . . . . . . . . . . . . . . . . . . . . . . . . . . . . . . . . . . . . . . . . . . . . . . . . . . . . . . . . . . . . . 5-3 Agilent Support, Services, and Assistance . . . . . . . . . . . . . . . . . . . . . . . . . . . . . . . . . . . . . . . . . . . . . . . . . . . . . . . . . . 5-4 Service and Support Options . . . . . . . . . . . . . . . . . . . . . . . . . . . . . . . . . . . . . . . . . . . . . . . . . . . . . . . . . . . . . . . . . . . . 5-4 Contacting Agilent. . . . . . . . . . . . . . . . . . . . . . . . . . . . . . . . . . . . . . . . . . . . . . . . . . . . . . . . . . . . . . . . . . . . . . . . . . . . . 5-4 Shipping an Item to Agilent for Service or Repair. . . . . . . . . . . . . . . . . . . . . . . . . . . . . . . . . . . . . . . . . . . . . . . . . . . 5-4 6 Performance Tests and Checks System Preparation and Analyzer Warm Up . . . . . . . . . . . . . . . . . . . . . . . . . . . . . . . . . . . . . . . . . . . . . . . . . . . . . . . . . 6-2 Torquing Connections . . . . . . . . . . . . . . . . . . . . . . . . . . . . . . . . . . . . . . . . . . . . . . . . . . . . . . . . . . . . . . . . . . . . . . . . . . . . 6-2 Long Term Storage of Test Results . . . . . . . . . . . . . . . . . . . . . . . . . . . . . . . . . . . . . . . . . . . . . . . . . . . . . . . . . . . . . . . . . 6-2 Protect Against Electrostatic Discharge (ESD) . . . . . . . . . . . . . . . . . . . . . . . . . . . . . . . . . . . . . . . . . . . . . . . . . . . . . . . 6-2 Review the Principles of Connector Care. . . . . . . . . . . . . . . . . . . . . . . . . . . . . . . . . . . . . . . . . . . . . . . . . . . . . . . . . . . . 6-3 System Check . . . . . . . . . . . . . . . . . . . . . . . . . . . . . . . . . . . . . . . . . . . . . . . . . . . . . . . . . . . . . . . . . . . . . . . . . . . . . . . . . . . 6-4 System Performance Verification . . . . . . . . . . . . . . . . . . . . . . . . . . . . . . . . . . . . . . . . . . . . . . . . . . . . . . . . . . . . . . . . . . 6-5 When to Verify . . . . . . . . . . . . . . . . . . . . . . . . . . . . . . . . . . . . . . . . . . . . . . . . . . . . . . . . . . . . . . . . . . . . . . . . . . . . . . . . 6-5 Materials Required . . . . . . . . . . . . . . . . . . . . . . . . . . . . . . . . . . . . . . . . . . . . . . . . . . . . . . . . . . . . . . . . . . . . . . . . . . . . 6-6 General Preparation. . . . . . . . . . . . . . . . . . . . . . . . . . . . . . . . . . . . . . . . . . . . . . . . . . . . . . . . . . . . . . . . . . . . . . . . . . . . 6-6 Verification Procedure. . . . . . . . . . . . . . . . . . . . . . . . . . . . . . . . . . . . . . . . . . . . . . . . . . . . . . . . . . . . . . . . . . . . . . . . . . 6-7 Verification Results Files . . . . . . . . . . . . . . . . . . . . . . . . . . . . . . . . . . . . . . . . . . . . . . . . . . . . . . . . . . . . . . . . . . . . . . 6-10 Interpreting the Verification Results. . . . . . . . . . . . . . . . . . . . . . . . . . . . . . . . . . . . . . . . . . . . . . . . . . . . . . . . . . . . .6-14 Improving the Verification Results . . . . . . . . . . . . . . . . . . . . . . . . . . . . . . . . . . . . . . . . . . . . . . . . . . . . . . . . . . . . . . 6-15 Saving Verification Results. . . . . . . . . . . . . . . . . . . . . . . . . . . . . . . . . . . . . . . . . . . . . . . . . . . . . . . . . . . . . . . . . . . . . 6-15 7 Replaceable Parts Ordering Information . . . . . . . . . . . . . . . . . . . . . . . . . . . . . . . . . . . . . . . . . . . . . . . . . . . . . . . . . . . . . . . . . . . . . . . . . . . . . 7-2 Replaceable Parts . . . . . . . . . . . . . . . . . . . . . . . . . . . . . . . . . . . . . . . . . . . . . . . . . . . . . . . . . . . . . . . . . . . . . . . . . . . . . . . 7-3 Contents-2 Installation and Service Guide N5250-90001 1 Safety and Regulatory Information Installation and Service Guide N5250-90001 1-1 Safety and Regulatory Information Safety Symbols PNA Series Microwave Network Analyzer System N5250A Safety Symbols The following safety symbols are used throughout this manual. Familiarize yourself with each of the symbols and its meaning before operating this instrument. CAUTION Caution denotes a hazard. It calls attention to a procedure that, if not correctly performed or adhered to, could result in damage to or destruction of the instrument. Do not proceed beyond a caution note until the indicated conditions are fully understood and met. WARNING Warning denotes a hazard. It calls attention to a procedure which, if not correctly performed or adhered to, could result in injury or loss of life. Do not proceed beyond a warning note until the indicated conditions are fully understood and met. General Safety Considerations Safety Earth Ground WARNING This is a Safety Class I product (provided with a protective earthing ground incorporated in the power cord). The mains plug shall only be inserted in a socket outlet provided with a protective earth contact. Any interruption of the protective conductor, inside or outside of the instrument, will make the instrument dangerous. Intentional interruption is prohibited. CAUTION Always use the three-prong AC power cord supplied with this product. Failure to ensure adequate grounding by not using this cord may cause product damage. Before Applying Power CAUTION Make sure that the analyzer line voltage selector switch is set to the voltage of the power supply and the correct fuse is installed. CAUTION If this product is to be energized via an autotransformer make sure the common terminal is connected to the neutral (grounded side of the mains supply). CAUTION This product is designed for use in Installation Category II and Pollution Degree 2. Servicing WARNING 1-2 These servicing instructions are for use by qualified personnel only. To avoid electrical shock, do not perform any servicing unless you are qualified to do so. Installation and Service Guide N5250-90001 PNA Series Microwave Network Analyzer System N5250A Safety and Regulatory Information General Safety Considerations WARNING The opening of covers or removal of parts may expose dangerous voltages. Disconnect the instrument from all voltage sources while it is opened. WARNING Danger of explosion if battery is incorrectly replaced. Replace only with the same or equivalent type recommended. Discard used batteries according to manufacturer’s instructions. WARNING Procedures described in this document may be performed with power supplied to the product while protective covers are removed. Energy available at many points may, if contacted, result in personal injury. WARNING The power cord is connected to internal capacitors that may remain live for 10 seconds after disconnecting the plug from its power supply. WARNING For continued protection against fire hazard, replace line fuse only with same type and rating. The use of other fuses or material is prohibited. WARNING The detachable power cord is the instrument disconnecting device. It disconnects the mains circuits from the mains supply before other parts of the instrument. The front panel switch is only a standby switch and is not a LINE switch (disconnecting device). Installation and Service Guide N5250-90001 1-3 Safety and Regulatory Information Electrostatic Discharge Protection PNA Series Microwave Network Analyzer System N5250A Electrostatic Discharge Protection Protection against electrostatic discharge (ESD) is essential while removing assemblies from or connecting cables to the system components. Static electricity can build up on your body and can easily damage sensitive internal circuit elements when discharged. Static discharges too small to be felt can cause permanent damage. To prevent damage to the instrument: • always have a grounded, conductive table mat in front of your test equipment. • always wear a grounded wrist strap, connected to a grounded conductive table mat, having a 1 M resistor in series with it, when handling components and assemblies or when making connections. • always wear a heel strap when working in an area with a conductive floor. If you are uncertain about the conductivity of your floor, wear a heel strap. • always ground yourself before you clean, inspect, or make a connection to a static-sensitive device or test port. You can, for example, grasp the grounded outer shell of the test port or cable connector briefly. • always ground the center conductor of a test cable before making a connection to the analyzer test port or other static-sensitive device. This can be done as follows: 1. Connect a short (from your calibration kit) to one end of the cable to short the center conductor to the outer conductor. 2. While wearing a grounded wrist strap, grasp the outer shell of the cable connector. 3. Connect the other end of the cable to the test port and remove the short from the cable. Figure 1-1 shows a typical ESD protection setup using a grounded mat and wrist strap. Figure 1-1 1-4 ESD Protection Setup Installation and Service Guide N5250-90001 PNA Series Microwave Network Analyzer System N5250A Safety and Regulatory Information Regulatory Information Regulatory Information This section contains information that is required by various government regulatory agencies. Installation and Service Guide N5250-90001 1-5 Safety and Regulatory Information Regulatory Information PNA Series Microwave Network Analyzer System N5250A Instrument Markings ! The instruction documentation symbol. The product is marked with this symbol when it is necessary for the user to refer to the instructions in the documentation. The CE mark is a registered trademark of the European Community. (If accompanied by a year, it is when the design was proven.) The CSA mark is a registered trademark of the Canadian Standards Association. ICES/NMB-001 This is a marking to indicate product compliance with the Canadian Interference-Causing Equipment Standard (ICES-001). This is a symbol of an Industrial Scientific and Medical Group 1 Class A product. This is a required mark signifying compliance with an EMC requirement. The C-Tick mark is a registered trademark of the Australian Spectrum Management Agency. This product complies with the WEEE Directive (2002/96/EC) marking requirements. The affixed label indicates that you must not discard this electrical/electronic product in domestic household waste. Product Category: With reference to the equipment types in the WEEE Directive Annex I, this product is classed as a “Monitoring and Control instrumentation” product. Do not dispose in domestic household waste. To return unwanted products, contact your local Agilent office, or see http://www.agilent.com/environment/product/ for more information. Indicates the time during which no hazardous or toxic substance elements are expected to leak or deteriorate during normal use. Forty years is the expected useful life of the product. This symbol on all primary and secondary packaging indicates compliance with China standard GB 18455-2001. This Korean Certification (KC) symbol is required for products that are subject to legally compulsory certification. The KC symbol includes the marking’s identifier code that has up to 26 digits and follows this format: KCC-VWX-YYY-ZZZZZZZZZZZZZ. 1-6 Installation and Service Guide N5250-90001 PNA Series Microwave Network Analyzer System N5250A Safety and Regulatory Information Regulatory Information Lithium Battery Disposal If the battery on the network analyzer’s CPU board needs to be disposed of, dispose of it in accordance with your country’s requirements. If required, you may return the battery to Agilent Technologies for disposal. For assistance refer to “Contacting Agilent” on page 5-4. Installation and Service Guide N5250-90001 1-7 Safety and Regulatory Information Regulatory Information 1-8 PNA Series Microwave Network Analyzer System N5250A Installation and Service Guide N5250-90001 2 System Description Installation and Service Guide N5250-90001 2-1 System Description N5250C Network Analyzer System PNA Series Microwave Network Analyzer System N5250A N5250C Network Analyzer System The N5250C is a vector network analyzer system with an extremely wide frequency range of 10 MHz to 110 GHz. The N5250C uses the same 1.0 mm test port connections throughout its entire range of test frequencies. It is never necessary to make and break connections to complete a test. The bias can be applied to a device under test (DUT) through the test ports using the bias-tees built into the E8361C H11 PNA. Optionally, bias-tees can be added to the millimeter-wave test head modules (N5250C Options 017 and 018) closer to the test ports to improve the bias conditions of sensitive devices. The N5250C system can be used to make S-parameter measurements three different ways: 1. Continuous sweep 10 MHz to 110 GHz measurements utilizing 1.0 mm test ports on the test head modules. 2. Standalone E8361C H11 PNA measurements from 10 MHz to 67 GHz utilizing the PNA front panel 1.85 mm test ports. This is accomplished by disconnecting the N5260A millimeter head controller and millimeter-wave test head modules from the E8361C H11 PNA and restarting the PNA application. 3. Waveguide measurements from 67 GHz to 110 GHz utilizing the WR-10 waveguide flange on the waveguide T/R modules. This is accomplished by disconnecting the combiner assembly on the front of the test head modules. The illustration below shows the N5250C configured for coaxial measurement. The system can also be configured for on-wafer measurement using a wafer probe test station. Figure 2-1 2-2 N5250C Network Analyzer System Installation and Service Guide N5250-90001 PNA Series Microwave Network Analyzer System N5250A System Description N5250C Network Analyzer System What’s Included in the N5250C System? The N5250C system includes the following: • PNA Series network analyzer, E8361C with Option H11 (includes options UNL, 014, 080, and 081) • N5260A millimeter head controller (which includes the following): • Left and right millimeter-wave test head modules (one of the following): — N5250C-700 (Standard) millimeter-wave test head modules without bias-tees (left test head has an attenuator) — N5250C-017 (Option 017) millimeter-wave test head modules with bias-tees (left test head has an attenuator) — N5250C-018 (Option 018) millimeter-wave test head modules with bias-tees (left and right test heads each have an attenuator) • Interconnection cables and adapters to interconnect the system components Partial Systems If you already have the E8361C network analyzer with Option H11, you can order the N5260A millimeter head controller (with millimeter-wave test head modules and cables) to make a complete system: • N5260A millimeter head controller (which includes the following): • Left and right millimeter-wave test head modules (one of the following): — N5260A-110 millimeter-wave test head modules without bias-tees (left test head has an attenuator). (Same as included in N5250C-700.) — N5260A-120 millimeter-wave test head modules with bias-tees (left test head has an attenuator). (Same as included in N5250C-017.) — N5260A-130 millimeter-wave test head modules with bias-tees (left and right test heads each have an attenuator). (Same as included in N5250C-018.) • Interconnection cables and adapters to interconnect the system components Installation and Service Guide N5250-90001 2-3 System Description Basic System Configurations PNA Series Microwave Network Analyzer System N5250A Basic System Configurations The N5250C can be used in either of two basic configurations, depending on how the test ports are connected to the device under test (DUT): coaxial measurement configuration or wafer probe measurement configuration. CAUTION Input power to the test ports must not exceed +27 dBm. Input power in excess of this level will damage expensive components. Observe proper precautions, especially when measuring amplifiers with gains of 20 dB or greater. Coaxial Measurement This configuration is used when the DUT has coaxial connectors. The N5250C test ports have 1.0 mm coaxial connectors, and are designed to cover a frequency range of 10 MHz to 110 GHz. In this configuration, the test head modules are placed on a work bench in front of the millimeter head controller. The DUT is normally connected to the test ports by way of a 1.0 mm coaxial cable (test port cable). Connect the device to Port 1 (left test head module) directly, and to Port 2 (right test head module) by way of a test cable. It is also possible to connect the DUT using a test port cable on each test port, although this configuration will result in greater signal loss. CAUTION Do not attempt to connect a test device directly between the two 1.0 mm test ports, without at least one test port cable. The test head modules will not move freely enough to allow such a connection to be made safely. Figure 2-2 on page 2-5 shows how the instruments are configured on a work bench for the coaxial measurement configuration. The test head modules are placed on the bench top in front of the PNA and controller. 2-4 Installation and Service Guide N5250-90001 PNA Series Microwave Network Analyzer System N5250A Figure 2-2 System Description Basic System Configurations Coaxial Measurement Configuration E8361A Network Analyzer 45 MHz to 67 GHz PNA Series Network Analyzer with Options 014, 080, 081, UNL, and H11 Port 1 CPLR ARM SOURCE OUT Port 1 RCVR A IN Port 2 RCVR B IN CPLR THRU CPLR THRU Reference 1 SOURCE OUT N5260A Millimeter-Head Controller CPLR ARM SOURCE OUT Reference 2 RCVR R2 IN RCVR R1 IN N5260A Millimeter Head Controller Port 2 Port 1 RF OUT A IF Port 2 2 AMP FUSE 2 AMP FUSE R1 IF RF OUT B IF Port 1 LO OUT SOURCE OUT Port 2 BIAS BIAS R2 IF LO OUT LINE 0 1 Optional Cable Left Test Head DUT Required 1.0 mm Test Port Cable Right Test Head n5250_001_303 Wafer Probe Measurement This configuration is used for on-wafer testing; each test port is connected (through a 1.0 mm coaxial cable, or through an adapter and another type of coaxial cable) to a wafer test probe. Contact the manufacturer of the wafer probe station and an Agilent office for information on the cables and adapters needed to connect the test head modules to the wafer probe station (refer to “General Safety Considerations” on page 1- 2. In this configuration, the test head modules are placed on X-Y positioners that are mounted to the wafer probe station. NOTE The wafer probe measurement configuration is not documented in this manual. For information about probing equipment and accessories, contact: Cascade Microtech, Inc. 2430 NW 206th Avenue Beaverton, Oregon 97006, USA Toll-free telephone: (800) 550-3279 Telephone: (503) 601-1000 Fax: (503) 601-1002 Web site www.cascademicrotech.com Email: [email protected] For additional information on DUT bias connections, refer to Table 4-3 on page 4-5, Figure 4-1 on page 4-6, and Figure 4-2 on page 4-6. Installation and Service Guide N5250-90001 2-5 System Description N5260A Millimeter Head Controller PNA Series Microwave Network Analyzer System N5250A N5260A Millimeter Head Controller The N5260A millimeter head controller provides the test interface between the millimeter-wave test head modules and the E8361C H11 PNA series network analyzer. The millimeter head controller, when used in conjunction with the millimeter-wave test head modules and the PNA, provides all of the feature and functions of a full S-Parameter test set. The millimeter head controller supplies RF and LO signals to the millimeter-wave test head modules and returns the down converted reference and test IF signals to the PNA for process and display. The N5260A millimeter head controller also supplies the +12 volt bias to each millimeter-wave head module. The front panel of the N5260A millimeter head controller is illustrated below. For additional information, see the N5260A Operation and Service Guide. If a printed version of the N5260A manual is not available, refer to “Printing Copies of Documentation from the Web” on page iii of this manual. Figure 2-3 N5260A Millimeter Head Controller Front Panel N5260A A Millimeter-Head Controller Port 1 RF OUT A IF Port 2 2 AMP FUSE 2 AMP FUSE Port 1 S11 LO OUT RF OUT R2 IF LO OUT S22 BIAS BIAS S12 LINE 0 R1 IF B IF S21 1 n5250_001_309 2-6 Installation and Service Guide N5250-90001 PNA Series Microwave Network Analyzer System N5250A System Description Millimeter-Wave Test Head Modules Millimeter-Wave Test Head Modules A pair of 67-110 GHz millimeter-wave test head modules, in conjunction with the N5260A millimeter head controller, is used to make reflection, transmission, or S-parameter measurements at millimeter wave frequencies with the E8361C H11 PNA. These test head modules are manufactured by OLM, Inc.© Refer to “Band Solutions from OML, Inc.©” on page 2- 11 for additional information. The N5250C system measurement ports, Port 1 and Port 2, are in the left and right millimeter-wave test head modules, respectively. The left and right test head modules are illustrated in Figure 2-4 on page 2-7. Each test head consists of a combiner assembly and a waveguide module. The combiner assembly contains a coupler and combiner, and optionally contains a bias-tee (N5250C, Options 017 and 018). The multiple-connector panels provide connections between the test head module, the N5260A millimeter head controller, and the E8361C H11 PNA. Figure 2-4 Left and Right Millimeter-Wave Test Head Modules Installation and Service Guide N5250-90001 2-7 System Description Millimeter-Wave Test Head Modules PNA Series Microwave Network Analyzer System N5250A Theory of Operation Refer to the block diagram in Figure 2-5 on page 2-9 for the following paragraphs. The N5260A millimeter head controller routes the LO and RF signals from the E8361C PNA to the test set modules. The millimeter head controller also performs switching from port 1 to port 2. The test head modules separate the incident from the reflected RF signal and then down convert those signals to an IF signal The test head modules do not have their own power supplies; each head receives dc power from the N5260A millimeter head controller, by way of a multi-pin interface cable. 10 MHz to 67 GHz Operation The RF signal is received from the E8361C PNA SOURCE OUT and input into the RF IN connector of the combiner module. The RF signal is then input to either the bias tee or coupler depending on the option configuration. From the coupler, the RF signal passes through the combiner and then on to the test port. The signal received at the test port of the combiner (either transmitted from another test head module or reflected from a device under test) is routed to the RCVR OUT connector via the combiner and coupled arm of the coupler. This output goes to the E8361C PNA RCVR A IN or RCVR B IN. 67 GHz to 110 GHz Operation The RF signal is received from the N5260A millimeter head controller and input into the RF IN connector of the T/R millimeter module. The RF is then amplified and multiplied times six by the source multiplier. This multiplied incident RF signal then passes through micrometer, attenuator (option), and a dual directional coupler where a portion of it is coupled off into the reference mixer. The signal received at the test port of the combiner section (either transmitted from another test head module or reflected from a device under test) is routed back to the dual directional coupler in the T/R millimeter module where a portion of it is coupled off into the test mixer. The LO signal is input from the E8361C PNA LO through the N5260A millimeter head controller. The LO 8th harmonic is input into the reference and test converters. These converters mix the LO with the RF signals so that two IF signals are output. These IF signals (incident and reflected) are then output to the millimeter head controller, as the REF IF and TEST IF signals respectively, and passed to the E8361C PNA for further processing. 2-8 Installation and Service Guide N5250-90001 PNA Series Microwave Network Analyzer System N5250A Figure 2-5 System Description Millimeter-Wave Test Head Modules Millimeter-wave Test Head Module Block Diagram Installation and Service Guide N5250-90001 2-9 System Description Millimeter-Wave Test Head Modules PNA Series Microwave Network Analyzer System N5250A Specifications Specifications described here are the typical performance for the 67 –110 GHz millimeter-wave test head modules. For the electrical specifications of the modules when used in the N5250C system, refer to “System Specifications (typical)” on page 4- 2. The N5260-60004 test head module does not have a built-in attenuator while the N5260-60003 adds a 25-dB variable attenuator inserted between the source multiplier and the source isolator. See the block diagram, Figure 2-5 on page 2-9. Table 2-1. Specifications (Typical Performance) Specifications N5260-60004 N5260-60003 System Operating Freq. 67 to 110 GHz 67 to 110 GHz RF Input Freq. 11.167 to 18.333 GHz (x6) 11.167 to 18.333 GHz (x6) RF Input Power +5 to +13 dBm +5 to +13 dBm LO Input Freq. 8.375 to 13.75 GHz (x8) 8.375 to 13.75 GHz (x8) LO Input Power +5 to +13 dBm +5 to +13 dBm Test Port (TP) Output Power 0 dBm min. +3 dBm typical -2 dBm min. +1 dBm typical TP Output Power Adjustment N/A 25 dB min. TP Input Power Operating Level +4 dBm typical, for 0.1 dB compression +4 dBm typical, for 0.1 dB compression TP Input Power Damage Level +27 dBm +27 dBm Test Port Interface OML precision WR-10 flange OML precision WR-10 flange Additional Interfaces 4 ea. SMA (f) (Source, LO, 2 IF) 4 ea. SMA (f) (Source, LO, 2 IF) Power Requirements +12 VDC @ 1.5 A. typical +12 VDC @ 1.5 A. typical Ambient Operating Temperature 20 to 30o C 20 to 30o C Dimensions (L x W x H) 13 x 4.3 x 2.7 inches 13 x 4.3 x 2.7 inches, not including the attenuator micrometer Warranty The millimeter-wave test head modules are covered by the N5250C system warranty. See “Service and Support Options” on page 5- 4. In addition, the test head modules have their own separate warranty. 2-10 Installation and Service Guide N5250-90001 PNA Series Microwave Network Analyzer System N5250A System Description Millimeter-Wave Test Head Modules Band Solutions from OML, Inc.© OML, Inc.© (formerly known as Oleson Microwave Labs) is a millimeter-wave test equipment manufacturer, and supplier of the millimeter-wave test heads used in the N5250C network analyzer system. Please contact OML, Inc.© for information about various test heads and related products, including availability, performance, compatibility, applications, and support questions. OML, Inc.© 300 Digital Drive Morgan Hill, CA 95037 Tel: (408) 779-2698 Fax: (408) 778-0491 www.omlinc.com For more information on millimeter-wave applications, refer to the manual for the N5260A Millimeter Head Controller. To view this manual online, go to www.agilent.com. Enter the manual’s part number, N5260-90001, in the Search box and click Search. Installation and Service Guide N5250-90001 2-11 System Description Millimeter-Wave Test Head Modules 2-12 PNA Series Microwave Network Analyzer System N5250A Installation and Service Guide N5250-90001 3 System Installation Installation and Service Guide N5250-90001 3-1 System Installation Receiving the System PNA Series Microwave Network Analyzer System N5250A Receiving the System WARNING The N5260A millimeter head controller and the test head modules are sensitive to electrostatic discharge (ESD). Ground your work station before unpacking and installing the test head modules. See “Electrostatic Discharge Protection” on page 1-4. The System as Shipped The N5250C system components will arrive packaged separately. For a complete list of components shipped with your system, refer to Table 3-1 on page 3-3. When the entire shipment has arrived, contact Agilent Technologies to arrange for system installation, if installation is available in your area. See “Agilent Support, Services, and Assistance” on page 5-4. Keep the shipping containers until the system checklist has been completed, and the system has been checked for physical damage. If the shipping container is damaged or the packaging material shows signs of stress, notify the carrier as well as the Agilent Technologies Customer Engineer. Keep the shipping materials for the carrier’s inspection. Agilent Technologies will arrange for repair or replacement of damaged equipment without waiting for a claim settlement from the carrier. Refer to “Agilent Support, Services, and Assistance” on page 5-4. Agilent Technologies Customer Engineering An Agilent Technologies Customer Engineer will be assigned to help you install the system. During installation, the Customer Engineer will do the following: • Unpack the system components. • Complete the system checklist, see Table 3-1 on page 3-3. • Connect the E8361C H11 PNA and the N5260A millimeter head controller. • Install the millimeter-wave test head modules. • Run a performance verification of the system, which includes a measurement calibration. • Provide user training for one engineer. 3-2 Installation and Service Guide N5250-90001 PNA Series Microwave Network Analyzer System N5250A System Installation Receiving the System System Contents Use the table below to verify that the shipment is complete. These are items that are supplied with all N5250C complete systems only. Table 3-1 N5250C System Contents ✔ Agilent Part Number N5250C-700 (Standard) Qty 0 or 1 0 or 1 0 or 1 Vector network analyzer system, 10 MHz to 110 GHz, 1.0 mm (m) test ports E8361C H11 PNA, N5260A millimeter head controller, N5260A-120 millimeter-wave test head modules with bias-tees, port 1 and 2 attenuators, and cables Includes: E8361C H11 Includes: Vector network analyzer system, 10 MHz to 110 GHz, 1.0 mm (m) test ports E8361C H11 PNA, N5260A millimeter head controller, N5260A-120 millimeter-wave test head modules with bias-tees, port 1 attenuator, and cables Includes: N5250C-018 (Option 018) Vector network analyzer system, 10 MHz to 110 GHz, 1.0 mm (m) test ports E8361C H11 PNA, N5260A millimeter head controller, N5260A-110 millimeter-wave test head modules, port 1 attenuator, and cables Includes: N5250C-017 (Option 017) Description 1 PNA series microwave vector network analyzer (10 MHz to 67 GHz) E8361C Option H11 1 IF Access E8361C Option 014 1 Configurable test set E8361C Option UNL 1 Source Attenuators and Bias-Tees E8361C Option 080 1 Frequency Offset E8361C Option 081 1 Reference Channel Switch E8356-90001 1 PNA Series Network Analyzer Installation and Quick Start Guide 1 Millimeter Head Controller 85105-60030 2 Bias Cable (48” length) 85105-60033 4 IF Signal Cable (48” length) 8121-1221 4 RF and LO 3.5 mm Cable (48” length) 1 Test Set Interface Cable 8120-1839 4 IF Signal Cable 5061-9038 2 RF and LO SMA Cable N5260A Includes: 8120-6818 Was 08503-60051 Installation and Service Guide N5250-90001 3-3 System Installation Receiving the System PNA Series Microwave Network Analyzer System N5250A Table 3-1 N5250C System Contents (Continued) 1250-2604 4 SMA Right Angle Adapter (Not required unless needed with 8121-1221 cables.) 5063-9226 1 Handle Set 5063-9232 1 Rack Mount Flange Set N5250C-90001 1 Installation and Service Guide N5260A-110 (Standard) 0 or 1 millimeter-wave test head modules, port 1 attenuator, 67 GHz to 110 GHz, 1 mm (m) test ports Includes: N5260-60007 Includes: 1 Left millimeter-wave test head N5260-60002 1 Left combiner assembly N5260-60003 1 67 GHz to 110 GHz Wave Guide T/R Module with Attenuator 1 Right millimeter-wave test head N5260-60001 1 Right combiner assembly N5260-60004 1 67 GHz to 110 GHz Wave Guide T/R Module N5260-60009 2 PNA Front Panel Test Port RF 1.85 mm (f)-(m) Cable (30” length) 8121-1233 2 PNA Front Panel Access Port RF 1.85 mm (m)-(m) Cable (30” length) 0 or 1 Millimeter-wave test head modules with bias-tees, port 1 attenuator, 67 GHz to 110 GHz, 1mm (m) test ports N5260-60006 Includes: N5260A-120 (Option 017) Includes: N5260-60011 Includes: 1 Left millimeter-wave test head with bias-tee N5260-60013 1 Left combiner assembly with bias-tee N5260-60003 1 67 GHz to 110 GHz Wave Guide T/R Module with Attenuator 1 Right millimeter-wave test head with bias-tee N5260-60012 1 Right combiner assembly with bias-tee N5260-60004 1 67 GHz to 110 GHz Wave Guide T/R Module 4 PNA Front Panel Access Port RF 1.85 mm (m)-(m) Cable (30” length) N5260-60010 Includes: 8121-1233 N5260A-130 (Option 018) 0 or 1 Millimeter-wave test head modules with bias-tees, port 1 and 2 attenuators, 67 GHz to 110 GHz, 1mm (m) test ports Includes: 3-4 Installation and Service Guide N5250-90001 PNA Series Microwave Network Analyzer System N5250A System Installation Receiving the System Table 3-1 N5250C System Contents (Continued) N5260-60011 Includes: 1 Left millimeter-wave test head with bias-tee N5260-60013 1 Left combiner assembly with bias-tee N5260-60003 1 67 GHz to 110 GHz Wave Guide T/R Module with Attenuator 1 Right millimeter-wave test head with bias-tee N5260-60012 1 Right combiner assembly with bias-tee N5260-60003 1 67 GHz to 110 GHz Wave Guide T/R Module with Attenuator 4 PNA Front Panel Access Port RF 1.85 mm (m)-(m) Cable (30” length) N5260-60022 Includes: 8121-1233 Installation and Service Guide N5250-90001 3-5 System Installation Site Preparation PNA Series Microwave Network Analyzer System N5250A Site Preparation Power Requirements Before installing the system, be sure that the required ac power is available at all necessary locations. • Three-wire power cables (which provide a safety ground) must be used with all instruments. • Air-conditioning equipment (or other motor-operated equipment) should not be placed on the same ac line that powers the system. • The table below lists the maximum VA ratings and BTU/hour ratings for all instruments in the system. This table can be used to determine both the electrical requirements and the air conditioning requirements of the system. Table 3-2 Power Requirements of the System Standard Equipment Instrument Maximum VA Rating Maximum BTU/hour E8361C H11 350 1195 N5260A millimeter head controller 320 1095 N5260-60007 left test head module or N5260-60006 right test head module (powered from controller) (powered from controller) N5260-60011 left test head module or N5260-60010 right test head module (powered from controller) (powered from controller) N5260-60011 left test head module or N5260-60022 right test head module (powered from controller) (powered from controller) Total 670 2290 Notes: (1) Values are based on 120 Vac supplied to each instrument at 60 Hz. (2) The N5260A millimeter head controller supplies power to the test head modules. 3-6 Installation and Service Guide N5250-90001 PNA Series Microwave Network Analyzer System N5250A System Installation Site Preparation Environmental Requirements The environmental requirements shown below are characteristic for the system and are based on the limitations of the E8361C network analyzer used. Table 3-3 Environmental Requirements Temperature Operation 5 C to 40 C (41 F to 104 F) Storage 40 C to +65 C (40 F to +158 F) Measurement Calibration 20 C to 26 C (68 F to 79 F) Performance Verification Temperature must be within 1 C (1.8 F) of the temperature at which the measurement calibration was performed. Relative Humidity Type tested at 95%, +40 C (non-condensing) Pressure Altitude Type tested 0 to 4600 meters (~15,000 feet) System Heating and Cooling Install air conditioning and heating, if necessary, to maintain the ambient temperature within the appropriate range (as given in the table above). Air conditioning capacity must be consistent with the BTU ratings given in Table 3-2 on page 3-6. Required Conditions for Accuracy Enhanced Measurement Accuracy-enhanced (error-corrected) measurements require the ambient temperature of the N5250C to be maintained within ± 1 C of the ambient temperature at calibration. Installation and Service Guide N5250-90001 3-7 System Installation Site Preparation PNA Series Microwave Network Analyzer System N5250A Protect Against Electrostatic Discharge (ESD) This is important. If not properly protected against, electrostatic discharge can seriously damage your analyzer, resulting in costly repair. CAUTION To reduce the chance of electrostatic discharge, follow all of the recommendations outlined in “Electrostatic Discharge Protection” on page 1-4. Review the Principles of Connector Care Proper connector care and connection techniques are critical for accurate and repeatable measurements. Refer to Table 5-1 on page 5-3 for tips on connector care. Prior to making connections to your analyzer, carefully review the information about inspecting, cleaning, and gaging connectors. Refer to the calibration kit documentation for detailed connector care information. Space Requirements Standard installation of the N5250C system includes configuration and installation of the system on a customer provided lab bench or table top of adequate size and strength. System Weight and Dimensions • 55 kg (110 lb) • Required Bench Top Dimensions for the System: — Clearance above bench top: 43 cm (17 in) — Width: 127 cm (50 in) — Depth: 102 cm (40 in) Component Weight and Dimensions Table 3-4 shows the maximum weight and dimensions of the N5250C system components. Refer also to Figure 3-1 on page 3-9 for test head module dimensions. Table 3-4 N5250C System Components Weights and Dimensions Model Weight Height Width Depth Millimeter-wave test head module (each) 3.5 kg (7.5 lb, ± 0.5 lb) 6.9 cm (2.7 in) 50.7 cm (20 in) 17.8 cm (6.9 in) E8361C, Option H11 PNA 29 Kg (64 lb) nominal 26.7 cm (10.5 in) 42.5 cm (16.7 in) 42.6 cm (16.8 in) N5260A millimeter- head controller 9.1 Kg (20 lb) 9.0 cm (3.5 in) 42.4 cm (16.75 in) 49.5 cm (19.5 in) 3-8 Installation and Service Guide N5250-90001 PNA Series Microwave Network Analyzer System N5250A Figure 3-1 System Installation Site Preparation Test Head Module Dimensions for Mounting Installation and Service Guide N5250-90001 3-9 System Installation PNA Series Microwave Network Analyzer System PNA, Controller, and Test Head Module Interconnections N5250A PNA, Controller, and Test Head Module Interconnections Rear Panel Cabling Figure 3-2 shows the rear panel cabling. For front-panel cabling between the N5260A millimeter head controller and the test head modules, see“Front Panel Cabling” on page 3-11. Figure 3-2 Rear View Cabling diagram A IF E8361C PNA Series Network Analyzer with Options 014, 080, 081, UNL, and H11 R1 IF Test Set I/O RF LO B R2 RF R1 B N5260A Millimeter-Head Controller R2 R1 A RF A LO LO Test Set Interconnect Test Set Interface R2 IF B IF n5250_001_304 3-10 Installation and Service Guide N5250-90001 PNA Series Microwave Network Analyzer System System Installation N5250A PNA, Controller, and Test Head Module Interconnections Front Panel Cabling The front-panel interconnections between the N5260A millimeter head controller and the test head modules are shown in Figure 3-3, Figure 3-4, and Figure 3-6. The test head modules are placed on the work surface in front of the PNA and head controller as shown. When the test head modules are facing each other like this, the Port 1 connector faces the Port 2 connector. Refer to “Sequence of Test Head Module Connections” on page 3-13 for power supply connections to the test head modules. NOTE The order in which cables are connected to a test head module is significant; see“Sequence of Test Head Module Connections” on page 3-13. Figure 3-3 N5250C Standard Configuration E8361A Network Analyzer 45 MHz to 67 GHz RCVR A IN Port 1 CPLR ARM SOURCE OUT RCVR A IN Port 1 RCVR B IN Port 2 Reference 1 Port 1 Millimeter-Head Controller Port 1 2 AMP FUSE A IF Port 2 LO O UT LO OUT BIAS BIAS LO IN Test IF Bias LO IN Test IF Bias RF IN R2 IF Ref IF RF IN Ref IF R F IN RC V R A 1 RF OUT B IF R1 IF LINE SOURCE OUT Port 2 2 AMP FUSE RF OUT 0 RCVR B IN Reference 2 RCVR R2 IN RCVR R1 IN N5260A CPLR ARM SOURCE OUT RC V R B SOURCE OUT Port 2 CPLR THRU CPLR THRU R F IN n5250_001_305 N5250C Option 017/018 Configuration E8361A Network Analyzer 45 MHz to 67 GHz RCVR A IN SOURCE OUT Port 1 CPLR ARM SOU RCE OUT RCVR A IN Port 1 RCVR B IN Port 2 CPLR THRU CPLR THRU Reference 1 RCVR R2 IN N5260A Port 1 Millimeter-Head Controller LO O UT 2 AMP FUSE A IF Port 2 LO IN Test IF Bias Ref IF LO OUT R2 IF Bias BIAS BIAS RF IN Ref IF 1 RF OUT B IF RF IN LINE R F IN SOURCE OUT SOURCE OUT Port 2 2 AM P FUSE Port 1 R1 IF RC V R A RCVR B IN Reference 2 RCVR R1 IN RF OUT 0 CPLR ARM SOURCE OUT LO IN Test IF SOURCE OUT Port 2 R F IN RC V R B Figure 3-4 n5250_001_306 Installation and Service Guide N5250-90001 3-11 System Installation PNA Series Microwave Network Analyzer System PNA, Controller, and Test Head Module Interconnections N5250A Figure 3-5 N5250C Option 018 Configuration E8361A Network Analyzer 45 MHz to 67 GHz PNA Series Network Analyzer with Options 014, 080, 081, UNL, and H11 Port 1 CPL R ARM SOURCE OUT Port 1 RCVR A IN Port 2 RCVR B IN CPLR THRU C PLR THRU Reference 1 SOUR CE OUT N5260A Millimeter Head Controller Port 2 C PL R ARM SOURCE OUT Reference 2 RCVR R1 IN R CVR R2 I N N5260A Port 1 Millimeter Head Controller R F OUT 2 AMP FU SE 2 AMP FU SE R1 IF R F OUT B IF Port 1 LO OUT SOURCE OUT Port 2 A IF Port 2 BIAS BI AS L O OUT R 2 IF LINE 0 1 48” Length Cables Left Test Head (Port 1) Right Test Head (Port 2) n5250_001_312 Figure 3-6 N5250C Waveguide Test Port Configuration with Combiner Assemblies Removed (Banded Solution for N5260A) E8361A Network Analyzer 45 MHz to 67 GHz Port 1 C PLR ARM SOURCE OUT Port 1 RCVR A IN Port 2 RC VR B IN CPLR THRU CPLR TH RU Reference 1 SOURCE OUT CPLR ARM SOURCE OUT Reference 2 RCVR R1 IN RCVR R2 IN N5260A Port 1 Millimeter-Head Controller Port 1 2 AMP FUSE A IF Port 2 LO OUT RF IN LO OUT LO IN Test IF LO IN Test IF Bias R2 IF Ref IF RF IN BIAS BIAS Bias Ref IF 1 RF OUT B IF R1 IF LINE SOURCE OUT Port 2 2 AMP FUSE RF OUT 0 Port 2 n5250_001_307 NOTE 3-12 See “Disconnecting the Combiner Assembly From the mm-Wave Module” on page 3-18 for a procedure to remove the combiner assemblies. Installation and Service Guide N5250-90001 PNA Series Microwave Network Analyzer System System Installation N5250A PNA, Controller, and Test Head Module Interconnections Sequence of Test Head Module Connections NOTE Use a 57 N-cm (5 in-lb) torque wrench to tighten the SMA connectors and a 90 N-cm (8 in-lb) torque wrench to tighten the 1.85 mm and 3.5 mm connectors. The connectors on the backs of the test head modules are very closely spaced. Attaching cables to these connectors is easiest if they are attached in the following sequence as illustrated in Figure 3-7. ① BIAS; +12V @ 1.5A ✍ RF INPUT; SMA connector, 11.17–19.33 GHz @ +5 to +13 dBm ③ LO INPUT; SMA connector, 8.37–14.5 GHz @ +5 to +13 dBm ④ Ref IF; SMA connector ⑤ Test IF; SMA connector ⑥ RCVR A or B; 1.85 mm connector ⑦ RF IN (Port 1 or 2); 1.85 mm connector ⑧ Ground unit (GNDU); sub mini-triax connector (N5250C Options 017 and 018) ⑨ Sense; sub mini-triax connector (N5250C Options 017 and 018) ⑩ Force; sub mini-triax connector (N5250C Options 017 and 018) Figure 3-7 4 2 Test Head Module Cabling Sequence 1 3 5 9 8 6 10 7 n5250_001_308 Installation and Service Guide N5250-90001 3-13 System Installation System Cable Connections PNA Series Microwave Network Analyzer System N5250A System Cable Connections In this table, a complete from/to connection list is given for the E8361C network analyzer, the N5260A millimeter head controller, and the left and right test head modules. In other words, each cable is listed twice, and can be found by looking up the connection from either end. The duplicate listings make it easier to check the cabling after installation, if a cabling error is suspected. Table 3-5 N5250C Cable List and Connections From E8361C H11 Network Analyzer: To: Cable Type Part Number Rear Panel: 8.333 MHz IF Input A N5260A–IF Output A BNC 8120-1839 8.333 MHz IF Input R1 N5260A–IF Output R1 BNC 8120-1839 8.333 MHz IF Input R2 N5260A–IF Output R2 BNC 8120-1839 8.333 MHz IF Input B N5260A–IF Output B BNC 8120-1839 Test Set Drivers RF N5260A-–RF Drive SMA 5061-9038 Test Set Drivers LO N5260A–LO Drive SMA 5061-9038 Test Set I/O N5260A–Test Set Interface Multi pin Rcvr A Rcvr A N5260-60001 or N5260-60013 1.85 mm (30” length) 8121-1233 Rcvr B Rcvr B N5260-60002 or N5260-60012 1.85 mm (30” length) 8121-1233 Test Port 1 (N5250C Standard) N5260-60002–RF In 1.85 mm (30” length) N5260-60009 Test Port 2 (N5250C Standard) N5260-60001–RF In 1.85 mm (30” length) N5260-60009 Source Out 1 (N5250C Options 017/018) N5260-60013–RF In 1.85 mm (30” length) 8121-1233 Source Out 2 (N5250C Options 017/018) N5260-60012–RF In 1.85 mm (30” length) 8121-1233 From N5260A Millimeter Head Controller: To: 8120-6818 Was 08503-60051 Front Panel: Cable Type Part Number Front Panel: Bias (Port 1) 3-14 Bias (+12 V) N5260-60003 Multi pin (48” length) 85105-60030 Installation and Service Guide N5250-90001 PNA Series Microwave Network Analyzer System N5250A System Installation System Cable Connections Table 3-5 N5250C Cable List and Connections (Continued) A IF (Port 1) Test IF N5260-60003 SMA (48” length) 85105-60033 R1 IF (Port 1) Ref IF N5260-60003 SMA (48” length) 85105-60033 RF Out (Port 1) RF In N5260-60003 3.5 mm (48” length) 8121-1221 LO Out (Port 1) LO In N5260-60003 3.5 mm (48” length) 8121-1221 Bias (Port 2) Bias (+12 V) N5260-60004 Multi pin (48” length) 85105-60030 R2 IF (Port 2) Ref IF N5260-60004 SMA (48” length) 85105-60033 B IF (Port 2) Test IF N5260-60004 SMA (48” length) 85105-60033 RF Out (Port 2) RF In N5260-60004 3.5 mm (48” length) 8121-1221 LO Out (Port 2) LO In N5260-60004 3.5 mm (48” length) 8121-1221 IF Output A 8.333 MHz IF Input A E8361C H11 BNC 8120-1839 IF Output R1 8.333 MHz IF Input R1 E8361C H11 BNC 8120-1839 IF Output R2 8.333 MHz IF Input R2 E8361C H11 BNC 8120-1839 IF Output B 8.333 MHz IF Input B E8361C H11 BNC 8120-1839 RF Drive Test Set Drivers RF E8361C H11 SMA 5061-9038 LO Drive Test Set Drivers LO E8361C H11 SMA 5061-9038 Test Set Interface Test Set I/O E8361C H11 Multi pin From Right Millimeter-Wave Test Head Module: To: Bias (+12 V) N5260-60004 Bias N5260A Rear Panel: Installation and Service Guide N5250-90001 Cable Type Multi pin (48” length) 8120-6818 Was 08503-60051 Part Number 85105-60030 3-15 System Installation System Cable Connections PNA Series Microwave Network Analyzer System N5250A Table 3-5 N5250C Cable List and Connections (Continued) Test IF N5260-60004 A IF N5260A SMA (48” length) 85105-60033 Ref IF N5260-60004 R1 IF N5260A SMA (48” length) 85105-60033 RF In N5260-60004 RF Out N5260A 3.5 mm (48” length) 8121-1221 LO In N5260-60004 LO Out N5260A 3.5 mm (48” length) 8121-1221 RF In N5260-60001 (N5250C Standard) Test Port 2 E8361C H11 1.85 mm (30” length) N5260-60009 RF In N5260-60012 (N5250C Options 017/018) Source Out 2 E8361C H11 1.85 mm (30” length) 8121-1233 Rcvr B N5260-60001 or N5260-60012 Rcvr B E8361C H11 1.85 mm (30” length) 8121-1233 From Left Millimeter-Wave Test Head Module: To: LO In N5260-60003 LO Out 3.5 mm (48” length) 8121-1221 RF IF N5260-60003 RF Out 3.5 mm (48” length) 8121-1221 Ref IF N5260-60003 R2 IF SMA (48” length) 85105-60033 Test IF N5260-60003 B IF SMA (48” length) 85105-60033 Bias (+12 V) N5260-60003 Bias Multi pin (48” length) 85105-60030 RF In N5260-60002 (N5250C Standard) Test Port 1 E8361C H11 1.85 mm (30” length) N5260-60009 RF In N5260-60013 (N5250C Options 017/018) Source Out 1 E8361C H11 1.85 mm (30” length) 8121-1233 Rcvr A N5260-60002 or N5260-60013 Rcvr A E8361C H11 1.85 mm (30” length) 8121-1233 3-16 Cable Type Part Number Installation and Service Guide N5250-90001 PNA Series Microwave Network Analyzer System N5250A System Installation Configuring the PNA Software for the N5250C Configuring the PNA Software for the N5250C 1. On the PNA, select: Utility > System > Configure > Millimeter Module Configuration. The dialog box shown in the following figure will be displayed. Figure 3-8 Millimeter Module Configuration Dialog Box 2. On the dialog box, under Available Configuration(s), select Broadband 10MHz - 110GHz, then click OK. This activates the N5250C mode for the PNA. Installation and Service Guide N5250-90001 3-17 System Installation PNA Series Microwave Network Analyzer System Disconnecting the Combiner Assembly From the mm-Wave Module N5250A Disconnecting the Combiner Assembly From the mm-Wave Module The mm-wave (waveguide) modules can be used stand-alone for 67 to 110 GHz high power W-band (WA-10) waveguide measurements. Old Design Figure 3-9. Old Design Combiner Assembly and mm-Wave Module (4 places) 3 2 1 4 (4 places) 5 N5230_013_315 Refer to Figure 3-9. To use the mm-wave modules without the combiner assembly, disconnect the combiner assembly (item 2) from the mm-wave (waveguide) module (item 1) using this procedure: 1. Loosen the four waveguide screws (item 3). 2. Remove the four screws (item 4) and the bracket (item 5). 3. Reverse the process to reassemble. NOTE Do NOT switch modules. Combiner must be reassembled to the mm-wave module in which it was originally installed. 4. Perform an Operator’s Check after reassembly to test for power holes, etc. 3-18 Installation and Service Guide N5250-90001 PNA Series Microwave Network Analyzer System System Installation N5250A Disconnecting the Combiner Assembly From the mm-Wave Module New Design Figure 3-10 New Design Combiner Assembly and mm-Wave Module: View 1 1 2 3 (3 places) N5230_013_316 Refer to Figure 3-10. To use the mm-wave modules without the combiner assembly, disconnect the combiner assembly (item 2) from the mm-wave (waveguide) module (item 1) using this procedure: 1. Remove the three screws (item 3). Installation and Service Guide N5250-90001 3-19 System Installation PNA Series Microwave Network Analyzer System Disconnecting the Combiner Assembly From the mm-Wave Module N5250A Figure 3-11 New Design Combiner Assembly and mm-Wave Module: View 2 1 2 (3 places) N5230_013_317 2. Remove the 3 screws (item 2). 3. Remove the large cover (item 1) 3-20 Installation and Service Guide N5250-90001 PNA Series Microwave Network Analyzer System System Installation N5250A Disconnecting the Combiner Assembly From the mm-Wave Module Figure 3-12 New Design Combiner Assembly and mm-Wave Module: View 3 (4 places) 2 1 (4 places) N5230_013_318 4. Remove the four waveguide screws (item 1). 5. Remove the four screws (item 2). 6. Reverse the process to reassemble. NOTE Do NOT switch modules. Combiner must be reassembled to the mm-wave module in which it was originally installed. 7. Perform an Operator’s Check after reassembly to test for power holes, etc. Installation and Service Guide N5250-90001 3-21 System Installation PNA Series Microwave Network Analyzer System Disconnecting the Combiner Assembly From the mm-Wave Module N5250A 3-22 Installation and Service Guide N5250-90001 4 System Specifications Installation and Service Guide N5250-90001 4-1 System Specifications Specifications PNA Series Microwave Network Analyzer System N5250A Specifications System Specifications (typical) The N5250C system has typical (non-warranted) specifications only. See Table 4-1. Table 4-1 Typical System Specifications Test Port Power (dBm) 1.0 mm Test Port (Std.a or Opt 017 or 018b) 1.85 mm PNA Port 10 MHz to 45 MHz –8 –7 45 MHz to 500 MHz –3 –1 500 MHz to 2 GHz 0 +2 2 GHz to 10 GHz –2 +2 10 GHz to 24 GHz –5 0 24 GHz to 30 GHz –7 0 30 GHz to 40 GHz –10 –1 40 GHz to 45 GHz –15 –5 45 GHz to 50 GHz –12 –1 50 GHz to 60 GHz –17 –4 60 GHz to 67 GHz –22 –8 67 GHz to 70 GHz –9 –2 70 GHz to 75 GHz –7 0 75 GHz to 80 GHz –6 +1 80 GHz to 100 GHz –5 +1 100 GHz to 110 GHz –8 –2 Noise Floor (dBm) 1.0 mm Test Port 1.85 mm PNA Port 10 MHz to 45 MHz –71 –72 45 MHz to 500 MHz –97 –98 500 MHz to 2 GHz –120 –121 2 GHz to 10 GHz –118 –121 10 GHz to 24 GHz –116 –121 24 GHz to 30 GHz –107 –112 30 GHz to 40 GHz –102 –108 4-2 WR-10 Waveguide Port Waveguide Port Installation and Service Guide N5250-90001 PNA Series Microwave Network Analyzer System N5250A Table 4-1 System Specifications Specifications Typical System Specifications (Continued) 40 GHz to 45 GHz –99 –106 45 GHz to 50 GHz –97 –104 50 GHz to 60 GHz –97 –104 60 GHz to 67 GHz –92 –103 67 GHz to 70 GHz –77 –84 70 GHz to 75 GHz –81 –87 75 GHz to 80 GHz –91 –97 80 GHz to 100 GHz –94 –100 100 GHz to 110 GHz –95 –100 System Dynamic Range (dB) 1.0 mm Test Port 1.85 mm PNA Port 10 MHz to 45 MHz 63 65 45 MHz to 500 MHz 94 97 500 MHz to 2 GHz 120 123 2 GHz to 10 GHz 116 123 10 GHz to 24 GHz 111 121 24 GHz to 30 GHz 100 112 30 GHz to 40 GHz 92 107 40 GHz to 45 GHz 84 101 45 GHz to 50 GHz 85 103 50 GHz to 60 GHz 80 100 60 GHz to 67 GHz 75 95 67 GHz to 70 GHz 68 82 70 GHz to 75 GHz 74 87 75 GHz to 80 GHz 85 98 80 GHz to 100 GHz 89 101 100 GHz to 110 GHz 87 98 Test Port Damage Level (dBm) 1.0 mm Test Port 1.85 mm PNA Port Waveguide Port 10 MHz to 110 GHz +27 +27 +27 Waveguide Port a. Assumes a 30 inch cable from the PNA 1.85 mm Test Port Out is used to provide the 10 MHz to 67 GHz source signal. The standard configuration does not have a bias-tee in the 1.0 mm test head and uses this connection. Installation and Service Guide N5250-90001 4-3 System Specifications Specifications PNA Series Microwave Network Analyzer System N5250A b. Assumes a 30 inch cable from the PNA Source Out bulkhead connector is used to provide the 10 MHz to 67 GHz source signal. The Option 017 and 018 configurations includes a bias-tee in the 1.0 mm test head and use this connection. General E8361C/C Option H11 Specifications NOTE The E8361C Option H11 specifications are identical to the specifications given for the E8361C Option UNL, 080, 081, and 014 in the E8361C data sheet. E8361C Option H11 Rear Panel Specifications Table 4-2 General E8361C/C H08 and H11 Rear Panel Specifications IF Connectors A, R1, R2, B IF Connector Input Frequency 8.333 MHz 0.1 dB Compression Points at IF inputs –27.0 dBm Pulse Input Connectorsa A, R1, R2, B (BNC connectors) Drive Voltage TTL (0, +5.0) Volts Nominal Input Impedance at IF Inputs 50 Ohms RF Damage Level to IF Connector Inputs –20.0 dBm DC Damage Level to IF Connector Inputs 25 Volts Nominal Input Impedance at Pulse Inputs 1 Kohm Minimum IF Gate Width 20 ns for less than 1 dB deviation from theoretical performanceb DC Damage Level to Pulse Connector Inputs 5.5 volts Rear Panel LO Power - Test Port Frequency (see 836x H11 PNA Specifications for test port frequencies up to 67 GHz) 67 GHz to 110 GHzc -7 to -13 dBm Rear Panel RF Power - Test Port Frequencies (see 836x H11 PNA Specifications for test port frequencies up to 67 GHz) 67 GHz to 76 GHzd -4 to -10 dBm 76 GHz to 96 GHzd +1 to -5 dBm 96 GHz to 110 GHzd +5 to -1 dBm 4-4 Installation and Service Guide N5250-90001 PNA Series Microwave Network Analyzer System N5250A System Specifications Specifications a. Pulse input connectors are operational only with Option H08 (Pulsed Measurement Capability) enabled. b. Based on deviation from signal reduction equation: Signal Reduction (dB) = 20log10(Duty_cycle) = 20log10(pulse_width/period). Measured at Pulse Repetition Frequency (PFR) of 1 MHz. c. For rear panel LO port frequency, divide by 8. d. For rear panel RF port frequency, divide by 6. N5250C Option 017 and 018 Test Head Bias-Tees Specifications Table 4-3 Test Head Bias Input Connector GNDU: Sub Mini-Triaxial Connector, Trompeter BJ152 Insulated Bulkhead Jack (150 Series) Sense: Sub Mini-Triaxial Connector, Trompeter BJ152 Insulated Bulkhead Jack (150 Series) Force: Sub Mini-Triaxial Connector, Trompeter BJ152 Insulated Bulkhead Jack (150 Series) Maximum Voltage: ± 30 VDC (typical) Damage Voltage: ± 40 VDC Maximum Current: ± 0.5 AMP Installation and Service Guide N5250-90001 4-5 System Specifications Specifications PNA Series Microwave Network Analyzer System N5250A Figure 4-1 Internal Connection Diagram for the Test Head Bias-Tee Figure 4-2 External Connection Diagram for the Test Head Bias-Tee Parametric DC Source Ex: Agilent 4142B or E5270B Cable, Agilent 16494A Cable, Cascade Microtech 104-330-LC Force F Sense S GNDU G Cable, Agilent 16493H Adapter, Trompeter Bj78 NOTE: GNDU is connected to only one of the test heads. A second GNDU connection is not required. NOTE Test Head N5250_001_402 Refer to the documentation of your parametric DC source for the appropriate cables to use for connecting to the test head bias tee. • Test head sub-miniature triax connectors are BJ152 bulkhead jacks from Trompeter Electronics (www.trompeter.com). • Parametric DC source connectors are standard triax. 4-6 Installation and Service Guide N5250-90001 5 Maintenance and Support Installation and Service Guide N5250-90001 5-1 Maintenance and Support Maintenance PNA Series Microwave Network Analyzer System N5250A Maintenance WARNING To prevent electrical shock, disconnect the analyzer from the mains source before cleaning. Use a dry cloth or one slightly dampened with water to clean the external case parts. Do not attempt to clean internally. Physical Maintenance Clean the cabinet, including the front panel, using a dry or slightly damp cloth only. Electrical Maintenance Refer to “Agilent Support, Services, and Assistance” on page 5-4. Caring for Waveguide (WG) Interfaces A clean surface at millimeter-wave frequencies is much more important than at lower frequencies because any debris on the waveguide surface can potentially distort the measurement results. Caring for WG interfaces is not difficult. Dirt and dust can be removed using the following: • Isopropyl alcohol 99.5 %1 • Lint-free cloth • Pressurized air (for dust removal) To remove dirt on the waveguide surface, simply put a few drops of isopropyl alcohol on a lint-free cloth and gently wipe the surface. To remove dust, simply spray the pressurized air on the waveguide surface. 1. Use isopropyl alcohol only in a well-ventilated area. Allow all residual alcohol moisture to evaporate, and the fumes to dissipate, prior to assembling waveguide interfaces. 5-2 Installation and Service Guide N5250-90001 PNA Series Microwave Network Analyzer System N5250A Maintenance and Support Principles of Connector Care Principles of Connector Care Proper connector care and connection techniques are critical for accurate and repeatable measurements. Refer to Table 5-1 for tips on connector care. Prior to making connections to your analyzer, carefully review the information about inspecting, cleaning, and gaging connectors. Refer to the calibration kit documentation for detailed connector care information. For course numbers about additional connector care instruction, contact Agilent Technologies. Refer to “Contacting Agilent” on page 5-4. Table 5-1 Connector Care Quick Reference Guide Handling and Storage Do • Keep connectors clean Do Not • Touch mating-plane surfaces • Extend sleeve or connector nut • Set connectors contact-end down • Use plastic end-caps during storage • Store connectors or adapters loose Visual Inspection Do • Inspect all connectors carefully Do Not • Use a damaged connector - ever • Look for metal particles, scratches, and dents Connector Cleaning Do • Try compressed air first Do Not • Use any abrasives • Get liquid into plastic support beads • Use isopropyl alcohola • Clean connector threads Gaging Connectors Do • Clean and zero the gage before use Do Not • Use an out-of-specification connector • Use the correct gage type • Use correct end of calibration block • Gage all connectors before first use Making Connections Do • Align connectors carefully Do Not • Apply bending force to connection • Make preliminary connection contact lightly • Over tighten preliminary connection • Turn only the connector nut • Twist or screw any connection • Use a torque wrench for final connection • Tighten past torque wrench “break” point a. Cleaning connectors with alcohol shall only be done with the instrument’s power cord removed, and in a well-ventilated area. Allow all residual alcohol moisture to evaporate, and the fumes to dissipate, prior to energizing the instrument. Installation and Service Guide N5250-90001 5-3 Maintenance and Support Agilent Support, Services, and Assistance PNA Series Microwave Network Analyzer System N5250A Agilent Support, Services, and Assistance Information on the following topics is included in this section. • “Service and Support Options” • “Contacting Agilent” • “Shipping an Item to Agilent for Service or Repair” Service and Support Options The N5250C system has a one-year on-site service warranty which covers troubleshooting the system to an individual instrument, device, or cable. In addition, each of the components (instrument, device, or cable) in the system has its own warranty. Refer to the documentation provided with those components for the appropriate warranty information. NOTE There are many repair and calibration options available from the Agilent Technologies support organization. These options cover a range of service agreements with varying response times. Contact Agilent for additional information on available service agreements for this product. Refer to “Contacting Agilent” on page 5-4. Contacting Agilent Assistance with test and measurements needs and information or finding a local Agilent office are available on the Web at: http://www.agilent.com/find/assist If you do not have access to the Internet, please contact your Agilent field engineer. NOTE In any correspondence or telephone conversation, refer to the Agilent product by its model number and full serial number. With this information, the Agilent representative can determine whether your product is still within its warranty period. Shipping an Item to Agilent for Service or Repair IMPORTANT Agilent Technologies reserves the right to reformat or replace the internal hard disk drive in the network analyzer, contained in this system, as part of its repair. This will erase all user information stored on the hard disk. It is imperative, therefore, that you make a backup copy of your critical test data located on the analyzer’s hard disk before shipping it to Agilent for repair. If you wish to send an item from your system to Agilent Technologies for service or repair: • Include a complete description of the service requested or of the failure and a description of any failed test and any error message. • Ship the item using the original or comparable antistatic packaging materials. • Contact Agilent for instructions on where to ship the item. Refer to “Contacting Agilent” on page 5-4. 5-4 Installation and Service Guide N5250-90001 6 Performance Tests and Checks Installation and Service Guide N5250-90001 6-1 Performance Tests and Checks System Preparation and Analyzer Warm Up PNA Series Microwave Network Analyzer System N5250A System Preparation and Analyzer Warm Up NOTE To achieve the maximum system stability, allow the analyzer to warm up for at least 90 minutes. Complete the procedures in Chapter 3 , “System Installation,” to assemble and configure the system. After you press the Preset button, the PNA should display a frequency range of 10 MHz to 110 GHz. Torquing Connections All connections made during the System Check and System Performance Verification procedures should be carefully torqued using the tools provided in the 85059A kit. Long Term Storage of Test Results It is recommended that you store results from the System Check and the System Performance Verification procedures for future reference. Prior results can be useful when evaluating changes in system performance. After completing a successful test process that accurately represents the system performance, store the test result files in the directory D:\sysver results. It may be necessary to create this directory if it does not already exist. Protect Against Electrostatic Discharge (ESD) This is important. If not properly protected against, electrostatic discharge can seriously damage your analyzer, resulting in costly repair. CAUTION 6-2 To reduce the chance of electrostatic discharge, follow all of the recommendations outlined in “Electrostatic Discharge Protection” on page 1-4, for all of the procedures in this chapter. Installation and Service Guide N5250-90001 PNA Series Microwave Network Analyzer System N5250A Performance Tests and Checks Review the Principles of Connector Care Review the Principles of Connector Care Proper connector care and connection techniques are critical for accurate and repeatable measurements. Refer to Table 5-1 on page 5-3 for tips on connector care. Prior to making connections to your analyzer, carefully review the information about inspecting, cleaning, and gaging connectors. Refer to the calibration kit documentation for detailed connector care information. Installation and Service Guide N5250-90001 6-3 Performance Tests and Checks System Check PNA Series Microwave Network Analyzer System N5250A System Check 1. Connect a 1.0 mm short to Port 1 and Port 2. An adapter may be used on Port 2. 2. Restart the PNA application and perform a factory preset by pressing the PRESET key. 3. On the PNA menu bar, select: System > Service > Utilities > Receiver Display. 4. Set the IF bandwidth to 1 kHz. The traces on the display should be similar to the example traces shown in Figure 6-1. If there are power holes or other unexpected characteristics, examine the system for loose or damaged cables, dirty or damaged connectors, proper connector torque, etc. Figure 6-1 Typical Receiver Display When you have a display that represents the current system performance, capture the display in a file and save the file in the directory D:\sysver results (create this directory if it does not already exist). To capture the display in a file, select: File > Print. An example of a recommended file name is “opcheck_Oct_18_2011.png”. 6-4 Installation and Service Guide N5250-90001 PNA Series Microwave Network Analyzer System N5250A Performance Tests and Checks System Performance Verification System Performance Verification NOTE Since the N5250C has typical (non-warranted) specifications only, the SYSTEM PERFORMANCE VERIFICATION is not a PASS/FAIL test. The SYSTEM PERFORMANCE VERIFICATION is a test to establish BASELINE PERFORMANCE after the installation. The system verification procedure is automated by the analyzer firmware. For each verification device, the analyzer reads a file from the verification disk and sequentially measures the magnitude and phase for all four S-parameters. System verification is performed at the N5250C system 1.0 mm port connectors over a frequency range of 45 MHz to 110 GHz with an Agilent 85059A 1.0 mm calibration and verification kit. For system verification to perform correctly, it is NECESSARY that the verification devices be measured with their female connectors connected to Port 1 and their male connectors connected to Port 2. The following procedure, and the connection prompts given, use the 11500-60001 (11500I) 1.0 mm female-to-female cable connected to Port 2. This cable is included in the 85059A 1.0 mm calibration and verification kit. When to Verify After installation of the system is complete, a performance verification is necessary to assure proper system operation. This initial verification is included with the installation. After the initial verification, the verification should be repeated once a year. This recommended interval assumes that Agilent cables are used with the system. If non-Agilent cables, adaptors, or other fixtures are used, the verification schedule must be determined by the user, as the characteristics of these devices are unknown. In establishing a verification schedule, the following factors should be considered: • Frequency of use • Amount of cable movement • Amount of drift occurring between prior verifications NOTE Performance verification of a system performed at long intervals is not to be confused with measurement calibration. Measurement calibration typically is performed on a daily basis, or when the measurement setup or conditions have changed. Installation and Service Guide N5250-90001 6-5 Performance Tests and Checks System Performance Verification PNA Series Microwave Network Analyzer System N5250A Materials Required The following materials are required to run the tests: • N5250C system (including system cables) • 85059A 1.0 mm precision calibration and verification kit General Preparation Prepare for performance verification by completing the following procedure: 1. Measure the environment temperature and humidity. The temperature must be between +20 C and +26 C. Additionally, the temperature cannot vary by more than ±1 C after calibration. 2. Power on the system components in the following order: a. N5260A millimeter head controller b. E8361C Option H11 PNA 3. Remember to allow at least 90 minutes for warm up and temperature stabilization of the components. The temperature of the calibration and verification kit must be stable with the environment temperature. 6-6 Installation and Service Guide N5250-90001 PNA Series Microwave Network Analyzer System N5250A Performance Tests and Checks System Performance Verification Verification Procedure 1. Insert the USB memory stick from the 85059A kit into the PNA. 2. Click Utility > System > Service > System Verification. The System Verification dialog box is displayed; refer to Figure 6-3.. Figure 6-2 System Verification Connections Installation and Service Guide N5250-90001 6-7 Performance Tests and Checks System Performance Verification Figure 6-3. PNA Series Microwave Network Analyzer System N5250A System Verification Dialog Box 3. In the Calibration Kit box, select the “Agilent 85059A Data-based (1.00 mm)” calibration kit by clicking on it. The corresponding verification kit to use is selected for you and displayed in the Verification Kit box. Refer to Figure 6-3.. 4. Under Outputs, the recommended selections are “File Tabular Data” and “File Graphs.” Other selections may be made. 5. Click Run. 6. Enter the serial number for the 85059A kit and click Continue. 7. Install the 1.0 mm female to female cable (8.8 cm, Agilent part number 11500-60001) onto the right test head (port 2) prior to calibration as shown in Figure 6-2. This cable is part of the 85059A 1.0 mm Precision Calibration and Verification Kit and is considered to be a test port cable. CAUTION Do not remove this test port cable once the Calibration/Verification process has begun. If the test port cable becomes loose or is removed during the calibration/verification process, the calibration is invalid. CAUTION Do not pull on the connectors on the ends of the test port cable—this will damage the cable. 6-8 Installation and Service Guide N5250-90001 PNA Series Microwave Network Analyzer System N5250A Performance Tests and Checks System Performance Verification Avoid damaging the cable once it is connected to port 2 when making the thru connection between the two test heads. This is best done by placing the two test heads on a smooth surface and gently sliding the right test head (port 2) towards the left test head (port 1). 8. Follow the instructions on the analyzer for performing a full 2-port calibration.The parameters for the calibration are setup automatically by the program. 9. At the last step of the calibration sequence it is necessary to make a thru connection. To make the thru connection, gently slide the right test (port 2) towards the left test head (port 1) a little bit at a time, while turning the threaded ring on the left head test port connector by hand onto the cable attached to the right test head. Do not use the threaded ring on the test port connector to pull the cable into the connector. Repeat this process until the cable is firmly seated into port 1, then make the threaded ring barely finger tight. Finally use the torque wrench on the port 1 threaded ring and a backup wrench on the cable to tighten the connection. 10. When prompted to save the calibration, provide a name for the cal file that will allow you to reuse the calibration as needed. 11. After completion of the full 2-port calibration, follow the instructions on the analyzer for performing the system verification. Use the match thru and mismatch thru verification standards provided with the 85059A 1.0 mm Precision Calibration and Verification kit. Insert the devices as shown in Figure 6-4. The Match Thru and the Mismatch Thru are very similar in appearance. The Mismatch Thru has a groove machined around its circumference. NOTE It is recommended to connect the Verification Standards to the test port cable on port 2 prior to attempting to connect to port 1. Then follow the recommended procedure for making a thru connection outlined under Step 8 above to avoid damaging the cable. Installation and Service Guide N5250-90001 6-9 Performance Tests and Checks System Performance Verification Figure 6-4 PNA Series Microwave Network Analyzer System N5250A System Verification Device Connections E8361A Network Analyzer 45 MHz to 67 GHz E8361A PNA Series Network Analyzer with Options 014, 080, 081, UNL, and H11 Port 1 CPLR ARM SOURCE OUT RCVR A IN Port 1 RCVR B IN Port 2 CPLR THRU CPLR THRU Reference 1 SOURCE OUT N5260A Millimeter-Head Controller CPLR ARM SOURCE OUT Reference 2 RCVR R1 IN RCVR R2 IN N5260A Millimeter Head Controller Port 2 Port 1 RF OUT A IF Port 2 2 AMP FUSE 2 AMP FUSE R1 IF RF OUT B IF Port 1 LO OUT SOURCE OUT Port 2 BIAS BIAS R2 IF LO OUT LINE 0 1 11500-60001 Cable assembly 1 mm (f-f) Verification Device Left Test Head Right Test Head n5250_001_604 Verification Results Files When System Verification is configured as recommended, the process produces five files - one text file and four .png files. The text file contains model numbers and serial numbers of the PNA and 85059A kit, along with tabular lists of all results. The other files are screen captures of the magnitude and phase traces for each verification device. All file names contain the date and time of the system verification. Refer to the example screen captures in Figure 6-5, Figure 6-6, Figure 6-7, and Figure 6-8. The windows are labeled 1, 2, 3, and 4. Window 1 is S11, window 2 is S21, window 3 is S12, and trace 4 is S22. Two traces are shown for each measurement - a black trace and a colored trace. The black traces represent the factory measured data for the verification devices. The colored traces represent the actual measured data from the calibrated system. 6-10 Installation and Service Guide N5250-90001 PNA Series Microwave Network Analyzer System N5250A Figure 6-5 Performance Tests and Checks System Performance Verification Magnitude for Matched Thru S11 and S22 are linear magnitude with a scale of milliunits. S21 and S12 are dB. Installation and Service Guide N5250-90001 6-11 Performance Tests and Checks System Performance Verification Figure 6-6 6-12 PNA Series Microwave Network Analyzer System N5250A Phase for Matched Thru Installation and Service Guide N5250-90001 PNA Series Microwave Network Analyzer System N5250A Figure 6-7 Performance Tests and Checks System Performance Verification Magnitude for Mismatched Thru S11 and S22 are linear magnitude with a scale of milliunits. S21 and S12 are dB. Installation and Service Guide N5250-90001 6-13 Performance Tests and Checks System Performance Verification Figure 6-8 PNA Series Microwave Network Analyzer System N5250A Phase for Mismatched Thru Interpreting the Verification Results The purpose of the N5250C system verification process is to demonstrate that the system is making reasonable measurements. There are no hard specifications on the N5250C system, so there are no pass/fail limits from the system verification measurements. the results allow the user to compare the actual measured data to the factory measured data for each verification device. The example traces on the previous pages show typical differences between measured and factory data. Ignore phase differences for S11 and S22 when comparing measured data to factory data. 6-14 Installation and Service Guide N5250-90001 PNA Series Microwave Network Analyzer System N5250A Performance Tests and Checks System Performance Verification Improving the Verification Results IMPORTANT Inspect all connections. Do not remove the test port cable from the analyzer test port. This will invalidate the calibration that you performed earlier. 1. Disconnect and clean the device that failed the verification measurement. 2. Reconnect the device making sure that all connections are carefully torqued. 3. Measure the device again using the previous calibration. 4. If the device still fails the verification measurement, repeat the full system verification process including calibration. Saving Verification Results When you have a system verification result that represents the current performance of the system, save the five resulting files to D:\sysver results. Installation and Service Guide N5250-90001 6-15 Performance Tests and Checks System Performance Verification 6-16 PNA Series Microwave Network Analyzer System N5250A Installation and Service Guide N5250-90001 7 Replaceable Parts Installation and Service Guide N5250-90001 7-1 Replaceable Parts Ordering Information PNA Series Microwave Network Analyzer System N5250A Ordering Information To order a part listed in the replaceable parts lists: • include the part number • indicate the quantity required • Contact Agilent Technologies for instructions on where to send the order. Refer to “Contacting Agilent” on page 5-4. To order a part that is not listed in the replaceable parts lists: • include the instrument model number and complete instrument serial number • include the description and function of the part • indicate the quantity required • Contact Agilent Technologies for instructions on where to send the order. Refer to “Contacting Agilent” on page 5-4. 7-2 Installation and Service Guide N5250-90001 PNA Series Microwave Network Analyzer System N5250A Replaceable Parts Replaceable Parts Replaceable Parts Table 7-1 Replaceable Parts List Agilent Part Number Description Waveguide Modules: N5260-69003 67 GHz to 110 GHz waveguide T/R module with attenuator. Exchange is available only when the customer’s module is returned to the factory for service. N5260-69004 67 GHz to 110 GHz waveguide T/R module without attenuator Exchange is available only when the customer’s module is returned to the factory for service. Combiner Assembly Parts: N5260-60005 WR-10 2-inch long waveguide section 1390-0765 4-40 captive screw (waveguide flange) 2190-0556 4-40 split-lock washer (waveguide flange) N5260-00007 Bracket—right combiner assembly N5260-00008 Bracket—left combiner assembly 0515-0372 M3.0 x 8 mm screw (bracket) 85104-60061 1.0 mm test port connector 2190-0104 Washer (for 1 mm test port connector) 2950-0132 Nut (for 1 mm test port connector) 2110-0046 Fuse (inch) 0.5A, 125V NTD BI. Fuse for bias tee (option 017 and 018) System Front Cables: 8121-1221 N5260A millimeter head controller RF and LO 3.5 mm cable (48” length) 85105-60033 N5260A millimeter head controller IF signal cable (SMA) (48” length) 85105-60030 N5260A millimeter head controller bias cable (48” length) 8121-1233 E8361C PNA front panel access port RF 1.85 mm (m)-(m) cable (30” length) N5260-60009 E8361C PNA front panel test port RF 1.85 mm (f)-(m) cable (Option 700) (30” length) 1250-2604 SMA right angle adapter (Used only with 8121-1221 cable.) System Rear Cables: 8120-1839 8120-6818 Was 08503-60051 N5260A millimeter head controller IF signal cable (BNC) N5260A millimeter head controller test set interface cable Installation and Service Guide N5250-90001 7-3 Replaceable Parts Replaceable Parts PNA Series Microwave Network Analyzer System N5250A Table 7-1 Replaceable Parts List (Continued) Agilent Part Number 5061-9038 Description N5260A millimeter head controller RF and LO SMA cable Accessories and Documentation: 9211-8177 Shipping container for millimeter-wave test heads and subcomponents (combiner assembly and/or waveguide T/R module) N5250-90001 Part number is for reference only. Documentation is available only on the Internet. Refer to “Printing Copies of Documentation from the Web” on page iii for instructions on locating this documentation. 7-4 Installation and Service Guide N5250-90001 Index A Agilent assistance, 5-4 contacting, 5-4 customer engineering, 3-2 service and support options, 5-4 services, 5-4 support, 5-4 system installation, 3-2 analyzer warmup time, 6-2 B battery disposal, 1-7 before applying power, 1-2 dimensions system, 3-8 system components, 3-8 documentation on the Web, 1-iii printing from the Web, 1-iii E E8361A PNA specifications, 4-4 earth ground, 1-2 electrostatic discharge, See ESD environmental requirements system, 3-7 ESD protection, 1-4, 3-8, 6-2 C cabling front panel, 3-11 rear panel, 3-10 system, 3-14 care of connectors, 3-8, 5-3, 6-3 care of waveguide, 5-2 caution, 1-2 CE mark, 1-6 certification, 1-ii check system, 6-4 cleaning connectors, 5-3 waveguide, 5-2 coaxial measurement, 2-4 coaxial configuration, 2-2 combiner assembly description of, 2-7 configuration coaxial, 2-2 wafer probe, 2-2 configuring PNA software, 3-17 connectors care of, 3-8, 5-3, 6-3 care quick reference, 5-3 cleaning, 5-3 contacting Agilent, 5-4 contents checklist, 3-3 of shipment, 3-3 CSA mark, 1-6 customer engineering Agilent, 3-2 D device connections system verification, 6-10 DFARS, 1-ii F front panel cabling, 3-11 G general safety considerations, 1-2 ground, safety earth, 1-2 H head controller, 2-6 I installing the system, 3-2 instruction documentation symbol, 1-6 instrument markings, 1-6 ISM1-A mark, 1-6 L lithium battery disposal, 1-7 M maintenance cleaning, 5-2 electrical, 5-2 physical, 5-2 system, 5-2 measurement coaxial, 2-4 wafer probe, 2-5 millimeter head controller, 2-6 millimeter-wave test head module cable connections, 3-13 millimeter-wave test head modules description of, 2-7 theory of operation, 2-8 Installation and Service Guide N5250-90001 millimeter-wave test heads by OML, Inc., 2-11 specifications, 2-10 warranty, 2-10 N N5250A system as shipped, 3-2 basic configurations, 2-4 cable connections, 3-14 check, 6-4 components weights and dimensions, 3-8 description of, 2-2 environmental requirements, 3-7 front panel cabling, 3-11 illustration of, 2-2 installation, 3-2 maintenance, 5-2 partial, 2-3 power requirements, 3-6 rear panel cabling, 3-10 receiving, 3-2 replaceable parts, 7-3 shipment checklist, 3-3 shipment contents, 3-3 shipment for service or repair, 5-4 site preparation, 3-6 space requirements, 3-8 specifications, 4-2 verification, 6-5 weight and dimensions, 3-8 What’s included?, 2-3 N5260A millimeter head controller, 2-6 O OML, Inc. contact information, 2-11 millimeter-wave test heads, 2-11 operation millimeter head controller, 2-6 millimeter-wave test head modules, 2-8 Option 017 description of, 2-2 test head bias tees specifications, 4-5 Option 018 description of, 2-2 test head bias tees specifications, 4-5 options service and support, 5-4 system, 2-2, 2-3 ordering information replaceable parts, 7-2 Index-1 Index P parts replaceable ordering information, 7-2 PNA specifications, 4-4 PNA software, configuring, 3-17 power requirements system, 3-6 printing documentation, 1-iii product certification, 1-ii warranty statement, 1-ii protection against ESD, 1-4, 3-8, 6-2 R rear panel cabling, 3-10 receiver display utility, 6-4 receiving the system, 3-2 regulatory information, 1-5 repair shipping to Agilent for, 5-4 replaceable parts ordering information, 7-2 system, 7-3 Restricted Rights Notice, 1-ii S safety considerations, 1-2 earth ground, 1-2 symbols, 1-2 service contacting Agilent, 5-4 options, 5-4 shipping to Agilent for, 5-4 warnings, 1-3 warranty standard, 5-4 shipment checklist, 3-3 contents, 3-3 for service or repair, 5-4 site preparation system, 3-6 software, PNA, configuring, 3-17 space requirements system, 3-8 specifications E8361A PNA, 4-4 millimeter-wave test heads, 2-10 stabilization, warm up time, 6-2 system, 4-2 test head bias tees, 4-5 Index-2 stabilization warm up time, 6-2 support contacting Agilent, 5-4 options, 5-4 organization, 5-4 system as shipped, 3-2 basic configurations, 2-4 cable connections, 3-14 check, 6-4 components weight and dimensions, 3-8 description of, 2-2 environmental requirements, 3-7 front panel cabling, 3-11 illustration of, 2-2 installation, 3-2 maintenance, 5-2 options, 2-2, 2-3 partial, 2-3 power requirements, 3-6 rear panel cabling, 3-10 receiving, 3-2 replaceable parts, 7-3 shipment checklist, 3-3 shipment contents, 3-3 shipment for service or repair, 5-4 site preparation, 3-6 space requirements, 3-8 specifications, 4-2 verification, 6-5 device connections, 6-10 dialog box, 6-8 weight and dimensions, 3-8 What’s included?, 2-3 equipment and accessories, 2-5 measurement, 2-5 wafer probe configuration, 2-2 warm up analyzer, 6-2 warning, 1-2 warnings for servicing, 1-3 warranty millimeter-wave test heads, 2-10 service standard, 5-4 warranty statement, 1-ii waveguide care of, 5-2 cleaning, 5-2 waveguide module description of, 2-7 weight system, 3-8 system components, 3-8 weight and dimensions system, 3-8 system components, 3-8 T test head bias tees specifications, 4-5 test head module cable connections, 3-13 test head modules description of, 2-7 test heads description of, 2-7 V verification system, 6-5 device connections, 6-10 dialog box, 6-8 W wafer probe Installation and Service Guide N5250-90001